Bath project with barbecue area. Corner bath with a veranda
Thanks to modern building materials, developers have the opportunity to build various options one-story baths with a veranda.

Buildings differ in:
- foundation type. For such baths, you can use screw pile, columnar, columnar with grillages and shallow-depth tape types of foundations;
 Types of building foundations
  Common types of foundations
  Types of columnar foundation
 - construction material. Baths can be built from natural sawn, profiled, glued and rounded timber, cement foam blocks and bricks. It is allowed to use sandwich panels and frame construction;
 Log cabin bath
  Bath from profiled timber
  Brick bath
  Block bath
  Bath from sandwich panels
- type of roof and roof coverings. The roof can be gable, flat or shed. Covered with all types of roofing materials - from ordinary asbestos-cement slate and metal roofing to materials based on modified bitumen;
 Roof types by shape
- architectural features of buildings. Detached, adjoining, with verandas, with attics, with swimming pools, etc.
 Bath-extension from a bar
  Bath with gazebo
  Sauna with summer kitchen
We no longer remember the differences in the designs of furnaces, the presence autonomous heating, drainage systems. In one article, it is not even theoretically possible to consider all the features of the construction of each version of the bath, we will consider only one option: a foam block bath.

With the preparation of the project, it is not necessary to contact specialized companies, it is very expensive. It is enough to get acquainted with numerous offers on the Internet and, based on the information received, choose the best option for yourself or create your own individual project. By what criteria to choose (or draw up) a bath project?
The number of family members. For a family of three to four people, it is quite enough to have a bath with a size of ≈10÷16 m2. such dimensions make it possible to place a quite comfortable washing room (≈4 m2), a steam room (≈4 m2) and a rest room (≈3 m2) inside.
 Bath project
  Layout option
If the family is larger or you plan to take a bath with friends - suitable option baths with dimensions ≈20÷30 m2. These dimensions make it possible to significantly increase the rest room (up to ≈10 m2), the size of the steam room and washing room up to 6 m2, and make a separate vestibule at the entrance door.

It is desirable to simultaneously make a veranda (terrace). What is the difference between a veranda and a terrace? The veranda is glazed and can be insulated. We would not advise making a veranda, its role is perfectly performed by the rest room. And the terrace will allow after water procedures enjoy the fresh air. But we only advise, the final decision is yours.
 Glazed veranda
Elite bath. Here, the fantasy is limited only by the capacity of the wallet. You can make pools, a separate Russian steam room and Finnish sauna, recreational facilities and gyms. Such projects cannot be done on your own; you should contact specialized design companies.
 Elite bath. Steam room with lighting
  Pool in the bath
  Luxurious bath room
We will focus on only one rather simple option. baths with a veranda made of foam blocks.

The technology of building a bath with a veranda made of foam blocks
Of all options building structures we choose the simplest one.
- Tape shallow foundation and drainage system.
- Gable sloping roof for a bath and a veranda, covered with a metal profile.
- Interior decoration and floors - natural lining and planed boards.
- Homemade metal stove.
- External finishing - painting with resistant paints.
Stages of work
First you need to calculate the required materials. What will you need?
During the manufacture of concrete, cement of a certain brand, sand and gravel will be required. To get acquainted with the recommended proportions, study the proposed table No. 1.

To calculate the amount of concrete ingredients, use table No. 2

No one, during the manufacture of concrete with their own hands, weighs the ingredients to the nearest kilogram, these standards are used industrial enterprises to write off materials.
For our version of the bath, concrete grade 200 is sufficient, it can withstand a load of ≈200 kg / cm2.

Calculate the volume of your foundation and the volume of the foundation for the furnace (if it has one), this will give you the opportunity to determine the amount of all the components of the concrete. The resulting value must be increased by about ten percent, which will cover possible mistakes and waste.

For the box you need to buy foam blocks. For laying one cubic meter of blocks, approximately 0.2 m3 of cement-sand mortar is required, keep this in mind. To calculate the number of blocks, you need to divide one cubic meter for one block. For example, with a block size of 200 × 300 × 600 mm, its volume is 0.036 m3, therefore, for a cubic meter of masonry, 27.8 pieces will be needed. (1:0.036).


In the same way, count the number of floorboards, boards for ceiling and wall sheathing, plastic lining and roofing. Determine the number and length of floor and ceiling beams 100 × 100 mm in size, boards for rafters 50 × 100 mm, laths for lathing 20 × 50 mm. Calculations of the amount of roofing materials, insulation and waterproofing materials are no different.
Of course, you need to purchase nails and screws, skirting boards, trim, doors and windows. All calculations are made, the material is purchased - you can start construction works.
Foundation
We have already decided that we are choosing a tape shallow option.

| No. p / p | Description of works | Illustration |
|---|---|---|
| Step 1. | Site preparation. It is necessary to level the site to the maximum along the perimeter of the foundation and remove the upper fertile layer. Do not be lazy to level the ground, otherwise you will have to increase the cost of materials and time to build the foundation. | |
| Step 2 | Markup. Highly milestone, mistakes made are very difficult to correct, and in many cases impossible. Prepare wooden pegs, tape measure and rope. Hit by size outside parties foundation pegs and check the corners. They should all be exactly 90°. Pre-make the markup according to the template. You need to check using the diagonals - the length of the two diagonals should be the same. The width of the foundation in our case is 25 centimeters. | |
| Step 3 | Trench digging. A depth of 60 centimeters is enough, to prevent swelling of the earth at the bottom, you need to make a sand cushion 15 ÷ 20 cm thick. This is much easier than digging a foundation to a freezing depth, in cold climatic regions it can reach more than two meters. The sand compensates for the swelling of the frozen earth, the foundation will be stable. If a stove with a foundation is breaded, prepare a hole for it as well. | |
| Step 4 | Pouring concrete into the ground. If the ground on your site is dense and the trenches do not collapse - great, concrete can be poured without formwork. If sand - you will have to make formwork not only above the ground, but also in a trench. This must be immediately foreseen and adjusted to the width of the foundation. The formwork is made from cut pieces, used boards, sheet plywood or moisture-resistant OSB boards. It is very important - fasten the formwork in such a way that it can be easily dismantled later. |
It is ideal to pour concrete all at once, it doesn’t work - do the pouring in stages. The main thing is that the concrete should be laid in a layer of the same thickness around the entire perimeter, otherwise the strength of the foundation will deteriorate sharply. Do not forget about tamping, you can do it with special vibrators or homemade pushers.


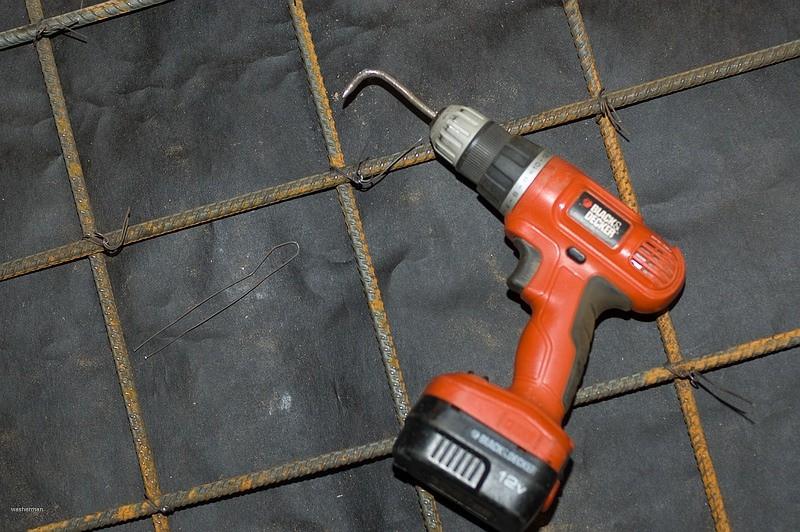
Concrete should be reinforced with building reinforcement of a periodic profile Ø 5 ÷ 8 mm.
 Reinforcement - scheme


Very important: the distance of the reinforcing box between the formwork must be at least 5 centimeters, lift it from the bottom with stones. A bunch of reinforcement is carried out with wire.
 Fittings - photo


CONCRETE AND REINFORCED CONCRETE STRUCTURES. MAIN PROVISIONS. SNiP 52-01-2003. Moscow 2004 Download file
Very important. Do not forget to make floor ventilation ducts, without functional natural ventilation boards will rot very quickly. To do this, insert pipe sections into the formwork or make wooden boxes. The distance between the air ducts in opposite walls is approximately 1.5÷2 meters. At the same time, leave a hole in one of the corners to drain water.


Manufacturing and installation of formwork
The height of the formwork should be slightly greater than the height of the foundation, the formwork is level, securely fasten all panels to the ground. Remember that fixing a "bulging" foundation is very difficult.

The work is carried out in the same way as pouring concrete into the ground. With one difference - carefully check the horizontal position, building standards allow a horizontal deviation of no more than one centimeter by five running meters. In most cases, the surface of the tape will have to be trimmed again. Let the concrete cure for at least two weeks, then remove the formwork.

The foundation is ready, you can start laying blocks.
Block masonry
Step 1. Markup. Before marking, lay two layers of waterproofing on the foundation. In this case, it does not so much protect the blocks from destruction (they are not afraid of high humidity) as all wooden elements adjacent to them. Make accurate markings of doorways and junctions internal walls with external ones. Further very important point- setting corner lighthouse blocks.


At all corners of the building without mortar, we lay the block, set them with maximum accuracy in terms of level, check the distance between them along the perimeter and, of course, the corners with a rope. How to check the corners, we have already described above. The maximum discrepancy between the length of the diagonals and the perimeter of the building should not exceed two centimeters, this figure can be eliminated during the laying of walls. Now you can put beacon blocks on the solution.

 Laying the first row of blocks - the result
Step 2 Carefully drive nails into the lighthouse blocks and pull the rope between them. This will be the template line in height and linearity for the next row of blocks. The rows of blocks should hang over the plinth a little, so it will be easier to do the finishing work on the plinth later. Apply a mortar with a thickness of 1.5 ÷ 2 cm to the foundation, then adjust the length of the applied area, taking into account the speed of your masonry.
Keep in mind that foam concrete blocks very quickly absorb water, all work should be done quickly. The first row is laid with special care. First, this series is considered basic. Secondly, you still do not have enough experience to use "masterful accurate eye" instead of the level. The length of the wall is rarely a multiple of the length of the blocks, they will have to be cut, use an ordinary hacksaw for this, foam blocks are perfectly cut with such a simple tool.
Step 3 Do not forget when laying the first row facade walls start laying out the first row of internal walls with binding.

Step 4 At the corners of the bath and at the junction of the walls, carefully place 3 ÷ 4 rows of blocks, check their position several times. Further, at the joints of each row, you will fix the rope and continue laying along it. In the future, all operations must be repeated: again lay several rows in the corners, pull the rope and build walls.


Step 5 Window openings. When the height of the walls is equal to the height of the windows or doors, make markings according to their width, continue laying, taking into account the height of the windows. As a jumper, you can use a metal corner 50 ÷ 50 mm or more or metal fittings with a diameter of 10 mm or more, or make a concrete jumper. The ends of the jumpers should extend approximately 25-30 cm onto the walls on each side of the window or door opening.


Step 6 The last two rows need to be reinforced with building reinforcement Ø 10 mm, lay the bars in two or three rows at an equal distance. Before reaching one row to the end of the masonry, lay ceiling beams 50 ÷ 100 mm. Due to the fact that attic space will not be used, boards 50 × 100 mm can be used for the ceiling, the ends of the boards resting on the wall must be insulated with roofing material. The distance between the beams is 1÷1.5 meters. Lay the last top row of blocks. On this box is almost ready, the gables will be walled up after the roof is erected. Windows will need to be made in the gables.


Now you can start building the roof. We will have a gable with a departure for the veranda.
Video - Laying lag overlap
Video - Draft Overlay
Video - Construction of a bath from foam blocks
Roof
The bath is small, we choose one of the most simple options truss system- hanging.
 Hanging rafters - calculations
Do not forget that the roof will be with a departure, before installing it, you need to fix the vertical supports for the veranda. Measure their length exactly and fasten them to the foundation using metal corners, check the height again and trim if necessary. Horizontalness checks with a rope or hydraulic level.


An example of the construction of a veranda - a pillar of timber
In order for the work to be carried out quickly and safely, it is necessary to lay a temporary (rough) coating on the existing ceiling beams. Use any boards for this, anyway, they will then need to be removed to insulate the bath ceiling. But do not be too "hacky", you will need to walk along this temporary ceiling during the construction of the roof.
Mauerlat installation
The rafters will rest on it; for the Mauerlat, use a beam of 100 × 100 mm. The beam is laid under the rope along the entire length of the bath and veranda; use roofing material for waterproofing. Be careful about waterproofing, the fact is that all cement-based materials tend to absorb atmospheric moisture. And high humidity has a negative effect on wooden structures.
Step 1. Check Position upper belt masonry, if necessary, trim it with a solution.
Step 2 Measure the length of the opposite walls and the distance to the extreme vertical support column, prepare the timber according to these data.
Step 3 Put two layers of roofing material on the wall and a beam on it, do all the work on a stretched rope, the Mauerlat should be in the middle of the blocks.


Very important! The distance between opposite Mauerlats must be exactly the same.
Step 4 Securely attach the Mauerlat to the wall. To do this, you can use trimming reinforcement with a length of 30 ÷ 40 centimeters. Before laying the Mauerlats, it is advisable to drill holes in them for metal dowels, the distance between the holes is about one meter. Drill the walls through the existing holes, drive in the metal dowels. Mauerlat must be firmly fixed, correctly perform all construction operations.
Mauerlats must also be made for the vertical supports of the veranda. We strongly recommend that one beam overlap the supports and be tied to the bath box - the stability of the structure will increase.

Step 5. Calculate the dimensions of the rafters, make one blank from the boards. It is not advisable to use headstocks for vertical stops, it is enough just to tie them together rafter legs top strap.


For fastening, use nails or self-tapping screws of the appropriate length, metal corners and plates. This will greatly speed up and simplify the process of building a truss system. For our rafters, a board 50 × 100 mm is suitable, the distance between the rafters is 1.2 ÷ 1.4 meters, the number of rafters should be more than necessary to cover the box - this roof will simultaneously close the veranda. The angle of inclination of the slopes is within 20÷30°. Do not forget that the rafters should protrude thirty centimeters beyond the walls to drain rain and melt water.

How to make a template? Take boards of suitable length with a thickness of 20 ÷ 25 mm, lift them onto the roof of the bath. With one nail, overlap at the top, the boards should rotate. First, set the angle of inclination “by eye”, drive in the second nail at the top, thus fixing the angle of inclination of the rafter legs. Attach the template to the Mauerlats, mark the docking point, cut the stubborn “heels” in these places, check the position of the rafter legs again. Walk with the template along the entire length of the bath, check the rafters. If everything is fine, you can lower the template to the ground. According to this template, make all the rafters, lift to the roof already prefabricated structures. Further, the rafter legs can be mounted on the Mauerlats.


Step 6 Install the rafters along the edges of the roof, including their flight over the veranda.


Check the position, everything is fine - temporarily fix them from below with any boards or slats of the appropriate length. Pull the rope over the ridge and you can install all the other rafter legs.


Step 7 Nail the crate. In our version for roofing selected metal profile (profiled sheet). The distance between the crate is approximately 40 centimeters, this is enough to securely fix the sheets. For crates, you can use slats or inexpensive boards. The latter are preferable - there is less chance of a self-tapping screw falling into the rail.

Step 8. If there is a desire - install a hydro-barrier, if there is no desire - do not install it. A properly covered roof will not leak. In addition, our attic space is not in use, there is no need to insulate the roof.

Step 9 Carefully mark the position of the first row of profiled sheets, the length of the overlap should be at least 10 centimeters. It is advisable to lay the first row without fixing and check everything.
Step 10 Fasten the sheets in turn using special self-tapping screws with rubber gasket, length of self-tapping screws not less than 25 mm. On the ridge you need to install a special metal curved bar. You can buy it at the store or make it yourself. Attach snow guards.


Step 11. Hammer the parts of the rafters protruding above the wall with wind boards.


Step 12 Install a drainage system. The brackets must be fixed to the wind boards, make a slight angle of inclination towards the water receiver. Vertical pipes put after sheathing the outer walls.


 In the photo - fastening the gutter
Now you can block the pediments with blocks, provide windows in them. That's all with the roof. You can start installing floors and ceilings.


Vido - Masonry of the pediment
Installing the floor in the steam room
We will lay the floors directly on the floor beams, the distance between the beams is one meter, for covering use an ordinary edged planed board with a thickness of approximately 25 mm. Before starting the installation of the floor, determine the place of water flow, prepare the receiver and draw a conclusion beyond the perimeter of the bath.
For a better descent of water, we will make a slight slope of the floor, 2 ÷ 3 ° is enough. to one of the walls, you can buy a factory grill or make it yourself from a piece of sheet aluminum.
Step 1. Make markings and install floor beams from a 100 × 100 mm beam. The ends must be wrapped with roofing material. Fix the beams in the blocks of the wall, for this, gouge them into holes 10 cm deep. Insert the beams into them, seal the gaps with mortar. Don't forget to make a slight slope. In other rooms of the bath, the beams are installed in a similar way, only without a slope. To install the floors, you will need to make an emphasis on pulling them together or buy a ready-made one in the store. This stop is attached to the beam, a wooden wedge is driven in between it and the floorboards to attract.


Step 2 Nail the boards in turn, you can leave small gaps in the steam room, in other rooms the floor should be dense.
Step 3 Nail the skirting boards, in the corners the skirting boards are connected at an angle of 45 °, make the cuts as accurate as possible.


While it is not necessary to grind the floorboards, this work will be done at the end of the work after the upholstery of the walls and the installation of windows and doors. In other rooms, the floor is installed according to the described algorithm without a slope.
Ceiling installation
For the ceiling you need to take edged boards 20 mm thick, the top of the ceiling can be covered with used material. We advise you to make insulation with foam. The fact is that mineral wool it is very afraid of high humidity, in such conditions its heat-saving characteristics significantly deteriorate. And it is expensive to use various steam and hydrobarriers. And they do not give a 100% guarantee of protection.

Bottom to ceiling beams nail the boards, follow the dimensions, do not skew. If necessary, leave a hole in the attic. Lay foam sheets at least five centimeters thick on the nailed boards tightly, cover with boards on top. If you already know the specific location of the stove and chimney outlet, leave holes. It is better, of course, to upholster the ceiling with natural clapboard, but this is a rather expensive pleasure. If there are financial opportunities - use lining.

Windows and doors
You will not be able to make these structures on your own, the best solution is to order plastic options according to the size, and install them yourself. In terms of price, durability and quality, plastic windows and doors satisfy most developers, and we chose this option. Let's see how to install plastic window, the doors are inserted in the same way.
| Step, No. | Description of actions |
|---|---|
| Step 1. | Clean the perimeter of the window opening from dust. |
| Step 2 | If the window is large and heavy, then it is better to remove the double-glazed windows, if the weight of the structure does not scare you, then you can not disassemble the windows. |
| Step 3 | Insert the box into the window opening, fix it to the wall with special dowels. For buildings made of foam blocks, the number of fixation points should be increased, the blocks do not differ high rates in terms of physical strength. If it is enough to install two dowels on each side of the box in a tree or brick, then foam blocks require at least four. Before fixing, you need to set the box strictly according to the level. Use various pads and wedges during this process. Replace window sills inside and out immediately. |
| Step 4 | Fill the gaps with mounting foam. Very important: foam should be given only on well-moistened surfaces of the blocks. On dry surfaces, the adhesion coefficient is greatly reduced. Unfortunately, most window installation companies skip this operation - time is the main thing for them, not quality. |
| Step 5 | The next day you need to cut off the excess foam. Noticed gaps - close them with mortar, level the surfaces. |

That's it, that's it further work will be made during the sheathing of external and internal walls.
External wall cladding
pay attention to comparative characteristics materials for thermal conductivity, we believe that additional insulation is not required for a bath. If you think otherwise - no problem, insulate the bath. Tip - stay warm external walls, it is much simpler and cheaper, and the effect is the same. Calculate the total surface area excluding door and window openings. Buy materials: special glue for foam, dowels and large hats, plastic reinforcing mesh, paint or decorative plaster. For insulation, use polystyrene foam with a thickness of five centimeters. How to do it?

Step 1. Thoroughly clean the walls of foam blocks from sand and dust.
Step 2 Installation of beacons. Lighthouses are used during many construction works, do not be "shy" to use them. With their help, not only work is accelerated, but also their quality is significantly improved. As beacons, you need to install foam plates at the ends of the bath; glue is used for installation. Stretch a rope between them and check the distance from it to the wall. This distance should include sheets and glue, if there are discrepancies - trim to problem areas wall or change the position of the beacons. A specific decision must be made independently, taking into account the size and location of the irregularities.

Step 3 Glue rows of foam plastic along the rope, constantly check their spatial position with a level in all directions and sides. If you have experience with tiles, you can not use ropes, control the position of the sheets with a long, even rail. In window and door openings, the foam plastic is cut off, the cut points are closed with additional elements: special trim and slats.


Step 4 Practice shows that expensive glue can be saved without compromising quality. Apply it in the corners and center only for pre-installation of the foam board, the final fixation is carried out with special dowels after the glue has set, usually the next day. It is the dowels that will hold the insulation.

Step 5 If the surfaces are very uneven - gradually align the rows, the gaps between the plates can be foamed.
Step 6 Fix the boards with dowels, One dowel should hold one corner of the foam board, another dowel should be installed in the center of the board. In total, five dowels are needed on the stove. Some builders try to save money and hold all the corners of four adjacent adjacent foam sheets with one dowel. This method of saving is risky, decide for yourself whether to use it or do everything according to the rules.

Step 7 Reinforcement with plastic mesh. Please note that the thickness of the adhesive must be at least 5 millimeters, otherwise you will not be able to completely hide the mesh. The mesh should be hidden before painting with fading-resistant paints (facade). If decorative plaster is planned in the future, there is no need to recess the mesh.
Interior wall cladding
Before sheathing, it is necessary to make electrical wiring, electrical cables must be protected with metal sleeves. The cross section of the conductive wires is selected taking into account maximum load and power reserve. Always make a reserve of at least 3-4 kW, this will allow you to safely use additional electrical household appliances or heaters.
For the steam room, be sure to use natural lining, all other rooms can be finished with any building materials. Consider the most difficult option wall decoration - natural clapboard.
Step 1. Mark the wall, determine the places where you will fix the vertical slats. The dimensions of the rails are 20–50 mm, the distance between them is approximately 50 centimeters.
Important - special dowels are produced for foam blocks, do not use ordinary ones!

Step 2 The slats must be leveled if there are irregularities on the wall large sizes- they need to be removed. Small irregularities can be eliminated by various supports for rails.

Step 3 Fasten the two extreme rails, pull the thread between them and install all the others along it.
Step 4 Check the distance from the floor to the ceiling at the corners. If there is a difference, then saw off the first lining at the right angle to level the horizontal. It is better to do this at the bottom of the wall, it is less conspicuous there.
Step 5 Using small nails, fasten the lining, drive the nails into the groove at an angle. Make sure that all nails fall into the rail. The length of the nails is approximately 2 cm.

Step 6 Beat the entire room around the perimeter, fix a special wooden corner in the corners to align the cuts. Fasten skirting boards and baguettes (on the floor and ceiling).

It is possible to finish some rooms with sheet plywood, OSB boards or plasterboard. Before starting upholstery work, you need to perform the same set of preparatory work and fastening the supporting frame as for lining.
Install rainwater pipes. This completes the largest and most labor-intensive construction work. You can start installing the stove, shelves for the steam room, various shelves and benches for bath equipment. And then paint or plaster decorative plaster facade walls.
Video - Project of a one-story VIP bath with a large terrace and a barbecue area
- organization of a good rest - having taken a steam bath and relaxing after a bath, right on veranda, without leaving anywhere, you can cook barbecue or snacks on the fire
- joint construction helps to accurately withstand the overall architectural style for all buildings on the site
- if the bath in the country is planned to be used only during the season, then a spacious terrace with a barbecue can completely replace the rest room, which will help to significantly save on the construction of a bath
- no need to link standalone objects paths which further saves usable area and reduce costs
- grouping several objects under one roof will help to significantly reduce costs, because in this case, for example, the bath wall will act as a terrace wall
Material selection
The most popular and cost-effective material for building a bath with a terrace is wooden timber. On the one hand, it keeps heat well, so the bath does not require additional insulation. Moreover, the tree traditional material Russian bath, it allows you to create a unique "bath" atmosphere. An additional plus is that wood, as a “breathing” material, independently regulates humidity, but at the same time it will require additional protection against mold and fire.
Brick baths are more reliable in terms of fire safety, but they take longer to warm up, requiring more fuel. Besides, brick baths require the mandatory installation of a ventilation system, otherwise condensate will begin to accumulate inside the bath, provoking the development of mold and bacteria.
Foundation laying
Despite the often common roof, they lay under the terrace and the bath different foundation. The bath, of course, is heavier than the terrace, so for large areas and multi-storey buildings, a tape monolithic foundation, and for small baths you can get by with pile ones. If foam concrete or brick is used to build a bath, then a strip foundation is necessarily poured - the other simply cannot withstand the weight of the building.
For wooden terrace a pile foundation will suffice. In cases where the terrace will be located on difficult ground, prone to freezing or shedding, on slopes, it is better to lay screw piles. At the same time, for wooden buildings it is very important to properly organize the waterproofing between the tree and the foundation in order to avoid rotting of the wood.
Advice! Since the soil under a heavier bath will shrink faster than under a lighter terrace, the foundations of the terrace and bath must be separated by a layer of insulation.
Terrace and barbecue: we plan correctly
When planning a terrace, first of all, it is necessary to take into account which direction of the wind is the main one, so that the task of the bath covers the terrace. In addition, this will allow you to properly place the barbecue so that the wind carries the smoke and heat away from the vacationers. If the terrace will serve as a shelter from the sun's rays on a hot summer day, then you should not place it from the south. Or vice versa - a terrace with a sun lounger can be a great place for a reception sunbathing- it all depends on the wishes and tastes of the owner. In addition, the choice of the location of the terrace is greatly influenced by the surrounding landscape - contemplation fence it is unlikely to add mood on vacation, where it is more pleasant to admire the forest, lake or landscaped landscape design.
The terrace can be placed frontally (i.e. along the facade of the bathhouse, Fig. 1), sideways (near one of the walls), it can be angular (along two adjoining walls) or encircling (along three camps, sometimes completely around the bathhouse, area permitting).
Rice. 1. The project of a bath with a frontal terrace
If you do not plan to invite a lot of people, then taking into account the installation of a barbecue (brazier), the minimum recommended terrace area is 7-8 m2. But it’s better to start with 9-10 m2, then in addition to tables and chairs on the terrace, you can put a deck chair, a couple of chairs, while the person standing at the barbecue will have enough free space to work, and vacationers will not be bothered by the heat from the stove and smoke .
Although the terrace in the classical sense is an open area, for greater comfort it has a roof to protect it from rain and sun. This can be a continuation of the roof of the bath and be made of a similar roofing material, or you can cover the terrace with a translucent polycarbonate. In addition, an opaque canopy will create twilight in the bath itself, so you will have to turn on the light earlier.
Advice! Polycarbonate coating is especially justified for large terraces - there is no need to build a massive base, lightweight metal structure will not clutter up the space, remaining almost invisible.
Ideal for patio flooring wooden plank or decking. Of course, you can put paving or ceramic tiles, but the tree will look cozier. Natural stone used as a covering on a large terrace
To install a barbecue, it is necessary to lay the foundation separately, and for construction use a special refractory brick, while the base is made about 70 cm high from the floor level.
Advice! To improve fire safety, it is better to put stone (tile) tiles around the barbecue instead of wood flooring- even if a spark falls on it, it will not cause a fire.
A rectangular niche is made in the front wall, in which it will be possible to store a small supply of firewood. To remove smoke for a barbecue, a separate chimney is made, which in height should ensure effective removal of smoke from the bath.
Designing a bath with a terrace and a barbecue oven
The design of the bath, regardless of the type (Russian, Turkish, Finnish) should provide for the presence of at least three rooms:
- dressing room - dressing room with a minimum size of 1.2 × 3 m, but it should be noted that according to the standards, 1.3 m2 should be per person
- shower room - minimum size 2x2m
- steam room - its size is a compromise between ease of placement and the need to maintain the required temperature at low fuel (electricity) costs. Minimum size a steam room for 2-3 people will be 1.3 × 1.8 m.
If you have a spacious terrace for a seasonal bath, you can refuse a rest room. The planning of the rest of the premises, of course, depends on the desire and capabilities of the future owner.
Let's take a closer look at some projects.
A corner bath with a terrace and a barbecue (Fig. 2) allows you to effectively use the area of \u200b\u200bthe site if you place it in one of the corners.

Rice. 2. Corner bath with terrace and barbecue
The space is used very functionally - a spacious shower room has a font with cold water. A fairly spacious steam room - it will be quite comfortable to heat the stove in it, while it is shifted closer to the corner, away from front door- so safer, because the eyes after bright lighting the shower room needs to get used to the subdued light of the steam room. If brick is chosen as the material for the bath, then the stove can be cut into the walls. If you make the steam room a little smaller, then with this arrangement of the stove, you can heat it from the shower. There are two entrances to the common vestibule - one directly from the street, the second - from the terrace.
Project bath-guest house(Fig. 3) with a veranda and a barbecue, a fairly large area - 98 m2. Therefore, if it is intended to be used year-round, a heating system will be required. Inside there is a spacious living room and separate kitchen. The terrace is located on the side, in terms of area - it is actually half of the building. Entrance from two sides - from the street through the vestibule (winter entrance) and from the terrace.

Rice. 3 Banya - a guest house with a barbecue and a terrace
Figures 4 and 5 show two more projects of a bathhouse with a terrace and a barbecue, which can be used as a guest house.

Rice. 4. The project of a bath-guest house with a terrace and a barbecue

Rice. 5. Sauna with terrace and barbecue
On fig. 6 drawing of a bath with a terrace and a barbecue, on which you should pay attention to front door to the rest room - it is located at the maximum distance from the barbecue in order to completely eliminate the possibility of smoke entering the room.

Rice. 6. Drawing of a bath with a terrace and a barbecue
Sauna from a bar with a veranda and a barbecue in the traditional Russian style - watch the video presentation:
Territories summer cottages do not always allow to realize all the dreams of the owner, so you have to save both space and materials. Therefore, combined projects of country cottages, baths, summer kitchens are becoming more and more popular. Today we will look at a few combined projects baths and find out all their features.
Benefits of barbecue bath projects
The dacha has become not so much a place for the realization of one's agricultural talents as a place for recreation. It is to ensure maximum comfort that such as a bathhouse with a terrace and a barbecue are created, the photo project of which we presented on the page. The combination of several objects at once in one not only saves the space of the site, but also makes the use of the bath more comfortable.
There are a great many projects of such a complex, and each of them can have different sizes and configuration. The optimal area for a terrace with a barbecue is 8-10 squares. This is enough for receiving guests, and for big family this terrace is perfect. On several projects shown on the page, interesting solutions have been introduced for the use of the terrace area and the bath itself:

Terrace decoration with BBQ
The terrace can have a lot of design options and be either completely open or have sliding or removable screens made of fabric, glass, polycarbonate. This option of temporary glazing of the terrace will allow you to use the bath complex almost all year round. It all depends on the degree of insulation of the terrace. But as a rule, removable elements are removed for the winter in the house. Also interesting option a multi-level extension can be obtained if the bath has a second floor or a full attic.
In the photo of such projects, the terrace looks simply luxurious, especially if you decorate it with flowers and glaze it. It turns out real winter Garden or greenhouse. A two-level bath with a terrace is also good because it can be used as a guest house. The second floor or attic in this case is designed as a living space with a guest room, while on the first floor there is a steam room, a relaxation room and a terrace with a barbecue, which can also serve as a summer kitchen.
The price of bath projects with a terrace
Bath projects with a terrace and a barbecue can be both budget and not too cheap. It all depends on the type of building. The most inexpensive bath projects involve construction using frame-panel technology. But this does not mean that the frame bath cannot be two-level or it will be less functional. The price of such a turnkey project is about half a million rubles.
More expensive projects already involve the construction of timber or log cabins from logs. The cost of such a bath with a terrace without an attic floor is about 800 thousand rubles. Two-story bath with an attic and a terrace will cost from 1,200,000 turnkey rubles. Naturally, the price of the final object will be influenced by the materials and equipment used, as well as engineering solutions that can help combine the foundation of the bathhouse and the terrace, which will somewhat reduce the cost of construction.
You can always save money due to the design of the stove, by equipping the bath itself, but the very fact of the presence of such a bath complex on suburban area- this is a reason for pride. Hours spent in silence after a good bath cannot be measured by any money, so the project of a sauna with a terrace and a barbecue is an excellent investment for the future.
In modern conditions, the concept of "Russian bath" has expanded from an ordinary place for ablution into a complex with wide functionality, which includes various types of recreation. In this regard, projects of baths with a terrace and a barbecue have become in demand (photos are presented on the page).
This solution allows you to significantly save space in your backyard or suburban area. A bath with a terrace under one roof is being implemented in different projects, which allows you to end up with a comfortable recreation area on fresh air where you can enjoy food, drink and socializing.
The relevance of the location of the bath complex
Terrace is called extensions open type adjacent to the main building. This site has the following features:
- has a reliable roof that protects from possible precipitation;
- to a certain extent protected from the wind on some sides;
- the space has a solid wood or tile floor;
- on this territory there is furniture in the form of benches, chairs, rocking chairs, dining tables.
Popular bath projects with an attic and a terrace include a cooking area on an open fire:
- open grill;
- B-B-Q;
- stationary stone oven, etc.

The fencing of this site is in most cases used in decorative form and can have a height of about 1 meter from the floor level or close the floor-to-ceiling space with a rare decorative lattice with large gaps.
Individual features of projects
Various architectural bureaus offer many options for bath projects with a terrace. Each of them is based on certain requirements regarding the materials used, the location and methods of installation. This is due to the fact that there are 6x4 bath projects with a terrace or a 6x6 bath project with a terrace that require a certain allocated area for them.
.jpg)
Access to the terrace is provided small porch with three steps. The site itself is quite spacious. And on it, a stove with a barbecue or a barbecue area will be located without any problems.
In such a territory you can comfortably accommodate even several guests. This takes into account certain nuances of the location of the open extension:
- The project of a bath with a large terrace and a barbecue may involve the location of an open area along the largest wall of the building or at the end of the building next to the exit from it.

- In some cases, in small areas, the space of the dressing room is sacrificed in bath projects with a relaxation room on the second floor and a terrace next to the building. This approach will also save not only space, but also funds for the materials used.
- The original decorative fence will mark the perimeter of the recreation area under a canopy in the projects of baths with a large terrace.
- When drawing up a plan of the territory with the installation of a stove or barbecue, it is necessary to provide a reliable chimney so that the combustion products do not create discomfort on the site.
- For the project corner bath with a terrace, a barbecue area stands out in the far corner, and smoke is removed through a pipe leading out of the roof.

Terrace decoration
Projects of frame baths with a terrace are often divided into two types according to the way the open area is designed:
- fully open terrace area;
- the presence of dense swinging screens made of fabric;
- the use of sliding structures using glass or transparent polycarbonate.
The possibility provided in the project of one-story baths with a terrace to hermetically close and open the space with the help of window modules makes it possible to use this zone almost all year round.
Removable elements made of polycarbonate or glass can be removed in the summer in the pantry to open up space in front of the guests on the terrace.
Using an open stove or barbecue
In those projects of a bathhouse with a kitchen and a terrace where the use of a barbecue or barbecue is supposed to be used, it is necessary to take into account the special conditions of the cooking zones on an open fire.
- Installation of a stationary furnace is often carried out away from the main resting place.
- It is advisable to provide shelter for the cooking area from possible bad weather in the form of precipitation or wind.
- Mobile barbecues should be located in a fireproof place on a flat surface.
- Individual decoration of the stove will emphasize the design of the terrace.
- In cool weather, a stationary stove becomes an additional source of heat for vacationers in an open summer area.
Featured Projects
If there is enough space on the site, it is possible to implement bath projects from logs with a terrace in the form of a small health complex. Such a platform is enough for almost any company from two or three families.
.jpg)
On the territory there is not only a bath with a steam room, but also a relaxation room. There is a terrace along the longitudinal wall. It is open and includes a barbecue oven. This project a bath house with a terrace implies the presence of two entrances to the site: from the back and front sides.
.jpg)
The spacious hall is equipped with a pair of spacious wardrobes, which contain some useful bathing equipment and clothes for changing. There are three further exits from this zone:
- to the toilet, where there is a dormer window with natural light;
- in the shower-washing room, after which there is a steam room;
- in the living room, where there are all conditions for a cozy pastime.
This arrangement allows you to properly manage the space and provides all the opportunities for comfortable movement around the bath. The living room and terrace are separated by a huge glass window. It can be done in a panoramic format. This solution will provide more light into the room and visually expand the territory of the terrace.

Convenient seating area
The close location of the outdoor recreation area and the living room will allow you to move between these spaces at any time with a possible deterioration in the weather or its improvement.
Some projects of a bath house with an attic and a terrace provide for the installation of stairs to the second floor from the side of the terrace. This will save space inside the building.
More examples of bath projects with a terrace and a barbecue:
.jpg)
.jpg)
Spacious bathroom with auxiliary rooms. The bathhouse is surrounded by a spacious view balcony. 2 porches - separately for the terrace and separately for the bath
VIDEO: Bath from a bar 4.5 by 5 with a terrace
03.01.2017
5928
Pechnik (Moscow)
In order to effectively organize the adjoining space and combine the spa area and the relaxation and entertainment area, it is convenient to combine open extensions to the house with the main building. There are many opportunities for creating such multifunctional objects, for example, projects of baths with a terrace and a barbecue, photos of various interesting solutions indicate an increasing demand for such a solution.
Advantages of combining a sauna with a terrace and a barbecue
The combination of several objects in one room helps:
- create maximum comfort;
- correctly zone the site, dividing the space into a recreation area and an area for agricultural plantings;
- to simplify the maintenance of the site;
- reduce construction and operating costs in the future.
Traditionally, a terrace is an open or glazed area, combined with a bathhouse by a common roof and foundation. The size of the terrace can be different, it all depends on the size of the plot, the hospitality of the owners and the size of the family, but the optimal size is 8-10 sq.m.
The combination of a spa area, including a bath or sauna, and sometimes a small swimming pool with a terrace, has a number of benefits:
- Saving space, a relaxation room can be located on the terrace;
- Placement of additional devices, such as a barbecue oven or an open barbecue;
- Simplification of connection of communications. For example, for lighting, a strip of one power cable with a common switchboard.
Also, a bathhouse with a barbecue terrace can partially perform the function summer kitchen. During the rest, you will have the opportunity to take a steam bath and have a small picnic at the same time, you don’t need to go far from building to building, everything will be at hand.
The content of the project for the construction of a bath with a terrace
Before starting construction, you should familiarize yourself with the permitting norms of the Russian Federation for the construction of such structures.
According to the provision of part 17 of article 51 of the urban planning code of the Russian Federation, the construction of a bathhouse, as a construction for auxiliary use, does not require a special permit. But in order to secure property rights, and in accordance with Art. 25.3 of the Law "On State Registration of Rights to Real Estate and Transactions with It", such an object as a bath should be registered. To do this, there is a simplified procedure for submitting an application to the ROSREESTR and paying the state duty.
Such a step will protect against possible fines for unauthorized construction in the future.
In addition, it must be remembered that the location of the bathhouse relative to other buildings on its site or buildings on neighboring sites is regulated by SNiP 30-02-97 "Planning and development of the territories of horticultural associations of citizens, buildings and structures" and should not be less than 8 m.
Insertion into the collective sewerage for outflow Wastewater, connection to the power grid is not possible without agreement with local utilities and energy companies by obtaining and agreeing Specifications(THAT.)
The project of a bath with a terrace and a barbecue should contain:
- Architectural and construction part. This section of the project includes views of all facades, floor plan and section. It is at this stage that the future interior and exterior are determined, and it is also described:
- foundation arrangement;
- construction of external walls and roofing;
- exterior and interior decoration.
- Engineering part. This section of the project includes schemes for laying engineering networks:
- electricity and water supply;
- sewage and sewerage device.
The project is accompanied by an estimate with the cost of work. Design prices usually start at $500. You can use numerous projects on the Internet, but most often they do not contain the most important parts, such as laying the foundation or laying networks. This is due to the fact that foundation work and connection to engineering networks required individually, taking into account the characteristics of the site.
Even if the construction of the bath on the site is carried out independently, in order to foresee all the necessary work and materials in advance, as well as to estimate the cost, such a project must be done at least in a draft version.

Smoke removal should be provided in advance, depending on which boiler is chosen for the bath, and the issue of smoke removal for the barbecue oven should also be resolved. The equipment manufacturer's instructions usually contain necessary requirements chimney height.
Since the barbecue is located in an open or well-ventilated area, there is no need to equip a classic high chimney. The pipe may be small size, but you should pay attention to the direction of the wind, usual for the site, so that the smoke does not drift back into the room. For an open barbecue or barbecue, it is advisable to organize protection zone so that embers and sparks do not damage the floorboards. It is convenient if there is a small woodpile for firewood or a box for storing coal.
Projects of baths with a terrace and a barbecue. Material selection and standard solutions
One of the most common materials for building a bath is wooden shields, timber or rounded log. This material "breathes", is environmentally friendly, and keeps heat well. Interior using natural wood creates a unique atmosphere of comfort and relaxation. But a wooden structure will require mandatory protection from excess moisture inside and the formation of mold as a result. Impregnation is also desirable wooden structures flame retardants to prevent fire.
No less in demand for the construction of baths and brick, shell rock or any other a natural stone. Especially if it is not a traditional bath or sauna, but a hammam or a Roman bath with other temperature regimes. Stone construction has many advantages:
- No significant measures are required to counter the fire;
- More options for interior solutions;
- Exposure to moisture does not lead to the rapid spread of mold and destruction.
The disadvantage is:
- Longer time to reach the required temperature for the bath;
- Greater fuel consumption, depending on the selected boiler system.

Table 1. Temperature regime depending on the type of bath

Regardless of the material chosen, it is necessary to carefully consider the ventilation system to remove condensate, especially if the furnace is equipped with a generator. light steam and a smoke exhaust system.
For example, mandatory for a bath stove-heater requires a competent chimney device, an incorrectly connected pipe, with an outlet through combustible materials or excessively insulated can lead to a fire.

The heater stove can be made of bricks with your own hands with a brick chimney. When performing these works, it should be taken into account that due to the fact that the lower part of the furnace is heated, the foundation of the bath and the heater must be separate.
It should also be taken into account that:
- The foundation of the furnace must have a depth below the freezing level of the soil by at least 0.7 m;
- The base must be larger than transverse section kilns at least half a brick.
The construction of any building, including baths, begins with pouring the foundation. In the case of the construction of a bath with a terrace and a barbecue, there is an important point that you should definitely pay attention to. Under the terrace and the bath building itself, it is necessary to lay a different foundation, because the bath is heavier than the terrace. For a bath of a large area or a bath of brick or foam concrete, a strip foundation is needed, and for a small bath, a pile foundation is also suitable. For an ordinary wooden terrace, a pile foundation is suitable. If the terrace is located on difficult ground, prone to landslides or freezing, it is better to use screw piles for greater reliability. Since the structure of the bath is heavier than the terrace, the soil under the bath will sag faster than under the terrace, and this can eventually lead to damage to the entire building. To avoid such an imbalance, the foundations must be separated by a layer of insulation.

Sauna with barbecue terrace. Examples of economical solutions

The most popular option for organizing a recreation area for a small area is a bathhouse, including:
- Steam room with stove and benches for 3-5 persons;
- Lounge area with table and seats where you can relax

It is advisable to provide a small room for undressing, it can also combine the functions of an auxiliary room for storing bath equipment, towels and the like.
It is ideal to provide a small bathroom with a shower, but most often the site's capabilities do not allow this. The most successful layouts can be found in the photo, below, or the video in the article.
If the territory allows for the most organic organization of space for recreation, the project of a corner bath with a terrace and a barbecue can be taken as a base. This layout allows you to use the space in many ways, allowing you to simultaneously organize recreation for companies of different ages. For example, while adults are relaxing in the bath, a children's company can gather on the second terrace. Or the steam room can have two exits to the relaxation room and the barbecue area.
Successful layout options for a corner bath and an interesting option exterior finish can be seen in the photo below.
We also recommend
 Switching power supply: repair and refinement
 Remote control of light
 Swimming lessons for preschool children
 Notes for the master - home household alarms
 Clock propeller on Atmega8
 Device and relay application examples, how to choose and connect a relay correctly Microcontroller and relay simple switching circuits