How to make a small lake We make a pond in the country with our own hands - from a bath, a film or a plastic mold
At the dacha, city dwellers like to spend their free time on weekends, relax and enjoy the beauty of nature. To make the rest more pleasant, create a pond in the yard. This article will show you how to make do-it-yourself pond in the country house photo step by step. This work is within the power of everyone, regardless of the level of training and knowledge. Construction will take 5-10 days and requires purchase necessary materials. As a result, you will get an aesthetic element. landscape design with minimal equipment costs.
Before starting work, decide on the location and type of artificial reservoir. The best place- the lower part with sufficient sunlight during the day. It is advisable to start construction away from large trees, which pollute the water with fallen leaves and violate the arranged waterproofing. The shape of the pond depends on the wishes and imagination of the owner of the house. Its depth: 0.5-1.4 m.
Species classification of artificial reservoirs
The shape and dimensions are up to you. Decide on the type of pond:
- mini. An excellent element of landscape design;
- decorative pond. It is decorated with decorative elements and plants;
- water. Designed for breeding fish;
- swimming pool. Used for swimming.
Pay attention to the choice of the shape of the reservoir, especially the mini version. To create it, old bathtubs, deep basins and other containers made of durable durable materials. The choice of base will determine the shape, dimensions and depth. For a pond from a bathtub and a basin, choose 3-7 types of plants.

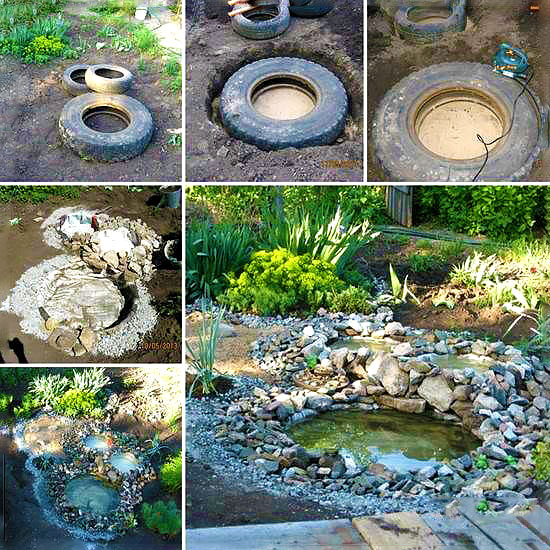
Interesting fact! A round-sized pond is easier to make than all other types! It is suitable for garden and yard decoration. country cottage. To form them, use concrete rings, tubs made of wood and molds made of durable plastic. Car tires are allowed.
The rectangular shape of the reservoir is combined with flower beds of a similar shape. This is The best decision for landscape design of the inner part of the yard. The use of irregular shapes, curved lines and exotic plants- option for fans creative solutions and modern design.
How to choose a design style
It will seem challenging task. To get the desired result, you should read the thematic literature and our tips. The number of modifications is huge, among them you will find the one you need. For fans of classics and conciseness, the formal style is perfect. Such a pond has an exact shape, simple design, the minimum number of decorative elements and plants. Arrange it on the site in modern style, hi-tech, minimalism.

Romantic personalities should pay attention to the landscape solutions for arranging a reservoir on the site. It's natural irregular shapes. You are not limited certain rules and you can realize your ideas. Consider the terrain and budget so that there are no unpleasant situations in the process of work. On flat terrain, it is possible to create all types of ponds, and slides and bridges are suitable for sharp drops. Here you should be careful at every stage of work, to the choice of materials, laying the film and digging the pit.
Choosing a place to start
This is a responsible stage. Ensure sufficient depth ground water on the site to prevent unpleasant consequences in the future. The value is needed to determine the depth of the pond. Proceed to site selection by finding an area that gets 5-7 hours of sunshine a day. So planted plants can develop and grow normally. Shady areas and places under tall trees- the worst solution to start working on an artificial pond.
Make sure that the reservoir looks aesthetically pleasing, harmonious, and has a proportional shape from all sides of the site. Clouds, a house, plants will be reflected on its surface in sunny weather. This is beautiful element landscape design for a country cottage, available to your family now!
When choosing a place for digging a pit, pay attention to factors:
- plot area;
- terrain;
- soil and depth of groundwater placement;
- amount of time exposed to direct sunlight.
Plot for a pond- a place on which the sun shines 5-7 hours a day, with good visibility from all parts of the site, a sufficient degree of surrounding landscaping. Decorate finished structure can be plants in barrels. Conduct power supply to the reservoir to provide lighting at night and connect filters, a pump, musical accompaniment.

Planning - milestone work to which attention should be paid, and to think over the sequence. Decide on realizable design solutions, buy decorative items, plants, choose a design style. Plants are planted in different schemes, having studied which you will create a unique composition.
The sizes of reservoirs are different. For small area set the container to 10 liters. It will not dry out, take up little space and allow you to make the yard aesthetic. But growing plants and breeding fish in it is impossible. An old bathtub, a plastic container, a basin are suitable for him. After choosing a place, you should dig a hole, 30 cm deep more than the height of the container used. Level and compact the bottom of the pit, lower the bath into it, filling the free space with earth.
To give naturalness to the created pond, paint the bathtub with paint. It is acceptable to use paint in natural shades, finishing materials, concrete mortar. Pots with flowers on the sides will be a beautiful decorative element of the created composition.

Medium sized pond original solution for owners of a spacious yard. Having created such beauty on your own, you will make the yard a real work of art, turning it into reality design ideas. The device is complex, but it can be done in the following ways:
- the bowl of the reservoir is made of concrete mortar. This is a long and expensive method;
- installation of a purchased plastic container. She will determine the size of the pond, its shape, depth. Choose between single-level and multi-level system;
- film with waterproof properties. Simple and fast. You will create a unique design yourself without significant time costs.
For a PVC pond, prepare a film, a shovel, ropes, bricks and gravel, sand, stone slabs. You will need 5-7 days to work. First of all, mark out the pond using a rope and stakes. After marking the dimensions, start digging a hole according to the pattern made. For excavation big size rent an excavator. After inspect the bottom of the pit, remove sharp stones, branches, roots. Cover the surface with sand, 10-15 cm thick, cover it with prepared material, level and fix the edges of the film with stones.

The next step is to fill the prepared pit with water. Only then should cut off the unnecessary edges of the film 24 hours after completion of work. Decorate the coast using pebbles, pots, plants, landscape figurines. Install the pump by connecting the filter. Bring out all the pipes unnoticed and mask them with plants, flowers, stones. The final stage is planting plants from the pond.
Pond sizing
Dimensions do not always depend on the financial capabilities of the owner country house. The dimensions of the pit are determined by its location on the plot, the width and length of the allocated land. Consider also the zones:
- for planting plants (10-40 cm);
- a place for deep-growing plants (40-100 cm);
- for breeding fish (from 1 meter). Depends on the number and size of the fish.
Interestingly, large ponds are easier to maintain than small ones. Each master will confirm these words to you.
Dimensions can be determined by the parameters of the purchased plastic container or old bathtub, the wishes of the owner of the house, the purpose of the artificial pool. Tires, bathtubs, PVC film, concrete mortar, basins, plastic bottles- all this will become the material for creating an aesthetic design on a personal plot in the hands of a talented person. The choice is up to you!
Rules for digging a pit from specialists
Having chosen a place for a reservoir, mark the territory in accordance with the size of the container. Use sand, rope, paint, stones, a strong stream of water for this. Then start digging. Do small volumes yourself with a shovel, and for the pool, rent special equipment and hire workers. The depth of the pit will always be 5-30 cm more than the height of the container used.

After removing the stones from the bottom, level and tamp it down. Use a layer of sand, 5 cm thick. Install the container or lay out a layer of film, fixing it with stones around the edges. After completing the stages of creation, proceed to the ennoblement of the area around the reservoir. Try to give creation natural look using plants, stones, figurines planted in containers. It is possible to install a fountain to create a harmonious composition.
To achieve an unusual effect, use lighting and musical accompaniment, entrusting the work to a specialized company.
Don't forget to change the water artificial ponds 2 times per year. This is necessary to maintain its purity and prevent the appearance of bad smell what will happen after the development of microorganisms. The process is natural and cannot be prevented. Snails, water striders, and fish are used to improve cleanliness. You can catch this living creature in the river or buy it in a specialized store. Economical option- order online.
It is better to locate the pond away from the trees - in the fall you will only do what to pull the leaves out of the water, in addition, the roots of plants can damage the bottom cover of the pond. The ideal place for a home reservoir is considered to be a quiet place, inaccessible to the winds, without slopes, with medium illumination. Before you build a natural pond, keep in mind that in a large pond it will be much easier to equip the ecosystem, arrange plants and care for the inhabitants.
First of all, when creating a pond in a country house and a personal plot with your own hands, you must understand that the water in it will not need to be chlorinated or subjected to another type of treatment - on the contrary, you will need to strive to create a biological balance between water, plants and living creatures, if it is you will. That is, the water should be as self-cleaning as possible, and on your part, in this case, you will only need a rare cleaning of bottom debris. The smaller the pond, the more difficult it is to establish a balance in it.
Reservoirs can be as strict geometric shapes, and imitating natural reservoirs - the first case is suitable for classic landscape design, clipped gardens and straight paths, while the second will fit into a landscape that imitates wildlife. If you are planning to make a pond with lighting or fountains, when choosing a place, consider the proximity of the power supply.
So that water does not leak - materials
Whatever materials you choose, you still have to dig! The only exceptions are raised reservoirs, which are fenced with a stone border. There are a lot of options for bottom coating - this is both PVC and butyl rubber film, as well as ready-made containers made of reinforced plastic or fiberglass. Immediately it is worth sweeping aside ordinary polyethylene - its service life is not more than 1-2 years.
PVC coating will last all 15 years, and butyl rubber - more than 50! True, the cost of the latter type of coverage will not be small. Another durable, expensive and labor-intensive method is a reinforced concrete pond bowl. Most fast way to get what you want is to buy a ready-made container made of fiberglass or plastic. True, in most cases these are containers small size, about 4 m 2 with a depth of up to a meter. Larger containers are already intended for pools, so they will not be cheap.
Ready-made containers are strong enough, in winter they are not afraid of frost, but it’s better not to step on the bottom with your feet, and be careful during transportation to avoid cracks. Plastic bathtubs last the least - up to 10 years, reinforced plastic tanks will last up to 20 years, and fiberglass products - all 30! The disadvantage of such ponds is that they will only be of the form that the manufacturer has set. Film coatings allow you to experiment with shapes to your heart's content.
How to arrange a pond - step by step
To begin with, outline the contours of the future pit - if the pond is constructed on the site using a film, then the contours will be arbitrary, but if you bought a ready-made container, then put it in the place of your choice and circle it with a shovel. Then take this same shovel and dig! The depth of the pit should be 4 cm more than the depth of the tank itself, since you will still need to lay a layer of sand for drainage. When the pit is ready, the drainage is backfilled and rammed, put the bath in place and cover the reservoir with a film.
Try to avoid voids between the walls of the tank and the soil, since in winter frosts they can cause cracks.
After installing the tank, its edges should be overlaid with brick, artificial or natural stone. Much harder to work with fiberglass tubs large sizes- just in their case, the slightest voids between the walls will cause an almost obligatory crack in winter time. Therefore, it is best to entrust their installation to specialists.
How to arrange a natural pond on the site with your own hands - dig it right!
Independent creation of a reservoir from 5 m 2 is possible only with flexible film coatings. Follow the pattern - the larger your pond, the thicker the bottom cover should be. Pay attention to the color of the film you want to use for your work. The black film forms a real mirror from the pond, in which the clouds and the blue sky will be reflected. If you are looking for a natural color, choose brown. Cream or blue shades it is best to use if fish will live in the water - against this background they will be much better distinguishable.
Now about how to ennoble a reservoir - for this there is a huge range of plants that are not afraid of constant humidity. Water lilies will look especially impressive on the water surface. These plants are planted on a special fabric that better holds them at the bottom of the reservoir. Decorate your pond and a small murmuring, for example, from natural stone.
*The article was prepared with the assistance of the Marlin-shop pond fish and pond equipment store.
How you want sometimes in the summer, on a hot day, to relax in nature near a small lake or pond. It’s great if such a reservoir is located nearby from your place of residence. But, for the most part, we have to relax in our free time in the summer on our household plots or cottages. And many of us, unfortunately, have money to build even a small country house and payment for the services of a landscape designer. A person has no other choice but to equip a pond in the country on your own. By the way, it is not difficult to make it and it is quite real. It usually depends on your desire, effort and personal imagination. Therefore, the article building portal will tell you how to make a pond in the country with your own hands step by step.
Important information
So, if you are going to build such a structure in your country house, then first you need to decide on the place where you want to place this reservoir. We advise you to immediately determine the size and shape of the future pond. Remember that these configurations and dimensions directly depend on the area of \u200b\u200bthe future pond. The larger it is, the more convenient it will be for him. further exploitation and care.
A small pond will have to be cleaned and cleaned much more often than a large one. If you decide to land in it a large number of plants and a variety of fish, it is better not to consider a pond with a small area as an option, because the internal microclimate will be disturbed and it will be difficult to maintain the necessary ecological balance in it.  As for the choice of the future place, then the future place for the reservoir should be chosen in an open area. Remember that the pond should be in a quiet area and not be subject to gusts strong wind. Do not select a site with bright lighting. It should be located in a place that is protected from direct contact. sunlight into the water (more than 7 hours), because in the future the pond will be subject to flowering. And its inhabitants will be only frogs. But if there is not enough light, then the growth of plants will sharply decrease, and you are unlikely to see beauty from this reservoir.
If your plans include the installation of a small fountain, then it will be necessary to prepare a reservoir diagram for the competent connection of special equipment. With a little work, you can make a circuit yourself.
Do not forget about how far the electrical system is from the pond. If you place a pond under trees, this can lead to the fact that falling leaves from them will lead to water pollution and it will be necessary to clean this pond much more often. Also, tree roots can cause damage to the reservoir, and the pond will begin to dry out.
Pay attention to the publication of the site: How to make a pipe bender yourself

We equip a home pond on a rigid basis
If you want to equip the reservoir thoroughly, then you should dig a large pit and cast a large bowl of the reservoir using cement and reinforcement. This design will serve you for many years (at least 25).
If you have plans to make the reservoir small, then you can stop at the cheaper and lighter option.
Let's find out below how to equip country pond on one's own? So, the easiest and most affordable method is to purchase a finished “bowl” in a specialized store. But the big disadvantage of this method is that you have to choose the shape of your future pond, which is offered for sale. Of the less expensive options, you can choose a pond made of plastic, total area from 5 to 9 sq.m. Naturally, there are larger forms, but this is no longer a pond, but a pool and their cost is much higher.
Before purchasing the design you like, you should ask the seller about its depth. It must be at least 1 meter deep. The water in this container summer period time will quickly warm up, and in winter it will not freeze to the bottom. Which in this case is one of the main factors. If you are going to equip the pond yourself, on your existing suburban area, and you want to use the finished form as the basis of the reservoir, then you first need to familiarize yourself with what materials are used in the manufacture this product.
A container made of plastic is the cheapest option, but when choosing this product, you will need to take into account its disadvantages. When delivering and further installing this product, you should be careful, as the container can easily burst, in the event of a slight impact or bending. A material such as plastic is very susceptible to destruction from exposure to sunlight. Based on this, the operation of such a pond will be small - about 4-7 years. To achieve a longer service life, it is necessary to choose a container made of reinforced plastic. This material will last you much longer than usual. Such forms are less susceptible to ultraviolet radiation and are much more plastic in their properties than products made from conventional plastic.  A more expensive, but also high-quality product is a fiberglass container with a rubber base. This product withstands temperature changes, will not be deformed or destroyed by sunlight, and the components included in it are environmentally friendly and are not dangerous for the inhabitants of the reservoir. The service life of such a pond will be approximately 30-35 years. It is easy to repair, which, in turn, increases its operation several times. The arrangement of such a reservoir is not a very difficult job. And as a result, you get a beautiful in shape, color and aesthetic in every respect a place to relax.
We build a reservoir on our summer cottage ourselves
This publication will tell each reader about how to make a pond in the country with your own hands. In general, remember that in order to equip a pond on your own, you need to choose a place for it on the site and decide on its future shape. Let's say that this stage of work is completed. Now you need to prepare for the construction work.
- First you need to mark the contours of the future pit. Making them is easy enough. With the help of a shovel, you need to make a border of the silhouette. 25 cm should be added to the prepared contour, so that sand can be poured into the pond. If you bought a container with ledges, you need to dig each finished level separately, gradually reducing them. It should be added to each resulting level of 12-17 cm for future sand addition.
- After you make a pit, its edges will need to be leveled, while tamping with a shovel. It is also recommended to remove all unnecessary debris from the pit, and root system shrubs or trees. If this procedure is not followed, then the form can be spoiled.
- Next, we start pouring sand. Each layer must be at least 15 cm, in which case the pond will not subside in the future.
- Then we are engaged in the installation of a plastic container. This work must be done carefully, using building level to ensure a level bath.
- After the container is installed, it is necessary to carefully pour water into the container, filling it by a third. The space remaining between the edges of the pit and the tank should be carefully covered with sand. Make sure all voids are filled. To do this, you need to regularly water the soil with water. The water pressure in this case should be small.
- After installing the container, you need to continue watering the soil around the reservoir, and if necessary add sand. After the soil subsidence stops, the container can be completely filled with water. With the help of stones, decorate the edge of the bowl, and plant plants.

Country pond made of flexible materials
Above, we talked about how to make a pond in the country with our own hands. Now let's talk about what options exist. self-manufacturing a pond, in case you cannot buy a ready-made bowl, but want to build a large pond of the original form.
So one of the most available options in this case, polyethylene, 600 microns thick, can serve. Although its cost is low, this material has a fairly large number of shortcomings.
Polyethylene is very thin in composition, so it can be torn, and under the influence of ultraviolet light, it begins to quickly collapse. The service life of a reservoir made of a polyethylene substrate will, alas, be very short, approximately 3-3.5 years.
And a material such as PVC film is quite cheap, but its composition is much stronger than polyethylene film. Its service life will be 9-10 years. PVC coating can also consist of two layers, with a fabric base. This material also, unfortunately, has a lot of shortcomings. It is also subject to its destruction from the sun, like polyethylene. But there is one main difference - you can always make it repair. On sale there are so-called repair kits. In addition, PVC film has good elasticity, excellent stretch. And a large number of folds created as a result of filling the pond with water straighten out after a while.
One of the most expensive coatings, but also the highest quality is butyl rubber. Lifetime this material is 50-60 years old. It is not subject to temperature fluctuations. Indeed, neither frost nor the sun are afraid of him. It has excellent properties - flexibility and plasticity. Withstands heavy loads. So if your plans include the construction of a large pond of a bizarre shape, then the best material you can't find.
 The next step will be marking the pit. To make a reservoir yourself, you will need to use various materials. You will need:
- sand,
- pebble,
- rope,
- felt,
- film,
- shovel,
- repair kit for film coating,
- bricks,
- irrigation hose,
- building level.
Using the use of pegs and rope, it is necessary to mark out the shape of the pit that you want to make. For arranging a large reservoir when performing land works You can use excavators. Care should be taken to ensure that the levels and alternate with each other.
This method is necessary to create more stable shores of the reservoir. You should also not forget about the terraces (about 25 cm wide) needed for planting. The descents of the ledges from each other should be gentle. The angle of inclination in this case should correspond to 45 degrees. Do not forget that the depth of the future reservoir should be 90 cm. If this distance is less, then with the onset of winter, all the water in the pond will freeze, and the inhabitants of the reservoir will all die. It follows that it is necessary to make a pit 20-25 cm larger than the planned size of the pond. This is necessary for pouring sand on its bottom and on the terraces, in order to eliminate future subsidence of the soil, damage to the base of the film. The mound of sand must be thoroughly leveled and properly compacted, removing all debris, stones and roots from the bottom in advance.

Drainage and waterproofing
- After the embankment is ready, you can proceed to the next job. In order to preserve the integrity of the film intended for the reservoir as long as possible, geotextiles should be laid on a layer of sand, preferably in several layers.
- After that, we level the film and fix its edges on the banks with the help of bricks. No, it makes no sense to try to smooth out all the wrinkles that have appeared on the film. Water will straighten them out later. Try to knead the irrigation hose so that one of its edges is placed in the center of the pond, and gradually, with a small pressure, we begin to supply water. With a uniform filling of the reservoir with water, it is necessary to partially release the edges of the film and level it along the ledges of the pit. After the pond is completely filled with water, it is necessary to stop any work for 2-3 days. During this time, the film will begin to gradually smooth out under the action of water and, as a result, all voids in the pond will be filled.
- After its final subsidence, we proceed to cut off the remaining parts of the film, while leaving 45-50 cm for further decoration of the banks. We fix the edges of the film with pegs and small metal arcs. Later they will be hidden. ornamental plants and various stones and pebbles.
- Now we are installing the pump and starting to plant ornamental plants.

Pond above the ground in the country
From this article, each reader will be able to learn how to make a pond in the country with their own hands step by step. Besides, useful information In this article we will show an interesting video.
If there are small children in the family, then the most important task in the construction of a reservoir is to ensure children's safety. In this case, it is necessary to equip the pond slightly above the surface of the water. This method will not only facilitate its further operation, but also make the reservoir safe for children. It will be necessary to use a reinforced concrete foundation for this. Let's describe in detail how to build such a pond.
- To begin with, you should dig a pit in the very deep place pond, and then make terraces for future plants, as described above.
- Along the banks of the reservoir, with the help of formwork, it will be necessary to fill the foundation of the required height.
- After it has completely dried, the wooden formwork can be removed, and the inner parts of the resulting walls can be treated with plaster to make them smooth. Through the use this method you will avoid damaging the film.
- We cover the finished bottom of the pit with a film and begin to fill it with water.
- Fixing the edges of the film, we leave them behind the manufactured fence. After the pond is filled with water, we give it some time to settle.
- Then we begin to cut off the excess edges of the film, fix it, and create a decor for the edges of the pond.
 It should be noted that arranging a pond on your own is not an easy task. But if you approach this correctly, then the result can exceed all your expectations and please you for more than one year. In such a case, you must also try to maintain proper and regular care for your reservoir. Here are a few examples that you will probably need:
Equipment designed to clean up debris from the water in your pond. It can be, as a rule, all kinds of scissors, nets or devices for cleaning the bottom.
You will also need radio sockets in order to connect to the network of fountains installed in the reservoir, or a filter for water purification.
If you want to put fish in a pond, then you will definitely need devices such as water filtration units and various UV lamps.
You can not do without a pump designed to pump water from the pond. It also ensures its constant renewal, and in winter it drains the reservoir.
Rules for the care of a country pond
There is no dispute - a pond in the country is wonderful. But if you do not want to see a small swamp on your site with its inhabitants croaking, then it is necessary to properly care for your pond.
The first step is to regularly monitor the purity of the water in it. You can resort to an expensive purification method - for example, buy a purification system for ponds. But if this option is too expensive for you, then there is another, cheaper remedy: using ordinary peat. In order to clean the pond in this way, it is necessary to fill a canvas bag with it and lower it to the bottom of the pond. The water will not bloom, and the algae that have appeared will disappear.
Maintain overall cleanliness in the pond. Regularly remove various debris accumulated on the surface of the water from leaves, branches, etc.
If you are the owner of a small pond, then it should be drained to the bottom in winter. And if you have a reservoir of a sufficiently large size, then at least 3 times a year it is necessary to produce complete cleaning water, pumping it out completely.

Instead of a conclusion
From this publication, everyone can learn how to make a mini-pond in the country with their own hands. But, what can be done if the site you have is very small to accommodate the reservoir? Do not fall into despair. In this case, you can place a small pond in any front garden, using a metal barrel or a large basin for this. Such a reservoir can be easily equipped even on a balcony in own apartment and then produce beautiful decor containers with stones or mosaics.
How to make a greenhouse with your own hands from ... We equip the water supply of a private house from a well ...
small pond able to decorate and diversify any suburban area. And it will be even more pleasant if you build such a pond with your own hands. It may seem complicated, but if you have quality instruction there shouldn't be any problems.


Floating flock of ornamental fish the best decoration pond
Traditionally, work begins with preparatory activities.
Stage 1. Decide on the place and size
First, we determine the place in which the decorative pond will be located. To do this, we take into account the following points:
- there should not be trees near, because their roots can damage the bottom of the structure, and the leaves can clog the water;
- the place should be open, as well as illuminated by the sun for at least 6 hours a day (this will increase the intensity of algae reproduction without infringing on terrestrial plants);
- if possible, it is desirable to leave room for future expansion of the pond;
- the area of the reservoir should not exceed 3% of the total area.

In a word, than less area, the easier it is to construction works. In terms of depth, the reservoir is divided into three levels:
- for plants near the shore;
- shallow water for winter-hardy water lily;
- a deepening in which fish will winter (if we breed them).
Note! It is undesirable to make the reservoir too deep - it is quite enough to make a deepening of 1.6-1.8 meters (that is, below the freezing level of the soil). The area of deepening should not exceed one fifth of the entire pond.

Stage 2. Decide on the material
There are a lot of materials that can serve as the basis for a decorative pond, but the most popular of them are the options below.

Due to the fact that the construction of a decorative reservoir from a mold can hardly cause any difficulties, we will consider the second construction option in more detail.
Stage 3. We prepare consumables
The work will require:
- PVC film;
- ruberoid;
- stones are round;
- rope;
- stone slabs;
- shovel;
- sand;
- bricks;
- fine gravel.
Having prepared everything you need, proceed to the next step.

Stage 4. Dig the pit
Step 1. First, we create a sketch of the future reservoir on a scale, indicating the dimensions and width of the curtains (shelves for plants, that is, the upper step of the structure). This will help to avoid possible difficulties not only during construction, but also when planting.
We also think over the accent of the composition - a large original stone, for example, a sculpture or just a tree.
Step 2. With the help of a rope or sand, we outline the intended contour of the reservoir. Be sure to check that all the banks are at the same level, after which, using a shovel, we cut the turf along the perimeter of the pond.


Step 3. Now let's start excavation. First, we dig a pit to a depth of the first level (about 30-40 cm) and mark a line from which it will be buried to the second mark (90 cm). Next, we create the deepest level (up to 1.8 meters if we plan to breed fish), extract the last portion of the soil.
Note! It is recommended to regularly check the level of the banks during the digging of the pit. In the absence of a water level of the appropriate length, you can take a simple long board and attach a 50-centimeter device to it.
Step 4. To dig a reservoir, it is advisable to use the services of specialists in this kind of work, accompanied by a small excavator, because this work is quite difficult. But if it was decided to do this stage of work with your own hands, then you should be prepared for the fact that moisture will accumulate in the pit and you will have to dig in dirty slurry. A pump can be used to remove water (but only specially designed for pumping liquid with solid particles). Nearby, you can dig another hole to dump water into it.


Step 5. Carefully inspect the bottom of the finished pit for branches, sharp stones and anything that can damage the film. We check the horizontality of the banks, if necessary, align them.

Step 6. Along the perimeter of the pond, we dig a ditch 20 cm deep to fix the film. Then, using a rope, we measure the dimensions to determine required size films, add 0.5 m on each side.
When conducting earthworks you may encounter the problem of where to put the earth from the pit. An excellent solution to this problem is to raise the level of the site by evenly distributing the soil over the entire garden area. Another option is also possible - to use the land for the construction of an alpine slide.
Stage 5. We lay the film

Step 1. We cover the bottom of the pit with a 15-centimeter sand "cushion", carefully tamp it down.
Step 2. To protect the PVC film from damage, we lay a layer of roofing material (we overlap).
Step 3. We cover the bowl of the reservoir with a film. We do it freely, with a small margin along the banks. We press the ends of the film with bricks.

Note! To increase the elasticity of the film, it is advisable to carry out laying on a sunny day - under the influence of temperature, the film will stretch better and easily bend around all the protrusions of the pit.
Step 4. We fill the pond with water, but we are in no hurry to cut off the excess film. It is necessary to wait approximately 24 hours for the PVC coating to take its final volume. Then we cut the film, lay its edges in a pre-made trench, turn it up and fill it with rubble.


Note! Often the width of the film is not enough for the whole pond. In such cases, several pieces are interconnected by soldering.
Stage 6. We equip a decorative pond
Step 1. In order to prevent the earth from shedding into the bowl of the reservoir, we strengthen the edge. This can be done with:
- stone blocks;
- plastic pipes nailed to pegs.
We lay out the edge with natural stone (although brick, tile, and other materials can also be used), decorate with a group of boulders or one large block.
Step 2. We lay out the bottom of the reservoir with rubble or stones. Then we place the pre-prepared plants in plastic containers and arrange them in curtains. It is advisable to use plants that saturate with oxygen (such as hornwort, water lily, swamp, etc.). After that, the pond can be finally filled with water.
Note! For correct selection hydrochemical preparations and a pump, it is necessary to measure the volume of the reservoir. To do this, when changing the water, read the water meter readings before / after the filling procedure.
Step 3. We can make a small stream for the permanent circulation of water - this will prevent the latter from stagnation. To do this, we raise the source slightly above the level of the reservoir and set it to supply water from the bowl. We plan to decorate the mouth of the stream, for which you can use:
- stones;
- containers made of glass or clay;
- vegetable planting.
Step 4. Install at the bottom of the reservoir, stretch the pipes to the source and connect them to the cleaning filter. The latter must be pressure, that is, with the provided reverse cleaning, since it is much more efficient than usual.


All, ready! It remains only to regularly clean it from dirt, use special means, which revitalizes the water and prevents excessive growth of algae, as well as remove plants for the winter.
When building a pond, it is difficult to avoid some mistakes, especially the compositional plan. For this reason, you need to be aware of the common mistakes gardeners make.
| Plant growing zones | Plants |
|---|---|
| coastal zone | Conifers, elderberry, ferns, meadowsweet, lilies of the valley, bergenia, etc. |
| Coastline | Gubastik, fluffy, marigold, veronica handrail, highlander snake, forget-me-not, etc. |
| Plants for decorating shallow water (up to a depth of 5-20 cm.) | Calamus, reeds, umbrella susak, cattail, arrowhead, etc. |
| Deep water plants 30-150 cm | Water lily, jug |
| Plants for decorating the surface of the water (floating on the surface of the water) | Duckweed, water paint, telorez |


Finally, having planned the independent construction of a pond, first practice - make, for example, a miniature pond, and only then move on to larger compositions. This will greatly increase your chances of success.


Good luck with your work!
Video - Creating a pond in the country
The reservoir should start with a choice suitable place and determining the size of the future pond. The best place is at the lowest point, but at the same time make sure that it is well lit by the sun throughout the day. It is important that there are no widely developed crowns nearby. Otherwise, they will constantly fall into the water, and large roots can seriously disrupt the waterproofing of the reservoir.
The size of the pond depends on the scale of the entire site and the intentions of its owner. A pond with a diameter of about 3.5 m and a depth of about 100-120 cm is considered a classic. But if the site is small, you can make a pond about a meter in size and no more than 50 cm deep. It is important to remember that if you plan to breed some aquatic plants, the depth should be a little more - about 100 cm.
The next step in the construction of the pond will be the preparation of the pit. In fact, it is just a pit of a certain depth with a relatively flat bottom and walls. Almost any shape of the pit can be made. If it is subsequently intended to use a ready-made form for waterproofing, then the foundation pit should follow its lines. If there is no rigid form, you can give the future pond the contours of a circle, oval, figure eight, etc. The walls of the finished pit are cleaned of protruding roots and sharp stones, and the bottom is covered with a thick layer of sand, which is well compacted.
Creating a good waterproofing is a very important stage in the arrangement of the pond. If the choice is on a purchased rigid form, it is important to make sure that it is made of quality material. Cheap plastic will quickly crack and crumble under the influence of sunlight and temperature changes. Homemade waterproofing is usually made either from concrete, filling the bottom and walls of the pit with it, or from a film laid in several layers. For flexible waterproofing, you should choose PVC film or, if the budget allows, butyl rubber. Such material can last from 15 to 30 years. The bottom and walls of the pit are lined with a film, leaving small allowances for fixing at the edges.
The finished pond is decorated along the edges with natural materials: large cobblestones, plants, lined with turf. To replenish with fresh water, it is good to draw an artificial stream to the pond, the edges of which can also be overlaid natural stone. The bottom can be decorated with a variety of stones (necessarily with blunt edges) and aquatic plants planted in baskets or small permeable containers. Most matching colors are water lilies (nymphs), beautifully covering the surface of the water.
We also recommend
 Hero pioneers in the Great Patriotic War Heroes of the Patriotic War pioneers presentation
 Presentation "Formation of posture in preschool children Hygiene of correct posture presentation for children
 Sciences of the human body
 Presentation "history and prospects for the development of robotics"
 The value of the struggle of Russia with the Polovtsy
 Asia and Africa after World War II