Summer kitchen in the garden. Summer kitchen in the country and in a private house: types and options with photos
Easy option summer kitchen for giving is available for any budget and level of your skill.
If desired, the kitchen can be made completely closed, but then you can only use gas and electric ovens, and a barbecue and a wood-fired barbecue can be located next to the kitchen.

A simple summer kitchen with a barbecue and a barbecue with your own hands.
This version of the summer kitchen is used only for cooking on an open fire. It includes a barbecue, a work table and a sink under a canopy. The dining area and barbecue are located on the adjacent site.

To build a summer kitchen, the site was first leveled, a layer of gravel and sand was laid on it, and pillars under supporting pillars canopy.

At the next stage, we lay the tiles on the prepared site. In the area intended for the barbecue, there will be no tiles, it will be with sand, just decorate the edges of the site with curb tiles. Then we lay out a circular masonry under the brazier with refractory bricks.

We install the canopy: first, the supporting pillars, then we connect them with floor beams, the roof of the canopy has a slope away from the site. We sheathe the frame of the summer kitchen with wooden planks.

We cover the brazier decorative masonry from natural stone.

We install a slate roof, sheathe the inside of the summer kitchen with a magnesite slab designed for outdoor use. We install the desktop, sink and barbecue.

Such a summer kitchen can be made with your own hands in just a couple of days off.
Summer kitchen with bar.
The project of this summer kitchen included a canopy for the summer kitchen itself and a pergola for the dining area. The summer kitchen includes an oven, barbecue and, in the future, a pizza oven. 
Using the example of this kitchen, you can see that a do-it-yourself summer kitchen can be built in several stages. At the first stage, everything is being built, except for the pizza oven, which so far is only in the plans, but there is no ability to build it and no means to hire a master to build it. It was postponed until next year.

The order of work is standard - we level the site, concrete the pillars for the supports, lay a gravel-sand cushion on the site, pave the site.

Because Since the summer kitchen is located in a quiet corner of the garden, we decided not to close it on three sides, but to make only the back blank wall. A simple laying of their cinder blocks forms a work surface. The tabletop was made from a wooden beam.

The very process of building such a kitchen is not very laborious and any summer resident can afford such a summer kitchen project.
A simple summer kitchen near the house with your own hands.
Unlike summer residents, the owners of a private house have a serious plus - they do not need to go anywhere and the construction process can be more calm and measured. The construction of this kitchen began with the paving of this beautiful area in front of the house natural stone combined with cobblestone. When the site was ready, it was decided that it could also be used for a summer kitchen next to the house.

First, the pillars were concreted under the canopy supports and installed. All kitchen will be made from concrete slabs and support platforms were also concreted under them.

To make concrete countertop, made a formwork, covered it with a film, laid reinforcement. Places for the sink and barbecue were marked with containers of appropriate sizes. After the concrete had hardened, the formwork was removed and the edges were sanded.

We are erecting a desktop of our summer kitchen from concrete blocks, we are supplying water inlet to a place intended for a sink.

Our summer kitchen is almost ready with our own hands - a sink is installed, on the right side of the countertop there is a place for a barbecue, on the lower left side there is a place for a barbecue.

Additionally, a storage cabinet was built next to the summer kitchen.

Pillows from furniture that will stand in the dining area will be stored here.

We covered the roof of the summer kitchen with transparent polycarbonate, finished the decorative fence around the kitchen to give the building a more finished look.

A simple and beautiful do-it-yourself kitchen can really be done inexpensively and easily.

But how pleasant it is to enjoy dinner outdoors in the garden!

Do-it-yourself summer kitchen next to the gazebo.
A small shed next to the main gazebo can be turned into a small summer kitchen.

stylized wooden furniture from improvised materials will add a relaxed atmosphere of comfort to this corner of your garden.

If necessary, you can take a fairly large company here - you just need to put a large table.

So a simple canopy next to the gazebo can turn it into dining area for the summer kitchen.

Summer kitchen with oven.
If you know how and love to cook in the oven, it is not necessary to follow the general fashion for barbecues and barbecues. Complete an extension to your gazebo, make a stove in it - and you have a wonderful summer kitchen, not like others.

By the way, barbecue and barbecue may well find their place in your summer kitchen.

This option is great for areas with cold summers, where while standing near the stove it is warm, but when you sit down for dinner, you want comfort, not refreshing coolness.
You already have a gazebo - it can be used as a dining room on cool days. And for summer days you can simply install a table between the house and the gazebo.

For the barbeque itself, an ordinary canopy tied to a gazebo and a small work table next to it for cooking will be enough for you.

So, if you are creative about what you already have, then it is not necessary to build a new free-standing structure for a summer kitchen. By intelligently adding small elements, you will significantly increase the functionality of existing buildings.

A simple summer kitchen with your own hands can be built with a very modest budget, you just need to include your creativity and can be built quickly and inexpensively.

If you have approached this process wisely, then you can always expand, complete and improve your summer kitchen.

Do you agree that a simple summer kitchen with your own hands is within the power of each of us?
Well, in what place else can you so fully gain strength and improve your health so well, if not on your own, albeit sometimes modest, but undoubtedly beloved suburban area? special item the pride of summer residents is a summer kitchen, projects and photos of which can be found on various sites on this topic.
What could be better than organizing a barbecue or barbecue in the fresh air filled with the smell of herbs. Only Vacation home or a dacha gives you the opportunity to enjoy eating in nature. If you approach this task on a large scale, then a pretty country kitchen will surely grow on the site. In this case, the preparation of country delicacies will become a real pleasure.
Purpose and benefits
The summer kitchen in the country is a cooking area in the heat, when you don’t want to be in the house, and even fill it with the aromas of boiled or fried food. The summer kitchen in the photo is a kind of platform where there is a space for cooking and eating. Stove, dining table, chairs, benches, cabinets, shelving and everything that is in an ordinary kitchen. If at your dacha you want to achieve maximum comfort and fully enjoy your family vacation, it makes sense to think over the kitchen object in your summer cottage well and comprehensively and then start construction. 
Varieties
Summer kitchens are open and closed.
open
Lightweight canopy or solid roof they will save even from a heavy downpour, and replaceable bulkheads will save from the wind, roller blinds or sliding wall structures. If a summer kitchen is being built with your own hands, then the easiest way is to cover shed roof. When the owner of the cottage entrusts this work to professionals, then there is no limit to the imagination. 
To build a summer kitchen in the country with your own hands, you will need a stone for the foundation and wood for wall cladding. For the construction of the roof use:
- metal tile;
- slate;
- corrugated board;
- polycarbonate;
- bituminous tiles.
Advantages:
- Low construction costs.
- An uncomplicated construction method and the least number of calculations.
- Prepare lunch for clean air- pure pleasure.
- The very process of eating in nature can be a very pleasant experience.
- The open kitchen in the country house in the photo below is quite suitable for receiving guests.
- In the gazebo, crumbs that have fallen on the floor or spilled soup are not terrible.
Disadvantages:
- Unable to use the room in winter.
- No protection from winds and insects.
- Moisture gets in from the outside.
Closed
For those whose summer season is not limited to the warm season, you need to take care of a more solid structure, in which it will be comfortable for any weather conditions. Summer kitchens in the country closed type, photos of which you will see below, can become a multifunctional object. It is sometimes not a sin to place guests in them for the night, if necessary. Concerning building materials, then everything is subject to the budget of the owners and the service life of the kitchen house. Of the materials, drywall, lining or plywood can be useful, and if the construction is planned on long years, then it is better to use foam blocks, brick or stone. 
Advantages:
- Reliable shelter from rain and wind.
- Temporary accommodation for guests.
- Absolute safety of things and products.
Disadvantages:
- A closed outdoor kitchen in the country will cost more, as more material will be needed for construction.
- A summer kitchen project of this type will require additional calculations.
Choice places
Outdoor kitchen can take up space on the site, both large and small. Therefore, a place for it must be selected immediately along with the preparation of a construction plan. 
If you are thinking about how to make a summer kitchen, here is what you should focus on when designing:
- Consider the remoteness of the object relative to the house, garden, utility yard.
- It is allowed to build a kitchen in the shade of trees, but so that the garden kitchen is warmed by the sun for at least a few hours.
- It is necessary to explore the terrain where you intend to build, the level ground water in the country, vegetation, distance from neighbors and others landscape features.
- The proximity of communications should be taken into account, because it will be necessary to carry out water and lighting. Therefore, it is best if the summer kitchen in the country is not far from home.
- You can not choose a place for a veranda in a lowland - the floors here will be saturated with moisture.
Material selection
Organically fit into the design of the kitchen in the country natural materials- stone, wood. Lightweight and durable materials are also supplied to the markets, which have won the approval of consumers for their durability and practicality - PVC, aluminum, polycarbonate, polystyrene foam, etc. 
Stone
The floor and walls can be faced with stone - marble, slate, granite, limestone. A stone-covered (or stone-styled) authentic or decorative fireplace. A tile is well suited, which perfectly withstands not only bad weather, but also the usual pollution for this room, rubbish. We offer you to see what a brick summer kitchen looks like, the photo of which is below. 
Wood
Wood is much more economical than stone. It is easier to process wood, and the buildings made of it look lightweight, beautiful, and have a pleasant smell. However, without specific treatment, it is subject to deterioration, deterioration, infection with a fungus. 
Other materials
It can be lining, plywood, drywall. Parquet, laminate, linoleum are used for flooring. Interior decoration summer kitchen is a tile, wallpaper different types. Siding can be used for exterior finishes; corrugated board and metal tile - for roofing. 
Design Choice
The main rule is that the design of the summer kitchen must harmoniously fit into the concept of the entire site. In the design of a stone veranda, details made of wood or compositions with others are applicable and even necessary. natural materials.
Often, verandas in the country look like fabulous houses or gazebos. It is very easy to organize such a summer kitchen design: you just need to hang lanterns, carve and decorate climbing plants.
Filling and furniture
Country furniture now it is easy to buy in every furniture store. It is possible to purchase ready-made sets or order the interior of the kitchen professional designer. The furniture and the entire design of the summer kitchen in the country, the photos of which can be seen in the article, look extremely beautiful, your eyes run wide from ideas and projects, but you need to equip your own kitchen. 
When thinking about furniture, it is useful to come up with an image of your kitchen: capital or simple portable. In the first case, all furniture items are fixed on right points and are not subject to movement around the perimeter. This version may be relevant for a completely open floor plan. 
The countertop should have such dimensions that it can comfortably accommodate the necessary appliances and food during cooking - this is at least 90x60 cm. Add ergonomics and a cabinet under the countertop. It is good to arrange pots, plates, pans and necessary cutlery in it.
Decor
Wood decor looks great on the veranda, but it must be treated with high-quality varnish that can protect the tree from rain and sun if the room is open. Summer kitchen in the country - projects, photos of which can be found in abundance on the Internet, will surprise you with a variety of decor and content. 
Do not forget about accessories in the interior. On hinged shelves, you can beautifully arrange decorative dishes, vases with bouquets of summer flowers, various containers with the necessary spices.
Popular Ideas
Let's move on to the main thing - the kitchen in the country: ideas and tips for their implementation.
Alcove
Arbors are convenient for barbecue, barbecue or oven. 
Frame racks are made of timber, brick, stone in the corners, and the whole structure is fixed with a roof made of simple roofing material (ondulin, bitumen sheets).
The gaps between the racks leave or sheathe one of the walls in order to hang shelves or kitchen cabinets. 
Openings can be decorated with curtains, openwork wood paneling, which will be able to braid subsequently weaving plants. To make the room comfortable in any weather, you need to put sliding removable fences or roller blinds.
small house
Country kitchen in the form of a house looks like a real home. But much more work will be required for its construction, whether it is laying the base (preferably monolithic) or installing windows and doors. 
Most functional gable roof. Powerful showers and snow caps will not be a problem with such a roof. A good cellar does not hurt at all, in this case the construction must begin with digging a pit. It is in the house that the summer kitchen with a veranda as a dining area will look beautiful.
Veranda
If you decide to equip a summer kitchen on the veranda, then remember that it should be in good harmony with the whole house. Construction begins with a foundation, the depth of which should be commensurate with the depth of the foundation of the house. 
It is better if the country house and the veranda have one thing in common roofing. To make the room bright, put large swing windows or glaze the entire wall.
Annex
The summer kitchen project with a terrace is shown in our article. Support beams are placed along the walls of the house, covered with a roof under a roll. On a well-leveled area where water does not accumulate, the floor can be arranged simply on the ground. Excellent material for him will be paving slabs. 
Summer kitchen in the country - projects, the photo of which is also presented in the article, will help determine the final look of the future building. When developing a construction plan, you need to take care of the paths that will connect it to the main house. Sandstone, pebbles will do for them, decorative tiles or stone. As a rule, the tracks are made the same as flooring gazebos.
Photo gallery
We suggest you look at 29 more photos of ways to design a summer kitchen.


Do you want to build a summer kitchen in your summer cottage, but don't know what to look for when choosing a project? Let's look at several options and analyze their pros and cons so that your country house has a place for cooking and relaxing in summer period.

What to look for when choosing a project
Even before you start considering specific design options, you should decide on several aspects:
- Amount of costs. Miscellaneous projects require different investments of money and time. Decide in advance how much you are willing to spend, so that later the unfinished structure does not stand for years and does not collapse. It is better to find a simpler option, and then upgrade it, than to stop construction halfway through;

- Required dimensions. It is important to decide which space will be optimal. For big company you need a lot of space, for a small family, extra space is useless. Of course, there should always be a small margin, but when choosing parameters, first of all, be guided by objective indicators and common sense;

- Purposes of use. If you cook and relax only in the summer, then open version. If you need to use the building in a cool season, then it is better to choose a closed type structure and provide for a fireplace in it for quick heating of the room;

- Place of construction. You must decide in advance whether the structure will be freestanding or easier to attach it to an existing building - country house or bath. Decide how much free space there is on the site, whether there are any obstacles in the form of trees, paths or communications.

There are also additional aspects which are best foreseen in advance:
- The presence of a roof. You can make a completely open structure, this will reduce the cost and simplify the process, but you can use the summer kitchen only in the absence of precipitation;

- Presence of walls. If in closed design there are doors and windows, then in the summer kitchen open type there may be no walls at all, but it is better to make partitions from 2-3 sides. They will be a good protection against wind and precipitation;

- Comfort elements. Decide in advance on electricity, plumbing, sewerage - how they will be supplied and what costs you will incur. Someone needs a kitchen with a barbecue, someone with a barbecue, and someone will be limited only to a stove - it all depends on your wishes and preferences.
Overview of some projects
Now we will analyze four types of structures and consider their pros and cons. Typical ideas are presented as examples, you can use them, or you can make your own unique project in accordance with all the recommendations.
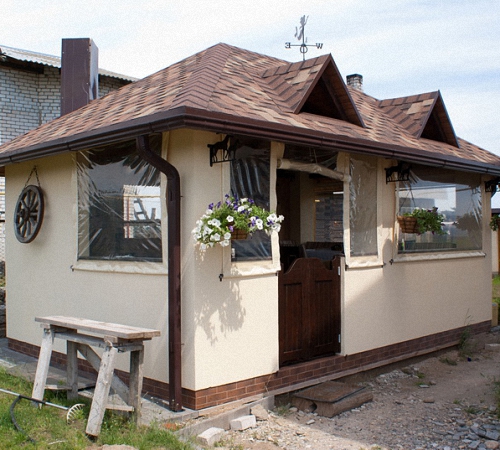
Option 1 - summer kitchen on the veranda
Summer kitchen in a private house, located on a spacious terrace or veranda - perfect solution, which is implemented simultaneously with the construction of the main building. The same option is ideal for baths or saunas: choose the appropriate project and solve two problems at once.
As an example, I will show the project of an open kitchen combined with a bath.

The advantages of this option are obvious:
| Illustration | Description |
 |
Ease of construction. You do not need to think about building a separate summer kitchen with your own hands, you arrange it at the same time as the main building and this way you solve two issues in one go. |
 |
economy. When arranging an open kitchen at the same time as a bathhouse or a house, the costs of laying communications, building a foundation and a roof are greatly reduced. Therefore, you can save a lot of money. |
 |
Convenience. From the house or bath you immediately find yourself in a recreation area, you do not need to walk down the street or go around the building. The design of the space should fit the interior, so the stylistic unity of all parts of the structure is preserved. |
Option 2 - summer kitchen attached to the house
If the house or bath has already been built, then the summer kitchen can be attached to one of the walls. The simplest solution is an ordinary canopy, under which you can place everything you need, the photo shows just such an option. Dimensions are selected individually depending on the parameters of the main structure.

These options have several advantages:
| Illustration | Description |
 |
Reliability. The foundation of the extension is connected to the base of the building and provides structural strength. The size of the base depends on the weight of the future structure.
|
 |
economy. A street extension can be a canopy on metal supports. The cost of building such a structure is minimal. Of course, if desired, you can build partitions and other elements. |
 |
Convenience. If you can get out of the house directly under the shed, then you won't have to walk in the rain. It is also important that it is much easier to bring communications to the extension. |
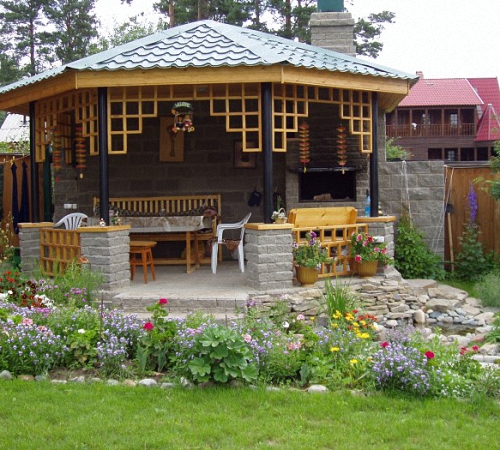
Option 3 - freestanding open structures
Country summer kitchens are often made separate, as they are placed in the very beautiful place area to enjoy good view and silence. As an example, I will show enough complex project, but you can choose something simpler - it all depends on your preferences.

The device of a summer kitchen in a separate building has several advantages:
- Ample opportunities when choosing a project. You are limited only by free space, the shape, configuration and size can be anything. This allows you to implement a variety of ideas, while in extensions you are tied to the main structure;

- Lots of design options. An open summer kitchen of this type can be built from any materials - use what is at hand. The beam can be connected with metal corners - this is a simple version of the construction of the simplest structure in a matter of days;

- The possibility of building a mobile structure. You can make a quick-release system that can be assembled for the winter.
Option 4 - closed summer kitchen
The main advantage of a closed summer kitchen is the possibility of year-round use. As an example, I will present a simple project, you can make the design larger or smaller.

The main disadvantage is the complexity of the construction, but the pluses compensate for all the costs and difficulties:
- The convenience of use. Even normal version summer kitchen allows you to use it in spring and autumn period. And if you insulate the walls and install energy-saving windows, you can comfortably stay in winter;

- Reliability. Capital buildings serve much longer, as they are protected from negative external influences;
- Functionality. In a closed summer kitchen, you can put almost any equipment for cooking, which will come in handy for cooking lovers.
Decide in advance what equipment will be used, the choice of the summer kitchen project depends on this.
![]()
Output
You have learned about the most common options for summer kitchens and, using the tips from the review, you can easily select the best project for your site. The video in this article will reveal the topic even better, and if you have questions, ask in the comments below.
Cooking in the summer is quite difficult, as the temperature in the kitchen is several degrees higher than in the room. Owners of a private house or cottage can easily solve this problem by arranging summer kitchens. Cooking and preserving outdoors is convenient and easy. We will talk about the features of the construction of a summer kitchen in the country house further.
Do-it-yourself summer kitchen in the country: functional features and types
The summer kitchen is, first of all, a place for cooking, and not only in summer, but also in spring and autumn. Such premises are especially relevant in small summer cottages. The summer kitchen is a platform with a stove, stove, cabinets and furniture installed on it. Fresh air improves the comfort of using the cooking surfaces.

A summer kitchen is not a mandatory building, but in cramped country conditions it is necessary. In relation to the materials for the construction of the building, we distinguish several varieties of summer kitchens:
1. Structures made of wood - glued beams, logs or boards. Among the advantages we note: environmental safety, attractive appearance, ease of processing, affordable cost. However, wood, before installation, is necessarily treated with antiseptic compounds.
2. Simple metal frame structures. They are easy to assemble and dismantle, easy to transport from place to place.
3. Budget options summer kitchens with a combination of various materials. For the construction of such a kitchen, everything that is at hand is used, it can be boards and metal and plastic bottles even.
4. Summer kitchens made of bricks - they have a chic appearance, excellent refractory characteristics. Among the advantages we note - high structural strength, good protective characteristics, long service life. On the other hand, the construction of a brick summer kitchen will take a lot of time, physical and material effort.
Depending on the design features, summer kitchens are divided into rooms:
- open type;
- closed type.
The first option has the form of a platform on which all the necessary appliances and furniture are located. Sometimes such structures are supplemented with a roof to protect against moisture during rain.
The closed summer kitchen has walls and resembles a full-fledged, but most often separate cooking room.

Summer kitchen in the country: choosing a place for construction
The area for the summer kitchen can have a wide variety of shapes in the form of an oval, circle, rectangle, square or polygon. Therefore, before drafting a summer kitchen, decide on its location.
Pay attention to these characteristics:
- remoteness from the entrance of the house, garden, other buildings;
- the presence of sunlight on the site, it is possible to build a kitchen in the garden, but try to choose a place where at least half of the kitchen is heated by sunlight;
- choose a site with limited wind load, otherwise, when strong wind, garbage will get into the food.
In addition, study the terrain, determine the level of groundwater, the presence of vegetation, distance from neighbors and other individual factors.
Choose a place convenient for supplying communication systems. After all, the kitchen should have electricity, water. It is not recommended to build a kitchen next to a toilet, household yard or compost pit.
Do-it-yourself summer kitchen in the country photo:

The following is the process of making a summer kitchen project. It indicates the size, shape of the building, the type of materials from which the building will be built, the foundation, the material for finishing the roof, etc. According to the project, the amount of materials for work is calculated and their purchase is made. In addition, make sure that the design of the kitchen fits in with general style decoration of the house and the exterior in general. Summer kitchen should be in harmony with environment. We recommend building it from the same materials as the main house.
Although it is possible to build slab foundation over the entire surface of the building. This option requires large material investments, but has better performance characteristics.
If there is soil on the site with high level heaving, we recommend stopping at screw foundation. For its construction, it is enough to purchase special piles, and the workflow takes no more than one day.

Summer kitchen construction technology in the country
We offer a variant of the construction of a summer kitchen with brick base And wooden frame. Work should begin with the foundation, since the upper part of the kitchen will be wooden and the building does not have an impressive weight, a shallow strip foundation is enough.
Pre-prepare the site for work, remove all debris and vegetation, level the surface. Next, using pegs and a rope, mark the installation of support structures.
Build a pit, the depth of which is determined by the weight of the summer kitchen and the type of soil on the site. Most often, a tape shallow foundation is laid at a depth of about 20-40 cm.
After digging a trench, lay a pillow at the bottom of the pit, first from sand, and then from crushed stone. Do not forget about waterproofing in the form of roofing material. This is followed by the process of mounting the formwork and installing reinforcement, if necessary.
Then prepare the concrete solution High Quality and pour it into the trench previously equipped with formwork. Do not forget about compacting concrete with a special vibrator or improvised means. Thus, the quality of the solution improves and there will be no air pores inside the foundation. The drying time of the foundation is at least 14 days, only after their expiration, work continues on the summer kitchen. We recommend covering the foundation with a film to prevent moisture from entering during rain.
If time is limited, choose pile version foundation. There are special bored piles, the installation of which is carried out quickly enough. Initially, calculations are performed to determine the length of the piles and their diameter, and then the structures are mounted in the ground. For these purposes, specialized equipment or tools are not required. Two people are enough. Such a foundation does not need to be defended, compared to concrete, and work on the construction of a summer kitchen continues immediately after its construction.
The following is the process of creating a site in the summer kitchen. It will be equipped with a stove, furniture and other kitchen utensils. The main requirements for the site are its evenness, strength and construction on a small hill.
Choose refractory materials for site construction - concrete, paving or ceramic tiles. After the foundation has completely dried, equip the pit with a depth of about twenty centimeters. Pour sand into the pit, tamping it well and wetting it with water. Try to achieve maximum pressing of the sand.
If you chose paving slabs to create an even base, then lay it directly on a pillow of sand. Please note that the tile should rise at least 5 cm above the ground. From this, and push off, constructing a sand cushion. Mounting option available decorative stone on the site, in this case, we recommend using cement mortar.
Summer kitchen in the country photo:
The next stage is the construction of a high-quality blind area. This element protect the foundation and the summer ground from moisture. Arrange a drainage system near the blind area. In addition, the blind area increases the decorativeness of the structure, framing it.
The next step is the laying of the walls. Beacons are pre-installed to obtain an even structure. Prepare a cement mortar, preferably using a concrete mixer. This device increases the quality of the resulting solution and reduces the time spent on its preparation. Perform laying in half a brick, with mandatory reinforcement. This is followed by the process of stitching and wiping the material. Wait a few days for the cement mortar to set.
The following is the process of mounting the frame part, made of wood. Please note that before starting work, the wood is treated with special antiseptic and fireproof compounds. Top part summer kitchen consists of vertical pillars, along the perimeter of which a bar or beams is fixed. Make high-quality dressing of structures, it will improve the strength of the walls. Monitor the evenness of the installation of the bars, using the building level.
Build a summer kitchen in the country house photo:

After that, proceed to the construction of the roof in the summer kitchen. There are many options for constructing a roof - corrugated board, tiles, slate, soft tiles, etc. When choosing one or another option, start from the total weight of the building and the load on the foundation. In addition, we recommend choosing the same roofing material just like the main building.
Before the beginning installation work, install a crate or solid flooring, provide for a slope along which moisture will drain from the roof. For maximum protection of the summer kitchen from moisture, install a gutter system.
After finishing the roof, take care of interior design premises, namely:
- grout the seams between the tiles;
- check the quality of the brickwork;
- make the ceiling in the form of filing the roof;
- paint or varnish wooden sections building.

For cooking, build an oven or install cooker. It is possible to supplement the summer kitchen with a barbecue or barbecue. Set the table, chairs, soft chairs for relax. To complement the interior will help shelves with racks for dishes and kitchen utensils. Run electricity, install a sink for washing dishes.
Textile elements, beautiful towels, napkins, tablecloths, fresh flowers in flowerpots, various decorative elements will help to complement the design of the summer kitchen in the country.
Do-it-yourself wooden summer kitchens for summer cottages
We offer the option of making a summer kitchen from wood. In the process of work, prepare the tools in the form of:
- high-strength woodworking machine;
- chain saw for working with timber;
- electric jigsaw with high power;
- screwdriver;
- electric drills with a set of nozzles;
- belt type grinder;
- planer, circular saw;
- hacksaws;
- brushes.

The dimensions of the proposed kitchen are 300 by 400 cm. The main part of the building is made of timber. Each of their elements is pre-processed, planed and planed. After processing all parts, soak them with used oil. This process prevents the wood from rotting and protects the material from moisture. Handle the end sections especially carefully, as these parts are subject to the highest operational load. Choose light-colored oils so as not to spoil the appearance of the wood.
Such a structure does not need an expensive foundation, an ordinary one is enough. concrete block, 15 cm deep into the ground. Pour sand around the blocks and compact it well. To connect the ends of the beam, select the most easy way half a tree. Fix the parts with nails. Strengthen additionally internal joints metal corners and long screws. This method significantly increases the durability and strength of the structure.
Next, lay the floor, for this, use a standard board, the thickness of which is at least 35 mm. For the manufacture of the frame part, also use a bar. We recommend stopping at the gable version of the roof, for the manufacture of which wood is also used. The next step is to install the crate. Lay on the roof first waterproofing material with a slight overhang. Set the exterior trim to suit your individual preferences. For wall cladding, also use wooden planks. Pre-treat the wood with an antiseptic in several layers.

A summer kitchen in a country house with a barbecue requires additional processing with fireproof compounds. Since wood is a highly flammable material.
A summer kitchen with a veranda in the country house is an excellent solution not only for outdoor cooking, but also for receiving guests.
We will send the material to you by e-mail
IN it is inconvenient to cook in the house on a hot day: it is hot and stuffy. But it is at this time that the hostess spends more time at the stove, because in addition to the usual cooking, she is also waiting for the seaming of home canned food. Light construction, a summer kitchen in the country will help to facilitate the task and turn duty into pleasure. Projects, photos and various design ideas for this cozy corner help home master turn your dream into reality.
For a seasonal structure, a canopy is enough and concreted area
It is not difficult to build a temporary dining room on your own, the main thing is to reasonably approach its location on the site and the choice of building materials.
We are preparing a project
The first step is to study the site plan and determine the location for the optimal location of the building. This site must meet the following requirements:
- be close to the main house so that you can bring dishes and food;
- have convenient access routes so that there is no obstacle to moving from home to building;
- it is desirable to provide for the proximity of the site to the main communications: water, sewerage and electricity.

Useful information! The ideal option would be to have a natural or artificial reservoir near the construction.

Having decided on the construction site, you need to measure its area. The size of the temporary structure is a separate issue. If it will additionally carry the function of a dining room, you will have to provide extra bed to set up a table and place chairs or benches. The presence of a stove or barbecue in the dining room also dictates the need to add square meters to separate the hot shop from the dining group.
Even with a complete lack of artistic skills, it is easy to draw a plan for the future kitchen using a ruler and checkered paper. On a scale, you need to depict all the main items that will be located in the building: a sink, work surfaces, a stove or oven, a table. If the hostess has assistants, it is better to make the room elongated so that it is convenient for several cooks to work at once.

Placement at the dining table should be comfortable, chairs need enough space to move back.
Useful advice! If the area of \u200b\u200bthe site does not allow you to place a temporary kitchen with a dining room, you can abandon this idea and move the dining group to or into the gazebo.
Open or closed summer kitchen in the country? Projects, photos, advantages and disadvantages
A light building can be with or without walls, have a roof or be located under open sky- it all depends on the wishes and imagination of the owner.

Important! It is better to refuse the option of open-air cuisine in the conditions of Russian latitudes. Hot sun, rain and hail can bring unpleasant surprises.
The walls of the country dining room, in principle, are not needed. Its main task is to enable outdoor cooking, so a canopy and supports are enough. Another thing is if the building will be used in the autumn-winter period. In this case, walls and glazing will have to be provided to protect against bad weather and cold. Advantages open building:
- access to fresh air;
- ease of movement;
- the possibility of cooking not only on a stationary, but also on a portable grill;
- low construction costs.

There are also disadvantages:
- inconvenience of cooking and eating in windy weather and cool time of day;
- availability of a place to store dishes and products for domestic and wild animals.
closed building
Pros:
- the ability to use the kitchen in any weather;
- in a closed area it is possible to place equipment that is sensitive to atmospheric moisture.
Minuses:

Open summer kitchen in the country: projects, photos, materials
The open dining option can be temporary or permanent. The temporary building is more mobile, it can be put up every year in a new place and cleaned for the winter in. All equipment will also have to be dismantled each time and look for a place to store it.

Closed and open summer kitchens in the country: projects, photos - all these materials give a reason to roll up your sleeves. In such a building, a Russian stove, barbecue or cauldron can be freely accommodated.

Building materials for such a project, you can choose a variety of:


- forged openwork elements are expensive, but will please the eye for a long time.

Examples of closed structures
Glass and wood are the most popular materials for building closed summer kitchens in the country. Projects, photos of similar buildings created by professionals and amateurs are available to everyone. Brick in combination with which can be opened wide is a practical and durable solution. Such a structure will reliably protect from bad weather. It can be operated all year round.

For your information! You can fully appreciate the advantages of a closed summer cottage with a barbecue or stove in new year holidays. A fabulous view of a snow-covered garden and a fire in the barbecue - what could be better for a Christmas evening?

Related article:
Over the past decade, log buildings have been breaking demand records. The summer dining room in the Slavic style, with a stove and matching furniture, will be a favorite place for parties with close friends.

The list of building materials for such projects is very wide: OSB boards, lining, stone. Photos and projects closed kitchens in the country they demonstrate the imagination of home craftsmen. They suggest using improvised, waste material - glass containers, plastic bottles and even firewood.

Video: photo ideas for summer kitchens
Do-it-yourself phased construction of a summer kitchen in the country house
- Drawing preparation. You can do it yourself or take it ready.

- Site preparation. The site is cleared of debris and vegetation, markings are made.

- Foundation arrangement. The base for the summer building must comply with the project. For an open structure, it is enough to fill it with sand, reinforce metal mesh and fill the site with concrete with a layer of 10 centimeters. Before pouring the base, canopy racks are installed. A closed dining room made of brick or stone requires a bookmark. Under the construction of a bar or log is installed.

- Frame installation. For an open dining room or you will need to install vertical supports. Their location depends on the project. The main thing is that the pillars are sufficiently reliable and can withstand the weight of the roof and the wind load.

- Wall construction. In variants of closed dining rooms, the walls are laid out from different material. Having no experience, it is better not to take on yourself. Laying timber and logs requires less building skills, but also has its own characteristics. If the seasonal structure is purchased as ready product from the manufacturer, you can try to assemble it yourself. Frame walls mastered even by a novice master.


- For a stationary stove, a solid foundation is required. The masonry is made of refractory bricks. To avoid accidental ignition, the space around the barbecue is laid out ceramic tiles. for the furnace it is better to order from the master. He will tell you what height the pipe needs to be installed for good traction.
Photo projects of a summer kitchen in the country with a barbecue grill:


- Arrangement of the workspace. In order for the summer building to be comfortable, it should have everything, as in real cuisine. It will take convenient washing and a work surface for food processing, drawers for storing utensils.

- Accessories and space design. Each kitchen is a visiting card of the hostess. For a summer building, any fantasies and experiments are acceptable.
In order for the seasonal building to become a favorite pastime place not only for the hostess, but for all household members, it is important to adhere to the following recommendations:
What type of summer kitchen building to choose?
Do-it-yourself kitchen in the country, photo examples of which could be seen in this review - a reason for inspiration. It is not difficult to choose for yourself any format. A closed or open design with a barbecue or a cauldron will be both a place for cooking and a favorite corner of the garden for friends and relatives. You can build a dining room yourself or invite professional craftsmen. In the first case, you can save a lot, in the second - to achieve a guaranteed result.
Video: summer kitchen in the form of a gazebo with barbecue and barbecue

Save Time: Featured Articles Every Week by Mail


