Toilet hut detailed drawing with dimensions. Do-it-yourself toilet in the country house drawings sizes of towers
To connect plumbing fixtures to the water supply network, a flexible water supply is used. It is in demand when connecting faucets, showers, toilets and other points of water intake, and greatly simplifies the installation process. Flexible piping is also used when installing gas equipment. It differs from similar devices for water in manufacturing technology and special safety requirements.
Characteristics and types
Flexible hose for plumbing is a hose of different lengths, made of non-toxic synthetic rubber. Due to the elasticity and softness of the material, it easily takes the desired position and allows installation in hard-to-reach places. To protect the flexible hose, the upper reinforcing layer is designed in the form of a braid, which is made of the following materials:
- aluminum. Such models withstand no more than +80 ° C and retain functionality for 3 years. In high humidity, aluminum braid is prone to rust.
- Of stainless steel. Thanks to this reinforcing layer, the service life of the flexible water supply is at least 10 years, and the maximum temperature of the transported medium is +95 °C.
- Nylon. Such a braid is used for the manufacture of reinforced models that can withstand temperatures up to +110 ° C and are designed for intensive use for 15 years.
Nut-nut and nut-nipple pairs are used as fasteners, which are made of brass or stainless steel. Devices with different indicators of permissible temperature differ in the color of the braid. Blue ones are used to connect to a pipeline with cold water, and red ones - to hot water.
When choosing a water supply, you need to pay attention to its elasticity, reliability of fasteners and purpose. It is also mandatory to have a certificate that excludes the release of toxic components by rubber during operation.
Features of gas connections
When connecting gas stoves, columns and other types of equipment, flexible connections are also used. Unlike models for water, they are yellow and are not tested for environmental safety. For fixing, end steel or aluminum fittings are used. There are the following types of devices for connecting gas appliances:
- PVC hoses reinforced with polyester thread;
- synthetic rubber with stainless steel braid;
- bellows, made in the form of a corrugated stainless steel tube.

Holding "Santekhkomplekt" offers engineering equipment, fittings, plumbing and accessories for its connection to communications. The assortment is represented by products and materials of well-known foreign and domestic manufacturers. Discounts apply for bulk purchases, and product quality is confirmed by standard certificates. For information support and assistance, a personal manager is assigned to each client. The ability to arrange delivery within Moscow and to other regions of the Russian Federation allows you to quickly receive the purchased goods without any hassle.
Drainage is a hydro-reclamation measure to remove excess groundwater.
If water does not leave the territory of the site for a long time, soil gleying occurs, if shrubs and trees quickly disappear (wet), it is urgent to take measures and drain the site.

Reasons for waterlogging the soil
There are several reasons for waterlogged soils:
- clay heavy soil structure with poor water permeability;
- an aquiclude in the form of gray-green and red-brown clays is located close to the surface;
- high occurrence of groundwater;
- technogenic factors (construction of roads, pipelines, various facilities) that impede natural drainage;
- violation of the water balance by the construction of irrigation systems;
- the landscape area is located in a lowland, a beam, a hollow. In this case, precipitation and water inflow from higher places play an important role.
What causes excess moisture in the soil
You can see the results of this phenomenon yourself - trees and shrubs are dying. Why is this happening?
- the oxygen content in the soil decreases and the content of carbon dioxide increases, which leads to a violation of the processes of air exchange, water regime and nutrition in the soil;
- oxygen starvation of the root-forming layer occurs, which leads to the death of plant roots;
- the intake of macro and microelements by plants (nitrogen, phosphorus, potassium, etc.) is disrupted, because excess water washes out mobile forms of elements from the soil, and they become inaccessible for assimilation;
- there is an intensive breakdown of proteins and, accordingly, the processes of decay are activated.
Plants can tell at what level groundwater occurs
Take a close look at the flora in your area. The species inhabiting it will tell you at what depth the groundwater layers are located:
- top water - in this place it is best to dig a reservoir;
- at a depth of up to 0.5 m - grow marigold, horsetail, varieties of sedge - blister, holly, fox, Langsdorf reed grass;
- at a depth of 0.5 m to 1 m - meadowsweet, canary grass,;
- from 1 m to 1.5 m - favorable conditions for meadow fescue, bluegrass, mouse pea, rank;
- from 1.5 m - wheatgrass, clover, wormwood, plantain.
What is important to know when planning site drainage
Each group of plants has its own moisture needs:
- with a groundwater depth of 0.5 to 1 m, vegetables and annual flowers can grow on high beds;
- the depth of the water reservoir up to 1.5 m is well tolerated by vegetable crops, cereals, annuals and perennials (flowers), ornamental and fruit and berry shrubs, trees on a dwarf rootstock;
- if groundwater at a depth of more than 2 m, you can grow fruit trees;
- the optimal depth of groundwater for agriculture is from 3.5 m.
Do you need site drainage?
Record your observations at least for a while. You yourself will be able to understand how much drainage is needed.
Maybe it makes sense to simply redirect melt and sediment water along a bypass channel, and not let it flow through your site?
Perhaps it is necessary to design and equip a storm drain and improve the composition of the soil, and will this be enough?
Or is it worth making a drainage system only for fruit and ornamental trees?
The exact answer will be given to you by a specialist, whom we strongly recommend calling. But after reading this article, you will gain some awareness in this matter.
At the end of the technological and production tasks associated with the arrangement of the sewer system in an apartment building, an industrial building, as well as in a private household, it is required to test the system involved using the forced spill method. This task was applied to identify possible defects or improper installation of the entire sewer part involved and the act of testing the internal sewerage and drain systems will be material evidence of the work on the acceptance of the object.

A visual check should be accompanied by entering into the test report of internal sewerage and drain systems according to SNIP, which is currently represented by the current regulations of the appendix of the D series, which corresponds to SP 73.13330.2012 "Internal sanitary systems of the building", recently a new one has been applied updated working version according to SNiP 3.05.01-85.
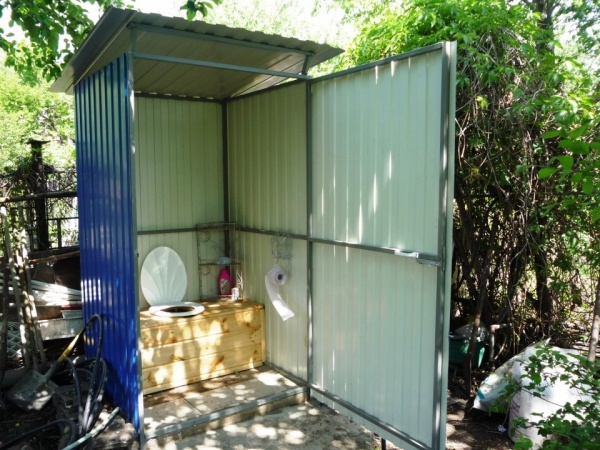
Not every country house is equipped with a modern bathroom that is connected to a septic tank. Most often, a toilet with a cesspool is located in the corner of the site, away from the house and the well. However, even in this case, it can be made comfortable and pretty, perfectly fitting into the overall design of the site.
The project of a standard country toilet
Project Features
The toilet project in the country is a cesspool, over which a small wooden house is installed. True, in recent years, instead of a cesspool, summer residents are increasingly using dry closets.
Peat toilets, in particular, are excellent alternatives to pit latrines, which convert waste into fertilizer. Their price varies between 50-500 US dollars.

However, in any case, it is necessary to build a booth. Most often it is made of a rectangular shape, made of wood. For its frame, an edged board is used, for example, 100x50 mm, a toilet is installed on a base of 150x150 mm timber.
Advice!
In regions with a cold climate, the toilet cubicle can be insulated with foam plastic 50-150 mm thick.
The roof is easiest to make a shed, with a slope back. To cover it, any roofing material is suitable, for example, slate, corrugated board or soft tiles.

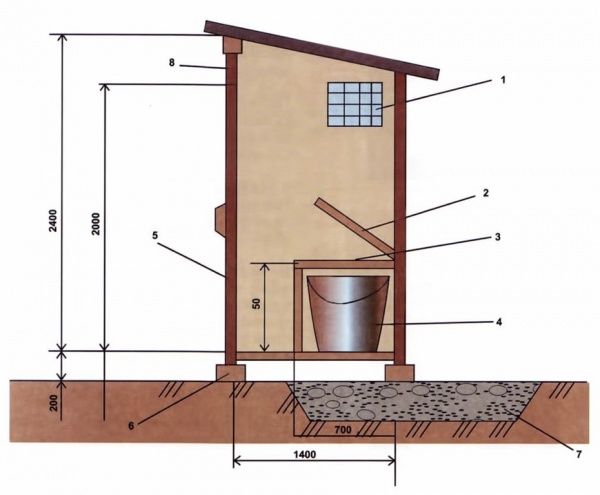
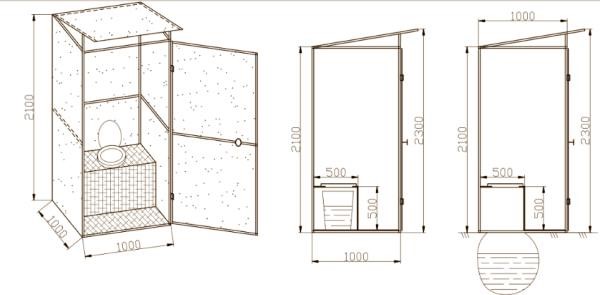
The height of the toilet, as a rule, is two meters and above, the width is not less than 120 cm. The exact dimensions contain the drawings of the country toilet.
The end wall of the booth has a rectangular shape. Its assembly is carried out from the same board on self-tapping screws or nails, in accordance with the drawing. Since the roof has a slope, the side walls are made in the form of a trapezoid.
In one of the walls, it is necessary to make a window that will provide natural light to the room and ventilation. The facade wall contains a doorway. The walls of the toilets are assembled separately and then fastened to the base.

The runners from the timber are connected with studs or nails. To increase the rigidity of the structure, grooves 150 mm wide and 50 mm deep must be made in the lower skids.
Note!
Before laying the bars, they must be treated with an antiseptic.
This procedure will protect the base from decay.
The lower overlap is made of boards 50x100 mm and sewn up with OSB sheets. The ceiling can also be insulated with foam. In the back of the toilet floor, if it is intended for a cesspool, a hole must be made.

For the manufacture of doors, you can use bars 50x50 mm, which are connected diagonally to increase rigidity. From the inside, the door should be sheathed with OSB boards, and outside with a board. Detailed information on the assembly of the door contains a drawing of a toilet for a summer residence.
After the box is completed, the roof truss system is made. Rafters can be made from the same boards 100x50 mm. The pitch of the rafters should be no more than 40 cm.
You can attach the rafters with nails or self-tapping screws.
materials
To build a toilet according to the above project, you need to prepare the following materials:
Advice!
If you bought a summer cottage without buildings, the toilet should be the first object built.
After that, you can start building the house itself.
In order not to spend years on this process, you should pay attention to such an option as country houses from block containers, the installation of which takes a minimum of time.

hut toilet project
If the standard design of a country toilet does not suit you, because you want to see a more original design on the site that will serve as an exterior decoration, you can make a toilet in the form of a hut or tower.
A feature of this design is a long gable roof. In some cases, such a roof starts from the very base, as a result of which there are no side vertical walls near the booth. The back and front walls are two triangles.
The base of this design is made of bars, in the same way as for the toilet described above. After that, the walls-triangles are assembled.
Since the roof of the building is gabled, its height should be higher than a standard toilet. Usually it is 2300 cm.

After installing the front and rear walls, a beam is fixed between them in the upper part, to which the boards of the truss system are attached. After that, the roof is sheathed with sheets of moisture-resistant plywood and the roofing material is laid. The best option in this case is a soft tile.
The front wall, as in the previous case, should have a doorway. The door itself is made in the same way as described in the previous project.

Features of the construction of the toilet
So, you have found a suitable toilet project for a summer residence and figured out its features. After that, you can get to work.
The instructions for building a pit latrine are as follows:
- First of all, you need to choose a place for the toilet, which should be located no closer than 25 m from the water source.. Sometimes it is impossible to fulfill this condition, in this case as a sealed container.
- Then you need to dig a hole with your own hands. It can be located strictly under the booth or occupy a large area.
- To equip the walls of the pit, you can use tires. Another common option is to install a special plastic container, which is reinforced with metal ribs.
- After installing the container, you need to fall asleep and compact the earth well around it..
- The next step is to install the column foundation, which is located at the corners of the base of the frame. The foundation can be made of blocks or bricks. To do this, it is necessary to dig holes according to the size of the blocks to a depth of about 30 cm and fill the bottom with sand about 10 cm thick, after which the blocks themselves can be laid.
- After the foundation is completed, it must be waterproofed with several layers of roofing material.
- Then on
Do not deny yourself comfort even in the country. There are a huge number of projects for country toilets that every person can bring to life. But first you need to decide on the drawing and, according to it, build the future structure.
A huge amount of materials and all kinds of projects for country toilets leads to the fact that people are simply lost in the background of all this diversity. That is why the theoretical part is so important. Based on the data in this article, you will be able to choose the best project for your dacha.
Typical projects of country toilets
Basically, to create a country toilet project, the following types of structures are used:
- toilet house with a cesspool,
- dry closet,
- closet powder.
Each of these designs has its own advantages. That is why it is so important to determine the type before starting construction.
Country toilet with a cesspool
In the project, it is imperative to provide for a pit. You also need to take care of its arrangement. For this, a plastic barrel or brickwork reinforced with reinforcement can be used.
In the project, you must provide the right amount of brick and cement, and do not forget about the fittings. The walls you created are subsequently covered with plaster. It is the pit that sets the character of the ground building. Usually this is a small wooden house made from improvised materials. It can be in the form of a hut, a miniature house and even a tower.
According to this country toilet project, all waste will accumulate in the pit. For its further cleaning you will need a sewer. The main disadvantage of the project is an unpleasant smell. That is why it is very important to provide ventilation at the planning stage.
Ventilation can be either natural or forced. In the first case, two holes are made in the design from below and from above. Their purpose is extremely simple - to create air disturbances. Thus, the unpleasant smell will not linger inside for a long time.
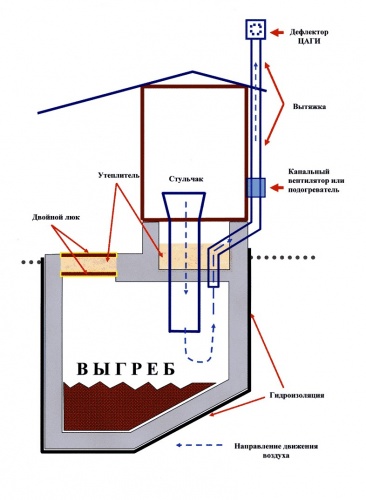
Forced ventilation is a simple fan that blows all the bad smells out of the toilet. When installing it, you need to think about a compensation hole through which air will penetrate inside. Its diameter should not be less than the diameter of the fan. All this is written in the project.
Important ! Don't forget the cesspool. It also needs air circulation. For this, a ventilation pipe is installed.
Powder closet
When creating this project of a country house, a cesspool is not provided. All waste is collected in a tank under the toilet seat. It is best to include two containers of different sizes in the design. In the smaller one, you need to make several different-sized holes and insert it into a large container, on the side of which there will be a round exit. A drain hose is connected to it.
Through the hose, the liquid goes into the ground or drainage system. The main role in this country toilet project is played by the container for the filler. Peat is most often used as a mixture. The filler helps to contain unpleasant smells. As soon as the tank is full, it should be taken out to the compost heap.
When you make a drawing, it is important to take into account the convenience of extracting the container. There are two possible solutions to this problem. In the first of these, the tank is removed when the seat is raised. In the second, a small door is cut out at the back of the building. It allows you to easily remove the filled container.
dry closet
You don't even need to build anything here. In fact, you are buying a ready-made project for a country toilet. All you need is to install the product in a convenient place. In this case, you can purchase both a finished design and a whole booth.
Advice ! The finished structure is easy to install even in the house. All you need to do is take care of the drainage.
Shower and toilet under one roof
Now projects of a country toilet combined with a shower are very popular. This is especially beneficial from a financial point of view. In addition, such a project allows you to significantly save free space on the site.

In the project, a toilet with a shower will have one common wall. The result is savings in building materials. At the same time, the bathroom can work both on the basis of a tank with a mixture, and on the basis of a cesspool.
How a drawing is created
The main task of the drawing when creating a project for a country toilet is to detail the design. The size, shape and type of building are clearly indicated on the paper. At the same time, there are a number of standards that must be observed.
Firstly, the distance of the country toilet for the place of water supply cannot be less than 30 meters. This must be specified in the project. Secondly, a residential or commercial building should not be closer than 15 meters. Of course, there are exceptions in the form of the same septic tank with a biological treatment system.
Dimensions are of particular importance in the drawing. You are free to ask them yourself. But there are certain standards that allow you to create a beautiful and comfortable building with a high guarantee.

The height of the future dacha building should not exceed two and a half meters. In this case, the minimum indicator is at the level of 2 meters. The length of the building is from 1.2 to 1.8 m. The width is in the range from 1 to 1.2 m.

Many novice builders do not attach sufficient importance to the parameters of the cesspool. It is unacceptable. After all, it must also be included in the drawings. The estimated depth is 1.5-2 m, the diameter is from 2 to 2.5 m. If the groundwater is close to the surface, then the pit will have to be abandoned.
Projects of superstructures for a country toilet
When choosing a suitable project for a country toilet, the selection of material is of particular importance. It is he who sets the parameters of the future building to the greatest extent. There are several typical options, which will be discussed further.
Brick toilet
The advantages of this material can be listed indefinitely. It is resistant to atmospheric influences, retains heat and cool equally well, and is environmentally friendly. Moreover, it allows you to give the structure any shape.
The basis of this project is the foundation. Without it, the creation of a country toilet made of bricks is simply impossible. Separately, it is necessary to mention the quality of the masonry. This is the real art of laying bricks for centuries. From above, the structure is covered with a roof, a material for which, in most cases, slate serves.

In the picture you see an example of a related project. In one design, a toilet and a shower are combined. This is not only practical, but also allows you to save a lot on the cost of building materials.
wooden toilet
The project of a wooden country toilet is a classic. Its construction takes a minimum of time, but in order for the structure to serve you faithfully, it is necessary to strictly follow the plan in the process of work.
The picture shows one of the most popular options among summer residents - a teremok. As you can see, it has a small internal space and small dimensions. This allows you to install it anywhere. It is also worth noting the aesthetic appearance.
metal toilet
This version of the project will appeal to those who want to save time and money. When building, you can use sheets of metal left over from building a house. The only thing you need to take care of is the inner lining. Of course, you can do without it, but in winter it will be very problematic to be in such a structure.
The main advantage of the project is the absence of the need for any knowledge. Almost anyone can build such a country toilet. This is the most cost effective option imaginable. The only thing you need to pay attention to is the toilet seat. It is best made of wood so that it is comfortable to sit on.
Types of wooden cabins
It is wooden cabins that are most popular among summer residents. This is explained quite simply. The timber is inexpensive, but provides good thermal insulation and has a pleasant appearance. During construction, the following projects are most often used:
Results
As you can see, there are many different projects for country toilets. During construction, you yourself choose the material, type of construction and internal arrangement. Any of the above options has its own advantages and disadvantages. Therefore, it is very important to weigh all the pros and cons of each project and make a choice in favor of the optimal one.
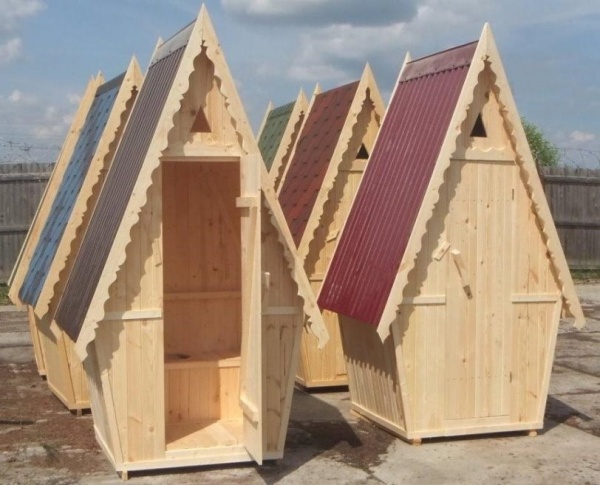
A toilet in the country is an indispensable thing; every owner of a suburban area has to deal with the construction of this important facility. Usually these buildings come out plain, so they try to hide them in the depths of the garden or in the backyard of the site. But you can make it a decoration of the yard - choose an unusual design of tapa tower. The toilet-teremok resembles a fairy-tale house, its main element is a strongly sloping roof, the slopes of which, sometimes, reach the very ground. This design looks spectacular, the toilet no longer needs to be hidden, on the contrary, it may well become the envy of the neighbors.
This article will be about how to build a dacha toilet with your own hands, here you can also find drawings and dimensions of this type of structure.
Features of the tower
The country toilet-teremok looks like a house with a very sharp and high roof, the slopes of which reach at least the middle of the building. From the photo of the finished toilets, you can understand that inside the tower is more spacious than in a regular rectangular toilet. This is due to the sloping side walls and roof slopes, which significantly increase the interior space of the tower at the level of the middle of the walls, while the floor, at the same time, has the same size as in the standard design.

It turns out that for the construction of a toilet-tower, more space is not required, but inside it will be spacious and comfortable.
There are several other advantages of this type of design:
- Long slopes reliably protect the side surfaces of the toilet-tower from drafts and strong winds. It is recommended to place the tower so that one of its side walls is on the leeward side.
- The teremok toilet is spacious, so it can be easily insulated with any insulating material and used in the winter season - there is enough space in the teremok toilet.
- On a strongly sloping roof, snow will not accumulate, water will not stagnate there, which minimizes the likelihood of roof leaks and its deformation due to load.
- If you decorate the toilet-teremok with beautiful details (forged canopies, hecks, a carved window), you get a real fairy-tale house, which, indeed, is not ashamed to show to neighbors and guests.
- The tower-type toilet is suitable for installation on a conventional cesspool, and for modern peat and chemical processing systems.
Advice! You can further increase the free space inside the tower by installing a toilet bowl instead of the toilet seat and bench that are customary for giving.

There are some drawbacks in the design of the toilet-teremka, for example, more material will be required for the roof, but it is not cheap. But the walls of the toilet can be made from almost any material, wood, the remains of a brick, cinder block or foam concrete are quite suitable. You can even use thick plywood - it all depends on the capabilities and imagination of the master.
It is very important during the construction of a toilet of such a complex shape as a teremok to observe all angles and accurately measure the dimensions, otherwise the parts will not subsequently fit together.
How to build a toilet teremok with your own hands
Inspired by the photo of the finished towers, you can get to work. The first step of the home master should be the choice of a building scheme and a sketch of its drawing. A drawing of a teremok type country toilet proves that the roof occupies a large part of the entire structure.
With the dimensions of the toilet-teremka are determined at the design stage. Practice shows that a teremka with sides of 140x200 cm is quite enough for comfortable use.
Important! If there is not enough space on the site, you can reduce the size of the toilet-tower. It is also possible to change the height of the building down, but in this case it will be necessary to make a semicircular or triangular door.

At the very beginning, it is worth thinking about the presence of a window, as well as such an important part of any country toilet as ventilation. The vent should be as high as possible so that the draft is stronger and the atmosphere inside the building is comfortable. In summer-type buildings, it is quite possible to combine a ventilation duct with a window, while simply cutting a hole in the upper part of the front wall of the toilet-tower.

For an all-season insulated toilet-teremka, it is better to glaze the window, and ventilation can be brought out with a pipe directly to the roof.
When all the nuances of construction are thought out, you can proceed directly to work on the toilet.
Creating the foundation for the toilet-teremok
Usually, a country toilet-teremok is built, after all, from wood. Wood is available, it costs less than stone materials, it is easy to work with it even alone. The weight of the wooden toilet tower will be small, so you can put it on a lightweight foundation.

Two types of foundations are suitable: strip and columnar. To create a strip foundation for a toilet, they dig a trench about 25-30 cm deep, its width is about 20 cm. Broken bricks, cobblestones, crushed stone, construction waste are poured inside the pit, reinforcement is laid out, then all this is poured with cement-based concrete. When the foundation hardens, you can start building the toilet-tower itself.
The columnar foundation consists of four pillars, 25x25 cm in size, located at the corners of the future toilet. The depth of the pits for the pillars is also small - about 30 cm. You can lay out the pillars of brick or cinder block or fill them with concrete, having previously installed metal reinforcement inside the pits.

Attention! The metal bars of the reinforcement must necessarily protrude from the foundation, because it is to them that the frame of the toilet tower will be attached.
Inside the frozen foundation, a cesspool or recess is dug for the installation of a chemical waste cleaner. The walls of an ordinary cesspool can be lined with bricks, cinder blocks or rubber tires. The bottom should be covered with gravel and sand to improve drainage and increase absorbency.
Construction of the frame of the toilet tower
The frame of the toilet tower is assembled on a flat surface, not far from the finished foundation. A wooden beam is used as a material, it is better to take coniferous wood, it better tolerates atmospheric influences and temperature differences.
The frame of the toilet itself is assembled from a bar, with a section of 11x11 cm. The length of the bars corresponds to the width of the toilet tower and is 140 cm. The bars are laid out parallel to each other from the short sides of the foundation. Previously, the foundation of the teremka toilet is isolated from the wood with two layers of roofing material.

Now the floor boards are stuffed onto the finished frame. On the front side, the floorboard of the tower is polished, and on the wrong side it is covered with automotive oil, so that the tree does not rot.
Four vertical racks from a bar of the same section are installed at the corners of the teremka toilet. The height of the racks is approximately 150 cm. You can install them strictly vertically or make a slight deviation outside the toilet to increase the building area.
Roof rafters are attached to the beams, their length is about two meters. Now all the details of the toilet are fastened with horizontal beams, which are laid on the ends of the supporting pillars.

Attention! The wooden parts of the toilet are first fastened with nails, and after checking all the angles and dimensions, they are firmly fixed with studs and nuts, as well as metal brackets.
Now the finished toilet frame can be put in place and fixed, connecting it to the floor and frame.
Final work
Now you need to install the frame for the toilet door. Usually, the dimensions of the doorway for country toilets are standard - 180x90 cm. The box is assembled from a bar or thick boards, fixed with studs, the holes for which are drilled obliquely.

The walls of the toilet of the tower are sheathed with planed boards or round timber, spread in half. The wood is nailed with bitten-off nails.
Boards are also stuffed onto the roof of the tower, first the top and bottom are laid, then the space between them is filled. Roof boards should be longer than the width of the toilet, ideally they protrude 18-20 cm beyond the level of the walls.

The roof of the teremka toilet can be covered with ondulin, shingles or metal profiles. The main thing is that the roofing material is not heavy. After that, end boards are stuffed, closing the side of the roof, and a ridge is installed.
A window is cut out in the upper part of the front wall of the tower. Inside the toilet, a shelf for a toilet seat is installed or a toilet bowl is mounted.
Important! If you decide to put a toilet bowl in the teremok, you must first nail wooden blocks to the wrong side of the floor - heavy plumbing will be attached to them.

It remains to fasten the handle, hinges to the tower, hang the door, cover the built toilet with varnish or paint.
Results
It is quite simple to build a teremok toilet with your own hands, for this you do not need to be a professional builder and have special skills.

Photos of finished towers will inspire the owner of the cottage, it remains only to decide on the size and choose a place for such vital beauty.
Thinking over the arrangement of a suburban area, many even try to make and arrange unsightly functional and outbuildings so that they harmoniously fit into the surrounding landscape.
There is nothing difficult in building a presentable and functional toilet in the country with your own hands. You just need to have basic construction skills and have the necessary materials on hand.
Design options for country toilets
When planning to build a toilet in the country with your own hands on the site, you first need to decide on the type of future construction.
Conventionally, all street latrines can be divided into two types: with a cesspool and with a removable container. Constructions of the first type suggest the presence of a hole dug in the ground. The latrines of the second type are equipped with special containers for collecting waste, filled with peat with sawdust, or with a special aqueous solution.
Traditional pit latrine. This is the cheapest and most affordable way to implement an outdoor bathroom. The principle of its operation is quite simple: waste products fall into a cesspool, where the liquid part of which is partially absorbed into the soil and evaporates, and the dense component accumulates. To clean the cesspools, they resort to the services of sewage companies.
Backlash closet. It is also equipped with a cesspool, but the walls of which are completely sealed. Emptying the cesspool in such a system is carried out only by pumping, using the toilet itself as a receiving funnel.
Powder closet. It is a construction of a pedestal with a toilet seat. The storage tank for collecting sewage, placed directly under the toilet seat, is sprinkled with a layer of peat, which has moisture-absorbing properties. A scoop with a bucket filled with a sawdust-peat mixture is installed next to the toilet seat. At each visit to the restroom, a portion of fresh peat is poured into the waste tank. After filling the container, it is taken out to the compost heap. Due to the mobility and compact design, it can be installed both inside a residential building and in a separate outdoor booth.
Chemical toilet. By type, it resembles a powder-closet, unlike a bio-toilet, the processing and splitting of sewage in it occurs under the action of chemical reagents. By using liquids based on biobacteria, waste products can be converted into useful organic fertilizer, using them as root food for plants.
Choosing a place to build
Of fundamental importance in the construction of a toilet for a dacha with their own hands is the choice of a place for its construction. It is strictly regulated by the provisions of the current regulatory documents, according to which:
- The distance of the toilet to the water well, well or reservoir should be at least 25-30 meters.
- The restroom must be at least 12 meters away from the residential building.
- Cesspools must be securely isolated.
- When choosing a place, take into account the features of the terrain and the direction of the wind.
- When occurring on a groundwater site at a depth of up to 2 meters, only a dry closet, chemical or powder closet can be installed.
- In the case of groundwater occurrence at a depth of 2.5 meters, a toilet with a cesspool or a play closet can be erected.
Compliance with these precautions helps to prevent sewage from entering drinking water.
Drawing up a diagram - drawing and sizing
Before starting the construction of a street restroom, it is necessary to determine the dimensions of the future structure. The first step is to draw up a diagram or drawing. The shape and design of the future house is limited only by the imagination and capabilities of the master. It can be an ordinary house, a cute little house or an original hut. If desired, options for drawings of country toilets can be taken on the Internet on thematic forums.
The most in demand is a classic house with a cesspool. The most optimal sizes can be considered:
- Height from 2 to 2.3 meters;
- Length 1.5 -1.7 meters;
- Width 1-1.2 meters.
Tip: A detailed drawing diagram with exact dimensions will allow you to correctly calculate the dimensions of the structure and the amount of materials needed, thereby preventing possible errors and unnecessary costs.
Construction of a cesspool
At the installation site of an outdoor toilet, a cesspool is dug, giving it a square or round shape. The depth of the septic tank should not exceed 1.5 meters, and its diameter - 2.5 meters. But as practice shows, cesspools that have a round shape are more functional. They are highly durable and able to withstand heavy loads and pressure.
Pull out a hole of the desired size, compact its base. Instead of tamping, the bottom can be lined with a pillow of gravel. To ensure the necessary sealing of the device, the walls of the pit are laid out with brickwork, or concrete rings are installed.
Brickwork is reinforced with reinforced mesh or reinforcement. All joints are carefully sealed with cement mortar, followed by a waterproofing layer. This allows you to protect the crop from sewage and save groundwater from pollution.
Construction of a toilet house
The easiest way is to build a toilet house out of wood. As a support for the future structure, it is better to use three-meter wooden bars, or metal or concrete poles.
Materials and tools for building a toilet:
- Wooden bars with a section of 100x100 mm and 50x50 mm;
- Edged boards or fiberboard for sheathing;
- Floor boards for arranging the floor area;
- A piece of roofing material of 1.5 meters;
- Hacksaw and planer;
- garden drill;
- Building level;
- Self-tapping screws, nails, hammer.
Along the perimeter of the structure, with the help of a garden drill, four holes are made about one meter deep, the diameter of which is 2-3 cm larger than the size of the supporting pillars.
One of the ends of each pipe is treated with bituminous mastic, which prevents rotting and corrosion. The columns are immersed in turn in the holes, deepening by 90-100 cm and fixing them with cement mortar. When the solution acquires sufficient strength, you can proceed to the construction of walls.
Tip: Racks for the back wall of the house are made a little lower to provide a slope for the roof. At all stages of installation, it is necessary to control the vertical installation of racks using the building level.
In parallel with the supporting posts, beams for the door are installed. To give strength to the structure around the perimeter of the vertical racks of bars of the same size, upper and lower trim is performed.
Building walls and installing doors
To ensure waterproofing, a roofing material is laid between the frame and the columnar foundation, on top of which a floor area is hammered together from edged boards.
At a height of about half a meter, perpendicular bars are installed, which will serve as the basis for attaching the toilet seat. Stepping back one meter from the back wall, at the same level, a second jumper is made to equip the seat. The base of the seat is sheathed with a sheet of chipboard or boards. A hole in the seat is cut out with a jigsaw, all corners are cleaned with a planer from burrs. To waterproof the front of the toilet seat along the inner wall, you can use a dense plastic film.
The finished frame remains sheathed with fiberboard sheets or wooden edged boards 20 mm thick. You can place the boards both horizontally and vertically, fixing them on the frame with screws or nails. If desired, the walls of the house can be insulated with mineral wool or sheet foam.
At this stage of work, it is worth taking care of arranging a ventilation window, which in parallel with this will play the role of natural lighting.
The door block can be purchased ready-made or built with your own hands. It is installed so that it opens outwards, and is framed with a casing. Latches are installed both inside and outside the toilet.
Roof arrangement
The roof can be made from any roofing material you like: galvanized iron, tiles, slate, polycarbonate or simple edged boards. The boards are overlapped, fixing with roofing screws.
The light in the toilet can be led from the nearest building by throwing a two-core aluminum wire and installing a cartridge with a light bulb with a power of 40-60 watts. An excellent alternative to stationary lighting can be an LED, for the arrangement of which it is not necessary to lay a cable. An LED on a small battery, capable of illuminating a small room, is enough for the whole season.
Do-it-yourself simple country toilet: video
dachadizain.ru
It must be remembered that there are a sufficient number of different norms and rules that must be followed to place a closet on the street. The main rule to be observed is the creation of conditions under which there will be minimal contact of waste with groundwater.
 Rules for placing a toilet in a summer cottage
 Before you make a toilet in the country yourself, it is important to study the main criteria that you should follow when choosing a place to build it:
- The required distance from the nearest water area should be at least 30 meters. If the geolocation of the reservoir is lower in level from the building, then the structure must be moved to another place or below the water source.
- The distance from adjacent pits, such as a basement, cellar, and so on, must be at least 15 meters.
- The distance from residential buildings or other structures must be at least 8 meters.
- Distance from places of settlement or habitat of animals - at least 5 meters;
- The distance from the plantations is not less than 1 meter.
- The distance from the fence of the nearby territory is at least 1 meter.
- When building a country toilet, you must also take into account the direction of the winds so as not to disturb your neighbors with an unpleasant smell.
Be carefull. Before the construction of the toilet, it is necessary to clarify the level of groundwater. Construction is possible only if their level is more than 2.5 m underground.
If it is impossible to build a cesspool, due to the flow of groundwater, you can use an alternative option and build a country toilet like backlash-closet or powder-closet with your own hands. An alternative option may be a dry closet. In such structures, human waste will not touch groundwater.
Requirements for the location of buildings on a summer cottage, including toiletsAttention should be given to the buildings of nearby wells or wells used by your neighbors.
Strict consideration of the rules in the ratio of buildings on your territory and the territory of your neighbors will allow you to properly build a toilet in the country in compliance with environmental standards.
Options for toilets in the country
You can build a country toilet yourself. There are several construction methods that directly depend on the type of structure. The most popular options for the execution of a country toilet:
- Toilet with a cesspool;
- backlash closet;
- Powder closet;
- Dry closets and chemical toilets.
These are the most common types of country toilets. More details about each version are given below.
Regarding the first type, the country toilet with a cesspool is the most common type of closet for temporary residences and is an elementary building over a cesspool.
Regarding the type of "Luft-closet", it has a sealed waste pit as part of its structure, which, in terms of its characteristics and dimensions, may differ and have different variations. For disposal in the Luft-closet toilet, a special sewage machine is used, the hose of which is lowered into the cesspool through a special hatch, which is located at the back of the house.
The third type of “Powder closet” represents a certain container under the saddle itself, which must be cleaned at specified intervals. After each use of the toilet, it is necessary to use additional means of disposal, namely, powdering sewage with peat. This is the cheapest option for a country toilet, but the cleaning process can cause some trouble.
The best type of toilet for a summer residence, with sufficient economic support, can be a dry closet or a chemical toilet. The peculiarity of using such a toilet is that there is no need for frequent cleaning due to the breakdown of waste products by special bacteria.
How to build a country toilet with your own hands - you need to perform several operations in the sequence below.
The most popular toilet is with a cesspool. This is due to its ease of use. The process of use is very simple and consists in the direct entry of waste into a deep pit. When the pit is more than 70% full, it requires proper cleaning.
Organizing a pit is not a very complicated process and, in principle, you can do it yourself. Having dug a hole of the required depth (its recommended parameters are 2 × 2 meters and a depth of 2 meters), you should proceed to strengthen the walls of the pit, which in the future will serve as the foundation for an above-ground building. You can strengthen the pit with the help of boards, which must first be treated with a special antiseptic. The pit can be reinforced with concrete rings or with brickwork.
It is advisable to make the bottom of the cesspool at an angle down to the back of the toilet house, so that the sewage falls towards the hatch, with which the pit is cleaned.
When laying brickwork, you need to follow its checkerboard pattern in order to take care of the future cleaning of the cesspool. The last six rows of bricks are laid without any gaps solid. If you are building a backlash closet, then it requires some effort to organize the complete sealing of the pit. To achieve this goal, a concrete screed is poured into the bottom of the resulting pit. If you decide to make a brick base, then in the end it is still poured with a concrete coating.
For pouring concrete, formwork is made, which can be done using ordinary boards or bars. After the concrete has completely hardened, the formwork frame is completely dismantled.
wooden formworkIt must be remembered that there is a need for a hole for the toilet itself and the implementation of holes for ventilation and pumping out waste.
An alternative option for cleaning the cesspool can be filling it with special chemicals or completely filling it and moving the toilet to another place. This option will be of interest to those who do not want to constantly clean the cesspool.
To date, there are many variations of building or acquiring a ready-made toilet cubicle.
Cabin types
When building a country toilet, there are several options for its execution, depending on the elevated building - the cabin. The main types are:
- Hut;
- birdhouse;
- small house;
- Hut.
Let's consider in more detail.
- Features of the "Shalash" structures are determined by their structural strength. The disadvantages include the inconvenience of placement inside the building due to the lack of space of the chosen form.
- Birdhouses in terms of their mounting properties are not heavier than the previous type of cabin and also have lower costs in terms of the amount of material. The only difference is that mechanically this design is less stable and has excessive heat dissipation. The advantages include a unique design and the ability to place a water tank on top of the roof.
- The “House” option is much stronger and warmer than previous competitors. In the use of the necessary materials for implementation, it does not differ much, but the decorative design and finishing work have a wide range.
- Cabin type "Izba" requires more materials, but is very durable and resistant to almost any climatic conditions. In such a booth it is possible to install a washstand, hangers, mirrors and everything you want. From the point of view of design solutions, it can fit into almost any interior.
Do-it-yourself toilet house made of wood
Depending on the financial condition and the ability to work, you can build a booth yourself, which can be done in different ways, depending on the type of material used. Next, the process of building a house made of wood of the "Starling House" type with a cesspool reinforced with bricks is considered.
When laying a brick house, it is necessary to make a foundation, which usually extends beyond the cesspool. The walls of the brick structure themselves should be 10-15 centimeters above the ground in order to place the foundation around the walls in the next step.
The walls of a brick cesspool protrude 10-15 centimeters above the groundOften, wooden toilet cubicles are used in summer cottages. The rectangular shape of the house and its construction is organized with wooden blocks measuring 100x100 mm. The tree must first be treated with an antiseptic for many years of its service. In the absence of an antiseptic at hand, you can use diluted bitumen in a 1: 1 ratio with water.
To comply with the correct technological process for the construction of the cabin, it is necessary to make waterproofing between the foundation and the frame of the wooden structure of the house. This can be achieved by laying a strip of roofing material.
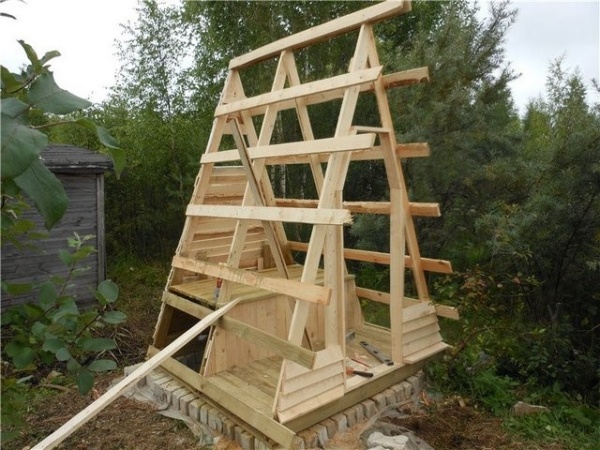
The figure below shows the step-by-step process of assembling the booth, described below under the image itself.
The process of assembling a wooden toilet cubicle- Placement of the foundation around the brick walls. A layer of roofing material strip is laid on the foundation in order to isolate it from water (waterproofing).
Foundation for a house with a superimposed layer of roofing material strip
- A pre-assembled wooden frame is installed on top of the foundation by screwing.
- The next step is the floor of the booth, which must be strong enough to support the weight of a person. For this purpose, a board with a thickness of at least 30 mm is taken and screwed with self-tapping screws to a previously installed frame.
- Frames are being constructed for the front and rear sides of the booth from wooden blocks. The slope of the roof of the country toilet is solved by installing frames of different lengths. The rear, as a rule, is made smaller in height than the front.
- Further, the installed frames of the rear and front sides are strengthened by connecting the transverse bars to each other. In this case, the bars are attached in 2 places: between the frames approximately in the middle of the height and at the very top. The latter will be used to attach boards to them to get a roof. For structural reasons, the upper bars should protrude beyond the base: in front by 30, and in the back by 16 millimeters. Do not get hung up on such strict sizes, a small error is acceptable.
- Inside the booth, a pre-prepared pedestal frame 450 mm high is installed. This is the most common height, but you can make it different to suit you.
- Sheathing of the frame of the house. Perfectly suited for this role is a false beam, which performs the function of simulating a solid wall made of timber. It is such an imitation of the connection between the bars with the help of tenon grooves.
False beam - imitation of a beamOn one side of the beam there is a spike, which is inserted into the groove located on the opposite side of the second beam. It is very comfortable. To the frame itself, the imitation of the beam is attached with nails or by screwing in self-tapping screws. To avoid moisture getting into the groove, make sure that he looked down the entire structure, and the spike up. Clapboard or OSB are also good cladding options. At the same stage, the pedestal is sheathed. A hole of the required size is cut out on the top board to accommodate the container in it.
- The beginning of the roof covering. At this stage, small boards with some distance between them are attached to the upper transverse bars (perpendicular to them and parallel to the front side of the cabin).
The visor is also sewn up from the side of the doors and the boards are attached to each other along the perimeter. Ultimately, an upper roof structure with right angles should be formed.
- The question of the final readiness of the roof is solved by imposing slate or tiles on it.
When building a country toilet with your own hands, do not forget about its insulation. Of course, you can do without insulation, but in winter it will be very cold there, which will give you terrible discomfort when you are inside the closet. Styrofoam sheathing can be used to insulate the house of a country toilet. Inside the toilet itself, it is necessary to install transverse strips of wood to organize the toilet seat itself.
With the correct calculation of the project and compliance with standardization standards, the recommended cabin dimensions are as follows:
- Length - 1-1.5 meters;
- Width - meter;
- Height - 2.10 meters.
Cabin doors
Usually, wooden doors are installed in the toilet, bought in advance or made by ourselves. Sheathing is possible with the same materials as the frame was sheathed. After, the doors are hung on 2 hinges in recesses, machined in advance.
A latch or a hook can be used to close the doors from the outside or from the inside. In order for the door not to open inwards and in order to close the cracks, platbands are installed.
After receiving the finished toilet house, it is completely impregnated with special materials in order to protect the tree from moisture and pests. Then everything is covered with varnish or paint.
Quite naturally - ventilation is necessary for such a building in order to remove odors that arise during operation. That is why the country toilet, or rather its body, is initially equipped with a hole, into which a plastic pipe with a diameter of 100 mm or more is then inserted.
Ventilation scheme in the country closetHaving passed the pipe into the cesspool to a depth of more than 20 cm, its reverse end is led along the back wall to a height of more than 20 centimeters above the roof level. To improve the hood, a special device is used - a deflector.
Organization of lighting
To conduct lighting in the toilet or not to do this depends on the time of your stay in the country. To save light, a small window can be provided in the design of the toilet. Alternatively, LED flashlights or battery-powered lamps can be used.
Organization of the hozblok
For ease of use, sometimes in summer cottages a combination of a toilet, a shower and a barn is used at the same time. The one-piece construction takes up less space and is cost-effective in terms of waste disposal. If living in a country house takes place in the summer, this is an ideal option.
Combining in the order of a warehouse-shower-cloaking room-toilet is called in the common people "Cheburashka". The implementation is similar to building a cabin with support poles and wooden blocks, but differs in size. With proper installation and location, compactness and expediency of construction in the future process of its operation are ensured.
As you already understood, building a country toilet with your own hands is not so difficult, since this process does not involve any heavy technical operations. The design of the cabin depends only on your capabilities and imagination. The main thing to remember is that the decisive factor in the successful construction of a country toilet is the convenience of its operation and the correct location.
Blueprints
If you decide to create your own unique structure for a summer closet, then you will certainly need to independently develop a project and a drawing of your particular design in order to clearly know in what sequence to perform all the work, the amount of materials needed and their dimensions.
But, if you don’t need this, or if you want to take some ready-made solution as a basis, then typical drawings with exact dimensions for the construction of country toilets, which we provide to you below, may well suit you. All images have a click-to-zoom function, so you can view them in full size, as well as download them to your computer to make viewing more convenient.
Drawings of a birdhouse type toilet
dachniki.life
So, first you need to make a foundation measuring 140 × 200 cm, depth and width 25 × 25 cm, plinth - 20 cm (photo 1, 2). As you can see, we covered the foundation with bricks and rubble (which was at hand), filled it with a mortar of grade 200 and left it to harden. Then a hole 80 cm deep was dug inside the foundation. Then they began to lay out the plinth one brick thick. The inside of the pit was also lined with a quarter of a brick, the bottom was left sandy.
 photo 1. We fill the foundation
 photo 2. Cesspool
Let's go to the toilet.
First of all, we harvested wood. In terms of structure, density, quality and evenness of the trunk, we liked spruce the most. We took spruce round timber, barked and polished it (photos 3 and 4).
 photo 3. Koruem
 photo 4. We grind
You can proceed to the frame for our building. We cut out two beams 11 × 11 cm long 140 cm (photo 5). We lay out one along the front edge of the foundation, the second on the foundation at a distance of 112 cm from the first. You don't need to fasten yet.
 photo 5. Cut out the bars
We prepare the floor from the bars 11 × 11 cm, 140 cm long. We knock down the floor 65 cm wide (photo 6). After that, the resulting surface is carefully polished (photo 7). We processed the reverse side with automotive working off.
 photo 6. We bring down the bars
 photo 7. We grind the floor
We lay it on the pit, but do not fasten it in order to fit it in case of inconsistencies. The floor is ready, then we assemble the frame. We did it on the ground, and then lifted and placed on the front and rear bars. Cut the bars to size. The dimensions are given in the drawings (photos 8 and 9). 4 racks of 150cm, 4 rafters of 200cm and a run of 130cm. On the ground, according to the drawing, we lay out the bars and only after checking and fitting, we cut the corners in them and fasten them together with nails. We cut the bottom of the resulting frame in one plane so that it can fit snugly on the floor of the toilet. Better to imagine it will help drawings of a country toilet below.
 photo 8. Drawing of the front side of the country street toilet
 Photo 9. Drawing of the side of the country street toilet
We put two, front and rear, frames on the front and rear bars, which lie on the foundation, and fasten with nails. All fastenings described are temporary, later the whole structure will be strengthened with brackets and studs. From above we connect them with a run.
After checking all dimensions, you can fix the frame to the floor. For this we used staples (photo 10). They were made of wire with a diameter of 6 mm. We sew the floor and the front beam with 200mm nails.
 Photo 10. Fixing the floor with a bracket
We put the door frame in the front frame and fix it from above and below. The box is made of timber 5×10cm. We insert a door of a standard size 190x80cm and fit the box to the door (photo 11).
 Photo 11. Door
Next, we firmly fixed the joints. Threaded studs, washers and nuts were used for all fasteners. We drill holes obliquely through the rack and rafters and tighten them with a hairpin (photo 12). Important! Drill holes shallower with a larger drill diameter to hide the nuts. So we do all four joints.
 photo 12. Fastening the seam with a hairpin
The door frame can be fixed with a self-tapping screw, but we also used studs (photo 13, 14). The hanging side of the door frame will be subjected to more stress, so we fixed it more firmly.
 photo 13. Fastening the door frame with a hairpin
 photo 14. Fastening the door frame with a hairpin
Everything is fastened together and now we move on to the lining. As I said earlier, we prepared and polished round timber. Now it needs to be dissolved along. For this we used a chain saw (photo 15).

We sheathe the sides first, then the front and back, and the side planks of the sheathing (blockhouse) should protrude from each side by about 12 cm (photo 16). To fasten the head of the nails, we bite.
 Photo 16
Let's move on to the roof, or rather to the crate. First, we nail the board to the rafters (photo 17). First we nail the top board, then the bottom, and only then, evenly distributing the boards between them, we fasten the rest. We do this on both sides. From the front and back of the toilet, the board should protrude 18 - 20 cm.
 Photo 17
Close the roof of our country toilet roofing material, we used ondulin (photo 18). Next, we cut the lathing board along the edge of the roof and make a shroud (we sheathe the end and bottom of the lathing with an edged board).
 photo 18. We fix ondulin
From the inside, on the side walls, we fasten the diagonal struts (photo 19). We fasten the guides to the walls with self-tapping screws, on which we fasten the board of the seat shelf. The dimensions are indicated in the drawing (photo 20). After the shelf is ready, we cut a hole in it using a jigsaw (photo 21).
 photo 19. Diagonal struts
 photo 20. Drawing of a country toilet seat
 Photo 21
For beauty and lighting above the door, you can cut a window (photo 22). Ours turned out to be 30 × 30 cm in size. Curtains, a handle and a deadbolt can also serve as a decorative element of a wooden toilet (photo 23, 24).
 Photo 22
 Photo 23
 Photo 24
Before opening with varnish, the entire structure must be lightly sanded to remove burrs, dirt and hammer marks. We used yacht varnish, but the main thing is that it should be for outdoor use. The miracle tower is ready!.. (photo 25, 26, 27, 28).
 photo 25. The restroom is ready
 Photo 26
 Photo 27
 photo 28. The restroom is ready
We also recommend
 Productive and reproductive thinking
 Reasonable egoism - what is the theory of reasonable egoism?
 Boris Nikolaevich Yeltsin, the first President of Russia
 Underground fights. Underground kings. What is “fighting not for the masses”? Where can you fight for money?
 Yakov Pavlov and Other Heroes of Stalingrad You Need to Know
 Survive an accident at sea in a dream - in reality experience a new love