Insulation of the concrete ceiling from the inside. Insulation of the ceiling from the inside - methods
The ceiling and roof account for, depending on local conditions and the design of the house, 15-40% of its heat loss. Builders for the insulation of ceilings, ceilings and roofs count the extra charge, because. the work is laborious and often it has to be done on weight. However, do-it-yourself ceiling insulation is quite possible to do without building qualifications: the technology is not complicated and in most cases does not require special equipment. To help those who decide to warm themselves from above on their own, this article is intended.
The general scheme of ceiling insulation with modern materials is not very complicated in appearance, on the left in the figure: a vapor barrier (vapor barrier) does not allow moisture vapor from the inside to the insulation that can ruin it. The waterproofing membrane does not let liquid moisture into it, incl. and condensate in the attic, but releases water vapor to the outside, which nevertheless penetrates to the insulation. In negligible amounts, but, accumulating, it is able to nullify the insulation and spoil the structure of the building.

However, behind the external simplicity is a long evolution of insulation technology and many subtle nuances, without knowledge of which the work may be in vain. That's why will be considered next:
- Physics and features of insulation technology from above.
- Properties of modern insulating materials and additional coatings for them: roofing films, hydro- and vapor barriers; how to choose the right materials for insulation.
- The possibility of using traditional cheap insulators and heaters: clay, expanded clay, sawdust, etc.
- Schemes and methods of ceiling insulation: from the side of the attic, from the inside of the rooms; also from the inside from the side of the roof - for houses without an attic (eg summer houses and temporary houses) or with an attic.
- How to insulate the ceiling in a house with a cold roof and concrete floors.
- Ways to insulate the ceiling in utility rooms; primarily in the garage and bath.
Cold and warm roofs
A cold roof is called without the so-called. roofing cake: a multi-layer insulating building structure between the counter-lattice under the roofing and the inner lining along the rafters. The device of the roofing pie belongs to another topic - roof insulation, but then we will have to get to know it. Firstly, for non-attic buildings and attics. Secondly, in a private house, the insulation of the ceiling from the side of the attic and the roof are inextricably linked technologically and constructively, as can be seen on the right in the upper figure. Thermal insulation of the ceiling from the attic, along with the roof from the inside, provides the following advantages:
- 2 layers of insulation 100 mm each, separated by an extensive thermal buffer in the form of an attic, are equivalent to 1 layer of the same material 270-280 mm;
- From paragraph 1, savings in the cost of insulation up to 40%, and the total, taking into account the greater consumption of the film, by 10-15%, which allows the use of more efficient insulation materials;
- By insulating the ceiling from the outside and the roof from the inside at the same time, you can get by with inter-beam insulation (see below), which is technologically simpler and more accessible to an unprepared amateur;
- "Two-stage" insulation of the top of the building will allow in the future, if necessary, to additionally insulate the rooms from the inside separately without the risk of dampness of the room.
About mineral wool

Warming with mineral wool in the Russian Federation breaks all records of popularity: The material is inexpensive and easy to work with. This is explained primarily by large reserves of readily available raw materials and production technology that has been developed for many decades. The disposal of blast-furnace slag in the USSR had to be taken care of even during the industrial leap of the first five-year plans, and for a breakthrough into space, thermal protection of return capsules based on fibers from remelted heat-resistant rocks was developed. So the “modern” methods of producing slag wool and stone (especially basalt) wool are actually not so new.
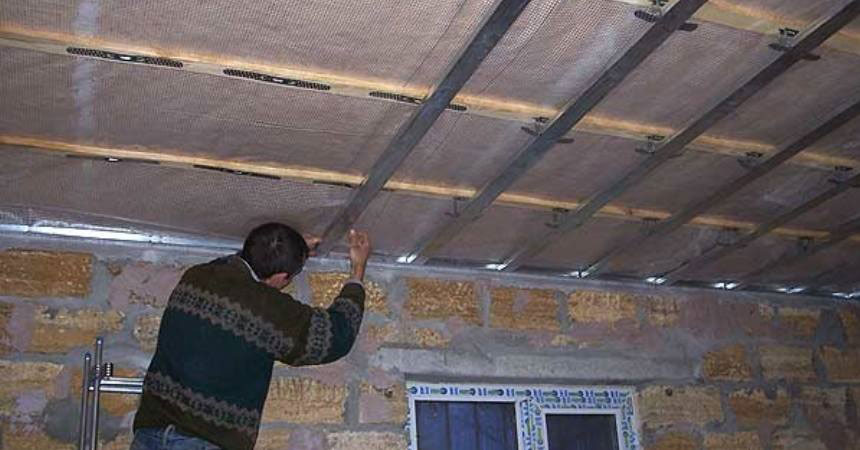
Professionals especially like mineral wool: it does not need expensive special equipment, but there is a wide range of special fasteners and accessories for sale. As a result, the ceiling area up to 20-25 square meters. m, it is possible to insulate in less than 1 work shift, or even in 2-3 hours, this is who knows how. How it looks technologically, you can see in the video below.
Video: an example of ceiling insulation with mineral wool
After reading the following, you may have a question: where is the membrane between the insulation and the ceiling? It is quite possible that in this case it is not needed if the attic with the roof is already insulated; Why same hosts spread superfluous. More Attention should be paid to the following precautions when working with mineral wool:
- Established electrical wiring rolled into a bay and hanging on the wall.
- Judging by the fact that a temporary light bulb is used for working lighting, the room is completely de-energized, and its wiring is disconnected in the nearest junction box or on the introductory plate - this is absolutely correct and absolutely necessary.
- The master puts on a full set of tools personal protection(PPE): special overalls, gloves, goggles, respirator. For the hobbyist it is important point, because rather expensive PPE will have to be used once.
Here it is already clear that mineral wool is not without drawbacks: it is an allergen and carcinogen of group 3, i.e. suitable for residential premises, but it is necessary to work with it using PPE. In addition, which all manufacturers and sellers, without exception, are prudently silent about, under the influence of even negligible amounts of moisture vapor and its own weight, mineral wool gives irreversible shrinkage, as a result of which its thermal conductivity drops by 50% in 3 years: air gaps in the insulation are the same thermal bridges , like metal lintels, only based on microconvection. The gaps between the plates in 5% of the area of the insulated surface increase heat loss by 30-35%
From this follows another unpleasant circumstance: the simplicity of working with mineral wool is apparent. When cutting plates / rolls to size, it is necessary to give an overlap (usually 20-40 mm) such that the plates fit tightly into the openings without sticking out, as on the right in the figure, but also so that further cracks do not go from shrinkage. Perhaps this is only on the basis of experience, because. material properties vary significantly from batch to batch.

Finally, the thermal conductivity of a completely new mineral wool significantly depends on its moisture content - in the direction of deterioration. An increase in air humidity in a room insulated with mineral wool from 60% to 85% leads to an increase in heat loss by 10-12%. Therefore, in the further presentation, focusing on mineral wool as the most popular insulation, we will give, where possible, recommendations for replacing it with something better.
Note: look also at the mounting jig (circled in green on the left in the figure). If you use a propylene linen cord instead of fishing line, then the jig can be left constant. Then special fasteners are not needed and, when mounted on a ceiling and surfaces with a negative slope, sagging of the middle and corners of the plates will be excluded.
Physics and technology of insulation
As you know, the critical factor for insulation is the dew point., the temperature at which this absolute, in g / cu. m of air, the content of water vapor in it corresponds to 100% relative humidity and condensation occurs. The dew point in residential premises is unacceptable: excessively humid air is detrimental to health, and for asthmatics and heart patients it can be a fatal circumstance.
For building structures the dew point is no more useful: from periodic saturation with moisture, concrete and brick crumble, wood becomes moldy and rots, because. the resource of its antiseptic impregnation is not unlimited. Since it is impossible to drive the dew point out forever, it remains to let it “walk” on the insulation, ensuring its isolation from moisture vapor and ventilation. The easiest way to implement such a scheme of insulation is when installing a heater from the outside, pos. 1a in fig.

Ways to "fight" with the dew point during insulation
Sometimes it is technically impossible to insulate from the outside. Or additional insulation is required to the existing one. Analogue - in the old days, in especially severe frosts, they wore 2 fur coats: naked with fur inside, and on top of it - with fur outside. In this case, i.e. when insulating from the inside, its scheme is developed so that the condensate in the heater migrates to the cold surface, and there it flows into the collection and is removed or evaporates to the outside, pos. 1b. In this case, the most insulating material is needed that does not lose its insulating properties when moistened. Such exist, see below.
Features of ceiling insulation
Features of ceiling insulation, firstly, is that it is impossible to organize a condensate drain. Even if the ceiling is sloping, does the water flow along the walls? Drained walls in construction are known, but their complexity and cost are such that it only remains to be mentioned here. Secondly, the warm (exuding water vapor) and cold sides of the ceiling in a low-rise building can also change places in the cold season, due to solar heating. Therefore, the ceiling insulation technology is primarily focused on ensuring that there is no condensate in the insulation. And if it has already formed, then you need to give it the opportunity to evaporate outward as quickly as possible, i.e. to the cold side.
cold overlap
On the ceiling of a material that conducts heat well, e.g. concrete, when insulated from the outside with loose material, 3 air gaps a, b and c, pos. 2a. Gap a, between the vapor barrier (vapor barrier) and the insulation layer - safety, in case of heavy condensation, which is possible on a cold surface. Gap a is necessarily ventilated, technically it is difficult to fulfill it, therefore it is desirable to insulate ceilings on concrete ceilings from the inside with massive, i.e. impervious to moisture, insulation. One of the practically important cases of this kind is considered below. Gap b is accumulating, it creates a partial pressure of water vapor, which ensures their diffusion through a semipermeable membrane that allows gases to pass through but retains liquid moisture. Gap c is the main working one, it is also ventilated, but, since it is located closer to the outside, it is easier to ensure its “ventilation”, for example, in the form of a slot around the perimeter.
Note: if there is a technical possibility and the ability to make the gap also ventilated, this will only benefit the insulation.
Warm overlay
"Warm", i.e. a ceiling that conducts heat poorly, creates a rather high barrier on the way of heat from the inside to the outside, shifting the dew point up into the insulation layer, if you look at pos. 2b. This makes it possible to do without gap a, which in turn simplifies the insulation of the wooden ceiling from the outside. Suddenly, the condensate at the border of the vapor barrier and the base will nevertheless fall out, then in a small amount, it will immediately be absorbed into the tree, and then, without bringing the humidity in the room to a critical level, it will slowly evaporate. Residents will most likely not notice this - wood keeps its mechanical and thermal parameters in a wide range of humidity.
Therefore, insulate wooden ceiling preferably from the attic, pos. 3: the base is covered with an inexpensive film vapor barrier (see below), a conventional waterproofing film without metallization will also go to the membrane. It is only necessary to arrange an air gap between the insulation and the membrane; its role has been discussed above.
Aweigh
The requirements for the vapor barrier are tightened if it is possible for water vapor to enter from free space, because. in this case, the intensity of their "attack" is unlimited. Then a vapor barrier is needed from a foil film, pos. 4, because no plastic is an absolute barrier to water vapor. Gap a between the vapor barrier and the insulation is also necessary, but now it is easier to provide it structurally. Press the vapor barrier against the insulation, as in pos. 5 is undesirable in all respects, even if the vapor barrier with the substrate, see below: both the work is superfluous and the insulation is worse.
Materials for insulation
Modern successes in building insulation technology are largely due to advances in the field of separating films (membranes). The “good old” roofing material and glassine with their counterparts still find application, but when working for yourself, the last thing you should save on films. And in view of the quality with durability, and in view of the fact that, having spent a little “above” on insulating membranes, you can save more on insulation. Therefore, we will start with membranes.
Barriers and membranes

As is clear from the previous one, separating coatings used in building insulation are divided into vapor barriers, or vapor barriers, which cut off liquids with their vapors, and waterproofing (membranes), which retain only the liquid phase. Vapor barriers, in turn, are divided into film, foil and foil with a capillary substrate (the so-called foil isols), and membranes are divided into single-layer film, microperforated film with double-sided vapor transmission, and the so-called. superdiffusion membranes that allow vapor to pass only in one direction.
Vapor barriers
Film vapor barriers are effective only polypropylene with a thickness of 60 microns. Polyethylene of any thickness, by virtue of its very nanostructure, is vapor permeable, no matter what anyone claims to the contrary. PVC under the influence of changes in temperature and humidity soon becomes brittle and cracks.
The basis of the foil vapor barrier can also be polyethylene, because. gases do not pass a layer of foil on it. On quality material this class the edge of the foil is palpable at the edge of the tape, and it can be picked up around the corner with a sharp knife, i.e. foil is thick enough. Foil insulators with a substrate also have a layer of fibrous material (most often synthetic winterizer) on the back, i.e. the side facing the heater. If condensate falls out, it quickly goes through the capillaries of the substrate to the edges of the coating, so the foil insulation with the substrate must be mounted with lapels, like waterproofing the floor, going into the ventilation gap around the perimeter.
Note: in insulation structures on foil insulations with a substrate, the “insurance” gap “a” (see above) is not required.
membranes
Simple film membranes are common waterproofing, incl. and polyethylene. For insulation of ceilings, they are suitable only in heated rooms, because. in addition to vapors, liquids are also passed in a noticeable amount. When insulating from the attic, it is desirable to use microperforated films. Most often they are produced in 3-layer with reinforcement, on the left in the figure; are also used as coatings for greenhouses and greenhouses. To insulate the ceiling in them, it is good that the reinforcing mesh does not allow the film to sag much and ensures a stable gap height b.

Superdiffusion membranes are commercially available as roofing films, in the center in fig. Them outer side smooth, metallized, designed for resistance to atmospheric precipitation. Vapors pass through it to the outside; the outer side is either marked, or it is outside and in a roll. The wind strength of the underlayment films is provided by through reinforcement: for high-quality membranes, it is easily felt from the inside, and the film looks as if quilted, on the right in Fig.
Heaters
Materials for the actual insulation are divided into:
- Monolithic, or massive - dense, waterproof. The dew point can wander in them as you like without compromising the quality of insulation.
- Loose, fibrous and porous - are produced in the form of plates (mats) or rolls. The cheapest and most technologically advanced in comparison with the quality of insulation. They are hygroscopic, the properties of the material deteriorate from moisture, often irreversibly, so measures are needed to protect the insulation from moisture and its ventilation.
- Bulk / sprayed - an insulating layer is formed on the spot; high-quality insulation requires special equipment.
Monolithic
From monolithic heaters for independent work expanded polystyrene is suitable. The attic and ceiling under a cold roof must be insulated with extruded polystyrene foam - EPS. For insulation, EPPS is produced with grooved boards, which eliminates the formation of air thermal bridges; therefore, foam insulation schemes are very simple and inexpensive due to the low cost of membranes, see for example. in fig. XPS does not shrink, is not hygroscopic. It is durable, able to work as part of load-bearing structures, its insulating qualities are the highest, and its durability is outdoors, according to recent data, up to 100 years or more.

Ordinary granular foam can begin to crumble from strong fluctuations in external conditions in just a winter, but it is cheap, easy to process and mount on any surface with water-based tile adhesive or PVA. Its layer of 30 mm is equivalent to 100 mm of mineral wool, so it is advisable to insulate heated rooms with low ceilings from the inside with foam.
Foam and XPS boards do not bend, so they can only be mounted on open surfaces; to insulate the EPS roof, you will have to disassemble the roof. However, a more serious drawback is its flammability and the release of a huge amount of highly toxic gases when ignited. If a fire in a room insulated with polystyrene foam from the inside occurred at night, when everyone is sleeping, then the residents are actually doomed: it is possible to evacuate people under such circumstances only in some cases. Therefore, it is possible to use expanded polystyrene for internal insulation only in limited quantities and when it is impossible in any other way; see one of these options below.
Fibrous/porous
The main advantage of loose insulation is high labor productivity with them without the use of special equipment, which is why professional individuals are so committed to them, for whom time is money. Mineral wool and sheet / slab polyurethane foam (neoprene) are suitable for independent work from "rukhlyakov". Mineral wool was analyzed in detail earlier, and neoprene for insulation large areas too expensive, although it is not afraid of moisture and is comparable in durability to XPS.
Sprayed and bulk
In terms of the combination of operational qualities, EPPS is almost as good as sprayed foam insulation. When frozen, they look like polystyrene, but are made on a formaldehyde-urea base, so they burn poorly and emit little, not very toxic smoke. The mass forming penoizol can be fed into hard-to-reach cavities, and kraft paper or glassine is enough from the separators, so long as the foaming mass does not stick out through the cracks. However, penoizols themselves are not cheap, and are sprayed using expensive installations. To work with a foam insulation station, serious professional training is required, therefore, equipment for spraying foam insulation is not rented.
You can work with cellulose insulation or ecowool on your own: using a blowing machine for it does not require professional training, so they are widely sold and rented, from those transported by road to small ones like a backpack or suitcase. Ecowool as a heater is relatively little known in the Russian Federation, but compared to mineral wool, it is simply a miracle:
- In terms of thermal conductivity, 0.037-0.042 W / (m * K) is approximately equal to mineral wool; an ecowool thickness of 100 mm is equivalent to a wall of 3 solid red bricks. This makes it possible to get by with inter-beam insulation, see below.
- Up to a humidity of 20%, the heat-insulating properties of ecowool do not fall; on drying after limiting moisture, they are completely restored.
- Sorption moisture absorption for 72 hours in an atmosphere with 100% humidity - 16%.
- Does not shrink, does not puff.
- Chemically neutral, non-corrosive.
- Due to the presence of 12% antiseptic (boric acid) and 7% fire retardant (borax) in the composition, it is slightly flammable and almost does not emit smoke in an extremely hot flame, see left in Fig. below.

- Unattractive to rodents: glass wool is eaten, but ecowool is not touched. After 5 years of application in a house where mice are teeming, their moves in ecowool are not detected.
- Application is possible dry by hand on open horizontal surfaces, with wetting with a blower into hard-to-reach cavities (in the center and on the right in the figure), with wetting and the addition of 5-15% glue on vertical surfaces and with a negative slope, both manually and by spraying .
- High labor productivity when spraying moistened (which the pros should also pay attention to): the floor, walls, ceiling and roof (!) of a house with an attic area in terms of 120 sq. m are "blown out" for 1 work shift.
Note, for your reference: ecowool goes on sale under the names Cellulose Insulation, EKOFIBER AB, EKOREMA, EKOVILLA, EXCEL, ISODAN, SELLUVILLA, TERMEX. The world leader in production and application is Finland.
The most serious advantage of ecowool is that it is hypoallergenic and hypocarcinogenic., i.e. does not show any of these properties. The raw material for the production of ecowool is waste paper, but who, where and when, has something inflamed or itched from old newspapers? Is that in the brains of the content of the articles. But for the preparation of ecowool paper carrier together with the content are ground into a homogeneous gray mass.
Ecowool has three disadvantages:
- Firstly, the cost per unit of its mass is about 30% higher than that of mineral wool. However, if we take into account the difference in the cost of PPE for mineral wool and the rental of a manual "blower", then the high cost remains approx. 15%. Let's also discard the cost of membranes (kraft paper on the warm side is enough for ecowool) - the cost of insulation is almost equal. And if you manually insulate the ceiling from the attic, then ecowool will cost less.
- Secondly, ecowool must be prepared before use. The initial mass is sold compressed by 2.5-3.5 times, it needs to be fluffed up in some container, add, if necessary, water and glue. This is already bad for the pros; time is money, and blow molding machines that prepare the mass themselves are very expensive. But for an amateur and one-time work, this drawback is not particularly significant.
- Thirdly, moistened ecowool must be applied in any way at temperatures above 23 degrees and air humidity up to 65-70% so that it can dry. This already seriously hinders its use: until the thunder breaks out, the peasant will not cross himself. In the summer, who thinks about warming? And the chills and bills for heating went - you can only apply it dry, far from everywhere and not always.
Note: if you have some ecowool left from work, keep in mind - this great material for crafts from papier-mâché.
Expanded clay and foam crumb

Traditional expanded clay (on the left in the figure), the advantages and disadvantages of which are known, can also be replaced by a slightly more expensive, but better material - foam glass crumb or simply foam crumb, right there. Foam crumb is lighter than expanded clay, so it can be poured onto a weak base: fragile flooring, into drywall pockets (see below), etc. Its heat-insulating properties are higher, allergenic and carcinogenic were not found. An example of a two-stage ceiling insulation with expanded clay and mineral wool is shown in fig. below. The film membrane (bilaterally permeable, not roofing) provides vapor exchange between the insulation stages, which is necessary to avoid condensation in the mineral wool. If expanded clay is replaced with foam crumb, and mineral wool with ecowool, then polyethylene 120 microns thick will be enough instead of a membrane. In this case, the mounting jig is not needed, and the insulation from the inside can be used to the full height of the ceiling beams.

Sawdust and shavings
Waste wood processing is also a traditional heater. How to insulate the attic with shavings, see the video below. Ceiling insulation with sawdust is more attractive, first, because of their poor flammability. Secondly, at the nearest sawmill, they can offer you sawdust for free in any quantity, and even deliver it at your own expense.
Video: insulation with sawdust ceiling and floor in the attic
However, the availability of sawdust is the other side of the coin, they have a very big drawback: they can “oppose”, ferment. In this case, CH3OH vapors are released. Yes, yes, that same wood (methyl) alcohol, from which unlucky drunkards, into whose throats with a voluptuous gurgling everything that is not water, it would seem, go blind and die. Therefore, sawmillers are happy to get rid of the "sawdust": according to modern sanitary requirements sawdust from under the sawmill should be removed continuously and immediately sent for disposal.
Meanwhile, getting rid of both disadvantages of wood waste is not so difficult and expensive. Approximately in the same way that ecowool is made safe. Proper insulation with woodworking waste is carried out as follows:
- Work is carried out in the summer in the very heat and dryness;
- In advance, in 2 separate containers (necessarily separate), strong solutions of boric acid and borax are prepared;
- Insulation is poured in layers of 3-5 cm;
- Each layer is abundantly sprayed with one and the other solutions alternately with the help of a stucco brush or a homemade sprinkler;
- The next layer is poured and sprayed after the previous one has completely dried.
As for sawdust, a reliable guarantee against their fermentation, even in a damp attic, is also provided by backfilling on a base of slab and clay, see below. To describe why, here, unfortunately, there is no way; the thing is unique properties clay and outer layers of softwood. Insulation of this type is known in houses more than 100 years old. But, once again, unfortunately, it is difficult to find oily clay in nature, it is a valuable mineral raw material, and on sale it is not cheap.
How to insulate the ceiling?
From the attic
The main ways to insulate the ceiling from the outside, i.e. from the attic, shown in fig. It is preferable, of course, to get by with inter-beam insulation. In this case, please note that with a sufficiently massive ceiling roll-up, you need to make the lapels of the vapor barrier on the ceiling beams or encircle them entirely with vapor protection. The vapor barrier can then be film. If the ceiling is hemmed thin, then the jumps in its thermal resistance at the locations of the beams can be harmful. Then the foil vapor barrier is fixed from the inside between the beams and the ceiling sheathing.

With full insulation, i.e. up to the calculated power of the heater, the scheme on the right will be more laborious, but also more efficient, acc. sections of rice: the inter-beam layer is laid in rolls or slabs, and the over-beam layer is made of square mats apart, i.e. with offset seams.
Note: See also the section in Fig. bottom right. This is the same slab insulation with clay, suitable for all types of insulation without the use of synthetic membranes.
From within
No attic
In the private economy, in addition to the additional insulation described above, from the inside, most often it is necessary to insulate non-attic buildings "on the go", in the middle of the cold season. For example, they started to build, built a utility block or a temporary hut for a while, and then it turned out that they would have to spend the winter in it. Or the chickens have stopped laying, the pig has become sad for something and is emaciated before our eyes. There's nothing you can do about it, you'll have to insulate the roof.

A typical design of a warm roof is shown on the left in fig. Insulation lapels down are necessary to avoid freezing of corners. This system has 2 nodes, A and B (ventilated ridge and counter rail, or counter bar), which seem to be impossible to complete without dismantling the roof. However, the “bypass” scheme of node A is shown in Fig. top right. Here it is taken into account that, firstly, in light buildings from individual developers, as a rule, there is no ridge beam, and the ridge "beam" is made by knocking down 2 boards in an L-shaped manner. Ventilation holes are drilled 2-3 per span between the rafters. If the entire roof is only roofing material, then there is nothing to do so that the rain does not drip through the ventilation, you need to climb up and install some kind of ridge run with a gap, at least from bent galvanized strips.
How to deal with node B is shown at the bottom right. It uses the fact that in a small samostroy the crossbar (bearing structure) of the roof is not beamed. The role of embedded in the rafter legs longitudinal beams the crossbars are laid on the boards of the battens under the roof, and the spans between the rafters are free from top to bottom. In Fig., presumably, everything is clear: the roofing membrane will have to be applied in pieces, and the necessary power of the insulation is obtained, if necessary, with the help of backing bars.
In an apartment building
Self-insulating ceilings in an apartment building is possible only from the inside. Firstly, tenants do not have the right to work on the roof or in the common attic; Secondly, why do we pay contributions for overhaul? The roof is cold - you need to demand its insulation from the operator; does not want everything legal rights on the side of the residents.
Nevertheless, while there is fuss and trials, you can do something with your own hands to insulate the ceiling in the apartment. A typical scheme for insulating the ceiling from the inside on concrete is shown on the left in fig. Its main drawback is not at all expensive, subject to corrosion and far from always as effective as manufacturers say, special metal profiles for insulation with thermal seals-thermal washers. Not the same as thermal washers for mounting polycarbonate! Both can be replaced with a wooden crate. And not special materials for the thermal gap along the perimeter and the complexity of working with them.

The main thing is that 0.4-0.5 m is subtracted from the height of the room. This does not add habitability in any way and in modern apartments, and what about the most in need of insulation Khrushchev with ceilings of 2.5 m?
But here, too, there is an acceptable way out. Let us take into account, firstly, that in stone houses heat escapes through the ceiling, mainly in the corners. Whoever has not seen how the ceilings in single-family apartments get moldy and moldy, take my word for it. Secondly, block and monolithic houses are very resistant to fires. It is possible to achieve an extensive fire in them only by a well-thought-out malicious influence. Therefore, it is possible to use granulated foam in a small amount.
Warming scheme concrete ceiling, worked out back in Brezhnevka, when drywall appeared on sale, is given on the right in fig. From the height of the ceiling in this way, only approx. 5 cm. It is quite difficult to fill the pockets of the corners along it, therefore this technology did not really take root even then: the corners are sheathed first on the short sides of the room and filled with insulation from the sides. Then the corners of the long sides are sheathed and the insulation is poured into the gaps between the laths of the crate. Styrofoam and horizontal filing are mounted last.
And now let's remember once again about ecowool. Will it be difficult to blow it into your pockets? At least through temporary technological hatches? The question is rhetorical.
Special cases
Attic
Attic insulation is actually the same special topic as roof insulation. Here it is appropriate to mention it again in connection with ecowool. See what is on the left in the figure, filled with red. In private houses, it is either impossible to climb into this attic without dismantling the roof, or it is impossible to work there. And you can blow out with ecowool instead of the recommended roll insulation without much difficulty.

Garage and bath
Garage roofs are often mounted on steel I-beams or channels. Reliable, the price doesn’t really bite, but what to do with such thermal bridges if you need to insulate? The diagram of the garage ceiling insulation on steel beams is given on the left in fig. Its peculiarity is that the insulation boards are laid in at least 2 layers apart horizontally and vertically. In this way, when insulating with mineral wool, it is possible to reduce heat loss to acceptable levels. If you use ecowool, then the cavities between the beams and between the sewing and the beams are simply blown out with it. Folgoizol is then not needed, enough kraft paper from the inside along the ceiling filing.

With a bath, things are simpler: the features of its design, without which a bath is not a bath, and the thermal / humidity mode of operation make it possible to develop a universal scheme for warming the ceiling of a bath, which is shown in Fig. on right. Feature: if the insulation is mineral wool, then it is certainly basalt, the other will not pull thermal loads and periodic dampening. If you insulate the bath with ecowool, then the peculiarity is that you need to cook the mass with the addition of glue.
In order to insulate the ceiling yourself, you do not need university-level knowledge. It is enough to understand the layout of the floor device, to know the types of heat insulators used and how to install them.
How to choose the right material for ceiling insulation
Insulation of the ceiling will significantly reduce the cost of heating residential premises. The main heat leakage occurs through the upper and lower floors of the house, so you need to pay attention to both of them. It should be understood that the insulation of the attic floor requires a more careful approach than the interfloor. The fact is that the first will always be colder, since there is a roof next to it.

When choosing thermal insulation materials, the following characteristics should be taken into account:
- thermal conductivity (the lower it is, the better the insulation will be);
- water absorption coefficient (an important indicator that allows you to choose the least hygroscopic material);
- density and weight;
- flammability class (optimal G1);
- environmental friendliness.
In a private house, the floor can be either concrete or wood. In the first case, bulk materials, polystyrene, sprayed heat insulators, and dense mineral wool boards are used. To insulate a wooden floor, you can use any available materials with a low thermal conductivity. It is easier and easier to work with such ceilings. Methods of installation of the same materials for concrete and wood floors may be different.
GOST R 52952-2008. Heat-insulating materials and products. Download file.
In order to quickly determine the type of insulation, we recommend that you familiarize yourself with the table.
Table. Characteristics of the most popular thermal insulation materials.
| Material | Thermal conductivity coefficient (W/m*°С) | Flammability class | Density (kg/m3) |
| Styrofoam | 0,035-0,039 | G2 | 15-25 |
| Styrofoam | 0,025 | G2 | 35-50 |
| Mineral wool boards | 0,035 | NG (non-flammable) | 250 |
| Mineral wool | 0,041 | NG | 125 |
| Slag | - | NG | 1000 |
| Expanded clay | 1,148 | NG | 500 |
| Perlite | 0,041 | NG | 40 |
| Vermiculite | 0,05 | NG | 100 |
| Wood fiber boards | 0,09 | G2 | 250 |
| Sawdust | 0,090-0,180 | G2 | 25 |
Video - How and how to insulate the ceiling of a private house
Ways to insulate the ceiling, their pros and cons
There are two ways to insulate the ceiling in a private house:
- internal;
- external.
Each of them has its own advantages and disadvantages. If possible, both can be used for best results.
internal
Insulation of the ceiling from the inside of the room will require a device suspended frame from a metal profile or wooden bars. This method is disadvantageous in that it significantly reduces the space of the room. Another disadvantage is that you will have to work at a height, holding tools and materials on weight. This will require significant labor costs.

Internal insulation requires a high-quality vapor barrier, since steam always rises and must certainly leave the room. Otherwise, the overlap will inevitably become damp, mold or fungus will appear on it. Therefore, when choosing thermal insulation materials, it is important to take into account the coefficient of their vapor permeability.
outdoor
External insulation of the ceiling is easier to perform, since in this case the construction of an expensive and bulky suspension frame is not required. You can use any bulk materials with low thermal conductivity: sawdust, expanded clay, slag, foam chips, ecowool. This method is often used when insulating attic floors, if they do not plan to exploit the space under the roof.
In the event that the premises are equipped attic type, external insulation of the ceiling will simultaneously be a floor device. Therefore, to complete this task, it will be necessary to mount the frame and its subsequent sheathing with suitable durable materials: boards, OSB boards, moisture-resistant plywood.

The technology of internal insulation of a concrete ceiling in a private house
Concrete flooring is easiest to insulate from the side of the attic. The fact is that for the device of the frame inside the dwelling, it will be necessary to perform a complex of very labor-intensive work, including drilling numerous holes.
But if there is no other way out, you should prepare all the necessary tools:
- drill or perforator;
- drill;
- screwdriver;
- building bubble level;
- twine and marker for marking.
From the materials you will need:
- metal profile for work with drywall (can be replaced with wooden blocks with a section of 40/40 mm);
- hangers for fixing the metal profile (narrow perforated metal strips);
- connecting elements - "crabs" used in the installation of frames for suspended ceilings;
- insulation (sheet foam, roll materials, mineral wool boards);
- panels for sheathing the frame (moisture-resistant plywood, OSB, drywall);
- vapor barrier membrane (film).

Stages of installation of a suspended frame and insulation
Step 1. Applying markup. In order to perform this task correctly, you need to understand what the frame scheme is. It consists of longitudinal and transverse racks interconnected by crabs and fixed to the ceiling with suspensions.

To make it easier for you to insulate concrete floor, you need to choose such a distance between the longitudinal posts so that it is possible to lay insulation sheets in the openings between them without additional cutting. But it should be noted that it should not exceed 80 cm, since in this case the structure will turn out to be unstable.
Marking is applied to all four walls adjacent to the ceiling. The easiest way is to pull the cord from corner to corner, checking the correct direction with bubble level. After that, markup is applied directly to the ceiling itself.

Step 2 Installation of guides. For mounting the frame, two types of metal profiles are used: PN 28/27 and PP 60/27. The first is the guide. It is fixed in accordance with the marking lines along the walls.
Step 3 Hanger installation. In order for the frame to be firmly attached to the ceiling, the suspensions are installed at a distance of 80-90 cm from each other. The required number of holes are drilled on the ceiling in the right places.
Step 4 Installation of longitudinal and transverse racks of the frame. Install the metal profile PP 60/27 so that the location of each rack corresponds to the markings.

Step 5 Heat insulator installation. To support the material laid between the racks of the frame, the legs of the suspensions are used, bending them in the right direction.

Step 6 Laying a vapor barrier membrane. At this stage of work, it is important not to violate the integrity of the film with sharp objects. You need to pull it carefully, fixing it on the metal racks of the frame using double-sided tape.
Step 7 Frame sheathing. When performing this work, it is important to install the sheathing sheets so that the gaps between them are minimal. Solid sheets must be fixed perpendicular to the long guide profiles. Docking of sheets should be carried out in the middle of the profile. For high-quality fastening, work is best done by two people. The sheets are fastened with self-tapping screws, and the latter are recessed into the sheathing material by 2-3 mm. The step between the screws should be 25-30 cm (3-4 cm from each corner of the sheets).
Chips should not form on the edges of the sheets when screwing in the screws. If damage does occur, the self-tapping screw must be removed, and a new one screwed in 3-4 cm.
Important point! A ventilation gap of at least 1 cm must remain between the insulation and the sheathing. Otherwise, moisture will accumulate under the film.
The technology of external insulation of the ceiling in a private house
External insulation of the upper floor can be single-layer or multi-layer. Regardless of the chosen option for landscaping the attic, it is recommended to use materials with low weight. This applies to both wooden and concrete ceilings.
If you plan to use bulk material, you must correctly calculate the thickness of the layer. For sawdust, 20-30 cm is enough, for expanded clay 10-15 cm. In order to make it convenient to move around the attic, a frame is mounted, on top of which floorboard, OSB boards or moisture resistant plywood.

For the device of the frame with external insulation of the ceiling, it is recommended to use wooden bars or boards. The first ones are suitable if the layer is not very thick.
Stages of work on the installation of a frame for external insulation of the ceiling
Step 1. Based on the dimensions of the insulation sheets, determine the distance between the racks of the frame (battens).
Step 2 Draw up a scheme for laying longitudinal and transverse crossbars.
Step 3 Boards are installed on the ends.
Step 4 Fasten the boards to the floor with metal corners and self-tapping screws.

The choice of material for external insulation
There are several possible options, let's get acquainted with the features of the installation of each of them.
Styrofoam
In the openings between the racks of the frame, you can lay:
- mineral wool in rolls and mats;
- foam sheets;
- bulk thermal insulation.
The choice depends on the financial capabilities of the owner of the house and his preferences. The least troublesome floor insulation using foam. If this particular material is chosen, the frame must be built so that the sheet can be laid without pre-cutting. In the case of polystyrene, this is not an easy task. Manufacturers offer canvases 50 cm and 1 m wide. You can use any.
The most preferred brand for attic floor insulation is C25. This is a denser foam compared to C15, therefore it has less thermal conductivity. Styrofoam grade C35 and polyurethane foam are expensive materials, but the most beneficial for regions with a harsh climate, as they provide the highest quality insulation.

Mineral wool
Manufacturers offer wide choose fibrous thermal insulation materials. The most popular: Izover, Rockwool, Ursa, Parok. These materials have a lot of advantages, but have only one drawback: hygroscopicity. If the roof is not waterproof enough, mineral wool cannot be used to insulate the attic. Over time, it will inevitably absorb moisture and lose most of its thermal insulation properties.

Sawdust
The cheapest and easiest way to insulate the ceiling from the outside is to use sawdust. When choosing this material, it should be taken into account that it is also very hygroscopic. To prevent wood decay, sawdust is mixed with lime. Lime fluff is sold in building supply stores, which is ideal for this purpose.
Another way to insulate with sawdust is to prepare a mixture consisting of the following ingredients:
- sawdust;
- cement;
- water.
Optimal proportions: 10:1:1. The mass is mixed manually in a suitable volume container or in a concrete mixer. The finished composition fills the space between the racks of the crate and gives time to dry.

Expanded clay
Expanded clay is the most convenient bulk insulation. When using it, there is one nuance, the knowledge of which will allow you to get better insulation. When backfilling expanded clay, you need to ensure that granules of different diameters are present. This will eliminate large voids.

The name of this material should not be misleading: it has nothing to do with high environmental friendliness. Ecowool is made from recycled materials: newspapers, cardboard, bags. All components are mixed with borax and boric acid. These additives are needed to ensure a low combustibility coefficient of the material and prevent its decay.
The advantage of ecowool is that it has low thermal conductivity and excellent vapor permeability. We can say about this material that it "breathes", so mold or fungus never forms under it.
Ecowool is extremely easy to install and apply. All work on insulation can be done by hand, without the involvement of assistants.
There are three ways to lay ecowool:
- dry;
- wet;
- adhesive.
In the first case, ecowool is laid in the openings of the crate and compacted. For insulation using the last two methods (wet and adhesive), a special machine will be required, consisting of a hopper, sprayer and compressor. A mixture based on water or PVA glue is prepared in the bunker, after which the ecowool is fed under pressure into the hose from which the spraying is performed.

Ceiling insulation with polyurethane foam
The modern method of ceiling insulation is spraying with polyurethane foam (PPU). This lightweight foam is quickly applied to any surface. At the same time, it does not need to be fixed to a wall or ceiling, as it adheres firmly to them.

PPU has the following advantages:
- has low flammability;
- non-toxic;
- resistant to chemicals;
- differs in low hygroscopicity;
- durable.
During spraying, a continuous layer without gaps is formed. This eliminates the formation of cold bridges, which makes the insulation better. Polyurethane foam has excellent vapor permeability, so the ceiling does not need additional vapor barrier. This allows you to save on the cost of insulating the ceiling.
Before applying PPU, it is important to make sure that the condition of the surfaces meets the requirements for them. The humidity level of a concrete ceiling should not exceed 4%, wood - 12%.
Before starting work, all surfaces not intended for insulation are covered with paper, polyethylene or thick cloth. Polyurethane foam is applied in layers, constantly controlling the thickness of the spray. Before applying the next layer, make sure that the previous one is completely dry and hardened. The application density of PPU is 30-50 kg per 1 m3. This method of ceiling insulation in a private house is the most expensive, but at the same time the most convenient.
Video - Insulation of the ceiling with polyurethane foam
The need to insulate the concrete ceiling from the inside often occurs among the owners of the upper floors of buildings with a flat roof. If it is possible to insulate the ceiling from the attic side, then this is the best option to keep the heat in the apartment.
Multi-storey buildings in cities traditionally have interfloor floors made of concrete slabs. Some private houses have the same floors, based on the foundation or its continuation - the basement, where utility rooms for various purposes are located.
Floor slab- ceiling and floor at the same time in apartment buildings. The plates are based on bearing walls, the ceiling is covered with several slabs. The sealing of the seams between the slabs and the places where the slabs rest on the walls is cracking: either due to the shrinkage of the building, or the poor work of the builders. Part of the heat leaves the apartments precisely through the joints of the plates: wall or ceiling.
Homes in need overhaul, usually insulated outside by thermal coat method. This method is applicable for insulating the ceiling from the inside. Having some building skills, you can perform the insulation of the ceiling from the inside yourself.
Houses that were built 20-30 years ago were designed to keep the house warm with excessive consumption of thermal energy. This is due to the fact that gas and electricity were cheap, and therefore the requirements for thermal conductivity of building panels were low. But the days of cheap energy consumption are over, houses still function with heat losses, for which the owners pay.
Natural desire to reduce heat loss - insulate the building. There are enough ways and materials for this.
Recommendation. How to determine the number of sheets of insulation? To do this, you need to know the geometric dimensions of the ceiling and the dimensions of the purchased insulation sheets. Make a drawing of the ceiling on a scale (a sheet of notebook in a box will do) and mark the layout of the sheets on a scale. Try options with less waste. It is advisable to start from the central axis, so symmetry will be observed.
But if putty is supposed on top of the material, this condition is not necessary.
In the course of the work that you will now see, decide what tool and material you need.
1. Ceiling preparation. Remove peeling plaster, repair gaps and cracks cement mortar. Apply primer in two coats perpendicular to each other.
2. Ceiling leveling: with a thin layer of putty, if the ceiling is even, or immediately after priming, level the ceiling with a beam of 50 x 50 or 50 x 70 mm along the location of the plates and with a distance so that the joint falls on the central axis of the beam.
The primer is applied with a roller or brush. If the ceiling is even and covered with a thin layer of putty, then notches are made with a spatula, cleaned and primed with a spray gun: this is how dust is additionally blown off the ceiling, and the primer under pressure penetrates deeper into the pores of the concrete slab.
3. Then apply a sheet of insulation, mark the borders of the sheet and apply a layer of 1-2 mm KNAUF Sevener plaster-adhesive mixture and smooth with a comb trowel.

4. To a prepared place glue the sheet.

On the second and subsequent sheets at the joints on the end apply glue, we apply and try to the panel is firmly attached to the ceiling, and to the panel, leaving no gap. Then we fix each panel with plastic umbrellas in the corners and center of the panel with 75 mm self-tapping screws. Umbrellas should be slightly sunk into the surface of the panel, and the recesses should be leveled with a mixture. Then we prepare the surface for reinforcement with rolled mesh. Grid width 1m, apply a layer of glue on the foam from wall to wall.

5. We impose a grid on the putty. Glue, iron with a spatula.

6. After reinforcing with a mesh, perform putty with a mixture of "Knauf Finish". This work is done by craftsmen. After complete drying - grouting the entire surface of the ceiling with a special plank with mesh No. 120.


Summary of work:
- Done ceiling soundproofing. A damping layer of putty is applied between the ceiling and the foam;
- Ceiling insulated with styrofoam 20 mm thick;
- The ceiling is painted with moisture resistant paint. This means that the insulation is protected from moisture.
The second option for insulating the ceiling along the crate of wooden beams will fit when the height of the ceiling allows it. The height of the beam will be added. You can use another 12 mm insulation panel ISOTEX Alaska. These panels, as stated on the packaging, are seamless. Once installed, no additional cladding is required.
They are given instructions on how and with what to fasten, but only professionals can do the work with these panels. There are also standard methods of insulation - suspended ceiling systems, where insulation is laid in the gap between the ceilings.
Ceiling insulation in the basement of an apartment building
The choice of insulation method depends on the purpose of the basement:
- Premises for storage of agricultural products;
- Placement of thermal and sanitary equipment;
- Arrangements under GYM's, billiard rooms;
- Premises for other purposes.
Of these, it is necessary to designate: heated And unheated cellars. This is important for residents of the first floors of apartment buildings. As a rule, residents insulate concrete floor slabs with basements with a device additional thermal insulation from the floor. It is not only efficient, but also cheaper.
In most cases, it is necessary to open the floors to the cement screed, eliminate defects (potholes, cracks); can be added additionally thin layer self-leveling cement mortar, and after hardening, make a substrate of thermal insulation material Parkolag from ICOPAL is a Finnish heat-insulating substrate for laminate, linoleum, parquet.
This substrate is laid on a flat surface of a cement screed without waterproofing and vapor barrier, because the bottom layer of the substrate has micro gaps with the floor and this achieves ventilation between the laminate and the concrete floor.
In another case, in the basements of some houses, storage facilities for agricultural products. In addition to maintaining a certain temperature, such cellars must be dry so that the products can be stored longer. Warm air, rising up, meets a barrier in the form of a cold cement slab, where it cools to the “dew point” on its surface and falls in the form of droplets from the ceiling. To prevent this from happening, it is necessary to prevent contact of warm air with the stove. Arrangement of ventilation with adjustment temperature regime will solve this problem, but we need to see what energy consumption occurs in this case.
A simple "ventilator" device, natural ventilation , directs the convection flow in the right direction and does not allow air vapor to be deposited on the surface of the plate. Another thing is maintaining the temperature. This is where it is necessary to insulate the ceiling, and possibly the entire basement room, in order to increase the temperature inside. The method of insulation is not new - the same as for walls:
- Additional beams are attached to the ceiling, from wall to wall: edged board 20 mm thick and 100 mm wide, impregnated with an antiseptic solution, is attached to the ceiling with a rib using corners along the entire length with a distance of 50-60 cm between them.
- The junction points to the ceiling are foamed with mounting foam. Between the beams prepared in this way, a rolled insulation is laid, then the vapor barrier is fixed with a stapler, and the seams are glued.
- Then a gasket rail 10-15 mm thick is nailed along the beams.
- They cover sheets of GKL or GKVL "Knauf", you can use moisture-resistant plywood and sew it to the rails.
You can use a stainless metal profile by attaching it to the ceiling on suspensions and also laying thermal insulation, followed by filing GKL.
Insulation of the concrete ceiling in the basement of a private house
In the basements of private houses, additional premises for various purposes are being equipped. Warming of storage rooms for agricultural products is the same as for the basements of apartment buildings. Another thing is when basements are insulated in order to provide additional space for life activities.
Such premises, as a rule, are always heated. They are thermally insulated when the basement is located under a terrace, garage or other unheated premises. The method of insulation is the same as for apartments with an attic floor, if it is not possible to perform insulation from the outside.
Advice. Properly organized ventilation of the room helps to avoid the formation of condensate. Try to leave gaps between insulating materials, use membrane-type films to arrange a vapor barrier.
Insulation of a concrete ceiling in a private house
If it is possible to insulate the ceiling from above, then the scheme is as follows.

From the side of the heated basement, in order to preserve heat, it is recommended insulate walls, and the ceiling is more insulated for noise insulation, so high-density foam is attached to the ceiling with an adhesive solution. Extruded polystyrene (XPS) boards can also be fastened. This material has a dense structure and high thermal and sound insulation properties.
In addition to the above methods, a more expensive method may be suitable - application of a polyurethane foam (PPU) layer on the insulated surface. Without special equipment, high-quality foam formation components, mixing and application technology, it is impossible to make thermal insulation on your own.
So, in order to successfully insulate your basement, determine the cause of heat loss, the location of the leak, and the formation of condensation in the insulation.
Attention! The first sign that the basement has poor thermal insulation is the appearance of bad smell in an apartment on the lower floors. This is manifested by the deposition of dampness on carpets lying on the floor. Mold can form, which will negatively affect your health.
It is urgent to correct the situation. For basement insulation, please contact specialized construction organizations. The specialist will determine the method of thermal insulation of a particular room. Additional waterproofing or installation of drainage systems may be required. This will be determined by a specialist from a company engaged in complex work on thermal insulation and ventilation of premises. Only a professional approach to this problem will reduce the cost of these works. ( 2
ratings, average: 5,00
out of 5)
In the construction of residential buildings, concrete floor slabs are often used. These reinforced concrete products are used both for and in the construction of walls. They are made of high quality concrete using a reinforced frame. The reliability and durability of buildings mainly depends on the quality of the materials used.
Floor slab structures
Overlapping with a monolithic slab
It features reinforced strength, which allows them to be used in places with an increased risk of sagging. Maximum protection against various deformations, but poor sound insulation. It has a large weight, which is a significant disadvantage of this type during construction.
Hollow structures

The most popular, due to the lightening of the mass of the product. Due to the voids, these plates have low thermal conductivity and good sound insulation. Manufacturing costs are significantly less than in the production of monolithic slabs. They are often made of ribbed or cellular concrete.
Mostly made in fixed sizes. And when designing a building, it is necessary to take into account the dimensions of standard manufactured plates. Depending on the requirements for future construction, the slabs are also classified by weight. Their average weight varies from 500 kg to 4 tons.
The use of concrete hollow core slabs in the construction of the foundation has been carried out for quite a long time. But the installation of frost protection for floor slabs is not always thought out.
Damp and freezing walls are one of the most serious factors in the fragility of buildings.
The appearance of mold significantly affects the health of the inhabitants of the houses.
Wall freezing factors

- Incorrect filling of joints between plates. Poorly filled joints lead to a violation of the heat-shielding properties of the floors. Increases the chance of cracking. Through them, the plate gains moisture.
- Poor quality solution in the production of products. The choice of cheap or dilute solutions results in frequent moisture penetration. Usually they have a very loose structure and do not withstand pressure.
- Errors in the design of the heating system. Poorly heated rooms are much more prone to frostbite on the walls. After the accumulation of moisture, they begin to freeze both from the outside and from inside.
- Subcooling of metal reinforcing elements and anchors. When various cracks appear, moisture begins to get into the metal components of hollow-core slabs. As a result, corrosion may occur. The structure of such plates softens and is more prone to decay from low temperatures.
- Exhaust pipes collect condensate. If the draft is weak, moisture accumulates inside the chimneys, which leads to icing and reduced efficiency. At the same time, poor air circulation contributes to the accumulation of unnecessary moisture.
- Small wall thickness. The thickness of the walls for their use in the climatic conditions of the region is not taken into account.
- Low thermal properties of the materials used. When choosing materials, the balance is generally outweighed in the direction of strength, while often, when installing insulation, the low level of thermal insulation is simply not taken into account.
- Insufficient through ventilation. In poorly ventilated rooms, the outer walls freeze through much more, losing their heat-shielding properties. Unsatisfactory internal waterproofing between the wall and the insulation leads to freezing of the outer surface, and then to the destruction of the masonry.
- Foundation with poor waterproofing, especially in houses without basements.
- Violation of the vapor barrier structure in attic floors. Poorly executed thermal insulation transfers the performance of its functions to a cement screed. The concrete surface collects moisture, accumulating condensate, and moistens the insulation. The heat-shielding material begins to lose its original properties, which are significantly reduced, as a result of which the floor slabs begin to freeze through. The insulation also increases its weight due to the accumulated fluid.
- Frequently flooded basements.
- The blind areas are incorrect or missing.
- The vertical waterproofing of the basement walls is not done correctly. Low air circulation leads to mold and condensation.
- Bad in the production process. The quality of concrete compaction determines the frost resistance and water tightness of the structure of manufactured hollow core slabs. A poorly compacted compound becomes too porous and the protection of the substrate is greatly reduced.
- Installation of insufficient thickness of the finishing layer.
Saving on the finishing layer, as a result, you can get global destruction. When the air temperature fluctuates, the lining gradually crumbles, reducing the protection of the wall from getting wet and frost. And as a result, the fortress of the entire building is broken, increasing the chances of emergency situations.
Prevention measures
To protect floor slabs from freezing, you need to take the following measures:

- Carefully and tightly fill the gap between the plates.
- High-quality installation of sealing joints must be waterproof (due to sealing mastics) and heat-shielding (using insulation packages). With air protection, the distance between the plates is filled with sealing gaskets. Compression of the material of such gaskets should be at least 30-50%.
- Monitor and check the ventilation of the building as often as possible.
- Poor air circulation in the premises contributes to the long drying of heat-insulating layers, the accumulation excess moisture and mold growth. Heaving soil under the base of the foundation and the walls of the basement floor should not be allowed to freeze, and the air temperature on the basement floor should not be allowed to fall below zero.
- If the building does not have a basement, then it is necessary to install horizontal waterproofing between the ground and the basement surface.
- Increase the layer of thermal insulation on attic floors.
- Contain in good condition blind areas and drainage devices. The reduction in the probability of freezing of hollow core slabs depends on the efficiency of their work.
- During the first 3 years of operation of the building, it is necessary to clean the distance of the drainage systems at least twice a year, in the future - once every three years.
- On damp sections of the walls, carry out drying without starting their condition.
- Try to reduce humidity in rooms with poor ventilation. In any room, the humidity of the air should not exceed 60%.
Ways to fix
Of course, it is always better to prevent a problem than to fix its consequences. But if the measures were not taken on time and freezing nevertheless began, you need to take up the correction of errors as soon as possible. There are a number of different methods for fixing wall freezing problems.
Depending on causes and locations

The appearance of dampness and black spots in the area of the last floors, as a rule, occurs if the installation of the insulation of the attic floor is insufficiently or poorly performed. First of all, defects in the joints between the plates are eliminated, which reduces the appearance of moisture on internal walls. Typically, expanded clay is used as insulation on attic floors. According to the norms, for its productive action, it must be at least 30 cm.
Be sure to check if there are any problems with the ventilation of the attic space. The lack of high-quality air exchange leads to the appearance of condensate and hypothermia of the floor slabs. Check for roof leaks.
Problems can also arise from poor-quality sealing of joints in walls and balcony slabs. Moisture can penetrate into the seams between the wall and the slabs, which contributes to damp spots. Dry the walls as soon as possible and close up any moisture ingress.
If the gap is not more than 8 cm, then you can use mounting foam. To use it, you must first clean the edges of the gap from concrete crumbs. Polyethylene and silicone surfaces require additional treatment with acetone. The hardening of the foam occurs during the day. Then the excess foam must be cut off, you can use a clerical knife, and the surface should be plastered, thereby closing the bridge of cold. If the gap at the junction is more than 8 cm, then you will have to use a thick cement mortar.
Check the effectiveness of balcony drains. If the sealing of the joints of the seams is broken, it is best to carry it out again, using newer and better materials. The strength of the building structure largely depends on the quality of the filling of the seams. Proper sealing should be carried out only after careful preparation of the surface:
- repair the outer surfaces of the wall panels;
- dry all wet and damp areas;
- remove any damaged sealant before applying a new coat.
In no case should mastic be allowed to be applied to wet and untreated areas. It is best to repair joints in positive and dry weather.
If an imbalance in the thermal protection of the walls is detected, insulation should be taken up due to their expansion.
Wall insulation options
For example, using a layer of brickwork, you can clad the outside of the wall. This can be done without special skills. For this you will need:

- bricks;
- level, tape measure and ordering, if the wall needs to be built high;
- sand-cement mortar in a ratio of 4: 1 or adhesive mortar for masonry;
- drill with mixer;
- trowel and mortar container;
- access to electricity.
You can also insulate the walls with plaster insulation on a reinforcing mesh. To do this, with the help of dowels, the reinforcing mesh is mounted to the wall. The latter does not have to be metal. Plaster is applied between the wall and the mesh and on top. It can be a cement mortar, and a ready-made dry mix for wet rooms. they are more expensive, but serve much longer than usual, because they have special additives in their composition.
Another one of the most qualitative methods is the installation of vapor barrier material and insulation on the inside of the concrete wall. Installation is carried out by installing a frame lined with tiled insulation. To make such a frame and fill the distance with insulation between the wall and the finishing material, you can use various clamps and hardware. It can be mounting brackets, and plastic dowels, "fungi", and glue, both in finished form and in the form of a dry mixture that requires preparation. After that, it is imperative to make the cladding with plaster or any other finishing material.
Materials for the frame and insulation:
- metal profiles or wooden slats;
- self-tapping screws for metal or wood;
- sealant and polyurethane foam;
- vapor barrier membrane or aluminum foil on isoplen;
- sheet insulation, mineral or fiberglass wool;
- dry mix for plaster.
Tools for mounting the frame and insulation:
- grinder with circles for cutting metal or special scissors;
- drill with mixer nozzle;
- screwdriver or screwdriver;
- tape measure, level and pencil;
- spatulas and graters for grinding;
- solution container.

Between the frame and the wall, you need to leave a place of about 50 mm and fill it with expanded clay. This material will perfectly absorb the remaining moisture from the wall and stop the appearance of mold. Thus, the wall thickness is increased by 150 mm. There are 80 mm foam blocks that successfully replace such frame structures. Installation is carried out on a conventional cement-sand mortar (1: 4).
On especially cold and damp walls, you can install a system called "warm floor", or run along the perimeter warm plinth. This solution is best suited for corner rooms. When choosing a method for heating walls, the most suitable option is an electric film version, or an infrared floor. It should not be installed by yourself. To heat the seam under the plinth, you can use a warm floor, where a cable is used as a heating element.
Installing a stationary wall-mounted electric heater will not completely solve the problem of poor-quality insulation between the plates, but you can install it yourself.
For this you will need:
- drill or perforator;
- anchors or dowels;
- hammer;
- power socket.
Whatever the reason for the freezing of hollow core slabs, it is necessary to significantly reduce the humidity in the premises, it is imperative to check the efficiency of the ventilation and control the quality of the heating system. All work to repair the building and eliminate the causes of freezing should be carried out carefully and accurately. Forgetting about some detail, you run the risk of facing this problem again, and very soon.
The issue of reducing the heat loss of the building is very acute. After all, only losses through attic floor increase operating costs by 10-15%. So it’s not even worth talking about the need for thermal insulation for a long time, the main question is formulated in this way - how and with what to insulate the attic floor effectively.
Insulation of a beamed attic floor.
Reducing the heat loss of floors is carried out by filling in some types of heat-insulating material, or laying rolled or slab types of insulation between the beams. First, a vapor barrier layer is mounted; when using foil materials, laying is done with the foil down (to the underlying living quarters). If there was already an insulating layer in the attic, then, before installing an additional carpet, the attic must be thoroughly ventilated to remove excess moisture. When insulating the area near the eaves, we lay the material so that ventilation gaps remain. On top of the laid layer of thermal insulation, it is recommended to place wind and waterproofing to prevent precipitation from falling on the material in emergency cases.
Thermal insulation of slabs.
These works are carried out in the same way as described above, the only exception concerns the vapor barrier. Since the construction of reinforced concrete slabs is characterized by low vapor permeability, the use of additional insulation is not required. We figured out the first part of the question - how and with what to insulate the attic floor, let's proceed to the second half.
Types of insulation for attic floors.
The most effective is the use of the following thermal insulation materials:
- Loose. The cheapest, but quite effective material. Various production wastes are used as backfill, it can be slag, sawdust. Expanded clay, a material with a low specific gravity and good thermal performance. Sometimes foam granules are used, but in this case there is a high probability of breeding rodents in the attic.
- Roll materials. A representative of this family is the well-known glass wool and its varieties. It has excellent thermal insulation properties, easy to install. True, this material cannot be classified as environmentally friendly, but its use in non-residential attics is quite justified. Moreover, it is economically profitable, and also meets fire requirements.
- Plate heater. The most demanded material is mineral (basalt) wool. Issued by various manufacturers, differs in size and thermal performance. For attic insulation
floors, cotton wool of different density and thickness is used. Sometimes, in order to reduce heat loss, expanded polystyrene, in particular extruded, is also used. This material is good insulation, but there are also several negative factors. Firstly, these are the already mentioned rodents, and secondly, the increased fire hazard of the material. Although the foam is positioned by manufacturers as a self-extinguishing, non-burning insulation, it still has a tendency to ignite. At the same time, during the combustion process, substances unsafe for humans are released.
- Recently, such material as penoizol has become popular. Despite the significant cost, insulation using this technology is very effective. But the performance of such work requires special equipment, and is carried out only by specialized organizations.
The thickness of the thermal insulation layer for the attic floor is selected depending on climatic conditions in the region, and the characteristics of the material itself. At the same time, along the perimeter of the ceiling, at the junction with the roof, for 1 meter, it is recommended to increase the layer by half of the design values.
Any investment in the insulation of a building is a good investment of funds, because thanks to energy savings, such work pays off very quickly and begins to make a profit.
How to solve the problem of heat loss, which are inherent in any roof structure? Especially if this question concerns a long-built building. There is only one answer, insulation! Styrofoam is quite suitable for this purpose, and it can be used both outside and inside the building.
When choosing the type of flooring for the future home, the overall concept of the structure is of great importance. It is unlikely that anyone would think of using a metal I-beam or a reinforced concrete beam as a ceiling in a wooden cottage. There are certain rules and norms that impose their own restrictions on the design and make their own adjustments.
The article touches upon the issue of choosing a heater for the roof of residential and non-residential premises. Also, detailed descriptions are given on the use of thermal insulation materials, depending on climatic conditions and structural features of insulated buildings.
How and with what to insulate the attic floor of a residential building
How and with what to insulate the attic floor of a residential building The issue of reducing the heat loss of a building is very acute. After all, only losses through the attic floor increase operating costs for
How to properly insulate an attic floor
Insulation of the attic floor makes it possible to save thermal energy inside the room, thereby preventing the cost of heating a cold attic. Still nothing if attic space used as a utility room or attic, but what if not? Of course, it makes no sense to spend money on heating it in this case.
For this reason, it is desirable to cover the attic floor with the use of thermal insulation materials. This can be done both outside and inside. Ideally, insulation should begin at the stage of building a house or, alternatively, right before finishing the premises. However, even while living there is no reason not to take care of the insulation of the ceiling from the attic.
Note! The thickness of the insulation layer is stated in SNiP. In addition, there you can find all the necessary calculations of the heat transfer resistance of various insulating materials, taking into account the average annual temperature, the material used in the construction and the length of the heating season.
But before proceeding directly to the insulation, you must identify the type of attic floor. In the private construction of residential buildings (regardless of whether wood is used, bricks or blocks), it can only be of two types. But both must be built according to certain rules and have a well-defined design.
Basic requirements for attic floors
The main quality that any attic floor must necessarily have is strength. If we are talking about the mansard roof, the entire structure should not sag or deform under the weight of furniture or equipment located in the attic. There is such a thing as the norm of deflection. For attic structures, it is 1/200 of the entire span. Ultimate load per square meter is 105 kilograms. Another equally important parameter of the floor is fire safety, which is more true for wood structures. So, fire resistance has such limits:
- for concrete or reinforced concrete structures it is 1 hour;
- for wooden structures (in the absence of additional protection) - five minutes;
- for wooden floors along beams, with backfill and plaster - about 45 minutes;
- for wooden floors with only one plastered surface - 15 minutes.

Features of the overlap device
It often occurs exactly beam ceilings, which is explained by the simplicity and cheapness of installation, so we will focus on it. Often they are found in wooden buildings, and elements of both wood and metal can serve as beams. According to experts, option number 1 is preferable, because:
- wood is cheaper than metal;
- it has excellent thermal insulation performance;
- it is easier to handle.
Insulation of the attic floor, if there are beams, consists in laying insulating material between them. If the height of the beams is not enough for this, then the bars are additionally stuffed from above. Before proceeding with laying, a vapor barrier layer should be laid (only not a plastic film, since the vapors that leave the room will not be able to penetrate outside). And if the film is still used, then the level of humidity in the house will increase markedly, especially if the ventilation system is not working properly. For this reason, it is preferable to purchase a modern vapor barrier, which can be laid in such a way that the air leaves the room, but does not penetrate into the house from the attic. And if such material is with foil, then it must be laid “face down”.

But how to choose the right insulation so that the resulting “sandwich” is as effective as possible? We will talk about this now.
Types of insulation for the attic
There are a lot of such materials, but we will consider only the most popular of them. Here they are:

Let's take a closer look at each of the options.
The use of mineral wool
Mineral wool is an effective insulation, the fibers in which are arranged in a special way. Due to such randomness, an oxygen “cushion” is formed between the fibers, due to which the material acquires its properties. But because of the same feature, mineral wool or absorbs moisture. In order to prevent this, the installation must be carried out properly.

The advantages of this material are undeniable:
- density;
- ease of installation;
- long service life;
- fire safety;
- finally, if the cotton wool is installed horizontally, then it does not slip and does not cake (read: cold bridges do not appear).
But there is also a drawback that we talked about - it absorbs moisture.
Mounting technology
Mineral wool can be laid in three possible ways:
The first method is the most efficient. The laying technology itself is as follows.
Step 1. First, lay the vapor barrier material - this is necessary to remove the steam that rises from the premises. For proper styling it is necessary to familiarize yourself with the marking on the film made by the manufacturer.
Note! Do not forget to observe the obligatory overlap of 10 centimeters.

If thermal insulation is made along the beams, then the vapor barrier must go around each element that protrudes, otherwise the beams will soon rot.
Step 2 Where the film joins with walls and other surfaces that protrude, lift it to the height of the insulating material + 5 centimeters, then wrap it behind the material plates or glue it with adhesive tape.
Step 3 After that, proceed to laying the insulating material. This procedure is extremely simple, since strips and plates can be easily cut with a construction knife.
Step 4 When laying, pay attention to the fact that the insulation is not squeezed and there are no gaps. You can see common mistakes in the image below.
 /p>
/p>
In the first case, the thickness of the thermal insulation is not enough; in the rest, the same parameter of the attic floor is incorrectly selected.
Good advice on warming with mineral wool
- Foil material will increase resistance to heat loss. But the material itself should be laid down with foil.
- If there are protruding structural elements in the attic, then the insulation should be raised by 40-50 centimeters and fixed.
- If a thin insulation material is laid in two layers, then it will be more effective than one thick layer.
- Do not allow material to protrude beyond the beams. But if this still happened, extend it with a rail or beam to the thickness of the material itself.
Step 5 If the rafter system is not protected by a waterproofing layer, and the attic space will not be used, then it is necessary to lay waterproofing.

Step 6 It remains only to make a rough floor. To do this, lay it on a heater - this will be the basis for the final finish.
Use of Styrofoam
Insulation of the attic floor with polystyrene foam is in many ways reminiscent of a similar procedure with the use of polystyrene foam. Moreover, the advantages of these materials are common - here they are:

Mounting technology
Installing foam for attic insulation is extremely simple - you can easily handle the procedure on your own. All work is divided into several stages.
Step 1. Level the surface. In order for the thermal insulation to be of the highest quality, no irregularities should remain on the base. And if you need to eliminate the recesses, then fill everything with a cement screed.
Step 2 Lay the insulation boards - between the bars or end-to-end. What is characteristic, if there are bars, then the strength of the structure will increase significantly.
Note! All joints (between the bars inclusive) must be carefully sealed. When avoiding obstacles, cut holes as accurately as possible. Finally, it is best to save thermal energy just a uniform layer.

To protect the foam in a non-residential attic from destruction, you can use a film. But if the attic is used often and people move along it, then the foam must be covered with a subfloor - it can be like a screed of cement and sand or OSB boards.
Using sawdust for attic insulation
Who does not know, shredded wood is called sawdust. We are talking about this material now, because it also has significant advantages, including:
- availability;
- naturalness;
- light weight;
- absence of any harmful or toxic substances.
The minus is the same as that of polystyrene - flammability.

The procedure for warming with sawdust
Step 1. First, prepare the sawdust, that is, mix it with water and cement in a ratio of 10-1-1.
Step 2 Pour the attic floor with the resulting mixture, and then carefully level it. Note that it is possible to insulate the attic with sawdust without a frame only if it (the attic) is non-residential. Otherwise, the sawdust will be pressed while walking, and the screed, respectively, will collapse.

Step 3 Using timber, build a honeycomb structure. Next, fill each cell with the mixture described above. The main advantage of this technology is that it will be possible to lay a subfloor on top of the timber, and the room itself can be actively used.

The use of expanded clay for insulation
Sufficiently high-quality insulation of the attic floor can be made using expanded clay. Who does not know, this material is obtained after firing clay. The main advantages of expanded clay include:
- availability;
- low thermal conductivity;
- light weight;
- environmental friendliness;
- naturalness.
But there is also a minus, which lies in the difficulty of raising the material to the height of the attic.

Note! Often this material is used when it is required to insulate the ceiling over the slabs.
Instructions for insulation with expanded clay
The whole procedure can be conditionally divided into the following stages.
Step 1. First, inspect the plates for cracks or gaps. If any are found, seal them with mortar and cover with thick paper. What is characteristic, even with protruding structural elements, there are no difficulties when backfilling.
Step 2 Using a beam, build a crate. A subfloor will subsequently be laid on top of this grate.
Step 3 Pour the material onto the slab and level it with a rake. The thickness should be approximately 25-30 centimeters. It is characteristic that you can walk on expanded clay - there are no restrictions in this case.

Note! Falling asleep expanded clay, try to combine pebbles of various fractions (sizes). This will prevent voids from forming.
At the end, fill everything with a concrete screed or mount a subfloor.
The main nuances of the procedure
- The tree rots, therefore, the steam rising from the house must pass freely. If you install a vapor barrier or use a material that does not "breathe" for this, then soon the tree may collapse.
- Insulation with foil should be laid with it (foil) down to protect the wood from moisture.
You can see examples of correct and incorrect installation in the image below.

But the universal scheme is the insulation of the attic floor using any of the materials.


As a result, we note that the thermal insulation of the attic floor will be as effective as possible if the attic itself is reliably protected from the penetration of moisture from the outside. In other words, you also need to properly equip the roof. Good luck with your work!
Insulation of the attic floor - methods and materials for installation
How to insulate an attic floor, what materials are best used for this
Thermal insulation of the attic floor
What kind of insulation for the floor to choose
Obviously, for wooden floors it is desirable to choose a vapor-permeable, biologically stable and non-combustible insulation. Mineral wool meets these requirements.

How much insulation for the attic is required
According to the current standards, it is economically feasible to make the heat transfer resistance of the attic fence at least 4.7 m2 °C / W for the climate of the Moscow region.
Steam regulation issues
It is necessary to ensure normal ventilation of the insulation, which means that the attic space must be sufficiently well ventilated with outside air. The area of the ventilation openings (airflow) in the attic enclosure must be at least 1:500 of the area of the room itself.

If the attic floor is wooden, then the layer of mineral wool should be protected from the room with a continuous layer of vapor barrier, which is better to use modern durable vapor barrier membranes.
What not to do
It is not advisable to use metallized membranes in the attic, as they disrupt (shield) the normal passage electromagnetic waves which, according to scientists, affects the health of all living things. Usually membranes based on polypropylene, polyethylene are used.
Technical issues of insulation
A ventilation gap of at least 30 mm must be left between the insulation and the flooring, open along the perimeter of the building and (or) through the gaps left in the flooring.
Overlapping on wooden joists
The most common type of attic flooring is on wooden logs. The lag installation step is 0.5 - 1.1 meters, while their height is 100 - 200 mm, usually the height is at least 1/20 of the span.

The logs themselves are inserted into the wall to a depth of 12 - 18 cm, while their direct contact with brick (concrete) is not allowed.
What is being done
After the filing of the ceiling is done, they begin to insulate the attic floor and erect the flooring. Since the height of the floor lag is usually not enough to accommodate the entire layer of insulation with a ventilation gap, a counter-lattice is built on the beams, on top of which the flooring is laid, most often from fiberboard boards.
- 1. A counter-lattice is built to the estimated height with a distance between the bars of 600 mm (so that the insulation plates are placed with a spacer, slots are not allowed).
Reinforced concrete attic floor
A common technology for insulating reinforced concrete attic floors is a screed over a layer of rigid insulation. The disadvantage is a significant mass of the screed, which is not always acceptable.
Attic insulation: the main ways to insulate the attic, types of insulation

Modern Vacation home, no matter if it is a garden house intended for seasonal living, or a chic cottage used as a permanent home, it is impossible to imagine without a ventilated attic.
In this case, one very significant problem arises - the loss of heat through its overlap, and then through the roof.
The main ways to insulate the attic
As already mentioned, when a ventilated attic is installed in a country house, its roof remains “cold” (unlike the attic), and only the ceilings located under it, separating the lower living quarters, are insulated.
There are many ways to insulate such floors, depending on their type (reinforced concrete floors or floors on beams). Let's consider each of them in detail.
Insulation of reinforced concrete attic floor
It is worth noting that there are prefabricated reinforced concrete slabs and a monolithic, solid reinforced concrete floor. However, they are united by the fact that they have a very flat surface that can withstand a high load. Based on this, you should choose a specific type of insulation for the attic. Let's start with the simplest.
 1. Installation of wooden beams (can be metal) or a log with a heater placed between them. In this case, you can use a variety of types of insulation material: various fillings, mats or rolls of ecowool, mineral wool, and even the most common foam. Let's take a closer look at the types of insulation for the attic below.
2. Warming without the use of logs with the help of backfill. Expanded clay or cocktail slag can be used as a backfill (in this case, it will need to be isolated from the living quarters). Or any other type of backfill.
Insulation of the attic with backfill is carried out as follows: a layer of the selected material with a thickness of twenty to thirty centimeters is poured, after which it is poured with cement mortar and a screed is made. If the attic space will not be used in the future, the screed can be omitted. For additional protection and vapor barrier, it is also recommended to fix roofing material on the slabs.
Of the minuses of this method, it is worth noting the complexity of the work and the need for a large amount of time.
 3. Insulation with hard insulation (without lag). Another popular and effective method insulation of a continuous floor made of reinforced concrete.
In this case, either foam concrete or foam glass is most often used as a heat insulator. Both options have advantages and disadvantages.
Foam glass is a more modern, efficient and affordable material, but it is also very expensive. For this reason, heavier and coarser foam concrete is still often used. It will take a little longer to mess with it, in addition, you need a layer at least forty centimeters thick. But the financial costs will be much less painful.
But in both cases, you do not have to resort to "wet" work, since a screed is not required here.

Attic insulation on beams
In this case, the material for insulation is placed between wood or metal beams. After the installation is completed, the ceiling is sheathed with any molded material of your choice, for example, clapboard. Often drywall is also used.
But there are cases when the floor beams are made of high-quality and reliable material, have the proper appearance, and they are left open. And the finishing material of the floor (tongue, plywood, MDF, and so on) is laid directly on the beams. Most often, this option is used in houses made of cylindered timber or logs.
 As for the type of insulation material, in this case the choice is quite wide. Therefore, we will proceed directly to the consideration of heaters for the attic of their features.
Types of insulation for the attic
1. Backfills. Most often, either expanded clay or slag (cocktail) is used as a backfill. Perlite is also used, but this is a more expensive option. Main disadvantage such insulation is its high weight, so it requires a very reliable and powerful base and filing.
 2. Basalt wool. It happens in the form of rolls or elastic plates. For reliable insulation, one layer of this material with a thickness of twenty centimeters is sufficient. Inexpensive, affordable and relatively more effective for its cost material, which, however, requires vapor barrier (protection from moisture).
3. Glass wool is a cheaper alternative to basalt wool. It is supplied most often in the form of plates. The properties are almost completely similar to basalt wool, except that it is slightly less fire resistant.
4. Styrofoam. The cheapest and most affordable material that does not require wind protection. Among the shortcomings, it is worth noting the high fragility and insufficient elasticity of the material.
 5. Ecowool. This is the most modern, environmentally friendly and easy-to-use material. Made from cellulose. Virtually non-flammable due to special impregnations, hypoallergenic, supplied loose or in slabs. Minus - the highest cost of all the materials presented.
 In the end, I would like to note that the most reliable and effective thermal insulation of the attic will be only if the owner also conducts all necessary measures for its vapor barrier and wind insulation. Otherwise, moisture and wind will very quickly render even the most expensive material unusable.
Attic insulation: the main ways to insulate the attic, types of insulation
Attic insulation: the main ways to insulate the attic, types of insulation
Cold attic floor insulation
Since the roof of a cold attic performs only the function of protection from rain, snow and, in part, wind, special attention should be paid to the thermal insulation of the floor. Insulation of the attic floor is carried out using various heat-insulating materials with the obligatory organization of wind protection, especially from the side of the eaves of the roof.

As a rule, insulation is laid directly on the floor of a cold attic. Naturally, provided that the attic will not be operated. This will save on a layer of waterproofing film, as well as on the organization of a full-fledged floor covering.
What should be the thickness of the attic floor insulation?
The thickness of the thermal insulation layer does not depend on which design of the attic floor on wooden beams or reinforced concrete is chosen. On the packaging of any insulation, the coefficient of thermal conductivity λ is indicated, and it has two values: λA - for a dry environment, and λB - for a wet one. The lower this coefficient, the better the insulating properties of the material. It is on the basis of this value that the calculation of the attic floor insulation is made.
The thickness of the attic floor insulation is:
where R is the coefficient of resistance to heat transfer, which, according to the standards, is equal to 4.15 m² ° C / W.
Insulation of the attic floor on wooden beams
Most small houses and dachas with a cold roof, wooden floors are used, therefore it is their thermal insulation that we will consider first of all.
The device of the attic floor on wooden beams, as a rule, is as follows:
- Hemming of the lower floor;
- Vapor barrier;
- Floor beams;
- insulation;
- Waterproofing;
- Finishing.
The installation of a ceiling in a private house with a cold attic begins with the laying of load-bearing beams. Since their maximum length is usually 4 meters, for rooms of greater width it is necessary either to build supports or use metal girders.

After the beams are laid, a vapor barrier is made for the ceiling of the cold attic. To do this, a vapor barrier film is attached to them from below, which protects the insulation from the penetration of moisture from the lower room. When you are insulating the wooden floor of the attic, it is advisable to use special reinforced multilayer materials made of polyethylene or polypropylene as a film, since it is stronger and much easier to attach.
It is best when the vapor barrier layer is continuous. However, the design of a wooden attic floor does not always allow this. If for some reason the vapor barrier cannot be placed under the beams, the film is laid between them with an overlap on them and fixed with a special adhesive tape to ensure tightness.
The device of a wooden attic floor involves the risk of damage to the supporting structures due to decay. Therefore, before laying the cold attic cake, all wooden beams and crates should be impregnated with special solutions that prevent rotting and mold formation.
Next, the attic floor is insulated along the beams, for which the heat-insulating material is laid between them. If you use loose insulation, then it should be carefully leveled and made sure that it fills all the voids.
The minimum thickness of thermal insulation for insulating an attic wooden floor, calculated by you using the formula above, may be greater than the width of the supporting beams. In this case, a crate of bars of the size you need is attached across them. Then another layer of insulation is laid between them with the obligatory overlap of the joints of the previous layer.
It is recommended to close the attic floor beams with a layer of thermal insulation even if their width is sufficient to accommodate the insulation of the calculated thickness. The fact is that so-called cold bridges are formed through them, in connection with which heat losses in the house increase.
Attic flooring on wooden beams is usually performed with a floor made of conventional flooring from processed boards laid across the crate or support beams. However, thick plywood, chipboard, MDF and other similar materials can also be used as a finish.
If you want to use a leveling screed as a finish, then waterproofing a cold attic over a layer of insulation is a must.
Insulation of the attic floor on a reinforced concrete slab
If you need to insulate the attic floor on reinforced concrete slabs, then this can be done in two ways: with and without the crate.
The first method is universal, but most often used for light types of insulation. The cold attic attic floor device in this case will look like this:
- Attic floor vapor barrier in progress cold attic, which should cover the entire layer of insulation also from the sides. Since the vapor barrier simply needs to be laid on the floor, it is not necessary to use specialized materials for these purposes - an ordinary cheap plastic film will do.
- On top of the film with a narrow side wooden block placed a width equal to half the required thickness, which the insulation for a cold attic should have. The distance between the bars is usually taken equal to the width of the roll or plate of the selected brand of insulation.
- between boards insulation for the attic floor. If it is necessary to use several layers of heat-insulating material in thickness, it is laid with overlapping joints of the previous layer.
- Across the already laid bars, exactly the same, at the same distance from each other. Between them, a second layer of thermal insulation of the attic floor is laid.
- Above vapor-permeable waterproofing of a cold attic is laid, which is fixed either with a special adhesive tape or a thin bar nailed along the crate. This stage can be omitted if high-quality waterproofing of the cold roof from corrugated board has already been completed before.
- across the bars nailed floor boards or walkways are laid for movement.
Since it is very important to properly insulate the ceiling under a cold roof in order to save on home heating, I recommend using the above transverse scheme thermal insulation installations. Such an attic floor device minimizes the possibility of forming a cold bridge through wooden bars, since most of them will be insulated with a heater.
The second method of warming a cold attic on reinforced concrete slabs without the use of a crate is suitable in cases where moisture-resistant solid types of insulation are used for thermal insulation, which can withstand a significant load without loss of properties.

In this case, the vapor barrier of the attic floor is also laid first. Next, the attic floor slabs are insulated with a layer of thermal insulation of the calculated thickness.
A leveling screed is poured over it. The finished floor is already laid on the screed. If the insulation of the concrete attic floor is carried out with aerated concrete and materials similar in density and properties, then you can do without hydro and vapor barrier, as well as screeds.
Insulation for the attic floor: which one to choose?
Before you insulate the attic floor, you need to choose a heat-insulating material that is right for you. Unfortunately, there is no universal option, the better to insulate the attic floor. This choice depends on many factors, the most significant of which are:
- Heat-insulating properties of the material;
- fire safety;
- Price;
- Ease of installation;
- Environmental friendliness;
- Hygroscopicity;
- Strength;
- Resistant to decay, temperature, acid and alkali.
You must decide which of these factors are most important to you, and which can be neglected.
Insulation of the ceiling of a cold attic with mineral wool
Mineral wool is one of the most popular materials for floor insulation. best performance in order to insulate the attic floor of the house, it has a variety based on basalt fibers, which is called stone (basalt) wool.
Insulation based on basalt fibers belongs to the class of non-combustible materials with a melting point above 1000 ° C; and has excellent thermal insulation properties. However, it easily absorbs moisture, so when using it, the requirements for hydro and vapor barrier are especially high.
Insulation of the attic floor with mineral wool is best done using rolls, since the joints between the plates, albeit not much, but reduce the effectiveness of thermal insulation. It must be laid close to the beams or guides, but avoiding jamming.

Installation of mineral wool is very simple, so this heat-insulating material is most often chosen when they want to insulate the attic floor with their own hands without involving specialists. During work, do not forget to use personal protective equipment: thick rubber gloves, goggles and clothing that covers the entire body. For people prone to allergies, this kit must be supplemented with a respirator.
- fire safety;
- Environmental friendliness;
- The convenience of use;
- Relatively low price.
- Tendency to form seals, good creasing;
- Hygroscopicity.
Insulation of the attic floor with foam
Styrofoam is a very inexpensive material, which, in fact, is expanded polystyrene foam and retains heat due to these "bubbles" with air. It is cheap, has good thermal insulation properties, is moisture resistant and can withstand fairly large compressive loads.

However, all its advantages are more than covered by one drawback - this material is fire hazardous. Already at 80 °C; foam plastic melts with the release of a huge amount of harmful substances, and at a temperature of 210 ° C; ignition occurs. Therefore, insulating the attic floor over wooden beams with foam plastic is not a good idea. However, it can be used between non-combustible materials, for example, when laying as insulation on a concrete slab with a screed.
- High heat-insulating properties;
- Low price;
- Moisture resistant;
- Resistant to decay;
- fragility;
- Very combustible;
- Deformed already at a temperature of 60 °C;
- It is an excellent hiding place for mice.
Insulation of the attic floor with extruded polystyrene foam
Extruded (extruded) polystyrene foam is made from the same material as polystyrene, but using a fundamentally different technology. On the territory of the CIS, heaters of this type from the Penoplex company are most common. The performance properties of extruded polystyrene foam are much better than those of polystyrene, especially with regard to the ignition temperature of the material.

However, the insulation of a wooden attic floor with foam plastic is still not recommended. Despite the fact that open combustion of this heat-insulating material occurs at a sufficiently high temperature, it is still a fire hazard. Firstly, extruded polystyrene foam supports combustion, and secondly, it releases very caustic and toxic substances when heated even to very low temperatures, and they are the cause of death in a fire in most cases. Therefore, penoplex is far from the best option than insulating the attic floor of the house, even if it is reinforced concrete.
- High heat-insulating properties;
- Moisture resistant;
- Resistant to decay;
- High density;
- Withstands fairly large loads;
- Light weight.
- When heated above 80 °C; begins to release toxic substances;
- Fire hazardous;
- Deforms when heated.
Insulation of the attic floor of the house with polyurethane foam
Polyurethane foam slabs are one of the best insulation materials available. This material has excellent thermal insulation properties, it is durable, resistant to chemical and bacteriological influences, non-hygroscopic and fireproof.

Polyurethane foam is the best way to insulate an attic floor in a private house. If you can afford it. It is the high cost that is its main and, probably, the only drawback. Because of it, it may even be difficult to purchase this material in small towns.
- The best heat-insulating properties among the considered materials;
- Fireproof;
- Unaffected by moisture and chemicals;
- Does not rot;
- Eco-friendly;
- Convenient to use.
Warming the ceiling of a cold attic with sawdust
Previously, in the absence of other materials, insulation cold roof sawdust was ubiquitous. Now this method of thermal insulation is used by those who like its environmental friendliness. At the same time, despite popular belief, the design of the attic floor with the use of such a heater is by no means cheap. Sawdust is not stacked “dry”, but in a special solution, the manufacture of which requires money and a lot of time.
The composition of the sawdust solution for warming a cold attic is as follows:
- 10 buckets of sawdust(we need exactly wood, which are formed during sawing and processing of wood, furniture sawdust - too small for these purposes);
- 1 bucket of hydrated lime(fluffs);
- 1 bucket of cement;
- 5-10 buckets of water with antiseptic, for example, with boric acid, soap or blue vitriol (fill in gradually with a watering can, the total amount depends on the size of the sawdust).
The resulting mixture is placed on the base between the beams and rammed. The thickness of the layer of such insulation for the attic floor should be at least 300 mm, but it is better to do more, since the thermal insulation properties of the sawdust solution can vary greatly. On top of such a heater to cover the attic, walkways are laid for movement, which can be used as sheets of chipboard or thick plywood.
- Comparative cheapness;
- Environmental friendliness;
- Good thermal insulation properties.
- Labor-intensive self-production;
- The thickness of the attic floor is large;
- Complicated installation;
- Differences in thermal insulation properties depending on the composition.
Insulation of the attic floor with expanded clay
Another relatively cheap material that can be used to insulate the attic floor in a private house is expanded clay. It is made by firing clay and is one of the most environmentally friendly building materials. In addition, expanded clay has good thermal insulation properties, fireproof, durable and inert to acids and alkalis.
Expanded clay can be used to insulate both reinforced concrete and wooden floor attic. However, in the latter case, you need to carefully consider the calculation of the bearing capacity of the beams, since expanded clay thermal insulation weighs much more than modern heaters. Concrete attic floor slabs can easily withstand very heavy loads, so expanded clay can be used for them without additional calculations.

If the wooden attic floor of the house is insulated, then the crate is first made over the beams and only after that the heat insulator is filled up. Expanded clay is poured in a layer of 250-300 mm and carefully leveled. Then it is covered with a floor of planks.
If you are insulating the attic floors from concrete, then the floor is waterproofed with bulk or coating materials, then expanded clay is mixed with cement and poured with a layer of 350-400 mm.
- Environmentally friendly material;
- Good thermal insulation properties;
- Fireproof;
- Resistant to acids and alkalis;
- Not subject to decay;
- Durable;
- Low cost.
Insulation of the attic floor made of wood or reinforced concrete slabs
Insulation of the attic floor: tips, diagrams, materials. Detailed step-by-step instructions on how to insulate the attic floor both on wooden beams and on a reinforced concrete slab


