How to make high beds with your own hands. How to make a raised garden bed How to make a raised garden bed
Reading time ≈ 12 minutes
Land cultivation on suburban area always takes a lot of time and effort. Every plant and vegetable crop needs a certain degree of moisture to ripen well, and groundwater is often higher than normal. The solution to this problem was high beds, you can make them yourself with step by step instructions from experts.
Features of high beds
Tall and smart - this is a real find for summer residents, they are suitable for growing any plants: vegetable crops, greens, berries, fruit trees and garden flowers.
High raised fences have many advantages:

The disadvantage of raised structures can be considered the need for frequent fertilization, enhanced fertilizing with minerals and watering the beds, since the soil inside such structures dries quickly. You can cope with this problem by organizing an automatic watering system or by mulching the soil.
Optimal dimensions:

The optimal perennial height should be up to 20 centimeters, otherwise the soil will freeze during winter frosts.
The construction of such structures on its own suburban area does not require large financial investments, which is why they are so popular among summer residents. Making high beds with your own hands is shown in the video with step-by-step instructions.
Varieties of beds
To organize a garden on a suburban area, several types of beds are used:

High bulk beds are also:

How to choose material
What to make a high structure in your garden from? First you need to choose the material suitable for a particular area. Raised beds can be:
- From a tree. The advantage of this material is its availability, convenience and environmental friendliness. To assemble the structure, you will need boards, bars and logs different sizes. Before use, the wood must be treated with special antifungal and water-repellent solutions to protect the bed.

- From slate. Assembly such light construction and fast, the material is available and inexpensive. The slate is quite fragile, so it requires accuracy during installation and further operation. The fence can be painted and painted with ornaments of different colors.

- From brick. A plus is the durability and strength of the structure. Brick or stone beds fit perfectly into any landscape, but are characterized by high cost and a complex manufacturing process. The constituent elements must be connected with a concrete solution. However, in too massive installations, the earth warms up more slowly, so you can not overdo it with the layer thickness.

- From twigs and vines. Sides for beds can be woven from small branches and twigs of trees. This design looks original and elegant, can be used as a decor. Such wicker structures should be covered from the inside with a layer of polyethylene film so that water does not seep through. The downside is their fragility, the service life will be no more than one season.

- From metal. Such structures have a long service life, are durable and stable. They are made by erecting a frame of welding metal elements. The material must be coated with an anti-corrosion compound for comfortable use and durable service.

- From plastic. The material is strong, durable and easy to install. However, some types plastic sheets can release toxic and harmful substances to plants.

- From concrete. Used for the construction of multi-tiered structures. The fence can be made from separate blocks (as in the photo), or be monolithic. Concrete beds are durable and can be decorated various decor. The installation process is complex and lengthy.

- From metal meshes and pebbles. You can make a bed using the "gabion" technique, which is used to build flower beds. Such a backfill fence consists of a double mesh frame, the inner wall is covered with a film, and small stones and pebbles are poured between the frame posts.

Technique "Gabion"
For the manufacture of structures, summer residents sometimes use improvised budget materials, for example, plastic bottles, old empty boxes and small pieces of plastic fencing.
Making high beds with your own hands is shown in the video.
How to choose a seat
It is extremely important to choose the right place for the construction of a high bed in a summer cottage. It is necessary to carefully study the territory and draw a diagram of the location of structures.
What to consider when arranging a vegetable garden with raised beds:
- The ground surface should be flat and preferably without strong slopes.
- The place should be well lit by the sun.
- It is necessary to take into account the shade from standing nearby trees.

Creating a frame is only a small part of the work, it is also important to correctly fill the structure with soil. It is necessary to start these works already in the fall. Internal filling consists of several layers of different widths. The dimensions of each layer depend on the height and beds.

How to fill the structure with soil:
- On the bottom it is necessary to lay a small metal mesh or geotextiles to protect the garden from small rodents and pests.
- Then the first drainage layer is laid from pieces of crushed bark, branches, dry leaves, plant stems and shavings.
- The second layer is various fertilizers, such as manure.
- The third layer is usually formed by a waterproof material: cardboard, clean paper or old natural burlap.
- To create the next fourth layer, organics will be required in the form of plant remains and not a large number of mineral fertilizers.
- Fertile soil serves as the last fifth layer, the layer is laid with a thickness of 10 centimeters. Soil should be selected depending on the crops grown.

As soon as the high bed is completely filled with earth, it must be watered abundantly and left for 3 days, during which time the layers will settle a little. Then the structure is covered with polyethylene so that the soil warms up well. And only in the spring you can start sowing seeds or planting plants. Step by step process the construction of such a bed is shown in the video below.
Bed-box from boards
Most often, summer residents prefer wood when it comes to making boards for high beds. The advantage of this material is the fact that the tree does not overheat and is easy to process.
It is better to use boards made of ash, oak, cedar or larch. Pine is considered a budget option, because this breed wood is more prone to decay.

Do-it-yourself high bed-box
Necessary tools and materials:
- Wooden boards 50*200 mm.
- Metal grid.
- Nails and hammer.
- Protective mixture for impregnation.
- Shovel.
- Roulette for measurements.
- Miter box for cutting.
Manufacturing process:

To create a design, both flat and wavy slate are suitable. At the end, the material can be painted in any color with special acrylic paint.
Materials and tools:
- Slate sheets.
- Bulgarian (can be replaced with an electric jigsaw).
- Shovel.
- Chalk or a simple pencil.
- Drill (can be replaced with a screwdriver).
- Roulette for measurements.
- Rubber mallet.
- Building level.
- Pegs made of wood or metal rods.

A bed of wavy slate in the summer area
Manufacturing technology:

high beds have various design, shape and size. With the help of such structures, you can realize any ideas and transform your summer cottage beyond recognition. The garden will look well-groomed, and the harvest will delight with its quality!

high beds have some advantages over the classic beds. Many people think that making such a bed is a difficult and costly task, but this does not require special skills and special tools.
Do-it-yourself high garden- what to make, a photo and a description of the process of assembling the beds, for which high beds are intended, advantages and disadvantages.
Processing the site in the traditional way requires a lot of effort and time, and the harvest does not always exceed expectations. Therefore, many gardeners equip high beds on their plots, allowing them to receive annually excellent harvest berries and vegetables with proper care.
High beds pros and cons
The main advantages of high beds over classic ones include:
Possibility to equip a garden in areas not suitable for agriculture;
- digging and weeding is replaced by light loosening of the soil;
- it is convenient to work with high beds, because they are raised above the ground;
- heating of high beds occurs faster than ordinary ones;
- it is easier to remove weeds in a limited space;
- equipping a high bed provides good drainage;
- in high beds, vegetables and berries ripen faster, which is important for regions with a cold climate;
- a high bed is easily mounted and disassembled if necessary;
- beds in case of frost can be protected by covering with agrofibre or tarpaulin.
Disadvantages of high beds
A high bed requires frequent watering and enhanced mineral dressings. Such a pest as a bear loves to settle on high beds, you will have to follow and fight for it.
Material for beds - what to make high beds from
high bed- This is a frame of a certain size. The inside of the frame is filled with compost, soil, fertilizers. The shape of the frame can be different, the most common is a high rectangular bed.
Material for the manufacture of beds - boards, slate, plastic, branches and others.

Wood- the most affordable, easy to install and fairly inexpensive material. To assemble a garden bed, you need timber, boards, or small logs.
The main disadvantage wood is its fragility, which requires additional protective treatment.

Rods and vine- original, cheap material. The woven walls of high beds look attractive, and the shape of the bed itself can be made any.
Such a frame has a very short service life and you need to be able to weave a vine.


brick and stone- durable, reliable material for beds. But such beds are difficult to dismantle and the construction takes a lot of material and time.

plastic frame is an alternative to wood. Plastic is easy to assemble and disassemble, durable, strong.
But some types of plastic contain harmful substances, they cannot be used in the garden.

Beds from WPC- a framework for beds from a wood and polymeric composite. Beautiful view, durable material, connected by means of docking elements. The disadvantage is a very expensive material.

Metal- durable, convenient material for creating beds. You can easily change appearance frame by painting in any color. To assemble such a frame, you need to have the skills of a welder, the material is quite expensive, surface treatment will be required to protect against corrosion.

Slate – a budget option garden beds decoration. Install such a bed quickly, slate is durable, you can paint the surface in any color. The disadvantage is the fragility of the material, care must be taken when assembling.

Summer residents use for the construction of high beds plastic bottles, old plastic boxes.
Video - High slate beds
Each gardener chooses the right size and shape of high beds on their own.
There are also optimal dimensions, at which the bed will be most effective:
Bed width 90-120 cm;
- the height of the beds from the surface of the earth is 15-50 cm.

Bed height depends on where the soil will be poured - if immediately on fertile soil, then a height of 15-20 cm is enough, this is enough for a good harvest. If the site is not suitable for farming, the bed is raised by 30 cm. Warm beds are made even higher up to 50 cm by adding compost.
Bed width make it so that 2 rows of plants fit - it will be convenient to process it, the plants will receive enough sun and air.
High bed length does not play a role and is limited by the size of the site. Common beds with a length of 1.5-3 meters.
A comfortable row spacing is at least 45-50 cm, do not make a smaller distance, it will be inconvenient to move between the beds and process.
Do-it-yourself high beds from boards

An inexpensive and convenient option for making a frame for a high bed.
For work you will need:
Roulette
bayonet shovel
screwdriver
Hand saw for wood or electric jigsaw
Building level
Boards size 50x200 mm
Beam 50x50 mm
self-tapping screws
Construction mesh
Primer

Decide on the size of the frame. Cut the boards to size and cover on all sides with antiseptic impregnation (you can use used oil).
Also saw a beam 50 cm long and treat with an impregnating agent.
Lay out boards and timber to dry.
Site preparationChoose a sunny location for a high bed, it should shine for at least 5 hours a day.
It is necessary to mark the boundaries of the beds, remove branches, stones, rhizomes of perennial plants. Dig the soil along with the grass, if it is dense, remove the layer of turf around the perimeter to conveniently expose the frame.
Assembling the bed frameAfter drying, the boards are knocked down into shields, connecting them with bars. The height of the shields is the height of the beds. In the center of the long sides of the frame, additionally strengthen with transverse bars.

Upon completion, you can paint the frame from the outside.
Transfer the finished frame to the installation site. The structure should stand as evenly as possible, the corners should be at the same level.
At the end of the installation of the frame, add soil around the perimeter of the walls so that there are no gaps.
Video - Making high beds
How to fill a high bed
The bottom of the frame is covered with a construction mesh, nailed to the walls of the frame. The mesh is needed to protect against moles and mice. Then lay the geotextile that does not allow weeds to germinate.
Drainage in the form of bark, small branches, leaves, large chips;
- a layer of fertilizers: compost or rotted manure, bird droppings;
- grass, fallen leaves, bark, small branches: creating a permeable layer;
- a layer of organic matter which is supplemented with mineral fertilizers;
- fertile layer land, the composition of which depends on the type of plants that you plan to grow in the beds. The minimum layer thickness is 10 cm.

When filling, the thickness of each layer is approximately 10 cm, it is not necessary to mix with each other.
When the high bed is filled, it is necessary to shed well with water and leave for several days to shrink the layers.
It is better to cover the bed with black agrofiber or polyethylene from above for this time to ensure better heating of the bed.
The beds should be done at the end of summer or autumn - in this way the layers will well rot until spring and there will be a sufficient amount in the soil useful substances for plants. Leave this bed covered until spring.
When installing the beds in the spring, a month before planting the plants, spill the bed several times with water.

High beds can be easily turned into a greenhouse by installing arcs above the frame, which you can fix on the walls of the frame with self-tapping screws or bolts.
A film or special agrofibre is attached to the arcs from above.
Video - Do-it-yourself high beds
How to care for raised beds
When seedlings of plants appear in the garden, it is good to spill water and mulch. Weeds that break through the mulch layer are removed immediately.

When the entire crop is harvested, the high bed is loosened and sown with green manure. Replace damaged sections in the garden.
Cultivated plants growing in garden plots provide their owners with a large amount of very useful nutrients and vitamins. And what kind of nutrition should gardeners provide plants in order to have a good harvest? Sunlight, heat, irrigation, fertilizer and good land. And good earth is called soft, crumbly soil with great content humus.
What to do if the land near the cottage is not at all like that. Somewhere heavy clay, somewhere sand with stones. The only way out in this situation is high beds that can be poured onto any flat surface.
What is the advantage of high beds over ordinary ones, and what are they? A high bed is a bed with a height of more than 10-15 cm if the soil below is normal, and more than 30 cm if the base is not suitable for plants.
 Its main advantages include:
- you can plant plants in any area, even rocky;
- it is easier to work with plants - no need to bend deeply;
- the bed warms up faster in the sun, which means you can plant plants and harvest earlier;
- it is easier to cover with a film greenhouse or agrofibre;
- plants are not afraid of heavy rains, thanks to natural drainage;
- you can make wide paths between the beds - it is convenient to walk and work with the beds;
- the area is becoming cultural.
By itself, the principle of beds or ridges is used in the cultivation of almost all garden plants. When sowing large fields, the ridges are created by a tractor. They can be of different widths, depending on the type of plants. Any ridges are needed in order to improve the supply of oxygen to plants, systematize weeding, and protect against waterlogging. You need to be objective when evaluating the pros and cons of high beds before you start building them.
The construction of one high bed of boards, plastic panels or from a brick with your own hands will take as much time as digging three ordinary ones.
In addition, during the drought period, every 10 cm of high beds will need an additional 5 liters of water per meter of area, when watered. If a high bed has already been built, then you will only have to work with the earth hand tool, walk-behind tractor or cultivator will not drive into such a bed. To make high beds with your own hands on a plot of more than 10 acres - few people will gather. When the plot is small, and you want to have a large crop, high beds will be the right decision.
Types of fences for high beds
 The most common and cheapest option is to make high beds with your own hands from boards. Wood is easy to process, does not contain harmful substances. But it quickly rots on contact with the ground. Can be processed wood special impregnation, antiseptic contains substances poisonous to insects and microbes.
Wattle and wicker wattle is also not durable, but beautiful option. To do this, you need the skills of such work. Using stones or bricks will make the bed very durable. The disadvantage is the high cost of bricks and decorative stone, although in some places this material is easily found in a quarry or landfill. In any case, the work is not fast and hard.
Plastic already appeared on sale in many construction stores. They cost more simple boards but more durable. Strips of plastic are relatively soft and require more posts for fastening. metal fences stronger than plastic, but rust without high-quality processing. The cost of metal is comparable to the cost of plastic. Concrete fences are a very durable and reliable option, but one of the most time-consuming. It will require the construction of formwork, the installation of metal reinforcement, kneading and pouring the solution.
A very simple and durable option is do-it-yourself slate beds. You can use the cheapest wavy, or you can use a more durable and beautiful even sheet. Slate is a rather fragile material and will require additional pegs. It is easy to cut with a grinder, but its dust contains asbestos, which is banned for use in many countries of the world. Since wooden structures are the most common option, in this example, it will be considered how to make high beds from available materials.
DIY wooden fences
 The durability of the structure depends on the thickness of the boards. But in order to save money, you can also buy the cheapest boards 25 mm thick, fourth grade. It is better to plan the arrangement of high beds with your own hands in advance, and immediately decide on the desired height and size of the beds.
For example, it was decided to build a bed 3 meters long and 1 meter wide, 30 cm high. Gotta cut the boards desired length and nail them together with small crossbars. It is better to do this on a flat horizontal platform. Having knocked together 4 shields, you can take them to the location of the beds. For connection at the corners, bars 50x50 or metal corners are used. If thick boards are used, you can do without additional corner fasteners, and use long nails or self-tapping screws. If the bed is more than 3 meters, it is worth using additional crossbars every few meters. To fix the beds to the ground, wooden or metal pegs are hammered.
The high beds of Igor Lyadov have gained great fame - the design of the beds is well suited to buildings made of logs. For the longitudinal walls, bark-free tree trunks are used. The length can be very different. Across the beds, they are hammered together with boards 60-150 cm long. Logs are a cheap material, and they can maintain strength for more than 10 years.
Filling high beds
 The sequence of filling is the secret of how to make high warm beds correctly. To protect plants from rodents and moles, the very bottom of the beds can be covered with a fine building net, pinned to the bottom of the walls. Lay a layer of geotextile on top of the mesh, which will protect the beds from weeds and prevent the fertile layer from deepening. To protect against weeds, for a while, old cardboard is also suitable.
Next, you need to make a layer of drainage, it can be small branches, tree bark, large chips, leaves. Then you can lay a layer of grass, preferably without seeds. The grass will overheat, releasing heat. Over time, it will turn into a fertile layer. The next fall asleep humus from manure, bird droppings or compost. If necessary, add mineral fertilizers. A layer of good fertile soil is poured upstairs, in which seeds or seedlings can be planted. High do-it-yourself almost ready. It is necessary to make the layers equal, about 10 cm each. Mixing the layers or digging up the garden bed is not necessary. For the top layer, you can buy soil from a mixture of peat and humus. At the end of the work, the garden bed is abundantly watered. The raised bed is complete.
To reduce the evaporation of moisture and counteract the growth of weeds, you can close the high warm beds with dark agrofibre.
Weed control in this way is especially relevant when growing perennials. And the most popular perennial in the garden - it's strawberries.
Strawberries in high beds
 How will strawberries feel in high beds? Great, and collecting it is a pleasure. This berry really does not like waterlogging of the soil; it is almost impossible to harvest a good harvest in the lowlands. There is a way to make high beds for strawberries with your own hands without using hard building materials.
It is better to start arranging a plot for strawberries in the fall. Choose a well-lit area 150-200 cm wide, of any length. It is necessary to remove the sod layer, about 10 cm. Coarse organics (tree branches, hard grass) 60 cm wide, up to 20 cm high are poured into the center. On top - succulent plant remains with a layer of 15 cm. You can use several rows with layers of straw. Soddy soil and another 15 cm of fallen leaves are poured on top. Next, a layer of humus or compost. Above is fertile soil. All layers are well watered. The total height of the beds can reach up to 50 cm. And so they leave until spring.
In the spring, the bed is completely buried with a special non-woven material. From above it is necessary to make two rows of slots into which strawberries are planted. Since it is not difficult to make high beds for strawberries (no need to build anything), you can harvest a very good crop. Moreover, strawberries will not need to be fed, they will have enough nutrients from the decomposition of compost. But it is necessary to water very plentifully.
Raised beds in small areas
 Many gardeners have gardens no more than one or two acres. It is they who need high beds in the country. Thanks to the excellent conditions for plants, you can get a bountiful harvest. How less area plot, the higher you need to make a bed. Many manage to grow two crops a year. How to make high beds in the country, and grow a bag of potatoes from one square meter? The proven method has long been known.
First, a square bed is made 1 m wide, up to 20 cm high. 4-5 potatoes are planted at the bottom. When the bores begin to appear from the ground, but before the green leaves open, the sprouts are covered with a layer of earth and put another layer of boards 10-20 cm. You can plant 4 more potatoes. And so do 3 layers, bring the height of the beds to 1 meter. The main condition for a good harvest is abundant watering. In autumn, the layers of boards are removed, and several buckets of potatoes are obtained.
Raised beds in a greenhouse
 On a small garden plot they always find a place for a greenhouse. Greenhouses are designed to create comfortable conditions heat-loving plants and getting a good harvest. High beds in the greenhouse serve just this purpose.
An ordinary bed of boards can serve as the basis for a small greenhouse. Conversely, the foundation of a standard greenhouse, 2-3 meters wide, made of timber or concrete will be one side of a warm bed. Since it is not difficult to make high beds in a greenhouse, you can raise them a little higher than on open space. Usually in a greenhouse with a width of 2.5 meters there are 2 beds along the long walls of the greenhouse. But with a width of 3 meters, it is already possible to make 3 beds: 2 narrow on the sides, and one wide in the middle.
A high bed itself needs abundant watering, and located in a greenhouse, requires special control of soil moisture levels. To facilitate work, it is recommended to install on high beds in the greenhouse, with an automatic switch-on function.
Most gardeners who have made high beds on their site do not regret it. Yes, the initial labor costs are quite high. But as a result, there are beautiful high beds - it's not a shame to bring guests and show them your well-groomed garden. Ordinary beds look beautiful only during a strong vegetation of plants. And high beds, made neatly and with love, delight the eye, both in spring and autumn. Reviews for high beds are always good. Less effort was spent on caring for plants, and the harvest is pleasing.
Everyone decides for himself which beds are better - high or low. Low beds for those who want to quickly dig, plant, and then, somehow, someone will weed and loosen everything. High beds - for those who make it themselves, plant it themselves, and in the summer they will only water it or, having installed automatic watering, will not have any trouble at all.
It would seem that new things can be invented to increase productivity, because agriculture as a science has existed for more than one hundred years. During this time, many methods and technologies have been tested. Some are more successful than others, but the traditional approach to growing vegetables is to create a bed that provides the plants with enough light and water.
Land work is always tiring, especially when the site is large. It must be prepared, sown, it requires daily care in the summer. Plants are attacked by pests, diseases and weeds. Growing seedlings and pouring fruits ask for top dressing, and from time to time there is a desire to sow this entire garden lawn grass or lay paving slabs.
If such an idea visits you regularly, then it's time to think about how to make your work easier. Not, we are talking not about buying expensive cultivators, irrigation systems, electric tillers and gas-powered weed mowers.
To increase productivity, while significantly reducing labor costs, you will be helped by a unique technology - "high beds". Its uniqueness lies primarily in its simplicity.
A high bed is not formed. She is being built. A high bed is a fixed structure, so it is important to initially plan the site correctly. In order not to reinvent the wheel, it would be most logical to equip new beds in place of the old, time-tested ones.
So, what is a high bed? Simply put, this is a box of arbitrary sizes, into which various components are poured in a certain order. nutrient soil. The dimensions of the beds should be such that it is convenient for you to work. Some gardeners build beds of such a height that they can not bend over at all during sowing, weeding and watering. The height of 40 cm is considered optimal. The length of the beds is arbitrary, the width should provide free access to the plants. Usually it is 120-150 cm.
A high bed can be arranged directly on the surface of the earth, or it can be deepened. In any case, the design of the high bed should be durable and stable.
For the manufacture of the box, lumber with a thickness of at least 4 cm or round logs with a diameter of 8 cm is suitable. You can use brick or other construction material at hand. The inner walls are sheathed with a moisture-proof material - a film or oilcloth. Lay at the bottom grid- it will protect from mice and moles. To strengthen the structure are required vertical racks so that the walls do not sag.
The height of the structure being created is determined individually, the main thing is that it is convenient to work while standing or even sitting. Bed width - no more than 130 cm otherwise it will be difficult to water and care for the plants. The length is arbitrary, depending on your desire, the available space and the amount of filling material.
 When arranging a high bed without deepening, right on the surface of the earth, it is filled in as follows:
- The first, lowest layer is drainage (3).
- The next layer is geotextile (2). Geotextile - nonwoven fabric made of polypropylene fibers, resistant to various chemical compounds (alkalis, acids). It is not subject to rotting, the effects of fungi and mold, the roots do not germinate through it.
- The main layer is fertile soil mixed with hydrogel (1). Hydrogel is a material with a unique ability to absorb and retain moisture. Non-toxic, retains its properties at high and low temperatures in soil for five years.
Now about the material. Many refuse to install high beds due to the initial cost. Of course, a garden bed built of bricks is good. But it is expensive, and in a large area the costs will be very noticeable. To begin with, you can build a garden bed from the board.
Usually on the site there is always something from which you can build a simple structure and a fence for the garden. It can be the remains of slate or finishing plastic. Such high beds will not be durable, but for several years you will definitely not have to dig anything.
Convinced of the effectiveness of the technology, it will gradually be possible to build capital beds.

To extend the life of a wooden garden bed from the inside, it will be useful cover with thick plastic wrap or others polymeric material. On the small areas you can build multi-level beds.
The lowest high bed will be from South, and gradually the height of the beds should increase. Then all the plants will get enough light, as they will not obscure each other.
On the site marked for the garden, the upper fertile layer of the earth is selected and set aside. If the depth turned out to be insufficient for laying the foundation of the walls of the beds, it is brought to the required level, 25-30 cm will be enough.

Laying high beds
High beds are built, now you can start them bookmark. In areas with rainy summers, it is worth taking care of drainage. Do not be afraid of this word, you will not have to build anything. Just fill the bottom layer with debris that has accumulated on the site. So you will put things in order, and prevent stagnation of water in the garden. Branches after pruning the garden, waste paper, rags - everything that will rot for a long time will also go here.
If rodents have been seen on the site, it will be useful to put a metal plaster mesh with a small cell under the drainage layer. Moles and mice will not pass through such a barrier.
On a layer of long-composting material put leaves, grass, of course, the one without seeds. Such a layer will quickly overheat, moreover, heat will be released during the composting process, which will significantly shift the ripening time of the crop. Now water the high bed with water and cover with a layer of fertile soil that you previously set aside.
During the season, a high bed several settle down, then you will fill it with compost, which will now ripen in a secluded corner of the garden. You will no longer burn fallen leaves or take them to a landfill, but will begin to collect all organic matter for compost. This is another advantage of raised beds. The use of chemical fertilizers is not required here, because a bucket or other organic fertilizer can always be prepared for a limited area of \u200b\u200bthe beds.
Benefits of raised beds

So what did we end up with? It is not necessary to dig a bed, and even more so, the paths around it. Sometimes you are amazed when you see gardeners digging up the entire plot, and then treading paths. A reasonable question arises: why?
Even if there is no high bed, there is no need to dig where they walk. Is that to help the weeds break through the layer of trampled earth. Before planting seedlings or sowing seeds, the ground in the garden is simply loosened. Thanks to the presence of compost, such soil is light and fertile.
On high beds you can grow two crops a year. These do not apply to cabbage and carrots, but growing and harvesting radishes or lettuce before the main sowing is quite realistic. The fact is that high beds warm up well not only from the outside, but also from the inside. Decaying drainage material has enough energy to start seeding early vegetables much ahead of time. A high bed is an ideal preparation for a greenhouse. By installing a greenhouse in early March, you will be able to harvest fortified greens on your site throughout April and early May.
You don't need any additional heating. By the time the time comes to plant seedlings of tomatoes, peppers and eggplants, you will have time to harvest the first crop. Similarly, you can use the garden bed after the main crops have already been removed from the garden. Daikon, onions, cilantro and other crops with short ripening periods behave well on a high bed.
high bed requires more water than usual, therefore, in areas with dry summers, drainage can be dispensed with, and the height of the beds should be small. The sides protruding by 15-20 cm will be just right. Thickened plantings are allowed on high beds, and in hot summers they must be mulched.
Try to equip one small garden bed, and you will be able to fully appreciate all its advantages on your own.
We make high beds-boxes
How to make raised beds: 100 useful ideas
You will be surprised at your past doubts - whether to make high beds in the country ... Your back will be grateful to you - you just bend down a little to care for the garden. Your knees will thank you - you can just sit on the edge of the garden and work on your garden. Your plants will thank you - no more competition from weeds or nearby fruit trees. Your land will be grateful to you - you do not trample it down and ennoble it with humus. Your high-bed garden can look beautiful, comfortable, and reward you with a generous harvest.

How to make high beds with your own hands.
1. First we must mark out the place for the beds. The usual width of the beds is 1.2 m, the length can be any. We mark the rectangles of the desired size on the ground with sand.

2. We collect high beds. The high bed has no bottom and consists of posts with grooves on all four sides and boards with corresponding grooves. You can buy ready-made garden fences or make your own. For fences, it is better to take hardwood, because. conifers emit resin, which can have an unnecessary effect on soil composition. We check the horizontal installation of the garden box with a level.

3. We lengthen the high beds. Because Our beds are modular, we can extend our beds from any side with another module.

4. How to protect a high bed from rodents. Even if you have not encountered moles and other underground garden pests in your summer cottage, it is better to provide protection for your garden right now than to unsuccessfully fight these rodents later. At the bottom of each box we put a metal mesh so that it goes a little to the edges of the fences.

5. How to protect the soil on a high bed from being washed out into the main soil. To do this, we use ordinary packing cardboard in two layers so that it covers the entire bottom of our garden box. If there are not enough whole pieces, we use scraps of cardboard - we fasten them with a stapler with the main piece so that the cardboard at the bottom of the box does not move when the soil is poured.

6. The soil for high beds should be light, crumbly and "fluffy". You can easily check its quality by poking your finger into the ground - if it sinks to the third joint, this is the norm. To improve the composition of the soil, you can add peat or compost. We pour the soil into the garden box, check its horizontal level, water it to compact it a little. During the season, we will need to add a little soil.

7. Irrigation system for high beds. Along the contour of the high beds, it is planned to fix a garden hose with watering nozzles: we need 90 and 180 degree splitters.

8. Trellis for high beds. Because the earth in the high bed is loose, then it will not be possible to install a trellis in it, so we fix the trellis from pvc pipes into the ground next to the garden box. We stretch nets on the trellises for climbing plants- cucumbers and beans. For tomatoes, we install light supports made of steel rod.

What you need to know when arranging a high bed.
1. Try to protect high beds from strong wind and heat, creating partial shade for them with trellises of flowers or tall shrubs.
2. The long side of the bed should face south - so the plants will be evenly lit, otherwise, taller plants will obscure the others.

3. Planting density on a high bed is twice as high as on a regular bed. So plants fight weeds and create a humid microclimate with foliage.

4. High beds with sides will make it possible for older people or people with back problems to take care of the garden.

5. A high bed is a warm bed. Such a bed warms up faster in the spring, and if you make a mini greenhouse on its basis, it will surprise you with an early and generous harvest.

6. Divide a long, tall bed into square segments with cross braces to reduce soil pressure on the side walls of the bed.

Fences for high beds.
1. Most often, wooden fences are used for understandable beds. There are several points here - do not use boo wood, especially sleepers, which may contain harmful chemical substances. Do not treat fresh wood with wood preservatives unless you are sure they are completely environmentally friendly.

2. Wattle as a fence for a high bed. For all its environmental friendliness, such a fence has three significant drawbacks - the soil in the bed dries quickly from the wind, proper thermal insulation of the bed is not provided, the soil can spill out through the cracks. Everything is fixable - use a layer of double cardboard around the inner perimeter of the fence. Environmentally friendly, the air gap between the sheets serves as thermal insulation, the earth no longer spills out.

3. As a fence for a high bed, you can use a metal profile, including from an old roof or fence.

5. You can make fences for a high bed with your own hands from brick or concrete. This is a very good option, but keep in mind that concrete will affect the acidity of the soil in the garden for 2-3 years.

6. The best raised bed railings are plastic. They do not emit anything of their own into the soil, excellent thermal insulation, long service life and the ability to set any shape of the beds, unlike standard rectangles of beds with wooden fences.

7. Fences for high beds from improvised materials. You can make the sides of the beds from bottles laid like bricks on a concrete mortar.

Why do we need high beds.
High beds allow you to increase the area under the garden. you can use inconvenient slopes or poor or weedy soil. Raised beds provide an environmentally friendly way to deal with weeds and soil erosion.

Such beds warm up faster and give more early harvest. They allow more economical use of moisture for irrigation.

Various types of high beds.
In addition to the traditional raised bed with high sides, there are several other types of raised beds.
1. Circular high bed. It consists of a round frame, in which there is a path to the center of the garden. This form of high beds is also called the "keyhole".

Branches, roots, paper, compost are placed at the bottom of the beds. In the middle of the bed there is a tunnel for fresh organic waste and water.

This bed design provides desired humidity and continuous enrichment of the soil.

2. High bed without fences. When arranging such a bed, the trunks of trees (not conifers), branches, roots, snags are laid in the ground at a shallow depth; the second layer is this sod removed from the place where you make the bed, laid with grass down; the third layer is 20-30 cm of the main soil mixed with humus.

For irrigation of bulk high beds, an irrigation irrigation system is used when water comes from a ditch between the beds - a good option for gardens flooded in the spring, or you can use a drip irrigation option when water enters the bed from mini terraces.

The paths between the beds are covered with straw or large sawdust. Never step on the ground in a high bed - this will compact it, and it will be more difficult for plants to receive moisture and nutrients.

High beds of this type can be used not only for a vegetable garden, but also for growing shrubs and fruit trees, if you have problematic soil for them in your summer cottage. The service life of such a bed (until the first tree layer with trunks completely rots) is 20-25 years - this period is enough for any fruit tree.

Spare no space for paths between high beds - so you can always drive there with a garden wheelbarrow both for harvesting and with a new portion of humus. Have pity on your back - use a wheelbarrow.
If your raised beds are located next to fruit trees, you may need to install a root barrier before laying out the beds - dig a trench, cut the root on the way to the beds, install a metal sheet into the trench, which will prevent the root from growing in that direction and cover the trench with soil.

Learn more about raised beds through your own experience. There are many interesting finds, experiments and new discoveries in this topic for every gardener.
Video with 100 inspiring examples of the use of high beds in the country.
We will send the material to you by e-mail
Working in the garden takes a lot of time and effort, so every summer resident tries to simplify the process of planting and caring for the crop. The main problem is the need to be in a bent position for a long time, which causes back pain and may begin headache. But this can be avoided by organizing high beds in the country with your own hands. Photo and detailed description technologies, the devices given in this article will help determine the type of beds and the material from which they are best constructed.
The original high multi-level design will be the highlight of your landscape
Raised vegetable gardens are gaining popularity more and more rapidly; they are used not only for growing vegetables, but also for planting flowers (). Through the use various materials for the construction of borders for beds (or flower beds), some options have a very attractive appearance, due to which they are increasingly used in open areas of the garden. However, in order to properly arrange high beds with sides, you need to know some of the features of such an organization of space in the garden.

Advice! Do not arrange high beds in southern regions. In them, the earth already warms up enough, and with such a planting, the roots of plants can burn.
Features of the device of high beds
First of all, you should follow the recommendations on the size of such beds:
- Height.
Of course, the main thing is that it is convenient to work with a new bed, the arrangement at the waist level is considered optimal, but in each case everything is individual, so be guided by your feelings.
In addition, the height depends on the degree of soil fertility. So for fertile soil the minimum value is 15 cm, for infertile - 30 cm.
- Lenght and width.
The length of the structure can be any (as far as your garden allows), the main thing is to further strengthen the extended sections with retaining posts. Width should be given special attention. It is advisable to plant no more than two rows of plants in a bed 90-120 cm wide. This way they will receive a sufficient amount sunlight and you can easily reach everyone.
Next, you need to choose a place to install a high bed. At the same time, the quality of the soil of a particular site is not of particular importance, since it will not participate in the life support of the plant. The main thing is to check whether a sufficient amount of light enters this area of the garden, it is desirable that the sun's rays illuminate the plants for at least 5 hours a day.

On high beds, you can grow almost everything: from vegetables to berries. However, plants that are too tall (for example, corn) should not be planted in them because of the complexity of their subsequent care.
Pros and cons of high beds
Many summer residents continue to use ordinary beds, despite their inconvenience. Compared with the traditional device method, high structures have the following advantages:
- The soil under such beds can be any.
Here we are talking about both its quality (fertility, the presence of sand and stones), and the features of the landscape (high beds can be arranged even on a slope without harming the crop).

- Ease of installation.
When arranging such beds, the use of technically complex tools and materials is not required, improvised means will be enough, and what is left of the construction site (for example, slate, boards, and so on).
- Ease of operation.
Planting, watering, harvesting - everything will be easier and faster than with a traditional device. This is especially important when working with undersized crops, for example, high beds for strawberries will be a salvation for any summer resident, because the search for this berry takes a lot of time.
- The erosion of the soil during irrigation is excluded (provided that the sides of sufficient strength and height are properly organized).
- Fewer weeds.
Due to the lack of direct contact with the rest of the garden. In addition, the soil in high beds is easier to fertilize and renew for maximum quality.
- Increased disease resistance is characteristic of plants grown in such beds.
- Possibility of earlier boarding.
When the ground has not yet thawed and even in greenhouses they do not start planting, high beds are already ready, since the working soil layer is above ground level, which means it warms up much earlier.
- There is no need to tie plants (eg cucumbers and tomatoes), you can leave them hanging down.
- Instead of hilling, you can loosen the ground shallowly, which reduces the time and effort spent on caring for the crop.
- The earth does not trample down from walking, so it stays loose longer, supplying enough oxygen to the root system.
- Attractive appearance.
There are many materials suitable for arranging high beds, so you can choose the perfect option that will be the highlight of your site.

Nothing is perfect, so beds of this type also have disadvantages:
- Rapid drying of the soil.
Main drawback this method arrangement of the territory, because of which it often becomes impractical (especially in elevated areas). You can correct the situation by frequent watering, The best way- the device of a drip irrigation system (then the soil will be evenly wetted over the entire thickness without your participation).
- Installation takes a lot of effort and money.
This disadvantage is debatable, since the forces spent on arranging such a garden bed are nothing compared to the forces that will be required to process a traditional garden bed. As for money, their investment can be avoided if improvised materials are used.
- Soil freezing in winter.
Due to the small volume, the soil freezes faster and harder than with traditional planting, which can be detrimental to perennial crops.
Advice! To simplify crop care, install a system in advance drip irrigation. So the plants will receive the same and sufficient amount of nutrients without your participation.
Related article:
This article tells you the easiest way to do it in the country. Photos and descriptions of the most successful ideas, as well as ways to implement them, should help make your site comfortable and well-groomed.
How to make a high bed in the country with your own hands: types, materials
If you want to make a non-standard garden bed with your own hands, first you need to understand the types of such structures. Summer residents distinguish beds by design features and the method of organizing the side.
According to the design of the beds are:
- High.

- Multilevel.
The most common case is the construction of a multi-tiered bed for strawberries, it is not difficult to do it with your own hands, and the harvest time will be significantly reduced.

- Vertical.

In addition to the shape of the beds, it is necessary to choose the material of the sides. Improvised means are usually used, but in order to achieve the best result, it is advisable to responsibly approach the choice. In fact, the sides can be made from anything, but the most famous and convenient are:
- Wood.
You can buy boards for high beds quite inexpensively, so the tree is often used in this case. However, this material has a significant drawback - ants and other insects often start up in it, which affects the quality of the crop. If this happens, you need to replace the sides.

- Slate.

- Plastic.
Durable and unpretentious material, however, it is worth paying special attention to its quality, especially environmental safety.

- Brick.
Durability and attractive appearance are the main advantages of this material. The disadvantage is the price, but if there are bricks from the construction site, this solution will be an excellent choice. ohm.

- Plastic pipes.
Great for vertical beds, as they are very easy to mount.

What is the design of the high bed? For its installation, it is necessary to install the sides of the selected material, then sequentially lay the following layers:
- Geofabric to prevent the rapid loss of nutrients into the soil during irrigation, as well as to protect against pests and weeds.
- Drainage (it can be rubble, brick fragments, and so on).
- Grass and peat.
- Priming.
Related article:
What are their advantages, examples creative solutions, average prices, consumer reviews, how to properly assemble a garden bed from panels with your own hands. Read about this and much more in our review.
Do-it-yourself vertical gardening: photo, technology overview
Vertical beds - one of the varieties of high, more precisely - an extreme degree. They are ideal solution for small plots, as they help to make the most efficient use of free space.

Vertical beds have the same advantages and disadvantages as simply high ones, only to a greater extent (for example, tillage is required even less, and the lack of moisture is even more pronounced), but there are other advantages of such an arrangement:
- Significant space savings.
Such a structure can even be attached to the wall of a building, the main thing is that a sufficient amount of sunlight falls on it.
- Mobility.
Any vertical bed can be equipped with wheels for quick movement to another place. But even without them, some designs are very light weight, so moving does not take much time and effort.
Vertical beds can be constructed from almost any material, as long as it is durable, strong and environmentally friendly. The most high-quality designs that have already been used by a large number of summer residents:
- Pyramid bed.
- Bed of plastic pipes.
- Vertical mesh bed.
- Using pots.
- From tires.
Not every summer resident is ready to spend time and effort on construction vertical beds for strawberries and other undersized crops, so many resort to buying this design.
How to buy a vertical bed for strawberries and other undersized crops
Thanks to their unique design, vertical beds bought in specialized stores are very popular. When buying, it is important to pay attention to the following points:
- Check if the material of construction complies with environmental and fire safety standards.
- Compare the dimensions with the available area.
- Specify the possibilities of watering plants (some modern models vertical beds are equipped with channels for efficient watering).
- Find out which plants are suitable for this system(each plant has its own planting depth, it is necessary to resolve this issue before buying in order to avoid subsequent problems).
There are a large number of both expensive and modern, as well as budget models of vertical beds on the market. However, if you do not want to spend money, you can make a good system yourself from improvised means.
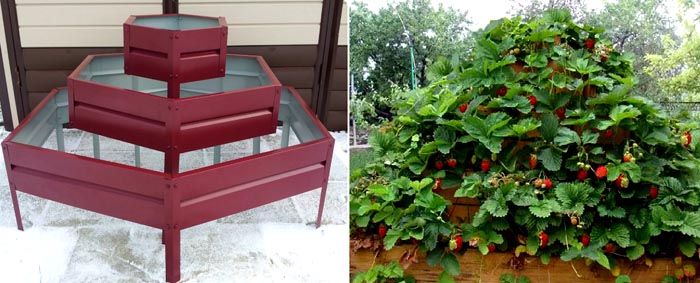
Do-it-yourself step-by-step production of a pyramid-bed for strawberries: dimensions, features
Self-construction of a pyramidal bed for strawberries is a rather complicated and lengthy process. First you need to stock up on the following tools and materials:
- Wooden boards cut according to the drawings.
They must be covered with drying oil and varnish to increase the service life. It is prohibited to use chemicals, which are quickly absorbed into the ground and affect the safety and taste of the berries.
- Nails.
They are selected depending on the thickness of the wood used.
- Hand tools (hammer, planer).
- Plastic pipe with holes along the entire length.
- Soil and humus to fill the frame.
- Grid.
First of all, we prepare the base for the pyramid and lay the grid on it. Then we install the lower tier of the structure on it and fill it with soil (about 150 mm).Now you need to install a plastic pipe in the center for irrigation, while tightly closing the bottom hole. Next, the humus is laid.
All layers are repeated in the above order until the desired height is reached. At the same time, it is important to reduce the size of each subsequent bed frame with a pyramidal structure for maximum illumination of the lower layers, as well as ensuring optimal load on them.

Step-by-step production of vertical beds from plastic pipes for strawberries, greens or flowers
Among vertical beds, structures made of plastic pipes are very popular due to their low cost and ease of installation and maintenance. In the manufacture of vertical beds from plastic pipes, one or two pipes can be used. Let's consider the first option.
Need to take sewer pipe 2.5 m long and, say, 110 mm in diameter. During installation, a third of the pipe is buried in the ground to ensure the stability of the structure, in the rest it is necessary to make holes with a diameter of 3-4 cm for planting plants in them.
After the pipes are securely fixed, we fill the holes with pre-prepared soil. In this case, it is not necessary to buy a specialized mixture, if the site has fertile land, you can use it. Strawberry seeds (or other plants) can be mixed directly into the soil or added later to existing holes (which is the best option).Watering the system is carried out from above, while the water does not flow to the plants quite evenly, so it is better to make a two-pipe system.

The peculiarity of installing two-pipe beds made of PVC pipes with your own hands is to insert a pipe of a smaller diameter into a large one. Watering will be carried out through a narrow pipeline in which small holes must be made to distribute water. In this case, the space between the pipes is filled with soil.

The main advantage of such systems is the ability to pull them out of the ground, put them and cover them on winter period(which is especially important for strawberries).
Using a construction grid for arranging vertical beds with your own hands
There are two ways to use a metal mesh to create high beds:
- as a supporting structure.
In this case, it is necessary to use a thick, reliable mesh that will be able to withstand a decent weight. In this case, the mesh is stretched between supporting pillars(or corners of the house), sinks a little into the ground and is securely fixed. Now you can insert pots or bottles with plants into it. This option great for growing seedlings or other plants that will later need to be transplanted.
- Mesh + polyethylene.
First, the mesh is stretched, then it is attached to it polyethylene film, and already between them soil with humus is poured. This design is suitable for growing herbs, onions and other small plants. It is not durable, so the best way to attach it is to the wall of the house. But even then it will not last more than 3-4 years.

In this case, a vertical bed is attached to the usual one (for cucumbers, grapes, and so on). This method is much more convenient than the standard tying to sticks.
How to make a do-it-yourself vertical bed for strawberries or other undersized plants from a flower pot?
A planter bed can decorate your landscape, as this design is original solution, moreover, opening up opportunities for the manifestation of fantasy. To create such a vertical bed you need:
- Several pots.
It is not necessary to look for pots of the same size, different ones will also be an interesting solution.
- Bar or pipe.
For fastening and ensuring the stability of the structure.
- Soil and seedlings.
- Paint (optional).
If you are using ceramic pots, which are quite heavy, the pipe can be omitted for structural stability. The main thing is to reduce the size of the planter as you move up and not make the design too high.

If you have light plastic pots, you need to pass a pipe (or timber) through the water hole, which will become the basis for the system. The cache-pot can be arranged randomly, painted in different colors, decorated - it all depends on your imagination.
Important! For the stability of the structure, it is necessary to deepen the pipe (or beam) into the ground. Otherwise, the pots will be fixed only to each other, which will not prevent the structure from tipping over under external influence.
Making your own hands a vertical bed of tires for strawberries: photos, features
Making beds or flower beds from tires is a fairly well-known method. However, most summer residents use tires only to enclose a flower bed, that is, creating only one level.
There are several ways to use car tires to create vertical beds:
- Installation of several tires in a checkerboard pattern.
You can also color them different colors, thus creating a sunny mood in any weather.
- Installation of tires of different diameters in the form of a pyramid.
You can also cut slots in the tires, then the vegetation will be not only on horizontal surfaces, but throughout the entire volume of the structure.

- Creating a high bed using several tires.
Article
We also recommend
 Switching power supply: repair and refinement
 Remote control of light
 Swimming lessons for preschool children
 Notes for the master - home household alarms
 Clock propeller on Atmega8
 Device and relay application examples, how to choose and connect a relay correctly Microcontroller and relay simple switching circuits