How to make a sandbox with a roof. Children's sandbox with a roof: photo ideas for giving
Perhaps all young parents of little fidgets dream of a children's playground in their backyard. Everyone knows about the benefits of children being outdoors, but when parents take their child out of town, they face the question: what to do with the baby. It is the sandbox that will occupy the child and allow parents to relax, develop their creative skills and spatial thinking. In this article we will talk about how to make a children's sandbox with our own hands, consider various photos and ideas for such structures.
It would seem that there is nothing difficult in building a sandbox: dig a hole, fill in the sand, enclose the sides, and you're done. But there are nuances that cannot be ignored.

You can easily make a children's sandbox with your own hands
When choosing a place where the future sandbox will be located, preference should be given to open areas where you can easily watch the child during the game. The sandbox should not be located in direct sunlight, but it is undesirable to do it in the shade. Penumbra is the best option. Build a sandbox near a large tree or place it under an umbrella so you don't have to worry about your little one overheating in the sun. But do not place it too close to the tree, as the leaves and fruits will constantly fall and pollute the sand.

There are many interesting sandbox options that can be purchased.

It is better to have a children's sandbox near the house, in full view of the parents.

Second stage: preparation of drawings and tools
A standard sandbox for kids under 5 years old is square and 2x2 m in size. However, the choice of size and shape is limited only by your imagination. If desired, draw up a drawing or diagram of the proposed playing place and enter the dimensions of the length, width, height there. Sketch the shape and additional details (umbrella, roof, partitions, seats). After that, it will become much easier for you to calculate the amount of building material required.

Tip: the shape for the sandbox does not have to be in the form of geometric shapes. A variety of sailboats and ships, flowers and even sand labyrinths will decorate the site no worse than designer things. Match them with various sandbox decorations that will complete her look.

So that the child does not overheat, it is better to make a sandbox with a canopy

An interesting option would be to make a whole sand maze
Choose natural building materials for building a children's corner: birch or pine boards are an excellent choice. You will also need bars, protective impregnation for wood, varnishes or paint, geotextiles or agrofibre.

Stock up on the following tools:
- Sander;
- Screwdriver or hammer;
- Self-tapping screws or nails;
- Saw:
- Shovel.
The third stage: preparing the foundation
Drive in pegs at the corners of the selected area and pull the rope. Inside the fenced area, remove the top fertile soil layer to a depth of about 30 cm.

For a sandbox, you need to choose high-quality sand
Sand can be poured already on an earthen base, but this will create difficulties in the future: the sand will settle and become contaminated. To avoid this, between the ground and the sand, a gasket is made of "breathable" materials. To do this, it is recommended to use agrofibre or geotextiles, which pass moisture well and protect the sandbox from plants and soil animals. For these purposes, plastic film or plywood will also go, but using them, make ventilation holes in them in advance.

So that plants do not germinate and moisture does not accumulate, it is better to lay sand on geotextiles
Then prepare the wood: carefully sand each board, bars (to reduce the risk of getting a splinter or scratch in the future), cover their surface with a protective impregnation.
At the corners of the pit, drive in the bars to a depth of 20-25 cm and attach pre-treated boards to them around the perimeter. They can be both wide and narrow. If desired, for strength, the corners of the frame are reinforced with the remains of a beam.

Do-it-yourself children's sandbox closing will protect from precipitation
It will be convenient for both kids and parents if seat-sides are nailed along the edges to the sandbox, as shown in the figure. In the future, children will be able to sculpt their masterpieces on them and put them on display or sit and relax.
Coloring the sandbox, if desired, easily turns into a real creative process. Color it with the children in all the colors of the rainbow or limit yourself to a strict monochromatic style. Paint color is a matter of taste, and all parents decide this issue based on their preferences.

DIY sandbox is a great addition to any playground
These hosts decided to stick with a monochromatic design.
You can emphasize the color of natural wood that has not gone out of fashion for a long time. Such a sandbox is universally suitable for any design of the site and is pleasantly pleasing to the eye.

It is interesting to paint the sandbox with bright drawings, your kids will really like them.
But the most interesting and original option will, of course, be painting the sandbox with all the colors of the rainbow. The kid will be delighted with the diversity of bright colors, and they will charge you with a good mood for the whole day.
Sides and seats can be decorated with drawings of animal figures, plants, favorite cartoon characters, geometric figures or even original ornaments. Such an unusual design will appeal to the baby, and you will develop his cognitive skills. He himself can decorate the playing place, developing creativity and imagination.


The tire sandbox can be covered with a film from rain and debris
Lid for sandbox
An essential piece for a playground is a lid. It will protect the sand from bad weather (rain, snow, strong wind), prevent its contamination with various debris: branches, leaves, plastic bottles, etc. It is important that if the sandbox is securely covered, this will exclude the possibility of stray or pet faeces in the sand, and you can safely let the baby go for a walk without fear for his health.
Interesting fact. The cover performs not only a protective function, but also a decorative one. Various design solutions for its design will add originality to the design.

The simplest version of a playground cover is an awning that is pulled up when the child has finished playing until the next walk. For this purpose, you can use a plastic film. But such a shelter has a drawback: insecurity. Both the awning and the film are easily damaged, not resistant to weather conditions.

A reliable and common option for sheltering a sandbox is a wooden cover. There are three options here:
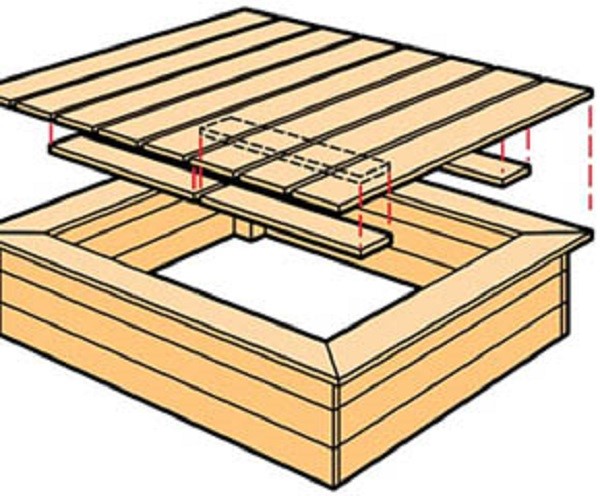
- Cover-shield: the initial boards are nailed onto the bars, carefully measuring the size. This is a very simple design, but the child himself will not be able to open and close the sandbox on his own.
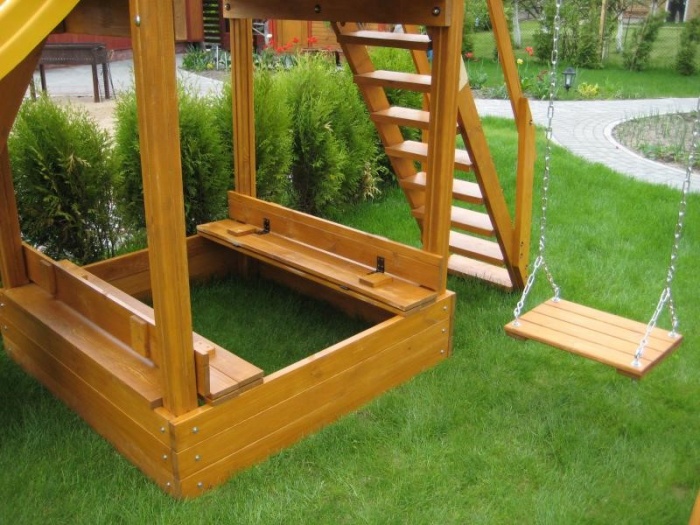
- Lid-door: two shields of a suitable size are made in exactly the same way, which are attached to the sides of the sandbox with loops, and handles are nailed on top. This design looks original, and the child will be able to easily open and close the lid.
- Cover-transformer. An unusual and practical solution when the lid forms a bench when opened. To do this, the initial boards are rigidly fixed to the sides of the sandbox, and the subsequent ones are fastened with hinges so that when folded, a seat with a back is formed. This design does not require a lot of effort and energy, and the result will pleasantly surprise and delight you.

The sandbox can be in the form of a table
Canopy for sandbox
In order for the child to feel comfortable during the game, when it is hot and scorching sun outside, it is recommended to install a sun canopy in the sandbox. As already mentioned, it is better to place the playground in partial shade, but if this is not possible, then the canopy will be an excellent solution to the problem.

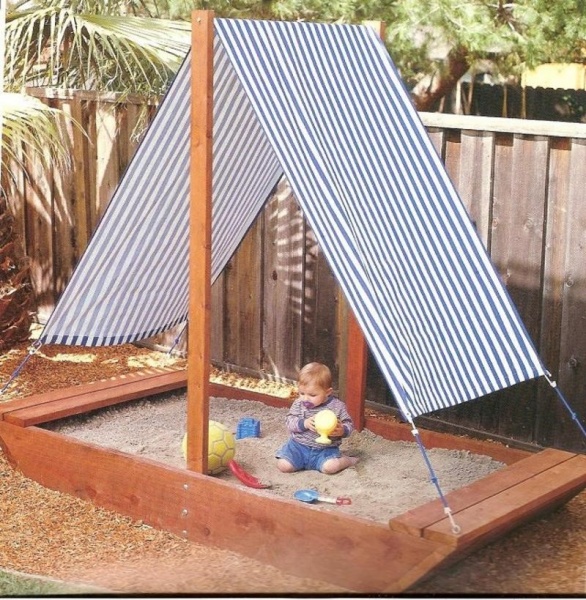
A simple and effective shelter from direct sunlight is an umbrella. This is not a stationary canopy, so you will need to remove it daily after a walk and fix and move it as the sun moves during the game.

Another option for a canopy is a canvas awning, mounted on wooden racks. But a stationary wooden canopy-roof fixed on wooden racks is more reliable. In this photo, we apparently have a combined version: a wooden roof covered with a canvas awning. This design is light and airy, but at the same time reliable.

Canopy - sandbox fungus
A decorative solution will be a canopy in the form of a "fungus", familiar to us since childhood. This will require one wooden rack, to which several triangular sheets of plywood are fixed so that a kind of umbrella is formed that resembles a mushroom cap. By coloring such a fungus, you can give free rein to your imagination, and you will get a decorative decoration for a suburban area.

The choice of sand for a children's sandbox
The choice of sand is approached carefully. There are three options here:
- River sand, which until today is considered the most suitable. It is natural, does not contain harmful impurities and foreign smell, clean. Everyone sculpted sea castles in childhood, relaxing on the banks of the river. The child will be delighted with the opportunity to build the same structures without waiting for a trip to the lake.
- Quartz sand. It is purchased at hardware stores. A good option, but it is not natural and may contain harmful building impurities in its composition.
- Sands with a high content of clay. These are special children's sands that are suitable for modeling, due to the special composition. Special substances are added to it that can drive away stray animals from sandboxes.

Sand is better to choose without pebbles and impurities
Interesting fact. Psychologists have proven that sand suppresses negative emotions, negative energy, having a calming effect on a person and his nervous system.

Before pouring sand on the playground, be sure to sift it. So you will be sure that there are no foreign objects in the sandbox. You will need about 1 ton of sand. Specify in advance the volume of the order, do not be discouraged if you order more than necessary. Remember that sand is also a versatile building material.

Show your imagination and make an unforgettable children's corner on your site! It will please the baby, decorate the design of the suburban area, and you will always find something to do with the child.
DIY sandbox
40 photo ideas:

A fuss in the sand is an indispensable attribute of children's summer happiness. And if there is no shortage of sandboxes on city courtyards, then on a personal plot the child risks getting bored without the usual entertainment. If your baby is growing up, it's time to start building a sandbox in the country yard. We tell you how to design and build a functional and durable sandbox with a lid with your own hands.
Sandbox with a lid: design features
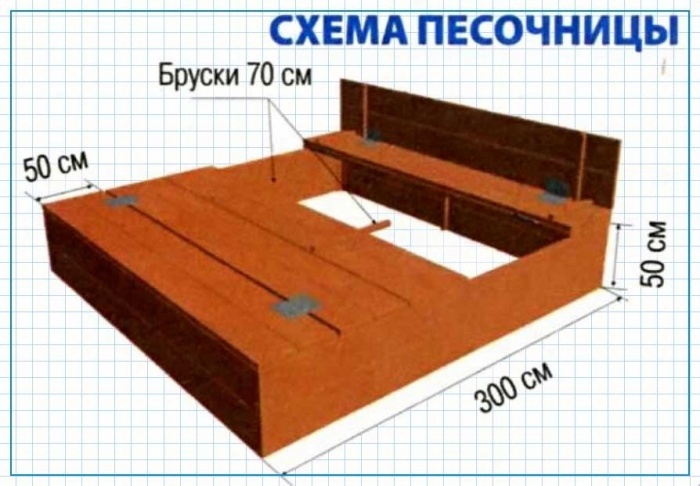
When starting construction, think over the main details in advance, starting with size. The sandbox should be deep and roomy enough so that a one-and-a-half-year-old baby can climb into it without any problems, but so that a five-year-old child is not cramped there. For this purpose, dimensions of 1.5 m x 1.5 m are suitable: such a sandbox will not take up much space and 3-4 children can comfortably fit in it.
Calculate the height of the structure so that the sand layer is at least 15 cm. Remember to leave a seating area on top. With a board width of 12 cm, you can build a sandbox in two boards, that is, 24 cm high. This is quite enough for the kid not only to sculpt Easter cakes on his “construction site”, but also build a sand castle.
But does the sandbox need a lid? For those who love order and care about the health of children, the answer is obvious.
Lid protects sand:
- from scattering throughout the territory;
- from excessive wetting during rain;
- from getting debris, branches, rotten fruits;
- from the encroachments of dogs and cats, arrange a toilet there.
The lid will protect the sand from contamination and become a comfortable bench
The simplest lid is a shield knocked down from boards, with which the sandbox is covered after the game. It is the easiest to make, but such a cover is very heavy and bulky, takes up extra space on the site during the daytime, and it is quite difficult to move it from place to place. Therefore, we propose to dwell on the transformer cover: its construction will take more time, and the result will justify itself. Build a lid that turns into a table and/or a comfortable stool with a back when opened: not only will kids love them, but adults will be lured to join them as well.
Transformer sandbox design (photo gallery)


Where to begin
To get started, stock up on materials and tools. We offer a list of the minimum necessary, without which you can not do without.
Building materials:
- Boards: for the construction of a frame of 1.5 m x 1.5 m, you will need two pieces with dimensions of 32x120x6000 mm; for the cover, two boards with dimensions of 20x120x6000 mm.
- Beam 2 pieces 50x50x1000 mm for fastening the body and the back of the lid.
- Agrofibre 1600x1600 mm for lining the bottom.
- Door hinges 6-8 pieces. For a more reliable design, use wicket hinges.
- Self-tapping screws.
- Staples.
- Impregnation for wood, stain, paint.
Instruments:
- saw (jigsaw);
- screwdriver;
- stapler;
- grinding device (planer, grinder + grinding wheel, sandpaper, etc.);
- roulette.
Construction step by step
Let's start with the construction of the frame. To do this, we cut the boards into the segments we need. With a standard length of 6 m, we divide each board into four equal segments, which ensures waste-free production.
The boards are carefully planed and sanded to achieve a smooth surface. We definitely don't need the splinters obtained in the sandbox. To make the sandbox last for a long time, treat the boards with a solution from fungi and decay. Antiseptic will provide protection against pests and extend the life of the product.
We saw the timber into four equal pieces of 25 cm each and grind them.
We collect the body of the sandbox, fastening it with a bar
We assemble a two-tier building of eight boards, fasten the boards in the corners with a beam. We carefully drive the heads of self-tapping screws (nails, screws) so that they do not protrude beyond the surface of the board and timber. Between the boards, glue a strip of self-adhesive sealant, then the sand will not wake up in the cracks.
Glue the joint of the boards with self-adhesive sealant
Having measured the dimensions of the resulting frame with maximum accuracy, we proceed to the manufacture of the transformer cover. You can make a table on one side of the sandbox, and a bench on the other, or you can place two benches opposite each other. Let's consider the first option.
Sandbox-transformer with a bench and a table
We attach the first board to the sandbox with self-tapping screws, we attach the second to the first with the help of two door hinges. Thus, we can adjust the size of the table and make it wider if necessary.
For the bench, we need six identical boards, two of which will go to the seat, two to the back and two to attach to the frame. How it should look like is shown in the diagram:
Scheme of a bench for a sandbox
We fasten the hinges to the outside of the lid so that the inner strips are bent when opening up. For fastening and fixing the backrest, use a polished beam. Calculate its length so that when you open the lid, it provides a stable support for the back.
The beam should provide good support for the back
Important: so that the hinges do not rust, paint them on both sides before installation.
With the active use of the sandbox, self-tapping screws may not be enough to securely fasten the hinges: with frequent opening / closing, they quickly begin to fall out. For greater reliability, use bolts for fixing.
So that, carried away by sandy excavations, the kid does not start digging the ground from the depths, make a bottom in the sandbox. It will not allow not only the earth, but also unwanted insects and plants to penetrate clean sifted sand. For the bottom, a dense agrofibre with high moisture permeability is suitable, which will eliminate stagnation of water in the sandbox.
Pull the agrofibre along the bottom of the sandbox and fix it with brackets around the perimeter.
DIY sandbox (video)
Installation and maintenance
Choose a suitable location in the area. Do not place the sandbox in an open area to avoid overheating and sunburn during all-consuming play. It is better to install the structure in partial shade - from the house, fence or bushes. Make sure in advance that at noon the place for the future sandbox is protected from the sun.
In the selected area, dig an even pit 3-5 cm deep. A little more than the area of \u200b\u200bthe sandbox so that it can easily “sit down” in it. You can make gravel around.
If you want the sandbox to be installed thoroughly, use a longer beam to fasten the box, then legs are formed at the corners of the structure, which can be dug into the ground.
Pit under the sandbox
When choosing between sea, quarry and river sand to fill the sandbox, we recommend choosing the latter. It is clean and does not contain impurities and salts, but it is still better to sift it when pouring, then the sand will be without pebbles and dirt, soft, gentle, pleasant to work with.
To make the children's "construction site" look cozy, surround it with lawn grass and lead a path to it.
Now the sandbox is absolutely “ready to use” and you can let the first little builders into it to test the object. It remains only to fill it with bright buckets, spatulas and molds as final touches. A sandbox made using this technology is simply bound to last for many years.
The more complex the construction of the sandbox, the more time and effort it will take to build it. At the same time, a good, conscientious thing will bring joy to more than one generation of kids. After all, sand games develop fine motor skills, creative thinking and simply give the joy of a carefree childhood. And for this it is worth a little effort.
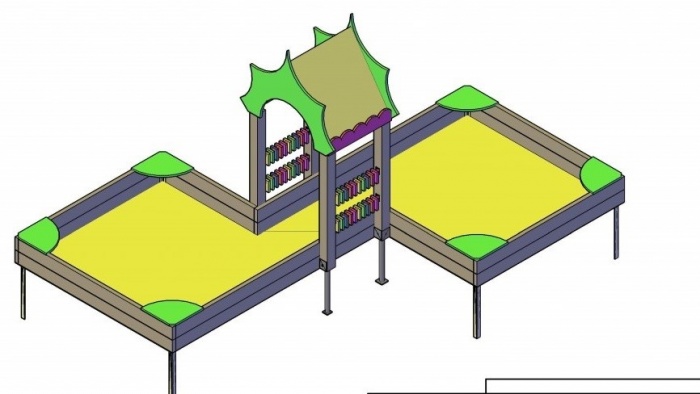
It is proposed to familiarize yourself with the project of a universal sandbox - a beach, for a private house or cottage.
Easy to manufacture, the design is a multifunctional transformer with elements that change position according to their intended purpose. In fact, this is a mini beach with all the attributes for children to relax on the shore of the reservoir. That's just, you can place this sandbox anywhere.
The materials for the manufacture of this miracle are publicly available and not expensive. When selecting materials, it should be taken into account that the sandbox can be in the open air, all year round. At least the whole season, in any weather.
Of course, the proposed design is easy to install and dismantle. But still, it is better to choose materials that are resistant to weathering.
Covers for functional compartments: sand containers, water containers and toy storage - use as walkways, walkways or play stands - additional convenience.


The exact dimensions of parts and design parameters are shown in the figure:

OPERATING PROCEDURE:
The work will need instruments: an electric jigsaw or a simple wood saw, a screwdriver or a set of screwdrivers, an electric drill or a brace with a set of drills, a clamp, a ruler, wrenches.
materials: polished board, plywood, self-tapping screws, washers, capercaillie bolt, fabric, trough


Manufacturing, we start with the internal and side partitions. When assembling top covers and covers, it is necessary to provide uniform gaps between the boards. To do this, before fixing the boards to the base, we lay pieces of 5 mm plywood between them.


All removable covers must be equipped with rope handles.
Tent holder, consider based on the size and location of the sandbox. The design of the canopy should not be complicated. Can be made in the form of an easily fastened cape.


On the surface parts, before screwing in self-tapping screws or screws, the places to be screwed in should be "cut off". That is, go through these places shallowly, with a drill, larger than the head of a self-tapping screw, with a diameter. This is necessary in order for the screwed screws to enter the recess. Do not stick out on the surface of the boards, sharp edges. The safety of children comes first.


After operation, a fully assembled sandbox can be additionally covered with a removed awning.
- this is a great way to show love and care for your baby, as well as a source of pride and admiration. After all, what could be better for your beloved children than a safe, environmentally friendly and simply beautiful place to relax and have fun.
It is important to remember that games in the sandbox develop children's creative abilities, fine motor skills of hands, eye, patience, balance and even perseverance in achieving the goal - after all, sand is not the strongest building material. In addition, according to psychologists, sand has a positive effect on the human psyche, absorbing negative energy, calms and stabilizes the nervous system.
How to make a sandbox with your own hands: step by step instructions
Today, parents and children are offered a wide range of sandboxes. The most advanced ones are plastic made of linear polyethylene. They are very safe - no splinters, plus - rounded shapes significantly reduce the possibility of injury.
In addition, they are UV resistant, while remaining bright and attractive, they do not need to be repainted annually, as wooden and easy to wash. Remaining in the sun, unlike metal ones, they practically do not heat up.
And in terms of durability, they are significantly superior to both wooden and metal samples. Due to their low weight and modular design, they are quite mobile - they can be transported in a car, and brought into the house for the winter. barn. However, with all its advantages, a plastic sandbox is quite expensive, especially considering the “temporary” nature of the purchase.
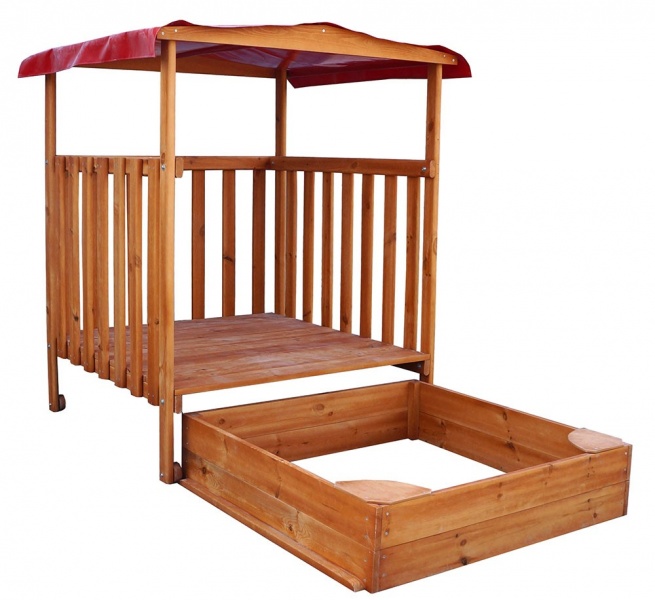
It can be just four high poles at the corners of the sandbox, on which an awning canopy will be fixed, or a wooden roof canopy covering the entire area of the sandbox. But a sandbox-fungus will look more decorative, made with your own hands from a bar (section 10x10 cm) and a “hat” from triangular pieces of plywood. Under it, you can wait out the sudden oncoming rain and hide from the sun.
The time of a happy childhood consists of many facets. Loving parents strive not only to provide the child with healthy food and beautiful clothes, but also worry about his development. This direction includes a physical and psychological component. Equipped playgrounds contribute to the pleasant pastime of the child, at the same time forming a lot of vital inclinations in him. A banal children's sandbox is no exception: patience, spatial thinking and the ability to communicate with peers are far from the whole list of character traits developed during the game. Often, children's recreation in the summer takes place outside the city, away from prepared sites. Therefore, you will have to make a convenient sandbox yourself. On which version of the children's design scheme to stop and how to properly organize the whole process, we will tell in detail.
We determine the place
In addition to studying possible schemes and preparing your own drawing, you should correctly choose a place to install a children's sandbox. When considering this issue, many factors are taken into account. The priority direction for placing a children's sandbox is the sector between the northern and southeastern parts of the site. The logical explanation lies in the influence of ultraviolet rays. The first half of the day is characterized by clear air and soft UV radiation, after lunch the picture changes, the ultraviolet becomes harder, so the formation of a shadow over the children's sandbox is necessary. The diagram below illustrates this idea clearly.
In addition to the orientation to the sun, there are several other factors that determine the installation location of the children's sandbox:
- Good visibility from the window of the house and the most visited points of the site. Children's unpredictability is a common occurrence, so the sandbox should always be in the field of view of the older generation.
- Equipping a children's sandbox in the shade of trees is not recommended. At best, it will become contaminated with bird droppings and other debris, at worst, a caterpillar will fall on the child.
- It is also not recommended to draw up a drawing of a children's sandbox, focusing on the nearest location of moisture sources, it can be an artificial reservoir or a regularly irrigated garden bed. Such places can be chosen by spiders, and meeting with them in a children's sandbox will not seem pleasant to a child.
- The northern side of housing construction will also have to be excluded - constant being in the shade prevents high-quality heating of the sand.
Remark ! In addition to installing the structure itself, the scheme should provide for the arrangement of the area around it. To avoid the mass transfer of sand into the house or onto the garden path, there should be a lawn within a radius of one and a half meters. In its absence, it is recommended to make a blind area around the sandbox.
Having decided on the place, they go directly to drawing up the scheme of the children's sandbox.
Design stages
The work on drawing up the diagram includes several stages: designing the box, starting from its shape, the drawing is supplemented with a cover and canopy design. What will be the basis of the children's sandbox depends on many factors:
- Is it planned to purchase new material or will the remnants of the previous construction be used.
- Your professional skills when working with wooden structures.
- How much time can you allocate to create a children's sandbox.
The most common version of the scheme is a standard square shape, with a side size of 1.2 to 3.0 m. The height of the children's sandbox varies between 25-30 cm, it can be equipped with a bottom. To fill a structure with a size of 2x2 m, you will need about 1 m 3 of sand. Having finished the drawing of the base, proceed to the design of the cover.

Cap options
It is foolish to doubt the need to install a protective element for a children's sandbox. The reasons why the diagram should contain the design of the cover are as follows:
- Attractiveness for dogs and cats to arrange a latrine there. So that children's rest does not end with treatment, hygiene standards should be constantly observed, and the sandbox is no exception. The purchase of expensive mixtures containing fragrances to repel animals does not always solve the problem for a long period. Firstly, the substance quickly disappears, and secondly, the harmlessness of its effect on the children's body is in question.
- During heavy rains, the cover will protect against excessive absorption of moisture by the sand, and as soon as the weather improves, the child will be able to start playing his favorite games in the children's sandbox.
- You can save money and not include the installation of a cover in the scheme, but protection in the form of polyethylene, pressed down by pipes or bricks, is not aesthetic. In addition, it is not possible for a child to remove such protection from a children's sandbox on their own.
Let's leave the options for drawings with complex structures in the form of a fan-opening lid or equipped with a lifting mechanism aside. The simplest option for a children's sandbox is an ordinary removable shield made of boards, shown in the drawing below:
But this is not a very good solution to the problem, due to the possible child injury, if you want to remove it yourself. Recently, models of children's sandboxes equipped with a folding lid, which easily transforms into a bench, have been very popular. The design option is shown in the following diagram:
For ease of opening, it is equipped with handles, as in the photo below:

For a children's sandbox, you can use a scheme with a sliding lid, which later plays the role of a shelf or bench without a back. Convenient lower stands provide ease of opening and contribute to the stability of the structure.

Canopy equipment
The scheme of the canopy also has many variations. Depending on the planned life of the children's sandbox, thick fabric, plywood or thin boards can be used as a material. Mounting is selected based on the overall dimensions of the structure:
- For small children's facilities, two poles with a crossbar and a stretched awning are enough.
- You can stop at the version familiar from childhood and create a drawing with a fungus. But it is better to leave such protection from the sun as a last resort, because the pillar in the middle of the children's sandbox often brings continuous inconvenience, and the shadow goes to the side.
- For three-dimensional structures, it is recommended to install four support pillars. In this case, the canopy can be flat or in the form of a gable roof.
The drawings and photos below will help you decide on the shape of the canopy you need for your children's sandbox scheme.

We prepare the site
It is extremely rare that structural schemes are used in the work, which are removed for the winter or equipped with rollers for moving around the site. In most cases, a children's sandbox is installed on an ongoing basis, so you should first take care of preparing the site. The process consists of the following steps:
- The area for the future children's sandbox is deepened by 20 cm.
- After leveling the soil, it is covered with sand by 5 cm and treated with a rake.
- It is optimal to use geotextiles or agrofibre as a drainage base for a children's sandbox. With a modest budget, dense polyethylene or propylene matting is suitable, which is spread with a margin of 30 cm along the border. This will prevent the germination of weeds and the penetration of pests, while speeding up the drying process of the sand.
- After installing the box, the recess not occupied around the children's sandbox is covered with soil and rammed, and the excess edges of the film are cut.
See the photo below for an example workflow:

The nuances of the construction process
After carefully rechecking the drawing of the children's structure, according to the chosen scheme, they proceed to the purchase, cutting and preliminary preparation of the material.
Material
Wood is the most commonly used material for the manufacture of children's structures. With proper processing and timely preventive care, a wooden sandbox will last more than 10 years. Details cut according to prepared drawings are coated twice with a water-polymer emulsion.
Remark ! The elements of the children's sandbox, which will be in the soil, are treated with bituminous mastic.
If the long-term operation of the children's sandbox is not planned, you can take aspen or alder for its manufacture. Coniferous trees will help to increase the service life. For construction, it is convenient to use quarter or tongue-and-groove boards. How to assemble a box from them is clearly shown in the following diagram:
Box assembly
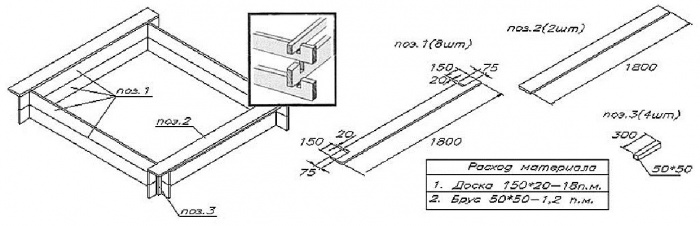
Focusing on the drawing, the box of the children's sandbox is assembled together. The boards are attached to the pieces of timber 50x50 using self-tapping screws. If the side of the structure exceeds 1.8 m, it is necessary to provide for additional fastening of the beam in the middle of the wall in the scheme. The height of the beam for a permanent children's structure, according to the drawing, should be 30-40 cm. The corners of the children's sandbox need additional reinforcement. How to do it correctly, see the diagram below:
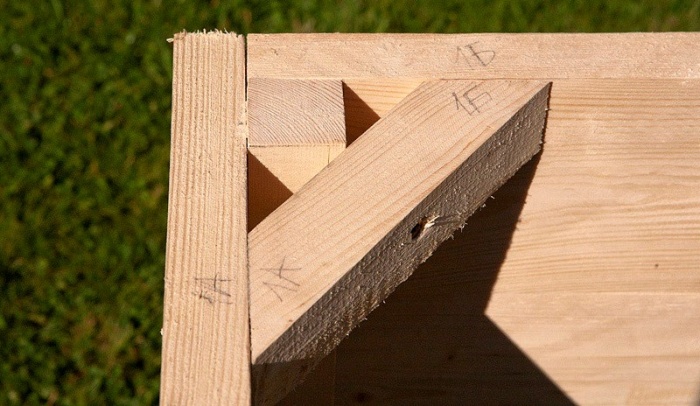
Advice ! All wooden parts should be carefully sanded to avoid injury to the child. Pay special attention to the corners, which are desirable to round off a little.
We have considered the simplest version of the sandbox box. The presence of experience and free time allows you to improve the design. After the base, they proceed to the equipment of the cover and canopy according to the prepared drawing. The scheme below will allow you to equip a miniature sandbox house that your child will like:


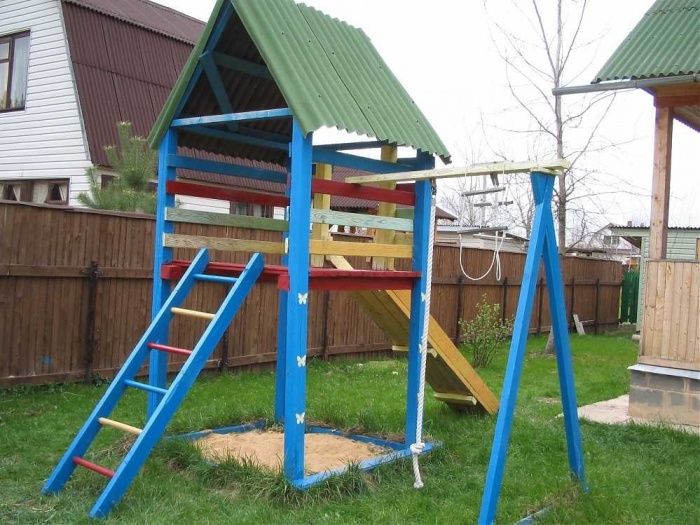
Also interesting is the children's building, where the sandbox is connected together with a slide:
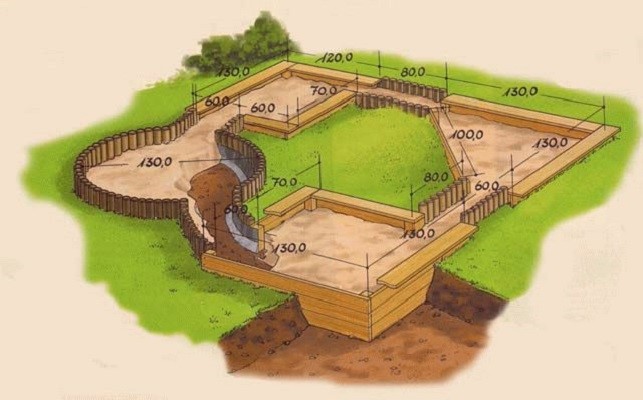
And finally, a few more interesting ideas that will be useful when creating your own drawing:


Good luck in your work and creative inspiration!
We also recommend
 Switching power supply: repair and refinement
 Remote control of light
 Swimming lessons for preschool children
 Notes for the master - home household alarms
 Clock propeller on Atmega8
 Device and relay application examples, how to choose and connect a relay correctly Microcontroller and relay simple switching circuits