How to beat a beam on the ceiling. Varieties
Beam to beam
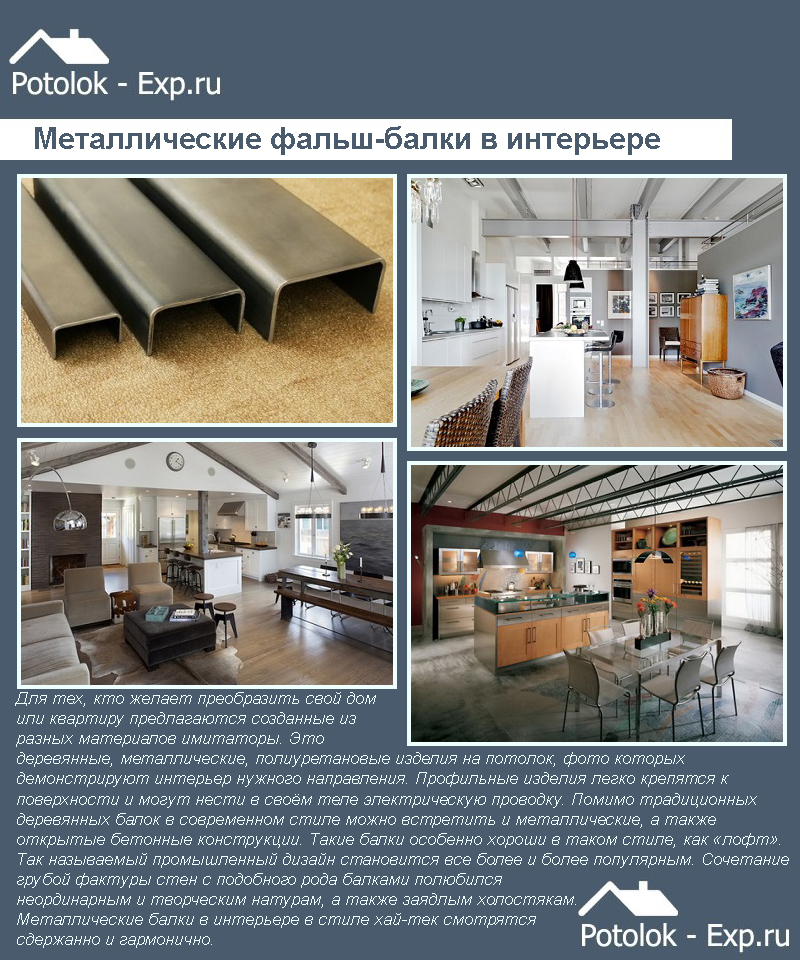
Regardless of the geographic affiliation of a rural dwelling, most people associate it with a living fire in a stove and wooden structural elements: beams, rafters. Although in our time houses are built not only from wood, and stove heating is not a priority, however, many owners country houses they prefer to put a stove or fireplace and decorate the ceiling with open beams. These details bring a special charm to the home, creating the atmosphere of a solid traditional home.
Ceiling beams decorate ceilings even in city houses and apartments made of concrete and brick. These elements of an authentic interior are very attractive for a resident of the "stone jungle".
Thus, open beams in our time are, as a rule, not functional, but decorative. This detail is called - "decorative beam". How are decorative beams used in the interior? What effects can this interior element achieve and how is it constructed?

Why are ceiling beams good in the interior?
If the ceilings are high, the beams will emphasize the volume of the room. If the room is too high, which deprives it of comfort, the beams can be placed low under the ceiling - this will visually lower its level, and the volume of the room will feel more comfortable.

In attics and attics, the design of a pitched ceiling with beams helps bring order to the space - the room becomes more harmonious.
"Hollow" beams (or "pseudo-beams", false beams) can mask the wiring and other communications running along the ceiling. Structures imitating beams are also used as boxes for mounting lamps.
And, of course, it should be said that decorative beams are simple, easy to install and very inexpensive way make the ceiling original.
What styles are suitable for ceiling beams?
Beams can decorate the ceiling in the interior in almost any style: from historical classics to ultra-modern. Well, if we are talking about interiors in ethnic styles, then the beams are exactly what the “designer ordered”.
If this is a classic with a claim to luxury, the beams can be decorated with paintings, vignettes, and carvings. Suitable for coloring soft color or even silver.

In strict classic interiors smooth lacquered beams look great - dark or white.


Smooth white, dark and gray beams are also suitable for modern interiors. Here given element looks no less impressive. The difference is that in a modern interior, creativity and bold decisions. For example, beams can be painted not only in white, dark brown or black, but also in bright color- let's say, make them red, blue or even pink.


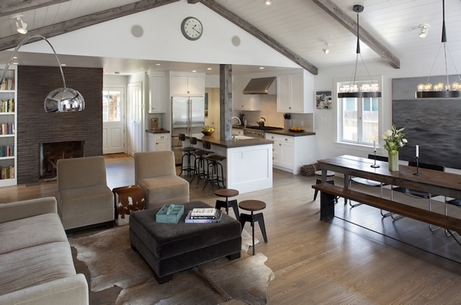
In loft and high-tech interiors, beams can be metal or painted with metallic effect paint. By the way, in modern interiors beams on the ceiling often coexist with those on the walls. This is an "industrial aesthetic", a reference to the theme of old abandoned factories and warehouses turned into modern luxury apartments.


Elements of this style (“loft”) can be repeated in an ordinary small apartment. A few beams, a few facing brick, some glass and metal, a few "naked" light bulbs and exposed wires - and you can enjoy the loft atmosphere.
For an interior in a rural style, of course, it is better to choose beams that imitate aged wood. Moreover, the beams here can be both light and very dark. Distinguishes their roughness, texture. The color of the beams can be very contrasting throughout the interior and not be combined with anything.


Beams in rustic interiors
If we are talking about the French country style (Provence), then here the beams are often quite neat and “graceful”. Preference is given to light, bleached beams.
Ceiling beams in the interior: color matters
Beams, contrasting to the ceiling, attract a lot of attention. If you want to focus on the beams, let them be very contrasting with the ceiling and the entire interior.

Most often, the contrasting beams are dark wood, while the ceiling is white. But the opposite solution is also possible: a dark ceiling and light beams, although it is far from being so spectacular.


If the beams merge with the color of the ceiling, they draw on themselves much less attention but their influence cannot be ignored. Staying in the shade, the beams add volume to the ceiling, make it structural, and bring dynamics. By the way, speaking of beams that merge with the ceiling, they usually mean either white or “wooden” beams on the corresponding ceilings. However, other solutions can be found: for example, both the ceiling and the beams can be blue, lilac, etc.

In the case of contrasting beams, a variety of palettes are also used. For example, the beams can be white and the ceiling blue.

The choice of the color of the ceiling and beams is made based on the style, color design of the interior, shades of furniture and textiles, etc. What should the beams in the interior be in tune with? With anything. They can match the color of wooden floors or furniture. They can be contrasting with the ceiling canvas, but match the color of the walls. There are no strict rules here.

You just need to consider that dark beams look more bulky and heavy. White beams seem weightless. Beams in light gray wood make the interior cool, while calm and serene. Black beams add graphic, bring rhythm, making the interior dynamic and "hard".


How to arrange beams in the interior?
Beams are able to visually change the geometry of the room. To visually expand the room, you need to arrange the beams in width. Well, the location along the wide side will make the room more elongated in appearance.

In order not to change the geometry, the beams can be placed crosswise (lattice). will come out imitation coffered ceiling. This beam finish adds volume to the ceiling.


Beams make out and small areas ceiling. It can be a “lattice”, and a “herringbone” made of beams, and other shapes.

Beams are also used to decorate niches in plasterboard ceiling structures.
One large beam on the ceiling can divide the zones: in this case, it is mounted at the junction of the zones - for example, above dining table, etc. Such a dividing beam is equipped with lamps.

Beams from the ceiling can go to the walls. Moreover, not a beam at all can go along the wall, but a thin bar in the color of the beam. This technique can be used to visually correct such a disadvantage as a low ceiling.
If the ceilings are very high, the beams can be lowered by fixing them on opposite walls. This visually organizes too voluminous space.

Beams and decor
In the kitchen, various hooks and holders can be mounted on the beams by hanging utensils and baskets on them. The beam above the bar can be equipped with glass holders.

In country-style kitchens, bunches of herbs and dried bouquets are hung from the beams.
In rooms, lamps are built into the beams or light sources, including chandeliers, are hung on them. In modern loft-type interiors, lamps on wires or even chains are simply thrown over, tied up or hung on beams.

In fact, you can hang anything on the beams - from photo frames on chains or shelves on ropes to a TV panel on a special ceiling bracket. If these are real beams, they even hang swings or "air" chairs on them.

Beams in the interior: from what and how?
Real full-bodied wooden beams are a luxury that is available mainly only to those who live in own house. Moreover, the presence of wooden beams as architectural structural elements should be provided in advance, even at the construction stage. mount wooden beams for the sake of aesthetics, in most cases it does not seem appropriate: they are too heavy, and expensive. It is much easier to create an imitation of wooden beams, since these imitations are indistinguishable in appearance from the original.
Imitations of wooden beams are usually made of polyurethane. Polyurethane beams weigh very little, which greatly simplifies the installation process. Their cost is not high. They can look different: like beams from old, cracking wood or like smoothly sanded, polished and varnished.

Another advantage of polyurethane beams is moisture resistance. They can, without fear of anything, be actively involved in the kitchen and bathroom.
The U-shaped shape of the pseudo-beams is also a big plus. The beam is hollow inside, so it successfully performs the function of the so-called cable channel, in which you can hide wires, cables and even pipes. These beams are easily and simply mounted.

Install such false beams in different ways. First, you can build on the ceiling in the places of the future location of the beams a kind of crate made of wooden or metal profiles, and then fasten the beams to the crate with self-tapping screws. However, if the beams are not too large, they can simply be planted on liquid nails.
With sufficiently heavy beams, a combined method is used. First, wooden blocks (small bars) are fixed on the ceiling. The edges of the beam are smeared with glue and applied to the ceiling. In this case, the beam is additionally connected with self-tapping screws with wooden block fixed to the ceiling. The beam, fixed with screws and glue, will sit securely in its place.
Imitation of beams can be done independently - for this it is not at all necessary to buy beams made of polyurethane or plastic. Pseudo-beams can be constructed from drywall or lightweight plywood.
First you need to decide on the size and location of the beams, then make markings on the ceiling and mount frames made of metal profiles according to the markings: a separate frame for each false beam.
After that, it is necessary to cut out the details of the desired size from drywall or plywood and screw them with self-tapping screws to the frame. In fact, you get long narrow boxes. When all the structures are ready, it remains to putty them, then sand, prime and cover with paint.
Polka dot walls and confetti decorDo you want to design in the style of a rustic house? One of the attributes of such an interior are beams. If in apartments many are afraid to use this element of decor, then in country house they have a place!
Sometimes it also happens that you have to mask the existing supports on the ceiling, which protrude strongly down. Surely you wondered how to beat the ceiling beam? Today we will talk about this.
Varieties of decorative beams
Beams are made of wood, metal or polyurethane.
- The classic version - made of oak, ash, pine. They can be solid or hollow inside, which is especially good for hiding various communications under them.
- Metal beams, as a rule, are very heavy, so they need to be fixed "tightly".
- Polyurethane beams have a fairly low weight, they can be freely fixed independently. The advantage of this material is that it is not afraid of moisture and does not absorb odors, so you can use it in almost any room. In addition, polyurethane can imitate many textures and colors, such as wood.
Design with decorative beams
Initially, the beams were used as a support for the attic, and took all the load on themselves. Over time, they began to be hidden under the ceiling, but recently many designers began to use beams in their interiors.
Beams will organically fit into the design:
- Kitchens;
- Living room;
- Bedrooms;
- cabinet;
- And even a corridor.
On a note! Their number and size should be chosen depending on the area of the room.

By the way, even the most ordinary can perform useful functions. On it you can fix unusual lamps or chandeliers hanging on chains. You can also zone big room with the help of well-placed beams on the ceiling.
Beams in various interior styles
Wooden beams are usually used in styles dominated by wooden decorative elements:
- Scandinavian;
- Rustic;
- Country;
- Victorian;
- Provence;
- Mediterranean style…
For high-tech style, metal beams are usually used, which emphasize the conciseness and practicality of the room.
Hide existing beams
Some people are thinking about how to make a ceiling beam, while other "lucky ones" are puzzled over how to hide it.
Let's look at the options for how to beat the beams on the ceiling.

Advice! To make the beam not stand out, make its color the same as the ceiling. Corners can be leveled with a ceiling plinth.
- In addition to lighting, a pattern or ornament can be applied to the beam to match the style of your design.. This option includes wallpaper and mirrors. They will visually increase the height of the ceiling.

- If the beam is in the kitchen, then you can use it as a hanger for kitchen utensils, fixing the railing on it.
In addition, you can install a bar counter down, and you get an island in the kitchen. This method can often be seen in foreign films.

- If the size of the beam is not very large, then you can hide it with a polyurethane false beam. It will look more beautiful than standard concrete or iron.

- Most often, the beam is decorated with ropes.. This technique is often used in eco-style, Mediterranean and country.
But what if the beam does not look aesthetically pleasing at all, and there is no way to disguise it? How to hide ceiling beams completely?
In this case best solution will hide it under a false or stretch ceiling. There are many varieties of them, and it is not necessary to make a complete ceiling, you can simply create a drywall box. The frame will look in this case in the form of the letter P.
It is necessary to fasten the frame of the structure to the ceiling; holes cannot be drilled in the beam itself, otherwise it will lose its properties.
It's important to know! Minimum indent drywall construction 15-20 centimeters from the base, and 2 centimeters from the stretch ceiling.
If the location of the beam allows you, then you can turn its disadvantage into an advantage. Make a built-in closet, and completely hide it. There will be a lot of useful storage space.
As you can see, using seemingly small, insignificant details, a beautiful and cozy interior. Show your imagination to the maximum, and you will definitely get an exclusive designer renovation. We hope you have found a way for yourself how to beat the beam.
October 22, 2016Specialization: master of internal and outdoor decoration(plaster, putty, tile, drywall, lining, laminate and so on). In addition, plumbing, heating, electrical, conventional cladding and balcony extensions. That is, repairs in an apartment or house were done on a turnkey basis with all necessary types works.
Decorative ceiling beams made of wood are inherently false, as they do not bear any load. These interior details are held by consoles. They look very impressive and decorate the room great, adding retro touches to the interior.
Today I will tell you how you can make and install them yourself, and I will also present you with a video in this article for a complete understanding of the process.
We make false beams
Advantages
Design features and advantages are as follows:
- first of all, wooden beams on the ceiling in the interior create a unique flavor and comfort, and it is definitely pleasant to be in such a room;
- You can make them for every taste, paint in any color and in any size;
- a very important advantage is that they are hollow, therefore, they are an ideal place for laying various communications - wires, cables, pipes, and so on;
- such products are also produced from wood-like polyurethane - they are lighter and more durable. However, you are unlikely to be able to make such a profile on your own, since molds for casting are needed here..
Material selection
No matter how carefully you assemble such a structure, it is important to choose the right material:
- to assemble fake wooden ceiling beams yourself, any type of wood will do. Only, of course, it is necessary that all elements be of the same breed, otherwise the texture will be different, and this does not always look good;
- the boards must be dry - if they are wet, then after some time after drying, the butt joint will become noticeable. As you know, the room is always warm, and the air rises, so this process will only contribute to deformation;
- it is desirable that the board be edged, of the same width and thickness, so that it is easier to make adjustments.
Note. When choosing a material, you should also pay attention to the deformation of the board. If she was strongly led, then it will not work to tighten the two elements tightly, especially since there is no way to use the clamp here. Therefore, the instruction does not recommend the use of warped wood.
Assembly
To make decorative wooden beams with your own hands, you cannot do with an ordinary hacksaw - here you need a plunge-cut circular saw (hand circular saw). Her clamping bar can rotate, that is, it can be set at any angle.
Although in this case it would be best to set 45⁰. You will also need at least a basic workbench where you can cut and assemble, and a pair of clamps to clamp the board while cutting to make it as accurate as possible.
So, fix the board on the workbench, set the clamping bar circular saw at an angle of 45⁰ and cut the longitudinal edges at this angle. Even if the disc is new, that is, sharp, it will still leave roughness that will interfere with a tight fit, so I recommend going through the cuts with coarse sandpaper.
When all three boards are ready (the bottom one with two cuts, and the side ones with one), you should prepare glue (you can use PVA or any other for wood) and bars to tighten the two elements.
In order for the self-tapping screw to attract the board well, drill holes in the bar for the screws to move freely. Try to ensure that the intersections are no closer than 50 mm to each other, otherwise the bar may split.
The distance between the screws should be no more than 15-20 cm - this frequency will ensure a tight fit, therefore, the joint will not be noticeable. Now glue the sections of the joined boards with glue, attach them to each other, insert the bar into the corner and tighten the elements with self-tapping screws. Do this not in a row, but best of all from the middle to the edges to avoid deformation.
But in order to do wooden ceiling with beams with your own hands, you will have to make consoles for them, on which they will lean. You can choose any form of consoles, or just the one for which you have enough skill as a carpenter.
The most popular options are shown in the top photo - you can use them, the main thing is that the console should match the width of the beam - it's much more beautiful.
Appearance
Finishing the finished profile depends on what kind of ceiling you have in the house on wooden beams, and the rest of the interior should also be taken into account. But the best way give cozy appearance is the brushing of wood.
This is an artificial aging of a tree, when it is removed with a metal brush upper layer and the structure of the tree appears with particular brightness. But not all types of wood lend themselves well to such processing - it is best to brush Siberian larch or pine, but on alder the surface turns out to be poorly polished.
This type of processing can be done a little differently, for example, with an ax - tilt the ax at an angle of 20-25⁰ and make random chips in the corners and along the plane. The tool must be well sharpened, that is, sharp.
Also, the effect of aging can be achieved by burning wood - for this you need a blowtorch or a gas nozzle. The firing should be uneven and the texture will show up with varying degrees brightness.
There is also special paints for artificial aging, which clearly highlight the growth rings and create the effect of comfort. It is possible to use them too.
In most cases, the manufacture of decorative wooden beams implies that they will display a solid mass of wood, so the structure of the wood should be preserved. As a rule, finished profiles are covered with stain and varnish. Stain makes them much darker, and varnish protects from various insects, fungal mold and moisture.
Decorative beams do not always have to be in rustic style. For example, if your walls are white, set to white plastic windows and doors, then the profile should be in harmony with such an interior.
In such cases, the boards are sanded with a grinder and painted in White color as in the photo above. The feeling of wood remains, but the design is much closer to modern.
Installation work
We will create such a design now, where we will not use consoles - the fastening will be done on bars. It makes no sense to put consoles here - the presence of vertical beams cancels them. As you can see, the beams here have different section, which gives a special charm to the interior - it turns out that one kind of comes out of the other.
I want to note right away, so as not to return to this topic later, that gashes are made at the intersections with vertical or horizontal beams. Only they need to be done with maximum accuracy in order to avoid gaps.
You can start from the corner on which the L-shaped profile is mounted and for this, the bars are first fixed - their cross section is not important, but it is much more convenient to use a 30 × 40 mm rail. One bar is screwed to the wall with screws, and the other to the ceiling.
Fastening with finishing nails
After installing the bars, a beam is put on them and fastened with finishing nails or self-tapping screws with an anti-corrosion coating. This is very convenient, since it is always possible to replace the ceiling beam in wooden house if necessary.
Decorative beams on the ceiling will give a special coziness to any room, do you agree?
If you, dear readers, have any questions or suggestions for creating beams on the ceiling, write about it in the comments, I will be happy to talk about this topic. In addition, your opinion is important and interesting to me!
October 22, 2016If you want to express gratitude, add a clarification or objection, ask the author something - add a comment or say thanks!
Previously, beams under the ceiling solved a completely functional task - they supported the ceiling. Now this one is exclusively decorative element most often found in interiors made in a rustic or old English style, in Provence, country and chalet styles. It is not bad to integrate beams into modern styles interior: loft, modern, minimalism, hi-tech.
The most advantageous decorative look in rooms with high ceilings, which dictates their placement mainly in houses with a ceiling height of three meters. Wooden beams under the ceiling stylish element home decoration, emphasizing the spaciousness of the room, and in some cases carrying a functional load (for example, it is used to hide communications). Most often, beams are placed in kitchens, halls, halls and offices.
Types of beams
Certainly, modern houses rarely decorated with real wooden elements under the ceiling. Although there are connoisseurs of the natural, who prefer real heavy beams for decorating the ceiling, as a rule, of a country house.
Building materials stores offer huge selection false beams made of lightweight and easy-to-install polyurethane. Visually, such elements are indistinguishable from natural wood, and in practice even surpass it in some respects.

The advantages of polyurethane false beams include the fact that they:
- not afraid of dampness, do not swell from excessive moisture;
- do not crack or deform;
- very easy to mount under the ceiling (including tension).
However, lovers of naturalness can opt for false beams made of MDF or chipboard, hollow inside. Veneers made of valuable wood species are glued onto such beams. You can find options made from lamellas. Beams come with sharp and rounded edges, U-shaped and L-shaped (for decorating joints).

Table. Comparison of polyurethane and wooden false beams.
To design a high-tech style, some designers use metal beams, however, such elements are more difficult to install and require the involvement of professionals for their installation.
How to make decorative beams on the ceiling with your own hands
Some craftsmen make beams with their own hands, which takes a minimum of time and is inexpensive. For example, in order to make false beams, you can use ordinary foam plastic, which is left over from the insulation of a garage or loggia.
Step 1. Sheets 4-5 cm thick cut into strips of the desired width.
Step 2 Glue the strips liquid nails into a U-shaped beam.
Step 3 After setting, cut the beams into segments of the desired length.
Step 4 Paste the beams self-adhesive film under a tree (except for the side that will be glued to the wall).

Using the same technology, you can make beams from plywood or even from ordinary boards. The boards can then be aged, stained and varnished.
If there is a desire to make beams from natural timber, you can buy edged polished timber, for example, 70x50. When choosing, be sure to check that it is even and dried. Then you need to process the stain and varnish and cut to the required length. It is also an inexpensive and affordable option.
Beam decoration
Each interior style will require its own style of beam design.
- For classic and Victorian styles, you can decorate the beams with gold carvings, decorate with patterns and vignettes. You can find such ready-made polyurethane beams for sale.
- White, black, brown as well as colored beams will be ideal solution for modern interiors.
- For high-tech style suitable design metal beams.
- To create a country style, wood will need to be aged.
- The rural style (country) is characterized by an emphatically rough texture.

Options for placing beams on the ceiling
False beams can decorate any type of ceiling: stretch, plasterboard, plain painted, etc. With their help, you can zone the room or create such a popular decorative element as a false window on the ceiling with imitation of stained glass. Decorative beams can imitate window coverings, between which a canvas with photo printing, mosaics, frescoes and even mirror panels are glued in the process of work. The modern European trend is very interesting, when the beams go to the walls.

Beams can be decorated from above LED backlight, which will give a special decorative effect. The beams in which they are mounted look amazing ceiling lights. All wiring in this case is hidden inside the hollow structure.
In general, the beams on the ceiling will give a feeling of warmth and comfort to the living space, bring a twist to modern interior styles and allow you to create the necessary authenticity in public institutions like clubs or pubs.

How to position the beams
If the room needs visual expansion, then the following points should be taken into account when arranging the beams.
- If you need to make the room wider, then the beams need to be placed on the short side.
- If you need to increase the length, the beams should be placed along the entire length of the ceiling.
- The criss-cross arrangement will give the room a visual dimension.
- One beam can be distinguished separate zone: for example, a bar counter.
Location frequency also plays a big role. For example, if the ceiling height is very high (which happens on the first floors of buildings), the close location of the beams to each other helps to reduce it a little. If the ceilings are of medium height, the beams should be fixed at a greater distance from each other. Also, beams can be laid "herringbone". Attic rooms without a ceiling, they look especially impressive if the ceiling beams pass through the columns and are fixed at the ends in the walls, creating the effect of a hut.

How to fix beams to the ceiling
The features of the procedure depend on the material from which the false beams are made. Let's take a closer look at each of the options.
How to glue foam false beams on a regular ceiling
This is the easiest option for placing false beams in modern apartment. If you want to decorate a kitchen or hall quickly, inexpensively and on your own, the best option can not found.
Step 1. First, marks are applied on the ceiling and on the walls to indicate the places where the false beams will be glued. Places of the sticker must be primed for better adhesion.
Step 2 Then the beam is smeared with liquid nails and glued to the required place. Styrofoam products are almost weightless, and liquid nails seize literally instantly.

Some instructions advise to spread the wall at the same time, but in case of excess glue, the beam may begin to slide down the wall. That's why golden mean must be determined empirically.
Step 3 If the room is narrow, you can stick 2 beams along the long walls of the room, and simply place the cross beams perpendicular to them. Such the simplest ceiling will help to hide the irregularities of the usual concrete ceiling and will look very advantageous.
How to quickly fix wooden beams to a wooden or concrete ceiling
This is also not very difficult and not expensive to do.

Step 1. On the ceiling we draw lines for placement.
Step 2 We drill holes in the beam with a 12 mm drill with a depth of not more than 0.5 cm every 30 cm.
Step 3 In the same holes we drill 8 mm holes, into which we drive 120 mm self-tapping screws.
Step 4 We apply the timber, mark the places for the holes on the ceiling.
Step 5 On the ceiling in the marked places with a perforator, we drill holes of 8 mm.
Step 6 We drive chopsticks into them.
Step 7 We fasten the beam.

Since the head of the self-tapping screw goes in, we cover these places with putty on wood. After drying, tint with stain, then with varnish. You can cover the caps of the self-tapping screws with wooden corks or special decorative overlays imitating the caps of forged nails. You can attach nails to ordinary dowels - this is an even faster option.
If you plan to cross-distribute the beams, then unevenness may occur at the joints. The design of these nodes depends on the style in which the room is designed. If this is country music, for example, then these places can be covered with leather decorative belts or large string glued in several rows.
Installation of polyurethane decorative beams on beams
This professional way installation.

Decorative beam B1 made of polyurethane (wenge, cherry, oak, olive, walnut, light oak)
Step 1. For a polyurethane false beam, wedge-beams are made of wood, which fully correspond to the internal cavity of the beam.
Step 2 The ceiling is marked: lines are drawn along which the beams will be attached.
Step 3 Wedge bars are installed along the line every 1 meter on self-tapping screws or dowels.
Step 4 When installing a false beam, glue for polyurethane is applied to the ceiling. This is necessary not for fixation, but for a tighter fit to the ceiling so that there are no gaps left.
Step 5 The beam is tightly put on the bars and screwed through the sides with screws.

Step 6 The screws that fasten the false beam to the beam and the joints of the beams are covered with decorative leather straps with rivet imitation.
Features of the installation of beams on a stretch ceiling
To do stretch ceiling and decorate it with decorative tanks, you should install embedded parts similar to those installed for hanging chandeliers. Mortgage for a decorative false beam - it's easy wooden block required thickness. It is attached to the main ceiling, and the stretch ceiling is stretched so that it passes touching the lower plane of the bar. Then false beams are attached through the ceiling to the timber.
You can use the fastening of beams with suspensions. Hangers are attached to the base. and after stretching the ceiling, cuts are made in the canvas. The specific steps depend on the type of material.
If the stretch ceiling has been hanging for a long time, but you want to somehow diversify the interior without dismantling the canvas, you can use external consoles with fasteners to the wall or internal bars screwed to the walls. Beams will be attached to them with self-tapping screws.
Features of the installation of beams on a plasterboard ceiling
Because plasterboard ceiling is suspended, you can’t just attach beams to it. You will have to remember / tap the places where the frame profiles go, and attach the beams to them. Can be attached to any convenient way: with a long anchor through a beam, plasterboard and profile or on a bar attached with a self-tapping screw to the plasterboard and profile. A self-tapping screw screwed exclusively onto drywall will not hold the beam for a long time.

Some nuances
The joints of the beams or the exit points of the self-tapping screws are covered different kind decorative overlays, among which are the following:
- masking with a decorative rope;
- masking with a wax pencil;
- masking with forged copper plates;
- decorative leather belts.
To decorate the space, you can use decorative consoles that are sold with beams and create an imitation of supports on the walls. If inside the polyurethane beam there will be cables for lighting fixtures, then they should be hidden in a corrugated protection.
Video - Installation of wooden decorative beams on the ceiling
In this way, you can get a very beautiful unusual interior with an emphasis on wooden beams under the ceiling. This interior does not require big investment money, and you can fix the beams with your own hands in just a few hours.


