Partitions from hl. All about the thickness of drywall partitions
13846 0 3
The thickness of drywall partitions: selection and calculation
Greetings, comrades! Today we have to find out what the thickness of a plasterboard partition can be, depending on the requirements for it, what factors affect this parameter, and what are the minimum and maximum thicknesses of a plasterboard wall. Let's get started.
Components
What is our design?
| Image | Description |
 |
frame: rack and guide profiles. Racks provide a rigid structure of the wall, guides - fastening racks to the walls. The size of the rack profiles varies from 50 to 100 mm, the guides have the same section at a fixed height of 40 mm. |
 |
sheathing: GKL is attached on both sides of the profile. The partition is sheathed in one or two layers. In addition, the drywall itself has a different transverse size: wall sheet - 12.5, ceiling - 9.5 mm. |
In addition to ceiling and wall, there is an even thinner arched drywall(6 mm), however, it is not used for wall cladding.
I deliberately do not consider structures on a wooden frame. He has too many serious flaws against the background of a galvanized profile:
- Non-ideal geometry;
- Tendency to deform with fluctuations in humidity;
- fragility: the tree is affected by fungus and insects.

Factors
What influences the choice of frame and skin dimensions?
- Stability Requirements partitions in relation to horizontal loads. This parameter is especially important in rooms with high traffic (corridors, hallways, kitchens) and in cases where drywall wall encloses a room with a stretch ceiling made of PVC film;
Reference: when tensioned, the vinyl sheet creates a horizontal load of 70 kgf per linear meter on the baguette.
- wall strength requirements with respect to impact loads. Typical example rooms with high requirements - children's room. Thin single-layer drywall can break when a native starts hitting it with a wooden machine or a pirate saber;

- Wishes for soundproofing possibilities walls. The thicker it is, the greater the layer of noise-absorbing material laid between the racks of the frame can be;
- The need for a hidden gasket engineering systems . In the wall can be mounted electrical wiring And the local network, plumbing and sewerage, ventilation ducts and air conditioning lines.
Calculation examples
Let's, as an example, do a few partition calculations with our own hands for different requirements To her.
Space saving
If the main priority is saving the usable space of the room, the minimum wall thickness will be equal to the sum of:
- The transverse size of the rack profile (5 centimeters);
- The total thickness of two sheets of plasterboard (9.5 or 12.5 mm).
Total - 50 + 9.5 + 9.5 = 69 or 50 + 12.5 + 12.5 = 75 mm.

The thickness of drywall for partitions of 9.5 millimeters is permissible only if it does not experience mechanical stress in principle. A sheet of ceiling plasterboard is easily and naturally broken through by an accidental blow of an elbow or knee.
Thin but strong
If you want to combine space savings with maximum strength walls, her optimal design- reinforced frame made of thin (50 mm) profile and double skin (one-sided or two-sided).
How can the frame be strengthened?
- Wooden mortgages from a bar 50x50, nested in racks;
- Pairwise connection of rack profiles with a standard step between them of 60 cm;
- Reducing the step between the racks up to 40 cm.
The final thickness with two-sided two-layer sheathing will be 50 + 12.5x4 = 100 mm.

Noise isolation, hidden laying of communications
If you plan to build a plumbing, 50 or 90 mm sewer inside the frame, or if the wall must provide maximum sound insulation, it is reasonable to opt for a frame of maximum thickness - from a 100 mm profile.
In the absence of special strength requirements, the wall sheathing is made single-layer. The final thickness is 100 + 12.5x2 = 125 mm.

Extreme noise isolation
To absorb the maximum noise, it is necessary not only to fill the cavities of the frame with noise-absorbing material, but also to acoustically decouple the skin on both sides of the partition. How to do it?
Here is the instruction:
- Build two parallel frames from a 50 mm profile with a minimum (5-10 mm) gap between them;
For better sound insulation, a damper tape is laid under the guides. It eliminates the transmission of acoustic vibrations from the profile to walls and ceilings.
- Fill the frame with slabs of glued mineral wool. Her standard size(600x100 mm) allows you to do without additional fastening: the plates are installed spaced between the racks;

- Sheathe the resulting structure with drywall on both sides. It is better to resort to a two-layer sheathing. The price of several additional GKL sheets will pay off with the greater strength of the wall and its lower permeability for high-frequency sound.
The maximum thickness of such a wall will be equal to 50 + 50 (two frames of thin racks and guides) + 5 (gap between them) + 12.5x4 (two-layer sheathing with wall plasterboard on each side) = 155 millimeters.

Conclusion
I hope that this material will help the reader to choose the best solution for his purposes. The video in this article will help you learn more about installing drywall partitions. I look forward to your additions to it. Good luck, comrades!
June 22, 2017If you want to express gratitude, add a clarification or objection, ask the author something - add a comment or say thanks!
Hello, hello, our brave plasterboarders. Today you will find a cool tutorial on the topic of drywall partitions. Speaking specifically, we will disassemble a single-layer partition on a single frame - C 111 according to the Knauf classification, because. such partitions are most widespread. Let's deal with general principles their installation, how to form a doorway, an external corner and pairing several partitions with each other. As an example, we will take a corner partition with a doorway, such as pantries and dressing rooms (essentially moth nurseries) are usually enclosed to store pickles / jams and all sorts of junk that is long overdue to be disposed of.
Please note that work with drywall can only be carried out after the plaster and screed in the apartment have completely dried.
To begin with, let's get acquainted with the special profiles that serve to form the frame of the partitions. These profiles are called rack-mount. To be more precise, there are exactly rack-mounted PSs (CW), and there are also special wide guides PN (UW) for them. Dimensions of guide profiles: 40×50, 75, 100 mm. In our example, profiles with a width of 100 mm will be used. The letters C and U in their bourgeois name indicate the shape of their section. As you can see in the picture, the guide shelves are straight, like the horns of the letter U, and the rack - with roundings, like the C. By the way, the shelves are called the side edges of the profiles, and the walls are the back. The second letter of the overseas name means that the profiles are rack-mounted, i.e. wall from the German "Wand".
Rack and guide profiles Knauf

They are in paired version.
Once again, we repeat that you can only use a profile with a metal thickness of 0.55-0.6 mm, for example, Knauf. They are good not only because of the rigidity, but also because their design allows you to insert them into each other, thereby achieving their elongation and reinforcement on the sides of the doorway. Profiles from other manufacturers may not be able to do this. In the walls of the PN there are already ready-made holes with a diameter of 8 mm for dowels.
Dimensions of rack profiles: 50×50, 75, 100 mm. For single-layer partitions, the 50th posts are rather weak, so we advise you all to take the 75th or 100th. In the walls of rack Knauf profiles there are 3 pairs of closely spaced holes with a diameter of 33 mm for laying wires.
- Guide profiles KNAUF PN 100×40 mm
- Rack profiles KNAUF PS 100×50 mm
- Sealing tape Dichtungsband
- Separating tape
- "Dowel-nails" (another name is "Quick installation") 6 × 40 mm
- Cord breaking device
- Laser level or bubble level
- Rule aluminum 2.5 m
- Gyproc plasterboard sheets 3000x1200x12.5
- Seam putty (we work with Danogips Superfinish)
- Reinforcing tape for seams KNAUF Kurt
- Roulette
- Hammer
- Stationery knife (or special knife for cutting the Civil Code)
- Perforator + drill
- Screwdriver and cutter
- Self-tapping screws for metal 3.5 × 25-35 mm (black, frequent pitch)
- Self-tapping screws with press washer 4.2×13mm or shorter
- Metal shears or grinder
- Mineral wool ISOVER, KNAUF Insulation, URSA, Rockwool, Shumanet, etc.
- Narrow and wide spatulas
On the next slide on the left - a self-tapping screw with a press washer, it serves to fasten the profiles together. There is an option with a drill and without. They are designated, respectively, LB and LN. On the slide - option LN. In our case, they are needed only if there is no cutter. On the right is a drywall screw. More precisely, it is all the same for metal, but it already serves to fasten sheets of the Civil Code to the profiles. Therefore, most often it is called that - a drywall screw. Has a secret, so-called. carob, head. Designated - TN. There is also a TB, with a drill at the end, but you can do without it, 0.6 mm steel TNs will easily be taken.

Self-tapping screws for mounting structures made of plasterboard
Do-it-yourself instructions for installing a plasterboard partition.
Step 1. Markup
For example, let our partition be a continuation of an existing wall. It is highly desirable to pre-align the beacons. We draw a line-the continuation of the wall on the ceiling, we make a right angle with a simple square. This line is the inner border of our future partition, taking into account its final dimensions. But we first need to mount the frame, and for it the dimensions are different. It is not necessary to draw your own lines for the frame, you can make everything easier. How? Find out very soon...

Marking lines on the ceiling
For now, we transfer the lines from the ceiling to the floor using a plumb line and a cord breaker, or a laser level.

Transfer markings to the floor
And now in front of you is the very simplified way of marking the PN.

Mark holes for fasteners
The bottom line is that pieces of drywall are sewn onto the guide profiles cut to size, which are already set along the lines. With this approach, the risk of error will be minimal. We mean that later, when the Civil Code sheets are sewn on, the rule will not “jump” at the wall/partition boundary. Pieces of GKL should be sewn flush with the walls of the PN. We expose the profile with these pieces along the line and put marks with a pencil or marker where we will have holes for attaching the PN to the base.

From a different angle
Step 2. Fixing the PN
Then, according to our marks, holes are drilled in the base, and a sealing tape is necessarily glued to the profiles. Its absence is capable of completely ruining the entire soundproofing of the future partition. With it, the adjunction to the base will be very tight, which also affects the crack resistance of the structure. The fastening itself is carried out with dowel-nails using an ordinary hammer. Fast and strong.

Attaching the profile to the dowel-nails

Guides on the floor

Near the opening

On the ceiling
We do not unscrew the pieces of GKL from the profiles until we fix the PN in all right points. Often there are situations when the holes available in the PN are not enough. In these cases, they should be drilled independently, and you can do it in one go - through the profile to the base. The main thing is to carefully monitor that the boundaries of the GKL pieces clearly coincide with the marking lines. After fixing the guides on the sides of the doorway, I advise you to check them with the rule and make sure that they lie exactly on the same line.
You need to make at least three attachment points per profile. Even if it is 30 cm long. Usually, the fastening pitch is made in the region of 50 cm. If the floor is uneven, the pitch is reduced. Sometimes you even have to divide the PN into several segments. We do the same on the ceiling. Then we unscrew the pieces of GKL, but do not throw them away, they will still be useful to us ...
Step 3. Mounting wall substations

Fastening racks to walls
We cut the rack profiles in height, insert them into the guides close to the walls and drill holes in the walls right through them. Try to maintain a step of about 50 cm, no more. We hammer the dowel-nails into these holes again. Do not forget to glue the walls of the profiles with sealing tape! And control them by the rule, they should not be bent. By the way, the height of the substation must be less than the height of the ceilings in the room, at least 1 centimeter. They should not support the ceiling.

The length of the racks is 1 cm less than the height of the ceiling
As you can see, there is some distance between the rack profile and the floor.
Step 4 Installing the frame posts
The rack profiles of the frame are installed in increments of 60 cm. If tiles are laid on the partition, then in increments of 40 cm. The profiles of the doorway are extraordinary, and they do not affect the pitch of the remaining substations. The slide shows the profiles set at 60 and 80 cm from the wall. Near PS just forms a doorway.

Partition frame posts
To reliably form an opening, the side PSs are made double, that is, one PS is inserted into the other. Of course, this is done in such a way that the holes in the walls of these profiles coincide in height. Inserting the PS into each other is not an easy task, sometimes you have to walk on them with your feet so that they snap into place along the entire length. It turns out that on the slide you see 3 profiles, but in fact there are 4 of them.

PS are set in one direction - with the wall to the corner from which the plasterboard sheathing will begin. Maximum weight door leaf, which can withstand a pair of PS-100 - 40 kg. Rack profiles are installed strictly vertically. Their length should be 1 cm less than the height of the ceilings. And the holes in all profiles must be at the same height. Profiles can be fixed to the rails using a cutter or self-tapping screws with a press washer (temporarily). Before patching the GKL, all self-tapping screws must be unscrewed.

Racks in place
Yes, PS are installed in one direction, because the fastening of sheets should begin from that part of the profile shelf, which is closer to its wall. If you do the opposite, the screws will jam the profile shelf, and it may bend. On the slide you see an almost finished partition frame. Let's take a look at how the outside corner is formed correctly...

Forming the outer corner

Frame from another angle
One of the rack profiles is turned with the wall outward, and the second one stands with a shelf towards us. A distance equal to the thickness of the GKL was left between them, we laid it at the stage of fixing the PN. Thus, the GK sheet on the inside of the partition will wind up, as it were, into its depths. At the end of the article, the outer corner of the fully finished partition will be shown in section.
Step 5 Jumper

Jumper from PN
It remains for us to make a jumper for the doorway. It is made from a guide profile by making an oblique incision of its shelves and bending a part of its length by 5-7 cm. The slide clearly shows how it will look. That is, you will need to cut a piece of PN 10-14 cm longer than the width of the opening. Cut and fold it symmetrically. On each side, the jumper is attached to the side posts with 2-3 LN screws.

Installing a jumper in the frame
Now our frame is completely finished. It is possible to pass electric cables through the frame. But you should not bring them inside the profiles, as they can be pierced with TN screws when sheathing the GKL.
Step 6. GKL sheathing

Sheathing the frame with drywall

BEFORE jumpers
There are several rules here.
- We have already mentioned the first one - you cannot join sheets on the side profiles of the opening.
- Secondly, cruciform joints of the “+” type are unacceptable, only of the “t” type.
- Third - the joints of the sheets with the inside and with outside must be shifted horizontally by a profile step, and vertically by at least 40 cm. On the slide you can see the very pieces of drywall that we used for marking. Now they serve us as props. After all, the sheets of the Civil Code cannot be placed directly on the floor, they must be raised above it by about 1 cm.
- And they should not reach the ceiling either, about half a centimeter. This is the fourth rule.
To fix the drywall to the double posts of the opening, you can use small metal drills. Otherwise, very often self-tapping screws simply jam the inside of the profile. First, drill holes through the gypsum board, then screw the screws into them. Of course, sheets can only be joined horizontally on profiles, which means that we must make jumpers from PS at the joints. See how they look on the next slide.

PS jumpers
These are segments of conventional rack profiles. To fix them, again, you need to start from the side of the shelf, which is closer to the wall. In the matter of mounting the jumpers, it is desirable to have an assistant who will hold the sections of the profiles while you turn the screws in them. As soon as all the jumpers are placed, it is possible to lay soundproofing plates (mineral wool) between the profiles. We like ISOVER the most. When laying, we try not to leave unfilled areas. It should be cut off with a margin of about 5 cm so that it abuts against the profiles and thus keeps in the frame. When working with mineral wool, be sure to use goggles, a respirator and gloves!

Sheathing process

Sheathing process 2

Finished skin
The step of the screws is about 20-25 cm. On the jumpers, it is advisable to twist them more often, after 10-15 cm. Make sure that the heads of the screws are deepened into the sheet, but do not pierce the cardboard. If the cardboard is pierced, the screw should be twisted. More importantly, the screws must enter strictly at right angles. They must be at least 15 mm from the edge of the end edge of the sheet and at least 10 mm from the longitudinal edge. By the way, GKL can only be mounted in a vertical position! If the premises are planned stretch ceiling, under it in the partition it is desirable to mount mortgages from PS, into which we recommend additionally inserting a beam of the appropriate size.
I also recommend screwing self-tapping screws into the jumpers on both sides of the partition, and not just from the side of the joint. It is advisable to adjust the location of the sheets on the outer corner so that they lie on it with the factory edge. Then, when we install a protective corner on it, it will deepen and the plane will not deteriorate. Of course, all progressive mankind has long been using a special corner-proof paper tape, Sheetrock, for example. But we know that in our country it’s hard to find one, so we have stone Age dragged on, and we still use outdated metal corners. So, the partition is assembled.
And here are the promised pairings:

Right outside corner

Cruciform conjugation

T-shaped interface
And here is the video from Knauf:
In contact with
IN last years many homeowners use drywall to. Before creating a model, it is necessary to carefully consider all the elements of the interior, their location, color, as well as the dimensions of the material used. The thickness of the plasterboard partition will depend on this, its skillful use will make it possible to obtain additional space in the end part. The structures are quickly assembled and have excellent soundproofing properties.
- First of all, the plasterboard partition must be resistant to horizontal loads. This is especially important in rooms with high traffic and when combined with a stretch ceiling.
- The thicker pier accommodates a sufficient layer sound insulating material placed inside.
- The wall should be quite strong, especially in children's rooms.

- Various communications are located inside the structure, the thickness of the partition directly depends on this.
Types of partitions with a frame
Such representatives are installations using a profile - metal or wood, sheathed drywall sheets. They can be filled special material to give the model. For this, GKL of various qualities are used:
- ordinary;
- waterproof;
- fire resistant.
The most popular is drywall with a thickness of 1.2 cm. Following the installation is finishing in any chosen way: painting, wallpaper, tile, tiling and more.
 Moisture resistant drywall partition
 Based on the classification of the German company Knauf, which produces high-quality materials, the following types of partitions can be distinguished:

 Diagram of one of partitions Knauf
 How to control the thickness of the partition
If the question arises about choosing a profile for a false wall, it is worth measuring the thickness of the walls located inside the apartment. If it is about 10 cm, this should be guided. PS can be easily matched to this figure. It is produced mainly in three sizes with regards to cross section: 50x50, 75x50 and 100x50 mm. Third enjoys in great demand. This full length profile has mounting holes designed for easy placement of electrical wiring and other utilities.

In practice, a thickness indicator of 12.6 cm is optimal, it is better to stick to it. But here the important fact is what will be the load on the walls. It arises from the shelves, niches, coasters and other items located on them according to the idea of the designers.
- with a load of 45–55 kg per 1 sq. m material is better to take a thickness of 1.6 cm;
- 65–70 kg will withstand sheets 1.9 cm thick;
- more than 70 kg, you will need double skin and reinforcement of the frame with the installation of additional racks.
What are the total indicators of the thickness of the partition
As already mentioned, the thickness of the drywall partition depends on the size of the thickness of the profile and the GKL.
It is possible to list the most used modifications of partitions by thickness:
- 12.5 cm: 10 cm PS - profile + thickness of 2 sheets on both sides. These are verified indicators;
- 7.4 cm: when using the arched profile PP (64 mm) + GKL thickness on each side. Such a partition is the thinnest in the combination of a metal profile and drywall.
Other ways to increase stiffness
In some cases, an increased load on the partition is expected. In this case, unusual methods of combining materials are used, namely: thinner sheets or a connection of several layers can be superimposed on a wide profile. This will require a large number of self-tapping screws. A calculation is carried out that precedes the work: for 1 GKL you will need more than 50 fasteners. When laying 2 layers on one, 6–8 self-tapping screws, having a length of 2.5 cm, placed at intervals of 1 meter, will go to the first one. On the second layer, you will need several times more elements 3.5 cm long with a step setting of 25 cm.

A little about the end
It is necessary to take care of the end of the partition, here you can equip additional space, while increasing the reliability of the frame with the help of horizontal crossbars, using aluminum profile. Only the owner himself can find a use for this part of the wall, here a lot is thought out and brought to life.
Having shown imagination, a plasterboard partition can be used not only as a wall, but also as a practical function, a model.
Drywall constructions are the most popular solution for creating partitions and full-fledged walls with an integrated door in private houses and apartments. Optimal specifications, low cost and ease of installation made drywall combined with metal profile most practical solution to demarcate space.
Determining the thickness of a plasterboard partition - milestone when designing a structure, on which the builder must decide on the purpose of erecting the structure and its purpose. So, when creating decorative partitions, you do not need to take into account complex decisions, laying in it a sound-proof layer, cables. But, if the GKL is used to build a full-fledged wall, which must be designed for certain mechanical loads, do the most simple solution will not work.
For the construction of partitions from gypsum boards, steel or wooden profile from a beam. Sheets cover 1 or more sides of the structure, between which soundproofing material or additional plasterboard is placed. The thickness of the partition depends on factors such as: the type of sheets used, the profile. At the same time, there are more than 5 design options, each of which is designed for different tasks:
- C111. The simplest profile, the weight of which does not exceed 28 kg per cubic meter finished construction. The composition includes 2 litas of moisture-resistant drywall, located inside mineral plate acting as a noise absorber. The minimum width depends on the profile, which can be 50 or 100, as well as drywall sheets, the standard is 12.5 mm per side.
- C112. Improved profile, the total weight of the structure reaches 53 kg at a height of 4 to 9 m. Sheathing is carried out in two layers on 2 sides, and inside there is mineral wool. The thickness of the drywall partition depends on the profile and sheets - most often 100 and 12.5 sheets are used in 2 layers. Structures of this type have good soundproofing properties.
- C113. The weight of the partition per meter is 78 kg, and inside, waterproof drywall is used in 3 layers, with mineral wool between the sides. Perfect solution for places where you need to protect yourself from noise and keep warm.
- C115.1. It is built from a double frame and 2 layers of plasterboard, the weight of the structure reaches 57 kg. Well protects from a sound, possesses the increased durability. If fire-resistant panels are used, the fire safety class increases. The minimum section depends on the profile, either 50 or 100. Plus 25 mm of two sheets of drywall on both sides.
- C115.2. Construction with a weight of 69 kg per 1 m, consists of 2 layers of cladding with a double frame. Inside there is an additional GKL. Due to the use of such technology, the strength of the structure increases by 3-4 times, it absorbs noise better and retains heat. Inside are slabs of mineral wool.
- C116. The minimum cross section is 220 mm with a weight of 61 kg. A double metal frame and 2 layers of plasterboard are used. Inside there is space for communications - heating pipes, sewerage, hidden electrical wiring. Fireproof panels are used.
- C118. Heavy baffle with high security properties, can be used where there are high risks of intrusion. The weight of 1 m is 86 kg, and the height is at least 220 mm. Between the GKL in the structure on both sides, galvanized steel with a thickness of 0.5 mm is used. Drywall panels - 3.
- C121. From this design, a light partition is obtained - 32 kg. The frame is made from wooden beam, sheathed with 1 layer of GKL. The cross section depends on the width of the timber, as well as the type of sheets used.
- C122. The weight of the partition is 57 kg per 1 m, it is made of bars, but sheathed with 2 layers of plasterboard. Inside there is an insulating material made of mineral fiber.
The most practical type of sheets used is GKL 12.5. This drywall is strong enough, and when combined with 2-3 layers, it makes it possible to create full-fledged walls using steel or wooden frame. From above it can be upholstered with tiles, wallpaper or treated with paint. In rooms with high humidity it is appropriate to use GKLV (waterproof).
Plasterboard partition calculation
To determine the minimum thickness of a drywall partition, it is necessary to take into account the cross-section of sheets and a rack made of metal, which is most often used to build durable and reliable structures. It is this type of profile that is taken as the basis for creating most interior partitions.
When calculating a drywall partition, you also need to consider how many layers there will be in the structure, single or double metal is used. If we take as a basis the classic version of drywall and a 100 mm rack, recognized as strong and reliable enough, the following results will be obtained.
Drywall thickness
The ideal thickness of a drywall sheet, recognized by all builders, is 12.5 mm. If you reduce the indicator, you can face serious problems regarding the strength of the building. If the dimensions of the GKL for the partition are taken smaller, there is a high risk that they will deform over time.
So, based on the selected drywall thickness for the partition, you can calculate the load level:
- if a load of up to 50 kg is expected, then GKL should be chosen 12.5;
- if the load is above 50, but less than 70 kg, you can use double GKL or 18 mm sheets;
- if more than 70 kg, then double or triple GCR is also installed.
Hanging shelves do not give a serious load, as well as hooks or hangers. If intervention is provided for in the design to create niches in which heavy objects will stand, the strength of the product also increases.
Thickness of uprights
For the construction of the frame, a rack-mount profile is used. It is suitable for the construction of walls that perform a purely decorative function, if you choose a 50 mm metal rail. For more serious buildings, a profile 100 frame is suitable.
Advice! For the construction of a decorative partition, which is not threatened by mechanical stress or high pressure, you can use thin metal slats 50, but you do not need to reduce the cross section of sheets for it.
If the design involves the use of heavy hinged parts or a door is mounted in it, the profile should be 100. Not only the thickness of the partition, but also the reliability depends on it:
- buildings made of metal slats are more reliable and durable;
- you can increase the layer of insulating material, increasing the protection of the room from extraneous noise;
- due to the frame, strength increases, for this you do not have to use an increased number of sheets;
- wide metal provides correct work doors.
Soundproofing material in partitions can be used in several types. Optimal - mineral wool or sheets. This material has a low price, complies with all building codes and helps to retain heat.
If you lay soundproof tapes under the metal, they will increase the quality of the building.
How to calculate the thickness of a wall partition
When calculating the minimum thickness of a drywall partition, many parameters must be taken into account. Will it have sound insulation, what profile is used, how many sheets for upholstery - all this increases the cross section by 1-2 cm. As a result, the design can be no more than 8 cm, or more than 15 cm.
If the main goal of building a partition is to save space, then thin metal 50 and GKL sheets 12.5 are used. If there is no choice at all, and you need to make the cross section even smaller, choose sheets of 9.5 mm, but experts do not advise doing this.
Add up the size of the metal rail with the total thickness of the sheets (9.5 or 12.5 mm): 50 mm profile + 9.5 and 9.5 mm = 69 mm when using the thinnest sheets. When using classic GKL 12.5 mm, the width increases by 6 and is equal to 75 mm.
The minimum section of the sheets can only be used if the installation of doors is not provided. Also, this type should not be selected if the wall is placed in a place where, optionally, a person can hit his elbow or fall in this space.
If the wall must be strong, but at the same time it is necessary to reduce its cross section as much as possible, use profile 50 and double skin on one or both sides. Here's how you can strengthen the frame in this case:
- use the trampled connection of the rack profile in a step of 60 cm between them;
- add bars 5 by 5 cm in cross section, inserting them into the racks;
- reduce the distance between the vertical ribs of the frame support to 40 cm.
The thickness in this case, with double-sided sheathing with one layer of GKL, will be 75 mm, and if sheathed with two layers of canvases, then 100.
Adding noise isolation
If a sound insulation layer is used inside, or it is planned to carry out plumbing, electrics, sewage, then use an expanded profile of 100. If the strength should not be high, use ordinary plasterboard sheets with a single-layer frame sheathing, the result is: 100 profiles + two sheets of 12 each, 5 = 125 mm finished wall.
If you need to maximize the level of noise absorption, then a strong layer of cotton wool is laid inside, and the frame itself is made double. To do this, put a 50 profile in a step of 5 to 10 mm from each other. A damper tape is placed under the guides of the structure - above and below.
The frame is filled with mineral wool 60 x 10 cm. The structure is sheathed with 2 plasterboard sheets on both sides. The result is the following thickness: 2 frames of 50 mm each, a gap of 5, 4 plasterboards with a 2-layer sheathing of 12.5 = 155 mm. If the gap is increased to 10 mm, then the wall size will be exactly 160.
What is the total thickness of the structure for walls
The wall thickness of the internal partitions depends on the sheets used, metal racks, decor designs. Additionally, when building, take into account decorative designs and fasteners, which increase the thickness by an average of 4 mm. So, a standard wall of 100 profiles and a single-layer sheathing on 2 sides of 12.5 GKL with the addition decorative elements will be approximately 130 mm in thickness. If sheathed with acrylic panels or tiles, add another 5 on each side at least, resulting in 140 mm.
It happens that an arched profile 65 is used for construction, as well as thin sheets GKL 9.5 1 layer on 2 sides. In this case, the thickness is 84 mm, excluding decorative elements. But, as noted above, the construction of partitions from sheets of 9.5 or less is impractical: their cost differs slightly from thicker sheets, while the strength characteristics are much lower.
Advice! If there are a lot of panels 9.5 left from any other work, you can make a double cladding of the frame. In this case, the thickness of 1 side is 19 mm.
The thickness of refractory and waterproof plasterboards may not differ from 12.5 standard panels. The only difference between them is the shade. So, GKLV have a green color.
Determination of the thickness of the drywall partition
To determine the total thickness of drywall partitions, the following must be considered:
- the use of a profile for 50, 65 or 100, as well as the number of profile structures (for example, a double 50 profile has a gap of 5-10 mm, which affects the total thickness of the erected product);
- to increase the overall rigidity, 2-3 layers of plasterboard are used, which increases the thickness by 12.5 mm of each layer when using standard panels;
- decorative designs can have one layer of coating on one side.
If we talk about the main characteristics of structures, we can distinguish 3 types. The first - 75-150 mm partitions C111 with a profile of 50 co standard sheets. If double cladding is used, this adds 25 mm to the total thickness.
The second type - C113 - 150-175 mm structures with a frame made of a 100 mm profile. With a three-layer coating of GKL 12.5, the thickness reaches 175 mm.
And the third type - thick walls with a double frame 175-250 mm. In the first case, you can use a profile 65-75, in the second - 100 mm. Communications are laid in such constructions.
Should I specifically buy arched drywall 6.5 or 9.5? Most builders agree that it's better to add some money and buy normal 12.5mm blades. This will not greatly affect the reduction of space, but will significantly improve the quality.
Determining the thickness of drywall partitions is a simple process. It is necessary to take into account only 3 components: the profile used, the GKL panels and the number of their layers, as well as the number of profile sections, which can be 2 or 1. Then there are simple operations of adding all the components, taking into account decorative coating. In order not to make mistakes with the calculations, you should not place a partition 1 cm from furniture or other structures. If you leave a distance of 3-5 cm, you can avoid any trouble during installation.
C 111 GKL partition with single-layer sheathing on metal frame - a single metal frame, sheathed with one layer of plasterboard sheets on both sides.
C111 partitions are recommended for use as light internal enclosing structures in rooms with dry and normal humidity conditions according to SNiP II-3-79, residential, civil and industrial buildings of all degrees of fire resistance and erected in any areas, including seismic ones. Marking is used in the technical sheet KNAUF. The counterpart of C111 partitions are the W111 designs by Knauf (Germany) and P2M developed by Mosproekt-2 (Russia).
Partition C111 consists of a profiled metal frame sheathed on both sides with gypsum boards in one layer. If there are requirements for thermal, sound and fireproof insulation, the cavity of the partition between the gypsum boards is filled with an insulating material made of mineral fibers. "Console Loads".
|
|
Partition thickness (A), mm |
|||
|
Sheathing thickness (b), mm |
||||
|
Weight 1 sq. m of wall, kg/m² |
||||
|
Fire protection: |
||||
|
Sound and heat protection: |
||||
|
Sound insulation index (Iv), dB |
||||
|
Heat transfer coefficient, W/m²ChK |
||||
|
When facing with ceramic tiles 40 cm. |
||||

 C 112 GKL partition with two-layer sheathing on a metal frame
General information
S112 partitions are recommended for use as light internal enclosing structures in rooms with dry and normal humidity conditions according to SNiP II-3-79, residential, civil and industrial buildings of all degrees of fire resistance and erected in any areas, including seismic ones.
The technical sheet uses the Knauf marking. The analogue of C112 partitions are the W112 designs by Knauf (Germany) and P5M developed by Mosproekt-2 (Russia).
The data given in the table is valid for the partition wall construction shown in this technical sheet. Partitions with deviations from the specified design, as well as the scope of their application, should be provided for by specific projects with the appropriate coordination in the bodies supervising the construction.
Design
Partition C112 consists of a profile metal frame, sheathed on both sides with plasterboard sheets in two layers.
The perimeter frame is attached to building structures and is the supporting part for drywall sheets, which, in turn, are attached to the frame with screws, forming a rigid structure.
If there are requirements for thermal, sound and fireproof insulation, the partition cavity between the plasterboard sheets is filled with an insulating material made of mineral fibers.
If it is necessary to mount the equipment on the bulkhead, refer to the "Cantilever Loads" section.
|
Technical details |
||||
|
|
Partition thickness (A), mm |
|||
|
Overall dimension of PS profile (a), mm |
||||
|
Sheathing thickness (b), mm |
||||
|
Maximum partition height, m |
||||
|
Weight 1 sq. m of wall, kg/m² |
||||
|
Fire protection: |
||||
|
Thickness of insulating material, mm |
||||
|
Fire resistance limit (EI), min. |
||||
|
Sound and heat protection: |
||||
|
Sound insulation index (Iv), dB |
||||
|
Heat transfer coefficient, W/m².K |
||||
|
With a decrease in the distance between the PS profiles allowable height barrier increases. |
||||

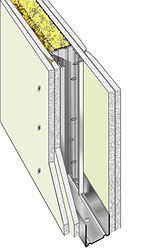
 C 113 GKL partition with three-layer sheathing on a metal frame "PEREGRADA"
- a metal frame sheathed with three layers of plasterboard sheets on both sides
C 113 GKL partition with three-layer sheathing on a metal frame "PEREGRADA"
- a metal frame sheathed with three layers of plasterboard sheets on both sides
General information
C113 partitions are generally recommended for use in case of special requirements for fire protection as light internal enclosing structures in rooms with dry and normal humidity conditions according to SNiP II-3-79, residential, civil and industrial buildings of all degrees of fire resistance and erected in any areas, including seismic.
The data given in the table is valid for the partition wall construction shown in this technical sheet. Partitions with deviations from the specified design, as well as the scope of their application, should be provided for by specific projects with the appropriate coordination in the bodies supervising the construction.
Design
Partition C113 consists of a profile metal frame, sheathed on both sides with plasterboard sheets in three layers.
The frame along the perimeter is attached to building structures and is the bearing part for plasterboard sheets, which, in turn, are attached to the frame with screws, forming a rigid structure.
The cavity of the partition between the plasterboard sheets is filled with an insulating material made of mineral fibers.
|
Horizontal section of the septum |
Technical details |
||
|
|
Partition thickness (A), mm |
||
|
Thickness of three-layer plating (b), mm |
|||
|
Maximum partition height, m |
|||
|
Weight of 1 sq.m of wall, kg/m |
|||
|
insulating material |
|||
|
Density, kg/m. cube |
|||
|
Thickness, mm |
|||
|
fire protection |
|||
|
Fire resistance limit (EI), min. |
|||
|
Sound and heat protection |
|||

With a decrease in the distance between the PS profiles, the allowable height of the partition increases.
Rigid mineral wool board of the company "Parok" (Finland).
Mineral wool board based on synthetic binder according to GOST 9573-82, manufactured by Mostermosteklo OJSC (Russia).
Sound insulation index Rw = Iv + 2.
 C 115 GKL partition on a double metal frame
General information
S115 partitions are recommended for use as light internal enclosing structures in rooms with dry and normal humidity conditions according to SNiP 11-3-79, residential, civil and industrial buildings of all degrees of fire resistance and erected in any areas, including seismic ones.
The technical sheet uses the Knauf marking. The analogue of the C115 partitions are the W115 designs by Knauf (Germany) and P6M developed by Mosproekt-2 (Russia).
The data given in the table is valid for the partition wall construction shown in this technical sheet. Partitions with deviations from the specified design, as well as the scope of their application, should be provided for by specific projects with the appropriate coordination in the bodies supervising the construction.
Design
Partition C115 consists of a profile metal frame, sheathed on both sides with plasterboard sheets in two layers.
The frame along the perimeter is attached to building structures and is the bearing part for plasterboard sheets, which, in turn, are attached to the frame with screws, forming a rigid structure.
|
Horizontal section of the septum |
Technical details |
|
|
|
Partition thickness (A), mm |
|
|
Overall frame size (a), mm |
||
|
Thickness of two-layer skin (b), mm |
||
|
Maximum partition height, m |
4,5(1); 6,0(1); 6,5(1) |
|
|
Weight of 1 sq.m of wall, kg/m |
||
|
fire protection |
||
|
Insulation material thickness(3) |
||
|
Fire resistance limit (EI), min. |
||
|
Sound and heat protection |
||
|
Sound insulation index (Iв), db |
||
|
Heat transfer coefficient, W/sq.m K |
||

- 1. With a decrease in the distance between PS profiles, the allowable height of the partition increases
- 2. Heat-insulating plate made of mineral wool on a synthetic binder, GOST 9573-62, grade 50.
- 3. For a partition with sheathing made of plasterboard sheets GKLO (see the section "Consumption of materials").
Sound insulation index Rw = Iv + 2.
 S 116 GKL partition on a double metal frame with space for communications
General information
Partitions S116 are recommended for use as light internal enclosing structures in rooms with dry and normal humidity conditions according to SNiP 11-3-79, residential, civil and industrial buildings of all degrees of fire resistance and erected in any areas, including seismic ones.
The technical sheet uses the Knauf marking. The W116 structures of the Knauf company (Germany) are analogous to C116 partitions.
The data given in the table is valid for the partition wall construction shown in this technical sheet. Partitions with deviations from the specified design, as well as the scope of their application, should be provided for by specific projects with the appropriate coordination in the bodies supervising the construction.
Design
Partition C116 consists of a profile metal frame with space for communications, sheathed on both sides with plasterboard sheets in two layers.
The frame along the perimeter is attached to building structures and is the bearing part for plasterboard sheets, which, in turn, are attached to the frame with screws, forming a rigid structure.
If there is a requirement for thermal, sound and fireproof insulation, the cavity of the partition between the plasterboard sheets is filled with an insulating material made of mineral fibers.
1. With horizontal orientation of sheathing sheets.
2. With a decrease in the distance between PS profiles, the allowable height of the partition increases
3. Heat-insulating plate made of mineral wool on a synthetic binder, GOST 9573-62, grade 50.
4. For a partition with sheathing made of plasterboard sheets GKLO (see the section "Consumption of materials").
5. Sound insulation index Rw = Iv + 2.
 C 623 GKL cladding on a ceiling profile frame
- a metal frame with fastening to the main wall, sheathed with one or two layers of plasterboard sheets
C 623 GKL cladding on a ceiling profile frame
- a metal frame with fastening to the main wall, sheathed with one or two layers of plasterboard sheets
General information
Prefabricated plasterboard cladding on a metal frame from a ceiling profile is used for cladding the surfaces of walls and partitions, in residential, civil and industrial buildings all categories (A, B and C) with dry and normal humidity conditions according to SNiP II-3 79* in order to reduce labour-intensive, wet processes and duration of production finishing works.
Design
Facing C623 is a frame sheathed in one or two layers of plasterboard sheets from ceiling profiles (PP 60/27), fixed on the floor and ceiling in ceiling guide profiles (PNP 28/27) and fixed to the wall by means of direct suspensions (PRP 60/27 ).
If there are requirements for sound insulation and fire protection, the cavity between the cladding and the wall is filled with mineral wool.
The cavity behind the lining can also be used to accommodate engineering communications.
In continuous linings, expansion joints should be provided at intervals of 10-15 m.
|
horizontal section |
Technical details |
||
|
|
One |
Two |
|
|
Cladding thickness (D), mm |
|||
|
Sheathing thickness (d), mm |
|||
|
Weight 1 sq. m of cladding, kg/m² |
|||
|
* When laying ceramic tiles for a single-layer structure - 40 cm. |
|||

Sealing and surface finishing:
Decorative coating: dispersion and oil paints(except for lime, silicate and paints based on liquid glass), enamels, plasters, paper, textile and polymer-based wallpapers, ceramic tile coatings.
 С 625 Single-layer plasterboard cladding on a metal frame
- metal frame, sheathed with one layer of plasterboard sheets
С 625 Single-layer plasterboard cladding on a metal frame
- metal frame, sheathed with one layer of plasterboard sheets
General information
Prefabricated plasterboard linings on a metal frame are used for facing the surfaces of walls and partitions in residential, civil and industrial buildings of all categories (A, B and C) with dry and normal humidity conditions according to SNiP II-3 79 * in order to reduce labor-intensive, wet processes and the duration of finishing work.
When using moisture-resistant plasterboard sheets, the use of cladding is allowed in rooms with high humidity(bathrooms, kitchens, bathrooms, etc.)
Design
S625 cladding is a frame sheathed in one layer with plasterboard sheets from rack profiles (PS 75/50 or PS 100/50) fixed on the floor and ceiling in the corresponding guide profiles (PN 75/40 or PN 100/40).
|
horizontal section |
Technical details |
||
|
|
|||
|
Cladding thickness (D), mm |
|||
|
Profile overall dimension (a), mm |
|||
|
Sheathing thickness (d), mm |
|||
|
Maximum lining height, m |
3,0 |
4,0 |
|
|
Weight 1 sq. m of cladding, kg/m² |
|||
|
* When laying ceramic tiles - 40 cm. |
|||

 C 626 Two-layer plasterboard cladding on a metal frame
- metal frame, sheathed with two layers of plasterboard sheets
C 626 Two-layer plasterboard cladding on a metal frame
- metal frame, sheathed with two layers of plasterboard sheets
General information
Prefabricated plasterboard claddings on a metal frame are used for cladding the surfaces of walls and partitions in residential, civil and industrial buildings of all categories (A, B and C) with dry and normal humidity conditions according to SNiP II-3 79* in order to reduce labor-intensive, wet processes and the duration of finishing work.
When using moisture-resistant plasterboard sheets, the use of lining is allowed in rooms with high humidity (bathrooms, kitchens, sanitary facilities, etc.)
Design
S626 cladding is a frame sheathed in two layers with gypsum boards made of rack profiles (PS 50/50, PS 75/50 or PS 100/50), fixed on the floor and ceiling in the corresponding guide profiles (PN 50/40, PN 75/40 or PN 100/40).
If there are requirements for sound insulation and fire protection, the space inside the frame is filled with mineral wool.
The cavity between the cladding and the wall can be used to accommodate utilities.
In continuous linings, expansion joints should be provided at intervals of 15 m.
|
horizontal section |
Technical details |
|||
|
|
||||
|
Cladding thickness (D), mm |
||||
|
Profile overall dimension (a), mm |
||||
|
Sheathing thickness (d), mm |
||||
|
Maximum lining height, m |
2,6 |
4,25 |
||
|
Weight 1 sq. m of cladding, kg/m² |
||||

1. Seam sealing using reinforcing tape (UK edge, PLUK or cut end, Fugenfüller or Uniflot putty):
a) fill the joint of sheets with putty, lay, pressing into it, reinforcing tape and let the putty dry;
b) apply the final layer of putty.
2. Sealing joints without the use of reinforcing tape (PLUK edge, Uniflot putty):
a) fill the joints of the sheets with putty and level the surface of the seam.
Priming: Tiefengrund primer.
Decorative coating: dispersion and oil paints (except for lime, silicate and water glass based paints), enamels, plasters, paper, textile and polymer-based wallpapers, ceramic tile coatings.


