Painting the walls in the apartment with textured paint. Tools for textured wall painting
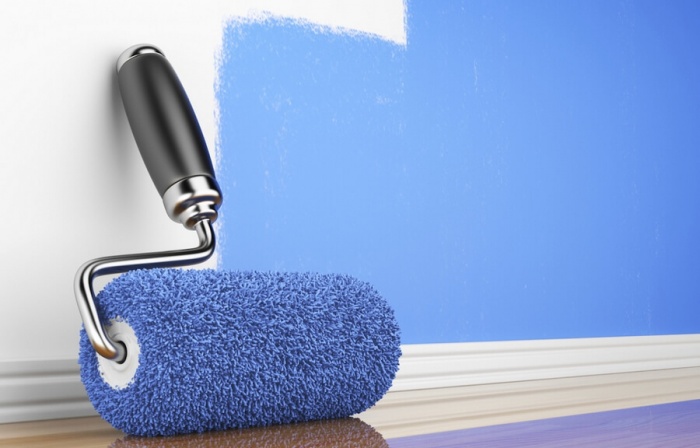
For textured painting of walls with a smooth and flat surface, it is convenient to use a construction tool such as a roller. There seems to be nothing complicated in using the tool. After all, we all saw rollers, we all had to use it or watch how others use it.
However, it should be taken into account that they are various types and issued for specific purposes. This can complicate his choice when buying. That is why this article will give practical advice to help you choose this tool. And also find out what types of paint rollers exist, what to look for when buying, and what is the peculiarity of each of them. We will take a closer look the right tools for textured walls.

Some information about paint rollers
For all of us, this simple tool is not too abstruse. Its design is quite simple: the main part of the tool is a roller that rotates around an axis. The surface of the roller is sheathed with a material that absorbs paint, transferring it to the surface of the walls. In order to work it was simple and easy, a handle - a clasp is attached to the axis. And it is also practical that such a handle is not permanent, you can replace it for more convenient use.

Differences paint rollers basically consists of two things:
- Roller coating, which is called a fur coat.
- Roller width.

Quality, convenience, as well as the finished result of the work performed depend on such factors. That is why we will consider all its types, so that your work is not difficult, but brings you pleasure.
coat type
In our time, there are such types of this material:
- thread;
- fur;
- foam;
- velor;
- flock and some with a flat surface;
- textured and texture rollers for decorative painting.

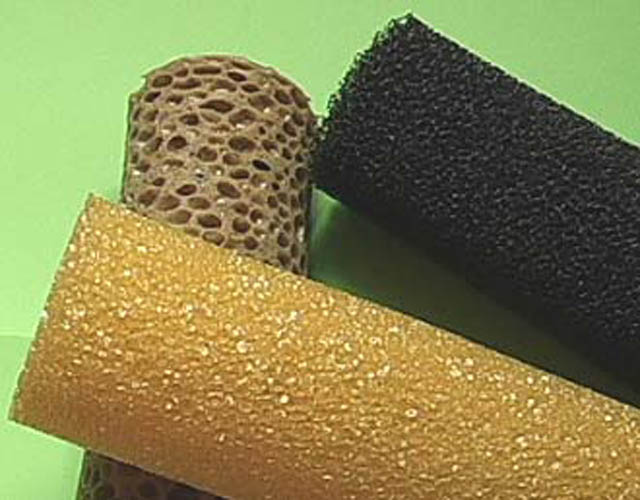
Fur
When painting walls, such rollers are universal, since any kind of paint can be applied with a fur roller, even paint made on an organic basis.
Advantages:
- the composition is qualitatively and evenly applied to the surface of the walls, which makes it easy to do the work with your own hands;
- absorb a sufficient amount of paint;
- when painting, the composition is not splashed;
- excellent for uneven surfaces such as decorative plaster.

The materials from which the villi are made:
- Natural fur . Such material contributes to the good absorption of paint into the fibers and its distribution on the walls. The only drawback may be that the lint can fall out from time to time and be applied to the surface along with the paint. Often this happens with cheap, low-quality rollers.
- Polyacryl. The main advantage of such materials is the relatively low cost. Polyacryl is a worthy replacement for natural fur. However, it has a significant drawback - it is used for painting walls only on water based, and without any fillers with aggressive substances.
- Polyamide. Compared with the previous material, this type is more durable and wear-resistant. That is why you can use fur coats made of such materials for paints of any type. The disadvantage is that during the painting of the wall, the paint will splatter more.

Fur coats can have a pile of different lengths. If you need to paint a rough surface, choose a fur coat with a long pile, if you need to paint a glossy surface, use a fur coat with a small pile.

Advice! In order for your roller to last as long as possible, properly care for it. After each use of the roller, take the time to wash it well.
How to do it right? First, soak the roller in kerosene, and then in plain water. If you used a roller to paint the walls water-dispersion paint, maintenance of the instrument will be even easier. In order to wash it, simply use a hose with water pressure.
Velor
Such painting is pleasantly performed, as it is applied in a beautiful uniform layer. If the surface has been previously prepared with high quality, then the painted surface will look completely smooth.
Often in hardware stores, sellers say that such a tool is intended for specialists. Why? Because with careless work, all defective places will be visible on the surface. Another disadvantage is that the villi of the fur coat do not absorb a large number of paint, which will force you to wet the roller regularly.

Foam rubber
The main advantage of this material is its price. For example, foam products can cost from 30-40 rubles. Such rollers can be used for painting walls with water-dispersion paint. Among the shortcomings, the following points can be distinguished: it does not paint an uneven surface well, it is short-lived, it splashes paint. But, despite such minor flaws, this roller is not the worst option, especially when painting a small area. For example, walls in the kitchen or bathroom.
Rollers for decorative wall painting
What does the concept of "decorative painting" imply? First of all, this is the application of patterns and drawings to the surface of the entire wall or to a specific place.
To perform this work, there are two types of rollers:

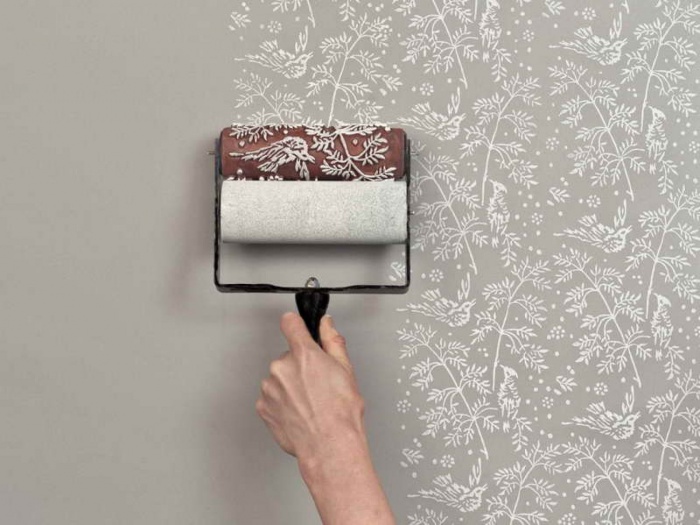
Such a structural roller is able to put a beautiful ornament on your wall. The photo shows what the finished result looks like.

Advantages of textured finish
When decorating walls in a room, it is worth imagining two varieties - the use of special textured paint or the use different technologies finishes. In applying the first option, you will have to go to the hardware store and select special paint containing acrylic components. When finishing, such paint lays unevenly on the surface, so you can get the effect of granulation.

Textured wall painting has many advantages: you can do the work yourself, without having special building skills, such a finish masks all the irregularities well, the paint is non-toxic, prevents mold, and is resistant to mechanical damage.
There is another version of the decor - this is the painting of the walls using stencils. Carry out such coloring with a water-based substance. This finishing method has the following advantages:
- low cost of work;
- allows you to draw, in those places where you like;
- big choice colors;
- the ability to do the work with your own hands, etc.
Texture paint tools
So, what do you need to do decorative wall painting? These are the following tools:
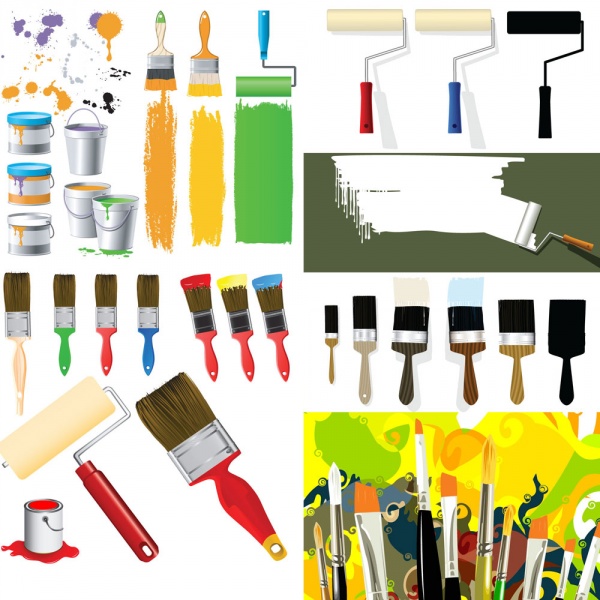
It is clear that not all of this list you will use. But these are all devices that can do the job. However, it also happens that there is no way to spend your money on various expensive rollers. What to do in this case? Don't panic, because this moment you can show your imagination and make your own original design premises.
Using a homemade tool
In order to make a textured roller, you need to impose or glue pieces of foam rubber, fabric or cellophane on a regular one. After completing this procedure, you can use such a roller to apply a water-based composition to the surface of a wall or ceiling. This decor option will look very original and aesthetically pleasing. You can also use wire wound on a roller.
The emergence of such an interesting finishing material as textured paint made a splash in the construction market thanks to bright color and the unique structure created on the surface. Such a simple and technologically thought-out coating immediately gained popularity.
But the question remains of how the factory and textured do-it-yourself paint differs from the usual types. coatings?
What is texture paint?

Do-it-yourself or factory-made textured wall paint is a material that allows you to create a non-uniform relief coating. Application area of this type finishes are very varied. Such surfaces can decorate the facade, as well as rooms.
Application instructions provide for the possibility of creating a decorative coating on the following types of substrates:
- Concrete;
- Plaster;
- Brickwork;
- Wood.
Note!
If any finishing is required metal elements interior, it is more appropriate to use products such as fire-retardant paints for metal Polistil or electrically conductive paint Zinga, which creates a coating that protects the surface from rust.
In fact, textured paint is a homogeneous mass of snow-white color, which contains a filler of a thick consistency. It is this very filler that allows, with the help of this material create surfaces that mimic various reliefs. It is these properties that distinguish structural finishing masses from acrylic or latex-type compositions.
Classification of textured material

A wide range of embossed lacquer coatings on modern market implies a classification.
Conventionally, compositions of this type last depending on the size of the filler present in the composition:
- Fine-grained (0.5 mm or less);
- Medium grain (0.5-1 mm);
- Coarse-grained (1-2 mm).

Structural paint products in their composition as a filler may contain the following products:
- stone chips;
- Quartz dust:
- Synthetic fibers;
- Gas silicate crushed or crushed;
Self-made textured paint
Special attention deserves the material prepared by oneself. But how to make textured paint with your own hands?
For cooking you will need acrylic paint for indoor or outdoor use, depending on which surfaces need to be painted. It is mixed with granite crystals, which can be purchased at any hardware store, and the price is low.
You can also mix paint with sand to create relief. This coating will create a surface that resembles colored sand.
Advice. Do not experiment and use marine or river sand, it will not lead to anything good.

Texture painting technology
What kind of relief will be created on the final coating directly depends on what application technique was used in the work.
Do-it-yourself textured wall painting can be done using the following tools:
- Metal combs;
- natural sponges;
- Structural rollers;
Advice. Before proceeding with the application of a relief coating, it is necessary to apply a deep penetration primer to the surface.
In addition to the tool with which the application is carried out, the composition also plays an important role.
To give the coating greater relief, quartz sand or sawdust is added to the mass.

- Brush painting.
For this better fit wide brush. With such a tool, the composition is applied to the prepared walls with wide strokes in any direction; - Roller processing.
You will need three rollers, two large, of the same size, and one small. The mass is applied to the surface with a large roller, processed with a small one. hard-to-reach places, and bumps or too large spots of paint are removed with a clean large roller; (See also the article.)

- Spray finish.
There are formulations that are sold immediately in a spray bottle. When applying the material in this way, you must be very careful, because it is quite difficult to control the thickness of the layer; - Sponge work.
sponge opens huge creative possibilities, because it allows you to use various stencils in your work. Sponges can literally draw on the surface, creating a relief.

The main pros and cons of textured paints
If we compare this type of paint with other paints and varnishes, we can distinguish the following advantages:
- Textured coating can be applied to the surface immediately, eliminating the long and costly leveling procedure. The relief coating makes the walls uniform and hides cracks, dents and uneven bases;
- The textured layer is resistant to different kind mechanical damage, which expands the scope of compositions of this type;
- Low price, combined with a huge variety of textures and color options;
- This type of paint is applied quite easily and quickly.

The disadvantages of textured coating include the following points:
- Relief coatings for their creation require 15-30% more material than conventional painting;
- The surface can be repainted only after the first layer of coating has been completely removed.

Textured paint made for walls with your own hands - this is a great opportunity to make high-quality and beautiful finish rooms without leveling the walls. You can create an original and bright design of the facade or room, spending a minimum of time and effort. A variety of colors, shades and various sizes filler grains will make it possible to realize even the craziest design idea.
You can learn even more important information on how to do it right from the video in this article.
Exquisitely and tastefully finished walls are very important element decor for any room. Almost all existing finishing materials have some drawbacks that limit their use, especially in indoor areas, which require not only beauty, but also safety and environmental friendliness. Therefore, the optimal material for the interior, and exterior finish walls is textured paint. Only it allows you to create incredibly chic, bewitching surfaces on the walls, allowing any manifestations of your own, even the richest and irrepressible imagination.
The process of working with textured paint is incredibly simple and easy, so it can be used by people with a complete lack of experience in building and construction. finishing works Oh. Distinctive feature of ongoing painting work can be considered the possibility of creating your own textures, as well as sufficient time to correct what you did not like or did not work out. To hone your “skill”, you can practice on a piece of plywood or small area walls (in this case, before the main painting, the “training” composition of the textured paint must be completely removed with a steel spatula, and the wall must be dried and primed).
Textured wall paint has undeniable advantages over other materials, and among the main ones are the following:
- frost resistance;
- resistance to constant exposure to UV rays;
- the plasticity of the resulting coating, which does not allow the wall to become covered with small cracks (with natural shrinkage of buildings);
- insensitivity to dampness, preventing the formation and reproduction of the fungus;
- the finished surface does not absorb odors at all;
- dust and dirt-repellent properties, facilitating subsequent care;
- high environmental friendliness, making it possible to use in children's rooms;
- the possibility of using it for any reason - from brickwork up to the tree;
- huge scope for creativity when it is self-applied.
In addition, it is worth noting its hypoallergenicity and the minimum requirements for the quality of the surface used for applying textured interior paints.
Applying textured paint
Textured wall paint is applied, according to reviews, extremely easily, and the use of any complex special tool is not required. Do-it-yourself textured wall paint can be somewhat modified, which will allow you to create your own, unusual textures. So, to obtain a rough relief surface, pure sawdust can be added to the paint, and quartz sand is added to obtain a structure with sharp edges. The paint is applied in a fairly thick layer, so it perfectly covers all the cracks, chips and small irregularities on the wall.
The choice of application tool is devoid of any standards, and depending on what effect you want to achieve, you can use:
- natural sponge;
- textured (structural) roller of various lengths and diameters;
- comb;
- putty knife.
In general, applying textured paint is possible even with your hands, since it is absolutely safe, and the decor created “by hand” can become quite unexpected, interesting and unique.
A little about applying textured paint with a roller is shown in the video
Variants of possible reliefs
Textured wall painting water-based paint allows you to get several basic textures.
Stages of work
Applying textured paint with a roller, of course, is neither particularly difficult nor time-consuming surface preparation - and this is her huge advantage. However, the minimum amount of work to be done is still required:
- it is advisable to tap the wall with a hammer, which will reveal areas where the old plaster is about to fall out (this must be eliminated);
- large cracks need to be repaired;
- the entire surface intended for painting the walls in the apartment with textured paint should be primed with an acrylic primer, preferably marked "deep penetration".
Advice ! Best results are achieved when the applied compound and base are at room temperature.
Before working with such paint, it requires very thorough mixing, and it is better if a drill with a mixer nozzle is used for this. Re-mixing is necessary after adding the selected filler and color. There are several mandatory rules, otherwise the effect may differ from what was intended:
- the application of textured paint should be carried out in a thick enough layer to be able to create the intended texture;
- it is desirable to work immediately on the entire surface where the texture will be created, since during breaks in work places of “joints” may be noticeable, which will visually worsen the impression of the whole work;
- the tool that is planned to be used must be prepared in advance;
- after drying, textured compositions for walls with effects can be additionally painted with acrylic compositions.

Choosing the best textured paint
Painting the walls with textured paint allows you to get a unique, refined interior. With this, now no one argues. But in some cases, people complain that instead of unprecedented beauty, it turned out completely different from what they expected. In almost every such fact, the buyers themselves are to blame, who did not have a clear idea of \u200b\u200bwhat they ultimately wanted to receive. If almost everyone understands how to work with textured paint, few know about the intricacies of its choice.
Each coloring composition to give the wall texture and relief has its own graininess. The more pronounced and deep the texture is required, the greater the graininess should be chosen, and since each manufacturer marks this parameter in its own way, do not neglect the seller's advice when buying. Another important parameter of textured coatings is the base.
- Mineral. Most a budget option, consisting of cement and lime, and produced in the form of a dry powder. Most often with mineral composition give texture to the outer walls of buildings.
- Silicone . The most common option that can be used both inside and outside buildings. Creates a vapor-permeable coating that is resistant to moisture, temperature extremes and aggressive environments.
- Silicate. The most expensive, but very practical option. such a coating is not afraid of any exposure to the atmosphere, the treated surface does not absorb dirt and dust, and is easy to clean. Use is allowed only in combination with a primer on a similar basis.
- Acrylic. The most convenient, ready-to-use composition that allows tinting and the introduction of the required fillers.

Passionate about creating something new creative interior own house, do not forget that in any business you need, if not experience, then at least skill, so training is necessary before work. In addition, you first need to be very clear about what kind of surface you want to get. To do this, you can not only look at online photo galleries, but also try to draw your future interior.
You can apply textured paint to a separate area, and using various tools or improvised means, see what kind of texture is obtained. It is important to understand that a pattern that looks good in a small area may not be appropriate on the entire wall. In addition, do not forget that all tools used to work with textured paint must be clean. Naturally, elementary safety requirements cannot be neglected - funds will not interfere personal protection and adequate ventilation.
In the past, the main types finishing materials for the walls there were wallpapers and almost indelible oil paints. Today's construction market offers a wide range of finishing materials.
One of the most popular is textured wall paint, due to its excellent characteristics. It can be painted on almost any surface, for example, brick, concrete, wood and other types. Thanks to special additives it can be used both for internal and external works.
Textured paint - special material, which is a viscous homogeneous mass of white color.

The presence of acrylic as a binder makes it resistant to mechanical and atmospheric influences, which makes it possible to use it for outdoor work.
By adding different colors, you can get any colors and shades. If desired, the color can be ordered from the manufacturer, then the resulting mixture can be immediately used for work. Depending on additional fillers, it is possible to imitate various surfaces.
Painting with textured paint can be carried out on surfaces with minor defects, recesses of no more than 2 mm are allowed. Much depends on the application method. If the differences in irregularities are large, then it is better to apply a layer of plaster.
There are such types of textured paints:

In addition, after applying textured paint, the surface can be additionally decorated by applying a transparent varnish to it, to which special creative pastes are added. With such a coating, the surface will change depending on the degree and angle of illumination, which can be used in the design of the premises.


If we talk about the merits of textured paints, they are in many ways superior in practicality to their counterparts, as they contain acrylic copolymers, which provide the following properties:
- High moisture resistance allows the use of paints in wet areas, makes it possible to wash the surface.
- Resistant to mold, do not absorb odors.
- Ecological cleanliness, hypoallergenicity, do not contain harmful substances.
- High temperature resistance, frost resistance.
- Resistance to mechanical and atmospheric influences.
- High vapor permeability for natural moisture regulation.
- Can be applied to any type of surface.
- Disguise minor irregularities and filling gaps.
- Resistant to sunlight.
- Excellent decorative details.
- Ease and ease of use.
The listed characteristics show that textured paints are perfect for interior finishing work and for facade decoration.
Application options and tools for the job
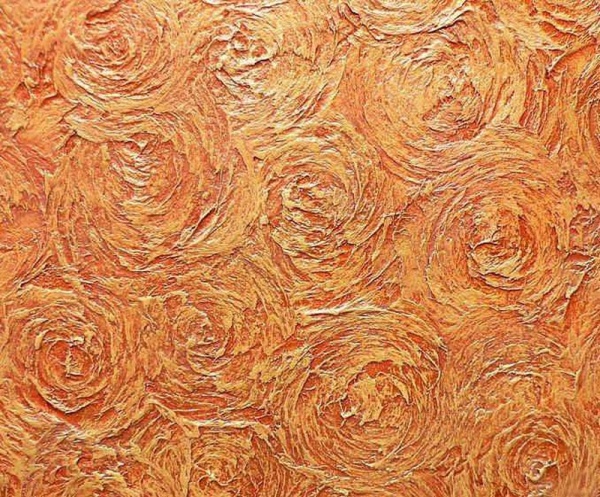
The use of textured paints in design makes it possible to express your imagination and make the interior of the room unique. Thanks to texture paints, you can imitate fabric, marble, create a floral ornament.

There are many options for creating surfaces with different patterns, you just need to know some secrets of application technology and use the appropriate tool.
To get a relief surface as a filler, sawdust can be added to the mixture, which will make the structure rougher.
If it is necessary that the structure is smoother, water is added. If the design requires sharp edges, quartz sand is used as a filler.
The tool chosen for the job helps to get different surfaces. You can use the following tools:

With the help of a brush, after the material has hardened, you can draw unusual pictures, however, this requires the talent of an artist. If you apply paint in the usual way, then it is better to take a wide brush and apply paint in large strokes. In order for the texture of the wall to learn to be uniform, you must first apply horizontal stripes, and then vertical ones.

To apply paint with a roller, you will need several rollers of different widths. The main layer is applied with a large roller.
When applied, perform vertical movements. A small roller is used to touch up inaccuracies and for hard-to-reach places.
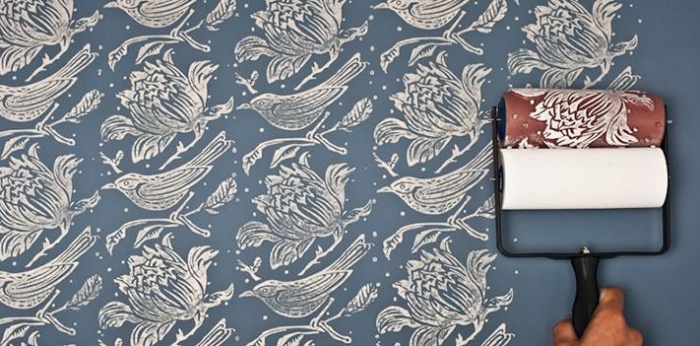
By wrapping the roller with a rope and moving upwards along the surface of the wall, you can create an imitation of stems. Various structural rollers with a ready-made pattern applied to them are widely used.

With a spatula, you can make a variety of stains that will add originality to the pattern. A rough spatula is more suitable for applying embossed paint with a coarse filler.
With a soft spatula, more delicate textures can be applied. Unique patterns can be obtained using a wet rag or paper crumpled and placed in cellophane.
Painting with the help of a pneumatic sprayer is possible. Apply the paint carefully, as it is difficult to control the layer of paint.
Before painting, it is better to practice on some surface. Using a sponge, various patterns can be applied to the surface using stencils.

To obtain a two-tone pattern on the walls using decorative painting, you can use the following methods:
- Horizontal stripes are made with a pointed object on a solution that has not yet solidified. While the coating is not completely frozen, using a thin stencil, a solution of a different color is applied. Thus, a pattern appears on the surface, which looks spectacular on a relief surface.
- You can make a pattern on the wall in the form of a geometric pattern. To do this, you can use masking or any other adhesive tape. It is glued to the surface in the form of some kind of geometric pattern. Then paint of a different color is applied to the surface. When it dries a little, the tape must be removed.
- A wall with a two-color coating will look original if you run a comb over it with large teeth in various directions. Wherein upper layer shouldn't dry out.
Wall preparation and application technology
Before decorative painting is carried out, the surface must be prepared.

First you need to remove the previous coating. Then the surface is cleaned of dirt and dust. Large gaps should be sealed with putty. Then the surface must be leveled and plastered. Irregularities should not exceed 2 mm.
At the last stage of wall preparation, an appropriate primer must be applied. It will ensure complete adhesion of the paint to the wall surface, even out irregularities and protect the wall from excess moisture. Thanks to the primer, the patterns will look more expressive.
The choice of primer must be approached responsibly. It must match the paint used and match the color. Before use, the primer is stirred with a construction mixer until a homogeneous mass is obtained. First, the wall is moistened with a damp sponge.

The mixture is then applied thin layer so that there are no drips and accumulation of material. The primer is applied with a roller and a small brush for hard-to-reach places.
The primer dries from 4 to 24 hours, the drying time is usually indicated on the package. In addition, the drying time is affected by the temperature and humidity in the room. Only after the final drying of the primer, a finishing decorative finish is applied.
The technology of painting with textured paint is somewhat different from the usual one, but mastering it is quite simple. The paint must be warm before use. room temperature. If you need to get the usual flat surface of the wall, then you should add a little water to the mixture.

1% of the total volume will be enough. If you need to get some effect, appropriate fillers are added. Then the mixture should be thoroughly mixed with a construction mixer.
The paint is applied in one layer. It must be necessarily thick, otherwise it will be impossible to create a textured pattern.
The application area should not be large, no more than two square meters. To create decorative patterns, you need to use the appropriate tool. Textured paint is fixed on the walls for 15 minutes, but finally dries out in a day.
The use of textured paints allows you to get unique surfaces and make interesting design rooms, making it attractive and unique.
You can make the room stylish and give it an original design with the help of high-quality finishes. Today, among a large abundance of materials, it is popular decorative coating walls with plaster or paint, for which a tool is used - a textured roller. So that the finish has a beautiful appearance, it is recommended to consider in more detail all the nuances of using this device.
The design of the device is quite simple: rollers for painting walls are made of various materials and by pressing are attached to the handle. The cylinder itself is located on a solid metal rod, which is fixed on the handle. Decorative wall paint rollers are used to create sinuous ornaments and patterns that look very advantageous in classic and modern interiors.
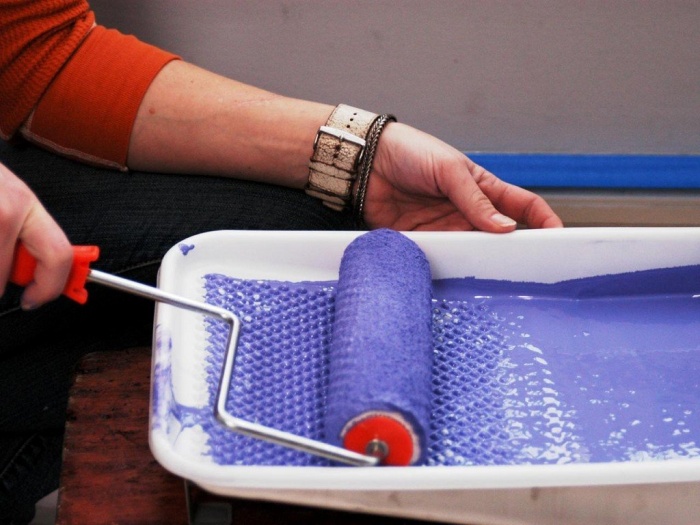
To work with the tool usually does not require additional skills. After the liquid composition of the future coating is diluted, the roller is knurled in a special cuvette. This is done to avoid smudges during work - thus, the paint lays down evenly, and the plaster is applied with a roller without leaving clots on the surface.
In the video: painting with a texture roller.
Important! Experts do not recommend using the same tool for different kind coatings: when applying textured paint, one type of roller is required, when using plaster, another. Besides, there is always an option self-manufacturing tool.
Roller materials for decorative wall treatment
Modern tools differ among themselves in the material of the working surface. Application textured plaster using a decorative roller allows you to divide fixtures into several categories:

A textured roller creates beautiful textured coatings. In addition to these types of materials, foam rubber, foam plastic and fabric are also used. Textured plaster rollers made of foam rubber are suitable for priming the first layer for further decor. They also performed well in creating the effect of bubbles on the wall. In fabric analogues, soft plush material is used, which forms original traces on the surface. The foam product is similar to a structural rubber roller, but is notable for its fragility.
Classification of rollers according to the texture of the finished pattern
Tools have the most diverse structure, thanks to which the final ornament is obtained. Some imitate natural materials, others simply create an arbitrary pattern. All rollers can be divided into 2 groups:
- Textured fixtures- able to transfer materials such as fur, wood, textiles and crumbs to the surface of the plaster natural stone. With the help of a textured roller, a relief is created, which is achieved due to the material used to make the tool. For the effect of uneven fibers, a fur roller is used, to make an imitation of natural stone, a rubber product with a special pattern in the form of eyelets is suitable. Such a device is used on a primed wall without the use of pre-finishing.

- structural products. Plastering with a roller of this type involves the application of a complex repeating ornament. This effect is achieved with the help of curly clippings on the roller. The peculiarity of their application lies in the fact that the coating should be applied to the prepared wall with the finish. For example, when the plane is finished with paint or plaster without relief, then it is dried and decorated. To achieve a more beautiful ornament, processing is carried out using a figured roller, which has a certain pattern.

In addition, products are classified according to the width of the roller. They come in sizes from 30 cm and up. The wider the tool, the faster the composition of the textured paint will fall, but choosing a narrow tool, the chances of getting an attractive clear structure are higher.
Self-made tool
As you know, some finishing fixtures are expensive, so making a device with your own hands will be a way out of the situation. We suggest that you familiarize yourself with how to make a textured roller with your own hands.
- For the first option you will need a clothesline and an old unusable tool with a reliable roller and a strong handle. Before making the device, wrap it with a rope and fix the ends tightly. Depending on the frequency of winding, you can adjust the future texture, which will create a variety of stripes on the wall.
- The second method involves using an old foam roller. By cutting the roller in several places with sharp scissors, you can get a texture roller with an original effect for the walls. Cuts can be combined with each other, make them wider and longer - all this will be reflected in the plane.
- Another way to make a textured painting tool is to use plastic bag. Wrap it around a wall roller and tie it with a thread. It can be replaced with adhesive tape, which will add traces of texture.
On video: creating a texture roller with your own hands.
Jacks of all trades also offer to make a structural roller with your own hands. This will require a little patience and imagination. To get a quality coating, think carefully about your idea. You can also use the template when covering the wall with trim. To get on the wall structural plaster, consider this option for manufacturing a roller:
- Take an old tool, preferably foam rubber;
- cut out thick fabric figurines of the same size;
- Form fantasy flaps from cuts and twist them like origami;
- Attach the resulting products evenly over the entire area of \u200b\u200bthe roller using a construction stapler or pins - the embossed plaster roller is ready!
Thus, it is possible to create almost any conceived structure on the surface of the wall, using improvised means.
wall coating technique
To keep the plaster for a long period of time, it is necessary to pre-treat the wall. If you intend to use a textured roller for painting walls, there is no need to paint the surface in the main color. When working with a structural tool, this procedure is mandatory so that the patterns on the roller do not stretch the finished mixture in the wrong direction.

Use the suggested tips to achieve the desired result:
- Do not press the tool close to the plane, move carefully and slowly.
- Using a patterned roller for decor with texture, start the next path where the border of the first pattern passes. Do not overlap the ornament.
- When you reach the ceiling, press the tool to the top. After that, work with normal pressing.
- Corner places must be treated with a brush - the roller will not pass into narrow joints.
- If it happens that the relief ornaments come out too convex, they can be corrected with a dampened grinding net.
Painting walls with a patterned roller requires care and smooth movements. Refuse to rush and keep the evenness of the pattern. Sometimes a stencil made of dense material is used during work.

Advice! To create a "fur coat" effect, marble chips, textile fibers, you can resort to using a relief roller for painting with a textured base. The material is applied to the walls, after running the tool in a container with paint. If excess is formed during work, they are removed with a spatula.
Having independently applied decorative rollers, you can create an attractive surface as good as any decorator. Pick a tool with necessary structure and turn on your imagination - the result will surely please with its appearance.
We also recommend
 Switching power supply: repair and refinement
 Remote control of light
 Swimming lessons for preschool children
 Notes for the master - home household alarms
 Clock propeller on Atmega8
 Device and relay application examples, how to choose and connect a relay correctly Microcontroller and relay simple switching circuits