Overhaul in the apartment - technological sequence of work. How to start repairs in an apartment: the main strategy for performing work Laying new electrical wiring
Have you finally decided to update the interior of your home? Then knowledge will come in handy, what stages of apartment renovation await us and how to follow their sequence. So there can be many, at first glance, imperceptible nuances.
If you determine the sequence of actions in advance, the result will only please.
- This is a chance to significantly save the budget, because you don’t have to redo anything and buy it in a hurry, while overpaying.
- The duration of work will be reduced. Self-organization always contributes to a faster end of the case.
- Repair will be really high quality.
- removal of old wallpaper;
- dismantling of plaster;
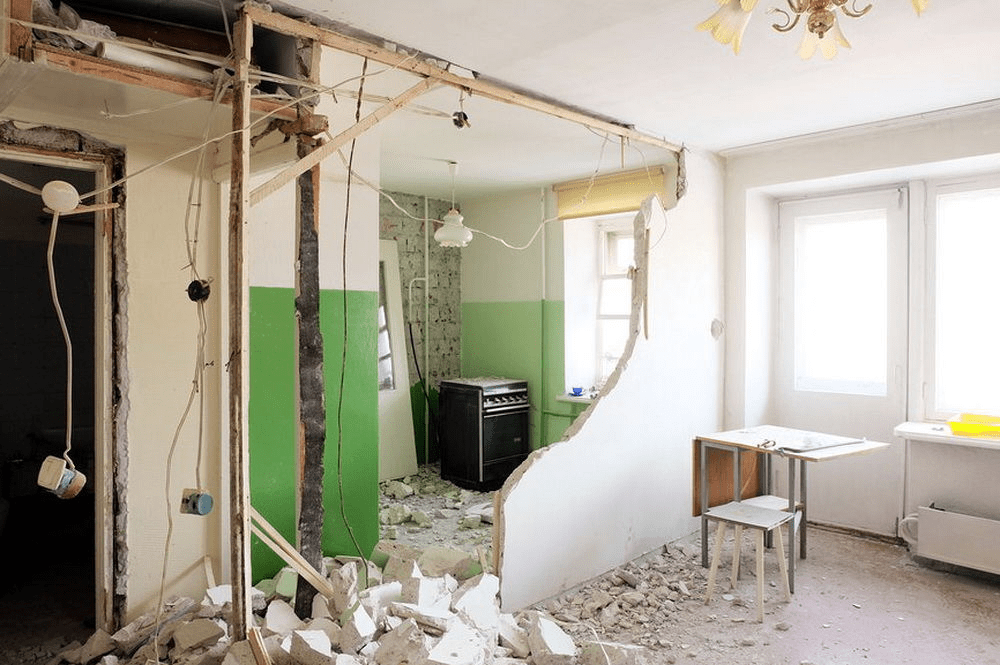
- destruction of walls and partitions not provided for in the new project;
- floor removal;
- dismantling surfaces intended for replacement.
The first mistake of the owner who decided to start construction works, - thoughtless purchase building materials. Often, because of the haste, he buys a lot of excess, and what is really needed, on the contrary, remains on the shelves. After all, even for groceries it is better to go with a thoughtful list.
Read how to start repairing.
It all starts with a budget. At the same time, it is advisable to invite a specialist for consultation, even if only independent work. Before starting the repair, it is necessary to develop a project and draw up an estimate
With a well-defined plan and a competent list of everything you need, you can proceed.
Work order
We pay attention again: in order to avoid errors, alterations and downtime during the repair process, be sure to adhere to ready plan. step by step repair
Dismantling of the old interior
It all starts with total preparation. Such works include:
Skip the disassembly step, going straight to the next step.  Interior dismantling
Installation of communications
First of all, they carry out work on the installation of communications. Before making repairs, you need to do all the operations that can destroy new coatings: installation of windows, doors, wiring and ventilation. Pipework can also be attributed to this stage.
Read more about it in our articles:
All old electrical wiring is removed and a new one is installed. The safety instructions for placing sockets will help you place electrical elements correctly and use wires with a sufficient cross section. For example, you should take care of the presence of thick wiring and grounding at the point to which the washing machine will be connected. 
Creating partitions
At this stage, you can change the entire layout of the apartment, bringing novelty and additional comfort to the interior. 
With the help of partitions (especially if the extra walls are removed), you can create an office, a nursery, share a bathroom.
More often, bricks or foam blocks are used for such purposes, less often - drywall. covering new wall soundproofing plaster, you can achieve greater comfort. When creating partitions, it is important to take into account the quadrature of the premises, sometimes it is better to leave one big room than doing five small ones. In addition, the creation of unnecessary partitions can lead to a violation natural ventilation apartments. So when building additional walls, be sure to consult with professionals.
Articles of our site on the topic:
Plaster
For plastering work, it is recommended to use a ready-made cement-sand mixture (CPS) or gypsum plaster, which will save you from possible errors in self-mixing proportions of sand and cement. If there is not enough experience in such work, it is still better to hire specialists. Firstly, it saves time, and secondly, you do not have to redo unsuccessful work.
More:

Screed
When pouring concrete, we level the floor. The quality of these works will affect the subsequent placement of furniture in the room. Surely more than once faced with the problem of leveling the table, chest of drawers, chairs and, more significantly, washing machine. good screed help avoid such problems in the future.
More details: . 
Drywall installation
Between the screed and the installation of drywall, at least a week must pass so that the room has time to dry.
We install the iron sectional base, leveling the surface of the ceiling. Then .
More detailed articles on this topic.
Everyone wants to bring their home to the proper form. For this, various improvements are being carried out, including repairs in the apartment. But at the same time, you should know how best to do everything and where to start so that the whole process does not drag on for for a long time. Except pre-training should be purchased and necessary set tools. But everything will depend on the amount of work.
Repair types
It is not always necessary to do so that the apartment acquires its original appearance. It will be enough to repair individual sections, re-paste the wallpaper or re-lay the floor screed. But when everything is already radically tired and you want something special, then you can safely take on a capital instead of a cosmetic one.
When it comes to modern design and new technologies, it is best to seek help from specialists. They will independently choose the material for work and transform each room on their own experience. Especially if redevelopment is carried out inside an apartment or house. But here it is important to proceed from the budget that is available. All possibilities and wishes must be realized in in full.
Preparation for repair
During preparation, you should know exactly whether to repair the floor or ceiling first. There are a lot of nuances and tips here. But you should first decide what you want to get in the end. It creates an impression of the interior. Every little detail must be taken into account, right down to the finish.
Regarding the repair, you should decide on the scope of work. It will be enough to redo the ceiling, glue new wallpapers or start dismantling the flooring, replace the screed and make a floor heating system. Future sockets must find their place before work begins.
In order not to encounter unexpected waste, an estimate should be drawn up, where all expenses are prescribed. It specifies everything that will be repaired. But even here it should be understood when performing repairs, what to do first on the floor or walls. The calculations indicate the required material consumption and purchase necessary tool. It is worth noting that the quantities of building materials should be taken with a margin so as not to run into interruption of repair work. In addition, a different batch may appear on sale here, for example, tiles, which will be somewhat different in tone from the original. 
Not every repair job is done on your own. In some cases, you will need to seek help from specialists. It's almost impossible to know everything. So you can putty the walls, and entrust the laying of parquet to a professional. In no case can you save money, since the work is carried out for the future, that is, for a long time. If there are experienced craftsmen, then you don’t have to think about whether the walls are plastered first or the floor is poured. They will tell you all the subtleties and nuances. But before pouring the floor screed, all possible work on the ceiling and walls should be carried out.
To the list preparatory activities should include the purchase of tools for work. Its quantity and list will also depend on the amount of work that you want to receive as a result of the repair. In some cases, you can purchase or rent professional instruments that provide more accurate results.
For repairs - spring. Temperature environment starts to rise above zero, it is possible to ventilate the room if necessary. Yes, and finding a construction team is much easier, since they are not particularly loaded with work.
When all of the above is done, you should decide on the sequence of work. Not everyone is aware of what to do first, leveling walls or floors. But even before this moment, other important steps are being taken.
Dismantling
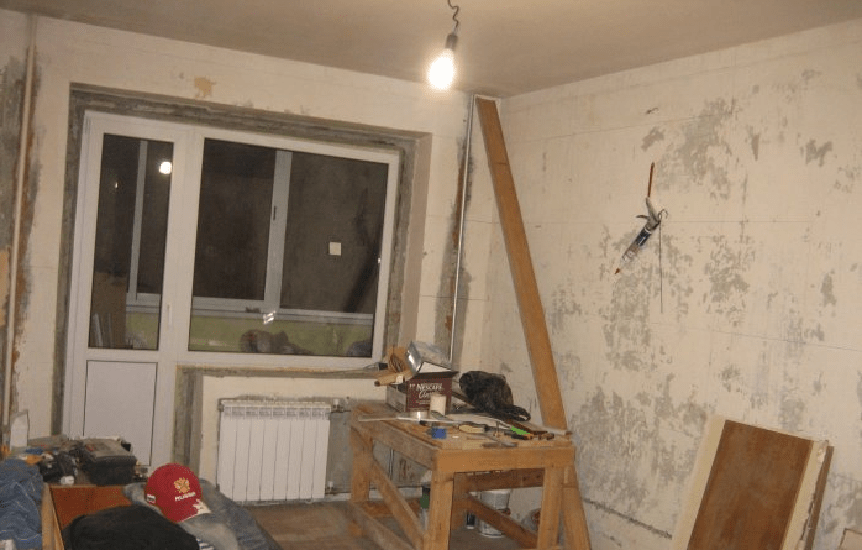
On the this stage not only the floor covering is removed, but also old wallpaper, window frames are exposed, whitewash is washed off the ceiling. If available, suspended ceilings, drywall systems are also dismantled, which will only interfere with quality repairs.
Removing the flooring is only the last step. It is better for any debris from the ceiling and walls to fall on it than to fall on the base of the floor.
There may be cases when the floor is not touched during repairs. Here you will need to carefully cover the surface with a thick oilcloth and an additional layer of cardboard.  Nothing must damage the floor covering during the dismantling work.
Somewhat later, attention is drawn to the old windows and. Only the cashier in the door at the entrance is removed. Premature dismantling and installation of new windows can lead to damage during repair work. Subsequently, then you will have to tint them, restore, wash or even change them to new ones.
When all these actions have been completed in full and excess garbage has been taken out, the remnants of old materials, you can direct your efforts to the next stage.
Communications
This stage is associated with chasing the walls in the room so that all cables and wiring can be placed in them. This includes:

This type of work is one of the dirtiest. Therefore, they should be dealt with in the first steps. Even this allows you to get an answer, to repair the floor or other areas first. It is important to make calculations and draw up a layout of everything in the room. The place where the TV will be installed, the air conditioner is suspended, the electrical systems are located.
Ceiling and wall decoration
Next, we are engaged in rough finishing, both the ceiling and the walls. It is draft, not finish. If the matter concerns false ceiling, then they should be dealt with only after the walls in the room are pasted over with wallpaper. As for the ceiling, it is prepared in such a way that it remains to be painted or otherwise.  At this stage, work is being carried out on plastering walls and ceilings, puttying, and complete cleaning of the old coating.
It is impossible to paint either the walls or the ceiling, since all subsequent steps also cause a large number of dust that easily settles on the surface. If old windows are replaced with new ones, then they should be covered, sealed with masking tape. Also in parallel with this, slopes are made, which are plastered.
The question is removed with the fact that the floor or walls are first leveled. Naturally, you should take care of the walls so that later all the debris and remnants of the material do not fall on the base of the floor.
Pouring a rough floor screed
When the old coating remains in place, then nothing will have to be done here. But if you are already doing a major overhaul, then do it to its logical conclusion. Consequently, the old coating is removed at the very beginning, after which self-leveling mixtures are performed or used for pouring.  There is a huge assortment of them on the market, and there is no need to think about the qualitative dilution of the necessary components. If the proportions are not properly observed in the technology, then solid foundation see, fail.
Before proceeding to the next step, you must wait for the surface to dry completely. Specific terms are usually prescribed in the instructions from the manufacturer, which should be followed, observing the technology. This helps to get an answer to whether the floor is poured or plastered first. It is carried out only after the work on finishing and leveling the walls and ceiling has been carried out.
Parquet can be used as flooring. But after its laying, the surface should be completely polished. This causes a huge amount of dust. To avoid its appearance in the future, it is best to deal with parquet now. Subsequently, it remains only to cover the surface well so as not to damage it.
Primer
An important process is considered not only the walls, but also the ceiling inside the room. This allows you to increase the adhesion properties with further use of the material. All small particles will connect with each other and will not interfere with setting. The quality is checked by hand. 
When it dries, you can run your palm over its surface. You can proceed to the next stage after when there is no dust, delamination, or putty residue left on your hand.
Finishing
There is nothing complicated here. It is enough to paint the ceiling in the chosen color, paste over it or otherwise finish it. The same applies to walls.  Let's get to. There are cases of performing decorative plaster. It all depends on the financial possibilities and the wishes of the final result.
Since the room is almost ready, it remains only to complete the flooring of the selected flooring option. The material is laid on the prepared base and fixed with all possible and in suitable ways. As for the parquet, it remains only to cover it with a layer or several layers of varnish to add shine and perform a protective function.
Tiles on the floor are allocated in a separate category. It is laid after finishing the ceiling. tile adhesive with a high probability will fall on the walls, which will immediately spoil the quality of the entire repair.
Specialists highlight some subtleties when carrying out repairs in an apartment. Each individual area requires attention and effort during work. If we move away from this, then it is unlikely that an ideal option will turn out and that room in the apartment, which was presented at the initial stage.

When starting to repair an apartment and each of its premises, it is necessary at the initial stage to determine the scope of work, as well as obtaining the desired result. Drawing up a complete plan for work and costs will allow you to calculate every step towards success. If you do all the work yourself, then the final amount will be noticeably reduced.
Preparation for repair
1. Consider design and redevelopment
At the very beginning, decide how you want to see your apartment: what will be its design, the arrangement of furniture, where there will be blank walls, and where - light ones.
In order not to forget anything, it is better to transfer ideas to paper or to a spreadsheet. Consider your long-standing desires: when else to realize them, if not now? It can be replacing old windows, laying underfloor heating, and so on.
Decide what you will not give up under any circumstances. It is often from such fundamental desires that people start when they think through the arrangement of furniture and other details. For example, a decision may lead to a rework kitchen set.

2. Draw up drawings and work plans
Measure all rooms and make drawings. Describe in detail the work plan, list everything that needs to be done. In the next column or a separate table, make notes: the shopping list, the approximate cost of materials and the work of craftsmen.
Count up. If you get out of the previously planned amount, decide what you can save on, and what you definitely can’t. For example, inexpensive wallpaper is easier to replace after a couple of years than cheap linoleum that has fallen into disrepair.
Savings options:
- lay the warm floor only in open areas of the floor (but it will not be possible to rearrange in the future);
- look online for an alternative to expensive ones that will not affect the quality of the repair;
- think about what work you can do on your own or with the involvement of friends, acquaintances, and for which you will definitely need a specialist.
If you live in an apartment being renovated, it is better to carry out work sequentially: first in one room, then in another, so as not to carry dirt around the house. Furniture and things will have to be disassembled, packed and taken to other rooms, some sent to the country house, to the garage, and some to be thrown away altogether.

Stages of repair in the apartment
The most "dirty" work:
- The first step is to dismantle all coatings from the walls, floor and ceiling.
- We demolish non-bearing interior walls or build new partitions.
- We remove the doors, and close the openings with a thick film.
- We are ordering new windows - while they are being made, you will probably complete the bulk of the work. When the wizards insert new windows, save protective film until the completion of the rough finish.
- If necessary, we adjust the openings for the purchased doors: we increase or decrease them.
- We change communications: electrical wiring, pipes, heating radiators, install an exhaust hood. AT panel houses it is advised to ditch the walls vertically, and do the wiring under the ceiling or near the floor. Switches, sockets, lamps are installed later - at the finishing stage.
- Let's start finishing the ceiling. An exception is stretch ceilings, they are mounted at the very end.
- Let's move on to the floor screed. The most economical option is to use a cement-sand mortar. Easier to work, but more expensive -.

On a flat base we lay the underfloor heating system - water or electric. The first type is prohibited in apartments. The second one is more expensive, but it has fewer "contraindications", and a large assortment of models allows you to take into account any features of the room.

We plaster the walls or go through the starting putty. If you plan to paint them, it is better to align them with beacons, otherwise the paint will emphasize the bulges and depressions. We do not ignore window slopes: they should also be leveled and putty.

We apply a layer of finishing putty. If for some reason the wiring was done after puttying, we close up the places where the wires “lie”. It is important not to forget about the priming of the walls: the primer improves adhesion finishing materials with surface.
Finishing work
Now you can start installation stretch ceilings glue and paint ceiling plinths(fillets), stucco.

Now it's time to lay the tiles on the walls.

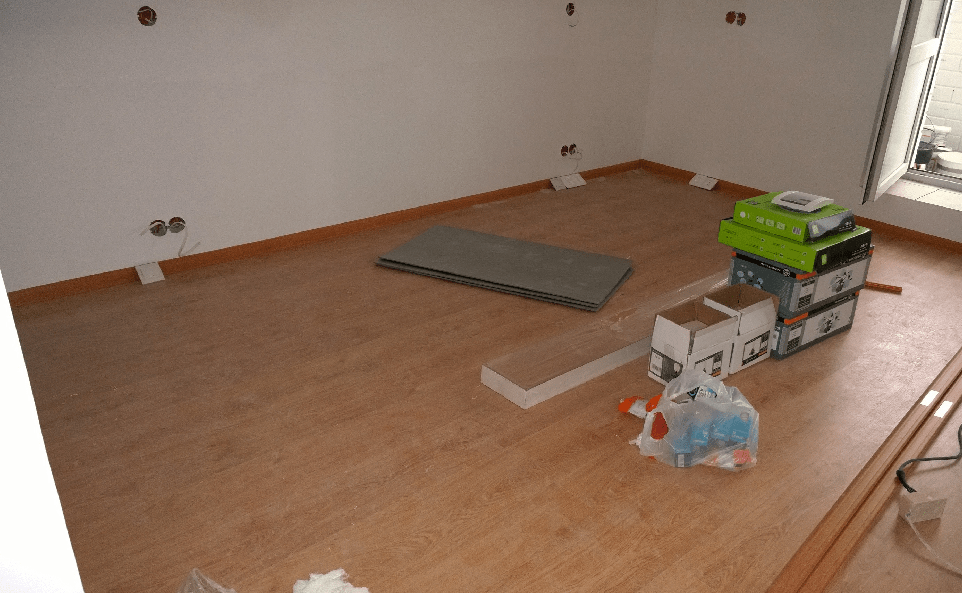
We put: linoleum, laminate, porcelain stoneware, tiles, parquet.

Install door frames and hang the door itself. You can “wrap” it with a film so as not to get dirty. We also cover the floor with a film and proceed to painting the walls or wallpapering.
We put platbands on the doors, glue skirting boards, hang lamps, install switches and sockets.
Redecorating
An individual plan is needed for this, since each apartment has its own nuances for replacing worn-out materials. Somewhere you just need to re-paste the wallpaper, somewhere you need to re-lay the floor and not touch the walls, and somewhere you need to update the entire finish, but without leveling the surfaces, replacing jambs and wiring.

You can visually see the sequence of repair work in the video instructions.
The idea of where to start repairs in the apartment begins to bother future homeowners long before the vending “three-ruble note” or “kopeck piece” was officially issued, and the keys to the front door migrated from the realtor to the new owners. With the purchase of housing in a new building, everything is clear, in this case the best option will make a rough repair of the apartment with his own hands. With housing purchased on the secondary market, the situation is more complicated.
Which option is preferable, capital or cosmetic
It is clear that the decision on how to plan the repair of an apartment, where to start and the sequence of work, will be based primarily on the condition of the dwelling. To a large extent, the planned scope of work, what to pay attention to and where to start repairing a secondary apartment depends on a number of conditions, including plans for the future, abilities and luck of the new owners:
- If the apartment was purchased in a relatively new building, 4-10 years old, complete with quality steel doors, plastic windows, shabby, but "living" floors, it is quite possible that you can get by with a redecoration of the apartment;
- Buying an apartment from an intermediary, especially if the residential premises smell of freshly completed cosmetic repairs designed to hide all the flaws and problems, will most likely require a major rework of most of the details;
- The third option is to buy a very old apartment which has not been renovated for a long time. In this case, you will need to spend a lot of time and effort to identify all the shortcomings and problems.

In the latter case, the solution is obvious, it is necessary to renovate the apartment from scratch, it is easier and more convenient to carry out a major overhaul of the premises before the tenants move into new apartments. In such a situation, you can deviate from the standard sequence of work when repairing an apartment and decide on your own where to start the repair, based on financial capabilities and free time.

Apartment with cosmetic repairs, where to start
The second case is considered the most problematic in terms of planning the stages of apartment renovation. Not only is the cost of cosmetic repairs automatically included in the cost of the purchased housing, it will also require the dexterity of a magician to determine the real state of the most important areas of the premises without breaking the freshly laid finish:
- The quality of the floor covering, the condition and degree of wear of the subfloor;
- Serviceability of water pipes, sewerage, heating systems;
- Wiring condition.
Note! Flooring, flooring and electrical wiring is easy enough to check with your own hands. For the revision and repair of pipes, radiators and sewers, it is best to invite specialists.
As a result of the audit, the answer to the question of where to start, and what next steps refurbishment of a secondary apartment become obvious. First of all, performed repair work in areas on which safety and the possibility of using housing depend. Further, you can make repairs to the apartment in any order, it is clear that it is best to start with the most dusty and dirty work and finish with painting and decor stickers.

How to organize and start cosmetic repairs
When planning the purchase of an apartment in the secondary market, experts recommend reserving funds for major repairs, even if, at first glance, the housing is in a tolerable condition. If you are lucky with the purchase of an apartment, and there are no urgent problems that require urgent capital repairs, then you can start with “cosmetics”, and plan a thorough alteration of the premises for a couple of years in advance, when funds and time appear.

Cosmetic repair of a one-room apartment
The most difficult thing is to plan repairs in the "odnushka", there is not enough free space, there is practically nowhere to place materials and tools for apartment renovation. Cosmetic renovation of the interior has to be done in a situation where there is practically no time left to build up and think about where to start repairs, from day to day the residents will move into new housing.
In this case, repair work in the apartment, as they say, is carried out "from the wheels":
At the end of the work, wooden floors are painted or parquet is varnished. If there is no time and opportunity to perform redecorating apartments in full, it is better to start with the restoration of flooring.
Even if you had to move into an unrenovated apartment with furniture and belongings, in the future you can always find a couple of free days when you can make repairs in the apartment. Always, at all times, floor repair has been the most difficult and problematic, so laying or replacing flooring should be done as soon as possible.
Renovation of a two-room apartment
Cosmetic procedures in a kopeck piece are much easier, since it is possible, before starting work, to transfer furniture and some things to a free room.
Masters recommend starting repair work in the apartment by changing the two most difficult parts to repair - replacing windows and elements of the heating system. In addition to a fairly high price, both parts of the apartment's life support system are tied to weather conditions and time of year.
Therefore, it is necessary to replace radiators or window frames customize the entire renovation plan, for example, plan to start redecorating around the end of August, during the next vacation. Prices for double-glazed windows and radiators are already starting to decline, the cold weather is far away, and central system heating is not yet filled with water.

Already in September, you can begin to close up the slopes and paint the pipes. It is still warm enough outside to make the final repairs in the apartment. If autumn frosts fall during the work, it will still be warm enough in the room to make repairs in two-room apartment with minimal loss of time.
How to start the overhaul of a problematic apartment
Unlike "cosmetics", which are planned on the basis of the principle - from dirty to clean, a major repair option must begin with solving the most complex and deepest problems. Repair work can take several weeks, it is best to start in early spring, when most of the specialized craftsmen do not have so many orders, summer is ahead, and there is an opportunity to thoroughly prepare the apartment:
- Solve the problem of obtaining permits, for example, for the redevelopment of an apartment, the transfer of a meter, the installation of individual heating;
- Remove some of the furniture, flowers, household appliances to the cottage;
- Stock up on garbage bags and plastic covers;
- Purchase materials and tools.
Most importantly, you need to create for yourself step by step instructions if the overhaul in the apartment is done from scratch. Useful list work will avoid inconsistencies and loss of time, especially if several craftsmen work simultaneously in the apartment.
Repair sequence
The preparations have been completed, the permits have been received, the materials have been purchased, the process of restoring the apartment can begin. Traditionally, overhaul is planned in the following sequence:

Installation interior doors, laying flooring, installation of fixtures are transferred, as the least urgent, to the final part of the repair. It is necessary to begin the process of restoring the premises with the removal of old trash.
Dismantling door frames, flooring and old plaster
According to the majority of new settlers, it would be right to start a major overhaul in the apartment with the installation entrance doors capital type. It can be armor, metal or double oak doors, anyway, as long as they have a sufficiently large opening, at least 90 cm wide, and have good sound insulation.
External walls must be plastered, interior decoration slopes can be transferred at the time of plastering the walls. At the same time, you need to start cutting out all the doorways inside the apartment, the old ones are being dismantled wooden frames. We tighten the opening thick plastic wrap. Before starting plastering work, it is necessary to install double-glazed windows.
Moving partitions and leveling walls
Next, the dirtiest part of the work is carried out - the plaster is cut off, the chalk or lime whitewash of the ceiling is washed out. The floor covering is removed concrete base, wooden floors are dismantled and removed from the apartment.
If the work plan provides for the transfer of partitions, the next step will be laying out new wall structures from drywall or drywall. First of all, plumbing is removed in the bathroom, plumbing and sewage pipes are changed. Next, the surface of the walls in the toilet, in the bathroom and in the kitchen is leveled for finishing. You can invite craftsmen to lay new communications, but for now you need to start working with plastering the walls and ceiling in the living rooms of the apartment.
Unexpected Problems
Capital work associated with the use of a perforator, grinding machines, drills, any other "noisy" power tool should only be performed during the daytime.
Any repair work can be carried out from 8-00 to 20-00. In some cases, by order of the municipal authorities, it is forbidden to work with a tool with high level noise from 13-00 to 15-00, so it will be useful to know in advance when and how long it is possible to do repairs in the apartment so as not to get into conflict situation with neighbors.
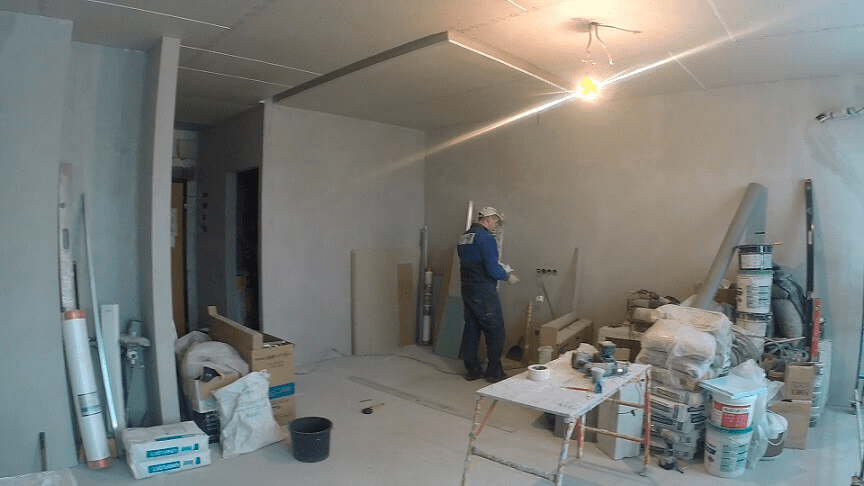
Laying new electrical wiring
Once the wall leveling process is completed gypsum plaster, you can start wiring. If the apartment does not plan to transfer the meter, then channels are immediately cut, wiring is carried out, installation of socket boxes and leads for lamps. In the case of transferring the meter, the wiring is taken out to a new installation site, connection and verification can only be started after the device is sealed.

Simultaneously with the wiring, you can start finishing the bathroom and kitchen, first of all the walls, then the floor and ceiling. Plumbing installed at the same time. Before you start repairing the floor, work in the kitchen-toilet must be fully completed.
Door installation and floor repair
Once the walls and ceiling are ready for fine finish- painting or wallpapering, you can start repairing the floor. Most often, a laminate or parquet slab is laid on concrete, but a real wooden floor can also be assembled. The floor covering is primed, dried and covered with a film.

At the next stage of the repair, interior doors are assembled. The doors themselves are not yet hung, the platbands are not nailed until the walls and ceiling are finished.
The final stage of the repair
The final stage of repair can begin with the installation of sockets, switches, lamps, adjustment window fittings. If the floor involves painting or varnishing, then you will need to install a ventilator, otherwise the drying process will drag on for several days.

So that the overhaul does not take a lot of time, and the work does not have to be redone, when performing them, it is necessary to strictly adhere to a certain sequence. Make a plan for yourself - and it will become easier for you to control the execution of operations and check the quality of work, as well as calculate the prices for apartment renovation per m2 from different companies.
General rules when planning the stages of major repairs in an apartment
- First, the “dirty” work is carried out. This ensures that the new finishing materials are not damaged or soiled.
- Finishing is done last.
- Work is carried out "from top to bottom": from the ceiling to the floor
Stage 1. Preparation for overhaul
Before starting work, you need to clearly define what you want to receive. The ideal option is to order a design project for an apartment, taking into account redevelopment, furniture arrangement, etc. If you are planning to transfer gas equipment, demolition of walls, arrangement of new openings, you will have to prepare working drawings, undergo a construction examination and coordinate the project with the housing inspection. Please note that this is a lengthy process, so if you wish to obtain planning permission yourself, it is best to do so in advance.
Even if the changes are minor, before starting work, you need to draw up a repair project. It indicates the desired layout, the layout of communications (wiring, sewerage, water supply) and technological equipment(plumbing, water and gas meters, air conditioning, built-in furniture, etc.). This will help to understand the scope of work, plan the sequence of implementation overhaul in the apartment and determine the approximate amount.
Stage 2. Dismantling

If you dream about quality repair that will delight you long years, then it is better to dismantle everything up to the bearing bases. Even old finish well preserved, it may not withstand additional layers of materials, and repairs will soon have to be redone. At the same stage, the walls are demolished and the configuration is changed. doorways. Among the stages of work on the overhaul of an apartment, dismantling is the most noisy and dirty, so you should warn your neighbors in advance, agree with the repair team on working hours and garbage collection.
Services of IC "Domus" include garbage collection. We will independently clean the premises of old finishing materials and fully prepare the apartment for the remaining stages of the apartment overhaul.
Stage 3. Construction of new partitions
If redevelopment is provided, then the next item will be the creation of partitions. They are built of brick, drywall, foam blocks, tongue-and-groove gypsum boards. The specific material is selected depending on the characteristics of the room: for example, brickwork able to withstand the highest loads, and drywall sheets are very light and fragile, so they are usually used to create complex design forms.
Stage 4. Conducting communications

The communication plan is prepared when planning the repair. Now it's time to implement it. Pipes and radiators are replaced, electrical wiring is updated. After the work is completed, tests are carried out: Electricity of the net current is applied, heating and water supply systems are checked for leaks.
Stage 5. Rough work
After the most "dirty" repair work is completed, the masters begin to process the surfaces. The ceiling and walls are leveled with plaster, a cement-sand mixture or self-leveling floors are poured. If follow correct sequence major repairs in the apartment, then at the same stage new double-glazed windows and entrance doors are installed.
Domus specialists reduce the repair time due to the parallel execution of some works. Fully staffed crews work in clients' apartments, so work can be carried out in several rooms at the same time.


Stage 6. Finishing work
You can start them only when the rough finish materials are completely dry: for example, plaster needs about two weeks, self-leveling floor- more than 15 days.
During the overhaul of an apartment, the sequence of finishing works is determined by general rule: first the ceiling, then the walls, lastly the floor. The ceiling is plastered, painted, slabs are installed, tension or suspended structures are installed. For walls use decorative plaster, wallpaper, plates, etc. Floor coverings are laid last, at the end of painting and tiling, to avoid dirt and moisture. The most difficult installation of parquet and massive board: only experienced craftsmen, knowledgeable technologies working with these materials, will be able to create a reliable and durable coating.
The final stages of the overhaul of the apartment are the installation of doors and furniture, the connection of electrical equipment, the fixing of skirting boards and cornices, etc.
As soon as we finish work on the site, you will sign the act of acceptance and delivery of the apartment and pay us. But we don’t say goodbye to this at all, because all work has a guarantee of up to two years.
Contact the company "Domus" - and do not doubt that all work will be done efficiently and on time. Additional advantage cooperation with us affordable prices. Find out the cost of a major overhaul of a one-room apartment - and you will definitely want to invite our masters.
We also recommend
 What is the name of the amount of money at stake in the game Modern monetary system is a financial pyramid
 How to name a horse: we select a suitable nickname
 How to name a horse: we select a suitable nickname
 Point of the celestial sphere above the observer's head
 Common peacock (Indian)
 What is the name of the male and female