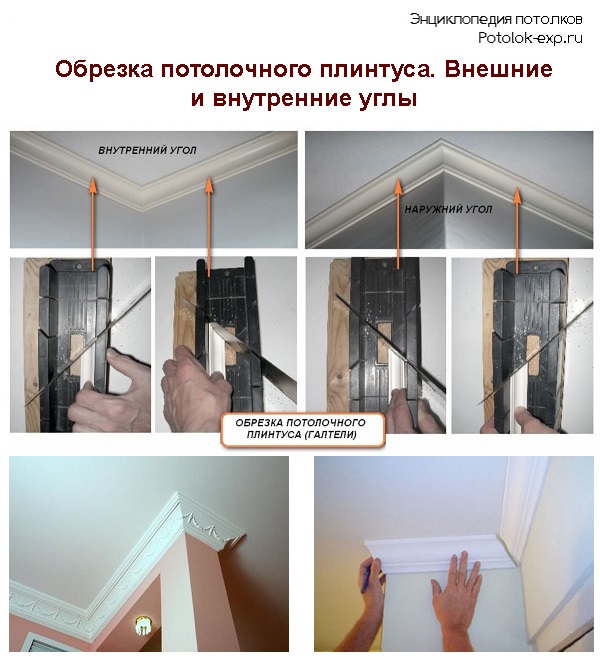
How to cut a ceiling plinth: learning to make the right angles. How to properly cut a ceiling plinth What is the name of the corner trimmer
Skirting boards are the finishing touch to any bathroom. And this touch must be perfect or very close to it, otherwise the finish will have an unfinished look, which is fraught with an unaesthetic interior as a whole. The ceiling plinth itself is quite simple to fix, but preparing it for work is not always easy. In particular, without knowledge of the matter it is difficult to make a neat corner - in an attempt to get beautiful strips, you can ruin a lot of consumables. So that you avoid such an unpleasant situation in the process of repairing your bathroom, then we will tell you how to properly cut the baseboard in the corners: what tools to use and what methods you can resort to.
Trimming skirting board corners with a miter box
First, let's figure out how to properly cut the corners of the plinth using a miter box - a carpentry tool that is a tray in the shape of an oblong inverted letter "P". This tool has special slots for cutting parts at angles of 45 and 90 degrees: a workpiece is placed inside the miter box, a hacksaw is inserted into the guides and the workpiece is cut at the required angle.
At first glance, everything is simple, but in the case of skirting boards, there is a risk of getting confused in the sides of the planks and making a marriage. In order to prevent this, we recommend that you work according to the following schemes.

Required Tools
For outside corner:
- With the side that will be directly attached to the ceiling, lay the plinth on the bottom of the miter box. With the other side, press the product against the wall of the tool, or rather, against its right slot.
- Cut off the required part of the plank using a hacksaw or utility knife.
Advice. Cut the baseboard without excessive pressure, so as not to provoke the appearance of chips and not to deform the workpiece.
For inside corner:
- Press the plinth to the bottom of the miter box with the side with which it will be fixed on the ceiling. With the other side, press the bar to the left slot.
- Cut off the corner. Attach the resulting bar to the first product and check how the sawn parts fit together. If gaps remain, carefully correct the blanks with a knife. At the same time, if the error is small and you are not sure that you can carefully work with a knife, choose an easier way - after sticking the plinth on the ceiling, mask the gap with putty that matches the color.

Trimming pattern
Trimming a plinth without a miter box
Agree, not everyone in the household has a carpentry tool, and buying it only for a baseboard is not a very successful idea. But you still need to cut the corners, because the accuracy of the ceiling finish is at stake. How to be in this case? In fact, you can completely do without a miter box. There are even two ways to cut the corners of the baseboard without a special tool: by resorting to marking on the wall and using a painted false miter box. Let's start with the first one.
You will need:
- hard pencil;
- ruler;
- utility knife or hacksaw.
The work is carried out as follows. For inside corner:
- Attach a bar to the ceiling, which will be installed to the right of the corner. Draw a straight line across the ceiling along the outer edge of the baseboard.
- Attach the plank to the opposite side of the corner and also draw a line on the ceiling.
- Mark the place where the two lines meet with a cross. Attach the bar to the corner and transfer the resulting mark to it, and then draw a neat line from it to the bottom corner of the workpiece - along this line you will need to cut the plinth.
- Cut off the required angle with a hacksaw or utility knife.

Trimming a plinth without a miter box
For outside corner:
- Attach the plank to the right of the corner. Draw a line across the ceiling along the baseboard away from the corner.
- Attach the plinth to the left of the corner. Draw a line along the plank to where it intersects with the first line.
- Transfer two marks to the bar: the first is the intersection of the lines on the ceiling, the second is the place where the corner of the room passes. Connect the two marks - you will get a plinth cutting line. Now it remains only to cut off the corner and, if necessary, adjust the gaps.
Trimming a corner with a false miter box
The third way to trim the corner of the plinth is not quite ordinary - using a kind of false miter box. There are two ways to make such a "tool".
The first is to draw a miter box. To do this, you can use ordinary thick paper or cardboard: draw two parallel lines on the sheet and, using a protractor or a simple square, set aside the corners with the required degree. The corner is cut off in almost the same way as in the case of using a joiner's miter box: attach the plinth to the "tool", make the necessary marks and make an incision along them.
The second way is to make a prototype of the miter box from three wooden planks: connect them in the form of an oblong letter “P” and make cuts at 45 and 90 degrees. You can use the same protractor to mark the corners.

A miter box made of wooden planks
When cutting the corners of the plinth without a miter box, it is very important not to miscalculate with the length of the plank and directly with the degree of the notch. In order not to be mistaken, at first it is better to cut the blanks 10 cm longer, then try them on dry to the ceiling and after that adjust until you get the desired result. In addition, let's not forget that not all bathrooms have ideal 90-degree angles - you still cannot do without adjusting the products.
Advice. You need to fix the skirting board to the ceiling only after you adjust the corner of the next skirting board blank to it. Sections are best tried on not under the ceiling itself, but on the table - it will take more time, but the cut lines will be more accurate.
Thus, we have several ways to trim the ceiling plinth at once: with the help of a joiner's miter box, without a miter box, using a kind of false miter box. Whichever option you choose for the corners, it is important to do everything carefully and accurately - only in this case you will get a truly effective tool for the final design of the ceiling, thereby making the interior of your bathroom aesthetically complete.
How to join skirting boards: video
How to cut a ceiling plinth: photo


High-quality repair requires an attentive and accurate attitude to the details. Finishing work with the ceiling, you need to arrange it well - ceiling plinths are used for this. As a rule, the installation of planks does not cause any particular difficulties; you will have to tinker with the corners. Let's take a closer look at how to cut a ceiling plinth in the corners, talk about different methods, and give useful recommendations on the topic.
Ceiling skirting boards of any material can be cut using one of the following methods. They are suitable for everyone except for plastic ones: they are made out using ready-made corners.
For a ceiling plinth, the following tools may be useful, depending on the chosen method of work:
- Saw on wood. Useful for working with wooden ceiling plinths.
- Canvas for metal. Suitable for other types of skirting boards (foam, plastic, etc.).
- Miter box. The tool is a gutter, which has the shape of an inverted P, where lines for cutting are outlined at angles of 45 ° and 90 °.
- Electric miter saw. Can be used instead of a miter box, helps to achieve high precision cuts.
- Electric jigsaw. It is easy to operate, with the help of it you can qualitatively and correctly cut a corner without burrs.
- Stationery or construction knife. Suitable for foam baseboards, it is important that it has an excellent cutting blade, and therefore must be well sharpened.
How to make an even corner: ways
The most difficult thing is to cut the corner so as to get a perfectly even one: the surface of the materials used is not easy to cut, in addition, you need to maintain a good fit, preferably without huge gaps. How to make a corner on a ceiling plinth? You can use several methods: with a miter box, without a miter box, using decorative corners, as well as in an alternative way.
We cut the corners of the ceiling plinth without a miter box
How to cut a ceiling plinth without a miter box? To work, you will need a well-sharpened pencil, a small piece of plinth, a clerical knife (for polystyrene or polyurethane) or a metal saw (for other materials), a ruler.

You need to attach the baseboard to the corner and draw a line with a pencil along the outer edge, then attach it to the other side of the corner and also mark. As a result, a cross will be obtained on the ceiling, the center of which will mark the place where the strips of the ceiling plinth should converge. Position the piece of skirting board where you will be gluing it. Having rested the end against the wall, transfer the desired mark to it. Thus, it is possible to cut the corners of the ceiling plinth without a miter box.
Making corners using a miter box
If the walls and corners in the room are even, you can use a miter box for work. To properly cut the corner, inside the miter box should be placed the part in which the person will make the drink, then insert the saw into the guides. This will hold the piece in place and allow it to be cut at the desired angle. For high-quality cutting of the plinth, it must simultaneously adhere to both surfaces, so it should be pressed against the wall of the miter box. The ceiling plinth is pressed with the side that is closer to you.
With the help of a miter box, you will need to cut a 45 degree angle. First you need to decide how to position the plinth in the miter box. To avoid confusion and cut correctly, place the right plank on the right and the left plank on the left.
Do the work according to the following instructions:

- Put together the cut pieces - you got an inner or outer corner.
Attach it to the ceiling and check the geometry. If it is not even enough, it can be slightly corrected with a knife, and in case of minor defects and wide gaps, putty can be used.
How to cut skirting boards using decorative corners
With their help, you can easily and quickly obtain the desired angles in polystyrene or polyurethane skirting boards. Install them on the ceiling, and then glue the strips tightly to them. Cutting them is easy with a utility knife.

How to make corners of a ceiling plinth without tools
- Make the necessary marks on the baseboards.
- Using a ruler, connect the edge of the skirting board with the mark. If you just cut along the line, the pieces in the corner still won't fit together because the inside will get in the way. You can trim it later by making measurements on the ceiling.
- You can lay on the table the piece to be cut, the part that will be located on the ceiling, and cut at an angle of 45 degrees. It needs some adjustment, but less.
- Repeat steps 2 and 3 for the second plank, making the outer corner.
Thus, you can make a ceiling plinth without special tools, using improvised means.
Use of fillets
You can not make fillets yourself, but immediately purchase those that were originally prepared for docking. This is how polystyrene foam fillets are produced, which do not need to be adjusted to each other.
The baguette, which will be fixed on the left, must have a right cut, the right baguette - the left one. When creating the inner corner, make sure that the bottom section rises above the top one, for the outer corner everything should be the other way around.

Attach the baguettes to each other, if necessary, make undercuts at the joints of the base. If everything is in order, the skirting boards can be fixed with glue or screwed to the walls with further sealing of the seams.
How to dock skirting boards in the corners
When a certain part of the plinth is glued and a small distance remains to the corner, in order not to be mistaken with the length, it is necessary to leave a margin. To begin with, you can cut off a piece that will be 10-15 cm longer. Then cut the corner in a convenient way, try it on a dry surface, put the bar on the ceiling and select the place to which it needs to be shortened. Cutting is performed at an angle of 90 °.

Next, you need to correctly dock the corners. Made ceiling moldings are attached at an angle of 38-45 °, so the classic 45 ° is not always suitable at the junction. In different cases, the cut edges do not meet and leave gaps. For this reason, after the initial trimming of the corners, it is necessary to carry out a “dry” and most accurate docking of the baguettes directly to the ceiling. You will especially have to tinker with wooden and plastic materials.
After completing the rough docking of the skirting boards, glue or screw the fillets to the walls and ceiling, then, if necessary, use putty and seal the seams at the end.
Important Points
Consider how to properly cut the corners of the ceiling plinth and get an excellent result the first time. Follow a few helpful tips:
- Before mounting, both parts must be adjusted to each other. Attach both halves to each other. The wall surface must be dry. Having found defects, you can easily align them with a knife.
- It may need a few trims. Don't be discouraged if it takes you a long time to do a few trims, especially if this is your first time doing the job.
- Correctly determine the length of the strips in the corners. For an inner corner, the length of the plank should be adjusted exactly from corner to corner; for an outer corner, the measurement is taken from the inner point in the direction of the room.
- If the corners as a whole match perfectly, but there are small gaps in the middle, they can be repaired with putty.
How to glue a ceiling plinth
Start in the corners of the room, as they are easier to work with, then move on to other parts of the room. Glue the corners in such a way that, if possible, no gaps are formed or defects, if unavoidable, are minor. For plastic skirting boards, finishing putty is used.
Water or soil is applied to the fastener areas. After the putty mixture has dried, all cracks must be sealed - various sealants are used for coating (professional builders recommend choosing products based on acrylic). In general, one package is required per room. Installation with a sealant is carried out in the same way as when using putty.
How to cut corners on baguettes (ceiling plinth) video
Mark corners with paper
Method of marking with a water container instead of a template
Use of a computer program
How to cut a profile tube at an angle
When installing piping, it is often necessary to reduce the tube below a certain slope.
Accuracy plays an important role in this task. There are several simple ways to cut the tube at an angle.
Incorrect cutting of pipes leads to the impossibility of installing the structure of the originally designed shape. For example, if you intend to rotate the system 45 degrees, the hose must be cut 45 degrees.
To complete the task, you will need marking tools and a Bulgarian (you can replace it with a metal wire).

Marking a corner with a piece of paper
Placement paper is one of the easiest ways to complete a task.
How to make a corner of the ceiling with knitting using a chair and impromptu tools
Requires a square sheet. Precise diagonal fold. The pipe cutting tutorial should be wrapped around the product so that the long side runs parallel to the product.
On the small sides, it is shaped like 45 degrees.
A cut line with a pencil or marker remains on a sheet of paper.

This method is great for long, large pipes with a cut in the center of the product.
Method of marking with a water container instead of a template
This marking method is suitable for small diameter pipes that are intended to be cut at a certain angle close to the edge.
First you need to prepare a deep water tank. Indicates the expected slope of the slope. Now you must carefully load the end of the product into the liquid, tilt it to the mark and pull it out.
As a result of such actions, a clear line of contact with water is displayed on it, it should be emphasized. Pipe cutting is at an angle. This method is best suited for jobs that require multiple markings.
Use of a computer program
To implement this cutting line marking method, you need a computer with special programs. First you need to draw a drawing that shows the cross-sectional dimensions of the product and is also designed as a section.
You need to get a virtual template.
Print it out on your printer. And then you need to understand that the larger the diameter of the pipe, the more sheets you will need to print. Then you need to accurately cut the drawing details on all sides and glue, it is best to apply this office box.
The pattern on the pipes should continue to be used and the label used.

This method of solving the problem is very accurate. You can download all the necessary programs on the Internet, download them and use them for free. There you can also find a sample for cutting the tube at an angle. It remains only to print it and turn it off. To complete the label, the curve simply hangs around the pipe.
How to cut a profile tube at an angle
The profile of the profile tube differs from the profile of the round one. Its manual execution can cause a significant error.
The best way to solve the problem is to create a cutting template from one profile, but with a larger diameter.
Take a small part of the profile tube.
On it, using projutor, mark it as 45 degrees. Now, with the help of a grinder, a piece of the workpiece should be cut along the marked line. The cutting edges must be routed to correct defects. Remains of product remain only in the template for cutting the tube at an angle.
Then you need to mark the cut line of the larger profile. And a tube is already cut through it.

The text describes how to cut the tube at an angle of 45 degrees.
When the tag is already complete, it is recommended to use the Bulgarian language. With it, she will be able to cut smoothly. We can replace it with a metal saw. The other part of the product will weld, but you will need experience with the tool, otherwise there will be irregularity. Also read: How to smoothly split a tube - tools and cutting methods.
Now in construction shops you can find a special tool for cutting pipes. However, it is easier and cheaper to create a template yourself.
How to cut a ceiling plinth
At first glance, it seems that the procedure for installing a baguette is not particularly difficult.
Indeed, this is the case if you properly cut the eaves for the ceiling. This is easy and simple to do with the help of such a device as a miter box. But if the tool is not at hand, do not despair. There are techniques that allow you to perfectly cope with the task and without it. We will teach you how to cut a ceiling plinth without a miter box.
In most houses and apartments, a right angle is decorated with a ceiling plinth, so we will cut the baguette into 2 sectors of 45 degrees.
And let's start with the method, which consists in creating markup on the wall:
- Attach the product to the corner at the place of fastening.
- Along its edge, we draw a line on the surface, which will act as the base for the attachment level.
- We will do the same on the other side, attaching the baguette to the docking wall.
- As a result, two lines are formed that intersect at one point.
Transfer it to the baguette, as this point is the top point of the cut.
- Next, you should again attach the plinth to the ceiling to draw lines between the edges of the cornice to indicate the cut line.
- Attach it to the corner of the room to trim.
- To cut the ceiling plinth, use a knife or a hacksaw, depending on the material from which it is made.

In addition, there is a rather interesting way to cut a baguette - draw a miter box on paper.
Draw this device on paper: draw two lines that should be parallel to each other, mark the corners, maintaining their degree, for which you can use a protractor. In this case, trim the plinth in the same way as when using a real miter box.
The product must be parallel to one of the lines. Trim the corner. But this technique may not give an ideal result, since we will cut the product at an angle of 45 degrees, but the corners in our houses are usually crooked, and as a result we get a noticeable gap.

This method of trimming a ceiling plinth consists in creating a special shape.
To do this, you will need 3 planks or pieces of thick plywood. In the sidewalls of the product, make cuts at an angle of 45 degrees using a protractor. Thus, cutting a baguette will turn out without a miter box.

Another simple method lies in the manipulation of paper. Bend the sheet to the desired angle. Then it must be placed on a bar and cut off along the formed line, which must first be drawn.
Such a bar will serve as a kind of template: a ceiling plinth is placed under it in the position in which it will be attached, and the corners are cut off, holding the knife strictly vertically.

A rather expensive way to create the corners of a ceiling plinth without a miter box is to use special additional inserts.
They are divided according to their purpose: for internal and external corners, there are also docking inserts.

If you have to work with non-standard corners, for example, those that have several intersection edges, or rounded ones, you will not need a miter box.
How to cut the corners of the ceiling plinth
After all, the magnitude of the angle is by no means 90 °. In this case, you should take a baguette and use a craft or clerical knife to cut it “by eye” at 45 degrees. Then the part to be joined must already be adjusted to the desired angle, constantly trying on the structure on weight at the installation site. There can be quite a lot of such fittings, so get ready. But if you wish, you can achieve a good result, even if the corners in the room are non-standard.

Thus, the absence of a miter box when installing a ceiling plinth is not a sentence.
On the contrary, this is a great opportunity to learn some new techniques that will help you cut a baguette just as well. And perhaps one of them will appeal to you even more!
Cutting a ceiling plinth: how the professionals do it
If you need to get an angle of 45 degrees, what should you do in this case? For this, there is a protractor known to everyone, even from the school bench, and with it you can measure any angle.
Well, if there is no protractor nearby, then you do not urgently need to search for it, you can do without it.
There are many different tricks or ways to do this, here is the simplest and most effective:

An angle of 45 degrees can be obtained using a regular sheet of paper, you can use a regular notebook or landscape sheet.
In extreme cases, you can get by with a newspaper.
Look closely at the drawing.
In order to get the desired angle, we first make a template out of paper, and with its help we easily measure the desired value.
It remains only to attach a paper blank to the part to be cut and draw a line with a pencil.
As you can see, such a simple trick can easily help out in your work if the necessary tools are not available.
Today it is impossible to imagine the interior of a residential building or apartment without ceiling plinths. The plinth covers irregularities in the false ceiling or wallpaper, gaps and imperfections in the walls, and gives the interior completeness. But how to make the skirting board fit perfectly in the most important place - in the corner? There are several ways.
Miter box use
Correctly cut the plinth for installation in the corner will help the miter box - a special device, which is a tray for cutting boards, plastic, etc. at different angles. The miter box can be bought at the store or made by yourself. Usually a saw is attached to the miter box sold in stores, but you can use your own tool.
The miter box has a recess for a board or plinth to be cut off and saw slots at an angle of 45 and 90 degrees. You will need to cut the baseboard at a 45 degree angle.
To cut a skirting board with this tool, follow these steps:
- We apply the plinth to the future attachment point.
- Mark where we will cut.
- We put the plinth in the chute of the miter box so that the lower part is pressed against the surface of the fixture, and the part that will be smeared with glue “looks” up.
- Cut off the section by inserting the saw into one of the 45-degree holes.
- We correct the cuts with a knife or the same saw (remove irregularities).

After that, the plinth can be glued into place.
How to make a miter box yourself?
If desired, the miter box can be made at home. It can be made from wood or iron. The dimensions of the workpiece do not play a special role, but the wider it is, the more accurate your cuts will be. However, if the width is greater than the length of the hacksaw with which you will cut the baseboards or boards, then sawing will be extremely inconvenient, so you do not need to take a workpiece that is too wide.
First, a transverse straight line is marked in the center of the workpiece. Then, at a distance of 1/2 the width of the workpiece from the intersection of the straight line with the edges of the workpiece, marks are made. Then these marks are connected crosswise, as shown in the figure.

Next, the process of marking the side walls of the miter box begins. Attach them to the already marked base and make marks, focusing on the marking of the base. Then draw straight lines from these marks across the entire wall.

After that, the installation process of the miter box begins. The walls must be attached to the base with self-tapping screws if the fixture is made of wood or chipboard or corners with bolts if it is made of steel. Only after installation in the miter box, cut through the slots for the saw.
After making slits, the miter box is ready. If you have a large volume of work or want to do repairs regularly (on a professional basis), this simple device can speed up the process of cutting skirting boards by 5-10 times.
How to cut a plinth without a miter box?
The easiest way is to draw a future cut line on paper (cardboard, wallpaper), and then, attaching a plinth blank to it, cut it off.
To do this, you must first attach the baseboard blank to the paper and draw two parallel lines that will indicate the sides of the baseboard. Then, using a protractor, you will have to measure 45 degrees and draw a line for the future cut. Then the drawing is used in the same way as the miter box: a workpiece is placed on it and the excess is sawn off along the line.

The disadvantage of this method is that the saw will have to be kept on weight, focusing on the drawing, and not inserted into a pre-prepared slot.
If the angle is not right
Unfortunately, in some cases, the angle between the walls in the room is not straight, but sharp, or, conversely, obtuse. This is due to structural defects that arose through the fault of non-professional builders, the architect's idea, or the result of subsidence of the soil some time after the construction of the building. This is especially common in village houses and cottages.
No miter box or a drawing that replaces it will help in this case, and you will have to do the markup in place.
- Attach the workpiece to one of the walls so that it rests against the other wall with its end.
- Draw a line on the ceiling along the workpiece.
- Perform the same operation on the other wall.
- At the intersection of the two lines, mark the workpiece itself.
- Draw a line from the mark to the corner of the workpiece and cut along it.
- Do the same with the blank, which you will attach to the other wall.
- Glue both blanks; they fit tightly.
External corners
It happens that the room has not only internal, but also external corners, which also need to be pasted over with a plinth (see photo). How to do it? There are also several ways here. The easiest way, as in the case of internal corners, is to cut them with a miter box. The outer joints must be cut so that the side that will be glued to the ceiling is on the surface of the miter box, and the side pressed against the wall is facing the wall of the fixture.
As in the case of internal corners, you can also use the markup "in place", that is, draw lines on the ceiling. Here the technology exactly repeats the one used for internal corners.
You can use wall markings by attaching a blank and drawing a line along its bottom edge (see photo).
If the outer corner is too rounded, you can finish the joint with a knife.
To the point where they converge, a line is drawn straight along the future part of the connection. From the point on the ceiling to the second. The resulting markup will be the line along which you need to saw off or cut off the connecting parts. Using these techniques, you can no longer wonder how to cut the corners of the ceiling plinth.
What tools can be used?
The expediency of using certain tools is related to the materials from which the plinth will be made.
Tab. 1. Varieties of materials and features of their use.
| Variety of material | Material properties, requirements | Tool |
|---|---|---|
| Polyvinyl chloride (PVC) | PVC skirting boards are distinguished by the fact that they are easily damaged when pressed and no longer restore their former appearance, as they are devoid of elasticity. Therefore, such skirting boards cannot be pressed when cutting. | Cut with a construction knife or a hacksaw for metal. A blade or a sharpened kitchen knife is also suitable. |
| Styrofoam | The foam plinth is also not very durable, but it is better than PVC analogues. Crumbles easily. | You can use the same tools as for PVC |
| Wood | Stronger and more aesthetically pleasing than their polymer counterparts, but expensive. | Wood is best cut with a hacksaw, you can use metal, although this way you risk clogging the teeth of the blade with sawdust. A fine-toothed wood saw works best. |
Using factory corners - an alternative to cutting and sawing
Instead of cutting skirting boards, you can use ready-made corners, which are sold in the same hardware stores. In this case, the main plinth can simply be measured and cut in the usual way, at a right angle, and then attached end-to-end with the corner element.

The disadvantage of corner elements is that they are actually and visually larger than the baseboard, which will make the corner noticeable. This can ruin the look of the room. It is also inconvenient to use the corners where the walls do not meet strictly at an angle of ninety degrees. But most of the time they look great.
Conclusion
Thus, cutting corners when gluing skirting boards is one of the most complex and responsible procedures for which it is advisable to use a special device - a miter box - which allows you to cut the skirting board at an angle of 45 degrees. If the angle between the walls is not straight, you have to use manual marking. Cutting tools depend on the material from which the baseboard is made.
Video - How to properly dock skirting boards
The quality of the ceiling finish greatly affects the appearance of the room. Therefore, they try to make everything perfect, or very close to it. The finishing touch in the design is the ceiling plinth. They give the finish a finished and holistic look. The strips themselves are mounted on flat surfaces simply: with a special white glue, but there are problems with the design of the corners. Without knowing how to make the corner of the ceiling plinth correctly, a lot of material deteriorates. We will tell you about how and with what to cut it in the corners.
What is it made of and what is it called
The very first skirting boards on the ceiling were made of gypsum. They were cast in special molds, then they were installed on the ceiling on the mortar. Such curly ornaments were called fillets. Today you can see them infrequently: they are expensive, and outwardly they are almost no different from cheaper options. And the name is almost lost.
The most popular today are ceiling plinths made of polyurethane or polystyrene. They are inexpensive, look great, are easy to install, and have a wide range of profiles and patterns. The width can be from 5 mm to 250 mm. They are used in almost any room, decorated in any style. The exception is wooden houses with an appropriate interior. Wooden products are most often used here - style dictates its own conditions.
Part of the assortment in a specialist shop
There is also a similar finish made of plastic. It is mainly installed in bathrooms. But even in damp rooms, you can safely mount polyurethane strips - they are not afraid of dampness.
Cut the ceiling plinth in the corners of any material using one of the methods described below. The only exception is plastic skirting boards: you can make such an angle only using ready-made corners.
What and how to cut
Working with skirting boards of different materials means using different cutting tools. When working with a ceiling plinth made of wood, it is more convenient to work with a wood saw. All the rest, including plastic, foam and other polymers, are better cut with a metal blade. It turns out a more even cut, less burr. Saws are usually used when working with a miter box.

Properly shaped corners look attractive
When working with foam skirting boards without special tools, they are cut with a good clerical knife. Its blade is quite thin and even, the cut is smooth, not jammed. If you work with polyurethane or polystyrene with a saw, do not press hard: you can wrinkle.
In general, in order to get used to the tool and material a little, take some piece and practice on it: cut, saw, cut. So at work there will be less problems.
You can read about the design of the ceiling in this article.
How to get the right angle
Most of the problems when working with ceiling plinths arise when making corners. Since the surface of the products is complex, simply cutting at the right angle will not work: you also need to cut them so that they fit together and preferably without large gaps. In fact, there are several ways to make the corner of the ceiling plinth perfect (or almost).
Using a chair
If the corners and walls in the room are even, you can use a special carpentry tool - a miter box. This is an inverted U-shaped chute with lines for 90° and 45° cuts. The part in which you want to make a wash is laid inside, a saw is inserted into the guides. The part is held in place, cut at the required angle.

This is what the chair looks like. Can be plastic, wood or metal
In the case of skirting boards, everything is not so simple: they must simultaneously adhere to two surfaces, therefore they must be pressed against one or another wall of the miter box. When working with ceiling, they are pressed against the side closest to you.
The sequence of actions when finishing the outer corner you need to make washed down at an angle of 45 degrees. Put the chair in front of you. Try on how the plinth will be located, determining which part of it will be attached to the ceiling. In order not to get confused and cut the ceiling plinth correctly, lay the plank that will be located on the right on the right, the one on the left - on the left.

How to cut a corner on a ceiling plinth: correctly install it in a miter box
With the part that is on the ceiling, press it to the bottom of the miter box. The other side is closer to you and raised. You lean it on the wall of the fixture so that it does not stagger when cutting. That is, the front part of the plinth is turned away from you. Make the cut direction as shown in the photo below. Putting the two cut parts together, you get a protruding - outer or outer corner.

How to make an outer corner of a ceiling plinth using a chair
The sawn off parts are first applied to the place “dry”, without applying glue. If the geometry of the corner turned out to be not so ideal, you can tweak it a little with a knife. Small errors are easier to cover with a special putty.
With the inner corner of the ceiling plinth, the situation is very similar. First, try on which side will be on the ceiling, press this part to the bottom of the miter box, rest the second part on the wall closest to you and make cuts as shown in the photo below.

How to make the inside corner of a ceiling plinth using a miter box
And again, first try on without applying glue, if necessary, slightly adjust. Then apply a thin bead of adhesive to both surfaces that will be attached to the wall or ceiling.
Your version of how to properly use the miter box is shown in the video.
How to make a corner of a ceiling plinth without a miter box
Few people in apartments or houses have exactly 90 ° angles. Small deviations are easily corrected after fitting. But not always. Then you have to mark everything "in place" - under the ceiling.
You will need a finely defined pencil (hard - it is not so visible on the ceiling, but leaves fairly clear marks close up), a small piece of plinth, a ruler and a good stationery knife if you work with polyurethane (polystyrene) baguettes or a metal saw to work with the rest of the materials.
Apply the plinth to the corner, draw along the outer edge with a pencil. Apply to the other side of the corner, also note. You have a cross on the ceiling, the center of which marks the place where the strips of the ceiling plinth should meet (see photo). Having installed a segment of the plinth in the corner, which will be glued there and resting it with its end against the wall, transfer the mark to it.

How to make corners on ceiling plinths without using special tools
Now take a ruler and connect the edge of the plinth with the marked mark. If you just put the plinth on the table and cut along the line, the two parts in the corner will still not add up: the inside will interfere. It can be trimmed later, trying on the ceiling. The second way is to set the piece to be cut on the table with the piece that will be on the ceiling. And cut along the line, but holding the knife at an angle of about 45 °. You will still need to correct, but much less (and less likely to make a mistake).
Repeat the same operation with the second bar. You put it against the desired wall, rest the end against the adjoining wall, mark the place where the cross is drawn, draw a line and then cut it off. Correction is carried out "dry" without applying glue.
You repeat exactly the same actions for the outer (protruding) corner. Now you know another way to make a corner of a ceiling plinth, and without a string or other special devices.
How to install sliding interior doors can be found here.
With decorative corners
There is another, the easiest way. For skirting boards made of polyurethane or polystyrene, use ready-made, factory-made decorative corners. They are installed in a corner, the strips are glued closely to them. Cutting them if necessary is very simple: a few millimeters with an ordinary clerical knife.

Examples of finished corners for fillets
How to join in corners
If the installation of the first corner is completed, we can assume that you have already learned to do almost everything. “Almost” because you still need to learn how to connect the corners and cut the planks to length. When some part is already glued and there is a small distance to the corner, how can one not make a mistake with the length? The answer is simple: leave a margin.
At first, you can cut off a piece 10-15 cm longer: there will be an opportunity to redo it several times if something does not work out right away. Then you make a corner in the way described above, try it on dry, adjust everything so that the result suits you. Only after that you can put the already cut bar into the corner and mark the place to which it can be shortened. You need to cut exactly at 90 °. It is not necessary to use a stool. Just try to put the knife (hacksaw) perpendicular to the surface.
How to cut a ceiling plinth? At first glance, it seems that such a problem does not exist at all. However, the very first attempt to make laying in the corner area leads to defects in the form of ugly gaps, mismatches. Any job requires a thoughtful approach, and installing a skirting board is no exception. In itself, this event can hardly be attributed to complex construction operations, but without taking into account some of the nuances, it is very difficult to ensure perfect quality. The question of how to cut a ceiling plinth is completely solved on our own, but this must be done correctly and accurately.

The ceiling plinth is a decorative strip and gives the finished look to the repair, so you need to know and be able to work with it correctly.
Features of the ceiling plinth
The ceiling plinth, or fillet, is a decorative strip that visually separates the ceiling from the wall, as well as masking the junction of finishing materials and the flaws in the corner joint between the wall and the ceiling. Such an element can be made of wood, PVC, polyurethane, expanded polystyrene, extruded polystyrene foam, gypsum and have different widths.

Figure 1. Scheme of mounting the ceiling plinth.
The fillet is fastened to the wall by gluing it with a special adhesive and does not cause difficulty when installing it yourself. The most difficult areas are the inner and outer corners. High-quality installation provides for a clear articulation of the bar in the corners without a gap, which sometimes causes problems. When forming corners on embossed, figured decorative plinths, it is better to use special corner overlays that allow you to perfectly cover all cutting defects. The cutting of the material itself is easily done with a sharp knife or a hacksaw.
Figure 1 shows options for making corners when installing a fillet. The overlay corner simplifies installation. When installing it, the part is simply measured along the length of the wall, and its end is cut off at a right angle. The overlay element hides all the gaps under it, but protrudes somewhat beyond the borders of the plinth, drawing attention to itself. For all the decorativeness of such details, not everyone likes their visibility, and therefore the direct joint of the planks without additional elements is more popular. (Fig. 1. Scheme of mounting the ceiling plinth)
When forming an external or internal corner joint from two fillets, their ends must be cut strictly in a given direction so that no gap is formed at the junction. The problem includes the following conditions: ensuring that the angles on both elements match, maintaining the same cut across the entire width of the baseboard, and ensuring a strictly vertical cut. Any violation of the conditions leads to a gap either across the entire width of the bar, or in separate areas. The task becomes more difficult as the width of the element increases.
Back to index
Ceiling skirting cutting tool

Figure 2. A simple tool for cutting skirting board corners is a miter box.
To cut the ceiling plinth with your own hands, you will need the following tool:
- hacksaw;
- hacksaw for metal;
- sandpaper;
- file;
- scissors;
- roulette;
- protractor;
- square;
- metal ruler.
Back to index
Cutting with a miter box
In order to qualitatively resolve the issue of how to cut the corners of a ceiling plinth, there is a fairly simple carpenter's tool - a miter box. This tool is made in the form of a wooden, metal or plastic tray with vertical slots for cutting in different directions. Typically, the fixture has slots with a slope of 45, 60 and 90º. In more complex designs, a mechanism for changing the inclination is provided, which allows you to set any desired cutting angle.

Figure 3. Scheme of cutting a corner with a miter box.
Fig. 2 shows a standard miter box, and Fig. 3 shows the principle of its operation. The ceiling element bar is installed on the bottom of the tray with the side that is joined to the ceiling during installation, and is pressed against the wall with the right slot. A hacksaw is inserted into the slot, and with neat, smooth movements, the plinth is completely cut. The second fillet is cut using the left slot. (Fig. 2. Standard miter box) (Fig. 3. Scheme of cutting a corner using a miter box)
When arranging a standard internal corner of two adjacent walls, the fillets are cut at 45º. This is the most common cut. The outer corner is made, if necessary, to bypass the ledges or niches on the wall and is formed in the same way (Fig. 3). Sometimes niches or ledges have a trapezoidal appearance - in this case, adjacent piers are joined at an angle other than a right one. The cut of the plinth in this case is made at an angle equal to half the angle of the junction of the walls. For this, a standard miter box has a cut angle of 60º (when joining walls at an angle of 120º).
The miter box is very easy to do with your own hands. To do this, a wooden tray is assembled from slats 15-20 cm thick, while the height of the tray should not be less than the width of the fillet. Using a protractor, an angle of 45º is set, and using a hacksaw, a complete sawing of both vertical walls of the tray is carried out. Perpendicular to the line of this cut, a line is drawn through the center of the tray, along which another cut of the walls is carried out. Cutting the plinth on such a home-made device is carried out similarly to a standard miter box.
Back to index
Cutting a skirting board without a miter box

It is possible to cut a ceiling plinth even in the absence of a miter box. What to do if there is no fixture at hand, but you need to cut off only a few skirting boards? You can form a neat corner without using a miter box. The easiest way is the attachment method. Taking into account the actual unevenness of the corner joints, it is better to carry it out directly at the installation site of the fillets.
Corner cutting is carried out in the following order. First, the planks are measured strictly according to the size of the walls (from corner to corner) and cut off at a right angle. Then the first fillet is placed end-to-end against the adjacent wall and held in that position. A second plank is set perpendicular to it, clinging to the wall. On the first fillet, a line is drawn along the edge of the docked second fillet. On both side faces, the drawn line is connected to the lower corners of the plank. Similarly, the marking of the second plinth is carried out. Cutting is done strictly according to the markup.
Marking can be carried out in the lower corner of the walls, but during installation, real deviations may appear at the junction of adjacent walls in the upper corner, which will cause certain inaccuracies.


