DIY bathroom stencil. Bathroom wall stencils (36 photos): old new wall decoration
Today's selection contains stencils and wall decor ideas. Textured painting is a very modern way of transforming your home. The monotony of the coating inspires despondency, but the multidimensional layers are very creative. The whole question is how to apply them. Let's talk about this today!

By the way, it is not at all necessary to buy some exquisite rollers and stamps. On a simple paint roller, you can screw the fabric and get the original texture.
Handy stencils for wall decor

However, even without a roller, you can create a very interesting structure on your walls.

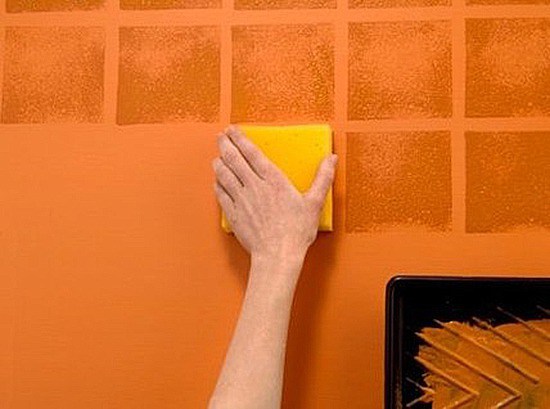
Use a large sponge or washcloth as a stencil for wall decor.
You can use rollers with pimpled film, some kind of nets or twine.

An old dust fan will help create a light, airy pattern on the wall.

Painting through tulle or mesh will make your walls look spectacular.

Tulle as a stencil for wall decor
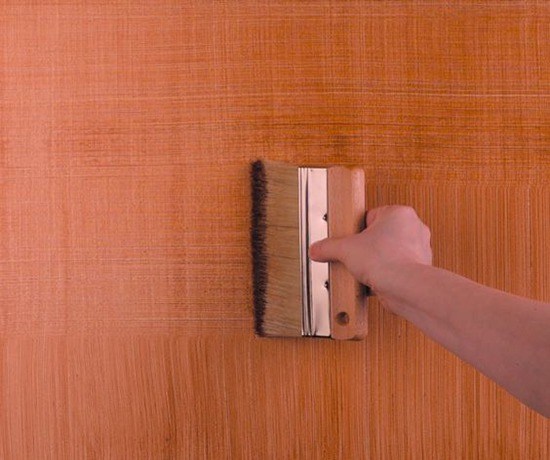
By the way, you can create vertical stripes on fresh paint with brushes or brushes. The depth of the stripes can be changed by pressing the brush. The pattern will depend on the thickness of the pile and on its rigidity.


You can make both vertical and horizontal stripes. And you can combine them.
The usual plastic film when painting the walls will help to give a very curious texture.

Film as a stencil for wall decor
Using thin transparent paper, you can decorate the walls like this.

Additionally, you can apply a patina over the paper.

In addition to abstract backgrounds, you can also experiment with normal wall decor stencils.

Stencil for wall decor - scales

You can cut out stencils from thick cardboard or from floral wrapping film.

Stencils for wall decor made of cardboard
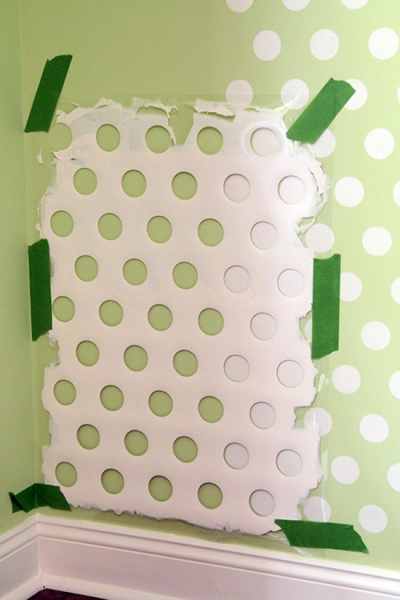
Stencil for wall decor - polka dots
Stencil for wall decor - monogram
You can even use some items from the kitchen as stencils.
Related article: Do-it-yourself gold wedding rings in 1 day!

By the way, the functional idea of a reusable stencil is made of canvas stretched over a stretcher. You can cut both simple and complex patterns.

Wall decor stencils

Stencil with astel pattern

Stencil for wall decor - ornament

Stencil for decorating columns

Ornament for wall decor
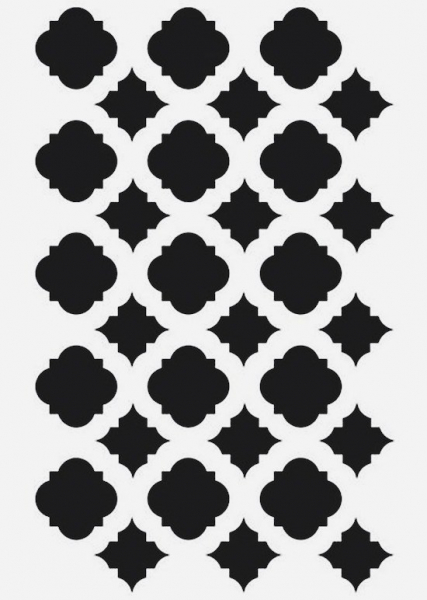
Stencil for wall decor - quadrangular ornament

Stencils for wall decor - diamond pentagons
If you use several colors when painting through a stencil, you can get spectacular transitions along the walls.
Multicolor Wall Decor Stencils


In the end, I propose another original idea - a mountain landscape on the wall. Gradient with a transition from dark to almost transparent.

Stencil for wall decor with a landscape
For wall decor with two-tone painting, you can use ready-made stencils. You can print the stencils below by scaling them. If you know how to draw, then you can redraw the stencil on very large paper and then you will be able to decorate a large area of \u200b\u200bthe wall.
Now you can also print large format stencils in print shops. For the money it will come out quite budget. By the way, you can also order a slot, so that later you can simply peel off the excess, leaving the right one. Explained chaotically, but I think it's clear ...
Below you see stencils for wall decor "Africa". There are two of them, they differ in the width and size of the elephant. As well as a stencil for the walls "Giraffes".
How to make stencils
You can use stencils by cutting them out of paper with a breadboard knife, attaching them to the wall with tape and stamping them with an acrylic paint sponge.
It is much more interesting to create your own stencils than to download ready-made ones. That way you don't show your personality. But, of course, in a circle of friends, if no one has seen them before, even common patterns will be like the original ones.
Related article: DIY colored summer scarf
Video - how to make a single-layer stencil from a photo
Another option - you can order a vinyl stencil from any outdoor advertising company - they have special plotters and they will cut you a stencil from a self-adhesive vinyl film. You can decorate the wall with a vinyl decal, or again, use this as a stencil by stenciling with acrylic paint and a foam sponge. In a word, there are a lot of options for drawing a picture on the wall.
Video - do-it-yourself stencil for wall decor
Pavel Perederiy tells more intelligibly, watch his master class and your knowledge will increase significantly.
By the way, on my website you can also see corner stencils or butterfly stencils.
Now, when painting walls, special stencils are often used, which make it easy to create interesting pictures on them. With the help of stencils, you can create both fairly simple patterns of the same type, as well as large-scale drawings with an abundance of small details. Different design options are perfect for decorating a nursery, living room, bedroom, kitchen or hallway.


What are they for?
Many people like ornamental painting or paintings on the walls, but not everyone can boast of the skills of a professional artist. For modern wall decor, you don’t need to be an artist - the main thing is to show patience and accuracy. Stencils are reusable templates made of paper or similar material. They are fixed on the wall and simply paint over the contours. The result is a stylish and interesting drawing without much effort.

If your interior seemed too boring and monotonous to you, you can easily refresh it by making drawings on the walls. Stencils can be used on smooth wallpaper for painting or on the walls themselves, applying paint to them after plastering. In addition, staining with texture, for example, with spraying or with decorative strokes, can look very interesting with stencil drawings.
All these options are very easy to implement with your own hands without the involvement of professionals.

Drawings created using stencils can look good in any type of interior: from classic to high-tech. Everything will depend only on the images that you choose. If your room has a free wall, you can choose a complex large-format picture. If the furniture is arranged tightly, it is better to give preference to small decorative patterns and patterns.. Such images can help you highlight the semantic center in the interior or visually divide the room into several zones.


An unusual finish with drawings can also hide minor flaws in the rough finish of the walls for painting. If you have slightly uneven walls, you should not make them light and smooth - this will make all the flaws obvious. If you choose an interesting color combination and paint with an image using a stencil, the flaws will become almost invisible.
To hide flaws, it is worth choosing mostly abstract ornaments without straight lines or complex paintings.

Kinds
All templates for drawing on the walls are made of thick cardboard, paper, oilcloth or similar materials. If you wish, you can even make them yourself by choosing the picture you like, printing it, and then carefully cutting it out along the contour. All possible stencils can be divided into the following types:
- Simple stencils involve applying a single-color pattern. Most often, these are large or small templates for simple patterns or contours of landscapes, city outlines, which can be depicted in one color. To apply such stencil drawings, a conventional roller is used. One paint is the easiest to work with - you can apply it in wide strokes and not think, because everything that does not cover your stencil should be painted over. You end up with a simple color image on a painted wall or wallpaper.

- Complex stencils allow multiple colors to be used. For such an unusual coloring of the walls, complex landscapes and bizarre patterns are suitable. Sometimes a list of recommended color shades is attached to the stencil, and sometimes you should choose colors yourself. Even if you have a bright picture, it is extremely important that the colors are in harmony with each other and not be overly catchy. In addition, when working with stencils that involve the use of more than one color, it is better to apply paint with a small brush. It is important to do this very carefully, without going beyond the edges of the outlines.

- Anti-stencils are used to paint over the wall space, and leave the pattern unpainted. Typically, such stencils are used for large shapes with complex shapes. Working with anti-stencils is no more difficult than with ordinary ones, but you need to decide right away whether you want to paint over the entire wall or just circle the image along the contour. In the second case, you will need to use another stencil that limits the area that you want to paint over.

Design
The design of modern stencils for walls for painting can be very diverse: for almost every interior, you can find unusual images that will help diversify even the most boring design project and add a unique zest to the room's decor. There are many factors to consider when choosing a design.
First of all, the size of the picture should be compared with the free space in your room: large-scale paintings will be good only if you have a wall free of furniture.


In addition, in small spaces it is better to use the most concise drawings. This applies to both form and color.
Now it is fashionable to apply various ornaments to the walls using stencils. If you choose a shade that differs slightly from the main color of the walls, such ornaments can be placed evenly over the entire surface. If you make bright patterns on your walls, they should occupy a small area, and they should be placed thoughtfully: Often, such ornaments visually divide the room into zones, form frames on the walls, or highlight the semantic center of the room.
Very often all kinds of floral and floral ornaments are used, as well as oriental motifs, but now you can also find abstract geometric stencils that are perfect for modern interiors.


Simple monochrome images are also popular. So, silhouettes of characters from fairy tales and cartoons are often drawn in children's rooms, images of butterflies, flowers, fish and trees would be appropriate in the bedroom and bathroom, and images of city houses or abstract wild animals can be perfect for the living room. You can find both fairly standard and typical drawings, as well as very unusual ones - for example, decorative trees, images of birds, a world map and silhouettes of people.


Depending on the color you choose, a monochrome image can look very different: it can be highlighted or, on the contrary, made less noticeable in the interior.
There are stencils that involve the use of several colors. With their help, you can create very realistic pictures. For example, very often such stencils are used to draw the outlines of a night city, a picturesque branch of a flowering tree, or an interesting animal. At the same time, such templates are not used very often.
First of all, this is due to the fact that making such a drawing on your own is quite difficult: you need to clearly follow the instructions, carefully apply the paint exactly along the contours, and sometimes use several stencils that will overlap each other.


In addition, realistic wall paintings rarely look organic in modern types of interior; rather, these options are only suitable for rooms with traditional furnishings.
Any of the stencils listed above can be used in different ways. Take note of a few relevant design decisions:
- Very often, with the help of stencils, photographs or mirrors hanging on the wall are emphasized. For example, you can make an image of a house around them, and photos will be instead of windows - this design is perfect for a living room.


- If you like to display flower pots on the walls, you might like the idea of painting a tree or individual branches on the wall, which will create an organic interior.

- Sometimes images are placed not only on the walls, but also on mirrors, wooden cabinets and even on the ceiling. This allows you to maintain the design of the entire room in a single style.


- If you have arches, partitions or beams in your house that delimit space in a spacious room, they can also be easily highlighted with interesting images.


- In the kitchen, all sorts of simple images of cups of coffee, bottles, vegetables and fruits can be very relevant. In modern kitchens, such drawings look very organic, and in studio apartments, it will be very easy to separate the kitchen area in this way.

- Often, with the help of stencils, beautiful life-affirming inscriptions are made on the walls or hieroglyphs are drawn. If you want to write your own words, you can make a stencil yourself or have one made. However, it is often possible to choose suitable inscriptions from the proposed assortment in stores.

- With the help of drawings made according to templates, you can easily decorate a children's room. The process of such drawing is simple, so you can even do joint creativity. In stores, you can find a wide variety of stencils for depicting children's cartoon characters.

Stencils can be made independently or to order, but most often they buy ready-made models in stores. You can buy stencils in almost any home and repair market - if wallpaper, paint and various finishing elements are sold there, stencils should also be there.
Now online stores have become very popular: although you cannot see the goods live, the variety of assortment and low prices compensate for this inconvenience.

To make the right choice, even before going to the store, you should decide what image you are looking for. Well, if the wall decoration is already completely ready - this is how you will select a template for a drawing for a specific interior. If you are not sure about the details, both in ordinary stores and on Internet sites there are consultants ready to help you. However, It is important to determine not only the form, but also the quality of the product.

Ready-made templates are usually made of thick cardboard or thin plastic. Make sure the material is strong enough. This is especially important if you are going to use the same template over and over again. At the same time, the lightness and flexibility of the material is important so that it is convenient to fix it on the wall.

Pay attention to the size of your stencil - if your wall space is limited, measurements must be taken very precisely to realize your design idea.
In fact, any stencils can be used for walls, ceilings, floors, and furniture. Only paint will matter - for the floor, mirror and wooden surfaces, special coloring compositions will be required.

Application technology
If you are working with walls after plaster, with walls already painted in one tone, or with wallpaper for painting, you will need the most ordinary wall paint. Variants from different manufacturers may vary in color saturation, possible smell and durability, but they will all work. For the ceiling, you can use the same paint.

If you are going to make drawings also on the floor or on furniture, you should choose a special coloring composition, depending on the materials.
Most often, the paint on the wall with large simple stencils is applied with a roller. This is a fairly simple way to quickly paint over large smooth surfaces. The size of the roller can be selected depending on the image you want to take. The technology of working with a roller is very simple: you need to pour a little paint into a flat container, roll the roller over it so that it evenly acquires the desired color, and then apply the paint according to a stencil previously fixed on the wall.

If you are stenciling textured wallpaper, it can be difficult to work with a roller: individual protrusions on the wallpaper will be painted over, and gaps may form between them. It is best to use a sprayer to apply stencil paint on such wallpapers.- so you can easily evenly cover the entire desired area.

You can make the image textured. To do this, paint can be applied to a smooth surface with a stencil attached to it with large or small splashes, textured strokes or drops. Nozzles for such application can also be purchased at large hypermarkets for repairs. It is no more difficult to distribute paint in this way than with a conventional roller or brush.

Now stencil rollers are popular. They have a prominent convex pattern on their surface, which is imprinted during application. Such stencil rollers are suitable if you want to cover an entire wall with small ornaments.

Finally, if you've chosen a complex stencil that uses multiple colors, a brush is usually the best choice for these types of images. The size of the brush should be chosen depending on how small details are to be drawn according to your stencil.
Don't choose a brush that is too small, which will take much longer to work with, but a brush that is too large can make the drawing messy.
Using stencils to decorate your home is a great alternative to boring traditional methods. wall decoration. If the idea of covering with wallpaper, paint or plaster does not inspire you, stencil patterns are just what you need.
This option for decorating a room has a number of positive features, and the first of them is the opportunity to get an inimitable interior that will have no analogues. After all, painting has always been considered a unique way of decorating walls.
Stencil drawings can only decorate walls, which makes this type of decoration truly versatile. The pattern can also be applied to furniture, doors or ceilings. And let this not scare those who do not feel the vocation to become an artist: in order to cover the surface with patterns using a stencil, no special artistic skills are required!
Where to start: preparing materials
Decide on a pattern that will act as a base. The pattern should be selected based on the overall style of the room. So, abstract or geometric images will look much better in a high-tech living room than in a rococo room.
If you are going to use a ready-made stencil, which you can buy at most hardware stores, it's up to you. But much more interesting and unique will be the drawing, the stencil for which you created yourself! Those of you who are good at drawing can design it yourself. If you are familiar with the art of drawing only by hearsay, it is better to trust the patterns found on the Internet and printed on a printer.
Advice! Patterns for stencils can be anything, but it is better to avoid drawings with too small details: there is a high probability that the paint will flow beyond the borders of an element that is too small. In addition, it is quite possible that from afar, small details of the picture will look illegible and sloppy.
When the drawing is ready, you will need to decide on the stencil material. Most often, thick cardboard or plastic is used. These materials are dense enough to avoid accidental tearing of thin partitions between the details of the pattern. In addition, they do not get wet from paint, do not get wet and do not wrap. You can also use paper, but in this case it is recommended to laminate the finished stencil - this will help protect against ink absorption and allow you to use it more than once.
The choice of drawing technique
- Single color stencil. Only one color of paint is used for drawing a picture.
- Multicolor (combined) stencil. It will require several paints of different colors, patience, time and some skill. It is better for beginners to start learning not with him.
- Volume. The stencil is made using putty, which is applied with a spatula. As a result, the drawing acquires a pleasant velvety. Typically, the thickness of the pattern is from 1 to 3 mm - this is quite enough to get a 3D effect.
Advice! If, when applied, the putty did not lie flat enough, and sloppy edges formed, do not worry: all defects can be corrected with a sandpaper.
- Anti-stencil. Unlike other types of stencils, during the creation of which the paint is applied inside the pattern, the anti-stencil requires that a small area be painted over and beyond. This helps to achieve the glow effect. In this case, spray paint is usually used. Please note: to create an anti-stencil, that part of the picture that is usually thrown away is used - it is called a clipping. It is glued to the surface, and spray paint is applied over it.
How to choose a place for a stencil?
There are no universal tips on this, but stencil patterns look best on large planes. Therefore, if your room has a spacious wall that is not used for furniture or decorative elements, you can start with it. The stencil in this case should be large enough so that the drawing does not look lonely on the wall.
You can also beat with the help of stencil decor switches, sockets, shelves, bedside tables. As for the latter, the wall above them can be interestingly beaten by drawing on it the image of those objects that could stand on this furniture.
Making a stencil yourself
To create any type of stencil, you will need the following:
- picture;
- future stencil material (plastic, cardboard);
- copy paper;
- a simple pencil or marker;
- stationery knife;
- adhesive tape (ordinary or masking);
- a piece of wallpaper or drawing paper for training;
- durable smooth surface for cutting a stencil on it.
So, the drawing and material of the future stencil have been selected - then you need to decide on transferring the image to the base. If you are using cardboard or thick paper, transfer the pattern onto them using carbon paper. In the case of transparent plastic, it will be easier: just transfer the drawing onto it with a marker. To prevent the image from moving, attach it with tape.
Using a utility knife, cut out and delete all areas located inside the picture. To do this, place the future stencil on a smooth, durable surface that you won’t be sorry to damage with a knife.
- Then comes the turn of coloring. Pick up a small amount of paint on the brush to prevent it from flowing under the stencil. It's best to hold the brush at a right angle to the wall and "drive in" the paint.
Advice! If you are using a thin brush and working on small details, use not the stuffing method, but painting the picture in an up and down motion. When applying spray paint, position the can at least 30 cm from the surface. When working with a sponge, the first two or three prints must be made on a “draft” - a piece of wallpaper or drawing paper to remove excess paint. When drawing a picture with a paint roller, then draw the unpainted corners and small details separately with a thin brush.
- When the drawing is ready, carefully separate the stencil from the wall and enjoy your masterpiece.
In Soviet times, bathroom walls were painted with oil paint, using a maximum of two colors. Then it became fashionable to paste over the walls with tiles. Now designers offer a lot of options on how to make an ordinary room bright and unique. One of the affordable and creative ways - stencil painting - is great for decorating the wettest room in the house.

Features of the application in the bathroom
The main feature of the bathroom and its problem is water, or rather a lot of water in a small space.
Hence the nuances of work:
- Moisture-resistant paints should be used for painting. Since the room is closed, it is better that the paints dry quickly. The same requirement applies to the main wall covering.
- A small space requires a careful approach to the choice of pattern and its position. Using a template of the correct size, you can increase the size of the room.
Large drawings are good where there is a feeling of emptiness that cannot be filled with voluminous objects.


Preparatory work
Stencils can be applied to even, prepared walls, existing tiles, mirror surfaces, or cabinet doors. The main condition: clean the surface. If applied to bare walls, then leveled and prepared for painting, if on other surfaces, it is worth walking with a soapy solution for cleaning and degreasing. Otherwise, the paint will not lay down or begin to stain, and after drying it will quickly come off. A clean surface will ensure the grip and durability of the pattern.
As for the stencil, here the preparation is divided into choosing a pattern or creating a pattern, as well as transferring it to a template - a kind of blank. More on this later.

Types of application technique
Painting with paints is a fascinating activity, especially for creative people. However, even pragmatic persons can find their joy in this activity and make it a hobby.
How to draw patterns:
The easiest way is one-color flat pattern drawing. According to the prepared drawing, you need to walk with just one color. Perfect for a first experience. So you can create simple ornaments and complex paintings. The difference is only in the templates used.


An option for the patient is a multi-color pattern that uses two or more colors. This option allows you to get a more expressive or cheerful picture. It is assumed that the process of preparing and choosing a drawing will take more time, as well as its application. At the preliminary stage, there is a choice of a color palette and planning how to use it in the drawing itself. You may need several blanks for each color.

Volumetric stencils - art for professionals. The template acts as a reference for arranging the parts of the drawing, giving a single shape. Plastic masses or special putties will help to get a relief image. Also work with color is not excluded. Thus, you can make beautiful three-dimensional images (ships, clouds, mermaids), creating a certain style and atmosphere. Of course, it will take a lot of time for such work, but you can make a bas-relief yourself if you practice first. The first time the job may fail.


Reverse stencil (negative) is a tricky technique when you need to paint over the area around the template, leaving the selected pattern in its original color. Helps to work with contrasting colors and textures, creates an interesting deep and multi-level drawing. Also an option for the sophisticated, it is often used in a multi-color format.

Paint selection
For painting in a damp room, silicate-based paints or quick-drying acrylics are well suited.
If the selected composition is not resistant, then the durability of the pattern can be achieved by fixing the result of the work with a waterproof varnish. The same trick will help when working with bas-reliefs, extending their life.
How to apply coloring compositions? Choose based on personal preferences: brushes, rollers, sponges, cans. There are no hard and fast rules on this issue.


Location selection
Large stencils look best in large spaces free from furniture and details (on the wall above the bathroom, for example). Small patterns help to give an elegant look to a room where there are no bright color accents. So you can not only decorate the inevitable or bulky, boring items (ventilation, socket, shelves, mirrors and cabinets), but also beat them, combine them with the rest of the interior using one theme (fish, butterflies, floral pattern). Drawings will help to hide some wall defects.


How to make a stencil with your own hands?
In addition to purchased options from a hardware store, you can use home-made templates for drawing a picture. The drawing itself can be found on the Internet by asking the topic of interest to the picture in a search engine, or you can create it yourself. The latter option is best used if you have a clear idea of the idea or have some experience in design work. Draw a sketch on paper, if it is complex, then simplify the idea to make it easier to implement. If the silhouette is vague or unrecognizable, make it stylized. Transfer the finished drawing to vinyl or other resistant material (plastic, cardboard). Cut out the design on the office with a construction knife or scalpel, taking precautions so as not to injure yourself.

stencil drawing
Before applying paint to the wall, you should make sure that the result is close to the idea. Test on old wallpaper or a large piece of paper. This will help to remove a little excitement before the first experience, to adapt to the instrument. Make sure the drawing area is dry and clean.
Check the level of the drawing, make light outlines with a pencil if necessary, secure the stencil with masking tape or special unstable glue (so that it does not leave marks on the surface and easily moves away from it). “Hide” with adhesive tape and paper those parts of the interior that the paint should not get on. If necessary, cover the floor with newspaper or polyethylene.


Apply the first coat of paint. After complete drying, you can refresh the color with a second layer (if necessary and based on the idea). The sponge and brush must first be blotted, removing excess so that they do not flow over the edge. The paint from the can must be sprayed at a distance of about 25-30 cm (this will give a more even layer and make the consumption optimal).


When the work is ready, you can apply a fixing layer of clear varnish. When it dries, remove the remnants of adhesive tape and paper, admire the creation!


Despite the name (stencil, template), this technique makes the room one of a kind. In order not to spoil the work, and then the mood, to enjoy your work, you should pay attention to the recommendations:
- The less experience, the less tricks you should use. Use purchased blanks, they simplify the task. Large clear lines are better transferred to surfaces, small features, a large number of angles are difficult to transfer and are often "cut off".
- The size of the picture should correspond to the possibilities of space: large compositions are appropriate for a large area, small stencils are appropriate for the design of details and small areas.
- The paintings made in the same technique, or supporting one theme, look elegant, the number of colors can be arbitrary. The theme helps to combine the elements of the room, create your own style.
- Reverse stencils help create the effect of depth, volumetric space. They are best done with spray paint. Anti-patterns are good for creating landscapes - falling leaves, tree branches, fireworks, waves, horizon lines. Natural materials can be used as a stencil: expressive branches, large leaves (for example, fern, maple, birch branches). It is better to work out this technique in advance in order to catch a good “angle”: spraying from different points will give new “shadows”.
- Favorite themes for templates in the bathroom: stylized flowers, floral ornaments, Greek, Roman and Egyptian patterns, marine theme (fish, shells, anchors, etc.), landscapes, African motifs, cartoon characters. When choosing colors, stop at bright, juicy, eye-pleasing shades and combinations. Dark, black and dirty shades are the prerogative of experienced craftsmen, beginners can overdo it.
- Drawings can decorate a room, zone, decorate flaws, combine disparate details.

It is not always possible to accurately implement the idea. This is not a reason to be upset, because the bathroom has found its own face and will become recognizable for your guests. Small mistakes are highlights that were meant to be. Let others think that way.


Alternatives
You can decorate the walls and bathroom furniture without a stencil. For example, a simple painting, without a template. Still, it’s better to sketch sketches on paper and choose colors so that the final result does not disappoint. Professionals create real masterpieces that are a pity to lose due to a new renovation. True, and this option can take a lot of time.
Wall stencils for painting are the best opportunity to decorate the interior with your own hands.
Wall decor with stencils
You need to choose a painter's suit, a roller, a brush, several colors of different paints and buy your favorite stencil for wall decor in Olstik. Next, clean the wall of old paint, putty cracks and cracks, level the surface. After that, open with a layer of screed.
For fine work, water-based paint is suitable. If it is decided to leave the walls pure white, then it is necessary to repeat the procedure for applying the water-based emulsion a second time. And if you plan to paint in a certain color, then you need to let the walls dry. You can also add color to water-based paint and make a coating of a certain color. Keep in mind that the more color you add, the darker the color will be.
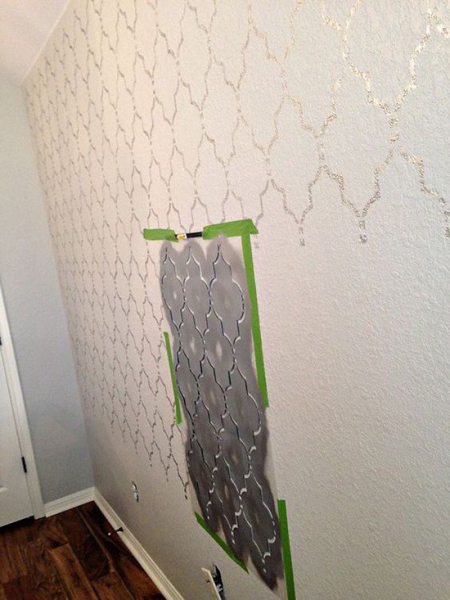
After the base dries, beautiful stencils for wall decor should be applied to the surface. Fix the stencil with small pieces of adhesive tape at the top and bottom so that the picture does not “move out”. Step back and analyze whether the drawing is evenly placed, whether the stencil is correctly fixed. Next, apply paint to the places where the details are cut out. If the drawing is large, then use a paint roller to apply paint, and for small parts, a brush is fine.
The choice of stencils for various rooms
The unique selection of patterns presented by Olstick allows you to act in any direction and decorate the surface of the walls in the following types of interiors:
- Entertainment facilities: children's creativity centers, youth clubs, exhibition pavilions, theater foyers, cinema halls, sports complexes, dance floor.
- Business complexes: trading houses, bars, mobile phone shops, restaurants, spa-centers, massage rooms, work offices.
- Living spaces: living rooms, hallways, corridors, bedrooms, kitchens and dining areas, loggias and balconies, bathrooms and toilets.
Almost any room can be decorated in an original way, using stencils of flowers, ornaments, patterns, etc., if you buy wall stencils from Olstik. We work throughout Russia, including remote regions.
Benefits of buying stencils for decorating
The online store site offers to buy stencils for independent wall decor. Products are made in accordance with five basic rules and requirements for compositions.
- Opportunities. With these convenient elements, the client will be able to independently decorate their home, workplace, business center.
- Uniqueness. Wall decor stencils are made of the original material, which allows you to draw a clear line between the pattern and the wall without blurring the image.
- Exclusivity. Design for many models developed in our design office.
- Convenience. Wall stencils for painting have a unique structure, which makes them comfortable to use. Even a non-professional designer will cope.
- Quality. The peculiarity of stencils for painting walls allows you to successfully combine several types of drawings, paintings, panels in one room.
Contact us, the quality of interior decor is guaranteed by the Olstik manufacturer!
We also recommend
 Hero pioneers in the Great Patriotic War Heroes of the Patriotic War pioneers presentation
 Presentation "Formation of posture in preschool children Hygiene of correct posture presentation for children
 Sciences of the human body
 Presentation "history and prospects for the development of robotics"
 The value of the struggle of Russia with the Polovtsy
 Asia and Africa after World War II