Making a wall lamp with your own hands. DIY sconce: style, materials, placement
Find out how to make a lamp out of wire, building mesh, so that flowers grow inside it. How to turn a snag into a lamp, and tree branches into a floor lamp?
How to make an original lamp?

Very interesting designer thing comes from the most simple materials, most of which remains from a picnic. If you went with friends, relatives to nature, you must definitely remove the garbage behind you. This not always desirable job will be made more enjoyable if you ask to fold the plastic spoons separately. If you have children traveling with you, arrange a competition to see who can throw more and faster spoons into a separate garbage bag or bag.
You will also need water canisters. After a fun picnic, after arriving home, after some time, you can make original lamps from the containers left after the feast. Hand them to your friends, leave them for yourself to hang in the hallway, in the kitchen or in the country.
So, here's how such a chandelier is created with your own hands or with the help of your home. First put side by side:
- 5 liter plastic bottle oval shape;
- disposable plastic spoons;
- cable with cartridge and plug;
- low power LED bulb;
- pliers;
- glue gun;
- screwdriver
- stationery knife.
So that such original lamps do not lead to a fire, take an LED, and not an ordinary Ilyich light bulb.
For information: 4-5 W LED light bulbs correspond to 40 W, and 8–10 W correspond to 60 W of conventional electric.

Carefully, so as not to cut yourself, remove the bottom from the canister with a knife.
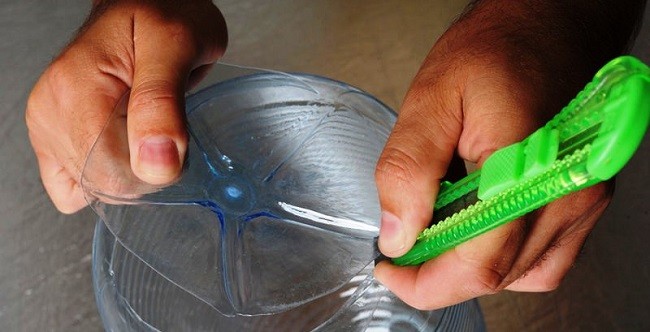
Also, observing safety precautions, so as not to get hurt, cut off the handles of each plastic spoon completely. Applying a little hot glue from a gun to the cuts of the “blades”, glue them to the bottom tier of the bottle. Usually 17 pieces go here. Then, overlapping, attach the second and subsequent rows, arranging the elements in a checkerboard pattern.

To cover the neck, glue 10-12 spoon blades together, forming them into a ring.

Pass the cartridge with a light bulb and cable through the cut bottom hole in the bottle. If this "electrical" part causes difficulty for women, call the husband. If you don't have one, buy a cable from the hardware store with the socket and plug already screwed to it. You can borrow this working part of the lamp from the old one.

Put a “ring” of spoons on top of the canister, screw on the lid. To do this, let the husband drill a hole in it with a drill, and you yourself can do this manipulation with a hot nail or self-tapping screw, holding it with pliers. The original lamp is ready.

3 models of designer lampshades with your own hands
Ideas are in the air. If you are in the country and this piece of furniture is not there, it is easy to make it yourself from what is at hand. Take:
- hollow dishes;
- wire;
- mounting foam;
- gloves;
- paint;
- brush;
- pliers.
As a basis, you can use unexpected things: an old pot, a planter, an already unnecessary children's pot.
Turn over any of these auxiliary items, put on a plane upside down. Wind the wire, its turns repeat the shape of the future product, should be the same as the lampshade. With your own hands, but with gloves, pick up a can, squeeze a little foam out of it onto the frame, close the wire, let it dry.
After that, make the contours more even with a knife, cutting off the excess. Paint in your favorite color, white looks airy and elegant. Such a lampshade, made by hand, will decorate country gazebo. You can make a few and hang them here. By avoiding big expenses, this way you decorate the space.

This lampshade looks stylish and modern, while the next one has a classic look. For it use:
- thick wire;
- pliers;
- small plastic water bottle.
Now roll the large outer ring from the wire. We will fasten it. To do this, cut 4 identical pieces of wire with pliers, fasten the first end of each to the small, and the second edge to the large ring. Top part lamp is ready.
The size of the lampshade depends on whether it is made for hanging from the ceiling or for a table lamp. The first is greater than the second.
Roll the bottom ring out of the wire, it is the largest. Connect it to the second top five pieces of wire, distributing them evenly. It remains to decorate the frame of the lampshade. To do this, pass the wire through the second ring, twisting it in a wave and twisting it through the base. Do the same for the second ring.

It remains to sheathe it with fabric. Attach the flap from the second top to the bottom ring, cut to size, adding to the seam. hem big sides the resulting rectangle. Sew the canvas on the side right on the frame, decorating this place with braid. That's it, you made a wonderful lampshade with your own hands.
If you want to see for yourself modern ideas on this topic, please! In skillful hands, the construction grid will turn into a stylish lampshade.

With your own hands or, having called on a man, cut a rectangle from it with metal scissors. To fix the cartridge, twist a circle from the wire, fix it on top of the lamp with four pieces of wire.
If you don't have a coarse mesh, use pliers to cut off the extra sections so that the distance between the strips of wire becomes larger. Paint the lampshade, and its frame is ready.
And now the magic begins. You can make an original lamp, which will benefit not only people, but also plants. Attach a planter with a flower at the bottom of the lampshade. You can tie, woven using the macrame technique, for the lower turns of the wire with a thick rope. Check that the fastening is secure.
If there is a man in the house and welding machine, call on this tandem to make a metal ring with "beams" that need to be welded to the bottom of the lamp.

If you have a home climbing plant, for example ivy, pass its lashes between the cells of the lattice. The original lamp will become a house for a flower. It is better not to use ordinary electric bulbs, as they are very hot and can burn the leaves of plants. In addition, the air around the flowers will be too hot. Screw in an LED or fluorescent light bulb.
For such original lamp, you need:
- construction mesh or strong wire;
- brush and paint (optional)
- pliers;
- light bulb with cartridge;
- flower.
You can well fix the cups with seedlings on such a lampshade, thereby finding extra bed for its cultivation and conditions for lighting in the evening.
We make a floor lamp, a table lamp with our own hands
Walking in the forest, do not pass by a rolled ornate driftwood. Put it in a bag, take it with you. Wash at home, if there is bark, peel off with a knife. Go over the surface with fine sandpaper, if required. Finish with wood varnish.

In order for the table lamp to hold well, the snag must be screwed with self-tapping screws to a solid pedestal. It should be heavy enough. Oak is suitable for him. If you find a broken branch of this tree in the same forest, saw off a circle 5–7 cm thick from the thick part.
It will also need to be sanded and varnished. When these wooden blanks are dry, connect them with self-tapping screws of sufficient length, first passing them through an oak stand, and then plunging them into a snag. You can also use nuts and bolts.
How to make a lampshade with your own hands, you already know. Therefore, make it and attach it to a snag, wrapping it with wire.
If the old floor lamp stand is no longer happy or you just want to decorate it, also use wood for this. See how good the birch racks look. Attach a branch of this tree to the lamp and see what kind of floor lamp you could make with your own hands.

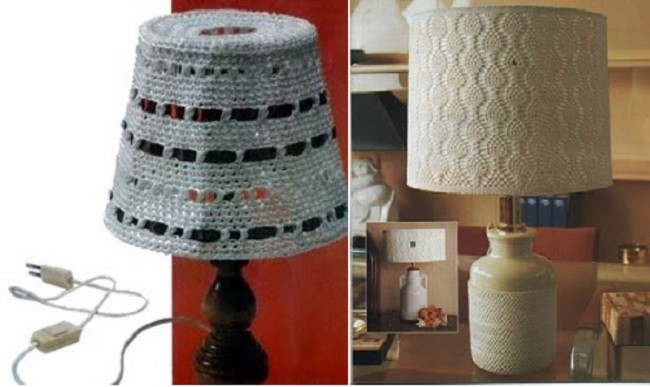
How to crochet a lampshade?
If you are fed up with an old floor lamp, you can transform it with your own hands, giving it a "zest". Take the openwork braid, sew it on the top and bottom of the fabric lampshade. You can decorate with glitter by gluing them in the form of a pattern, evenly or randomly.
A floor lamp or a chandelier will turn out unique if you knit a lampshade for them with your own hands. This can be done with a crochet or thin knitting needles. For the first option, you will need:
- hook;
- cotton threads;
- pattern for knitting napkins;
- water;
- starch;
- ribbons.

Measure the top circumference of the lampshade, we need its diameter. Tie a chain from the air loops. Next, knit in a circle, based on the napkin pattern. Measure the height of the lampshade and the diameter of its bottom circle. Based on these data, draw a trapezoid or a rectangle (depending on the shape of the lampshade). Crochet this pattern. Sew on the side.
With single crochets, tie the upper circle of the lamp and this trapezoidal or rectangular part.
Boil a glass of water, stirring, pour 200 ml here cold water, in which 1.5 tbsp. l starch. Boil for 1 minute, remove from heat, cool. Drop a knitted lampshade here, soak well, then wring out, let the water drain, and the fabric will dry, but remain slightly damp.
Put it on the plafond. In order for the knitted lampshade to hold well, you can skip several ribbons or ribbons between the loops and tie them.
Plafonds look very nice if they are decorated with crocheted flowers.

A solution of starch or PVA will help shape the knitted lampshade. Put it on the frame, apply glue, let dry.
In the second case (when knitting needles are used), you need to make calculations for knitting, draw a pattern according to the standards of the lamp, knit a trapezoid or rectangular lampshade. Similar models are suitable for floor lamps, chandeliers strict form. If you need to crochet a semi-circular lampshade, make wedges first, and then connect them with single crochets.

Here is another openwork chandelier. It is pleasant to make kisei with your own hands and decorate the bottom of the product in a circle. But first you need to create the lampshade itself. The crochet pattern for this beautiful thing is presented right there.

A table lamp will look amazing on the bedside table if there is such a lampshade on it, the knitting pattern of which is also given.

If your son or daughter does not let you finish the work, demanding attention, invite the children to make a lampshade too, let them twist strips of paper into tubes with their own hands. Better wind them on a thin pencil go on wooden stick for sushi, and then glue the free edge so that it does not unfold.

Now you need to glue the resulting blanks, using an object of a suitable shape as a frame, for example, a 5-liter canister. Having made the first inner layer, let the child move on to the second. There should be several of them to close the gaps. When the PVA is dry, cover with this lampshade table lamp or hang it from the ceiling. Looks original and extravagant.

If you are interested in other ideas on this topic, watch the video:
A very interesting version of the lamp from the disks:
The chandelier in the room is not only a lighting fixture. Without exaggeration, we can say that she is the main decoration of the room. Handmade items are considered especially valuable. This allows you to highlight the special taste of the owners of the home, as well as an outstanding and creative mind. Of course, this type of work is quite complex and requires increased concentration. But at the same time, when creating decorations for your home, you can find many interesting and extraordinary solutions in it!
This article presents some ideas for decorating a chandelier with your own hands, as well as instructions for them. Everything is written so simply and clearly that anyone can do what they have planned at home.
In order to make a chandelier, sometimes the most unusual materials are used. For example, everyone is already familiar with glass or wood, plastic, and so on. But sometimes, when you want something completely “unusual”, both wooden skewers and glass bottles out of wine, and cans, and all kinds of tree branches, and cardboard, and even straw. You need to choose depending on the idea of \u200b\u200bthe creator and on the wishes of the owners of the apartment. It is also necessary to take into account the general interior of the room where the finished product is supposed to be placed.

An interesting idea for a chandelier made of plastic spoons
Plastic disposable spoons are one of the simplest and most readily available materials for creating a chandelier for a room. Their advantages are low price, variety colors and such material will last quite long time. To create such an extraordinary chandelier, you will need a minimum of investments, both physical and material.
Materials:
- empty bottle from under drinking water, with a volume of 5 liters;
- plastic spoons (their number depends on the size of the bottle);
- glue for plastic;
- an old chandelier (or rather, a cartridge from it);
- sharpened knife.
Process of creation:
- First you need to prepare a plastic bottle for the next step. Remove the label in advance, cut off the bottom, dry well.
- Then you need to get the plastic spoons out of the package and carefully cut off unnecessary handles with a knife, leaving about 2-3 centimeters above the level of the "scoop".
- You need to glue the “scoops” blanks to the base of the bottle. On the left "tail" apply a large number of glue and press it to the surface (the convex side of the spoon out). It is necessary to cover the entire bottle in a circle until the entire perimeter is occupied by plastic "spoons". It is advisable to arrange them in a checkerboard pattern and slightly move them together. This will leave fewer "free spots".
- You need to remove the cartridge from the old unnecessary chandelier, and then place it in an already glued and dried bottle and fix it on the frame.
- A decorative bowl can also be made from plastic spoons: stick "scoops" around the neck of the eggplant.
- Install and connect the chandelier, check its operation.

Note! Possible option decorative painting or painting spoons in absolutely any color. Thus, your product will look even more beautiful and more original!


Chandelier made of plastic bottles in the form of leaves
Another unusual option a chandelier made in the form of leaves will serve in the interior. It is created from simple plastic bottles, the variety of colors of which allows you to work in the most unusual colors and embody the most daring ideas.
Process of creation:
- Cut plastic bottles on blanks shaped like future leaves.
- Each blank has to finally fix the shape of the sheet.
- With a soldering iron with a thick tip and a one-sided bevel, you need to slightly fuse the sections of each leaf in order to give the future product greatest effect.
- In the same way, thanks to the soldering iron, you need to give the blanks a sheet structure. You need to act very carefully and accurately, because you can easily make a hole in the plastic. Such a leaf with outlined contours of veins and slightly fused edges will look complete.
- With a hot needle at the "leg" of each leaf, you need to melt several holes in order to attach them.
- Thanks to a thin wire, form branches and screw them to a steel wire frame.

Same way great idea there will be a production of a new chandelier in the form of a ceiling lamp for a floor lamp or a lamp on the table. Thus, it will be a great addition to the previous product!

Chandelier with paper butterflies
The most common version of the product is a chandelier with butterflies. And this is no accident. To begin with, this option looks luxurious and expensive, and secondly, its manufacture does not require special physical costs. Thus, even a child can participate in the creation of a chandelier.
Process of creation:
- The basis is either an old chandelier or a similar frame. If this is not available, then you can take the simplest wooden or metal rim. If there is no such material, then, as an option, you can take a thick wire and make about 2-3 skeins, so that a circle forms.
- Cut paper butterflies according to the template. You need to take a butterfly template and fit it to the desired size. The option also looks very unusual when butterflies of several sizes are located on the chandelier at once (again, depending on desire). Transfer the outlines to paper and carefully cut out, preferably with a sharpened clerical knife, or small non-rounded scissors. The material for the templates themselves is better to use dense, not very dirty and does not attract dust. For example, velvet paper is very bad for a product, because in the future you will need to vacuum the chandelier quite often.
- Take a thread from a nylon or a transparent fishing line and attach butterflies to it. You can attach it in two ways: either pierce the bodies of butterflies, or stick them on silicone glue.
- Next, we attach threads with butterflies to the base of the frame and decorate it.
- You can also try an interesting variation if you make a wire ball! It should be based on a suspension from a chandelier and placed on it with the help of glue gun several patterns of butterflies.


fabric chandelier
This chandelier is also based on the frame. As in the previous version, either old metal frames or dense wire are suitable for its manufacture.
After you have pre-prepared the base, proceed to cutting out the fabric from which the lampshade will be made in the future. How long will it be ready product, depends on your desire, however, it should be borne in mind that the width of the fabric must be the same as the diameter of the frame! Once you have finished the pattern, you need to try on.
Another nuance is that the top of the fabric will need to be sewn directly on the frame, which means that it (the frame) must be solid. Otherwise, if it is possible to thread it directly into the fabric, then you should first fold the upper edge of the pattern and stitch it, and then iron it. Then we sew a seam on the side of the product.
In order for the lampshade not to lose its shape, due attention should be paid to the material. If the fabric is too light, "airy", then the bottom of the product should be weighted. To do this, you can use cardboard or fishing line.
A neatly sewn fringe, lace or braid will also look beautiful. But do not "overload" the product! The process of making a fabric chandelier is similar to making a lace chandelier. So you can safely experiment with materials that are located on the frame.


Plafond of threads and a balloon
Materials:
- thick threads, such as wool, cotton, or jute rope- not less than 1 meter;
- cartridge;
- petrolatum;
- PVA glue;
- a brush to apply glue and petroleum jelly (it is desirable that the brush does not shed);
- 1 or 2 pieces balloons(the first in order to work with it, and the second in order to check the finished product, if desired);
Process of creation:
- Inflate the balloon to a certain size, secure. Remember that the finished work will exactly repeat the shape of the ball! With a marker, draw a couple of circles at the top and bottom, in order to determine the boundaries of winding threads.
- Using a brush, smear the ball around the entire perimeter with petroleum jelly.
- Pour PVA into a plastic container and thoroughly process the threads with it (It is not advisable to apply glue to the entire length of the threads at once! Treat them as you wind them around the ball!).
- Given the borders that you applied with a marker, wind the threads around the ball. Do not forget that depending on the density with which you wind, the future appearance of the product depends.
- After winding, you need to leave the product for a day until it dries completely; After complete drying, you need to burst the ball and remove it through the holes.
- Cut a place at the top and insert the cartridge.
- In order to be completely sure that the product turned out to be strong, you can insert a ball into it and inflate it. Similarly, you can check the flexibility and reliability of the lampshade.
Alternatively, you can paint the structure with a spray can or acrylic paint, attach all kinds of decorative ornaments such as butterflies, artificial flowers or beads. It's also a great idea to arrange a few balloons in the form of a bunch of grapes and fasten them together.


Wine bottle chandelier
This version of the chandelier is a little more complicated than the previous ones. Making a chandelier for this is quite difficult, the manufacturing process will require accuracy and care. However, you will love the result!
Materials:
- a bottle of wine;
- glass cutter;
- sandpaper for sanding edges;
- cartridge;
- electrical wire;
- metallic or wooden frame, rim.
Process of creation:
- First you need to prepare the bottle itself for further manipulations with it. The first step is to draw a straight line around the perimeter at the level you need. This is required in order to cut off the bottom of the bottle with a glass cutter;
- In order not to cut yourself on the glass, you need to grind sharp edges sandpaper;
- Pull the wire through the neck of the bottle and then connect the cartridge;
- Attach the bottle to the frame.
You can also decorate the bottle with all kinds of decorative items, or leave it in its original form. In any case, it will look original and spectacular.
The number of products on the frame depends on your desire. You can either leave one bottle, or fix four or more bottles at once.


Chandelier idea from laserdiscs
This idea is great for those who have a large number of laser discs left in the house, and the hand does not rise to throw them away. It is immediately worth noting that the manufacturing options and the result can be very different. It all depends on your imagination and creativity!
Materials:
- two round wooden planks of different thicknesses, and which are slightly larger in diameter than the disks;
- racks made of metal or wood;
- Fluorescent Lamp;
- magnetic switch;
- disks.
Process of creation:
- Make a hole in a board with a greater thickness and install a starter with a switch in it.
- Then connect it all to the lamp.
- String disks on the lamp.
- Install the racks around the discs and secure the top.
The finished product will delight its owners for a long time, and it does not require special care. It is not advisable to place this type of chandelier in a children's room so that the child cannot harm himself (only if the chandelier hangs out of reach).


Shabby chic chandelier
To create spectacular lighting in the room, you can also make a chandelier from fabric or beads. The result is a kind of chandelier or ceiling in the style of "shabby chic".
Materials:
- finished metal or wooden frame (or it can be made from old hoops, garden basket, thick wire);
- cartridge and lamp;
- chains and threads for decoration;
- all kinds of beads and beads.
Working on such a ceiling is not difficult, but it is a very painstaking task. Such chandeliers usually consist of two or three levels of rings, which are located one above the other. It all depends on the size of the selected bases. If you take rings of the same diameter, then the finished product will be made in the Art Nouveau style.
One of important points consists in the fact that before starting the design of the chandelier, you need to paint and wrap the frames with decorative materials!
The approximate consumption of beads is:
- For the lower part of the lampshade - 16 mm beads, about 15-17 pieces per thread;
- For the upper part of the lampshade - 12 mm beads, about 35 pieces per strand.
Naturally, when stringing beads on a thread, you can increase or decrease their number or the degree of thread tension. But it is still desirable to stock up on materials in excess of the norm.
The essence of the work is to hang threads with beads "waterfall" or "cascade" so that they flow down the structure.
In order to make the effect of "muting" the light, you can sheathe the frame with a thick fabric.

A handmade chandelier will definitely bring a fresh touch, originality and beauty to the interior. You will immediately notice how the room will sparkle with new colors, and your guests will sincerely admire your creativity, diligence and original taste!
90 photos of DIY chandelier ideas


Highly useful thing for everyday life are lamps, which can also act as a separate design element of your apartment. There are many types of these electrical devices, which, first of all, are divided according to the method of attachment to the surface: ceiling lamp, wall, floor and desktop.
Types of fixtures
In addition, there are also a great variety of materials from which lamps can be made. And it's not just factory-made plastic, metal, or glass devices.
They can be collected from the most unexpected improvised means, which we simply do not pay attention to in ordinary life. For example, it can be a tree or an ordinary wine bottle. Therefore, let's in our article we will look at how to make a lamp with our own hands, so that it performs direct functions with high quality and decorates your home interior original appearance.
LED lamp
Let's start with the most economical and very popular LED lamp among users, which are mass-produced at enterprises and factories. At first glance, it might seem like a very difficult task, but believe for a person who has even a little experience in soldering, do LED lamp do-it-yourself task is feasible and does not require any special knowledge and skills.

Thread lamp
Theoretical knowledge
But in order to start this work, you need to know something about the operation of such devices.
Note!
First of all, you need to know what LED bulbs work for DC at low voltage and in order for them to work properly, you will need to purchase a power supply.
But there is another option - a correctly assembled circuit that does not present great difficulties for a person who, at least once in his life, is engaged in electrical work.
Types of heat sink
The second thing you need to know if you are going to do homemade lamp of this type is that only 30% of the energy is converted into a luminous flux, and the rest is converted into heat. And this significantly reduces the service life, so for more long work Such a lamp needs to think about effective heat dissipation. There are three types of heat sink:
- Heat output through the luminaire housing.
- Through tracks that conduct current and are placed on printed circuit board.
- With the participation of a radiator, which is fixed directly on the board or on the LEDs.

The main stages of manufacture
- We find the old burned out fluorescent lamp with a conventional base.
- We understand it.
- We take out the converter board from the case. Then we take the lid and remove the glass arcuate flasks from there. Thus, we get six holes for the LEDs.
- We buy high-quality LEDs of medium brightness. Too high brightness will force us to fix a few more heatsinks on the LED table lamp.
- According to the scheme that comes with the LEDs, we begin to connect the LEDs. Note that this kind of circuits usually requires only even number LEDs. But on the other hand, they win over other options in simplicity and, accordingly, in fewer parts and your time.
- We fix the board in the lamp housing using any glue that can withstand elevated temperatures. And then we fix the cover from which the LED elements look out.
Thus, following this step by step instructions, you can independently make a lamp from LEDs, spending a little time and a minimum of money on it.

bottle lamp
You can make a lamp out of a bottle original and uncomplicated in execution. For this we need the following materials.
- The board is 2-3 cm thick. The width should be 24 cm and the length 34 cm.
- 100 watt ceramic lamp holder.
- 6 empty bottles.
- Acrylic paints.
- Fasteners for fixing the lamp to the wall.
- Electric wire.
The main stages of manufacture
We mark on our board six circles equal to the diameter of the necks of our bottles. The layout of the markup will be as follows - 4 in front and two in the back. Then we work with a drill and drill six holes for bottles and two small ones for wires and brackets. Using the bracket, we will fix our product to the wall. After that, we insert the wires into the holes and fix the bulb holder to them. acrylic paint, the colors of which are most preferable to your interior, we paint the board and cartridge with its outside. Then we fix, using screws, brackets to the wall and put our lamp on them.

Lace lamp
Final stage
The final chord in this work will be screwing the light bulb into the cartridge and inserting the bottles into the prepared holes. To enhance the effect, you can pour tinted liquid into the resulting wall lamp, or rather into bottles. desired color and the device is ready to use. In general, this design, though a little more complex type, proposed by the famous french designer Duchamp and she was successfully shown in leading European galleries with great success. As you can see, everything ingenious is simple and making such a lamp on your own is not a big deal. A master class on the execution of similar works can be viewed in this video.
Wooden lamps
A handmade wooden lamp will look very original in your home. It will look especially interesting in a room trimmed with wood. Agree that lamps made of plastic or any other material in such a room will lose wooden version.
Note!
A variety of parts can be used as parts of the lamp. It can be ordinary boards, tree branches, wooden pots.
Many lamps of the most diverse designs are made from clothespins.
Let's see how to make a lamp from planks.

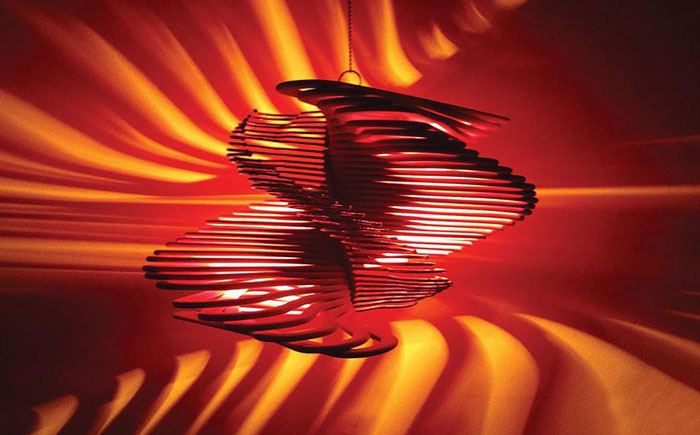
Plank lamp
For its manufacture, waste left over from other work may be useful. In our case, the seventeen boards that we will use are left over from furniture making. It is a pity to throw away such material, especially if it consists of precious woods. To make such floor lamp, you will have to process rectangular pieces of wood to a wedge shape.
By the way, if the source material belongs to different breeds wood, it will look even more original, since each type of wood has its own unique color and texture. This will be especially noticeable in daylight. The lamp is made without a single use of nails. After all, the planks are attached to the wooden base of the lamp with the help of pins (a fastener in the form of a cylindrical rod), in the amount of two pieces for each.
A cartridge is inserted into the base of the lamp, which is made in the form of a circle, into a pre-made hole. From it comes a wire with a switch that connects to an outlet. As you can see, the design is quite simple and if you have waste the right amount and shape, such a floor wooden lamp will be almost free.
So, in the examples above, you can see what to diversify the interior of your apartment by making with my own hands another light source is a doable task.
How to make a lamp with your own hands video:
In contact with
See inaccuracies, incomplete or incorrect information? Do you know how to make an article better?
Would you like to suggest photos for publication on a topic?
Please help us make the site better! Leave a message and your contacts in the comments - we will contact you and together we will make the publication better!
Handmade items fill the house with special warmth and comfort. Plus, they are exclusive. We offer an overview of lamps that will completely change the atmosphere in the room, turning into an object of envy from the groans of friends and relatives. Moreover, they are made from everyday items that are usually thrown away.


A cardboard bag for juices or other drinks is a common thing in most homes. Most of the time it gets thrown away. But the Malay designer Edward Chu spent a lot of time to cut them into hundreds of strips and build amazing lamps from them without a drop of glue, a simple origami principle.

Yaroslav Olenev proposed to make lamps from disposable plastic spoons and became the winner in the nomination "Ecology and Design" from the magazine "Future Now".

No less original application was found by Natalie Simpson for ordinary wooden hangers. But they look amazing in the form of a chandelier.


Kevin Chempeny must be given credit, not everyone has the strength and patience to string 14 thousand bears to get a chandelier.

Tira Hilden and Pio Diaz have their own vision on the problem of housing lighting. Thanks to their lamps, the room becomes like a forest. All walls come to life and turn into trees.

Talented welder Matt Ludwig was also an excellent designer. For the JJ's Red Hots restaurant, he made an incredible original chandelier from an old drum kit.

Texan artists Joe O'Connell and Blessing Hancock made stunning lamps from old bike parts and hung them in a tunnel under the highway.

It will probably be difficult to find a more original chandelier than a pumpkin from a Polish artist. It carves stunning patterns on the peel that do not repeat.

Felt hat lampshades from Jeeves & Wooster look original and stylish.

Once Heather Jennings saw an amazing Rhododendron chandelier in the store, only it cost more than $ 800. Then the designer decided that she could do just as well with her own hands. To do this, she needed paper molds for cupcakes.
11. Chandelier in the kitchen

A chandelier made of ordinary metal tetrahedral graters will look incredibly beautiful.

Still fresh in my memory are vases and candy bowls made from openwork napkins. Now it's time to knit chandeliers.

A strange option is offered by Fansois Lego, he believes that the most The best way cutlery storage is a chandelier.

A large cloud is cut out of wood, but the rest and the switch are made of cardboard.

A few globes can make a wonderful cascading chandelier, a great way to light up a flight of stairs.
A chandelier in any room has long been not only a device for lighting. It would not be an exaggeration to say that this is the piece of furniture that acts as the main decoration in any room.
Of course, a do-it-yourself chandelier will be a particularly valuable thing. This will not only highlight the special taste of the owners of the house, but also their creative mind.
Despite the fact that deciding to make a lampshade with your own hands for a chandelier, you will need to spend a lot of effort, because the process requires special concentration - for sure, the time of work cannot be considered wasted, since the work will bring incredible pleasure and even a pleasant aftertaste will remain after, and in the future you will definitely want to repeat this kind of work.

If you are thinking about how to make a chandelier, then you have probably already seen that today you can use the most various materials and sometimes quite unusual. For example, very often the ceiling for a chandelier is made of wood or glass.
However, if you want something even more incredible, then you can also use cardboard, wooden skewers, and even wine bottles. The choice here depends solely on the ideas that the creator has, as well as on various kinds of wishes from the owners of the apartment.

In addition, a chandelier made from improvised materials must also be created taking into account the general interior of the room.
Chandelier made of plastic spoons
Disposable spoons, which most people are used to using exclusively for a picnic, can actually also be one of the simplest and at the same time easily accessible materials for everyone to create an interesting chandelier option for any room.

If you look at a photo of a chandelier of such a plan, you will first of all be struck by the variety of colors, and in the future it will be easy to understand that the material will last a long time.

In addition, in order to create such an interesting piece of furniture, you will need a minimum of financial and material investments.

What materials will be needed?
- Any empty plastic bottle. The only condition is that its volume cannot be less than five liters.
- Any plastic spoons. Their number depends solely on the chosen size of the future chandelier.
- Glue that will allow you to glue the plastic together.
- Cartridge from an old, no longer working chandelier.

The process of creating an original chandelier
Prepare a plastic bottle. First of all, you need to get rid of the label and the bottom, as well as dry it properly.

Remove the plastic spoons and use a knife to remove any handles that are not needed. The only thing to do is to leave a couple of centimeters above the so-called “scoop” level.

Glue the blanks to the base of the prepared bottle. On the “tail” that remains, you need to apply as much glue as possible and then press it to the surface.
It is very important to continue to cover the entire bottle in this way directly in a circle until the entire prepared perimeter is “occupied” with plastic spoons.

It is best to arrange them in a classic checkerboard pattern and move them together a little.

In this way, it will be possible to reduce the number of "free spots" to a minimum.
- The cover is removed from the old cooked chandelier and placed in a dried bottle.
- If there is a desire, then decorative more often can be done in a similar way.

That's all. It remains only to install the chandelier in the chosen place, and also check its operation by connecting it to the power supply.

Another interesting option chandelier is a chandelier with decorative butterflies. It is worth noting that, having gone to almost any master class for making a chandelier, designers always offer to learn how to create it, which is not surprising, because it can fit perfectly into almost any room interior.
Note!

Besides that this option looks really luxurious and expensive, even a child can make it with the help of an adult, so its popularity is easily explained.

DIY chandelier photo


Note!


We also recommend
 Hero pioneers in the Great Patriotic War Heroes of the Patriotic War pioneers presentation
 Presentation "Formation of posture in preschool children Hygiene of correct posture presentation for children
 Sciences of the human body
 Presentation "history and prospects for the development of robotics"
 The value of the struggle of Russia with the Polovtsy
 Asia and Africa after World War II