Drawing of a wall hanger for clothes. Beautiful do-it-yourself floor and wall hanger - photo ideas
Decorating a space creates a cozier and more organized living space. After the front door, the hallway can be called the first part of the apartment that a person sees when he returns home. This is the interior that presents the whole house. But all too often the hallway becomes a "highway" where coats and shoes are thrown off at random. But how beautiful it is when this room, with love, is decorated with your own hands!
People have a lot of excuses for not equipping the entrance group. For example, they say that the room is small or narrow. But in this case, it is all the more necessary to develop furniture according to individual sizes, and it is not necessary to order its production to specialists. Even women can easily handle the creation of some designs! There are many unique ways to make DIY furniture that save time and money, it's just that most people don't think about it often.
Throne or tree? Choose!
incredible tree
By and large, the apartment should begin with a hanger, this item can be exclusive, made according to an individual design. As you know, hangers can look different. There are many designs in different materials, different colors, styles and sizes. Some of them hide behind a mirror in the closet, others hang on the wall, and still others stand on the floor. Floor hangers compare favorably with the fact that they can be easily moved, they take up very little space.
For modern interior decoration, floor hangers in the form of birch are ideal. And you can make them from real thick branches. The new rack will bring unique accents and romantic feelings to the hall or hallway, decorate children's rooms in a playful, interesting style, become a kind of divine island of nature.
Of course, furniture in the form of wood will be loved in the house. Our ancestors deified trees, which occupied not the last place in rituals. Today there are oaks that have lived for more than one century, they are also considered special.

The natural-looking floor rack looks impressive, and its designs are ideal for small spaces. Elegant natural shapes can be cut from plywood.
Plywood is made up of three or more thin layers of wood glued together. Each layer is generally oriented, running at right angles to the adjacent layer to reduce shrinkage and improve the strength of the finished product. Pieces of plywood can be shaped into complex curves for use in producing beautiful natural designs:
- Before purchasing materials, a sketch is drawn. After that, the dimensions are calculated.
- Mastery is in the details - you need to saw, laying out sheets of plywood on a completely flat plane.
- To protect the material from chipping, the line along which the sheets will be cut is coated with PVA glue.
- The finished product is varnished or painted.
And even the king will envy!
The design created by one's own hands in the form of a chair is also interesting. In its production, you can use boards. Original handmade furniture looks like a royal throne, in combination with any type of decoration, it will become not only a functional addition to the house, but also a central element of the hallway space.

The design of such a chair is very simple for any person involved in carpentry. The most interesting, useful detail of this model is a square mirror, which is indispensable for any room at the entrance, it makes the furniture richer. The robust model has 5 hooks, children can stand on the chair to take off or hang up their coat by themselves. The main condition is stability, it must be checked after manufacture.
Three brilliant ideas
Alicia Prusakovskaya's idea

Knowing that the most important part of an alluring, beautiful entryway or hallway design is a handy clothes storage rack with a bench or a unique hanger, the Krakow-based designer designed outdoor furniture with a shoe storage area that you can sit on. Designed for flexible use in the hallway, the freestanding item resembles a white box containing a collection of thin wooden skis. Probably, this is what skis sticking out of the snow would look like if the athletes turned over, making a somersault, and fell into a snowdrift. Curved hooks at the ends of the pine planks are positioned at different heights to hang coats and accessories.

Ergonomic shapes, roundings and curves in the design emphasize the beauty and nobility of the model. The shoe storage area, which acts as a seat, is made from four sections of white lacquered medium density fibreboard (MDF) held together with pine pieces. Elements with hooks are formed from pine boards.
When working, traditional methods of wood processing were used, for example, hooks for clothes were cut by hand, using a chisel. “My goal was to design an object that would be useful and visually appealing,” says the designer. The holes intended for the installation of pine boards are decorated with wood hoops.
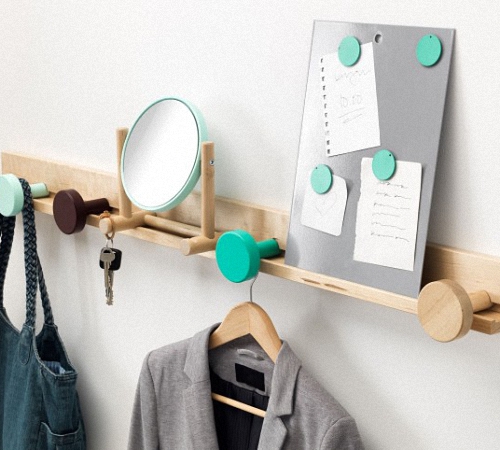
The idea of German designers

Kristin Herold and Katarina Ganz have designed floor furniture with unique hooks, reminiscent of birds resting on power lines. Such a model will incredibly decorate any hallway. Clothes hooks are picturesquely located on a metal rail, and are directed upwards at an angle of 45 degrees. The legs of the furniture are made of birch, with a metal pipe of round cross-section neatly inserted between them, which looks very elegant, it really resembles an electric wire.
Removable coat hooks allow you to hang outerwear on both sides, similar forms can also be used to store hats, umbrellas and bags.

By the same principle, but using different materials and decor, you can develop many unique models. For example, make a wooden structure of 6 boards and 3 wooden sticks, round in diameter. Such furniture, 70 cm high, is convenient to assemble and disassemble, it will look good in a children's room.
Idea from Japan
Japanese designer Yasu Mifune created a structure from a steel rod, curved back and forth and attached to a circular base. As a result, there were three horizontal stripes. The stand is compact, it does not take up space at all. Flat plywood hangers are neatly placed on the base of the furniture when not in use and are held in place with a short rod.
“Sometimes there are situations where clothing furniture is not really needed, for example, if you only need to hang a scarf,” says the designer. This floor hanger is ideal for summer clothes and decorates the room.
Out of nothing - something
Do not rush to throw away the old door

Do not rush to take the old, but strong door to the trash, if it had to be changed to a modern model. After all, with your own hands you can make a chic hanger for a country house in the Provence style!
For the main structure, you will need ordinary boxes, 5-6 beautiful and reliable coat hooks, 2 pieces of thick plywood and 2 decorative metal brackets. After assembly, the hanger should be painted using crackle techniques. Drawers that will play the role of a shelf for shoes and at the same time serve as a bench (you can sit on it to put on shoes) should be decorated with decorative pillows.
How to make furniture in half an hour
In the production of stylish, comfortable furniture for clothes with your own hands, you can use fittings for water pipes, connecting parts made of wood or pipes directly with them. Many structures are created according to several schemes.

The copper details of handmade furniture look both vintage and very modern - it's still a beautiful home design trend. Details made of metal, valued for centuries, decorate the space, make it elegant and stylish. Using copper plumbing accessories and round wood sticks bought from a hardware store, you can create a chic hanger in just half an hour.
- Purchase materials. The inner diameter of the copper adapters must match the diameter of the wooden sticks.
- Cut sticks. 2 pieces - 1300 mm, 2 pieces - 800 mm, 4 pieces - 200 mm, 6 pieces - 100 mm.
- Connect sticks with copper parts.
- If the design turned out to be stable, then the parts are fastened with glue.
- Using universal drawings, racks can be designed in any size.

When do-it-yourself furniture is made from metal pipes, you need to consider that it will be quite heavy. To make it easy to move, it is worth using the wheels.
Using a wooden box, the design is easy to supplement with a place for shoes.
One of the most interesting ideas for creating furniture from unusual materials is the use of pallets in its production. Pallets are unusual in the sense that absolutely any furniture can be made from them. If the apartment is overloaded with things, and the person is facing certain problems, then the production of storage spaces from pallets will be of great help. Pallets transform an ordinary apartment into a trendy and stylish space that is adorned with unusual patterns, including those designed to hang bags, hats, scarves and more.

Hooks for clothes will give a special character to such furniture; they, just like buttons matched to clothes, form the whole style.
This project can be done by hand with some pretty simple tools:
- pencil
- pallets
- hand saw
- nails
- a hammer
- measuring tape
- nail puller
- sandpaper
- level

Brushes, paints and varnishes will come in handy in order to make your own clothes hanger even more unusual. Adding an interesting color to your entryway or foyer is a great idea. After the furniture is made, its surface is prepared and sanded, paints can be used in any shades, according to individual taste and the rest of the decor. You can also use the remnants of paints that painted the walls of the house. Enamel is applied in several layers.
Clothes hangers are a mandatory attribute in every home, since otherwise it is rather problematic to arrange outerwear. In addition, floor hangers are also useful in the bedroom, so as not to put clothes in the closet every evening and not to use chairs or armchairs. But in the store, beautiful furniture is quite expensive, so the best solution is a do-it-yourself outdoor clothes hanger. Indeed, from inexpensive materials, you can make original and beautiful hangers that will greatly decorate and make your interior comfortable.
You can make a clothes hanger from almost any material. But if you are going to do it yourself, the choice of material should be approached carefully.
Wood and plywood are best suited for work, these are the most practical and plastic materials that are easy to work with. If products from them are used in the house, then they are guaranteed not to be exposed to moisture and their service life will increase significantly.
Working with metal or plastic at home is quite difficult, so you should not choose these materials. It is worth considering the fact that sometimes there is a significant load on the hanger, so you need to use materials of appropriate strength so that the furniture does not break.

Examples of floor hangers using metal water pipes
When you buy wood or plywood, pay attention to their quality, because this is a guarantee that the hanger will look beautiful. In most cases, wooden products are only stained or varnished, so the texture remains visible on the surface.
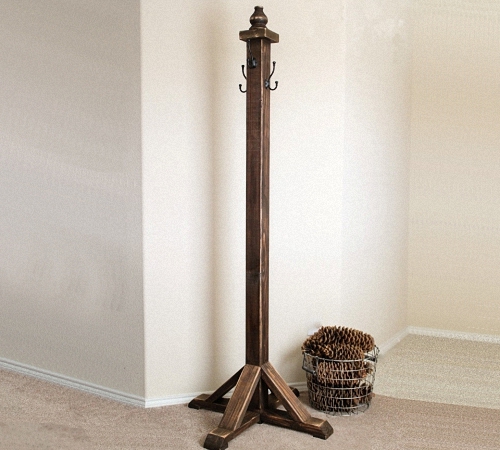
Floor hanger in the form of a tree
Making a floor hanger is easy, and it does not require a lot of tools and materials. This hanger is made from two sheets of plywood, approximately 70x170 cm in size and 18 mm thick. For manufacturing, you only need glue, a jigsaw and sandpaper. The work itself will also not take much time and you will not find such hangers in any furniture store.

First you need to draw on one of the sheets of plywood the outline of the future product. This can be done simply by transferring the drawing to scale on plywood. The most important thing is that the legs are of sufficient width - about 60 centimeters. This is necessary for stability, since if you make them narrow, then the hanger will fall if you hang heavy winter clothes on it.

In order not to draw a picture on the second sheet of plywood, you need to simply fasten two sheets of plywood with self-tapping screws or clamps before you start cutting. It is best to use the clips, rearranging them as you cut the plywood. Make sure that the sheets do not move and that both workpieces are the same.

To connect the blanks and turn them into a hanger, you need to make two slots. On one blank, you need to make a slot to the middle from the top, and on the second from the bottom. The width of the slot should match the thickness of the plywood.

Both slots on the inside must be well treated with glue, and then put the workpieces one on top of the other. As a result, you will get an original and beautiful floor clothes hanger, which will only have to be sanded and painted.

As you can see, making a floor hanger with your own hands is a simple task even for a beginner. And you can decorate it in any way. You can simply stain, varnish or paint the plywood. If you reduce the size, you get a children's clothes hanger that will decorate any room, especially if it is painted.
Wooden hangers made from natural elements
Racks made of natural materials are a good design solution. More specifically, from a tree trunk. Such a clothes hanger is very easy to manufacture and does not require special tools and materials.
First you need to find a good piece of dry wood, it must be completely dry and free of rot. The type of wood practically does not matter, but it is worth remembering that it is better not to use conifers with a high resin content. Glue can be released from the barrel even after complete drying. It is best to use hardwoods with a well-branched trunk so that there is more room for clothing.

First you need to completely clear the trunk of the bark, cut the lower branches to a height of one meter, and shorten the upper ones so that there are knots on which you can hang clothes. Then you need to completely sand the rack and clean it of dirt, bumps. If the wood is damaged by a bark beetle, then this does not interfere, as it creates a rather beautiful pattern that will fit perfectly into the design of the hanger.
The second stage of work is the stand, since the tree trunk cannot stand on its own. The most important thing to remember here is that the more massive the stand, the more stable the hanger will be. You can make a stand from a thick board, this will be the best option for work. The stand itself can be given any shape, it can be a circle, square, triangle and any other geometric or abstract figure.

There are many ways to attach the stand to the stand. For example, if the lower part of the tree is quite thick, then you can simply screw the board to it with self-tapping screws. The heads of the screws will be at the bottom, so they will not be visible. If the bottom of the tree is relatively thin, then you can fix it in a stand by making a hole in it, it should be no larger than the diameter of the trunk itself. Then just the rack is fixed with glue on the stand - this method is the most reliable.

It is worth remembering one feature of the tree trunk - it has a cone shape. Therefore, it is better to make a hole in the stand smaller than its diameter, and carefully trim the bottom of the tree. Thus, the stand will hold well and there will be no gaps at the junction.
When the wooden hanger is ready, you just need to varnish it, as it is better to preserve the natural color of the tree. But if a light hanger doesn’t suit your design, then you can use stain or dark paint.
An original and very practical option for a floor hanger, which is easy to make, is to make it in the form of a ladder. Such an accessory is perfect for the bedroom if you do not like to use an armchair or chair back to store clothes in the evening.

For manufacturing, you will need only two bars with a thickness of about 5x5, and a length of 170-180 cm. Also, for the crossbars, you will need three smaller bars, the length of which will be equal to the width of the hanger. All bars are ground or processed by a planer. To make the hanger look beautiful and neat, it is best to connect the parts together with spikes.
Then you just need to cover the hanger with stain and varnish. A convenient and comfortable clothes rack is ready. As you can see, this DIY clothes rack is very simple and it is suitable for a bedroom or a summer house.
Like any wooden piece of furniture, such a clothes stand will look great in almost any interior and you can arrange things on it so that they do not wrinkle. If desired, you can use several clothes hangers that can be hung on the top bar. If during the day the hanger interferes, then you can simply take it and put it upright, as it is light and does not attach to anything.
Other types of floor hangers
Despite the fact that the floor rack for clothes is a fairly simple element of the interior, there are so many ways to make it. It is enough just to show a little imagination and remember that the design must be stable. Otherwise, you can make clothes racks from any available material at hand.
You don't need any special tools to work either. Of course, there are hangers made on a lathe from wood, but they are made by professional carpenters.

Remember that any piece of interior made by you personally will not only be the next step in your skill. If you make something with your own hands, then this thing will be unique and unique.

In addition, by making the elements of the decor yourself, you not only show your individuality, but also save a lot. Since even the simplest clothes racks in the store will cost an order of magnitude more expensive than craft material. And this is another incentive to start making your own, since handmade products are even more expensive.
Floor hanger, one of the easiest tasks. Therefore, you should not buy it in the store, but rather make it yourself.
Hanger-rack, hooks on the wall, coat hangers in cabinets are convenient and very optimal attributes in the house. To save space in the hallway, it is advisable to install these interior items instead of shelving. There are many original ideas with which you can create them yourself. Applying personal preferences in colors, from any material, on any subject (which is close to you and you like, for example, wildlife) and, accordingly, any shape. At the same time, the quality and characteristic properties will not yield to the option purchased in the store, if you approach the handwork wisely. The undoubted advantage will be that the hanger in the hallway with your own hands will be distinguished by individuality, originality, and will cost minimal material costs. It is also important that it will be possible to make options that are most suitable for the design of the entire room, which will be in harmony with it. Creating comfort in your home with your own hands is a truly exciting experience.
The main functions that this multifunctional interior item performs:

If there are built-in shelves, you can store items in them, there are also options with shelves for shoes and hats.
In addition, there are models that are used as an element of decor, to decorate and give a certain charm to the interior. They are not used for their intended purpose and are made of fragile, impractical materials.
Materials and tools
The choice of material depends on your imagination and desire. It can be:

You can also use glass, chipboard or cardboard. Each modification has its own advantages and features. Combinations of metal with wood are allowed, silicone coating to avoid slipping.
Since there are different types of fabrics, it is advisable to make your own or purchase hangers from different materials to maintain their neat appearance. It is important to consider the size (for children, they have smaller parameters).
Tools sufficient for manufacturing: tape measure, hooks (from different raw materials), blowtorch (heater), jigsaw, needle with handle, sandpaper, hand saw, screws, screwdriver, pencil, fitting, screwdriver, measuring instruments, drill, drills , stain, self-tapping screws. In some designs, it is not necessary to use all of the listed tools.

Types of design and construction
There are 2 types of structures: designed to store wardrobe items inside the closet and outside it. The first type includes the so-called “standard model”, that is, a coat hanger with a hook. They fit in the closet, the hook is placed on the crossbar, things hang on hangers. In such a model, a crossbar is made between the sides so that trousers (skirt) can be hung through it, which makes it more multifunctional. Some are made with notches so that clothes with eyelets and straps can be hooked onto them.
The second type includes those on which coats, jackets, raincoats, fur coats are usually left:

Wooden hangers
Wall construction
A wooden structure will fit well into almost any interior. In order to get started, you need to decide what size and height of the hanger you need. Based on this, saw off a suitable piece of board. Use a jigsaw to cut rounded edges with smooth lines, after which they must be sanded with sandpaper, first large, and finally fine grit. The board must be processed with a blowtorch or over a gas burner. Attach the resulting blank to the wall, for this there are 2 tricks:

- Attach metal ears on the back side. To fix with long screws, drill holes in the fastener;
- Fasten the workpiece immediately to the wall by drilling through holes.
The final step is to secure the hooks with screws.
If you want to make the wall hanger more spacious and fit more things, then triple hooks should be chosen. Antique made will look unusual and beautiful.
floor structure

The natural pattern present on the wood, thanks to the stain, will acquire clearer contours. Glue the rubber to the bottom part, made by yourself, so that it does not slip and scratch the parquet.

From a copper pipe
Copper products are always relevant and have a decent look. To do the work with your own hands you will need: copper pipes: 60 cm - 4 pcs.; 150 cm - 2 pcs.; 90 cm - 1 pc.; copper tees - 2 pcs.; epoxy adhesive; copper corners - 2 pcs.

To make the base, you need to connect 2 copper pipes (60 cm) with epoxy glue using a tee. Do the same for 2 other pipes of the same size.
Attach 2 corners to the pipe (90 cm) (later it will act as a crossbar on which you need to hang clothes). The next step is to insert 2 pipes (150 cm) into the tees and connect the upper part of the pipes to the corners.
After the glue dries, the product can be used for its intended purpose. It is also permissible to add a wooden stand, fixing the legs on it and using it to store shoes.

From leather belts
The belt can serve not only as a stylish accessory, but also as a piece of furniture. To make a hanger from an old leather belt, you need to cut off its fasteners, giving the ends an oval shape. Then combine the 2 ends of the belt and at a distance of approximately 3-5 cm from the edge, make a hole with an awl. Make a wooden peg with a diameter less than the width of the belt. Fold the belt in half in the form of a loop and fasten it to the wall with a self-tapping screw or an ordinary nail. Glue the peg with reliable glue at the base of the loop (where the nail is located).
You can also make 2 such loops at a symmetrical distance from each other and thread the crossbar into the loops. Clothes can be hung both on the loops themselves, and on pegs or a crossbar. Such a hanger looks very stylish and can be improved in many ways by adding bright applications, decorations, additional elements, etc.

From branches and cuts
The simplest and most financially advantageous model is made from wood branches and trunks. Such a hanger will bring an element of wildlife into the design, give the atmosphere of a cozy country house, the work will not take much time and effort. Materials can be found in the park or forest. With the help of a pruner, it is enough to cut off the extra branches, the remaining ones will act as hooks. A massive wooden cut is suitable as a support for a floor hanger. The bark can be peeled, dyed any color, or left as is. A trunk with branches can be sawn into sections. Next, hang them on the wall on a board or frame. The result is a multifunctional comfortable interior element. The trunk can also be hung near a window or under the ceiling as a support and a kind of crossbar for hangers.

From a pallet
The main subject for such an idea is a wooden pallet. Before proceeding with the manufacture, it is necessary to remove all unnecessary elements (bottom, side wall) with a saw. You will need a piece consisting of 4 long planks fastened on the sides. The pallet must be thoroughly cleaned of odors, eliminate all irregularities with sandpaper. After the surface is even, the product must be painted with wood paint and varnished on top. Using a marker, mark the places where the hooks will be attached. The hanger from the pallet is quite massive, and the fastening must be chosen reliable. Attach the hooks to the pallet, then, using self-tapping screws and a drill, hang the pallet on the wall. Additionally, shelves and holders can be nailed.

From longitudinal and transverse boards
This roomy model will fit shoes, hats, jackets. To begin with, fix 2 longitudinal boards on the wall: from below and from above. The length is determined depending on how wide the shelves you are planning to make. Using self-tapping screws, attach transverse bars to the longitudinal boards. The interval should be sufficient to store clothes, the number can be any - choose at your discretion. In order to make an even fastening of the elements, use the level. To build a support, use the bars (in the future it will be a shelf for shoes). Fasten the connections with metal corners. Also, with their help, fasten a shelf on top (for hats, hats, gloves) perpendicular to the longitudinal boards. The final step will be attaching hooks and decorating.

hanger manufacturing process
Cut out a template from a sheet of plywood and transfer it to a beam with a marker. Drill 2 holes in the inside, cut out the circled template with a jigsaw. Mark a hole for the hook, then drill (diameter 5 mm). Cut a recess in the inside of the drilled hole (using a file with a large notch), place a nut in it. A recess is needed in the future so that no hooks form during operation. Saw off 20 centimeters of wire with a narrow hand saw, round off one end with a file, chamfer the second end and cut a thread with a metal-cutting die (about 5 mm long.). Drill a hole for the hook, which must be bent, then insert and securely fix with a nut.
decoration
Unusual design solutions can transform any, even unsightly hallway. To maintain the classic style, the hanger can be sheathed in leather (leather substitute) or to preserve the natural beauty of wood, if it was used. Hooks painted with bronze or gold paint. Cover the shoulders with velvet, satin fabric. For country use additional accessories in the form of horns, it is permissible to cut them out of wood. For the retro style, the color can be artificially aged; the decoupage technique is used for Provence. In the role of prints, glue or draw flowers, images of birds, landscapes. In a modern interior, experiments, unusual shapes, original accessories, silhouettes, complex intricate patterns are acceptable. You can decorate and give originality with rhinestones, sequins, handmade decor, drawings, bows. Apply images of your favorite cartoon characters, series, books.
- To avoid cracks in the wood - before screwing in the screws, it is recommended to drill holes with a drill.
- The diameter of the self-tapping screw must be larger than the drill. Fill the holes in advance with glue, and then screw in the self-tapping screw - so the product can carry a lot of weight of the clothes and will be more wear-resistant and strong.
- For a metal hanger, use paints and coatings that resist corrosive processes.
- At the planning stage, it is imperative to take into account the dimensions of the wall, to think about exactly how you will fix the workpieces, taking into account the material from which the wall is made (concrete, wood, plastic).
- All wood blanks must be processed with a grinder or sandpaper, and at least 2 times: first coarse grain, and then fine grain.
Video: Do-it-yourself hanger in the hallway
Photo gallery: Do-it-yourself hanger in the hallway
 White hanger in the hallway.


In a cozy house it is impossible to do without a hanger - floor, wall or ordinary hangers in the closet. But besides its utilitarian function, storing clothes in a straightened form is also a way to show your creativity, an opportunity to do something with your own hands for household use. An original do-it-yourself outdoor clothes hanger or originally nailed hooks in the hallway - how can you do without them? You don't have to be a jack-of-all-trades to make simple jacket tremples or hat horns, all you need is a tool and some creative ideas.
Hanger as an art object or decorative element
To quickly clean up the house by organizing things in the closet, it is important to have enough space to easily fit:
- dresses and jackets;
- hats and caps;
- bags and belts;
- scarves and neckerchiefs;
- blouses and sweaters;
- business suits;
- outerwear for the off-season;
- skirts and trousers.
But for each such thing, a special device is needed:
- wall hanger;
- hangers (trempel);
- panel or shelf with hooks;
- clothes hanger in the hallway;
- rings and hooks for wardrobe for scarves and accessories.
It is easy to build many types of clothes hangers - with your own hands, photo:

If you look at old things from your grandmother's closet or chest, there are probably some pretty interesting clothes hangers. Vintage trempels and homemade hangers, if they don’t qualify for the “antiques” rank, may well be the basis for renovation or even become a unique art object. No matter how hard they try to transform the old hanger, craftsmen, needlewomen and just lovers of something “creative”! For example, a clothes hanger photo.

Hangers from grandmother's use were made in an era when plastic or plastic products were not produced. An old wooden base can be used as an original decor object, especially if there is no wardrobe in the room. They can be transformed in any way or use any suitable technique:
- decoupage;
- original painting;
- application for varnishing;
- pasting with posters, magazines, geographical maps, etc.
It does not hurt to make soft “shoulders” for knitwear on the old basis so that it does not slip or stretch. These simple devices are also easy to make from scratch from improvised materials. But if you need a wall-mounted base for hooks made of wood or an original floor-standing clothes hanger, then you need materials, tools and woodworking skills.
Wall wooden hanger
Although a wall hanger is the simplest device that is suitable for DIY, you should not make it rough and primitive. Even if it is planned to be used temporarily, for example, in the country, it is still better to make it beautiful so that the wall-mounted clothes hanger decorates the house for many years.
For a quality product, you will need good wood, a board or a cut of a bar, of the required length - the width of 2-3 freely hanging trempels with jackets. The board for the base must be strong and dry, without cracks, treated with antiseptics. On this basis, you will need to fill a few hooks:
- in line;
- in 2 rows;
- in 3 rows - in a checkerboard pattern.
The simplest single-row hanger is useful in any room:
- on the back of the door in the bedroom - under bathrobes;
- in the bathroom or bathroom - for linen during bathing;
- in the pantry - for working or seasonal outerwear;
- in the pool or sauna - under towels and bathrobes.
A simple wall hanger is also needed in a nursery or a teenager's room - accustoming schoolchildren to order, hang casual clothes on hangers so that they do not wrinkle.
Tip: The simplest hanger is a board with hooks and hanging loops for hanging on the wall. But do not forget that it cannot be nailed to a non-plastered wall or whitewash. From an unprepared surface, clothes will get dirty. Therefore, a wooden shield, plastic wrap or drawing paper must be hung on the wall in an unfinished room under a hanger. And wet outerwear will stain the wallpaper or painted wall on the prepared wall.

If you have some original idea regarding the design of the product, it is not necessary to make it in the form of an oblong rectangular disc. A wooden base for a wall-mounted clothes hanger with your own hands can be made in the form of:
- oval;
- wavy panel;
- musical staff;
- heart;
- spirals, etc.
After making the base, the wood must be sanded and varnished or processed in another way. It is important that the wood does not give the prerequisites for splinters when using a homemade hanger. It is desirable to make hooks or “carnations” of the hanger in any original way, suitable:
- old wooden spools for thread;
- handles of broken screwdrivers, scissors and other household items;
- specially cut hooks.
Hooks, “carnations” or “holders” for a hanger do not have to be made of wood or metal, they can also be bought at a hardware or building supermarket. Natural material is also suitable - dry branches, knots, cuttings or cuttings of roots. They must be cleaned of bark, cut off or sawed off the excess, polished and varnished.
Another standard hanger option is made from wooden planks nailed in parallel. They will become not only the basis for hooks, but also a decorative shield for clothes on a whitewashed wall or just a beautiful piece of furniture. It will take a little more time to make it, but such a design looks more solid than just a board for hooks. And if you attach a visor to the hats, it will already be a full-fledged clothes hanger in the hallway with your own hands.

Homemade clothes hanger in the hallway
Hallway hanger should be enough:
- strong and strong;
- aesthetic;
- capacious;
- multifunctional.
Ideally, a small gap in the wall in a narrow hallway should fit:
- outerwear of all family members or guests;
- hats;
- umbrellas and bags;
- shoes under clothes.
It is this versatility that is important to consider when building a homemade hanger for the hallway. Therefore, it is reasonable not just to make a board with hooks, but to decorate it beautifully:
- shield with hooks for clothes;
- visor for caps and hats;
- shoe rack;
- stand for bags and umbrellas.
Tip: The dimensions of such a hanger should not be arbitrary, they are measured with that part of the wall where the hanger should be located.

Usually there is enough space about 1m wide, the height of the clothes hanger in the hallway with your own hands should be more than head level. 2-3 rows of hooks are placed under the trempels and outerwear, plus a visor (shelf) for hats. Reliable connection of the side panel shelves can be connected with planks at an angle of 45°C. The hanger must be attached to the wall with brackets or dowels.
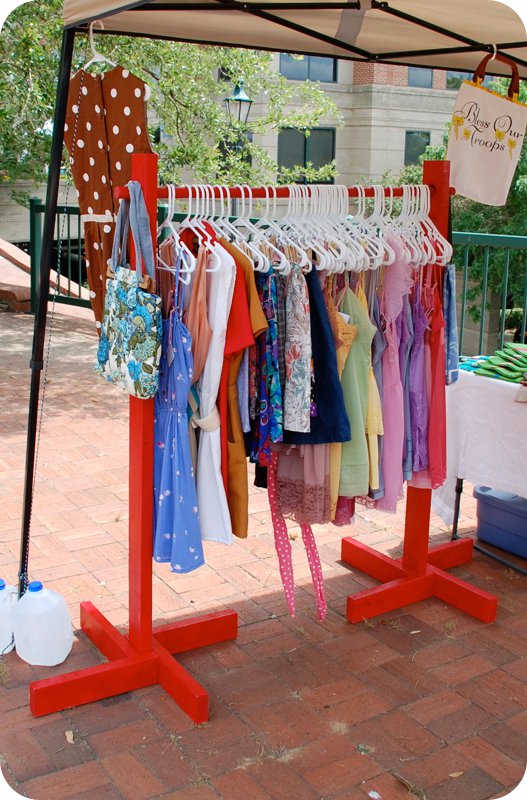
Floor hanger rack
Another type of fixture for placing clothes at the entrance to the building is a do-it-yourself outdoor clothes hanger. You can often see them:
- in the office of the clinic;
- at the reception;
- in the lobby or lobby;
- Internet cafes, etc.
They are commonly referred to as "standing" or "horn" hangers and are made from tubular metal. They are notable for the fact that it is convenient to hang on them not only outerwear, but also hats, bags and umbrellas. And although they are not as stable as hangers nailed to the wall, they are more compact and mobile. They can be rearranged to any place or put away in the pantry for the summer.
In houses and apartments, this type of hanger is used less frequently than in public places, but it is also easy to make it yourself. There are some good ideas, for example to use:
- a cross for Christmas trees as a base and a long shovel handle as a stand, where ready-made long hooks are nailed;
- cuttings of plastic pipes and couplings for the base of the hanger;
- the base of a dried garden tree in the form of a multi-track structure, process and install on a cross or other base;
- cutting pipes of different sections as a telescopic rack;
- the remains of old chairs and stools and build a hanger on a rotating swivel mechanism (buy ready-made);
- as a basis - a tripod from an old camera, a floor lamp and other household items.

Attention: Whatever the design, it is important to observe the main condition - the stability of the floor hanger. And this depends not only on its design, but also on the support. It can be a rotating disk, 3-6 legs or a cross.
Do-it-yourself coat hanger or trempel
It is not difficult to make a clothes hanger on your own, while using any material at hand as a basis:
- thick wire;
- fragment of a thick branch in the form of shoulders;
- small plastic bottles strung on a metal base in the form of a large "paper clip";
- bent metal plate or corner.
The base for the hanger "shoulders" remains to be wrapped with synthetic winterizer (another filler) and sheathed with any beautiful fabric. This is the best option for knitwear. A beautiful satin bow or an attractive face from a small soft toy will help to add originality. Children will love these hangers. The main thing is to find the right metal for the hanger hook.

Do-it-yourself original hangers from improvised materials
Interesting ideas for the independent manufacture of hangers of any type can be implemented using a variety of improvised materials.
1. Metal. Pieces of steel wire, tubing or angle are suitable for a metal coat hanger. Depending on the flexibility and thickness of the metal, the structure can be bent or joined by welding. The shape and design of the product is optional, see photo:
2. The remains of a bar, board, veneer and other wood are suitable for a wall hanger or a universal product in the hallway. A detailed video is useful for those who love woodwork;
3. Parts of old furniture are also easy to transform into a hanger, for example, by building a multifunctional model based on a chair. This design is convenient in that a jacket and trousers from a suit, a shirt and a tie are conveniently located on one module.
4. The original base for hangers will become an original fixture in a room where there is temporarily no wardrobe. Any wooden handle that is suspended from the ceiling parallel to the floor at a level slightly above the height will do.
5. The old "hunting" idea is to use deer antlers instead of hanger hooks. They can be attached to any base - for a wall hanger or a vertical stand with antlers. Moose antlers will do.
6. The construction of plastic pipes will appeal to lovers of technical crafts.
7. Small wardrobe hangers are also needed, for example, in the form of connected rings made of cardboard or plastic. They are suitable for hanging scarves and neckerchiefs, belts and belts.
8. The simplest wire hanger "hand-rolled" with clothespins around the edges is an excellent tool for storing trousers or skirts. The shape of such simple hangers can be classic, in the form of a curved paper clip or in the form of an intricate labyrinth - as fantasy suggests.

Hangers as a stylistic decor
When choosing the material, shape and design of hangers, you should consider what style your interior is decorated in:
- a wooden hanger with chiseled decorations is suitable for an English office or a discreet classic hallway;
- soft hangers covered with bright fabric will decorate the bedroom in country style, shabby chic, romanticism or boho;
- metal-plastic structures will emphasize the originality of loft apartments, decorate the shelter of a lonely wanderer in the power of techno or high-tech;
- old restored coat hangers fit vintage, retro, Biedermeier or Victorian style;
- hangers of the simplest form and design - an ascetic attribute in the style of minimalism or functionalism;
- original hangers with a "girlish" design are suitable for a Barbie-style children's room;
- a chic and spectacularly decorated hanger - for a boudoir in a palace style;
- satin ribbons, sequins, beads and pebbles are attributes of a glamorous bedroom.
For more information on making your own hanger, see the video:
Such hangers can be used not only for outerwear in the hallway, but also as mini-wardrobes in the room. It all depends on which type and design you choose. Clothes rack hangers are functional, easily moved from place to place, and free the backs of chairs from unnecessary clothes there.
This article has collected some interesting and easy ways to make a floor clothes rack with your own hands. They don't take much time or effort.
Choose your favorite option and go ahead to change the interior!

Necessary materials:
- Two copper pipes long 3 m and 2 cm thick, each of them will need to be cut into such parts (this can be done at a hardware store where you will buy everything):
- 1.5 m long- the height of the hanger (this height should be enough for both jackets and coats, but you can take more or less if you wish);
- 1 m long- the size of the pipe on which you will directly hang things (you can also take it longer or shorter, calculate how many things you want to put there);
- two tubes about 20-25 cm long- we will make hanger legs from them.
That is, it turns out 2 copper tubes of 1.5 m, 2 of 1 m, 4 of 20-25 cm.

- 4 copper elbows (tubes bent at an angle of 90 degrees) for attaching pipes to each other, select according to the diameter for the pipes (approximately 2 cm);
- 2 T-connectors;
- 2 caps for pipes;
- Glue (epoxy glue or ask the seller in the store which of what is available is suitable);
 Step-by-step instruction:
Step 1: Measurements
Measure the space on the floor where the hanger will be, make sure it will fit. If you take the indicated dimensions, you will end up with 150 cm x 100 cm x 45 cm.
TIP: Adjust the dimensions if necessary.
Step 2: Assemble the legs of the hanger
We begin to fold the floor hanger itself from the legs, make a support and a rack. To do this, take the first pair of tubes of 20 cm each and fasten them between a T-connector, and then we do the same with the second pair.
Step 3: Attach the protective caps
To prevent dust and dirt from getting into the middle of the pipes, which will serve as legs, you need to close the holes. On each of the two legs folded in the previous step, attach a pipe cap at one end.
Step 4: Foundation
- On tubes with caps on the other side, attach a corner in this way: when the corner is on the floor, the T-connector located in the middle of the leg should be pointing up.
- Take one of the meter-long pipes and insert it into the corners, now the base of the hanger is ready.
ATTENTION: To securely fix the structure, you can use glue (at least in all joints), but then the hanger cannot be disassembled and folded again (when moving, for example).
Step 5: Side Racks
Insert a one and a half meter pipe into each of the T-shaped connectors, thus forming the side racks.
Step 6: Finishing touch
- Attach a corner to each of the newly installed racks (they should be directed at each other), and insert a meter pipe into them.
- You can also attach felt pads to protect the floor. The floor hanger is ready!

Note: Since this design is easily disassembled (if you did not use glue), you can change its length, for example, depending on the time of year: in winter there are more things - longer pipes were installed, in summer they are shorter.
Hanger made of PVC pipes (budget option)
The method of making this floor hanger is similar to the previous one: the pipes are folded like a designer to form a hanger. But here we use not copper pipes, but PVC, so it will come out much cheaper. And, of course, another new design idea.

Necessary materials:
- PVC pipe with a length of 2 m and a diameter of 2.5 cm, it must be cut into the following parts: 12 cm (6 pieces), 80 cm (1 piece), 20 cm (2 pieces) and 10 cm (1 piece).
- PVC pipe 50 cm long and 2 cm in diameter, cut it into 3 pieces of 15 cm.
- 4 bends-corners with a diameter of 2.5 cm.
- 3 bends-corner with a diameter of 2 cm.
- 6 T-connectors with a diameter of 2.5 cm.
- Adhesive for PVC.
- Aerosol paint.
- 4 PVC adapters from 2.5 cm to 1.25 cm.
- 3 PVC adapters from 2.5 cm to 2 cm.
- Felt pads to protect the floor (optional).
Step-by-step instruction:
Step 1: Cut the tubes into desired sizes
First of all, we have to cut PVC pipes for rack mounting. You can do this yourself at home with a PVC cutter or ask at a hardware store.
After cutting the pipes into pieces, their edges can be sanded so as not to be scratched when assembling the hanger.
Step 2: Sort the materials
Now we have all the necessary parts and for convenience it is better to sort them, then the assembly process will be faster and more orderly. Arrange the materials in piles, depending on their purpose.
- For the hanger stand you will need: 4 elbows, 4 adapters from 2.5 cm to 1.25 cm, 3 T-pieces and 6 tubes 12 cm long (diameter 2.5 cm).
- For each arm hanger: T-connector, PVC adapter from 2.5 cm to 2 cm, 15 cm PVC pipes with a diameter of 2 cm and a corner with a diameter of 2 cm (you can still put a pipe cap on it).
- For rack: one PVC tube 80 cm long, two 20 cm each, one 10 cm and a cap.
Step 3: Assemble the hanger
- Stand

Fasten each two tubes with a T-piece. Insert one of the three resulting structures between the other two, as shown in the photo. Put the corners on the edges of the other two, turning them down so that a hanger stands on them.
- Arms

Put together the T-piece, adapter, tube and cap as shown in the photo.
- rack
Insert a tube 80 cm long into the T-connector into the stand, attach one of the arms of the hanger to it, then attach a tube 20 cm long, another arm of the hanger, again the same tube and arm, a tube 10 cm long and put the cap on top with the last stroke .

To keep the structure better, it can be fastened with a special adhesive for PVC. Be careful with the arms of the hanger to stick them turned in the right direction - corners up.
Step 4: Painting
The design of the hanger is ready, but it still does not look very aesthetically pleasing. Carefully and evenly apply the spray paint in the color of your choice, do not stain the room.
TIP: to make the hanger more stable, sand can be poured into the pipes from which the stand is made. After such a little trick, the hanger will not fall and turn over.
Hanger made of pipes with several levels
Another hanger of this type, only with extended functionality: here you can not only hang clothes, but also put shoes. Compact and comfortable wardrobe.

Necessary materials:
- PVC tubes with a diameter of 20-25 mm:
- 4 long 100cm
- 2 long 65cm
- 4 long 48cm
- 6 long 20cm
- 8 long 5cm
- 10 T-connectors
- 6 elbows
- Plate for bottom shelf

We fold it completely in the same way as the two hangers described above.

Wooden floor hanger in 10 minutes

Necessary materials:
- Wooden sticks (4 pieces) 180 cm long and 2 cm in diameter.
- Rope: we will use this to tie wooden sticks together (you can also use leather cords, wire, or some other decorative material, as long as it fixes the structure firmly and securely).
- Spray paint: We used gold to paint the bottom of the hanger legs (you can also use a different shade or color).
- Paint: We used four different colors of paint, one on each hanger leg (but of course you can use the same color for all legs).
- Masking tape: When using spray paint, this will help keep the paint off.

Step-by-step instruction:
Step 1: Paint the supports
- Paint the legs in your chosen colors, let the paint dry.
- Apply painter's tape where you want the spray paint to end, and gently apply the paint to the legs. It is better to do this on the street, or cover the floor with newspapers so as not to stain anything. Peel off the masking tape.

Step 2: Shape the Hanger
Connect the wooden supports together with a rope, and then gradually push them apart. You should get something similar to the basis of a wigwam, the legs should be spaced wide enough so that the hanger is stable and easy to use.

Such a hanger takes up a lot of space, so it is best to put it in the corner.
Interesting ideas and photos
Tree hangers
It can be a neatly sanded tree trunk or branch, or a folded wooden structure. The main thing is that there should be one support and branches from it - hanger handles. An original and useful addition to the hallway. 

Hangers-constructors
The number of elements and design may vary, but what all these floor hangers have in common is that they can be quickly folded, and just as quickly disassembled (if no glue was used). Sometimes more expensive and noble materials are used, such as copper, sometimes wood or PVC, in any case it turns out beautifully and extraordinary.


We also recommend
 Productive and reproductive thinking
 Reasonable egoism - what is the theory of reasonable egoism?
 Boris Nikolaevich Yeltsin, the first President of Russia
 Underground fights. Underground kings. What is “fighting not for the masses”? Where can you fight for money?
 Yakov Pavlov and Other Heroes of Stalingrad You Need to Know
 Survive an accident at sea in a dream - in reality experience a new love