Borders for wallpaper on the wall with your own hands. Wallpaper border photo: do-it-yourself decorative, paper in the interior, self-adhesive, how to glue a child's wall for walls, what kind of glue, video
Modern technologies used in apartment design is difficult to imagine without finishing work with ceilings. The overall impression of the condition of the premises largely depends on the quality of the ceiling surface finish. In some cases, the interior of the premises depends on the types of ceiling design.
Today, the most different ways and options, each of which differs in the cost of materials and labor intensity. However, when working with ceilings at the final stage, one cannot do without decor elements - ceiling plinths. Another name for these consumables, common among specialists and professionals, is curbs on the ceiling. What is this expendable materials, and what is their significance for the ceiling design, let's try to figure it out in more detail.
Ceiling borders - what is this. Main purpose
When finishing work on ceilings, it is not enough to achieve good quality finishes. The finished ceiling surface will look more attractive if all the junctions of the ceiling to the walls and top corners will be decorated. It is for these purposes that borders or ceiling plinths are used. Accordingly, the main task of these consumables is aesthetic. Plinth decor becomes a decoration for any ceilings. Ceiling decoration in this case is determined by the shape of the borders, their size and appearance. Together with the design of the ceilings, these products create a stable feeling of completeness and completeness.
Previously, a different technology was used for these purposes. Paper ceiling borders were produced, which, after pasting the room with wallpaper and finishing the ceilings, were glued around the entire perimeter of the room at the junction of the walls with the ceilings. This brought its zest, charm and presentability to the interior decoration of residential premises.

In addition to the aesthetic function, plinth panels perform a protective role. Errors made at the time of work with ceilings and walls lead to the appearance of defects. Thanks to the installation of decorative elements in the upper part of the room, miscalculations can be skillfully disguised.

On a note: The protective function of the plinth decor is perfectly manifested during the finishing of bathrooms and toilets, where it is required in the absence suspended ceilings close the protruding edges of the facing material.
Already the production of skirting boards on the ceiling presupposes their subsequent use without additional processing. Finished products have a presentable appearance, excellent edge condition and correct form. The only thing you have to do after installing the plinth decor is to paint its fragments to match the rest of the details and interior elements. Summing up, we can draw the following conclusions about the significance of the plinth trim elements:
- their presence emphasizes the integrity of the interior;
- due to the shape and texture of finished products, the visual perception of the entire design is enhanced;
- protective function;
- decor with the right selection of colors can visually increase the interior space.
Depending on how to glue the decorative border on the decorated ceilings, what material it is made of, the durability of the finish and the aesthetic content of the finishing work depend.
The choice of consumables for ceiling design
When choosing materials for finishing, one should always be guided not only by considerations of aesthetics, but also by the practicality and manufacturability of products. It is important that the ceiling curb you buy meets the requirements. This is first of all:
- quality of production of products;
- convenient and fast installation;
- ease of maintenance and durability.
Only after that you can pay attention to its external data, shape, color and technological parameters.

The width of the finished product in many cases plays a decisive role. You should not blindly follow the desire to install wide and richly decorated consumables on the ceiling. This can both positively and negatively affect the visual perception of a small room.
For reference: an angular room with clearly outlined contours negatively affects the human psyche, while lines subtly emphasizing the layout of the walls, rounded shapes create a cozy and comfortable atmosphere inside the room.

Wide borders look great in large and high rooms. From a practical point of view, it is more convenient to work with such consumables. The large width helps to successfully hide defects and imperfections on walls and ceilings with skirting boards.
Do not lose sight of the color of the finishing materials on the ceiling. As a rule, in the factory version, all curbs have White color. This is due to the initially white color of the source material - polystyrene foam, polystyrene foam or polyurethane. If you wish, you can leave the skirting boards in their original color, but often in the process of work, painting of the skirting board decor is required in accordance with the overall color scheme of the interior.
On a note: white skirting boards increase the interior space and height of the room. Painting products to match the color of the walls, on the contrary, reduces the height of the room.
It is not recommended to use a color for finishing skirting boards that is radically different in tone from the color scheme of the walls and ceiling. However, black and bright hues, in which the installed border is painted, ceiling plinths, go well with any other color. Contrast plays an important role here, due to which a beautiful visual effect is achieved.
Finally, the last aspect we pay attention to when choosing materials is the shape of the border. There is nothing special to say in this regard. The form is determined in accordance with the general design used in interior decoration. It is important to consider balance here. Products with artsy, complex shape may look pompous, spoiling the entire interior with their presence. In addition, simple in form, factory products are very convenient in terms of installation.
What types of ceiling curbs do they usually work with
To date, domestic and foreign industry produces a wide variety of similar consumables. The border on the ceiling can be of several types, which differ only in the material of manufacture. According to the principle of installation and installation, almost all products are the same with a small share of working nuances and subtleties.
Polyurethane ceiling edging
In this case we are talking about consumables that have appeared on the market recently. Such skirting boards owe their popularity in finishing works, first of all, to the advantages that polyurethane has. Most importantly, such materials are convenient and practical to use, they feel great in rooms with high humidity. Initially, polyurethane products have a pure white color, which allows you not to paint them at the time of installation.
On a note: such skirting boards are very effective in finishing work in bathrooms, saunas and baths, where there is always high humidity and requires constant cleaning of ceiling surfaces.

In terms of manufacturability, polyurethane products are indispensable. With their help, you can easily decorate curved surfaces, radii. The reason for this quality is the high plasticity of the material. For complex, multi-level suspended structures, such material is a real find.
The disadvantages of consumables of this type include:
- the high cost of polyurethane in comparison with PVC products;
- sufficiently large weight of products;
- work only with basic ceiling surfaces (for equipment stretch ceilings this type of skirting board is not suitable).
Styrofoam borders
Ceiling borders made of expanded polystyrene or foam plastic are the most common consumables, differ affordable price, high technological and operational qualities. Having equipped the ceilings with such skirting boards, you can forget about their presence for a long time, faced with the need to update the decor elements only during the next repair.

This type of product has other advantages:
- thermal insulation properties, which play an important role in the insulation of joints between panels;
- polystyrene is completely insensitive to moisture, so it can be mounted in rooms with high humidity;
- in terms of ecology, polystyrene poses absolutely no threat to humans;
- it is possible to install skirting boards on ceilings and on any suspended structure using conventional mounting adhesive.
Ceiling curb installation
This type of finishing decor is installed at the final stage. It is possible to glue the skirting boards before wallpapering and completing the equipment of the upper part in the room, or vice versa, to carry out the sticker of materials after the fact. Each of the methods is equally successful and has a place to be. It all depends on skills and dexterity. The second method is more painstaking and time-consuming, however, the quality of the finish in this case is much higher.
Important! work with skirting boards is necessary only at a positive temperature and the absence of drafts. Otherwise, the glue will dry quickly and lose its adhesive properties.
For stretch ceilings, foam consumables are suitable, for suspended ceiling structures and open surfaces, both polyurethane skirting boards and foam products can be used. There is a lot of information on how to glue ceiling borders on your ceiling, both photos and videos. Lightweight, foam skirting boards are mounted liquid nails, others mounting adhesives or with putty. Heavier polyurethane fragments are mounted on glue or on mechanical fasteners, screws and self-tapping screws.

Do not forget about the correct formation of corners during the installation of plinth decor. For the correct cutting of products at the desired angle of 45 degrees, a miter box or templates are used. Thanks to such devices, it is possible to cut high-quality corners on skirting boards for precise joining. All cracks and joints after installing the main line of skirting boards are sealed with putty.
In custody
Speaking about ceiling borders, it should be said that this type of product is one of the most convenient and simple in terms of technology. Playing an important role in interior decoration At the same time, skirting boards on the ceiling are very convenient for installation. In order to properly finish the finishing work with ceilings, you need to remember the following points.
Decorative borders give the interior a special charm, modern, finished look. Experienced Designer when creating a project, it will not do without such decorative element. Various ways applications allow you to fully use the purchased material.
Decorative borders for walls: application and relevance
A decorative border for a wall is a wallpaper strip, a textile strip, wood or foam plastic, a design pattern or decorated details glued (drawn) in places intended for decoration.
Use:
- for some wall delimiter;
- for interior decoration;
- to cover imperfections in wall gluing
The border as an element of decor is used for visual expansion space. This is the height or length of the walls. At misuse the effect will be exactly the opposite.
A typical application is the use of edging in the upper part of the wall, at the intersection with the ceiling. This way of positioning the element will help to hide the imperfections of pasting and wall irregularities.
A border glued around the perimeter at the bottom of the wall will help hide pasting imperfections such as improper wallpaper height. It is important to choose a strong material here, otherwise it will quickly wear out at the bottom of the floor.
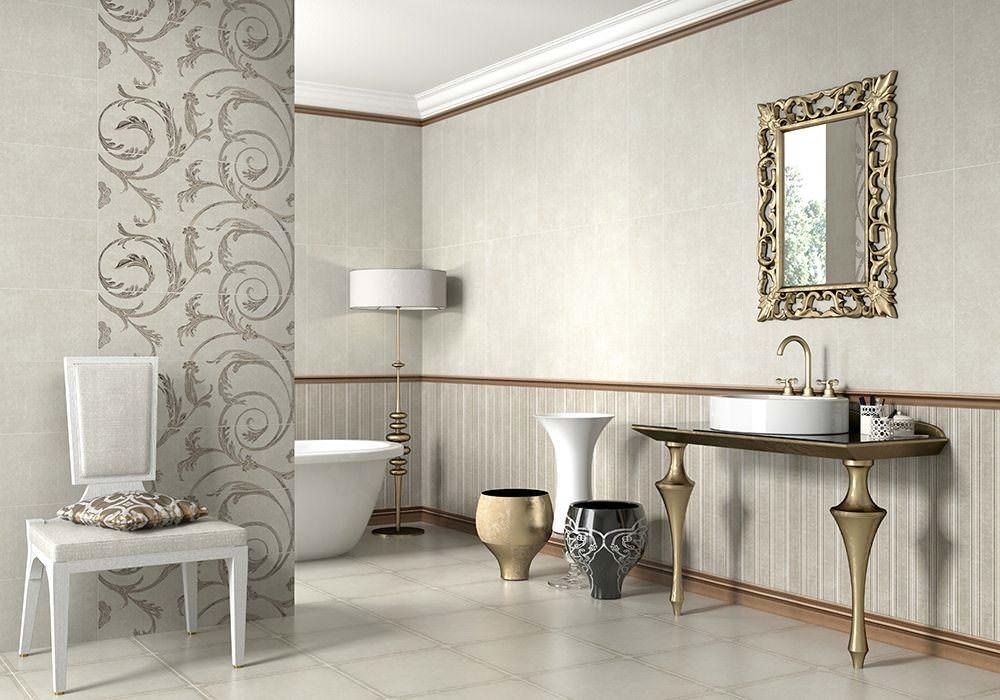
Actual use of the border and to separate two different wallpapers(textures), the decorated element merges them into a single whole. This method is used in practice among designers.
Make a choice of a border when buying wallpaper, this will help to avoid mistakes when choosing a shade (pattern).
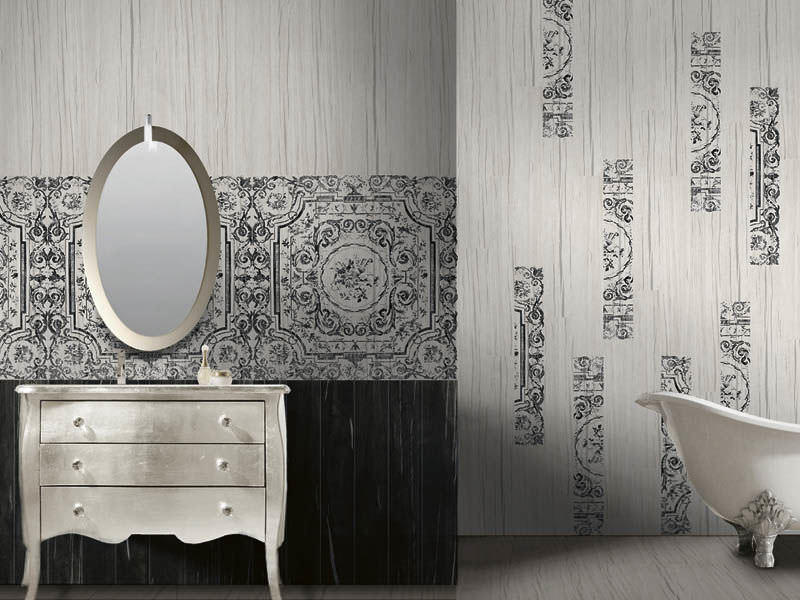
 The edge of the arch or mirror can be pasted over with a bright strip, this will help separate the decorated element from the rest of the background in the room. Use bright material, so it will look more advantageous.
A new border will help refresh the atmosphere in the house, prepare for a holiday or the birth of a child.
The relevance of decorated elements has not changed, just like a hundred years ago, people need beautiful interior. The stores open entire departments with a variety of its types. The imagination of designers helps to embody the ideas of customers, and the existing assortment of the store helps specialists. Paints, boards and stencils are a great way to diversify your border ideas.
Varieties
There are several types of borders, which we will consider below.
By shape
 Form types:
- narrow paper strip - framing used for vertical or horizontal application;
- wide paper strip - framing used for vertical or horizontal application;
- decorated elements (flowers, tiles, and others), more often this type is used in the kitchen or in the bathroom;
- drawing obtained using a stencil;
- convex 3D plastic strips
By material
Types by material:
- Paper (easy to glue and remove, not washable);
- Acrylic (paper with acrylic coating);
- Plastic (washable, difficult to glue);
- Ceramic (used for bathrooms and kitchens);
- Wooden (suitable for summer cottages and country houses);
- Obtained with paint (washable, done on painted walls);
- Self-adhesive (stick and peel off);
- Textile (thick paper with a layer of textile);
- Vinyl (paper with a vinyl covering).
by color
 Variety of color options:
- Bright shades;
- Warm shades;
- Multicolored;
- patterned;
- Wood colors etc.
By destination
It is always best to match the look of the border with the wallpaper or material to which it will be glued. For example, if the wallpaper is vinyl, then the edging, respectively, is also vinyl.
There are decorated elements designed for gluing in the bathroom, they are characterized by moisture resistance. This is a tile type that is suitable for kitchen and bathroom.
Wooden borders are designed for kitchen or rooms in country house. In a city apartment, this type of decor is unlikely to fit into the interior, although designers can do everything.
What should be the border in the kitchen or bathroom on the wall
The border for the kitchen is bright color scheme. Designers do not miss the chance to use the element in the interior of the kitchen. More often they take a ceramic border with a convex pattern or smooth. The length of the strip should correspond to the length of one tile.
A ceramic border in the kitchen is a sign of the wealth of the owners, attractive and possessive in its own way. The properties of ceramics are durable. Easy to wash and pleases the eye of the hostess.
In every bathroom, there is a gap between the tub and the tiles that needs to be sealed. To do this, use a plastic border. This is an economical option, used in inexpensive repairs.
Adhesive border tape will be the most budget option. The service life does not reach one year, it quickly gets dirty, but it is considered quite moisture resistant.
How to stick
 When pasting the edging, the main thing is that the walls are even. Then fixing the decor will be much easier.
When choosing glue, you should give preference to acrylic, perfect glue at an economical price.
The second option would be the same glue with which the wallpaper was glued. This is convenient if there is a lot of glue left. The quality of fixing will not be much worse.
If you treat the wall with a primer before gluing, this will reduce the consumption of glue. The primer will improve the necessary adhesion.
When preparing for gluing, pay attention that the pattern is even and coincides with the next strip.
If we are talking about the bathroom and kitchen, here the border is glued mounting foam sealant or cement mixture.
To do this, do the following:
- Fill the gaps with sealant (mounting foam);
- Glue for ceramics should be prepared strictly following the instructions;
- Start pasting from the corner, press firmly and hold for 30 seconds;
- We leave small gaps between the parts (tiles), fill the gaps with grout every other day.
Grout the left cracks with grout only after complete drying.
When choosing a border, there are many things to consider. Every little detail in the repair is very important. The technology of gluing borders is simple, it is worth plunging into the matter with your head and then everything will work out!
Useful video
The range of modern finishing materials impresses the imagination.
But ordinary wallpaper still creates a special mood and a feeling of warmth in the room.
Properly selected, they can transform any interior, making it both cozy and presentable at the same time.
However, simply wallpapering a room is no longer relevant.
Their additional decoration is becoming a fashionable trend.
Different inserts, stickers or ornaments enliven the interior, make it original and interesting.
It is possible to embody all creative ideas with the help of an original finishing accessory - a wallpaper border.
Simple design tricks help visually change the geometry of the room: increase or decrease its height, add extra meters, delimit the space.
The simplest is the combination of wallpaper, different in color and pattern.
It is the curbs that play the role of a "border" either between them, or at the points of docking with other materials and structures.
But the separation of parts is not the only task that these elements cope with.
They themselves can adjust the visual dimensions of the room and give the interior completeness and integrity.
In addition, with their help, significant details are highlighted or errors made during the finishing process are hidden.
In fact, a border (frieze, edging) is a strip of small width with its own pattern, glued to the walls around the perimeter of the room.
Gallery


Frieze Characteristics
Usually, manufacturers make life easier for the average buyer and release wallpaper collections complete with friezes.
Layout examples are presented either in catalogs or on sample stands.
But they, as a rule, are quite stereotyped and are advisory in nature.
To create a truly unique interior, you can and should combine the canvas and edging yourself.
Unique combinations in this case will become a real decoration of the home and will exactly match the taste preferences of its inhabitants.
In order not to make a mistake in choosing a wallpaper frieze, you should know its main parameters and characteristics.
The size
 Curb tape is produced in rolls, the width of which is very different: from the minimum possible one and a half centimeters to one meter.
The most common are values from 3 - 4 to 30 - 40 cm.
The standard length is 5 - 10 meters, in rare cases it is also 12 m.
When buying, you should provide for a certain supply of material for pasting corners, joining a picture, or correcting errors in work.
Material
The main rule for the selection of wallpaper piping is strict compliance with the materials.
In other words, what the wallpaper is made of is the same as the border.
Therefore, today there are several varieties.
In addition to the usual paper and vinyl strips, there are tapes for textile, acrylic and even fiberglass.
They have all the characteristics inherent in wallpaper from a similar material.
Plastic slats are also used as edging.
They serve as limiters for wallpaper made of different materials.
AT classical style interior design, they are combined with a border, drawing additional attention to it.
There are also plaster and wood.
Drawing and color
Unlike selection by type of material, the search for edging by pattern and color is not limited to such strict limits.
Although certain well-established rules are still present.
Self-combination should be done in color and pattern.
The image on the border tape usually corresponds to the purpose of the room or a neutral option is selected.
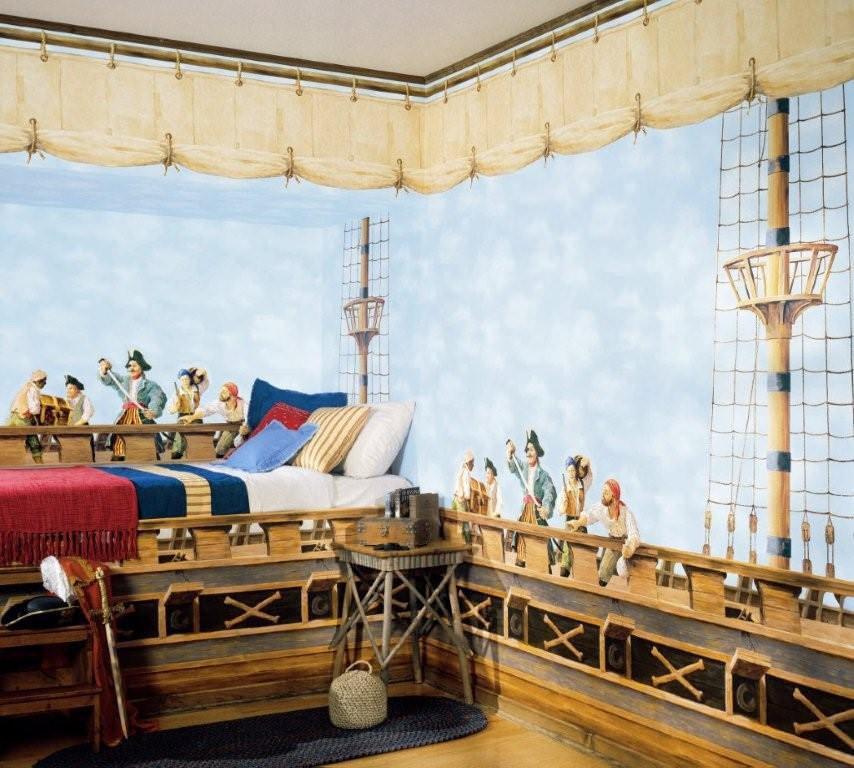
For example, in a children's room, these can be animated characters, heroes of fairy tales, adapted images of animals, plants or the world around them.
And for the kitchen, images of beautifully designed dishes, painted fruits and vegetables, dishes, kitchenware or excerpts from a cookbook.
In other rooms, you can use a floral ornament or visual abstraction.
Often the pattern on the wallpaper is repeated in some way on the edging.
They differ in size and concentration of the image.
Such combinations are chosen according to the contrasting principle: a large detail on the wallpaper - a small one on the tape.
In the second case, elements dispersed throughout the canvas are opposed to clustered counterparts on the border and vice versa.
The color selection rules are as follows:
- the use of shades of the same color;
- selection of harmoniously combined colors;
- combination of contrasting colors.
The most original today is the use of panoramic photos.
However, not in every interior such a border will be appropriate.
Concerning ready-made kits canvases with edging, their selection usually does not cause difficulties.
They are initially released in accordance with each other.
The manufacturer offers several combinations, and the buyer can only choose the most pleasant of them.
Location
There are many options for placing a curb tape today.
Each version has its own functional purpose, aesthetic component and semantic load.
For right choice It is worth exploring the main places and ways to use this decor:
- Horizontally, vertically, at an angle. The arrangement of the stripes in this way visually changes the space, which, as a rule, either expands or stretches upwards. Dividing the wall according to the “top-bottom” principle, zoning the room, masking the joints of the wallpaper - a correctly placed border perfectly copes with these tasks. However, not every frieze can be pasted in all of these ways. If the drawing has a strict orientation, then its location sideways or at an angle is unlikely to look beautiful.
- In the center of the wall, under the ceiling or near the floor surface. A very controversial point in the art of decorating is the choice of height for a horizontal ribbon. It is believed that the equality of the upper and lower parts of the wall "cuts off" its height, which is already small in standard houses. Indeed, a strip pasted in the lower third of the wall is able to visually “raise the ceiling”. However, design is not mathematics. Therefore, the “rule of inequality” can be deviated from. It happens that the height of the room is too high. Then the horizontal placement of the edge in the center can visually reduce it to an acceptable size. And in the case of pasting with more colorful wallpaper not the lower, but the upper part of the wall, it would be more appropriate to divide it in half. The application of the edging directly under the ceiling acts as a wide molding. This technique well emphasizes high ceilings, but mercilessly steals height from low ones. The compensation is the creation of a more comfortable environment and the "softening" of the interior. Additionally, such a technique, as well as edging the walls at the very bottom near floor plinth, is designed to hide the irregularities of the wallpaper cut or errors made during finishing.
- One or more rows. AT decorative purposes the border can be pasted in several lines. Tapes can have different widths and be located at different distances from each other. Horizontal or vertical, they can spice up even dull plain wallpapers and completely change the perception of a space.
- All around or on one side. Edging does not have to be strictly around the entire perimeter. Companion wallpaper or diagonal application may well limit the use of piping on only one wall. This design move is able to further individualize the room.
- In a straight line or pattern. Ordinary gluing of the border does not cause any particular difficulties, if you strictly follow the rules and instructions. A non-standard approach and the location of the edge in the form of any pattern requires more vocational training. Moreover, it is not always appropriate.
- Decoration detail. Very often, with the help of wallpaper piping, window and door openings are framed, and furniture is also decorated. And if you approach this creatively, you can get a very interesting and unusual result.
Texture
Borders are smooth or embossed.
But since this is still an element of decor, there are several variations of its execution.
They can be coated with a fluorescent compound to glow in the dark, they can have a holographic pattern or gilding.
The ribbon with lace looks especially elegant.
The final choice depends on the style in which the interior is made, and on compatibility with other types of finishes.
How to glue a border on wallpaper?
Wallpaper edging according to the method of fastening can be ordinary and self-adhesive.
 The first type is not much different from simple wallpapering.
The second one has protective film, which is removed immediately before application.
The border is glued either directly on the wallpaper, or joined with them (in case the canvas has a corrugated structure).
Before starting work, make sure that the wallpaper is completely dry and there are no defects on the surface.
Then the necessary markup is made and the selection of the pattern is carried out.
Glue is applied to the cut pieces.
If the tape is applied to the wallpaper, then the adhesive must be special.
When gluing end-to-end, you can also use an ordinary one, designed for of this type material.
On the wall, the strip is carefully smoothed out (from the center to the edges), the adhesive residues are carefully removed.
When using a self-adhesive edging, the protective film must be folded back gradually to avoid sticking of the material.
It is better to do this with an assistant, since such a border can be easily damaged, and it is almost impossible to re-glue it.
Thus, the wallpaper border is a fashionable, up-to-date and modern decor accessory.
Video about gluing borders on wallpaper:
Having, at first glance, a small size, it is able to radically transform the room and give it an absolutely finished look.
In contact with
Not very wide strips for decorating wallpaper are called borders. Often they serve as a border for combining different types of wallpaper on one wall, in particular, in a horizontal way. The border in this situation looks natural and concise.
Glue borders most often in the upper segment of the wall. This does not mean that only this option acceptable, but this is the typical case. Although, it would not be superfluous to consider the option with a border along the perimeter of the ceiling, or, which is also interesting, in the lower third of the wall.
Features of the location of the curb:
- At the top of the wall it plays the role of a decorative edging, which definitely makes the room cozier.
- Around the ceiling the border serves as a separator, zonator.
- Wall bordering near the floor - a way to hide the unsuccessful gluing of the walls, when you made a little mistake with the height of the wallpaper.

But the vertical use of borders is not uncommon. For example, if you need to visually divide the wall into two zones, this option is often chosen in the nursery. Doors, mirrors, etc. are bordered with a border, in a word, what you want to highlight.
Paper borders for wallpaper in the nursery: application specifics
A paper border is often used in a nursery. And this is a smart move.
The border in this case will help:
- Divide the room into a zone (work, play, neutral);
- Visually change the space, visually increase or expand it;

A definite mistake would be sticking a border in the middle of the wall. Not only does it not look very impressive, it cuts off a large part of the wall, visually, of course. But vertically gluing a border in the middle of the wall is not forbidden.
How to glue a border on wallpaper: instructions step by step
The pasting process is simple, your main task is the perfect evenness of the walls, where the border will be fixed.
Will you need building level and a slate pencil.
Proceed like this:
- Measure in several places the desired height from the floor (of course, the same everywhere);
- Put dots in these places, and connect the lines to each other;
- The place is determined, which means that half the work is done;
- Roll a small roll on the wall and right places cut;
- Lay the pieces with a pattern down, and apply special glue to the back of the border;
- You can fold the canvas with an accordion so that the side with glue is inside;
- Take the canvas left hand, straighten the first fold and attach it to the wall;
- Smoothing the border from the middle, move to the edges;
- Apply the canvas until it is completely glued to the wall.

Great, if you purchased self-adhesive borders, this will speed up the process. If you have a regular border, the question arises of what glue to fix it on. Paper borders are glued to the glue for the appropriate type of wallpaper, denser ones can be glued to liquid nails or Titanium glue.
Wallpaper border (video)
Do-it-yourself wallpaper border: we make the decor ourselves
If you decide to make a border for wallpaper with your own hands, the most the obvious way- cut a strip from another type of wallpaper. Of course, you need to cut carefully and strictly along the line marked in advance. Any unevenness will be noticeable.
But there are more creative options for making borders. If its length is short, you can build a border from children's photos. For a baby or teenager's room, this is a very original and touching option.
You need to make a strip of a certain width on which children's photos will be pasted. To make the border look aesthetically pleasing, already print the photos in decorative frames so that they do not just stick dully to each other.

DIY wallpaper border can be made from:
- Fragments of designer cardboard;
- Postcards;
- textile fragments;
- Self-adhesive film;
- Colored fluorescent paper.
And here the most daring ideas can be taken - the border can be laid out from the covers of old records, magazines, posters.
Wallpaper with a border in the interior: important points
There are a few more useful tips which may come in handy before you get started.
Note Tips:
- You should not stick a border on a wallpaper that has just been glued, be patient for a couple of days in order to avoid unexpected troubles;
- Special glue dries quickly, so glue the border in stages;
- When cutting, make the pieces a little longer so that the pattern can be compared.

The border serves as a stylish addition to the interior. It seems to be a small detail, and the room becomes more elegant.
The delimiter border eliminates the need to use furniture as a zoner. One glued strip visually divides the room into zones, and it usually looks convincing.
It is important not to miscalculate in the palette. Do not confuse cold and warm colors, such a substitution will literally cut the eye.
The specifics of gluing a border for wallpaper (video)
The border is not a new solution, sophisticated, interesting, classic. modern standard apartments often lacks the conciseness, rigor, sophistication that the border brings to the interior.
Happy interior design!
Border for wallpaper in the interior (photo)


Wallpaper border (or frieze, edging, edging, border tape) is made of various materials a strip of small width, which is glued on top of the wallpaper or in places where they are paired with other materials. Choosing the right edging is not so difficult. This article describes in detail what you need to consider and what nuances you should pay attention to before buying a wallpaper border.

Stylish wallpaper borders
Options for combining wallpaper and decorative borders
Often when buying wallpaper in addition to the main finishing material it is proposed to purchase such a decorative element as borders. This product allows you to complement the appearance of the room, highlight significant design details, adjust the visual size of the interior space, hide finishing errors, set boundaries at the joints with other materials.

Border tape allows you to give the room a sophisticated look.
Almost any specialized wallpaper store has border tape catalogs. The buyer can choose it independently from the offered assortment. However, many manufacturers greatly simplify the selection task by providing one or more border options with the wallpaper model.
As a rule, the manufacturer offers two combination options: by color or by pattern. For example, green wallpaper in light colors with floral ornament go well with a white or dark green border with or without the same pattern. In the case of a monochromatic coating, you should opt for a frieze of a similar shade with some kind of print. Such an addition will enrich the design of the room and make it more refined and attractive.

It is important to choose a border that will be in harmony with the wallpaper.
Helpful advice! In one collection, you can find wallpaper and border tape with different patterns. This combination may not look very good in small room, too oversaturating the appearance of the walls and drawing too much attention to them.
Another option from manufacturers are wallpapers and borders with the same image. For example, the first ones are decorated with large geometric shapes, and the edging is identical in color and shape, but smaller. It should also be taken into account that the wall covering should be combined not only with the frieze, but also with other design elements.

Border and wallpaper with the same image
With regard to choice colors it must be said separately that a very colorful ribbon is appropriate only in rooms where the emphasis is on the walls. At the same time, even lockers and other furniture items are not planned to be hung. However, there is one type of room where the use of bright colors is justified - a nursery.
When a child reaches a conscious age, caring parents often want to paste over his room with wallpaper of the theme that is interesting to him in this moment. This is the main mistake, since the hobbies of a young child usually change very quickly. It is much more expedient to choose a curb tape “by interests”. Replacing it will be much easier, cheaper and faster than completely re-gluing the entire covering in the nursery.

Themed children's room with bright border
The walls themselves are executed in a neutral positive color. It is worth remembering that too bright and defiant room can cause anxiety in children.
The choice of material for the execution of the border tape for wallpaper
There are several options for making a decorative frieze.
Paper border for wallpaper. This option is subject to ultraviolet rays, pigment burnout, as well as mechanical damage during cleaning. Such framing in repairs can be used if relatively frequent changes in the interior of the room are foreseen. The main advantage is the ease of pasting and removal. All this is worth taking into account before buying a paper border for wallpaper.

Decorating a child's room in soft colors
Vinyl frame. It is more practical, durable, strong, less prone to fading, easy to clean with wet cleaning. Vinyl tape is well suited for hallways, kitchens, bathrooms and other high-pollution areas.
Acrylic piping. Includes all the benefits of vinyl, but has more low cost due to the use of acrylic emulsion in it.
Textile edge. It has a two-layer structure of paper and fabric, resulting in a high density and strength of the coating.

There are many bright subspecies of paper borders.
How to place a wallpaper border on the wall
It should be noted right away that the edging is never glued in the center of the wall. Otherwise, visually the room becomes lower. The ideal location is 1/3 of the height from the floor. In this case, the strip becomes the boundary between the wallpaper. different kind. One of the classic examples of combination is " striped wallpaper- edging - patterned wallpaper. The choice can also be made in favor of plain wallpaper, while the lighter ones are glued at the top, and the dark ones at the bottom.
The framing arrangement described above is especially relevant when pasting the kitchen. Practicality is the main factor here. Often more expensive coverage is glued to the top of the wall, and special washable wallpaper and vinyl or acrylic edging cover the work area.

Border with vinyl flowers
The most common location for a decorative border for wallpaper is under the ceiling. However, it partially replaces ceiling plinth. It must be taken into account that it is recommended to choose frieze pasting at the very top of the wall only for large spacious rooms. This emphasizes the beauty of the ceiling, makes the room more comfortable and cozy, corrects its visual dimensions.
Helpful advice! Wallpaper edging can be pasted vertically. This allows you to visually highlight a specific section of the wall or functional area. You can edging doorways, mirrors, furniture, etc.
Very rarely, the border tape for wallpaper is located at the bottom near the floor. This technique can be used if a mistake was made when measuring the height of the wall and the wallpaper turned out to be a bit short after cutting. There are also cases where low-quality material shrinks when it dries.

Border tape visually dividing the wall into two parts
Also, the tape is glued to the ceiling and, like a mirror image, immediately below it on the walls. This arrangement visually adjusts the size of the room and its appearance.
When pasting wallpaper absorb moisture and become more susceptible to mechanical stress and pollution. Therefore, you should let them dry well and only after that proceed with applying the edging for the wallpaper. The drier the surface, the better the adhesion of the two materials after application.

Combination of vertical and horizontal borders
Adhesive for borders polymerizes (dries) rather quickly. Therefore, in the absence of much experience, the pasting process should be divided into stages. This avoids situations when the smeared edging has dried up and become unusable. It is also worth making sure in advance that all necessary tools.
Some wallpaper has a pattern with horizontal guides that you need to navigate. The lack of parallel between the frame and the main wall pattern can be very noticeable and negatively affect the visual perception of the design.

The location of the curb should be determined in advance.
When cutting, the pieces need to be made a little longer, which will allow you to compare the images. This is true for borders with a pattern.
It is necessary to carefully check the surface of the walls on which it is planned to place the tape. Any irregularities will sooner or later appear due to thin material execution. It is necessary to cover up all the bumps, cracks, remove the remnants of paint or glue.

Stylish border allows you to divide the room into zones
When using self-adhesive wallpaper edging, you should not rely entirely on its quality. Over time, it may begin to fall off. Therefore, it is much more expedient to additionally lubricate the surface with glue when placing than to solve the problems that have arisen in the future.
Sometimes the wallpaper border is glued end-to-end with the main coating. This is true for varieties with a developed or high relief (two-layer wallpaper with embossed or with an additional layer of foamed vinyl). In this case, ordinary wallpaper glue is used.

The border in the bathroom should be fixed with waterproof glue
Necessary tools for applying a border on the wall
To glue the frieze, you will need the following tools.
Level. It is very important to strictly follow horizontal arrangement edging, which allows you to perfectly combine the border around the entire perimeter of the room and not spoil the appearance of the interior.
Smoothing roller. Serves to expel bubbles and excess glue. This tool can be replaced with a plastic spatula or a soft sponge. However, the roller has an advantage: the likelihood of displacement when smoothing the wallpaper border tape is minimal.

The border tape on a plain wall stands out much brighter than in the picture.
Circumcision knife . It is recommended to use a clerical knife and a ruler, which allows you to more accurately cut the tape along the marked lines. It will also be needed when combining patterns and cutting off excess.
Brush. The surface on which the frieze is glued must be as clean as possible. A soft brush will help get rid of dust immediately before pasting.

The border will look good at any height from the floor.
Sponge or absorbent cloth . It is needed to remove excess glue from the wall. The fabric should not be fluffy. It is best to use natural white linen or cotton fabric so that the cloth dye does not smear the coating when wet.
glue roller. Can be replaced with normal paint brush. However, it should be noted that when pasting the pile can cause a lot of inconvenience and slow down the work. If one person is pasting, it will be quite difficult for him to simultaneously hold the plastered frieze and at the same time get rid of adhering debris.

When gluing the border on various textures, do not spare the adhesive
Wallpaper glue. When choosing an adhesive, it makes sense to additionally consult with the seller at the time of purchase, indicating the material of the frieze and on which surface it should be applied.
Stepladder or table. If you plan to place the curb on the walls in the upper part, then you will need a stepladder or a sturdy table that can support the weight of a person. It is necessary to remove in advance all objects that interfere with movement along the perimeter of the room. This will also reduce the chance of further injury from falling from a height.
Desktop. Necessary for placing the tape when spreading. The work surface must be thoroughly cleaned of dirt and can be covered with plastic wrap to avoid any contamination during operation.
The process of gluing a decorative border for wallpaper
Before proceeding with the main operations, once again make sure that all the necessary tools and materials are available. Remove all unnecessary items from the room or protect them from accidental contamination, conveniently position the work surface.

The border can decorate any room
Glue preparation. It is highly recommended that you read the manufacturer's instructions carefully, as some adhesive mixtures bred unconventionally. According to general rules, the dry mixture is placed in a container with water and slowly mixed. The subsequent infusion process takes approximately 20 minutes. After this time, the glue is re-mixed until a homogeneous mass without lumps is obtained.
In the case of using an adhesive mixed with an acrylic mass, mixing with water is not required. Such material can be used immediately. It should be noted that thanks to the acrylic base, an ideal adhesion to the surface is ensured.

cute one option border for nursery
Note! Improper preparation of the adhesive will subsequently affect decorative features wallpaper borders. Therefore, it is worth taking this step responsibly. Otherwise, the tape will have to be re-glued.
markup. In order for the edging to be glued evenly, you need to mark in advance with a simple pencil the location of its location. This will greatly speed up and simplify the subsequent work and make its result ideal. For marking, a level and a long ruler (or other straight guide for drawing) are used. The greater the distance between two points when drawing lines, the less likely the deviations.

Designers often use a border for zoning a room.
An interesting approach that greatly speeds up the process of drawing lines is the use of a guide line. In this case, you can mark out an arbitrarily long wall in one step. However, for such work, at least three people are needed: two for maintaining the guide and one for drafting.
Tape cutting. This step is very simple, but requires special care. After the surface is marked, measurements are taken and pieces of wallpaper border tape are cut. If the length is chosen with a small margin, the process of combining joints can be greatly simplified. Excess can be neatly trimmed immediately after being placed on the wall.

You can decorate the border with decorative elements yourself
Glue application. Glue is applied to the curb tape with a brush or roller. The greased edging is left for 5-10 minutes. This time can be used to once again go over the surface of the wall with a brush and remove settled dust.
Applying the edging. The wallpaper border is neatly placed on the wall according to the pre-made markings. When gluing in corners, the end of the tape must grip the adjacent wall. The next strip is glued with an overlap, the allowance is 5-10 mm. This avoids gaps. Do not make sudden movements and strong bends. Otherwise, the border may break.

Border and two types of wallpaper from one collection
After application, using a special roller (or a clean cloth), air bubbles and excess glue are expelled from under the material. Next, excess glue is carefully removed with a cloth or sponge. After the entire perimeter of the room has been processed, the curb glued to the wall should dry well. Drying time depends on the selected adhesive, but often up to 24 hours.
Border for wallpaper around the perimeter of openings
Selection of door or window openings decorative tape will be a spectacular decoration and addition to the overall design of the room. The main difficulty here is that the pieces of tape must be connected at an angle of 45 degrees.

An example of a border for a stylized office
To get a perfect seam, you need to place vertical and horizontal strips overlapping, one on top of the other. Immediately after that, attach a ruler along the line of the future joint (diagonally) and draw with a sharp knife, cutting both layers. Next, fold the edges and remove the trim. After that, return the parts of the joint to their original position and carefully smooth out, while removing excess glue.
Choosing and applying a border to a wall is a simple task that even the first time can do it. However, it is worth remembering that what in theory seems new, original idea- in practice, it can give far from the expected result. Therefore, it makes sense, if not to be guided, then at least to take into account the well-known rules and recommendations of specialists.
We also recommend
 Hero pioneers in the Great Patriotic War Heroes of the Patriotic War pioneers presentation
 Presentation "Formation of posture in preschool children Hygiene of correct posture presentation for children
 Sciences of the human body
 Presentation "history and prospects for the development of robotics"
 The value of the struggle of Russia with the Polovtsy
 Asia and Africa after World War II