Vine. Growing experience
Seeing full-weight bunches hanging on luxurious green grape bushes, almost every gardener wants not only to enjoy the amazing taste of the berry, but also to grow this miracle himself. This is quite within the power of even an inexperienced grower.
The garden grape bush is a branched liana, in which the lignified, but flexible, stems stretch towards the sun.
These multi-meter branches in the spring give young shoots, called vines, on which brushes of amber, ruby and black berries soaked in the sun are formed. It is noteworthy that it is the young shoots that bear fruit.
Over the summer, their growth is about 3 meters, so the formation of a bush is an urgent task for a gardener.
With a competent approach to this operation and good care already a three-year bush gives a full harvest.
The pruning technology involves leaving no more than 5 buds on the lateral branches on the bush in the fall, and in the spring only the lower and upper young shoots should be kept on them. All the rest are removed, otherwise the bush will thicken, and the berries will be small and inconspicuous.
 Grapes are not particularly picky about growing soil, and vineyards are planted even in wetlands, excluding only saline ones for use.
It is important to choose the right place when breaking down, because a rich harvest is harvested from the sunny southern and southeastern slopes.
Low-lying places should be avoided, as there is a high probability of fogs and cold air masses.
All you need for the vine:
- good ventilation between the rows of grape bushes;
- maximum illumination;
- good soil heating.
In the vine, like all representatives flora, there is a rhythm of watering. It directly depends on soil moisture and the amount of precipitation.
As a rule, sandy soil assumes its frequency of 7-10 days, and clay and black soil - about 14 days.
Along with irrigation, it is advisable to carry out fertilizing with nitrogenous, phosphorus-potassium fertilizers, they are applied three times during the summer.
Mineral fertilizers are necessary for the development and fruiting of plants, but the soil also requires care: structuring and restoring the biocenosis.
The introduction of organic matter can help with this: humus, bird droppings, peat or compost.
Organics of animal origin, such as manure, are introduced only in a rotted state.
 Mandatory in the care of the vine and general procedures: careful weeding, systematic loosening and timely treatment with agents to combat diseases and pests.
It is important to get the expected harvest in time to carry out a fragment of unnecessary shoots, because only those two that were left in the spring should develop on the bush.
This is done when the shoots reach a length of 2-3 cm. By autumn, the stem has young fruit-bearing shoots about 7 mm thick. Pruning at this time of the year performs two functions: a further stage in the design of the bush and preparing it for wintering.
The absence of a trunk in a vineyard vine - a rigid skeleton of plants - makes necessary use artificially created frames or arrangement of trellises of various options.
When using the second option, the spring garter leads to a strong bending of the vine in the area of the first bud to form a powerful shoot in this place - arrows. He will become next year fruiting vine.
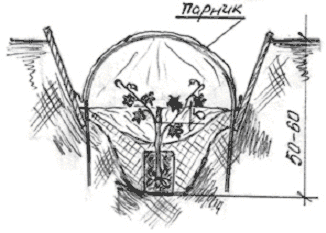
Grapevine wintering rules
Usually at the end of October in areas where winter brings snow and frost, work begins to prepare the grapes for this harsh period. Having abundantly watered the soil under the bush, it is covered with sawdust, needles, and some gardeners use the earth for this.
The use of such natural warming agents requires additional waterproofing. But here the danger from rodents is real, we must remember this. The vines of more tender grape varieties are tied in bunches, laid in grooves and only then insulated.
They also scrupulously carry out work on opening the grapes after the end of the winter period. First, the heaters are removed, bunches of vines are lifted from the ground and from the trenches, after which they are shaken off. Then they are hung on a trellis and dried, while carrying out preventive treatment of the land and the vines themselves.
It is better to open the grapes in the evening or in cloudy weather to prevent overheating and drying out. And the most important thing in this process is to prevent damage to swollen buds and young shoots by spring frosts.
Lesson 1 - The structure of a grape bush
Under natural conditions, a grape bush is a perennial liana with several climbing trees or rocks, and sometimes creeping along the ground and reaching for sunlight, flexible, multi-meter lignified stems, at the ends of which young green shoots-vines develop annually, bearing bunches of grapes. . A feature of grapes is that only green shoots that develop from last year's buds bear fruit on it, i.e. annual vines.
The grape bush (Fig. 1) consists of two systems: underground and aboveground. In the underground part of the grape bush there is an underground stem with a root system and a bush head - a thickening, which is the beginning of the above-ground part of the bush.
Rice. 1. Scheme of the formation of a grape bush
An underground trunk is the cutting from which the grape bush was grown. Roots developed in its lower part and along the lateral surface, and shoots grew from the upper eyes, from which the aerial part of the bush is formed within 3-4 years.
These shoots become the basis of the bush and are called sleeves. The trunk and sleeves after the first year of life develop only in thickness.
Roots according to the height of the bole differ into calcaneal (main), median (lateral) and dew (upper), and according to the degree of development - old (skeletal) and young (fouling) roots. Skeletal roots are hard, covered with cork, serve as conductors of water with minerals dissolved in it, accumulate and store reserves nutrients. Young fibrous roots suck out water and minerals from the soil, they synthesize organic substances - nutrition for the grape bush. Each young root has a growth cone at the end, where new cells are formed, i.e. development of the root system. With age, part of the skeletal roots dies off. The remaining six or seven continue to develop, forming the roots of subsequent orders: the third, fourth, etc.
The roots of grapes do not have a dormant period, like the aerial part and stem in winter period, and under favorable temperature conditions (+ 9 degrees and above) are able to develop all year round. But the strongest growth, of course, falls on the spring - summer and autumn period. The root system of grapes is usually located at a depth of 0.6 - 1.5 meters. In structural, well-drained soils, roots can go down to 2-3 meters or more. The radius of the roots is 3-4 meters or more.
The roots of Euro-Asian grape varieties can withstand temperatures up to -5, -70 C, and Amur and some American varieties up to -9 ... -120 C.
Above-ground stem - a vertical stem, a continuation of the underground stem. In the northern (Siberian) sheltering viticulture, an above-ground stem is not allowed, it is not formed.
To ensure protection and shelter of grapes from frost, a head is formed in the upper part of the underground stem - thickened top part underground trunk, which leaves 2-4 or more perennial vines. The head is much thicker than the underground bole. is the basis of developing vines (sleeves). In order to properly form a vine bush, to correctly carry out pruning and other operations that ensure development and productivity, you need to know the above-ground organs of the grape, their name and the purpose of each of them.
Sleeves (shoulders) - perennial vines, more than 35 cm long, extending from the head of the bush. Depending on the shape of the bush being created: fan, cordon, bowl, etc., or depending on the design of the supports: one-plane trellis, two-plane trellis, gazebo, the number of sleeves in the bush can be different - from one sleeve to six or more.
Horns - shortened sleeves (shorter than 35 cm).
All green growth of the current year is called annual shoots, and after maturation, from autumn to spring of next year, annual vines

Rice. 2. Organs of a grape shoot.
1 - main shoot, 2 - stepson, 3 - stepson of the second order, 40 - double shoot, 5 - buds, 6 - corner bud, 7 - inflorescence, 8 - leaves, 9 - tendril, 10 - year old vine
Stepchildren are young shoots developing from the axils of the leaves of the main shoots (Fig. 3). If you pinch the top of the stepchild, stepchildren of the second order develop from the axils of its leaves, on which, in turn, stepchildren of the third order can appear.
The annual vine is a ripened shoot of the last year, from the grasses of which new green shoots with clusters (fruit shoots) develop in the current season. If there are no clusters on the green shoot, such an shoot is called barren.
A fruiting vine is considered to be a fruit arrow on which shoots of the current year (annual shoots) developed and bore fruit. Usually, fruiting vines, together with annual shoots on them, are removed during pruning in the fall. But any one-year-old shoot that has matured on the arrow is ready to bear fruit next year. From such shoots, new fruit arrows can be formed. One-year-old shoot, the thickness of which at the 8th internode is more than 10 mm. considered "fatty".
The grape shoot consists of nodes (thickenings) and internodes. The center of the shoot in the internodes is occupied by the core. On the node are located: a leaf with an eye hibernating in its axil, a stepson can develop in the axil of the leaf, and on the opposite side of the node a tendril or inflorescence. Sometimes an extra-axillary shoot can develop in place of the antennae.
At the node where the tendril or inflorescence develops, there is a full diaphragm separating the internode. Where there is no tendril or inflorescence on the node, the diaphragm is incomplete (underdeveloped). A full diaphragm is a "pantry" of nutrients.
The crown is the top of a growing shoot.
Growth point - the apical part of the shoot. During the period of active growth, the apical part is strongly curved (nutation); when growth is attenuated, the apex straightens somewhat. This happens in late August - early September.
The leaf consists of a carved plate and a long petiole. The shape, size, irregularity of the leaves are varied and are a varietal sign of grapes. Leaves perform the most important function in the life of grapes - photosynthesis, i.e. the production of organic nutrients (starch, sugars, amino acids, etc.) Leaves absorb carbon dioxide from the atmosphere and release oxygen. Leaves not only assimilate and breathe, but also evaporate excess moisture from the roots. During the day, grape leaves from an area of 1m2 evaporate up to 1.5 liters of water.
The kidney is the germ of the future shoot. The buds are united in the eyes, which form in the axil of each leaf on a green shoot.
The wintering eye is a complex organ in which several buds are combined, densely covered with hairs and scales. There are kidneys: central (main), replacing (reserve) and stepson (summer). If for some reason the main kidney is damaged, then replacement kidneys develop. One eye can have from two to six replacement buds. There is only one stepson bud in the ocellus and it develops in the ocellus before the others. If the main and replacement buds develop after overwintering, then the stepson bud is formed into a shoot on a vegetative green shoot in the current season.

Rice. 3 Grape Escape
1- node, 2- internode, 3- eye, 4- leaf petiole, 5- stepson, 6- diaphragm is complete, 7- diaphragm is not complete, 8- core, 9- antennae.
Corner buds - the first 2-3 eyes at the base of each shoot. They are poorly developed and often infertile.
Sleeping buds are buds that have not developed and remain in the nodes of a perennial vine, on the head of a bush and in an underground stem. These buds are very viable and carry the functions of restoring and rejuvenating the grape bush. Shoots developing from dormant buds on the head and sleeves are called top shoots, and those developing from an underground stem are called coppice shoots.
Extra-axillary shoots are called shoots formed on nodes instead of antennae. These shoots are able to bear fruit in some varieties, developing inflorescences at the first node.
Twins, tees - shoots that develop from replacement buds along with the main central shoot. All of them can be fruitful, but inflorescences on shoots from replacement buds are weaker. Sometimes up to six shoots (panicle) develop simultaneously from one eye. In such cases, one or two of the strongest are left, the rest are broken out.
The tendril is an organ for the natural fastening of the shoot on solid supports (under natural conditions, these are trees, rocks, etc.). Antennae are formed on the nodes on the opposite side of the leaf; either a tendril, or an inflorescence, or an extra-axillary shoot can develop here. The tendril can also develop on the crest of the inflorescence, thus securing the bunch on a solid support. The first tendril grows on Euro-Asian varieties from the 4th - 5th node. Along the length of the shoot, the antennae are arranged in pairs: two nodes with antennae, one without. And only in isabelle varieties have antennae on the shoots at each node. With the artificial fixation of vines, the tendrils lose their significance, and since. for their development, they take away nutrients, it is desirable to cut out part of the antennae.
Lesson 2 - Vegetative reproduction grapes
PREPARATION AND STORAGE OF CUTTINGS
Planting material - cuttings or seedlings should be purchased from nurseries or from experienced growers who guarantee varietal compliance of the material and the absence of dangerous diseases!
Do not purchase seedlings from regions infected with phylloxera!
Any planting material must be disinfected, both at the harvest site and before planting!
Grapes, as a perennial plant, annually undergo a small annual cycle of development, consisting of a dormant period and a vegetative period.
The dormant period begins after leaf fall and ends in spring with climate warming. During the period of winter dormancy in the plant, the physiological processes that support life fade and proceed very weakly. Kidneys at rest do not germinate even under favorable temperature conditions. This is the so-called physiological rest.
From the second half of January, the plant goes into a state of forced dormancy. In this state, a quick awakening of vital activity is possible under favorable temperature conditions (t = + 100 s or more). This period is used for winter grafting and accelerated cultivation of own-rooted and grafted grape seedlings.
For winter cultivation of grape seedlings, cuttings of a mature annual vine are used. For propagation, cuttings are selected with the most typical varietal qualities of uterine bushes with a high yield.
The most suitable for cuttings are shoots developed on the vine of the previous year from the central buds. The stalk is part of a mature shoot. Cuttings can be of any size, even single-eyed. Rational, convenient for rooting, can be considered 2 x and 3 x eye cuttings. The most viable are cuttings harvested in the fall after the completion of the growing season. For cuttings, mature shoots with a diameter of 7-10 mm are selected. Thinner cuttings take root worse. But some varieties have thin vines, such varieties will have thinner cuttings.
When cutting cuttings, the vine is cleaned of antennae and stepchildren. The lower cut is made at an angle to the axis 3-4 cm below the node on which the tendril or bunch was. Recall the previous lesson - "At the node where the tendril or inflorescence develops, there is a full diaphragm separating the internodes. The full diaphragm is a "storehouse of nutrients." This means that the nutrition of the first young roots at the initial stage of development will be provided by this pantry. The upper cut is made perpendicular axis 4-5 cm above the node.Then the cuttings are collected in a bundle, aligned along the lower ends and tied in 2 places.A label with the name of the variety is attached to each bundle.Before laying the cuttings for winter storage, it is advisable to soak them in water for a day, after what to spray or immerse for a few seconds in a 3% solution iron sulphate. These are preventive measures that protect the cuttings from drying out and mold formation during storage.
Cuttings are normally preserved in plastic bags in a ventilated basement, at a temperature of 0 - + 6 0C. You can fill the cuttings with wet clean sand. To do this, a hole is dug 0.5 m deep. Bundles of cuttings are laid horizontally in it, which are then poured with moderately moist sand. A wooden control cover is laid on the powdered cuttings and everything is covered with sand to the top. When digging cuttings, sand is thrown with a shovel to the control cover. After removing the lid, so as not to damage the kidneys, the cuttings are dug out by hand. It is very convenient to store a small amount of cuttings in two 1.5 liter plastic bottles with cut bottoms. After laying the cuttings in one of the bottles with the second bottle with a cut bottom and 2 longitudinal cuts, the package with the cuttings is securely closed.

Rice. 4. Packing cuttings for winter storage
This method of storage is convenient because the cuttings do not need to be tied. It is very convenient with this method to ventilate the cuttings. To do this, just open the plugs. And airing the cuttings 2-3 times during storage is necessary in any way.
Preparation of cuttings for winter rooting begins at the end of February. The cuttings are taken out of storage, cleaned of sand, then washed in a solution of potassium permanganate from possible mold, after which they begin to check their condition in appearance.
The condition of the wood is determined by the updated cross section. It should be bright green, with pressure on the handle near the cut of wood, slight traces of moisture should stand out.
Having made a longitudinal section of the lower eye, we will check the condition of the kidneys. Living buds in the eye have the same bright green color. Dark dots or spots on the cut of the eye indicate kidney damage. Cuttings with dark spots, blackened or browned bark and wood, with damaged buds are discarded.
The optimum moisture content of the vine is 51-52%. During storage, some of the moisture may evaporate, so restoring the moisture in the cuttings to the optimum is a must. For the lock, it is better to use soft rain water (melted snow).
The soaking time can be, depending on the condition of the cuttings, from one to three days.
WINTER ROOTING OF WOODEN CUTTINGS.
Before rooting, each cutting must be labeled with the name of the variety. The lower sections of the cuttings must be updated directly under the nodes. Once again, remember that the lower node of the handle must be with a full diaphragm. The cut can be any: - straight, perpendicular to the axis; oblique - one-sided; bilateral (Fig. 5).

Rice. 5. a - a three-glazed cutting prepared for rooting, c - a straight cut under the knot, a bevel cut, d - a two-sided cut
It is believed that oblique cuts increase the area of callus formation - the plant tissue from which roots develop.
It is important that the cuts are smooth, without crushing the wood, i.e. you need to do them with a very sharp knife. On the lower part of the cutting, from opposite sides along the bark, grooves can be scratched with a knife, which will also become a place for the formation of roots. The lower kidney may not be removed, but when it is removed, we once again control the condition of the cutting. The upper sections of the cuttings are not updated. They are perpendicular to the axis of the cuttings and 4-5 cm above the top node. The top cut should be protected from fungal putrefactive bacteria by dipping for a second in a molten mixture of paraffin and wax (2:1).
The most common and acceptable method of rooting cuttings is sprouting in cups. Prepared cuttings are kept during the day in an aqueous solution of heteroauxin (0.5 tablets per 5 liters of water) or honey (1 tablespoon per 10 liters of water). The cuttings are installed with their lower ends in the solution, the upper part with the eyes remains above the solution. Dishes with cuttings are covered with a plastic bag and installed at a heat source (oven, battery). Then the cuttings are planted in cups (Fig. 6) with a fertile mixture consisting of one part of humus, one part of peat, two parts of soddy soil and one part of coarse sand. Such soil with granular fertilizers is now sold in all stores selling seeds. Cups are easy to make from plastic 1.5 liter bottles. Cut off the top of the bottle, leaving the bottom about 20 cm high. Don't forget to make some drainage holes in the bottom of the cup. The upper part of the bottle will serve as a cap-lid for your cup and will provide a microclimate for the rooting period of the cutting.

Rice. 6
The earth in the cup should be moist enough so that a hole with a diameter of approximately 20 mm can be formed in it in the center of the cup almost to the entire depth. A "pillow" of coarse-grained sand is poured into this hole, then a cutting is installed and the hole is filled to the top with sand. The sand protects the cutting from harmful bacteria.
The main danger when rooting cuttings is the awakening of the kidneys and the development of green shoots before the roots appear; after all, the shoots are genetically incorporated in the buds, and there are no roots, even signs of roots on the cutting. But if the soil in the cup is heated from below, and the buds are kept cold, in a month or a little more, seedlings are obtained with a good root system and buds that are just waking up. How to create such conditions? Best on the window. Indeed, at home, we usually grow seedlings on the windows.
We install cups with cuttings on a metal or plastic pallet. We fix the pallet on the radiator under the window. We need to provide a temperature difference: in the area of root formation, i.e. at the bottom of the cup + 25 - +300 s and + 10- + 15 deg. C in the kidney area. Heat will flow to the cups from the bottom of the battery.

Rice. 7
And in order to create a low temperature for the kidneys, we open the inner frame of the window and isolate the cuttings from the influence of the warm air of the room with a polyethylene screen fixed in the window opening. If the cooling of the cuttings is not enough, periodically open the window and supply cold air from the street. If warm (+25-30 0 s) water is periodically poured into the pan, we will ensure that the cuttings are fed from below, through the drainage holes, and, in this case, watering from above is optional. As soon as white roots begin to be visible through the transparent walls of the cups, cooling of the cuttings can be stopped.
From the moment the shoots from the buds develop, open the caps on the lids, and with the start of active growth of the shoots, begin to harden the young seedlings. In the absence of direct sunlight, remove the lids from the cups and gradually increase the time the seedlings stay outside the greenhouse conditions.
In the ground, on permanent place seedlings are planted in the spring, when the earth warms up to a temperature of + 100C. The advantage of growing seedlings in winter is that due to the early start of rooting, the growing season of a young grape bush increases by more than three months and the seedling has time to prepare well for winter.
Lesson 3 - Rooting lignified cuttings in the open field
For a grape school, a sunny, wind-protected land plot with fertile, structural, light soil is selected. It can be light loamy, sandy or chernozem soil. The plot for school is prepared at the end of summer or autumn. In preparation for each square meter, the following is applied: humus - 15-20 kg, superphosphate -100 g, potassium sulfate -50 - 70 g. The applied fertilizers are dug up.
Cuttings can be planted in a shkolka in the fall, immediately after harvesting, or in the spring, when the earth warms up at a depth of 25-30 cm to + 100 s. 3 eye cuttings are used. Before planting, the cuttings are kept for a day in a warm (+30 - +40 0c) stimulant solution: a solution of heteroauxin (0.5 tablets per 5 liters of water) or flower honey (1 tablespoon per 10 liters of water). The cuttings are planted in grooves with a slope of 450 to the north, to a depth that ensures the location of the upper eye at ground level. (Fig. 8).

Rice. eight.
The distance between the cuttings in a row is 10-12 cm, the distance between the rows is 30 cm. The grooves are watered abundantly before planting the cuttings. warm water and the cuttings must be installed in moist soil. After planting the cuttings, the grooves are covered with soil and again filled with warm water, and after it has been absorbed, the ends of the cuttings protruding above the ground are rolled up with a roller 4-5 cm high. .
After the buds open and shoots appear above the ground, a cross-shaped hole is cut in the film above each cutting for the exit and further growth of the shoot.
During the period of rooting and development of seedlings in shkolka, frequent watering is necessary. The highest soil moisture of 90-85% of the MPC (maximum useful moisture capacity) should be until the end of June, somewhat less than 85-75% in July, and watering is gradually reduced in August-September up to 65% soil moisture.
To accelerate the development and maturation of seedlings, their foliar top dressing is carried out. In June-early July - the first foliar top dressing (30 g. ammonium nitrate, 200 g, superphosphate, 100 g of potassium sulfate per 10 liters. water). Superphosphate during the day is dissolved in 3 liters. water with frequent stirring. In 2 liters of water dissolve 30 g of ammonium nitrate, 100 g of potassium sulfate and 10 g of boric acid. After a day, the superphosphate solution is drained from the sediment, both solutions are mixed and the total volume is adjusted to 10 liters. adding water. When spraying, the solution should be applied to the lower and upper surfaces of the leaves. Spraying is carried out in cloudy weather or in the evening, before sunset. Under these conditions, the solution evaporates more slowly, remains on the leaves longer and is more fully absorbed by them. It is very useful to spray again with water after a day or two in order to dissolve the remnants of nutrients remaining on the leaves and, thus, allow the plant to fully assimilate them.
In the second half of July - early August, a second top dressing should be carried out (200 g of superphosphate and 100 g of potassium sulfate per 10 liters of water). Preparation and application of the solution is similar to the first feeding.
Only two shoots should be left on each seedling, breaking off doubles and tees. If one shoot develops on the seedling, to create the second, the existing shoot must be pinched at the point of growth after the 5-6th leaf. After 10-15 days, stepchildren will begin to develop on the shoot. Of the formed stepchildren, one lower one is left, all the rest are pinched on a stump.
At the end of August, chasing is carried out - the removal of the upper part of the shoots to a normally developed top sheet. Chasing is carried out in order to stop growth and accelerate the ripening of shoots.
Seedlings should not be left to overwinter. The digging of seedlings is carried out before the onset of the first autumn frosts. 3-4 days before digging, the school is watered to the full depth of the roots. The seedlings dug out of the shkolka are tied into bundles, labels are hung on them indicating the variety, and, having dipped the roots in a clay mash, they are placed in plastic bags and stored in the cellar at t \u003d 0 - + 60 s.
When planting cuttings in the autumn, it is necessary to protect them from winter frosts by covering them with earth with a layer of 25-30 cm. Growing seedlings in the same place for more than two years is not recommended, because. the soil is tired of monoculture, there is a danger of poor development of seedlings and the appearance of diseases.
Growing seedlings from green cuttings.
In summer, the propagation of grapes is carried out by green cuttings. This and the only reliable way propagation for varieties such as "Violet early", "Festival", etc., hard-rooted lignified cuttings.
Two-eyed cuttings with a leaf at the second eye are cut before flowering from any green shoots, except for coppice, from the 3rd to the 7th node. Best of all, cuttings from shoots of fruit arrows and replacement knots take root. Cuttings are harvested early in the morning or in cloudy weather and immediately placed in water with a potassium permanganate crystal or in a solution of a heteroauxin stimulant or flower honey. If the cuttings are kept in a stimulant solution in a cool place for 4-5 hours, then their rooting period is reduced.
Rooting of green cuttings can be carried out in glass jars with water, the level of which is about 2 cm (Fig. 9).

Rice. 9.
From above, the jar with cuttings is closed with a plastic bag with a hole in one of the corners. The jar is placed on a sunny window. After the formation of the rudiments of the roots, the cuttings are carefully removed from the jar and planted in pre-prepared nurseries so as not to damage the roots.
Nurseries can be cups, which were described in the lesson "Winter rooting of lignified cuttings" or wooden boxes 20 cm high, with cells 10 x 10 cm (Fig. 10).

Rice. ten.
The box is half filled with fertile soil, clean river sand is poured on top with a layer of 4-5 cm. All moisturize with warm water with potassium permanganate (weak solution). The planting depth of the cuttings is 2.5-3.5 cm. When planting, try not to damage the roots. After installing the cutting, cover the planting hole with sand and water again.
It is possible to root green cuttings immediately in nurseries, without prior rooting in water.
Before the development of shoots from the buds, it is necessary to create greenhouse conditions for seedlings, i.e. above the seedlings, you need to make a shelter in the form of a tent from the film, which can be removed with the development of shoots on the cuttings.
Rooted cuttings (seedlings) are left in nurseries until the end of the growing season. In autumn, seedlings are placed in heated greenhouses or on sunny windows in apartments, where they can continue to develop. At the end of the growing season, they are transferred to the basement, where they are stored at t = 0 - + 60s until spring.
In the spring, after the earth warms up to + 100C, the seedlings are planted in a permanent place.
You can start the growing season much earlier. To do this, seedlings from the basement are transferred at the end of January to heated greenhouses or to sunny windows in the apartment, thus interrupting the period of forced dormancy and starting a new growing season.
Reproduction by layering.
Layers are annual vines or green shoots laid in the soil for rooting.
Reproduction by layering ensures the rapid development and entry into fruiting of young bushes.
A groove about 15 cm deep is made in a convenient direction from the bush. A vine selected on the bush, usually from top shoots, is placed in it, and pinned to the bottom of the groove with wire arches.
After that, the groove with the vine is covered with earth and watered with a weak solution of potassium permanganate or a solution of humic fertilizers. Along the entire length, the groove is mulched with a 4-5 cm layer of humus or other mulching material ( pine needles, grain husks, sawdust, etc.). At the end of the layering, a landmark is placed. How many eyes on the laid vine, so many seedlings should be obtained (Fig. 11).

Rice. 11. 1 - layer, 2 - groove covered with earth, 3 - layer of mulch
Layer care - regular watering and tying shoots to vertical supports. During the summer, shoots will develop at each node of the layering and roots will form. In the autumn, after the shoots have matured, the layers are carefully dug up with the roots and tied into a bundle, a label is hung, the roots are dipped in a clay mash. Seedlings are stored in winter in the basement at t = 0 - + 60 s in plastic bags.
Lesson 4 - Vaccinations
Grafting by budding on a winter-hardy stock
This is another way to propagate grapes. It is used for breeding in harsh Siberian conditions of non-hardy grape varieties, the roots of which cannot withstand significant freezing of the soil.
Grafting with a shield (budding) provides a direct adjoining of the cultivated scion to the wood of a winter-hardy stock, this increases the winter hardiness of the scion.
As a stock, cuttings of such varieties as Buitur, Alfa, Bashkir early, winter-hardy hybrids of R.F. Sharov - Sharov's riddle, Biysk - 2, Amur grapes. Vaccination is carried out during the period of forced rest, in late January - early February.
Two or three days before the start of vaccination, the rootstock cuttings are taken out of storage, washed in water or a weak solution of potassium permanganate and dried. They check the condition of the cuttings after storage (see lesson two "Procurement and storage of cuttings") and reject poor-quality ones. Rootstock cuttings are cut to a length equal to the planting depth (30-40 cm). The lower end is cut under a knot that has a sign of a tendril or peduncle (a knot with a full diaphragm). All eyes on the handle are removed with a sharp knife, without damaging the wood. Ready stock cuttings are immersed in a solution of heteroauxin or flower honey for 1-2 days for soaking at room temperature.
Graft cuttings are prepared on the day of vaccination, they are also taken out of cellars or refrigerators, washed in water or a weak solution of potassium permanganate, they check the condition, paying special attention to the safety of the eyes. Scion cuttings are immersed for soaking in water for 4-6 hours at room temperature (+ 12 - 150C).

Rice. 12. a - scion cutting, b - scion shield, c - scion cutting, d - grafted cutting
Budding is usually performed at the node, at the site of the removed eye, but grafting can also be performed at the internodes. When budding on the node, the knife blade is set 1-1.5 cm below the eye at an angle of 450 to the axis of the handle and an incision is made about 2 mm deep. Then the knife is rearranged 1-1.5 cm above the eye and a shield with a small layer of wood is cut out with a sliding movement to the lower incision.
The cutout on the stock is made in the same way and, having inserted the scion shield into the cutout, they tie it with a narrow plastic tape, leaving the eyelet completely open. The cuts on the rootstock and on the scion shield should coincide with cambial layers and tightly touch the cut surfaces. This will ensure their best fusion. Do not contaminate cut surfaces or touch them with your hands. The grafting operation must be carried out immediately, without delay, after the cut and the place of grafting, and the cut of the grafting shield.
Grafted cuttings are planted in nurseries (boxes or cups) and rooted in the same way as self-rooted seedlings (see lesson 2 "Winter rooting of lignified cuttings").
Usually not all vaccinations are successful. In order to reject failed grafts before planting in nurseries, it is advisable to first stratify them in plastic bags (Fig. 13), in which the bases of the grafted cuttings are covered 5-8 cm with river sand, sawdust or moss.

Rice. 13.
The bags are suspended or installed in warm, bright rooms with a temperature of + 20 - 280C. Sand or sawdust in a bag is periodically moistened with water. In the corner of the bag, you need to make a hole to drain excess moisture. Through the transparent walls of the sac, one can observe the state of the scion buds, the formation of callus at the grafting site, the development of roots, which, as they grow, will go to the walls of the sac. Normally stratified are considered cuttings with an accustomed scion shield and an eye that has begun vegetation and developed roots. It is these cuttings that are used for further cultivation.
In order not to damage very fragile and weak roots, when removing the cuttings from the bag, the substrate (sand, sawdust, etc.) is diluted with an excess amount of water. It is better to take out the cuttings with the whole bunch, and then evaluate and select for planting each separately.
It is easier to stratify the grafted cuttings in glass jars with 2-3 cm water. The water in the jars should change in a day or two.
Grafted cuttings with root rudiments and accustomed and blooming eyes are planted in cups or boxes. We know about planting in nurseries from previous lessons. With the onset of warm days, young seedlings are accustomed to natural conditions, hardened, taking out open air to shady places. When the threat of spring frosts disappears, young grafted seedlings are planted in a permanent place.
At first, seedlings are covered from direct sunlight and regularly watered with warm water (+25 -300C). No operations should be done with young seedlings, with the exception of fixing the shoots on a vertical support. This will ensure the best growth of green shoots. In mid-August, you can pinch the tops in order to speed up the ripening of the shoots.
At the end of July, watering is stopped, this will accelerate the ripening of the shoots.
The strapping is removed from the vaccination after 3-4 months, when the active growth of the scion begins.
It is recommended to protect young seedlings from the first autumn frosts. To do this, a "hut" is constructed above the bush from covering material or polyethylene. In this way, it is possible to extend the growing season and allow the young shoots to mature and better prepare for winter.
Before winter shelter, pruning of the bush is carried out. Two shoots are left in the bush, which are shortened to 3-4 eyes.
Major grafting is a type of budding. "Majorca" is distinguished by the shape of the graft element and the seat for the graft on a stock handle. (Fig.14).

Rice. fourteen.
The scion is cut not in the form of a shield, but in the form of a trapezoid. An appropriate cut is made on the cutting of the rootstock in the internodes, below the upper thickening, where the scion should fit snugly, with the maximum fit of all sections. For a more reliable connection, the grafting site is tied with a narrow polyethylene tape in the same way as when budding with a shield.
Major grafting is technologically more complicated, but due to the larger grafting area, more reliable connection of the scion with the stock, this grafting is of better quality and almost waste-free.
Replacing the variety by grafting into an underground stem.
If for some reason you are not satisfied with the grown grape variety, do not rush to uproot it and replace it with a new seedling, do not remove bushes that have been completely eaten by mice. After all, it is not recommended to plant grapes again in the place of an uprooted bush for several years, a new bush in this place will develop very poorly due to the fatigue of the earth. So this place will fall out of your grape row.
You can replace an old bush with a new one, one variety with another, by grafting into an underground stem. At the same time, the restoration of a new bush on the old one is possible within one or two seasons.
The time of spring grafting into the bole is immediately after the release of the grapes from shelter, i.e. in the second half of April.
Autumn vaccination time is the first half of October. It is very important that the lower node on the scion handle has a full diaphragm, i.e. there should be signs of a tendril on this node. Such a cutting, if it is not dried, will always take root. Preparing bushes and cuttings for grafting in spring and autumn is no different.
Two or three days before grafting, the rootstock bush is dug to a depth of 25-30 cm. On the day of grafting, the underground stem of the bush is cleared of earth and dead bark. After that, the aerial part is cut off at the bush along with the head of the bush.
The cut is made at a depth of at least 15-20 cm, so that the upper eye of the 2-eye scion cutting is 4-6 cm below ground level after grafting.
The day before vaccination, 2-eye cuttings are soaked with complete immersion in clean water or a stimulant solution: heteroauxin - 0.5 tablets per 5 liters. water, or sodium humate - 1 incomplete teaspoon per 5 liters. water. In the absence of stimulants, an aqueous solution of bee honey is used - 0.5 tablespoon per 5 liters. water.
After soaking, the cuttings are aired. Wet cuttings cannot be grafted, as well as overdried ones. Finally, the stalk is prepared at the time of grafting. Depending on the thickness of the underground stem, one, two or more cuttings can be grafted onto it. At the time of grafting, a split is made along the diameter of the stem cut to a depth of 3-4 cm. Having selected the stalk, try it on in depth until the split so that the upper eye is 4-6 cm below ground level. it by 1 cm and for a length of not more than 2 cm (Fig. 15a). On longer sections, the development of the callus is delayed. The preparatory cutting is immediately inserted into the split with the lower eye outward (Fig. 15 c). It is very important that the cambial layer of the cutting coincides with the cambial layer of the rootstock and that the outer side surface of the cutting in the wedge area does not protrude beyond side surface stem. If the diameter of the stem allows, then a second cutting can be inserted into the same split from the diametrically opposite side, i.e. make two vaccinations in one split (Fig. 15 c). With a thicker bole, two pairs of vaccinations can be made (Fig. 15, c).

Rice. 15. Grafting into an underground trunk
Do not forget that the lower knot of the scion should have signs of a tendril.
Remember that the lower eye of the scion should be directed outward. Under these conditions, the guarantee of successful vaccination is higher. Place of inoculation, i.e. the cut on the trunk and splits must be isolated from the influence of the external environment. The cut should be closed with a polyethylene flap, and then tightly wrapped with twine. During the year, the twine will collapse and will not interfere with the development of young shoots. The entire grafting area on top of the winding must be covered with a layer of garden pitch. After that, the graft is covered with wet moss and completely covered with loose, moist soil and mulched with sawdust, humus, pine needles or grain husks with a layer of 2-3 cm to maintain moisture.
As young shoots grow, they must be tied to supports. The land should always be moist, weed-free and mulched.
Lesson 5 - Site selection and vineyard planning
The development of grapes begins with the choice of a place for it. Grapes are an unpretentious plant that can grow on any soil, except for saline ones.
In Biysk, there is an example of growing grapes even in a swampy area with a high water level. When choosing a place for a vineyard, preference is given to the southern and southeastern slopes. Lowlands are not desirable, where cold air masses accumulate and a high probability of spring and autumn frosts. The northern slopes and areas facing the prevailing winds are less suitable for vineyards, since there is a possibility of deep freezing of the soil, blowing snow to the ground and, consequently, freezing of vines.
Amateur gardeners are limited in choosing a place for grapes by their garden plots, sometimes very inconvenient. Therefore, the most rational would be to choose the most sunny, open, high and dry area. Grapes grow well on the southern sides of deaf fences and walls of buildings.
The direction of the rows in the vineyard is preferably from north to south, so that the sun illuminates the grape bushes before noon on one side, and in the afternoon on the other.
The distance between the bushes in a row should be 2.5 -3 meters, depending on the strength of the growth of grape bushes. For very tall varieties, such as Rizamat, Amirkhai, Queen of Vineyards, Katyr-2, the distance between the bushes is at least 3 meters, and for Tukay, Zhemchug Sabo, Sharov's Riddle, Thumbelina between the bushes can be 2.5 meters. These requirements are due to the fact that when forming the bushes on the trellises should not overlap each other.
There are many, sometimes conflicting, recommendations for row spacing. A row spacing of 2.5 - 3 meters is justified by maximum illumination, good soil heating, excellent ventilation and is necessary for machine processing of a vineyard in large industrial vineyards, but such a row spacing is unforgivable due to its wastefulness on small garden plots. When the rows of grapes are located from north to south, the row spacing can be 1.5-2 meters. Do not be afraid that the bushes will replace each other, which can reduce the intensity of photosynthesis. It has been proven that photosynthesis reaches its highest intensity during the scattered light period, at 10-11 am and 4-5 pm. At noon, with direct maximum illumination, the amount of photosynthesis is minimal. On a hot sunny day with low relative humidity, light shading and scattering of sunlight due to narrow row spacing provides Better conditions for photosynthesis than scorching direct sunlight.

Rice. 16.
So we accept the scheme of planting grapes:
rows from north to south or along the south side of blind fences and walls;
distance between rows 1.5 meters, but should be increased to 2 meters in case of poor ventilation or when the rows are arranged from east to west;
the distance from fences and walls is at least 1 meter, for the free growth of roots and ease of maintenance.
With the help of a cord and pegs, we outline a landing pattern in the selected area. On the south and northern sides perimeter we drive in pegs through 1.5 (2.0) meters. Stretching cords between opposite pegs, we define our grape rows. Stepping back from the southern edge by 1.5 meters, we mark in each row the landing sites of the first grape bushes. The second bush in the row should be at a distance of 2.5 meters from the first bush, or 3 meters if the bushes are vigorous. We adhere to the same distances for subsequent bushes in each row. From the north, each row should end at a distance of 1.5 meters from the last bush. The total length of the row is equal to the sum of the distances between the bushes plus two half-meter segments on both sides of the row - this is the length of future trenches in which we will plant grape seedlings.
Trenching and preparation of planting pits.
Grapes - a crop of a temperate warm climate, characterized by increased sensitivity to frost and especially spring residual frosts in the initial growing season. In unusual climatic conditions for grapes, measures are needed to protect it from the cold.
A serious protection of grapes from winter frosts is the buried planting of grapes in trenches.
Trenches are dug along the entire length of the intended vine row with a depth of 25-30 centimeters and a width of 35-40 cm. In order for the walls of the trench not to crumble, they must be made with some slope and, preferably, lined with boards or flat slate. In this case, the cladding should be slightly (3-5 cm) deepened, and the upper edge of the cladding should be 3-5 cm above ground level. This is necessary so that the trench does not become contaminated and during the spring snowmelt, it is not flooded with melt water.

Rice. 17. Planting holes and a trench in a grape row.
1 - fertile land with fertilizers, 2 - fertile land without fertilizers, 3 - lining the walls of the trench, 4 - greenhouse
To fix the facing sheets, it is enough to drive spacer blocks between them after 2-3 meters.
In the northern viticulture zones, the time for planting grapes is considered to be the beginning or middle of May, when the earth at the planting depth warms up to + 10 0С.
For planting in advance, preferably in the fall, they are preparing landing pits 60-80 cm in diameter and 1-1.2 meters deep or elongated pits 60 cm wide, 1 meter long and 1-1.2 meters deep. Preparation of landing pits, especially on heavy clay soils and poor sandy soils, a necessarily deep, well-fertilized planting pit at the base contributes to an increase in the growth force of the bush and, which is especially important for Siberia, the development of deep heel roots in the bush, less damaged by frost.
When digging a hole, the surface fertile soil is thrown out on one side of the hole and used in the future, and the lower geological infertile soil layer is on the other side and is scattered evenly between the rows or removed from the site. The lower part of the pit is covered with two or three buckets of humus or compost, then two or three buckets of sand or gravel, if the soil in the area is clay. 200 g of superphosphate, 150 g of potassium sulfate or 400 grams of ash are added, and all this is dug up (shoveled) with soil at the bottom of the pit. After a light compaction, two or three buckets of humus are again filled up, 2/3 of the fertile soil from the top layer, 200 grams of superphosphate, 150 g of potassium sulfate are added again, if necessary, two or three buckets of sand or gravel and everything is shoveled again. The addition of sand and gravel to heavy clay soils improves soil aeration and drainage and is thought to improve grape quality. The remaining third of the fertile land is poured into a pit without humus and fertilizers and will serve as a planting layer for a seedling. Thus, with some compaction and after abundant watering, the pit should be filled to more than 3/4 of the total volume. If the pits are prepared in the spring, they must be filled with warm water after filling with fertile soil. To do this, the water is heated to 50-600 C. Before planting, it is necessary to create conditions for the rapid heating of the soil in the planting pit. To do this, a shelter (greenhouse) made of film is arranged above the pit in order to create conditions for accumulating solar heat and heating the soil in the pit, i.e. to create a greenhouse effect in the pit.
On the side of the pit of chernozem (fertile land), sand and humus, in accordance with 10: 2: 1, an additional one or two buckets of the mixture are prepared, which will sprinkle the root system and the seedling itself when planting. It is advisable to warm this mixture in the sun under the film.
Lesson 6 - Planting grapes and caring for young seedlings.
Grapes are best planted when the ground temperature in the pit is above + 150 C. At a temperature of + 200 s, the vital processes of plants occur 4 times more intense than + 150 s, and at + 250 s 8-10 times, the higher the temperature (but not more than + 350 s), the faster the seedlings take root and start growing consequently, a more powerful root system develops.
In the climatic conditions of Biysk, grapes are planted in the ground in the second half of May. The best time to plant vegetative (winter-grown) seedlings is in the evening or on an overcast day. For tender young shoots, the sunny time of the day is dangerous.
A hole is dug in the center of the planting hole, the depth of which should ensure that the seedling is immersed 50-60 cm below ground level, and the upper shoot of the seedling should be 5-6 cm below the trench level so that the future bush does not have an above-ground stem. The seedling is carefully installed in the hole so as not to damage the young roots and green shoots. Seedling shoots or vegetative buds must be oriented along the trench (see Fig. 17, lesson five). A vertically installed seedling is covered with a prepared earthen mixture until a developing green shoot is poured over with warm water and the planting pit is again covered with a greenhouse.
Rice. 18. Planting and protecting a vegetative seedling
The planting of vegetative seedlings grown in peat or plastic cups is significantly improved. In these cases, planting can be done without destroying the earthen clod at the root system, i.e. without injury to young roots. The greenhouses are not removed from the planting pits until the threat of spring frosts disappears and until full confidence in the rooting of seedlings. In hot weather, it is necessary to ventilate the greenhouses by slightly opening them from the ends.
Annual seedlings taken from winter storages are pre-treated: they shorten the heel roots to 10-12 cm, cut off the dew roots. If the seedling has more than two vines, leave only the two strongest and cut them into two eyes, and if the seedling has one vine, then cut it above the third eye (Fig. 19).

Rice. 19.
After that, the seedlings are soaked for a day in an aqueous solution of heteroaunsin (half a tablet per 5 liters of water) or sodium humate (half a teaspoon per 5 liters of water). Water temperature + 25-300С. Before planting, the roots of the seedling are dipped in a clay mash and planted immediately. As well as for vegetative seedlings, a hole is made in the center of the planting pit, the depth and diameter of which should ensure that the seedling is placed with roots straightened without damage and that the heel of the seedling is at a depth of 50-60 cm from the ground, and the pruned vines do not protrude above ground level in a trench (Figure 20).

Rice. 20. Planting a one-year-old seedling
After installing the seedling, it is oriented with vines along the trench, half covered with a prepared mixture of earth, sand and humus, slightly pulled up so that the roots are evenly distributed obliquely from the heel down. After that, the soil is compacted, watered with warm water and finally backfilled to the top, leaving a funnel deep to the bottom of the vine.
The objective of the first year is to grow young seedling two strong shoots. A seedling may have one or two vegetative shoots, depending on what kind of cutting it was grown from. Let's consider both options.
The seedling has two vegetative shoots (Fig. 21).

Rice. 21. Landing (May)
minting (beginning of September)
The existing two shoots should become the main vines of the young bush. In the process of summer development, replacement buds may wake up on the seedling and shoots-twins and tees will begin to develop, stepchildren may appear on the main shoots. All these new shoots that arise during the growth of the main shoots must be pinched on a stump at the beginning of their development. The energy of a developing bush should be given to the two main shoots (vines) for their powerful development. At the end of August and beginning of September, the main shoots, which should grow to 1-1.5 m, can be pinched off the growing top, this will ensure the best maturation of the vines.
In the first decade of October, after full maturity, the vines are cut into three or four buds, pinned horizontally above ground level in a trench and covered with earth to the height of the trench (25:30 cm). The place of the sheltered bush must be marked with a peg or in some other way, so as not to damage it in the spring when it is released from the shelter.
If the seedling has one vegetative shoot (Fig. 22).

Rice. 22. Landing (May)
minting (beginning of September)
pruning for the winter and shelter (early October)
When the shoot reaches 50-60 cm, it is pinched on the growing top to cause the formation of stepchildren. It is necessary to leave the strongest stepson, conveniently located to give it the direction of growth in the opposite direction from the direction of the main shoot. The remaining stepchildren and shoots from replacement buds are pinched onto a stump. The abandoned stepson will very quickly catch up with the main shoot in development, and by September both shoots will reach 1-1.5 meters in height, they can be pinched, and before shelter for Wintering, cut into 3-4 eyes and cover with earth, as described in the first option.
Lesson 7 - Designs of vertical single-plane and inclined two-plane tapestries.

Vertical trellis.

Rice. 2.

Lesson 7 - Designs of vertical single-plane and inclined two-plane tapestries.
A feature of the grape plant is the lack of a certain strong skeleton-trunk with branches. Liana with several perennial sleeves, on which many long, flexible green shoots bearing clusters are formed and develop annually - this makes it necessary for cultural cultivation to grow grapes on rigid supports or special devices - trellises, the designs of which are selected depending on the formation of the bush.
The most common devices for forming and fixing vines are trellises (see Fig. 1): a - vertical single-plane, c - inclined two-plane.
The height of the tapestries is 2-2.2 m. Five or six rows of wire with a diameter of 3-4 mm are stretched along the height of the racks on the trellises, the distance between which can be from 30 to 50 cm, but the lowest string should be ~ 20 cm from the ground level, fruit arrows are fixed horizontally on it (lashes). I offer viticulturists the design of vertical and two-plane inclined trellises.
Vertical trellis.
For trellis racks, metal pipes (1) with an outer diameter of 40-50 mm and a length of 2.8-3.0 m are used (see Fig. 2). A piece of an angle 45x45 1 m long is welded to the upper end of the pipe.
According to the height of the rack, diametrically through holes with a diameter of 5 mm are marked and drilled. For each stand, a section of casing pipe (3) ~ 80 cm long is prepared with an inner diameter greater than the outer diameter of the stand. Casing pipes are driven into the ground along the trench at a distance of 10 cm from the trench wall, 2.5-3 meters apart (see Fig. 3, c). Racks are installed in casing pipes and with the help of poles or wooden bars (4) 2.5-3 meters long, with a section of 5x5 are interconnected at the corners (2). You can hook poles or bars on the corners with wire twists, clamps or long screws, bolts passed through the holes in the corners from below. The poles (bars) connecting the racks provide rigidity to the trellis structure, preventing the racks from changing their vertical position when the wire strings are stretched. A steel wire with a diameter of 3-4 mm is passed through the through holes in the posts in parallel rows, which is fixed and stretched on the extreme posts by twisting the ends of the wire into a ring (see Fig. 3) using pliers.
This trellis is very reliable in operation and can be easily dismantled if necessary.
Rice. 3.
Two-plane inclined trellis.
For multi-armed (more than 4 arms) fan formations of grapes, it is advisable to use two-plane inclined trellises. From the single-plane tapestries described above, they differ more complex design. The rack is a welded frame in the form of an inverted trapezoid. Frame elements: side racks (1) made of pipes with a diameter of 40-50 mm. 3 meters long; jumpers - top 150cm. (6) and bottom 60cm. (5), from pipes of any diameter, less than the diameter of the racks, or from an angle: guide angles (2) 45x45 100 cm long, for poles or wooden blocks; casing pipes ~ 80 cm long with an inner diameter slightly larger than the outer diameter of the racks.
The installation of a two-plane trellis is somewhat more complicated than a single-plane one, but the nature of the operations is similar. Casing pipes are installed on both sides of the trench. The distance of the racks in a row is 2.5-3 meters.
The trellis system allows the maximum use of solar energy, is well ventilated and allows you to easily carry out agrotechnical activities in the vineyard during the entire growing season.

Rice. four.
Lesson 8 - What is polarity?
In natural conditions, starting its development in deep shade under the arch of dense trees, the grape plant, clinging to the bumps of the bark, knots and branches, rapidly directs its green shoots up to the tops of the trees, to the warmth and sun. Striving upward, the grapes lose most of their shoots, sacrifice them in order to give all their strength, all their energy to one or two of the topmost young shoots. Everything that starts life below these shoots, due to a lack of nutrients, weakens, degrades and gradually dies off. And only the leaders remain alive, from year to year, growing with new shoots on their peaks. Only they, in the end, reach the arch of tree crowns, where, finally, they can scatter numerous shoots widely and powerfully under the warm rays of the sun. Only here, under the sun, spreading over the crowns, grapes begin a full-fledged active life and abundant fruiting.
Thus, with a vertical arrangement of annual vines, selective development of green shoots is carried out - the strongest and most viable at the top, and everything below is weaker and weaker.
The historically developed ability of grapes to direct the bulk of nutrients along a vertically located vine to the uppermost buds, to the uppermost young green shoots and growth points of these shoots is called longitudinal polarity.
Such a property of the vine cannot satisfy us in the artificial cultivation of grapes. But what if the annual vines (fruit arrows and fruit lashes) are not arranged vertically, as in natural conditions, when they strove for warmth and the sun from dusk, but horizontally, as the vines were located when they reached the tops of the trees? Yes, this is the correct decision. The horizontal arrangement of the vine is a signal: "Nothing closes the sun! You can develop in full force, evenly distributing nutrition over all green shoots, without depriving anyone!" Thus, in artificial viticulture, when forming a bush, it is possible to take into account and neutralize the property of longitudinal polarity.
Grapes have another feature, which is called transverse polarity. Without going into scientific definitions, as in the previous section of the lesson, we will deal with this property of grapes in a popular form. On the vine, the buds (eyes) are located sequentially, sometimes on one side, sometimes on the other, and therefore the shoots develop from diametrically opposite sides in a strictly sequential order (Fig. 1).

Rice. one.
In the process of vegetation, nutrients are supplied along the vine, then to the right, then to the left shoot. If we make a cross section of a normally developing grape sleeve (Fig. 1, a), we will see that the core is located strictly in the center of the section. Let's imagine that during development in some area on one side of the vine, several shoots died or were broken in a row. As a result, there was no need to supply nutrients to this place, and therefore the development of this area was significantly weakened. The vine begins to develop inharmoniously. Over the years, transverse deformation of wood occurs with a displacement of the core (Fig. 1, c).
Due to the underdevelopment of one side, the nutrition of the shoots as a whole worsens. This place has become vitally weakened, fragile and fragile. With minor physical exertion, a fracture can occur here; at critical temperatures, it is here that freezing and drying of the shoot will occur first.
Unfortunately, we often do not attach serious importance to this feature of the vine. And the transverse polarity must be taken into account when pruning and shaping a grape bush and eliminate the possible negative consequences of this property. The essence of the correct formation of fruit links is that when pruning, it is imperative to leave polar opposite annual shoots on the sleeves - for the replacement knot - the lower outer shoot, for the fruit arrow - the upper inner shoot. (We will look at this rule in more detail in the lesson "Forming a vine bush".)
In the system of growing grapes and the formation of a grape bush, an exception harmful influence transverse polarity must be given as much importance as the exclusion of the influence of longitudinal polarity.
Lesson 9 - Pruning and shaping the vine for the second, third and fourth year.
Second year.
In the spring of the second year, in the second half of April or early May, if the spring is late and cold, the bushes must be opened, carefully cleaned from the ground so as not to damage the eyes. Remember, they were left in the fall when pruning four on each shoot. After airing and drying, the bushes must be covered with a film cover (this was discussed in the sixth lesson). The sooner the bush begins active life, the more likely it is to form the basis of a bush of four strong shoots - this is the main task of the second year.
On last year's two vines, if our young seedling endured the winter well and all the eyes remained alive, eight green shoots begin to develop, i.e. four on each. At the very beginning of the development of young shoots, their number must be halved. On each last year's vine, only two young shoots are left. To exclude the negative influence of transverse polarity, shoots are left on each last year's vine, developing from diametrically opposite buds (Fig. 1).

Rice. one.
In our example (Fig. 1), 1 and 2 buds are left on the left vine, and 2 and 3 on the right; a valid option is 1 and 4 kidneys, but 1 and 3 are not allowed; 2 and 4 kidneys.
In the process of development of the main shoots, all shoots developing from replacement buds are removed, stepchildren are pinched over the second or third leaf, and all possible inflorescences are removed.
In the autumn of the second year, only the unripened part is cut off from the bush.
Third year.
In the spring of the third year, each of the shoots of a young bush is again cut into 2 healthy eyes. In total, eight shoots must be grown in the third year. When pruning, it is again necessary to exclude the negative effect of transverse polarity and the lower eye on each shoot must necessarily look outward from the bush, and the upper one into the bush (Fig. 2, spring of the 3rd year).

Rice. 2.
Care of the bush during the summer is the most thorough with pinching stepchildren, a fragment of shoots from replacement buds, from dormant buds on sleeves and an underground trunk. You can leave one inflorescence on one or two of the strongest shoots and let them ripen (Fig. 2).
In the autumn of the third year, the unripened part of the vine is cut off from all eight shoots.
Fourth year.
In the spring of the fourth year, the final fan formation of the bush is carried out as shown in (Fig. 3). The upper vines on the sleeves (fruiting vines) are cut into 5-8-12 eyes. The number of eyes left is determined by the allowable load of eyes for each grape variety and bush individually. When determining the load with eyes, the condition of the bush is taken into account - the number of strong young vines (Fig. 3).
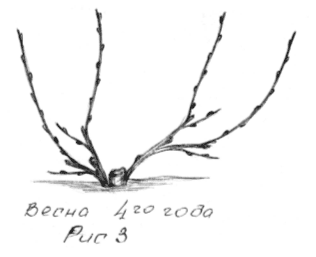
Rice. 3.
The lower vines are cut into two healthy eyes, thus forming four replacement knots. Do not forget that the first (lower) eye on the replacement knots must necessarily look outside the bush, and the second (upper) inside. This ensures a strict order of annual pruning of the bush and excludes the influence of transverse polarity.
The final formation of the bush is best done not in the spring of the fourth year, but in the autumn of the third year. Autumn pruning is less painfully tolerated during the spring "weeping" of the grapes. But during autumn pruning on replacement knots, it is necessary to leave an additional one or two spare eyes, in case of possible damage during shelter for the winter, wintering, or when opening after wintering.
So, in the fourth year, a 4-arm fan-shaped vine bush was formed with four fruit links, consisting of a fruit vine (arrow) and a replacement knot. Now, every year in the fall, we will remove the fruiting vines to the replacement knots, and from the vines on the replacement knots we will form new arrows and new replacement knots.
If desired, you can make a grape bush multi-arm, adding in the described way, one new sleeve annually. To do this, you can use strong shoots from dormant buds (tops) or coppice shoots from an underground bole, or additional replacement knots formed from fruit-bearing vines.
Lesson 10 - Formation of reinforced bushes for two-plane trellises.
In the ninth lesson, we determined the order of formation of a 4-arm fan-shaped bush - last year's fruit arrow, together with all the fruiting vines, is cut off completely to last year's replacement knot, on the replacement knot, the lower outer shoot is cut to a new replacement knot (3-4 eyes), and the next inner shoot cut off on a new fruit arrow (5-12 eyes). The combination of a fruit arrow and a substitution knot on the sleeve is a fruit link (Fig. 1).
On a well-developed bush older than 6 years, with a high yield and good ripening, it is possible to strengthen the fruit link, leaving not one, but two fruit arrows in it. Thus, an increase in yield is ensured (increase in the load on the bush) (Fig. 1).

Rice. 1. Fruit links
The load on the bush should increase gradually. It is impossible to form reinforced fruit links simultaneously on all sleeves in one year. And you need to know that the formation of even one reinforced link per year will not ensure an increase in yield indefinitely.
On 9-10-year-old bushes, the load can be increased by forming additional arms, and then again strengthening the fruit links on new arms.
New branches are formed from strong coppice shoots of an underground trunk or from conveniently located top shoots developing from dormant buds on perennial wood in the head of the bush. The formation of new sleeves, as well as reinforced fruit links, is carried out gradually, one per year. Therefore, if there are several coppice shoots and tops in the bush, it is necessary to choose one of them, the strongest and most conveniently located, to form an additional sleeve. All other shoots must be removed (Fig. 2).

Rice. 2. Bush with coppice shoots and spinning tops
It is necessary to form a sleeve from a coppice shoot in one season. The accelerated formation of the sleeve is provided by pinching (chasing) in June of the selected green coppice shoot, which has 9-10 leaves, leaving 5-6 leaves. After eight to nine days, stepchildren will develop on the chased shoot, of which two upper ones must be left, and the lower one is desirable to be external (future replacement knot). All other unnecessary stepchildren at the beginning of their development are carefully plucked onto stumps. Thus, the coppice shoot turns into a young sleeve with two shoots, one of which is the lower one, in the spring of next year it will be cut into a replacement knot with 2 buds, and the upper one - into a fruit arrow with 5 or more buds. A sleeve with a fruit link formed by an accelerated method is able to bear fruit the next year.
Young sleeves are also formed to replace old or damaged sleeves. The development, maturation and aging of sleeves is a continuous and inevitable process. After 12-15 years, fruiting on the old sleeve gradually decreases. A sign of sleeve failure is, first of all, the absence of normal growth (short and weak green shoots on fruit shoots). Green shoots with a length of at least 75 cm and a thickness of at least 7 mm are considered full-fledged.
The need to replace old sleeves arises when the sleeves are excessively elongated as a result of the mandatory increase in the process of annual formation of fruit links at the ends of the sleeves. And although the increase in wood mass due to the development of sleeves is a positive factor, since the supply of nutrients increases in direct proportion to this, and, consequently, the yield, it still becomes necessary to cut out an excessively long sleeve and replace it with a new one. Thus, rejuvenation of grape bushes is carried out.
Lesson 11 - No shoots on replacement knots? No problem!
In the practice of viticulture, deviations from the standard formation of fruit links are quite common. On replacement knots, the necessary shoots do not always develop, which are used to replace the fruit-bearing arrow. Sometimes, due to negligence, young shoots on replacement knots can be broken off, they can freeze slightly, and other unforeseen cases of loss of shoots or their weak development on replacement knots can occur. Of course, this is annoying, but still we must remember that our main task is to get a harvest, and not adhere to any strict rules for the formation of a grape bush. Therefore, if there is nothing to replace a fructifying arrow, it is necessary to take well-developed strong vines on this arrow for fruiting.
Consider various options for autumn pruning in case of loss or underdevelopment of shoots on replacement knots. For simplicity and clarity, we will consider all options on one sleeve of a grape bush.
1. On the replacement knot, the upper shoot is underdeveloped or absent altogether. In this case, the old replacement knot is cut to a new one, shortening the lower outer shoot by 3-4 buds, and on the fruiting arrow, one or two first ripened annual shoots from the sleeve are set aside for fruit shoots. The rest of the fruiting vine, along with the growth, is cut off. Thus, a normal or reinforced new fruit link is obtained. (Fig. 1).

Rice. one.
2. If there is not a single shoot on the replacement knot, then such a knot is cut off completely, and on last year’s fruiting arrow, the first outer shoot is cut into a replacement knot (3-4 buds), and the inner one following it is cut into a fruit arrow. The rest of the old vine is cut off. If the first shoot turns out to be not external, but internal, then it makes sense to leave it for fruiting with the next shoot, thus forming a reinforced fruit link without a replacement knot, and a knot can be formed in the next season (Fig. 2).

Rice. 2.
3. Maybe so, there are no shoots on the replacement knot and no shoots at the beginning of the arrow, but there are strong shoots at the end of the arrow. This option is possible if the grape bush is damaged by mice during wintering. In this case, the strongest one or two terminal shoots are left for fruiting. But such a forcedly elongated sleeve is not desirable in the next shaping. Instead, it is necessary to prepare a new young sleeve (Fig. 3).

Rice. 3.
4. If there are no shoots on the replacement knot, and on the fruiting arrow, the first (initial) shoots developed poorly, but the final shoots are strong (this option is possible with a vertical dry garter of the fruit arrow in the spring, i.e. the negative effect of the longitudinal polarity was not taken into account, then, leaving one or two final strong shoots and cutting them into fruit arrows, the remaining shoots along the entire length of the fruiting arrow are cut into 2-3 buds). Thus, for fruiting in the next season, a temporary cordon is created (the formation of grapes on long sleeves with short fruit arrows) (Fig. 4).

Rice. four.
Replacement knots on which shoots have not formed are cut out.
In the spring, last year's arrow, which now functions as a sleeve of a temporary cordon, is tied horizontally to the trellis with a sharp bend at a right angle at the first short-cut vine, so that strong replacement shoots grow at the bend.
5. It should be noted that in this way it is possible to form vines for fruiting without replacement knots (Fig. 5).

Rice. 5.
To do this, in the vine that is chosen for fruiting, with a spring dry garter, it is enough to make a strong bend in the area of \u200b\u200bthe first eye in order to get a strong shoot in this place, which will be the new fruiting vine (arrow) next year.
Lesson 12 - Green operations (fragments of green vine shoots, pinching the tops of fruiting shoots)
From the beginning of the growing season on the grape bush, many green shoots develop from the main, replacing and sleeping buds, an excessive amount of which can adversely affect the development of the bush, the quantity and quality of the crop. Therefore, for the normal development of grapes, the so-called green operations on the grape bush are of great importance.
Green operations include: debris - removal of entire shoots; pinching and chasing - removing the top of the shoots; pasynkovanie - partial or complete removal of lateral shoots (stepchildren); leaf thinning; normalization of inflorescences.
Green operations help to establish the optimal ratio between the above-ground part and the root system of the plant in order to maintain a balance between the growth force of the bushes and their ability to bear fruit.
Fragment of green shoots.
Removing part of the shoots in spring period, when development is just beginning, it enhances the growth of shoots remaining on the bush and does not have a depressing effect on the plant. Therefore, the fragment should be carried out in the spring, at the beginning of the growing season.
Shoots developing from various buds have different meanings and are used differently in viticulture. The main role is played by the central shoots developing from the main buds on the annual vine and bearing inflorescences. The so-called shoots - twins and tees, developing from replacement buds, are used only when the bush, for some reason, has insufficient leaf surface, i.e. part of the main fruitful shoots died (results of unfavorable overwintering, damage to shoots by spring frosts, damage to some of the eyes by mice). In such cases, they say - the bush is underloaded. Replenishment of the green mass of the bush is made by shoots - twins.
With the normal development of fruitful shoots, all twins and tees break out at an early stage of development.
Shoots that have grown from dormant buds on the aboveground and underground boles - tops and shoots, are used in very limited quantities to rejuvenate the bush, i.e. to replace old and create new additional sleeves. To do this, the strongest and most conveniently located spinning top or coppice shoot is selected, the rest are broken out or cut out from the stem under the ground. There can be a lot of such shoots (sometimes dozens) and they appear throughout the summer, they can greatly thicken the bush and sharply weaken the development of the main shoots, therefore, coppice shoots and tops must be removed several times during the summer.
On young bushes, debris is also necessary, but its purpose is somewhat different. Carrying out this operation aims to select and grow the strongest shoots for the formation of sleeves and ensure their growth by removing the weak and unsuitable for formation. On young bushes, it is imperative to remove all shoots - twins, since they cannot be used to form bushes.
Coppice debris is especially important in grafted vines, because the coppice, in addition to using the nutrients needed for the scion, carries poor-quality maternal rootstock flavors. If you remove coppice shoots on rootstocks carefully and repeatedly, then within a few years you can get rid of them altogether.
Pinching the tops of fruiting shoots.
Pinching shoots is one of the techniques that affects the quality of berries and bunches, as well as yield.
Nutrients entering young shoots, due to the manifestation of longitudinal polarity, are primarily directed to growth points. If most of the plastic substances are consumed for the continuous growth of the apex, starvation of the inflorescences sets in. Shoot pinching is done to redistribute nutrition from the growing point to the inflorescence (Fig. 1).
Rice. 1. Pinching a grape shoot
Pinching consists in removing the top of the growing shoot by 3-5 cm. Pinching is performed only on fruitful shoots 2-3 days before flowering. After pinching, shoot growth is delayed for 10-15 days and most of the nutrients will go to the inflorescences, ensuring their better development: pollination conditions for flowers improve, their shedding decreases and, as a result, more berries are tied, the yield increases.
Pinching is a very effective technique for varieties that are characterized by strong shedding of ovaries, peas, and uneven development of berries (Irinka, Tukay, Strashensky). Pinching is also recommended for varieties that have a functionally female type of flower. A temporary increase in the flow of nutrients to the inflorescences contributes to better fertilization of flowers.
Pinching causes the formation of stepchildren on coppice or top shoots left for the accelerated formation of new sleeves.
Lesson 13 - Green operations (chasing, pinching, thinning leaves)
Chasing is the removal of the tops of all shoots with all young underdeveloped leaves in order to ensure better nutrition of the clusters and ripening of the shoots. Accelerating the maturation of shoots, chasing contributes to the accumulation of additional plastic substances in them, increases the resistance of vines to adverse wintering conditions. Chasing is carried out when the active growth of shoots stops. With timely minting, only an insignificant part of the green mass is removed, which does not impair photosynthesis, but, on the contrary, enhances it due to improved illumination. Chasing stops the growth of shoots, which leads to a redistribution of nutrients produced by the leaves, they enter the berries in greater quantities. As a result, the berries ripen faster, increase in size, accumulate more sugar, which leads to an increase in yield. Chasing is necessary to improve the ventilation of the bushes.
Minting should not be carried out in dry years. The time of minting is determined by the state of the vine: the beginning of the maturation of the lower internodes and the slowdown in the growth of shoots, which usually happens in early August. An external sign of growth retardation is the straightening of the tops of the shoots, during active growth they are bent.
When chasing, at least 8-12 leaves are left above the upper bunch. Simultaneously with the minting, the newly appeared stepchildren are also shortened. On young and low-growing bushes with a vine length of no more than 1.5 m, chasing is not done.
Pasynkovanie.
This is an operation to remove or pinch second-order shoots developing on green shoots from axillary buds. In large numbers, stepchildren appear on vigorous and underloaded bushes. If the bush is normally loaded with crops and shoots, stepchildren usually develop weakly on it and no operations are necessary with them. In such cases, it is enough to pinch the stepchildren to the bunches (Fig. 1).
Rice. 1. Pinching stepchildren
The purpose of pinching is to create conditions for better lighting and ventilation in the area where the bunch develops. Removal of stepchildren is carried out in cases where there is an increased growth of stepchildren and, as a result, a strong thickening of the bush. It is impossible to completely remove the stepchildren, as this can damage the hibernating eyes. It is believed that stepchildren have a positive effect on the development of eyes and the formation of inflorescences in them. Therefore, stepchildren pinch over the second or third sheet.
If the main shoots were damaged due to spring return frosts, then pinching should not be carried out. New shoots will form from strong stepchildren, which will ensure the development of the bush and even the harvest, however, smaller in size and with a significant delay.
The kidneys of pinched stepchildren are capable of producing second-order stepchildren, which can be removed completely.
thinning.
Leaf thinning - removal of leaves that shade the clusters is performed to accelerate ripening, improve the color of the berries, to improve ventilation and prevent fungal diseases on the berries. The leaves are cut off gradually so that the berries do not get a sunburn. Remove the oldest leaves with reduced assimilation activity, located above and below the clusters. The time to remove the leaves is 15-20 days before the berries are fully ripe.
Thinning of inflorescences is carried out in some grape varieties that have very long, loose clusters. For example, Strashensky has long flowering due to very long clusters. The upper part of the bunch already has an ovary, and the lower part is still blooming. Due to the duration of flowering, such varieties can fall into different weather conditions during the flowering period, the inflorescences are not pollinated evenly and not completely, there is a significant shedding of inflorescences, peas, the clusters become sparse, the ripening of such clusters is greatly delayed. Removing the lower part of the inflorescence during flowering stimulates an improvement in the nutrition of the remaining part of the inflorescence. The clusters become more compact, have a marketable appearance, the berries in the clusters are aligned in size and ripen together.
It is desirable to remove inflorescences on stepchildren, since their crop, as a rule, does not have time to ripen, and these clusters consume a significant amount of nutrients for new development.
Often, the operation of thinning the clusters is used to normalize the yield, which is more effective than thinning the inflorescences, since it is carried out after flowering, when it is clear how the fruits (berries) set. Clusters with defects are removed - poorly developed, with mechanical damage, underheating or burns, etc.
Lesson 14 - Determine the load of the bush.
Grapes have the ability to produce many more buds and flowers than they can provide nutrition. Therefore, in order not to reduce the yield, not to worsen the quality of the berries, not to weaken the development of the bush, the load of the bush is rationed with eyes (shoots) and inflorescences.
Amateur growers often overload the bushes, not paying attention to the huge number of new shoots of the annual growth of the bush, and after a year they are perplexed: "Why did the crop fall sharply, why do the shoots develop poorly and do not ripen?"
The viticulture literature and reference data for grape varieties give advice on pruning and eye loading. For example, "Victoria" - a hybrid form obtained as a result of complex backcrosses of frost-resistant European-Amur hybrids with a resistance donor SV-12-304, is prone to crop overload, therefore, it is necessary to normalize the load of bushes with inflorescences and clusters. The load of adult bushes is 25-30 eyes per bush when pruning fruit vines for 5-8 eyes. The eyes at the base of the shoots are highly fruitful, therefore, you can cut the vines for 2-3 eyes. "(Extract from the description of the variety.) Of course, when forming a bush, it is necessary to take into account the recommendations for pruning fruit vines and the number of eyes on them. But each bush is individual , one is more powerful, the other is weaker, therefore, in different cases there cannot be a single recommendation even for the same variety.
A convenient system of rationing and pruning of grape bushes was proposed by the scientists of VNIIViV "Magarach".
First of all, the strength of the bush is determined - the number of vigorous shoots on this bush. A shoot with a length of more than 1.2 m and a diameter at the base of more than 8 mm is considered vigorous. Fattening shoots with a diameter of more than 12 mm are counted as two.
Note. There are many varieties of grapes that optimal diameter vines are smaller than 8 mm, therefore, for these varieties, strong vines are determined by their individual criteria.
The load of the grape bush is determined by the formula "Magarach".
Where, M is the optimal number of eyes in the bush,
N - the number of vigorous shoots,
C = 2.5 - coefficient at which the yield is slightly lower than the maximum, but the quality of bunches and berries is ensured and the best ripening of the vines is ensured.
Consider the application of the formula "Magarach" on an example. There are 20 strong vines on the bush.
M = 2.5 x 20 = 50 eyes.
This means that during autumn pruning, 50 eyes must be left on the bush.
With a four-arm fan formation, our bush consists of four fruit links. For most varieties, the recommended length of pruning vines for fruiting is 6-8 buds, and on replacement knots 3-4 buds (of which only two will be selected in the spring). Thus, the fruit link should have 9-12 eyes. Distribute the estimated number of eyes - 50 as follows:
For four replacement knots, 4 eyes each - 16 eyes;
For four fruit arrows, 8 eyes each - 32 eyes, since we have the opportunity to place two more eyes on the bush, we can redistribute the eyes on four fruit arrows, leaving seven eyes on them, and form the fifth fruit arrow from the remaining 6 eyes, thus, creating a reinforced fruit link.
The figures show options for trimming bushes with a load of 50 eyes.

On fig. 1 - the bush is formed with three ordinary fruit links, 7 eyes on the fruit arrow and 4 eyes on the replacement knot and one reinforced link with fruit arrows of 6 and 7 eyes and a replacement knot with 4 eyes.
On fig. 2 - the bush is formed with four ordinary fruit links and one coppice shoot for a new sleeve (creation of a reinforced bush).
The "Magarach" formula takes into account up to 45% loss of buds during winter storage and breakage of green shoots when vines are raised and tied up on trellises. Therefore, if the actual losses on your bush in the spring are within the limits provided for, you need to carry out additional normalization. If, on the bush in the spring, all eyes were preserved and began to develop, then it is necessary to ration the number of green shoots and inflorescences. First of all, two shoots are left on the replacement knots in accordance with the requirement - the first (lower) shoot should look outside the bush, and the second - inside. Two extra shoots on each substitution knot are broken out. The upper inflorescences on fruitful shoots and all inflorescences on the shoots of replacement knots are removed; underdeveloped inflorescences and underdeveloped shoots are removed; sterile shoots are removed in order to thin out the fruit arrows (first of all, the fruitless shoots at the ends of the fruit arrows are removed).
Rationing according to the "Magarach" system in combination with the implementation of green operations helps to strengthen the bush and increase productivity. As the bush becomes stronger and with experience, you can increase the load on the bush by increasing the C factor to 3 and even up to 3.5. Thus, it is possible to achieve high yields, excellent quality of the bunches and the own development of the grape bush.
Lesson 15 - How to properly fertilize and irrigate the vineyard.
Fertilization is a very important and complex operation in providing a grape plant with nutrients.
The main organs of plant nutrition are leaves and roots. The main function of the leaf apparatus is the assimilation of carbon from the air, photosynthesis; The root system provides the plant with water and assimilates nutrients from the soil. The roots absorb from the soil the mineral elements necessary for nutrition: nitrogen, phosphorus, potassium, magnesium, calcium, iron, sulfur; trace elements: boron, manganese, zinc, molybdenum, copper, chlorine and some organic substances, such as salts of humic acids. In the root system, the absorbed inorganic compounds are converted into organic ones - amino acids, proteins, sugars, fats. When nourished with micro- and macroelements, the vital processes of the plant are activated: the synthesis of chlorophyll ensures the growth of the assimilation surfaces of various plant organs (leaves, shoots, roots, fruits). Conditions of mineral nutrition largely depend on the content of these nutrients in the soil.
A grape plant, growing in one place for many years, absorbs a large amount of these elements from the soil for its development, for the construction of plant tissues, for the formation of various organs: shoots, roots, leaves, buds, fruits.
During the growing season, the plant absorbs nutrients with different intensity and selectively for individual development phases: the intensity of nutrient absorption increases from the beginning of flowering to the ripening of the crop. The last stages of vegetation are characterized by an increase in potassium intake.
When fertilizing vineyards, it is necessary to take into account the right combination of nutrients, depending on the need for them in a certain growing season.
Universal recommendations and recipes for fertilizing for any vineyards with a variety of types and varieties of soils, their chemical content, water regime; with a variety of varieties and age of grape bushes, of course, it cannot be. One thing is clear: how much nutrients the plant has taken from the environment, so much must be replenished. So how much mineral, organic, micronutrient fertilizers should be applied when feeding? What is their optimal ratio?
Vinogradar A.L. Dmitriev in his book "The Ideal Vineyard" recommends with serious justification to determine the doses of mineral fertilizers in dressings to take into account the ratio of nitrogen, phosphorus and potassium in the grape plant (N: K = 3: 1: 2), determined by the scientists of the Research Institute. V.E. Tairov. The author, having processed the results of research in the field of vineyard fertilizers, came to the conclusion that in order to obtain 1 kg of crop, an adult grape bush needs 6 g of nitrogen, 2 g of phosphorus and 4 g of potassium (according to the active substance).
Note. Active substance- this is the amount of pure substance in the fertilizer, expressed in%.
Knowing the yield of a grape bush, it is easy to determine how much nitrogen, phosphorus and potassium are taken out of the soil, i.e. how much fertilizer should be applied to the soil. With an average annual yield of 10 kg, a grape bush needs 60 g of nitrogen, 20 g of phosphorus and 40 g of potassium, i.e.:
Ammonium nitrate (N-34%) - 60: 0.34 \u003d 176.5 g ~ 180 g;
- superphosphate (Р2О5-20%) - 20:0.2 = 100g;
- potassium sulfate (K2O-50%) - 40: 0.5 = 80 g.
But limited only mineral supplements it is forbidden. The soil requires not only the restoration of the chemical content, but also the improvement of the structure and microflora, and this requires organic fertilizers: humus, compost, peat, bird droppings, etc. Under the influence of organic matter, sandy soils become more cohesive and water-intensive, while clay soils, on the contrary, reduce density and become more structural. organic fertilizers are complete fertilizers, they contain all the nutrients necessary for plants. The manure of various farm animals is used as the main organic fertilizer. Manure is brought under the grapes only in a rotted state, in the form of humus. The content of nutrients in humus depends on the conditions of its storage. If during the storage period it was not washed out by rains and melt waters, then nitrogen, phosphorus, potassium and other nutrients were preserved in it. It is enough to add 6-8 kg of humus under the bush to restore the nutrient medium depleted during the season. Humus is usually introduced in the fall with deep incorporation (digging) into the soil.
In small gardens and vineyards, compost can be the main type of organic fertilizer - the most effective, cheapest and most affordable type of complete fertilizer. For its preparation, all types of waste of plant and animal origin are used: food waste, waste of fruits and vegetables, manure and droppings of domestic animals and birds, feces, mowed grass and weeds, tops vegetable crops, sawdust and chopped branches of cut trees and shrubs, sawdust and shavings, green shoots, leaves, wood ash, any household waste of organic origin.
To lay the compost, you need to prepare a site with three walls fastened together with a height of approximately 1 m. Determine the area of the compost bin yourself according to your capabilities and needs, but most likely your compost pit will be no less than 1 x 1 m. Of course, the ideal option is a stationary structure with concrete floor, with reliable durable walls, with two compartments (Fig. 1).

But there may also be a compost bin and a temporary structure with walls made of wooden shields or old slate and other materials. In this case, it is necessary to compact the area under the compost bin and cover it with a thick layer (20-30 cm) of sawdust or straw to make it easier to shovel the compost in the future. Any organic matter can be put and poured into the compost heap, except for bones and animal fat, and the tops of diseased plants (late blight of tomatoes, fungal diseases of grapes) should not be filled up there, they must be removed from the garden, buried or burned. The compost heap can be filled in random order with periodic refilling with earth, sawdust, straw and watering with water, slurry, faecal solutions or bird droppings. It is desirable that the heap be covered with a film, this provides a greenhouse effect and quick overheating of the compost and protects it from being washed out by rains and volatilizing some nutrients. If a pile is shoveled at least once during the season, i.e. transfer to the next compartment, then by autumn the compost will be ready. Ripened compost is a dark, homogeneous, crumbly substrate without an unpleasant odor. Like manure, it has all the necessary nutrients. It is introduced in the same way as humus in the fall, 6-8 kg for each bush with digging.
Bird droppings are a very valuable organic fertilizer. It contains nitrogen, phosphorus and potassium in an easily digestible form. Nutrients in bird droppings are very quickly absorbed by plants. Apply bird droppings for root top dressing after dry garter and 5-7 days before flowering, instead of mineral top dressing.
For fermentation, bird droppings are diluted 4 times with water. Fermentation is carried out within one to one and a half weeks. Before making under the grape bushes, the infusion of the litter is diluted 10 times. For one feeding of a bush, 0.5 liters of diluted infusion is enough. Feeding with bird droppings should be combined with watering the vineyard.
AT last years serious attention is paid to microbiological methods of soil restoration. More than ten years ago, EM was created in Japan - a technology that has gained recognition in many countries of the world and is beginning to be mastered in Russia. EM (effective microorganisms) is a preparation created according to a special technology in which a large number of anabiotic (beneficial) microorganisms living in the soil are grown: photosynthetic bacteria, lactic acid, yeast, etc. Interacting in the soil, they produce enzymes and physiologically active substances that have a positive effect on the growth and development of plants.
Properties of this drug:
accelerates plant growth;
accelerates the ripening of fruits;
converts organic waste into effective fertilizer in the form of compost;
restores the natural fertility of the soil;
sharply reduces the content of toxic elements;
improves the taste and presentation of the grown products;
increases the shelf life of the crop in its natural form.
The EM preparation is produced in Russia by EM-TECHNOLOGIA LLC, Ulan-Ude under the brand name Baikal EM-1 in the form of 30 ml bottles and is available in retail. How the drug is used is described in detail in the instructions attached to each package.
When and how should fertilizer be applied?
The timing of fertilization is of great importance and, as a rule, several elements of fertilizer must be applied at once. The joint application of nitrogen and phosphorus fertilizers is much more effective than their separate application to the soil. Nitrogen fertilizers together with phosphate fertilizers are best applied in spring and in the first half of summer; potassium is well absorbed in the second half of summer. Organic fertilizers should be applied in the fall, while reducing the amount of nitrogen fertilizers in the spring of the following year by half. To ensure the effectiveness of fertilizing, fertilizers must be applied to a depth of 40-60 cm, in the area of \u200b\u200blocation of the main roots within a radius of ~ 1 m. The most convenient way to apply fertilizers in liquid form is through drainage pits (Fig. 2) for irrigation.

As drainage pipes (1), you can use asbestos-cement or plastic pipes 80-100 mm in diameter, 50-60 cm long. Drainage pits (2) ~ 50x50 cm in size are dug to a depth of 70-80 cm, covered ~ 30 cm with gravel or crushed stone. A plastic film is spread over the gravel, on which a drainage pipe is installed in the center of the pit. The upper end of the pipe should rise about 10 cm above the ground level. Thus, the prepared drainage pit is filled up with the soil selected from it to the ground level. Such drainage pits can be used for many years for top dressing and for simultaneous deep watering of grape bushes.
Foliar top dressing (spraying on leaves).
Nutrition can enter the plant not only through the roots, but also through the leaves. With foliar top dressing, nutrients are absorbed by plants very efficiently, quickly and completely. Foliar top dressing is combined with spraying against mildew and oidium. Foliar top dressing is carried out on a cloudy day or in the evening, after sunset.
Recipes for foliar dressings.
First foliar top dressing. Infuse 200 g of superphosphate for a day in 3 liters of water in a glass bowl. On the day of foliar feeding, dissolve 30 g of ammonium nitrate or 50 g of ammonium sulfate, 100 g of potassium sulfate, 10 g of boric acid and 100 g of copper sulfate in separate dishes. Drain the superphosphate solution from the sediment, mixing with the solution of the remaining components. At the same time, prepare a solution of 100 g of lime in a separate bowl. Pour milk of lime into a mixture of solutions of all components until a neutral reaction, which can be determined using litmus paper or a new iron nail (if the acid nail solution becomes rusty). Then the prepared mixture of solutions is diluted to 10 liters.
The solution for the second foliar top dressing is prepared in the same way as the first, only boric acid and Bordeaux mixture are excluded from it. The solution is brought to a neutral reaction by adding baking soda. The second foliar top dressing can be carried out with an aqueous infusion of mullein. One part of mullein is diluted in 10 parts of water and infused for three days, after which it is filtered and used for spraying. Such a solution is not only a foliar top dressing, but also a biological means of combating oidium.
During the third foliar top dressing, the nitrogen-containing component is also excluded from the solution.
Recipe for the fourth foliar top dressing. 200 g of superphosphate is infused for a day in 3 liters of water. 450-500 g of wood ash is also infused in 3 liters of water during the day. The solutions drained from the sediment are mixed, brought to a neutral reaction with baking soda and diluted with water up to 10 liters.
Foliar top dressing with microelements.
Foliar top dressing with a weak solution of trace elements is carried out once a season, the next day after the first foliar top dressing.
To prepare the solution, any composition of trace elements is used in accordance with the instructions attached to the package.
For the convenience of carrying out all types of feeding A.L. Dmitriev compiled tables, one of which we will use with minor changes.
Top dressing Timing Fertilizer rate
Ammonium nitrate Superphosphate Potassium sulphate
Manure or compost Autumn, once every 2-3 years
1st top dressing After dry garter 90 g 100 g -
2nd top dressing 5-7 days before flowering 40 g 30 g 80 g
1st foliar application 2-3 days before flowering 30 g 200 g 100 g
Foliar top dressing with microelements The next day after foliar application The composition of the solution of microelements according to the instructions
2nd foliar application Immediately after flowering 30 g 200 g 100 g
3rd top dressing 5-6 days after flowering 40 g 30 g 30 g
4th feeding At the end of the day 30 g 30 g
3rd foliar top dressing At the beginning of maturation 200 g 100 g
5th feeding 30 g 30 g
4th foliar application 200 g 450-500 g wood ash
Fertilizer rates are given based on one grape bush with a planned yield of 10 kg. The norms of superphosphate and potassium sulphate are doubled in comparison with the calculations, because. half of these fertilizers are not absorbed by plants.
Norms for foliar dressings are given for processing ~ 10 bushes.
More details about fertilizing vineyards can be found in the book by A.L. Dmitrieva "Ideal vineyard or how to get a ton of fruit from a hundred square meters", (ed. Volgograd, 2001).
Lesson 16 - Preventive measures for the protection of vineyards.
In recent years, the leading institutes of viticulture have bred a number of complex-resistant varieties, which are already zoned in Siberia and in our Altai. But these varieties are also to varying degrees resistant to certain diseases and therefore need protection, preventive measures against viral diseases.
In 2002, due to prolonged rains and high humidity, the vineyards in Biysk horticulture for the first time suffered to varying degrees from oidium. Such varieties as Aleshenkin, Amirkhan, Muskat Katunsky, Grochanka, Zhemchug Sabo turned out to be especially unstable to this disease. Our growers were not ready to resist the disease and, as a result, many vineyards had a significant loss of harvest, the vine did not ripen and the wintering buds were weakened, i.e. grape bushes were poorly prepared for wintering and did not endure a rather mild and very snowy winter. Thus, oidium affected the condition of many vineyards.
In the practice of southern viticulture, preventive measures are constantly taken to combat mildew, gray mold, oidium, anthracnose, phylloxera - the main diseases of vineyards.
To keep vines healthy, chemical treatments should not be completely abandoned, even if your grape varieties are complex-resistant. It is easier to prevent than to treat a disease.
What system of protective measures can be recommended for country vineyards?
Immediately after the dry tying of the vines, the soil surface is sprayed against pests and mildew with a 3% solution of nitrafen. After cultivation, the soil is mulched so that wintering mildew spores cannot spread to the first young shoots and leaves. Treatment with nitrafen can also be carried out in the fall, before the shelter of the grapes for the winter. To some extent, the smell of nitrafen repels mice. The next year, the first treatment can be carried out with a 3% solution of iron sulfate.
anti-mildew treatment is carried out in conjunction with the first foliar top dressing with Bordeaux mixture or a 3% solution of copper oxychloride (30 g of copper oxychloride is added to the general foliar solution). Currently, Bordeaux mixture substitutes are used: polychom, polycarbacin, efal.
Processing from oidium can be carried out with potassium permanganate in conjunction with foliar top dressing with microelements, for this it is enough to add a few crystals of potassium permanganate to the microelement solution.
Protection against oidium is provided by foliar top dressing with a solution of mullein, as described in the previous lesson. A preventive measure to combat oidium is the pollination of plants with ground sulfur or spraying with colloidal sulfur (80-100 g per 10 liters of water). In this case, sulfur evaporation occurs, which occur at temperatures above 18 C.
All treatments should be carried out before flowering or after flowering.
Treatments with sulfur preparations should be carried out in cases of detection of foci of infection with oidium.
Treatments against mildew and oidium suppress diseases of anthracnose and phomopsis.
Tips from old gardeners.
Grapes and fruit trees can be protected from mice if, during winter protection (shelter), a burnt piece of felt, old felt boots or wool is placed under the shelter. They do not like mice and the smell of crumb rubber.
Lesson 17 - Protecting the vineyard from frost and frost.
Shelter for the winter.
Grapes - a crop of a temperate warm climate, characterized by increased sensitivity to frost and, especially, to early autumn and residual spring frosts. The most sensitive to frost are green grassy shoots that cannot withstand even short frosts of -1-2 C.
During early autumn frosts, wintering buds, even on well-ripened, but not hardened shoots, can be damaged by frosts of -5-8 C.
In winter, buds on vines that have completely completed the vegetation process can withstand frost without damage: for Euro-Asian varieties -18-20 C; varieties with increased resistance -22-24 C; interspecific varieties -24-35C; North American varieties -30 C; Amur grapes up to -40-45 C.
Buds that have not blossomed in spring can withstand short frosts of -3-4 C.
Blooming buds are damaged by frost -1 C.
A great danger to the kidneys are temperature fluctuations from minus to plus in winter after the end of deep dormancy. Under such conditions, the shoots lose their hardening and even slight frosts become dangerous for them.
The roots of grapes are less hardy than the aerial part. In Euro-Asian varieties, the roots are damaged at a temperature of -5-6 C; the roots of North American interspecific varieties endure -9-12 C; The roots of Amur grapes are able to withstand soil freezing down to -19-21 C.
In our unusual climatic conditions for grapes, measures are needed to protect it from the cold.
To increase the effectiveness of protection, reduce the laboriousness of work on shelter, planting of grapes is done in depth, in trenches 35-40 cm deep.
The grapes usually take cover in the last decade of September - the first decade of October, before the onset of frost. But it is desirable to extend the time of ripening and hardening of grapes as much as possible. In September - early October, the cells of vines have not yet accumulated the required amount of sugars - substances that provide frost resistance. Therefore, during this period, grape buds are damaged even by slight frosts of -4-5 C, at a temperature of -7-8 C, wintering eyes and poorly ripened vines may die completely.
To acquire resistance to low temperatures in the stage of deep organic dormancy, it is necessary that the vines undergo hardening. The first stage of hardening at low positive temperatures from +10 to 0 C for 14-16 days. It is at this stage that the bulk of the starch accumulated in the cells is converted into sugars, which serve as an energy material that protects the plant from freezing.
The second stage of hardening should take place at a temperature of -1 to -15 C, also within a half-moon.
It is possible to provide conditions for hardening in Siberian conditions only in a covering form.
Before shelter, the vine bush is cut off (see "Lesson Nine"). The remaining vines and sleeves are tied into bundles and left in a horizontal position for the hardening period, tied up on the lower string of the trellis with a temporary cover made of polyethylene film or covering material. Thus, it is possible to extend the hardening time of grapes by 2-3 weeks and protect them from possible early autumn frosts.
A 4-5 cm thick layer of mulch made of sawdust, peat, grain husks, humus or coniferous needles not only retains moisture in the soil in summer, but also provides additional protection for the roots from frost. Therefore, it is necessary to check the condition of the mulch and, if necessary, make additional mulching of the trench.
The main and most reliable way to protect grapes from frost in winter is to cover them with earth and snow. The thickness of the earth layer is 30-35 cm, i.e. the trench with the grapes laid in it should be completely covered with earth with a slide. With such a shelter, even incompletely matured vines are preserved. For additional protection against underheating and mechanical damage, it is advisable to spray the sleeves and vines milk of lime(better Bordeaux mixture), dry and then wrap in polypropylene bags (bags of sugar or flour). After that, the sleeves are laid and pinned with metal staples or wooden hooks at the bottom of the trench and then covered with earth. A polyethylene film or roofing material is spread over the earthen embankment so that in spring the melt water rolls off the earthen embankment and does not flood into the trench. For snow retention, cut vines, branches of trees and shrubs and tops are laid out above the shelter, for the same purpose, cut vines are left on the trellis.
Many winegrowers in Siberia have tested the "dry" method of sheltering grapes. With such a shelter, the vine remains in natural conditions (not buried in the ground), which reduces the likelihood of underheating of the eyes, does not reduce the degree of hardening. The method is as follows: sleeves and fruit vines, tied into bundles with staples or on wooden blocks, are fixed horizontally in the trench, without touching the ground. You can isolate the vine from the ground by laying a strip of roofing material or plastic film under the vines along the entire length of the trench. From above, the trench is closed with dense wooden shields 25-30 mm thick, on top of which a roofing material or polyethylene film is spread to protect against melt water. Of course, in the first and in this case, the film and roofing material must be securely fastened so that they are not blown away by the wind.
For additional insulation and protection from mice, the author wraps the vines in polypropylene bags and completely fills the trenches with pine needles, and only then closes them with shields and film.
For the destruction of mice, it is necessary to take the most radical measures. Mice are a disaster in the garden. The damage caused by these rodents can sometimes be irreparable for both fruit trees and grapes. There are many poisons for rodents on sale, it makes no sense to list them. The main thing is that there are enough of these means of killing mice in your garden, and as you eat them, you need to replenish them again and again. There are folk remedies for repelling these pests - burnt pieces of old felt boots, felt or wool, which are laid out under each bush before shelter for the winter.
Omsk winegrowers, using the "dry" method of shelter, which they call "air cushion", arrange shelters from a double polyethylene film, which stretches along arcs installed above the trenches every 1.5-2 m. This version of the shelter simultaneously solves the issues of protection from autumn and spring frosts, prolongation of the growing season, for full ripening and hardening of grapes and protection for the winter period.
Regardless of the method of shelter, with the first snowfalls, one should strive to cover the grapes with snow with a layer of at least 60 cm.

Rice. 1 Ways to shelter grapes.
a - shelter for the winter with wooden shields.
1 - polyethylene film
2 - wooden shield
3 - device for pressing the film to the ground
4 - coniferous needles
5 - mulch
b - cover with double film
1 - polyethylene sleeve
2 - board
c - covering along arcs with covering material
1 - covering material (agrosil No. 60)
2 - metal arc
Opening of grapes in spring and frost protection.
The opening of the grapes begins after the snow has melted. First remove the means of snow retention. As it thaws, the means of protection against melt water are removed. Cleaning the vineyard from large debris and foreign objects will accelerate the defrosting of the soil. In the second half of April, the main means of shelter are removed - earth, insulating materials (shields, mats, spruce branches, reed mats, coniferous needles, etc.). The bunched vines are lifted out of the trench, shaken off the ground, weakened and partially removed the binding of the bunches, if the vines were wrapped, then the wrapper is removed. After that, the vines are hung on the bottom wire string of the trellis to dry. Trenches are cleared of the remnants of covering material and debris. At the same time, preventive treatment of the vine and soil is carried out (see "Lesson Sixteen"). After drying, the vines are finally untied, unraveled, separated from each other, and again lowered into the trench. Grapes should be opened in cloudy weather or in the evening. On a sunny clear day, overheating and drying of the vine and buds are possible, because. they do not yet receive enough water and nutrients and are weakened after wintering.
The main task after opening is to protect the vines and rapidly swelling and developing buds and young shoots from residual spring frosts. Vines should be kept in the trench until the danger of frost has passed. Under the influence of solar heat, the vegetation process begins in the grapes, green shoots develop, which are very sensitive even to very light frosts (0-2 C). Therefore, during the entire period of spring frosts, the grapes must be covered. It is enough to miss at least one frost to kill the main fruitful shoots that develop first. Of course, in a week or two, the replacement buds will wake up and start growing, but they will be delayed in development, and besides, they are usually barren.
Frosts in Siberian conditions are the most serious danger for grapes, even more dangerous than severe frosts winters.
Spring frosts until mid-May can be very strong (-10-15 C). In late May and early June, they weaken, but their probability is not excluded until the end of the first ten days of June.
How to determine the possibility of night frosts? If in the evening, with clear weather, the air temperature drops sharply, approaching 0 C, with a high degree of probability, one can expect a strong frost at night and always in the morning. Grapes need to be covered immediately. As a stationary shelter, a "hut" with a double wall of a polyethylene sleeve can be built over a grape trench (see Fig. 1, c). Instead of a polyethylene sleeve, you can use a covering nonwoven fabric"Agrotex" №60. For the construction of shelters, you can use the lower wire string of the trellis, on which you can easily straighten, stretch and fix the covering material. You can make a shelter on the frame of metal arcs, stuck ends into the ground after 1.5-2 meters on both sides of the trench. Between themselves, the arcs must be tied with a light wire or cord in several longitudinal rows so that when tensioned, the covering material does not sag between the arcs (Fig. 1, c). You can press the covering material on both sides of the trench with metal pipes or rods, boards or poles, you can sprinkle the edges with earth.
If there is a threat of frost at such structures, it is enough to close the ends, for which the covering material at the ends should be left with a margin.
Under such shelters in the daytime, a greenhouse effect is created, the air and soil are heated more intensively, and, consequently, the vital activity of grapes proceeds more actively. Thus, in addition to protection from frost, it provides a reduction in the ripening of berries, ripening of the vine and wintering buds.
When the threat of frost disappears, the grapes are finally opened. Vines with green shoots must be very carefully separated from each other and tied to the trellis strings in accordance with the chosen bush formation.
Lesson 18 - Enjoy grapes all year round.
Having mastered the lessons of Siberian viticulture, you were able to grow young grape bushes, got full-bodied bunches on adult bushes that delight you with a variety of shapes, colors and, most importantly, extraordinary taste.
So how to prolong the pleasure and enjoyment of all this charm? What to do with amber, emerald, ruby, black berries?
Grapes can be enjoyed not only by consuming them fresh for a short time, they can be used to prepare a variety of sweet products for the future: jams, marinades, juices, jellies, compotes, marmalade, marmalade, wine.
Here is some of them:
Grape jam.
For jam, grapes with large fleshy berries and strong skins are used. Berries, taken from the combs and washed in running water dipped in a syrup made from 1 kg of sugar and 1 glass of water and heated to a boil. After half an hour of exposure, they start cooking on low heat until the berries settle, the solution becomes transparent, and a drop of jam stops spreading. During the cooking process, the foam is removed and the floating seeds are removed. Before removing from heating, you can add citric acid and a few vanillin crystals.
The cooled jam is poured into jars, closed with lids and stored in a dry, cool place.
Pickled grapes.
Pickled grapes with thick skins. Clusters to be pickled are cleaned of damaged berries, washed well in running water and, after draining the water, whole or divided into parts, placed tightly in glass jars, pour marinade and cover with lids. The marinade is prepared according to the recipe: for 1 liter of water, take 500 g of sugar, 150 g of 8% vinegar, 25 g of salt, 6-7 cloves, the same amount of allspice peas, a little cinnamon, Bay leaf. All this is boiled for 10-15 minutes. Note: vinegar is poured into the marinade after boiling. The finished marinade is cooled, filtered and poured into jars of grapes. Banks are placed in a container with cold water and heated to a boil, sterilized for 5-6 minutes.
Grape juice.
For the preparation of grape juice, any grape variety can be used, provided that the berries are fully ripe.
Clusters are washed in running water and dried. The berries are separated from the ridges, unripe and spoiled are discarded. You can squeeze the juice in a juicer, a screw press or under oppression by hand.
Muscat grapes such as "Tukay", "Pearl Sabo", "Muscat Katunsky" give the juices a wonderful nutmeg flavor. Grape juice "The Riddle of Sharov" has a unique mysterious bouquet of aromas of exotic fruits and wild strawberries.
To obtain colored juices, black, red, dark pink grape varieties such as Early Purple, Katyr - 2, Isabella, Cardinal and others are used. The clusters are placed in a colander or sieve and immersed for 5 minutes in a pot of water brought to a boil. Then the grapes are laid out in an enamel bowl, tightly covered with a lid and allowed to cool. After that, the berries are separated from the ridges and the juice is squeezed out of the berries. The juice is heated to 90 C and poured into glass bottles or jars washed with hot water and soda, rolled up with lids, and cooled by turning the jars over on the lid, and laying the bottles on their side.
If you want to get a clear, pulp-free juice, it is left for clarification for 3-4 days. After a precipitate forms at the bottom of the bottles or jars, it is carefully drained again, heated to 90 C again and poured into a new container.
Jam made from grapes with fruits (bekmez).
Washed and separated from the ridges, the grapes are boiled over low heat with constant stirring until the berries crack and juice appears. When boiling the juice, remove the foam and floating seeds, add sugar, diced peeled and core fruits (apples, pears) and lemon slices. For 5 kg of grapes add 1 kg of sugar, 0.5 kg of fruit, 2-3 lemons. Cooking is carried out with constant stirring until the density of honey. Then the jam is laid out in jars, left open until completely cooled, and then closed with plastic lids.
Grape compote.
For compote take large ripe grapes. The berries are washed, carefully removed from the combs, tightly placed in jars and poured with hot syrup, for the preparation of which they take 250-300 g of sugar per 1 liter of water. Steep grapes in syrup for 2-3 minutes. Then the syrup is drained, it is reheated to a boil and the berries are poured to the top again and rolled up with lids.
Compote turns out to be tastier if the syrup is prepared on juice squeezed from defective grapes (but not spoiled). It is good to add a few slices of lemon to the compote of sweet grapes.
Dried grapes.
For drying, seedless varieties with high sugar content and full maturity are usually used. Many amateur gardeners leave grapes destined for drying on the vine until they wilt, then sort and dry in the sun. Before drying, grapes are carefully examined, rotten and damaged berries are removed and laid out on trays and baking sheets. Clusters are periodically turned over during drying and this is repeated until the berries are dry. Usually dry berries themselves fall off from the branches. Dried grapes are winnowed in the wind and put away for storage.
Some grape varieties can be stored dried for 5-6 months. These include "Tukai", "Original", "Pleven stable" and others.
When drying, bunches can be covered with gauze blankets from flies and wasps.
Dried bunches are stored in a suspended state, without touching each other, in a dry, ventilated room at a temperature of +5 - -1 C.
Grape wines.
The quality of wine depends largely on the grape varieties. It is desirable that these be technical or table-technical varieties with a high sugar content of 18-22% and an acidity of 7-8 g / l.
Excellent dessert wines are made from nutmeg varieties"Tukay", "Pearl Sabo", "White Muscat"; many are attracted to wines from isabella varieties; good red wines from "Early Magarach", "Purple Early".
Harvesting grapes for wine should be done only in settled dry weather. Rotten, moldy and unripe berries are completely unsuitable for winemaking.
The harvested grapes are separated from the ridges by hand, while each berry is crushed and loaded into a screw press, under the tray of which a glass bottle or enamelware is placed. As the press is loaded, the juice flows out, and the pulp settles, and the press is supplemented with a new portion of grapes. After the juice stops separating by gravity, they begin to squeeze it mechanically, gradually increasing the pressing pressure. The squeezed pulp is taken out of the press into an enamel bowl, mixed with the next squeezed portions and pressed again. Juice extraction can be done on an electric juicer.
In the absence of a juicer or press, the pulp is squeezed out under oppression or by hands, placed in a canvas or nylon bag, but losses of up to 20% are inevitable.
Dry white wine.
Table (dry) wine is a wine that does not contain sugar. During fermentation, all grape sugar is "dry" (hence the name - " dry wine") turns into wine alcohol and carbon dioxide. Table wines, depending on the sugar content in the grapes, have a strength of 9 to 14 degrees.
White wine is made from white grapes.
The squeezed juice (wort) settles for a day at a temperature of +15-20 C. After settling, the must is carefully removed from the sediment using a rubber or vinyl chloride tube, pouring into bottles where fermentation will take place. Bottles are filled no more than? volume, so that the wort does not come out of the bottle at the time of rapid fermentation. Fermentation of the must takes place on its own grape yeast, which develops on the surface of the berries at the time of their ripening. That is why it is very important to harvest grapes in steady dry weather. Rains can wash off the yeast culture from the berries and active fermentation of grape must in this case may not work. It is most reliable to use a pure yeast culture for fermentation. But it's hard to get them these days. They are not available in retail trade, and they are supplied only to wine production. But "wine sourdough" can be prepared independently. A few days before the grape harvest, ripe berries of early grape varieties are harvested for wine. Two glasses of unwashed berries are crushed, placed in a bottle, a glass of water and half a glass of sugar are added. Then everyone is shaken until sugar is completely dissolved, the bottle is closed with a cotton swab and placed in a dark place where the temperature should be + 22-24 C. After 3-4 days, the leaven begins to ferment, it is filtered through gauze and used to activate the fermentation process, adding from calculation of 2% on the total amount of wort. Sourdough should not be stored for more than 10 days.
Bottles with wort for fermentation are placed in a room with a temperature not lower than +18 C and not higher than +24 C and closed with a water seal (see Fig. 1). At temperatures above or below the optimum, malnutrition can occur.
Fermentation has two phases:
The first - rapid fermentation, lasts 5-8 days, during this period up to 90% of sugar is fermented;
The second - quiet fermentation, lasts 3-4 weeks.
To preserve the aroma and prevent possible oxidation, the bottle with fermenting wine is topped up with the same wine. To do this, the wort for fermentation must be put in two bottles. After the end of rapid fermentation, one bottle is topped up from the second, closed again with a cork with a siphon dipped into a glass of water. Quiet fermentation takes place in the filled bottle, which can be judged by the release of bubbles from the siphon (Fig. 1).

Rice. 1 Phase of quiet fermentation and clarification of the wine.
The end of fermentation is defined by the cessation of bubbling and the clarification of the wine with a clear interface between the wine and the yeast sediment. The wine is separated from the sediment. To do this, a bottle of wine is placed on the table, and an empty one on the floor. The overflow tube is immersed in the wine so that its end is slightly higher than the yeast sediment. Wine is sucked off from the other end of the tube, and when it begins to flow, this end is lowered into a bottle standing on the floor. The remaining yeast sediment is poured into a smaller container, allowed to settle again and the settled wine is drained again. The grounds are filtered through a cloth filter. Filtered wine is added to the bottle to half the neck. The bottle is tightly closed with a cork or wooden tongue and placed in a cold room with a temperature not exceeding +15 C for re-settlement. A month later, the wine is again removed from the sediment and can be bottled up to half the height of the neck. The bottles are closed with corks and stacked lying down.
Note. Cork stoppers during long-term storage of wine are poured with tar or sealing wax.
Dry red wine.
Red wines are made from grape varieties with black, purple or dark red berries.
Red wines at home are prepared with some difference from white wine technology. The pulp after crushing the berries is not separated from the wort, but all together they are placed in an enameled bowl for? volume, sourdough is added there (2% of the loaded grapes). During rapid fermentation, the pulp cap rising above the wort is stirred several times a day. You can press down the pulp cap for the entire period of rapid fermentation with a light oppression so that it does not float up. This is to ensure that the wine material does not oxidize and turn into vinegar.
After the end of rapid fermentation, the wine must be separated from the pulp. To do this, the entire wine mass is filtered through a sieve or colander, and the pulp is pressed or passed through a juicer. The wort separated from the pulp is poured onto volume in the bottle is closed with a water lock and the process continues according to the technology of white wine.
Dessert wines.
Dessert wine has a high content of free sugar (up to 15%). It should be well-coloured, transparent, fragrant, thick, with low acidity. At home, dessert wine can be prepared by adding concentrated grape juice or sugar to dry wine.
Before the start of fermentation, 50 g of sugar is added to the grape must for each liter. The rest of the process is carried out according to the technology of dry wine. After the end of fermentation, the wine should be dry, as the sugar in it has completely fermented. The wine is allowed to stand and when it clears (this happens after about two months), it is removed from the sediment. In transparent wine, to add sweetness, add 100-150 g of sugar or about 200 g of concentrated grape juice for each liter. Sugar is pre-dissolved in a small amount of the same wine with slight heating in a water bath and constant stirring, and then poured into the total volume of wine. After adding sugar, the wine in the bottle is shaken (mixed) and settled again until completely clarified. The finished wine is bottled, corked and stored as dry wines.
The best temperature for dry wine is no higher than +10 C, and for dessert wines no more than +15 C.
Do not store wine in the light.
During storage in bottles, sediment (tartar) may appear. Don't let that worry you, it doesn't mean that the wine has gone bad. Just pour the wine into new bottles or try to keep this sediment out of your glasses.
Vine Symbol of fertility and life. the Tree of Life, and in some traditions, the Tree of Knowledge. Sometimes dedicated to dying gods. A vine with bunches of grapes symbolizes fertility and passion, a wild vine - deceit and treachery. In Buddhism, the woven vine of greed and desire must be cut to the very root. In Christianity, Christ is the true vine, and the followers are its branches (Heb. John 15). It also symbolizes the church and believers. Depicted as the Tree of Life with doves resting on its branches, the vine symbolizes souls resting in Christ and spiritual fertility. The vine with ears of bread symbolizes the Eucharist. In Egypt, the vine is dedicated to Osiris. In the Greco-Roman tradition, this tree is mainly considered a symbol of Dionysus (Bacchus), and is also dedicated to Apollo. Among the Jews, the vine symbolizes the people of Israel as God's chosen ones, and depicted together with a fig tree - peace and abundance. In Sumero-Semitic mythology, it is dedicated to Tammuz and Baal and is an attribute of the goddess of wine, Geshtinanna.
Symbol Dictionary. 2000 .
See what "Grape Vine" is in other dictionaries:
See grapes, vine, vineyard, wine...
vine- grapes (vine) are not mentioned in Scripture before the story of the flood, and after, especially after the Israelites left Egypt, it is very often used as a symbolic image to describe their life and their relationship to their God. Grape… … Complete and detailed Bible Dictionary for the Russian canonical Bible
"Vine"- VINE, ballet in 3 acts 5 scenes. Comp. A. G. Rubinshtein, scenes. P. Taglioni, Grandmougin, I. Hansen. Composed in 1883, did not go completely. 8.4.1906 post. 2nd scene of the 1st act on the stage of the Mariinsky Tra (charity performance). Ballet… Ballet. Encyclopedia
- (Vitis L.) tenacious and partly climbing trees and trees that make up the genus from the grape family, or ampelides (see Ampelides). This genus contains up to 230 species, of which the most famous and important is Vitis vinifera L. common ... ... Encyclopedic Dictionary F.A. Brockhaus and I.A. Efron
Encyclopedic Dictionary F.A. Brockhaus and I.A. Efron
Like wine, it is the subject of numerous folk tales; they tell about where the plant itself comes from, which gives such a noxious juice. This question could be followed by a double answer: either the plant was created by God, but with ... ... Encyclopedic Dictionary F.A. Brockhaus and I.A. Efron
I. Vine (Vitis vinifera) woody creeping plant; thin shoots (vines) and their lateral branches have tendrils, with the help of which the plant is fixed on a prop. Cutting off side branches leads to more intensive fruiting (cf. ... ... Brockhaus Bible Encyclopedia
- (Deut. 32:32). It has now been almost completely proved that the famous Sodom grapes or apples are nothing but the osher of the Arabs. The osher fruit is like a large apple, or rather an orange, filled with air like a bubble. In the middle... ... Bible. Old and New Testaments. Synodal translation. Bible encyclopedia arch. Nicephorus.
Books
- Grapevine, Irina Yarich. Ancient Media. ancient persia. VI century BC ... Although at that time these countries were called a little differently. Lust for power, cruelty, revenge, loss of a loved one, enterprise, prudence……
Extreme conditions for the southern berry are not a hindrance! A grape lover will be able to grow a grapevine on his plot or in an apartment and get a good harvest in the second year after planting!
1) How grapes grow
Grapes is a perennial berry bush, reaching a height of 15 to 40 m. It has a branched stem, which eventually acquires a tree, reaching up to 0.7 m in diameter. Long vines, clusters and foliage develop from the stem. Clinging with antennae to any support, it stretches upward. Grapes are not a whimsical plant and adapts even to the most severe climate of Russia. Steadfastly endures defeat by hail, recovering after a harsh winter and easily tolerates autumn-spring pruning. Grapes is a heat-loving plant, but the process of photosynthesis does not stop even at a temperature of -25 degrees. The fruits of the berry bush have a whole storehouse of vitamins:
- Phosphorus.
- Vitamins B, PP, C, P.
- Copper.
- Iron.
- Zinc.
- Folic acid.
- Silicon.
2) How grapes grow - cultivation
There are two ways to grow grapes: vegetatively and by seeds. On your windowsill, you can completely grow grape seedlings, transplanting it from a cramped pot in the spring into a prepared place for growing. But it should be borne in mind that when propagated by seeds, some grape varieties change their qualities for the worse.
- Seeds for planting are selected from overripe bunches of grapes, the seeds of which are dark brown.
- Large seeds with a thick shell are most valued.
The vegetative method of propagation of a crop involves 2 methods - cuttings and layering. When propagating by cuttings, planting material is prepared from autumn, keeping the cuttings in a cool place. In early March, they are planted in plastic cups and grown until young shoots appear. When propagating by layering, the strongest shoot is selected and rooted in a prepared hole, located 20 cm from the mother bush. Watering and hilling throughout the season, it is recommended to replant only in the next spring. Reproduction by layering is considered a more successful way of breeding grapes, in which it is possible to preserve all the taste qualities of the mother bush.

3) How grapes grow in an apartment - what you need to know
Growing grapes in an apartment is convenient and beautiful, in addition, you get the opportunity to harvest 2 times a year! The best place for grapes is a window sill on the sunny side of the house. For cultivation grapes flat :
- Prepare a box for planting cuttings measuring 10X12X12 cm.
- Lay river sand at the bottom of the box with a layer of 2 cm, which will serve as excellent drainage.
- Pour over humus and fertile soil 50/50, add 50 g of mineral fertilizers.
- With the onset of warm weather, take the accustomed stalk to the balcony or garden, bringing it into the room during frosts.
- By autumn, a shoot with 15–20 nodes will form on the seedling, which will begin to bear fruit next spring. Closer to winter, grapes shed their leaves and require rest, duration about three months. At this time, remove the plant in a cool place (+2, +8 degrees).
- Every year, transplant the grapes with the preservation of the earthy clod into a box 10-15 cm deeper than usual. Pruning of the plant is done after dropping the leaves, remove from fruitful shoots up to 8 eyes.


4) How grapes grow on the site
When choosing a site for vineyards, give preference to areas near buildings on the south side. During daylight hours, the plant will be warm and light, and at night, the heated surface from the sun will provide the grapes with additional heat, contributing to the ripening of ripe berries ahead of time. A planting pit for a grape seedling has been prepared since autumn:
- Prepare a hole 70–80 cm deep and about 60 cm wide.
- The bottom must be covered with crushed brick or pebbles, about 25 cm high.
- Prepare a 1:1:1 potting mix consisting of river sand, clay and fertile soil.
- The soil mixture must be mixed with phosphorus fertilizers and poured 20 cm into the seat.
- Lay well-rotted manure with the last layer and fill it with a bucket of hot water.
- After planting, mulch the plant and water.
To form a beautiful shape, place a support next to the bush and fasten the vine next to it. Pruning is done in the spring - for the growth of lateral stems, remove unnecessary shoots from above and pinch the top. Apply top dressing in the spring before flowering and when the berries ripen. For the winter, the grapes are covered with a film, and the root system is sprinkled with sawdust or peat.


© Sotsium Publishing House, 2012
Editorial
Dear readers!
Throughout the world, grapes are one of the main crops under which land areas are increasing every year. Viticulture is also developing in the Chernozem region, mainly through the efforts of amateurs.
This brochure summarizes the experience of practical vine growers in the Voronezh region. The technological process of growing grapes is presented.
We wish you good luck!
Where tomatoes grow, grapes will grow!
This title was not chosen by chance. The whole country grows this well-known vegetable, but grapes are associated only with the south of the country.
But the experience of growing grapes in Arkhangelsk and other northern regions, sometimes even in unheated greenhouses, has been practiced for decades. The ripening period of grapes is the same as that of tomatoes.

Krasnikov Petr Alekseevich
A few years ago, many non-covering fruit crops (apple, pear, cherry, apricot) suffered from frosts of 40 °. Those that did not freeze out, reduced the yield due to the freezing of flower buds. And the grapes did not even notice these frosts, and, as if rejoicing, gave an even greater harvest. Under the snow, he winters like under a fur coat, sometimes even better than in the Rostov region, where thaws are replaced by severe frosts.
Throughout the world, grapes are one of the main crops under which land areas are increasing every year. The most expensive agricultural the land is the land under the vineyard. But keep in mind that grapes brought from abroad from industrial vineyards are grown for sale. And in order to guarantee a high, high-quality harvest, you need: high doses of mineral fertilizers, chemical treatment from pests and diseases with a margin of 10–13 times + bunch and berry expanders + shine improvers + rotting treatment. So think about it, you can still plant your own and not be afraid to treat your children to them. By content useful substances it's just a unique culture. And if we take into account that our wine has become mostly powdered, then this is another plus in favor of the development of this culture.
By the way, the labor intensity of growing tomatoes is much higher than that of grapes (annual sowing, picking, planting seedlings in a greenhouse, then in a permanent place, garter, loosening, processing, pinching, watering).
The structure of the vine

Parts of a vine plant stem:
1 - underground trunk;
2 - main roots;
3 - lateral roots;
4 - superficial roots;
5 - head of a bush;
6 - sleeves;
7 - replacement knots;
8 - arrows;
9 - fatty escape;
10 - coppice shoot;
11 - stepson.
Seedling preparation
When purchasing a seedling from the southern regions (and they are mainly quarantined in relation to a very dangerous pest: phylloxera), a number of measures must be taken. It:
1. soak overnight in water with the addition of pest poisons (double dose);
2. Rinse under running water at t °50–5 °C for 10–15 minutes. At the same time, clean the roots and vine from mold and bacteria;
3. inspect the seedling and cut out all suspicious areas;
4. dip for a few seconds in a Bordeaux mixture or in a solution of potassium permanganate;
5. renew cuts at the ends of the roots, shorten long roots to 30 cm, the cut should be light;
6. shorten the aerial part to 4–5 buds;
7. Before planting, dip the roots into a creamy mixture: clay + cow dung + growth stimulator (any).
Points 1 and 2 impair the survival of weak seedlings.
Do not rush to dig up a seedling that has not begun to grow in spring. He can wake up in August-September and even next spring.
Planting a grape seedling
The winter hardiness and yield of the bush depend on how you planted the grapes. I have repeatedly heard that many gardeners say that they filled the planting pits as drainage with construction debris, broken glass, etc. The hair stands on end. After all, grapes are planted not for one year and more than once, you may not like the variety, but this land, perhaps, will be cultivated by your children, and maybe grandchildren. What are they to you "thank you" for broken glass they will say. I won’t say anything bad against broken silicate brick, but it’s better to replace gravel with expanded clay (baked clay).
Each region of the country leaves its mark on many aspects of grape farming. An inclined planting of a seedling is preferred, leaving a recess of 30 cm. This achieves many advantages that will play a big role in the future:
1. all roots are left, including dew, the seedling does not receive stress after pruning and develops better;
2. the roots in the hole lie at a shallow depth and warm up better, more air access;
3. it is easier to cover a young seedling for the winter. The hole is covered with needles, on top - boards and slate.


At this depth (30–40 cm), the bulk of the roots develop. They will be more winter-hardy, because they will freeze less. After 2 years, gradually level these holes (with the level of the soil), if they do not interfere, then you can connect them into trenches and lay the vine in them. When planting in a recess, it is necessary to provide protection against water and snow getting into this hole, because when they freeze, they will give an ice crust, and a seedling, especially a young one, may die. For these purposes, a collar is made around the pit.
In grapes, the most vulnerable place is the roots. The roots located in the upper soil layer are subject to freezing, and this affects the development of the bush in the summer and the harvest.
To avoid this, a deep planting is used with the roots located at a depth of 30–35 cm, and in order to prevent the formation of upper dew roots, polyethylene covers are used. However, at the same time, the solar heat weakly warms the roots at such a depth and aeration is much worse. In the northern regions, it is much more convenient not to fill up with a large layer of soil, but to leave depressions of 25–30 cm, while the seedling is placed obliquely at an angle of 20–400. This will make it possible to fill up part of the shoot and not cut off the dew roots (according to the generally accepted rule), but, on the contrary, stimulate their development at this depth. The more roots, the stronger the bush. It is good to pour straw cuttings under the roots, it will give additional air and, when rotting, heat. Leave only matured 2-3 buds not covered. With this method, it is possible to form sleeves at an angle for better shelter in the winter. The roots warm up well, a lot of air, which means they grow better.
In 2 years, the main roots will develop at this depth, and in the future this depression can be gradually covered with humus.
Landing technology
The standard pit is 80x80x80. But with a compacted planting, it is better to make pits 50 cm wide, 1 m 30 cm long, 0.7–1 m deep. In this case, 2 seedlings can be planted along the edges of the pit. Depth - depending on the structure of the soil: on sandy - up to 1 m, but on heavy clay soils this is not for everyone. The main thing is to create conditions for good development of the roots in the first 2-3 years, that is, under the roots there should be dug up, loose, moisture- and breathable nutrient soil. At the bottom of the pit, rotted compost is mixed with humus, on sand - with black soil or topsoil; on clay soils - with river sand. Ash, potassium sulfate, superphosphate (200–300 g) are added. When 40 cm remains to the soil level, a 5 cm layer of clean earth is poured and a seedling is placed according to the drawing. It is sprinkled with earth so that 25–30 cm remain to the soil level. For better survival, acceleration of growth, immediately before planting, dip the roots into a clay mash with the addition of cow dung and Kornevin. These nutrients will improve the survival of the plant during transplantation. In this regard, I prefer autumn planting (second half of October - November), when the plant falls asleep, and not when it wakes up and is pulled out of its place.
The main thing during autumn planting is to insulate well root system. Usually it is needle peat, but shavings are also possible. They fill the hole with a layer of more than 10 cm, boards and slate are placed on top. Insulate and close as soon as possible. In the middle lane, this is the middle, the end of November, when the top layer of soil is captured by frost. Do not be afraid of the first frosts, after them there are usually long thaws. The vine at this time is only hardened and is better prepared for wintering. If they close earlier, then a brick is placed under one corner so that the seedling does not suffocate and does not suffocate. When sheltering, it is necessary to create protection against moisture entering the pit, since wet sawdust does not hold heat, and the kidneys can rot. The advantage of autumn planting is that the buds are asleep, and the roots take root. The main growth of the roots is not in the summer, but in the spring and autumn.
To do this, the seedling in the spring, as soon as the sun warms up, on the last snow, you need to open it, remove the needles or sawdust, and spill it with water (preferably warm) to thaw the earth.
Sleeping buds that have withstood winter frosts are not afraid of spring frosts, they are afraid of them from the moment the buds swell (April). At this point, it is necessary to monitor their safety. On young seedlings during frosts, you can throw old clothes or other heat-retaining material. For adult bushes, I advise you to use the trellis developed by me for the northern regions, which combines the best qualities of the trellises of the southern regions.
Planting a vegetative seedling
A vegetative seedling is planted in the spring after the soil has warmed up to 10 degrees. If the site is located near the house and it is possible to insulate it additionally at night, then it should be planted as early as possible, sometimes in mid-April. Be sure to make a mini-greenhouse and cover it with a non-woven covering material, it is possible in 2 layers. It is also planted at an angle, but it is undesirable to cover the beginning of shoot growth, it is necessary to leave 1.5–2 cm.

1 - arc (metal bar)
2 - non-woven covering material
3 - cardboard
In sunny weather, within 2 weeks, it is necessary to shade from direct rays, since delicate unhardened leaves can burn out in a few hours. Planting is best done in the evening.
Then, to accelerate growth, put slats on the pit, i.e. create sun-shade-sun conditions. At the same time, photosynthesis increases by 4–6 times. Instead of slats, you can use a vegetable plastic box.
It is good to throw a handful of barley into the hole when planting. When growing, barley phytoncides also stimulate the growth of the seedling. The task of the first year is to grow a strong 1 or 2 shoots. To do this, at the beginning of growth, all shoots are pinched except for 1-2 of the best.
A vertical garter of a young shoot is required - as soon as it deviates to the side, its growth decreases. In the second half of summer (August), tilt the bar, and with it the shoot (at an angle of 45 °) along the row. This is done so that the non-lignified shoot is accustomed to tilting during winter shelter before the vines begin to ripen. After tilting the rod, the growth of shoots can not be tied up, free hanging is recommended.

Some growers use even a weak pull-up, throwing threads with a weight over the bottom wire (but this is fraught with a fragment of a weak shoot).
grape trellis


1 - pipe with a diameter of 25–50 mm
2 - pipe with a diameter of 15–20 mm
3 - a piece of pipe with a diameter of 25 mm
4 - galvanized wire with a diameter of 2–2.5 mm
5 - spring
6 - non-woven covering material with a density of 60 g / m 2
Those who have already grown grapes know that the main crop is up to 1 m from the ground. Fruiting vines are tied horizontally in the spring so that future clusters do not touch the ground.
The main structure of the trellis is made 1 m 20 cm high. This size is designed for a standard covering material 3–3.2 m wide, which can be used to cover this structure until the spring frosts pass. All ovaries are within this height.
Grapes, by their nature, tend to grow upwards, therefore, at the end of May - beginning of June, sections of pipes of the required length (0.8–1.5 m) are inserted into this structure. This length depends on the strength of the planted bushes.
The advantages of this design:
1. Grapes can be tied up on a trellis from early spring - this eliminates the fragments of young growing shoots when lifting them from the ground with the usual method of frost protection.
2. The ability to adjust the height of the structure.
3. Get an earlier harvest.
4. Shelter in autumn from the first frosts makes it possible for later varieties to ripen with the ability to leave part of the crop until mid-October, which allows these clusters to be stored in winter for an additional 2 months in a cold room.
5. The term for the defeat of fungal diseases in the spring is postponed, because during spring rains, the ground with splashes does not fall on the vine.
6. 100% opportunity to save grapes from frost and frost, which is very important for all regions of the country, especially for those whose plots are located in lowland areas.
When frosts use a covering material with a density of 60 g/m 2 . At frosts of -6 ... -8 ° C, a film is thrown from above to retain heat, any heat heaters are turned on inside: light bulbs, fan heaters, heaters. If there is no electricity, they put water containers, paraffin candles. This increases the labor intensity, but gives a guarantee of the future harvest. When using pipes, make sure that they fit easily. For this, it is easier to use seamless pipes. Along the paths, near houses where it is not possible to install a two-plane trellis, you can use a single-plane one. The height of the outer pillars is 2.4 m, and the intermediate ones are 1.2 m. At this height, a pipe with a diameter of 15–20 mm is welded, and a pipe with a diameter of 25 mm and a length of 100 mm is welded to the middle posts to install removable pipes with a diameter of 20 mm.
ON A NOTE
It should be remembered that the most non-frost-resistant part of a grape plant is the roots, which die in European grapes at a temperature of -5–7 ° C. Therefore, the development of roots in deeper soil layers increases the resistance of grapes to low temperatures.


1. Pipe with a diameter of 32–50 mm.
2. Spring, L = 100 mm, S = 20(25) mm. can be from old beds.

3. Chain with a hook.
a - nut m12 - m16 (ring) with a slot

4. Removable pipe with a diameter of 20 mm with a hook (from sagging wire).
5. Pipe with a diameter of 15–20 mm.

6. A piece of pipe with a diameter of 25 mm, L = 100 mm. a - rod.
7. Intermediate supports L = 1 m 20 cm.
8. galvanized wire with a diameter of 2–2.5 mm. The distance between the intermediate supports is 3–5 m.
grape pruning
In our region, the main pruning should be done only in the fall. In the spring, you can update the cut into parts of small vines. This is useful, plastic substances are supplied to the kidneys, and growers rejoice at the weeping of the vine, which means the bush is alive, which means there is hope for the harvest. But look, if you cut a lot of branches or cut off 2-3-year-old wood, the entire sleeve, and sometimes the entire bush, may disappear. If, for some reason, it was not possible to cut it in the fall, then wait for the leaves to bloom, then cut it off.
One of the main barriers to growing vines is the ignorance and fear of pruning vines and sheltering them in the winter. Sometimes even gardeners who have been growing grapes for many years come up to a bush and do not know what to do with it.
I offer a simplified basis for all shaping and pruning of grape bushes:
1. the bulk of the grown shoots is cut off, i.e. 5–8 mature buds are left on each vine;
2. from the remaining shoots, all thin and unripened shoots are cut;
3. so that the sleeves do not lengthen much, all distant vines are cut;
4. inconveniently located shoots are cut off.
As a result, 80–90% of the growth is cut off. Remains on adult bushes from 20 to 100 buds, depending on the strength of growth. At the same time, in May, if the bush thickens strongly, part of the shoots can still be manually broken out of the remaining ones with a light touch of the fingers. They should grow about 7 cm apart from each other. After such pruning, you can think about replacement knots and fruiting vines. (This concept is conditional: less than 4 buds and closer to the beginning of the sleeve - a knot of replacement, more - a fruiting vine.) It is necessary to strive for proper pruning, but grapes are unpredictable every year. Very often, weak shoots grow on replacement knots, and the most distant ones turn out to be the strongest. If you leave them, the sleeves will lengthen. In order for good vines to develop on replacement knots, the knot must be higher than the fruiting vine. In the spring, just before flowering, pinch fruiting vines. In addition, short pruning for 4–5 buds can also be used, that is, rather than leaving 8–10 buds on one vine, it is better to leave 2 vines of 4–5 buds for fruiting. Although this may lead to a decrease in yield. It is necessary to experiment: part of this, and part - in a different way.

1 - sleeve (should always be free of shoots)
2 - replacement knot
3 - fruiting vine


leaf scrap
The primary scrap of leaves is done in the month of May.
1. The tops of all shoots are torn off 2 days before flowering, except for shoots intended to replace fruit-bearing vines (on replacement knots, etc.). This is done so that nutrients are not spent on growth, but on high-quality pollination, while at the same time, replacement shoots will have time to grow a little during this time and improve their development. On pinched shoots, do not forget to cut off all stepchildren except the top one in the future.
2. Before flowering on varieties prone to peas and with a functionally female flower, remove some of the leaves that thicken the bunch. This is done to improve pollination, since the grapes are pollinated by the wind, not by insects. It will not be ventilated - there will be "peas". To improve air exchange (especially in greenhouses), you can periodically turn on the fan.
3. From the second half of summer, a gradual scrap of the lowest leaves begins. By the time of ripening, the clusters are completely or partially freed from leaves. This is done in order to protect the bunches from fungal diseases by improving ventilation. Dark-colored varieties for a set of colors open completely, light direct sunlight is not necessary, sometimes harmful (burn, worsen storage). In no case do not break off the leaf at the vine itself: this is an open door to all infections! break off the leaf leaving the petiole, which will gradually fall off by itself.
4. On young seedlings, to accelerate the ripening of the lower part of the shoot, the leaves are also gradually cut off from the end of August and the top of the shoots is pinched in mid-September.
On the question of stepchildren
Very diverse recommendations have been and are being made on this issue, and not only among "amateurs", but also among various scientific institutions. Some advise not to break off the stepchildren at all, others to cut off completely, still others to pinch after 1 leaf, and fourth to leave more leaves on the stepchildren. By the way, all these conflicting opinions have the right to life.
1. If the seedling is young and we drive it up, i.e. we need to build up a powerful shoot (future sleeve), we need to remove everything that will distract food (these are stepchildren and mustaches). The shoot should be maintained in an upright position (garter or leaving 1 mustache per 50–70 cm), the main part of the stepchildren must be completely broken off.
2. If we have fertile land, powerful fertilizer, powerful bushes, no diseases (or high-quality chemical treatment), stepchildren can also be broken off when they appear. In their place, new stepchildren will no longer develop. Consequently, there will be less labor intensity during care. Leave stepchildren one leaf only on vines intended for fruiting next year.
3. It is very good to cut off the stepson after the 1st sheet. The stepson leaf, growing up, provides additional nutrition to the axillary bud, which goes into the winter. This is closer to the natural growth of grapes. In the second half of summer, part of the old leaves loses the ability to photosynthesis (chemical treatment, diseases), the stepson replaces it. The old leaf can be torn off to improve ventilation around the clusters and when the bush itself is thickened (that is, we have a road for young people ... just kidding).
With this method of pinching the stepson, there is one minus: very quickly a new stepson appears from the sinus of the stepson leaf, which also needs to be plucked, and this increases the complexity of the operation.
4. To reduce the complexity and shift the beginning of pinching, pinching is used after the 2nd or 3rd sheet. With this method, time is added for the growth of the second leaf, and after pinching behind the 2nd or 3rd leaf, the time for the growth of two or three stepchildren at once increases. The shoots from the stepchildren are completely removed, otherwise the bush will thicken greatly, and the young leaves will be more susceptible to disease.
For those who do not have time to deal with grapes: the plant will grow without our help, as long as there is support for growth nearby. And disease resistance 2–2.5 points.
On the issue of chasing and pinching
Here we mean pinching and chasing, which contributes to better ripening of shoots and clusters. A pinch is a piece of the uppermost part of the shoot. It is done to suspend the growth of the shoot for a while and transfer the supplied nutrients to other parts of the plant (to clusters, to replacement shoots). An incorrectly made pinching will not cause much harm. can only lead to severe thickening. But chasing done at the wrong time (cutting a large length of the upper part of the shoot - 3–6 internodes or more) can greatly harm the plant. According to the generally accepted rule, chasing is done after straightening the crown of the shoot, as they write in all publications. Chasing is done in order to abruptly switch nutrients to the ripening of the clusters. But the thing is that the crown begins to straighten at the end of August, and the clusters begin to ripen in July and October.
In this regard, chasing, depending on the variety, should be done without paying attention to the straightening of the crown, about 20 days before the berries begin to ripen (at the beginning of their softening).
On some - in July, on others - at the end of August. And until this moment, the bush should gain the maximum amount of green mass, i.e., the roots work to their full potential. After strong chasing, the roots also supply all this nutrient flow, but already in bunches and in the remaining leaves. Too few leaves cannot be left, because there must be an opposite response to the roots. Here it is necessary to look for the golden mean. In practice, the bush is usually cut at a height of 1.8–2.2 m.
Storage of seedlings and cuttings
Sapling storage
In the fall of 2008, I conducted an experiment. I wrapped the roots of the dug seedlings in 3 layers of newspaper, moistened with water with a weak solution of potassium permanganate, and tied a plastic bag on top as close to the root heel as possible so that the vine would not freeze. The seedlings were placed in a cold basement. In the spring I took it out and moistened it again. The seedling was preserved in this form until the end of August, when I planted it. I think that this method is convenient for those who purchase seedlings, and for those who sell them, as well as for shipping. The usual way of storage: the roots of the seedling in the cellar are covered with clean sand and watered once. It is very good to plant weak seedlings in thin plastic buckets with a volume of 3–8 liters. The composition of the soil should be light, moisture permeable. Usually it is black soil / river sand / peat - 1 / 1 / 2. You can add sawdust soaked in a weak solution of urea.
Storage of cuttings
According to the generally accepted rule, the cuttings are stored in the cellar or in the ground. I have tried for several years the storage of cuttings in the barn. I prune vines in November. I collect cuttings in 60-120-liter plastic bags. In very severe frosts, I additionally cover them with rags. I soak them for two days before sprouting. Then for a few seconds I dip in a 3–5% solution of copper (iron) sulfate.
Major diseases and pests
Diseases
The main diseases of grapes are (as in most of the living world) viral, fungal and bacterial. Accordingly, the drugs must be effective.
The main bacterial disease is bacterial cancer. The simplest and most reliable way to fight is a sleeve cut at the base in time.
Fungal: downy and powdery mildew (mildew and oidium). The main task in the prevention of these diseases is spraying. In autumn or spring, after opening the vine, spraying with copper (iron) vitriol (30 g per 1 liter of water). In early May, on the 5th leaf - spraying with 0.5% Bordeaux mixture or potassium permanganate. Before flowering - spraying with a systemic preparation (Thiovit). After flowering on ovaries less than 1.5 mm - one more spraying with a systemic preparation. In the future, use biopreparations such as Fitosporin. Very dense clusters are prone to rot infection. A folk way to protect against diseases is 100 g of table vinegar per 10 liters of water. A preventive measure against diseases is also a good ventilation of the vineyard and bunches, thinning, breaking old leaves that have lost their ability to photosynthesize, especially in the lower part of the grape bushes. But the main goal is planting varieties with high immunity. Clusters of dark varieties are gradually completely freed from leaves (they gain color better). Clusters of some light varieties can get sunburn, so it is advisable to leave some leaves on the south side. Not necessarily, but you can remove the exfoliated bark on the old sleeves.
The main conclusion from what has been said is: do not leave diseased vines and sleeves with the hope of getting more harvest from them. You will lose both the crop and the grape bush, and neighboring bushes will get sick.
Pests
Felt, spider mites and a little-described, but increasingly widespread humpback leafhopper. Felt mite infects grape leaves from the inside. On the outer side there are small pronounced tubercles. On the inside, in these tubercles, there are white cobwebs (felt).
Control measures.
The easiest and most reliable way is to manually scrap the affected leaves. In this case, it happens that all the young leaves are torn off. But the pest will be destroyed in the first generation, and new leaves will grow.
The second mass defeat occurs in mid-June. You can not pick off the entire sheet, but only tubercles, if they are single. From chemical methods, TIOVIT JET (colloidal sulfur preparation), FUFANON, ALATAR, etc. are used.
The cicada strikes the internode on young green shoots very often near the ground itself. In the future, a constriction appears in the internodes, then an outgrowth. Young seedlings are especially affected.
Control measures. Cutting the vines and burning the affected area. Advance treatment with poisons (FUFANON, ALATAR, etc.) from the end of May.
Watering
Most importantly, you can not water the plants on the leaves! If you like to water with a diffuser, then immediately after that, treat it from fungal diseases. On the leaves, you can only do top dressing and pollinate with ashes. Industrial vineyards are mostly not irrigated or drip irrigation. With proper watering, the yield of the crop will be much higher. It is necessary to water at least 1-2 times a month, with the exception of the moment the berries ripen. Here you have to be careful. On many varieties, abundant watering at this time will lead to cracking of the berries. Very convenient watering through plastic sewer pipes, which are placed 50 cm from the bush. For the winter they are insulated by closing with plugs. I have tested watering through dug-in 10-liter plastic canisters with a hole in the bottom. It is convenient to pour fertilizers into it, cover it with a lid from above, change the place annually, i.e. gradually fertilize the entire feeding area. For the winter, clean up and fall asleep.
On young bushes, a landing hole is enough for irrigation without additional devices.

1 - film, tin, roofing material
fertilizers
The best fertilizer is cattle manure. It gives its nutrients to the soil for a long time. Horse dung the earth "remembers" up to 10 years. But you need to know that if not straw, but sawdust was used as bedding, its quality will be poor. It is good to insist any manure for a week in containers, filling them with water. You can also insist in barrels and freshly picked grass. As soon as it starts to ferment, you can start watering. It is good to add chalk and a concentrate of bacteria "Baikal", "Shine", etc. to the barrel. Before watering, both manure and grass should be diluted 1:10. You can not ferment mullein, but you need to breed 1:15 (1.5 buckets per barrel of water 200 liters). Must be watered first.
Of the minerals, it is imperative to use superphosphate (usually a lack of phosphorus in the soil), ash. They are used in the second half of summer and autumn. You can use nitric (sulphuric) acid potassium. Nitrogen fertilizers are applied in the spring in 3 doses: the first - on frozen ground, the second and third - in April, May.
Top dressing on the leaves is good to do with fertilizers Kemira Lux + Albit + Potassium humate. It is done on weakened plants or after chem. processing. If a young seedling grows very poorly, water it with urea.
grape propagation
100% rooting of a seedling is obtained by layering from an already fruiting bush. To do this, a groove 10 cm deep is made next to the bush, last year's vine is laid in it and pinned in 2 places. When the shoots grow 5–10 cm above ground level, the groove is covered with humus. During the summer it is necessary to moisten this place. In autumn, dig and divide according to the number of shoots. This is the easiest way to propagate your favorite variety. For reliability of rooting, you can leave the digging for another year.
In order to propagate the variety by cuttings, it is necessary, after the appropriate treatment described earlier, to wrap the bottom of the heel in a damp newspaper, wrap the entire seedling in cellophane and put the lower part to the battery (to the return line) for 18 days. The temperature near the heel should be 25 ° C (be sure to check with a thermometer).
This should be done in the month of December, because the roots do not have a dormant period, but the buds do. At this time, when germinating naturally natural method, it turns out that the development of roots is ahead of the germination of the kidney.
After 15–20 days, as soon as the calus appears, the cutting is planted in a good substrate (chernozem, river sand, sawdust soaked in a weak solution of urea, peat). The composition of the soil should be such that water, when irrigated, seeps through the holes at the bottom very quickly, i.e. breathable. Otherwise, the roots will suffocate and rot.
Before the shoots appear, the cutting should be covered with a transparent plastic bag. Usually, by the time such a seedling is planted (May), 1–2 lower buds mature, the roots take on a natural brown shade(not white). The seedling can be kept for 2-3 weeks in a warm room in December, then lowered into the cellar for 2 months.
The planted seedling has a larger supply of nutrients and is easier to transplant. There was a case, in the evening after planting, I forgot to shade such a seedling. The next day the temperature was 35°. I remembered in the evening, I thought - it was gone, I look - it’s worth it, at least something. But it is advisable not to experiment. Two weeks after planting the seedling, the leaves should not be exposed to direct sunlight.
fruit storage
Varieties ripening in September are suitable for storage. First of all, these are Original pink, Blagovest, Camelot, Buffalo, and the early Rapture white variety is also well stored. It is necessary to pluck the bunches as late as possible, preferably with a 40 cm piece of vine. It is still warm in the cellar at this time, so it is better to store it in the barn until frost sets in. It's much cooler. A V-shaped tray is attached at the top. Eggplants with water are placed in it. Cuttings with clusters are inserted into them so that they do not touch each other, and so that the prune coating on the berries remains less damaged. When the t ° inside the barn drops to 0 °, transfer the bunches to a cellar or other cool room. It is quite possible to save your berries until Christmas.
Variety selection
The grower seeks to acquire and plant one or more new varieties every year. It's like a beautiful disease, it's the pursuit of perfection, it's the search for the perfect variety. But I will tell you right away - there is no perfect variety. But there is a goal and new varieties. Some are sad, others are happy. That's the way it should be.
For beginners, I can advise planting 80% of early varieties that ripen in July - August (first of all, these are Rapture white (planted only in a sunny place) and Kodryanka), 20% of varieties that ripen in September (this, of course, is Original pink), - for storage. Of the other varieties, I can recommend very early varieties - GF 342, White Miracle; early ones - In memory of a surgeon, Laura, Augustine, Eureka, Golbena Nou, Kishmish Zaporizhzhya, Nadezhda Aksaiskaya; relatively uncovered - Platovsky, Crystal, Buffalo; autumn - Blagovest, Pearl of Moldova, Hercules, Camelot. By the way, for Camelot I would like to say thanks to the breeder Maistrenko L.A. The variety impresses with the purity of the vine, leaves, berries. In autumn, he stands alone with clean green leaves, when everything has already turned yellow and crumbled. You have to really love your profession and be a good specialist in order to breed such a variety. It would be nice to have a variety of this quality with an ultra-early ripening period.
Once again I want to confirm that in the Central Black Earth region, under the condition of a ripening vine, adult grapes do not freeze out. It can rot, rot, but not freeze. I have adult bushes covered with wooden pallets. They press the bush with their weight, there is no need to pin the sleeves. Only one film is thrown from above. The ends of the shelter do not close tightly, for ventilation. On vines not covered with a film, part of the kidneys disappears. If, nevertheless, the bush is frozen, dig it 15 cm and water it with warm water. Sleeping buds on the root stem should wake up.
In conclusion, I want to say thank you to all the growers who shared their knowledge with me, because all this is collected bit by bit. Sometimes you read a book, you seem to know a lot, but one paragraph is new - thanks already! So you collect it in a piggy bank to distribute later to people.
Voronezh, pos. Pridonskoy, per. Zapolyarny, 5For consultation, call: 8(4732)43–86–18; 8–903–653–93–53.Krasnikovy Petr Alekseevich, Galina Dmitrievna
Propagation of grapes by cuttings
“Grapes are a true miracle. It is attractive, contagious, interesting and inexhaustible. Growing grapes is a pleasure and an art"
When propagating grapes by cuttings, it is necessary to perform the following organizational and agrotechnical measures:
1. Procurement of cuttings.
2. Storage of cuttings.
3. Preparation of cuttings for planting.
4. Kilchevanie.
5. Preparation of the substrate and cups.
6. Planting kilchevanny cuttings in cups (containers).
7. Care for cuttings planted in containers.
8. Planting cuttings in the school and caring for the school.
Procurement of cuttings
I start harvesting after the leaves fall, usually after small frosts (late October - early November), since at this time the supply of nutrients in the vine is the largest. I choose cuttings from vines that had large clusters and berries.
I take cuttings from the mature part of the vine. The vines must be clean, without formations and cracks. Curves, with spots of oidium, cracked and affected cuttings are rejected. I cut the cuttings immediately into three eyes, 6-12 mm thick. I disinfect the cuttings with a 3% solution of iron sulfate and tie them into a bundle with twine. I hang a 2x4 cm tag indicating the variety and number of cuttings in the bunch. I cut the cutting, both sides at an angle of 60 °. I make cuts approximately in the middle between the nodes, as shown in the figure.

Storage of cuttings
To store the cuttings, I use a cellar specially equipped for grapes, where the temperature is maintained at 0 ... + 4 ° C with a humidity of more than 80%. The cellar is equipped with supply and exhaust ventilation.
After harvesting the cuttings and soaking them, I put the bundles in a bag of sugar (I remove the plastic insert). I fall asleep in a bag with cuttings wet sawdust (about 1.5 buckets). I take sawdust not fresh, but lain in the air for 2-3 years. I loosely tie the bag and place it in a black shopping bag. I close the shopping bag with an overlap, that is, open, as shown in the figure.

When examining (controlling) cuttings during storage, I pay attention to the moisture content of sawdust and cuttings, if necessary, add 1–2 cups of water at room temperature.
During storage, mold may form on the cuttings, then the cuttings must be ventilated and treated with a 2% solution of ferrous sulfate.
With a small number of cuttings, they can be stored in the lower part of the refrigerator, after wrapping them in a wet rag, plastic wrap.
Preparation of cuttings for planting and kilchevanie
In late January - early February, I take out the cuttings from the cellar (for growing vegetative seedlings) and thoroughly wash them with a solution of potassium permanganate (pale pink color) or copper sulfate (one tablespoon per bucket of water). To determine the viability of the cutting, we make an incision across the cutting and along the kidney. If we see a green color along the cutting line of the cutting and the kidney, then this indicates the viability of the cutting. If the color of the cut is brown or light, such a cutting is rejected. For growing vegetative seedlings, I cut the cuttings as follows: I cut the lower end 3–5 mm from the kidney. I do not cut the upper end, since it was cut in the fall by 2–3 cm with an oblique cut.
For growing seedlings in a school, I make the lower cut with an oblique cut 5 cm from the kidney. After this operation, I furrow the cuttings. Furrowing is carried out as follows: I take a saw on a tree with a small tooth in my right hand, and a cutting in my left hand and apply light scratches above the lower eye (the length of the scratches is 2–3 cm).
After these operations, I tie the cuttings into bundles and put the bundles in snow (or ordinary, without chlorine) water for two to three days (or more).
I control the soaking as follows: I take the stalk, cut off the upper part and lightly press on the stalk; if droplets of water appear, then the soaking of the cuttings stops. After that, the cuttings are placed in a growth stimulator.
Growth stimulants are as follows:
1. I add a tablespoon of flower honey and sodium humate to a bucket of water according to the instructions.
2. I use aloe juice (one part of aloe to two parts of water).
3. I use heteroauxin, I breed according to the instructions. I keep the cuttings in the growth stimulator from six hours to a day.
After all operations, I attach a tag indicating the grape variety to each cutting.
The stalk treated in this way can be planted immediately in a container, creating certain conditions for it to grow. That is, in the lower part of the container, the temperature should be 20–25 ° C, and in the upper part of the handle - 15–17 ° C. This is achieved as follows: the containers are placed above the radiator, and the upper part of the container is under the window, so that the bud break slows down in the upper part, then you should monitor the temperature in the upper and lower parts of the container. I water once a week with water at room temperature.

ON A NOTE
The most basic condition when choosing a variety is that the berries have time to ripen well over the summer. Near Voronezh, the ripening period has a border of 90 to 120 days. Specifically, this "ceiling" falls on the end of August. If you know that the ripening period of a variety falls even in the first decade of September, it is better to refuse it, no matter how much it delights you with its parameters in terms of the size of clusters, berries, taste, etc.
It is very easy to calculate this limit. For example, if a variety you like from opening its eyes to ripening berries takes 120 days, then you get the following. In the vicinity of Voronezh, in early spring, the eyes begin to open at the end of April, with a belated spring, which was last year, in early May. Let's say our variety has a ripening period of 120 days, so it turns out - August.
You should not hope for September warmth: the sun is shining, but it is no longer warm and cannot significantly affect the increase in the sugar content of berries. In addition, only after the grapes are removed, the vines begin to mature and accumulate nutrients for wintering. As a result, we eat sour meat, and we put the bushes at risk of freezing or complete death from frost, since the vines did not have time to sufficiently lignify and accumulate plastic substances.
Kilchevanie cuttings
The kilchevanie of cuttings is carried out in order to accelerate the formation of callus and roots. I made a kilchevator as shown in the picture.


The temperature at the roots can be regulated by turning on the kilchevator in the network through LATR or turning the kilchevator on and off after reaching a temperature of 25 ° C at the bases of the cuttings. After turning off the kilchevator, the temperature is maintained for approximately 12 hours.
Seedling boxes are filled with steamed sawdust. Cuttings are inserted into the sawdust with the lower end. The kilchevator is placed in a cool room with a temperature of 8-12 ° C, and the lower part is heated. Sawdust used in the kilchevator must be boiled over low heat for 30–40 minutes.
100-110 cuttings are placed in a seedling box. In the kilchevator, 400-450 cuttings are immediately kilched. In order for the cuttings not to dehydrate, I cover them with a film. After 15–20 days, I check the formation of roots. We start planting the cuttings from the kilchevator into containers (the container is a plastic bag or a plastic bottle with a cut off throat).
Planting cuttings in containers
I do it as follows: I take a bag, pour 2–3 cm of coarse-grained river sand into it or screenings of expanded clay for drainage. I pour 3–4 cm of the prepared substrate, carefully place the stalk with roots on the ground and half fill it with the substrate. The rest of the container is covered with steamed sawdust (to lighten the weight of the container).
I prepare the substrate as follows: I take 2 buckets of earth (taken in autumn from under a poplar or aspen), 2 buckets of river sand, a bucket of humus, a bucket of wood ash and mix it all thoroughly.
The cutting planted in the container is placed in a warm place. Once a week (if necessary) water with warm water. When leaves appear, I feed with nitrogen-phosphorus fertilizer (1 g per liter of water).
When 5-7 leaves appear, it is necessary to treat against ticks, mildew, oidium and gray rot.
ON A NOTE
Stepchildren appear as the main shoot grows. More developed stepchildren are on the lower and middle nodes, and less developed ones are on the upper ones. Stepchildren restore the lost part of the shoot, and they are practically used for the accelerated restoration of damaged vine bushes. Stepchildren are often barren and less often with an inflorescence. The smaller axillary bud remains dormant throughout the growing season and awakens only the next spring. This kidney is called wintering (eye).
In the center is the largest, main kidney, and on the sides of it are less developed replacement (reserve) kidneys. When the main bud dies, the first more developed spare starts to grow, from which a fruitful shoot often grows, but with a smaller cluster size. Around the spare kidneys of the first order (more developed), less developed replacement kidneys of the second and other orders are formed.
Planting cuttings in school
Since autumn, I have been preparing the land for school. I disinfect the earth with a pink solution of potassium permanganate or a 3% solution of ferrous sulfate.
I apply organic and inorganic fertilizers, add river sand and use a walk-behind tractor to process the area for the school.
In early spring, I carry out early tillage (with a walk-behind tractor, end of March). In early April, I level the site and cover it with agril to warm the soil before planting. I control the temperature under the agril with a thermometer. When the temperature reaches 18–20 ° C, I start planting the cuttings in the school. For this purpose, I made a marker.

I take the marker, put it on the agril, step on the marker with my foot and press it to the ground - I get 10 places for planting cuttings. I plant cuttings of grapes in the formed holes.

Before planting the cuttings in a shkolka, I dip them in hot water (temperature 45–50 °) for 30 minutes. After 30 minutes, I take the cuttings out of the water and sprinkle the lower part with a mixture of wood ash and potassium humate.
The cuttings grow with weeds, which, by raising the agril, form a kind of greenhouse, thus creating an optimal regime for the growth of the cuttings. In the absence of rain, I water the cuttings on the agril. Agril freely passes water, ensuring a uniform flow of water to the cuttings. In mid-June, I remove the shelter and weed the shkolka, getting rid of the weeds. In the future, the seedlings are systematically weeded and watered.
In July, I feed under the root with a solution of phosphorus and potassium (one matchbox to a bucket of water). In August, I spray with a one percent solution of potassium and phosphorus on the leaves. On the fifth or sixth sheet, it is necessary to process against mildew, oidium and gray rot. In late September-early October, seedlings are ready for planting in a permanent place.
Diseases of grapes
For our area, common diseases are: mildew, oidium, bacterial cancer, gray rot, chlorosis.
mildew
The appearance of light green spots on all vegetative organs - leaves, shoots, inflorescences and berries is the first sign of this disease. Then white spots form on the underside. Affected berries (up to a pea size) develop dirty gray spots at the base, then they become dark chocolate in color. Grapes shrivel and fall off. Large and ripe berries are not affected.
The disease begins to develop before the grapes bloom, so treatment with a 2% Bordeaux mixture solution must be carried out before flowering, subsequent treatments are carried out with a 1% Bordeaux mixture solution.
It is possible to process bushes with Radomil with a concentration of 0.25%. Protective actions of Radomil - 14 days. Subsequent treatments with the same solution. The last treatment with Radomil stops 14 days before harvest.
oidium
The disease develops in places of high humidity and high temperature (above 24-26 ° C). On the buds, green berries, a gray coating appears with a faint smell of herring, later brown spots appear under the gray coating. With a later lesion, the berries of the grapes crack, exposing the seeds. On such berries, gray rot develops first.
Control measures: collect the remains of leaves and vines, burn it all. Treat around the bushes with a 3% solution of iron sulfate or a 4% solution of copper sulfate. Further, the bushes are treated with colloidal sulfur after 7–12 days. It is necessary to systematically break off the green shoots, tie the branches to the trellis, pinch and chasing to prevent shading.
Gray rot
Favorable conditions for the development of the disease are rains, that is, high humidity. The berries are covered with a gray coating and rot. Control measures: treatment of bushes with a solution of baking soda. You can exclude this disease by carrying out green operations, that is, by eliminating the thickening of the bush.
bacterial cancer
The disease manifests itself in the form of spherical growths. By the end of the growing season, light spots turn brown, harden and fall off. He reappears at this location the following year. As a result, the bush weakens, and this can lead to its death. The causative agent is a bacterium that enters the plant through wounds. If bacterial cancer is detected, the bush is cut to a healthy place, and the wound is treated with a 5% solution of copper sulfate, followed by putty with garden pitch.
The tool after trimming is disinfected with a 5% solution of formalin or denatured alcohol, alcohol.
Chlorosis
It is caused by a violation of the balance of nutrients in plants: the leaves turn yellow, shoots form. It is necessary to find the cause of the disease and fertilize with manure under the root, and treat the leaves with a 1-2% solution of ferrous sulfate. Add microfertilizers to the soil.
V. V. MESCHERYAKOV
I REALIZE SEEDLINGS OF ELITE GRAPE VARIETIES
Tel. 80920-468-47-02
Voronezh region, with. Nechaevka, st. Grape, 9.
Meshcheryakov Valentin Vasilievich
Characteristics of grape varieties
AUGUSTINE (or PHENOMENON). Vigorous. Clusters are large - up to 1000 g. Berries weighing 7–8 g, amber-white. Sugar content up to 21%. Disease resistance is high. Frost resistance -25 °C. Clusters are transportable. Early.
ALESHENKIN. Vigorous, high yielding. Clusters are large - 700-1000 g, berries weighing 4-5 g, with a creamy tint, the flesh is fleshy - juicy, very tasty. Sugar content up to 21%. Disease resistant. Early.
WHITE MIRACLE. Medium-sized, high-yielding. Clusters 600–800 g or more. The berries are amber-white, round, large and very large - up to 9 g, with a brown tan in the sun. Sugar content up to 24% with an acidity of 5–7 g/l. Frost resistance - 24 °C. Exceptionally disease resistant.
JOY WHITE. Vigorous. Clusters are large and very large - up to 1.5–2 kg. Berries up to 5–6 g, white, harmonious taste. Sugar content - up to 25%. Frost resistance -26 °C. Transportability is very good, bunches can be stored under normal conditions for up to three months or more. Disease resistant. Early.
GOLBENA KNOW. Vigorous. The clusters are very large - up to 700 g, berries weighing 7-8 g, creamy yellow, with a nutmeg taste. Sugar content 23%. Frost resistance -27 °C. Works without chemicals. Early.
PEARL OF MOLDOVA. Early maturity. Medium height. The average weight of a bunch is 300–400 g. The bunches are of medium density or loose. The berry is round, red-blue, large, with a nutmeg flavor. Marketability, transportability, productivity are good. Resistant to fungal diseases. Winter hardiness down to -25 °C.
KISHMISH ZAPORIZHIA. Vigorous. Clusters are large and very large - up to 1.5 kg. Berries - up to 3 g, dark red or dark purple, harmonious taste. Frost resistance -27 °C. Sugar content 20%. Does not require chemical treatment. Early.
KODRYANKA-218. Vigorous. Clusters up to 1 kg or more. The berries are large - up to 7–9 g, oblong, dark purple, simple taste. Sugar content 16%. The berries are small-seeded or may even be pitted. Disease resistance 3 points, frost resistance -22 °C. Early.
CRYSTAL. High-yielding technical grade of grapes. The ripening period is very early (110–115 days). Bushes are medium. Clusters are medium, medium density, weighing 170–200 g. The berries are medium, oval, yellow-green or white with a pruinous coating, harmonious taste, weighing 1.5–2.1 g. The pulp is juicy, the skin is strong. Sugar content - 17–18%. Winter hardiness down to -29 °C. Resistant to fungal diseases: grapes are used to make dry table wines such as sherry.
IN MEMORY OF THE SURGEON. Early maturity. Bushes of great vigor. The berries are yellow-pink, with an average weight of 7.4 g, oval, the average weight of a bunch is 400 g.
PLATOVSKII. Medium sized, productive. A bunch of 200 g, berries weighing 3 g are white-pink, the taste is harmonious. Sugar content 20%. Disease resistance is high. Frost resistance -29 °C. Early.
ELEGANT EXTREMELY. Bushes are medium. Clusters 400–500 g or more. Berries weighing 5–6 g, tender, with a nutmeg taste. Sugar content more than 25%, frost resistance -25 °C. Disease resistant.
mid-early
ALEXA. Early medium maturity, 120–125 days. Bushes of great vigor. Clusters are very large, 700-1000 g, individual up to 1.8 kg, moderate density. The berries are white, very large, 10–14 g, oval. The pulp is fleshy, dense, with good sugar accumulation. The taste is harmonious. Frost resistance down to -25 °C.
BLAGOVEST. Medium height. Clusters up to 2500 g, berries up to 15 g, amber, harmonious taste. Sugar content 20%. Frost resistance -23 °C. Disease resistant. Mid-early.
BUFFALO. A versatile grape variety. Early medium maturation. The growth force of bushes is good. Clusters of medium size, loose, conical. Berry black, slightly oval, medium size. It has an original strawberry taste. Sugar content from 18 to 21%, with acidity from 5.4 to 9.9 g / l. Relatively high winter hardiness, resistant to mildew and gray mold of berries.
CAMELOT. Table grape variety. Winter hardy. Vigorous. Large berries of amber-white color, harmonious taste.
LAURA. The bush is medium. The cluster is large - 2 kg or more. The berries are white, large - up to 14 g, the taste is pleasant, harmonious, the seeds are small. Sugar content 23%. Frost resistance -23 °C. Disease resistance is high.
HOPE AKSAYSKAYA. Table form of early ripening grapes. Bushes of medium vigor. Clusters are large and very large, weighing 700-1200 g, individual up to 2 kg. Weight of berries is 8–12 g and more, oblong, when ripe with a light nutmeg aroma. Sugar content - 16–18%. Relatively resistant to mildew, oidium and gray rot. Marketability and transportability are good. Frost resistance -23…-24 °C.
Thor Heyerdahl. Black. Medium height. The clusters are very large - up to 3 kg, up to 0.45 m long. The berries are large - 5–6 g, red-blue. The pulp is fleshy and juicy with a nutmeg flavor. Disease resistant, frost resistance -26 °C. High-yielding, requires normalization. Early middle.
EUREKA. Medium height. Bunches up to 1.5 kg. The berries are large - 6 g, green-white, pleasant taste. Sugar content 19%. The yield is very high. Resistant to disease, does without chemical treatments. Unpretentious. Mid-early.
Middle Late
HERCULES. A table variety of grapes of medium late ripening. The berry is round, with an average weight of 6–7 g, somewhat dirty pink. Clusters 1000–2000 g. The flesh is crisp, the taste is very good. Hercules is not resistant to fungal diseases, especially strongly to oidium, in wet weather clusters can rot.
RIZAMAT. Vigorous. Clusters are large and very large - up to 3 kg. The berries are seedless, very large - from 15 g or more, the largest are up to 25–30 g, pink, with an intensely colored barrel, very tasty. Sugar content 25%. Frost resistance - 18 °C. Can be dried for sultanas. Disease resistant. You need to plant in the sunniest place, closed from the northern winds.
We also recommend
 Smartphone xperia z5 premium black
 Download toilet paper business plan
 Description Nokia X2 dual sim on the Android platform, powerful processor and support for two sim cards
 Is it possible to open a hostel in an apartment?
 Services to the public: the most promising business ideas
 How to start farming?