How to make a raft from 5 liter bottles. How to make a raft from ordinary plastic bottles
After the BP, it would be most reasonable to get out of the city, and this can be done in several ways, by land, by air and by water. By land, everything is clear, by air - it is too difficult to build an airplane, but by water there are several options ...
Most cities stand on the coast of the sea, river, bay, and with great success you can get out of the city, or at least they must be crossed to get to a place from where it will be easier to continue on your way. Boats have a high speed, but are extremely fragile, especially rubber ones. The engines are not the fact that they will work, so you still have to row (there is a high probability).
The most ideal river rafting option is a raft, but where in the city to collect the required amount of FLOATING wood?? and it’s impossible to control a raft, and even about moving against the current on a raft it’s impossible at all. Also the raft is heavy; In short, it has many cons.
So what can a raft be made of in a city??? - My version of plastic bottles. At the dacha, I thought of this at the age of 10 and immediately made a raft that still floats. from which we can conclude that with the extreme simplicity of the design, any person ALONE will make it in a few hours. I then did it exactly 1 day, that's what happened ...


In this version of the raft there are only 4 bags, I don’t know the exact number of bottles, but I can say that this raft can withstand 130 kg, while 2-3 cm still remain above the water. We checked it personally, when another person sat down (Third), he went under water completely, we plunged knee-deep into the water, he held it for a couple of seconds, then he just turned over under the water and surfaced.)))
This raft becomes absolutely unsinkable with some refinement of the design. Even if you start shooting at him, he will still remain afloat, because. the internal system is similar to the system of modern ships, in which, if part of the ship is damaged, only a couple of compartments are flooded, and the ship itself remains afloat. In order to sink it, you need to break through EVERY bottle, and this is a very long time.
I also want to add that the raft itself weighs very little, I calmly lift it over my head, without making any special efforts. Which is also extremely important for the ship.
It has a very small displacement, which means that with a small load it can be sailed against a small current, although the raft itself, even with a load, is very well controlled.
Raft itself is made from plastic bottles with a volume of 1.5 or more. The bottles are tightly closed and placed in bags of sugar, flour ... (In short, ordinary white construction bags). Then these bags are attached to the body with what is. I fastened it with Nails, you can use ordinary rope, adhesive tape, even just make a body in the form of a sandwich, where you can stuff bags between two boards.
The bottles themselves are obtained very simply: We go to the nearest garbage dump and collect as much as we need there. In half an hour, the two of us collected about 5 bags at the dacha, considering that we took only the bottles lying on top, and then after our collection, there were still the same amount left.)))
Below is the experience of some other people from the Internet: 


Here are the bags. 
In general, with a special desire and patience, you can generally do something similar. 

Or this, but it's not difficult.)) 
In general, everything can be made from a plastic bottle!)))
Reading time ≈ 6 minutes
Descent along the river is a great entertainment for those who prefer active recreation. And the absence of a raft should not be an obstacle to the implementation of such an undertaking. A simple raft can be easily built with your own hands from plastic bottles.
Materials and tools
A raft is a floating craft that can be constructed from a variety of materials. Traditionally, rafts are made of wood. At least that's what our ancestors did. It is important to consider that at that time they did not really have any alternatives.
However, is it possible to stop a modern person in a flight of fancy. Sometimes unique ideas are born in the heads of the Kulibins, by embodying which it is possible to create original swimming facilities from a material that does not need to be bought at all, incur financial losses. To create a floating facility, you can use secondary materials that have already completed their main “mission”.
A plastic bottle is an excellent material from which you can build a raft of a simple design, or, by allocating more time for work, even create a boat, catamaran, mini-yacht. It already depends on the desire of the performer.
To create an original raft, you need to prepare a sufficient number of plastic bottles. To improve buoyancy, you can additionally use foam. To connect plastic bottles into a single structure, you will need adhesive tape, twine, and ropes. For some options, you will also need canvas bags and boards.
The raft, built from plastic bottles, is able to withstand the weight of even an adult. Sometimes craftsmen build rafts on which several people can simultaneously accommodate and feel comfortable at once.
Before proceeding with the practical construction of the raft, it is recommended that you first prepare the bottles so that they can better stay on the water later on.

First, you should immediately reject containers in which even minor damage or holes are found. Secondly, it is better to refuse flattened containers. They will complicate the assembly process, in addition, a flattened container can no longer “boast” of good buoyancy.
Stickers are removed from each selected container, the bottles are thoroughly washed and placed open in the freezer for several minutes. Then they are removed, immediately twisted with lids and left to lie down in a warm room.
The container will gradually heat up, and the air inside the bottle will also heat up in the same way. The air pressure will increase, as a result, this simple technique will give the container additional rigidity and density.
These qualities are especially important for a swimming facility.
The process of creating a raft
Before proceeding with the creation of the structure, it is still necessary to clarify how many “passengers” this raft should subsequently carry. If a bottle boat is built for one person, then much less materials will be required, and it will be lighter and safer.
To build a raft, we suggest performing the steps in the sequence indicated in the instructions.
First you need to take four identical bottles, tightly attach them one to the other, rewind them with waterproof tape. When rewinding, it is important to monitor the tight fit of the containers. If the bottles dangle, then there is a risk of a quick failure of the raft.
After rewinding the bottles, one block is obtained. For the construction of a raft, a sufficient number of such blocks will be required, depending on the size of the floating facility.

The advantage of creating separate blocks is that they can be quickly and easily replaced in case of damage.
To make it convenient to place on the raft, boards and a sheet of plywood are laid and fixed on top of the connected blocks. To protect the wooden base, a tarpaulin or a very dense oilcloth is laid on top.
This completes the process of creating the simplest swimming facility. However, many do not limit themselves to such actions, but continue to improve the design, increasing both the aesthetics of the craft and the level of comfort for the “navigators”.
With the help of bottles are also created:
- sides;
- benches;
- mini cabins;
- shelter from the sun.
Bottle layout options
There are several options for connecting plastic bottles:
- creation of a structure with horizontal placement of bottles;
- creation of blocks with vertical placement of containers;
- with the use of large containers (in this case, they can be placed at the corners of the raft, attached to the surface and not connected to each other);
- construction of a raft from small containers, which are placed in polypropylene bags.
Horizontal
The option of a horizontal arrangement of bottles is acceptable for those who seek to quickly build a raft. However, such a swimming facility in its characteristics is more like an air mattress. You can not use it as a means by which you want to go on a trip along the river.
With a horizontal arrangement of containers, it is important to ensure that all necks are directed in one direction. In each subsequent row, the neck of the bottle should rest against the bottom of the bottles of the previous row.
When the watercraft is built, it is recommended to wrap it with tape again, especially pay attention to the extreme rows. Scotch tape will not only strengthen the structure, but also protect the outer bottles from damage when the side accidentally comes into contact with a snag.

vertical
When placing bottles vertically, initially blocks (formed squares) are created. Then the blocks are interconnected in such a quantity that a deck of the desired size is obtained. When creating a deck, the bottles are positioned so that the neck is at the bottom. On top of the bottoms, it is better to lay not plywood, but linoleum or matting.
From a large container
If twenty-liter containers or canisters are available, the process of building a raft will be quick. A frame of a floating facility is constructed from a wooden beam, plywood will need to be fixed on top, a tarpaulin should be laid, and containers should be attached and fixed along the edges. The result is a raft that can withstand even a large company.

From small containers
If you want to build a spacious raft, and only small containers are available, besides, only a limited time can be allocated to create a watercraft, then it is recommended to arm yourself with a little trick.
Small bottles are folded into polypropylene bags, which are then tightly tied. The bags are interconnected and then used in a similar way, as well as large volume containers.
On the video, you can once again watch the entire process of creating a raft so that there is not a single unanswered question. After the construction of a standard raft, you can not limit the flight of your imagination, but come up with, design additional elements, as a result of which you get a unique "yacht" or a whole "ship".
After spending some free time and showing your creativity, you can create a unique raft from plastic bottles with your own hands, on which you can ride along the river or go fishing.
Do-it-yourself boat or raft from plastic bottles, homemade craft. Sometimes it happens that you really need some kind of melt. means, but there is no money to buy, for example, an inflatable boat, but you want to fish or just swim. The way out can be the manufacture of a boat or raft from improvised or purchased materials. But despite the fact that it is quite simple and cheap to make a full-fledged boat, for example, from plywood, not everyone has the skills and capabilities to build boats on their own. But there is still a way out ... It is advisable to collect 5 liter bottles in large quantities, since you need less of them, which means less fastening to the frame, you can also use plastic canisters, which are 5 liters, and often come across 10 liters . Below I want to consider 2 options for building a float. from 5 liter plastic bottles. The first option is a raft similar in shape to a boat, for its manufacture 81 pieces. five liter plastic bottles. Such a raft can withstand about 120 kg. If you need more capacity, simply increase the size and number of bottles. The base of the raft is made of poles, but the frame is assembled in stages. First you need to chop the required number of poles with a diameter of 5-8 cm, it can be thicker. Next, you need to tie two poles together with a distance of 5-10 cm between them, depending on the thickness. This distance is necessary so that the bottle is additionally held on the sides of these poles. So we connect 2 poles with each other with the help of small sticks, and then plastic bottles are tied to these poles. On the one hand for the neck, and girth in the center of the bottle. You can tie both with a nylon thread, and with a thin, soft wire, you can also tie with a thick fishing line. The result should be a long section consisting of two poles with a row of bottles tied. Next, you need to make the same sections in the right amount. An example in the figure is 6 sections. And then all 6 sections are made up and already connected to each other with the help of transverse poles. The transverse poles must be carefully and rigidly tied, otherwise the raft will not have rigidity. It is enough to fix the bottles in 2 places, the first mount is by the neck, it will hold the bottle in its place, and the second clasping mount so that the bottle does not jump out of its place. The result is a free float. a tool that can be made in a day, and at the same time it is reliable and light, since the main weight of this frame will weigh no more than 20-30 kg, and bottles of 2-3 kg. You can also make an even lighter raft out of plastic bottles by using thin plastic tubes instead of wooden poles as a "skeleton" (i.e. foundations), crates of a raft or boat. A frame made of, for example, inch plastic tubes will weigh at least 2 times lighter than a wooden frame, which will also get wet and become heavier. But in this case, you need to spend money on plastic tubes. For a raft as in the picture, you need 5 pairs of plastic poles, i.e. 12 pieces. But there is one plus here, bottles can be attached to plastic poles using wide adhesive tape. If you fix it with adhesive tape on wooden poles, then after the wood gets wet, the adhesive tape does not hold on it and all the bottles will begin to crawl along the poles. And on plastic, the adhesive tape holds perfectly and water does not get under the glued surfaces and the adhesive tape holds the bottles perfectly. A boat with a plastic frame will only weigh about 10 kg. if as in the picture, and will not get wet and absorb water like a tree, and therefore become heavier after swimming. Any person can cope with the construction of such a boat on plastic bottles, and you can build it in 1-2 days slowly, but you can use it for years, and at the same time, in the version with wooden poles and found bottles, such a melt. the tool does not cost a penny, except for the ropes or fishing line for tying bottles and assembling the frame of the boat. At the same time, the design is light enough to carry such a boat alone, and it’s not scary to leave it unattended, since it’s such a melt. very few people will be interested in the means and want to steal.
You can make kayaks and canoes with your own hands from branches and film, and a raft from plastic bottles and scotch tape. Also a master class on creating a ship out of sweets.
How to make kayaks and canoes from branches and film?

This is how your floating vehicle will turn out. When you surf the expanses of water on it, due to the transparency of the bottom you will be able to see river, lake or sea inhabitants. To make such a kayak, take:
- branches;
- scotch;
- stretch film in a roll;
- hatchet;
If you decide to use wicker, then roll each oval, make two turns with this material. Large ribs in diameter will be 70 cm, medium 40 cm, corner ones a little less - 33 cm. To make a canoe for 2 people, it is enough to install two large oval ribs in the center, then two medium ones go on both sides, 2 small ones complete this design oval. They need to be connected to the side stringers.

Various materials can be used to connect wooden parts: adhesive tape, nylon cable ties, wire in the winding. But the last two devices are the best to take for a canvas canoe, and for a film - the first.

The length of the kayak is approximately 3.5 meters. After you attach all the sidewalls, you will get a similar design.

- If willow does not grow in your area or there is no way to get its twigs, then cut spruce branches. Using a knife, you need to remove the bark and small processes with needles.
- Then the tree trunk is wrapped with branches, and for blanks that are wider in diameter, a log is also attached to it. In this position, the branches need to dry out so that the structure becomes oval.
- Next, for kayaks and canoes, you need to make a coating. You can use a tarp, but it is better to take a stretch film.
- It is easier to wrap 2-3 people. Two will hold the frame, the third will wind the film. But if you are alone in the forest, then you need to hang the kayak by the bow and stern on two trees, using a rope, do the work yourself.
- Stretch the film well. It is enough to wind 3 layers of film at each place, but at the same time it is necessary to overlap its edges. You can additionally fix the structure with tape.
- When this stage of the work is done, make slots on both sides of the kayak to make room for 1 and 2 people.
If you use a tarp instead of a film, then cover it so that the edges of the material are at the top and not at the bottom, secure it with clips.

Such a kayak is built in just 4 hours, you can use improvised materials for it in order to save a lot, it is easy to transfer to another place.

Now you will think about whether you need to buy a kayak or you can make it yourself. The following diagram will be a good addition to the above.

How to make a raft out of plastic bottles - 5 ideas
This junk material will allow you to quickly make floating tools. Of course, if there is a desire, a lot of containers, you can make a boat.

If you need to quickly make a tool to swim to the other side of the reservoir or just lie on the water, then you need to make a raft.

To make one, take:
- plastic bottles of 2 or 2.5 liters;
- waterproof tape;
- scissors.
It is better to lay them not in one, but in two rows and not immediately fasten the entire structure with adhesive tape, but first 4 pieces each. And then connect these components with adhesive tape.
Pay attention to the fact that all the bottles look in the same direction. Additionally, strengthen the structure by wrapping it with tape.

Here is the second version of such a device. Take:
- large plastic bottles or canisters;
- wooden slats;
- wire in the winding;
- scotch;
- knife.

Another option is to arrange the bottles not horizontally, but vertically, here's how to make a raft of this type. It is necessary to fix the bottles element by element, but not down, but upside down. Then these parts are connected into a single whole, thus creating a strong structure for a floating vehicle. You can put linoleum or a mat here to comfortably accommodate several people.
If you have a similar metal frame, then use it, fix the bottles not only on the bottom, but also on the sides of the raft. You can twist this one from a thick wire in a winding.

Even very small bottles will work. The fourth idea will suggest several options.
If you have a strong large nylon net, place them here, tie them tightly, and the pilaf is ready. Of course, on such a structure, children cannot be left unattended and you need to swim not at a depth, but in shallow water.
To implement the next option, you will need:
- small plastic bottles;
- polypropylene bags;
- rope;
- knife;
- plywood base;
- slats;
- screws or nails.
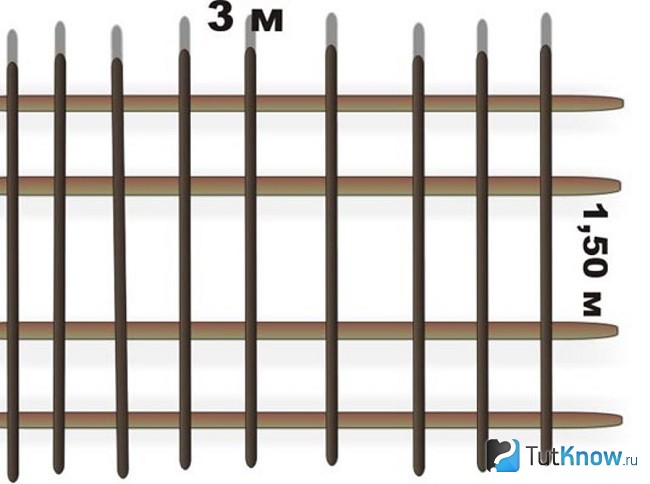
Watch a detailed tutorial that will show you how to make a raft out of branches and small bottles. You can use young trees, cutting them down, for example, along ditches or along them. From such overgrowth in these places you need to get rid of. Therefore, you will do two good deeds at the same time.
From this material or thick branches, assemble the frame of the raft, the length of which is 3, and the width is one and a half meters. If this is a shoot, then chop off the extra branches and knots with an ax.

Tie the top of the bags with nylon cable ties, tape, or wire. Additionally, tie each bag with a rope for a fortress construction. Attach these prepared elements to this frame.

Also make an oar from a sledge. Having flattened the bottle, put its neck on this straight thick stick, fasten it well with a rope. And you can go on a pleasant water trip.
If an old cot is available, it will form the basis of the next watercraft.

Take:
- 4 plastic beer crates;
- 80 empty plastic bottles of 1.5 liters;
- wire;
- rope;
- wide board;
- the aluminum base of an old cot.

How to make a ship out of candy with your own hands?
After such righteous labors, it's time to refresh yourself. But the treat will be devoted to the same topic. Make such a ship to give it to your loved one, a child. Everyone will be happy with such an unusual present.

To make it, you will need:
- foam sheet;
- cardboard;
- corrugated paper;
- PVA glue;
- silver beads;
- toothpicks;
- sweets in a shiny wrapper;
- red fabric;
- black gouache;
- silver thread;
- flower green mesh;
- pencil;
- scissors;
- compass.

Put one blank on the second, glue them with PVA, fix these parts with toothpicks. Now redraw the template for the side of the ship, cut out the deck on it.

Attach the ship template to the back of the ship as well as to the sidewall. Cut off all unnecessary foam, on the contrary, the stern of the ship needs to be built on, use a piece of foam or foam rubber for this.

Here's what you get at this stage.

But how to make a ship further with your own hands. Decorate the case with corrugated paper, starting from the bottom, glue it with sweets. Sometimes attach golden ones between black ones, and glue candies only of this color, but flat shape, on top.

But how to make a mast on a ship, the photos clearly show. Glue several toothpicks in a certain way, and you will get these elements of a floating agent.

The following parts do not need to be crafted, but if you want the ship's elements to be authentic, then it's better to make them. To make mars - platforms for pulling ropes, you need to draw a small and a large circle on cardboard with a compass. Cut out the larger one in the shape of a ring, the smaller one in the shape of a circle. Fasten them together using scraps of toothpicks.

Glue the mars to the masts.

Having laid two toothpicks almost parallel, but with a slight slope, 4 more must be glued perpendicularly to them. Pre-cut the corners of these elements. Glue the resulting shrouds to the place where shown in the photo.

Now you need to attach threads to the masts, beads are used as limiters.

Finally, our candy ship needs to get a sail. Cut it out of red fabric, apply a pattern with black paint using a stencil.

Glue the sail to the yard, then mount it on the mast.
Using the same technology, make a few more sails, attach them to their places. If you want, make a coaster, decorating it with blue crepe paper, a grid for flowers, so that these materials turn into sea waves.
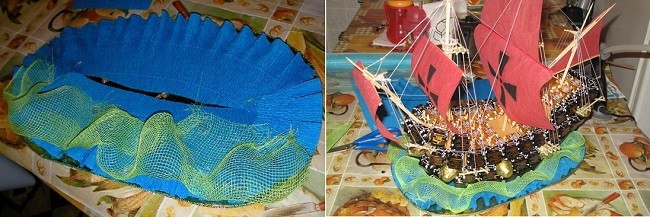
Here's how to make a DIY candy ship.
Now you know what to give to your son, husband, nephew. Such a sweet present will be a great way out. If you want to see the subtleties of such a process, then watch a specially selected plot.
The following video shows the process of making a kayak from branches and film, which was described earlier.
Looking through the third, you will understand how to make a bottle raft.
The raft is compact, easy to build, it can be made from any improvised means. For example, you can build a raft out of plastic bottles. All you need:
- Rope
- bottles
- Waterproof tape
But without preparation, nowhere. Bottles should be checked for cracks, holes. Tear off the labels, wash, tightly close the lids so that the air cannot escape from it.
Here on such battleships with vertically arranged bottles they ferry people in Malaysia.

And you can arrange the bottles horizontally and get pretty decent.

Dimensions are limited only by imagination and the number of passengers. 
And he spent time with the child and saved on travel.
 Only 800 bottles, a couple of boards and a romantic vacation on the water is ready.
And on such a "yacht" a resident of the Crimea went on a trip to Odessa.

But the inhabitants of Odessa, on the contrary, are in a hurry to leave their hometown.

On such a rocket, the guys from Pskov conquered the water festival.

Knife, wit, time, and not even a raft, the whole boat is ready to sail.

There are materials, there is a desire, there is also a crew, so why waste time on trifles? Whistle everyone on the yardarm. 
Patience, adhesive tape and work, if they don’t grind everything, then at least they will help you swim.

Complete the sides and you can open the transport line. 
DIY raft: 10 drawings of the best models
Anyone can come up with their own raft model by making it with their own hands. There are many materials for their construction, but they are usually made from:
- tree;
- logs;
- plastic bottles and canisters;
- barrels;
- polystyrene;
- cameras;
Each raft is special for the designer. You don’t have to invent models of rafts, but take drawings from the Internet, you can only add your own details. The top ten drawings of the best models included both relatively simple and complex raft models.
For the construction you will need: an ax, a knife.

On lack of fish and reeds like wood. All you need: reeds, a couple of sticks and a rope, or its substitute.

Why not just? Boards, bottles and forward, boarding.

Four barrels, a dismantled local pier, a rope - the raft is ready. Goodbye Earth.

It will take a lot of effort, but what a result!

Professional rafts of rescuers of the Ministry of Emergency Situations.

Such a raft can withstand up to 5 people, of medium completeness. Well, a couple of boxes of 40 degree fuel.

All people over 30 have heard of Tom Sawyer. This is the same raft.

Sailing raft "Yukagir", why not a fairy tale?

A raft built on cameras. Such a "destroyer" would be the envy of the "Black Pearl".

Do-it-yourself canister raft 8 photos
A high-quality and difficult-to-sink raft can be made from canisters. Of course, the more of them, the better, but 40 canisters are enough to keep two people afloat. To build it, you will need boards 50x160 cm, cans, rope or tape, enthusiasm.
To strengthen the structure, you can use a metal tape for packing and several boards measuring 30x155 cm, which are attached to the finished frame. It is advisable to cover the boards from deformation with paint or glue.

Floating cottage.

Budget, relatively fast option. I dismantled the neighbor's fence, took a rope with canisters and go for it.

This raft needs 28 canisters. At least cross the sea.

Another budget option, the main thing is that the canisters are intact, and there, you see, they won’t drown.

A combined version of canisters with bottles, which were combined into blocks. The only thing missing is a canopy from the sun. 
For one person, this amount is enough for sure. The main thing is to do everything carefully and not to touch the canisters. 
Combined option, not budget, but it's worth it. Finish building chairs, a canopy, and you can start excursions. 
Do-it-yourself log raft 9 photos
The most ancient, but reliable material for building a raft is logs. It is not always possible to find even boards, but there are always logs, the problem is only in their extraction. Despite the fact that they are heavy, they stick to the water like plastic, very well. For the simplest models, only logs, rope or its substitute are needed.
Correct raft bonding.

Here, no one really bothered. Float is fine.

Norwegian raft. The guys are trying hard, large-scale work, it's worth it.

Single raft for fishing, in normal current you can get anywhere on the water.

The process of making a raft from logs with your own hands.

The guys from the USA spare no effort, such a “raft” will fit a truck or half a hundred people. In general, how will it go.

Hunting version of a single raft.

This option is suitable even for romantic dates.

floating house. For people who are tired of the bustle of the city.

12 photos - do-it-yourself wooden raft
The main material in the construction of the raft is wood. Without it, it would be impossible to launch a single raft. A do-it-yourself wooden raft can be combined with other materials: cameras, bottles, foam plastic, etc. It is better to choose a tree without rotten parts, traces of termites. If possible, for additional protection, you can cover with paint.
Model of an advanced raft from the middle of the last century.

Similar rafts were also used for military purposes. A couple of boxes of ammunition and 2-3 people will fit without problems.

A simple version of a single raft. The main thing is to firmly nail and tie the materials together.

Bamboo raft from Thailand. Very light, manoeuvrable and durable.

We do not grow bamboo, but there are enough craftsmen.

Swimming Siberian rivers is not a question.

The guys from Bryansk are preparing for the water festival.

Our domestic battleship. It’s not a pity to go around the world on this.

Good compact model, will accommodate two adults.

You won’t be able to swim far on this one, but you can swim near the shore.

Island rafts are popular with tourists.

DIY foam raft 9 ideas + photo
When choosing a material for building a raft, you can pay attention to the foam. It is lightweight, durable, inexpensive, and most importantly accessible to anyone. The amount of materials for building a foam raft with your own hands is limited only by imagination and time.
One of the simplest models. The foam blocks are held together with wood. You can do it without cross boards, but the raft will be unstable.

Practical implementation by the Finns. On it you can fry a barbecue, sleep, fish. You can take on board 3-6 people.

And this guy decided to go to the social network during the voyage, it is not known why, but the main thing is that his raft did not sink.

Why not a canoe? Styrofoam only.

Here the guys decided not to trifle. Build a raft, so build safely.

But the sailboat for all the money. I found time both for construction and for sailing.

With such a battleship, even to the extreme north. The main thing is not to fall into the water.

They are preparing thoroughly, no, one might even say epic.

We also recommend
 Productive and reproductive thinking
 Reasonable egoism - what is the theory of reasonable egoism?
 Boris Nikolaevich Yeltsin, the first President of Russia
 Underground fights. Underground kings. What is “fighting not for the masses”? Where can you fight for money?
 Yakov Pavlov and Other Heroes of Stalingrad You Need to Know
 Survive an accident at sea in a dream - in reality experience a new love