Is it possible to apply liquid wallpaper plaster. On what surface of the walls and ceiling can liquid wallpaper be applied
Liquid wallpaper is a universal material. Easy to apply, long lasting and has incredible decorative characteristics. To give the aesthetic properties of the appearance, fillers in the form of granules, sparkles and dyes are added to the composition of the wallpaper. The finished mixture is dry fine flakes, soluble in water, which form a relief or smooth coating on the surface. Main advantage liquid wallpaper in that they can be applied to any surface, it is important that it is well prepared.
Wall preparation
The walls must be made as even as possible, they are heterogeneous in composition, and on the surface there may be remnants of the old coating, glue, putty, self-tapping screws and screws. Application of liquid wallpaper on uncleaned, wet or uneven wall will cause rust, stains and yellow spots to appear on it over time.
Important! It is possible to level the surface with liquid wallpaper in layers no more than 3 mm thick, otherwise pits will form and all flaws will appear.

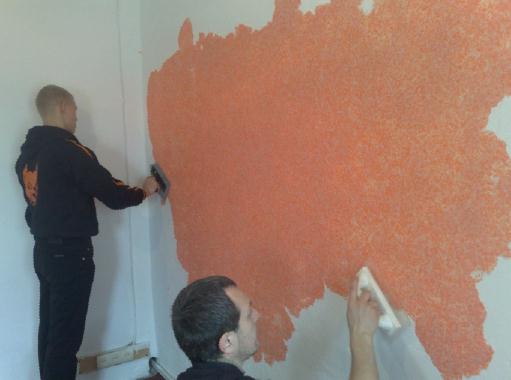
Before working with the material, the wall is painted with a substrate (primer concentrate) in 2-3 layers to protect the wallpaper from everything on the wall and inside it. It is better to choose a substrate that is odorless and quick-drying. The first layer is strongly absorbed into the wall and there is no effect from it, so the painting should be uniform, without “bald spots”.
- removal of old coating, wallpaper glue, nails;
- wall cleaning;
- primer treatment;
- painting the wall with white paint in two layers;
- the rust left after the nails is covered with a special paint.
Rules for working with a painted wall
Liquid wallpaper can be applied to painted walls. If you take into account some rules, the result will be very good. Firstly, water-based paint is not suitable for removing rust on the wall, since yellowness will appear again through it over time. Oil or nitro paint for walls - not the best good decision they won't "breathe". For better adhesion to liquid wallpaper, PVA glue is added to the paint in a small amount.
Without pre-training liquid wallpaper will not stick to a painted wall. Before applying, you need to check how firmly the paint sits - whether it peels off. If there is plaster under it, the wall needs to be tapped and checked to see if it is lagging behind. On the problem area, when tapping, a booming sound will be heard. Identified defects must be repaired immediately to avoid problems in the future.
If the paint and plaster are holding well, you will need a quartz primer to treat the surface before applying the liquid wallpaper. Such a primer increases the adhesion of the finishing material and helps to distribute it more easily. Wallpaper adheres to a highly absorbent wall, so the painted surface must be roughened. To do this, use a primer paint with quartz sand. Processing is best done with a wide brush, and not with a roller.

If the wall is covered with oil paint or another glossy layer, then it is as smooth as possible. Sandpaper will help to make it rough for better adhesion.
Advice! The thickness of the superimposed layer must be adjusted, for this the tilt of the spatula is used. The stronger the blade is pressed against the plane, the sharper the angle and the thicker the layer. facing material and vice versa. At a higher angle of the mixture, more will be cut off.
On what surface can liquid wallpaper be applied:
- "bare" concrete;
- brick plastered wall;
- wall with putty;
- wood, including fiberboard, MDF and plywood;
- places with protruding metal parts;
- painted surfaces.
Important! The color of the walls painted different colors, needs to be compared. Liquid wallpaper over white paint will be lighter and brighter, while on dark paint it will be dimmer and darker.
Application to plaster and whitewash
It is impossible to apply liquid wallpaper on whitewash. It is not enough, as many believe, to cover such walls with a primer. Lime surfaces are highly saturated with moisture and begin to crumble, yellow spots appear. Therefore, the coating is sanded completely to the base material, then oil-phthalic paint or a waterproof primer is applied to the wall.

Many people wonder whether it is possible to apply liquid wallpaper on plaster - not only is it possible, but this is the most suitable medium for intermolecular effects. Plaster is a mineral surface and the finishing material “sticks” to it very well. However, the coating must also be leveled with a special mortar consisting of cement with sand, rotband and putty.
Depending on the composition of the plaster itself, it can absorb a lot of moisture, so it is first treated in 3-5 layers with a primer in order to close all the pores for sure. The crumbling plaster needs to be removed to the firm basis.

Concrete walls are puttied with a gypsum binder before priming. Water-soluble primer lays down quite well on them.
Working with wood flooring
Can liquid wallpaper be applied to plywood? The answer will be unequivocally "no", if it is not processed by anything. Plywood is a wooden material for which excessive contact with moisture is highly undesirable, and liquid wallpaper contains a lot of water. Otherwise, the finishing material will simply delaminate and peel off, and the tree will begin to swell. Therefore, applying it to an unprepared surface may result in peeling, a change in the structure of the plywood itself.
Laminated sheets are covered with primer paint with abrasive chips before applying liquid wallpaper. This will help to achieve, if not perfect adhesion to the surface, then very high quality. Alkyd enamel is applied to non-laminated boards, then a primer layer.
Interesting! According to some experts, plywood in direct contact with liquid wallpaper will greatly decrease in area. From the side of the wallpaper, the sheet bends inward.

The easiest way to verify everything that has been said is to conduct an experiment on thin sheet plywood and see what will happen to it and how the finish itself will look.
What you need to know about applying liquid wallpaper
Liquid wallpaper can be applied on almost any surface, including deformable ones (chipboard, plasterboard, plywood, fiberboard), but not on peeling paint, lime, greasy or oil stains. Defective areas are processed using scrapers, special washes for paints and varnishes. The main requirement for the surface is the interchangeability of the product, that is, good adhesion, and for this it will be necessary to compare the main components.

The video shows how to prepare the walls before applying liquid wallpaper:
Liquid wallpaper covers small irregularities well. They will ideally lay down on carefully rubbed plaster. The processed plane should be without waves; small cracks and scratches are allowed. In rooms with high humidity working with such a finishing material is not very convenient. The temperature in the room must not exceed +40°C.
Among all decorating agents for interior cladding, liquid wallpapers stand out not only for their appearance, but also for their ease of application. How to breed them and apply them to the wall at home?
This article is intended for persons over 18 years of age.
Are you over 18 already?
But still it is worth paying attention to some nuances of proper repair:
- liquid tapestries are a kind of plaster, so the surface for their application should be as even as possible;
- before proceeding with gluing, it is necessary to treat the desired area with a primer - so the wallpaper will be easier to lay down. It will also increase their adhesion to the surface;
- prepare for gluing in advance - after soaking, they need 8-12 hours to swell;
- you determine the layer thickness yourself, but it should not exceed 3 mm;
- do not forget about ventilation - fumes from wet wallpaper are a little toxic.
But this is not all sticking tricks. We will talk about them in more detail.
How to apply liquid wallpaper with your own hands
As mentioned earlier, wallpapering does not require special skills, so you can easily handle this task yourself. Repair work with this innovative tool takes place in several stages and the final result will depend on how correctly you perform them.
Step by step application:
- Level the surface with putty. First, cover all the holes with a rough putty, and then trim the wall with a fine one (it is smaller, so it lies much more evenly). Let this layer dry.
- Prime the wall carefully. For this you can take special agent for deep penetration or use the usual water-based (a prerequisite - it must be white). It is not necessary to treat the walls with products that have color, as they will definitely appear on the wallpaper.
- Instructions on how to dilute the tapestries yourself are always written on the package. But remember: liquid wallpaper does not like experiments, so stick to clear proportions. The product should be soaked in warm water and the whole package at once - even absolutely identical-looking mixtures can have a slightly different shade. Mix the mixture with your hands and very gently (it is absolutely impossible to use a mixer - it will break up a complex consistency). The main thing - do not leave lumps, they can ruin appearance walls.
- Tapestries are prepared in approximately 8-12 hours (the manufacturer specifies the exact time). Their main feature is in ready-made they can be stored for a very long time (closed for about 2 weeks), and even if they have dried out (which also happens), they are easy to dilute again. That is why it is not recommended to throw out the leftovers - they can come in handy when correcting flaws or touching up the walls in the future.
- The mixture should be applied using a special trowel. It is very good if you find a tool designed for applying this particular product. The peculiarity of such a trowel is a transparent base, which helps to determine how evenly you apply the wallpaper. An important nuance - the application of the mixture is carried out exclusively on a dry surface.
- Start off repair work follows from the center of the room - it's easier to adapt. The liquid mixture should be applied from the bottom up (the upper edge of the trowel is slightly raised). But if you wish, you can at this stage form various patterns - this is done by gluing wallpaper in different directions. It is also extremely important to monitor the thickness of the wallpaper layer - it must be exactly the same.

Liquid tapestries dry out for about 2 days and for this time they need an influx fresh air so keep your windows open.
How to apply liquid wallpaper on the ceiling
Is it possible to glue the ceiling with liquid wallpaper? This question is asked by everyone who has encountered this amazing tool. Of course. This mixture is quite versatile, so with its help you can get a perfectly beautiful even ceiling without additional financial costs for the services of professional craftsmen.
How to apply liquid wallpaper
First, remove the old coating from the surface and level it with putty.
Prime the wall carefully. To do this, you can take a special primer designed for such work, or water-based paint.
Wallpaper should be applied with a special float (to create texture, you also need a special roller). Apply the liquid mixture evenly, moving in one direction. It is also extremely important to monitor the thickness of the wallpaper layer - it must be exactly the same.
Is it possible to apply liquid wallpaper on paint
Removing paint from the walls is a rather laborious process, so the question involuntarily arises: is it possible not to remove it, but to immediately glue liquid wallpaper? There is no single answer - it all depends on the state paintwork. If it is quite strong, does not have blisters and fungus, then the wallpaper can be applied without removing the preliminary layer. But only after careful preparation.
To start old paint you need to brush a little on metal (this ensures better adhesion), then apply a quartz primer and let the walls dry properly. And only after that you can glue the wallpaper mixture. There are no special instructions on how to apply liquid wallpaper in this case. At proper preparation such walls are no different from ordinary putty.
Is it possible to apply liquid wallpaper on drywall
Many people are very worried about how to apply liquid wallpaper on drywall so that they stick firmly enough to such a smooth material. And can it be done at all? The answer is unequivocal - of course, it is possible, but on one condition - the correct step-by-step preparation.

How to properly prepare drywall for gluing:
- first, the surface should be puttied (for better adhesion, at least two thin layers must be made);
- When the putty dries, you can proceed to the next step - the primer. The final result largely depends on the quality of its application, so do not spare money and effort on it.
And only now, when the primer is absolutely dry, you can glue the liquid tapestries.
What surface is liquid wallpaper applied to?
Liquid wallpaper mix is versatile enough that it can be applied to almost all surfaces. The answer to the question of whether it is possible to glue it in any rooms is rather ambiguous. It all depends on which walls you will apply them to and in which rooms.

What can liquid tapestries be glued to:
- on drywall;
- on ordinary concrete walls;
- on plastered brickwork;
- on wooden surfaces;
- on metal.
It is also very important to know which room you plan to decorate with liquid trellises. In places with high humidity, they can be glued only if they are subsequently opened with varnish.
What varnish is applied to liquid wallpaper
Applying varnish to the wallpaper mixture is done in two cases:
- if you need to make the wallpaper washable - there is no special need for this, since this wallpaper is antistatic and does not attract dust at all;
- gluing liquid tapestries in places with high humidity - in this case, the protection of the product is simply necessary.

But the way how to apply varnish on liquid wallpaper is a bit unusual. Of course, you can simply open the walls in the usual way with a brush, but this is a laborious and costly process. To make the tapestries moisture resistant, you can simply add varnish to the wallpaper mixture and cover the walls with it. And this will be enough for the repair to last for many years in extreme conditions.
Therefore, to the question of whether it is possible to apply liquid wallpaper in the bathroom, the answer is definitely yes. But this does not mean at all that they can be glued to the tile. Ceramics has dubious adhesion, and it will not be possible to stick wallpaper mixture on it.
Is it possible to apply a second layer of liquid wallpaper
This question is very ambiguous and depends on the situation. The primary gluing of liquid tapestries in two layers is not done, and why the extra spending (these wallpapers are not at all cheap). But sometimes there is such a situation that only part of the wallpaper is damaged, while the rest is still nothing. Then gluing with a second layer is allowed, but only on condition that you still have a mixture of the same batch (the new ones are categorically not suitable).
To apply the second layer, be sure to use a primer, for better adhesion of old and new trellises.
Liquid wallpaper - universal remedy, which makes repairs affordable even for non-professionals.
When carrying out repairs in a house or apartment, many are interested in whether it is possible to apply liquid wallpaper on vinyl, acrylic or paper wallpaper, on paint, wood, and so on, in short, what should be the rough surface for finishing. To understand this, you need to understand what the finishing material itself is made of and what surfaces are compatible for molecular interaction, as well as understand the finishing technique.
All this will be outlined below, and in addition, you will have the opportunity to watch the video in this article on this topic as an addition.
What it is

- As a rule, such material is sold in dry form, packaged in plastic bags of one kilogram, and diluted with water at least 12 hours before use (application to the surface). The composition includes cellulose, silk fibers, adhesive binders, natural fungicides, plasticizers, coloring pigments, as well as additives such as mineral chips, mica gloss and mother-of-pearl, which can be dosed at will or not added at all.
- According to the type of material, such wallpapers are divided into cellulose, silk and silk-cellulose, and this is reflected in their technical specifications issued by the manufacturer. The best option can be called the option with silk fibers - they are resistant to ultraviolet radiation(do not burn out from a direct hit sunlight), therefore, have the longest service life. But the option with cellulose has a much lower price, but this affects not only the operational resource, but also the appearance of the finish, even if there is an addition of silk fibers.
- In addition, such wallpapers can go on sale in liquid form, when they only need to be slightly diluted with water and immediately proceed to finishing work- this allows even beginners to manage the lining. But the material that is sold in dry form requires not only pre-soaking, but also mixing, as required by the instructions, so that all components are evenly distributed in the bag and also lie evenly on the surface to be finished.
Note. Despite all the advantages, such material, due to its hygroscopicity, is not recommended for use in rooms with high humidity or in places where direct water ingress is possible.
Surface preparation

During installation, liquid wallpaper can be applied to wallpaper of the same nature, but this should not be done when there is old peeling paint, lime, spilled oil or any grease on the surface.
All this prevents the creation of proper adhesion, therefore, it must be got rid of, for which scrapers of a different nature or washes for paints and varnishes are used, which are currently not dangerous, since they do not contain volatile substances (solvents) with a pungent odor.

It may happen that it is extremely difficult to remove oil paint or nitro enamel with your own hands, since it is tightly ingrained into the coating and is not scraped by any device, but it cannot be left on the surface, as this will greatly weaken adhesion.
In such cases, resort to a very simple device in the form of a rod with two or more short chains fixed on it (several links each). Such a device is clamped into an electric drill and, during rotation, methodically hits the surface, breaking paintwork materials - the effect is excellent.

Some are interested in whether it is possible to apply liquid wallpaper on plaster or putty - the answer here can only be unambiguous - not only possible, but also necessary, because this is a mineral surface, the most favorable environment for intermolecular interaction in this situation!
Despite the fact that this kind of finishing material adheres very well to all building materials of mineral origin (brick, stone, shell rock), it is more expedient to level the surface with a plaster mortar (cement with sand, rotband, putty) than to do this by applying thick layer finishes.
In addition, (the ceiling) may be uneven vertically or horizontally, therefore, it is again necessary to stretch them to zero with the help of beacon plaster or putty. In addition, gypsum board or fiber cement sheets can serve well for this purpose, only they take away part usable area due to the mounting bracket.
After leveling the plane and drying it, be sure to apply a primer coat, which must also dry - this usually takes from two to four hours, depending on temperature and air humidity.
Facing

Let's see how the dry material is prepared, and for this, for each package, we will prepare a separate container for breeding - for convenience, there should be at least two or three of them.
Pour water into a bowl room temperature(25⁰ C-30⁰ C), and then, first of all, pour mica or glitter there (depending on what is included in the kit), mix and only after that add the rest of the contents of the package, which must be shaken well before that so that the components mix together .
The solution is kneaded by hand (it is absolutely harmless to the skin) until a homogeneous mass is obtained, and then again put into the same bags and left until the next day so that all the elements are well soaked.

The resulting mixture is applied to the surface with a metal trowel or small trowel with an optimal layer thickness of 1.5-2 mm. To do this, it is best to hold the tool at an angle of 15⁰-20⁰, and after applying, smooth the mixture over the surface to get a flat plane. Liquid wallpaper can also be applied to liquid wallpaper to create a varied color palette.
Several years ago on the market finishing materials liquid wallpaper appeared. Gradually, they are becoming more and more popular, as they can be used for 5-8 years without losing their appearance, even in the hallway or corridor. Among the advantages of this coating are safety, high maintainability, plasticity, which allows you to easily finish arches, columns, and other surfaces with complex shapes.
What it is
Liquid wallpaper is sometimes confused with decorative plaster. Probably because the application technique is very similar. - using a spatula. The fundamental difference is that the composition of the applied mass is completely different. Any plaster contains sand, and cement and lime are used as a binder. The composition of liquid wallpaper includes silk, cotton, cellulose fibers. As a binder - some kind of glue.
Acrylic dyes are usually used to color the composition, and sparkles are added to obtain a surface that is different in appearance. different sizes, pieces of mica, mother-of-pearl, thread, other natural or artificial materials. These decorative additives are called "glitters".
How do they look on the wall
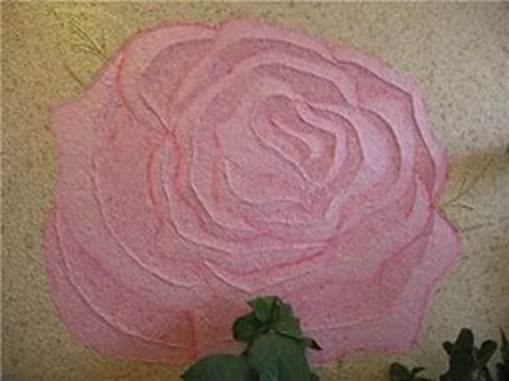
If we talk about appearance, liquid wallpaper is a cross between plaster and paper wallpaper. From the store you bring a dry composition, to which, according to the instructions, add a certain amount of water. The resulting semi-liquid mass is applied to the walls or ceiling. The coating is seamless due to the plasticity of the material; minor surface defects are corrected during application - recesses, cracks, etc. Due to the same plasticity, it is not too difficult to form a drawing, even a picture.

Liquid wallpaper can be applied to the walls even complex patterns ... or paintings
So on the wall, liquid wallpaper looks different. Differences are added by another different composition. If it is silk-based liquid wallpaper, the surface has a characteristic matte gloss. This composition is also called "liquid silk". Cellulose and cotton variation - matte, even in the same shade and with the same decorative additives, the wall looks different.
And there are also mixed compositions - cellulose-silk or cotton-silk, in which there is a certain degree of sheen, but not so pronounced. In general, it's hard to say what liquid wallpaper looks like on the wall. If you like decorative plaster, you will also like this finish option.
Kinds
Liquid wallpaper is distinguished by composition. As already mentioned, they are made on the basis of natural fibers. According to the type of these fibers, they are:

They differ not only in composition, but also in appearance. It is difficult to convey this in the pictures - the difference is in the presence and type of gloss, its brightness, visual "looseness" or smoothness of the surface. Of all the options, the most expensive silk compositions. More budget - cotton and cellulose.
Advantages and disadvantages
If we talk about the general impression, some people like liquid wallpaper, some do not. But they have good features. The advantages include the following qualities:

Good qualities. Most impressive is the high maintainability. This is good in the presence of pets: scratches are simply overwritten. If you like this coating also externally, you should try it.
Liquid wallpaper also has disadvantages:

As you can see, there are some pretty serious drawbacks. The worst thing is the impossibility wet cleaning. In the hallway or in the kitchen, this is not always acceptable. This disadvantage can be leveled by varnishing the wall. It can be washed, but cannot be restored. In addition, the varnished coating loses vapor permeability, but becomes water-repellent.
Application technique
Although manufacturers say that liquid wallpaper can be applied to curved walls, it is better not to do this. There are two points. The first is increased material consumption. Considering that the cost of liquid wallpaper is not too low (one package per 4-5 m² is required, and it costs from $5 to $18, although there are $40), it is cheaper to prepare the surface. The second point is that if there are significant differences, a pronounced “spotting” may result. Darker will be the areas where the liquid wallpaper lay down in a thick layer, and lighter where the layer is thin (due to the translucence of the wall). This again leads to an increase in consumption - to even out the color.

Surface preparation
First of all, you need to remove the old decorative coating. We peel off the wallpaper to the bare wall, we also remove the paint, if it bubbles and peels off. Then we smooth out the bumps. As already said, better wall make it more or less even.
A smooth (or relatively flat) wall must be smeared several times with a primer. This will reduce the absorbency of the surface, making it easier to work.

According to the experience of use, liquid wallpaper is best applied to rough walls, such as plaster. So, it is desirable that the primer gives a similar effect. Of the finished compositions, this is Betonokontakt. After its application, the wall becomes a little "viscous" in sensations, grains of sand adhering to the surface make it rough. On such a basis, any composition fits perfectly. There are more cheap option wall primers for liquid wallpaper - the most inexpensive white water-based emulsion (2 parts) with PVA glue (1 part). It is necessary to cover with a primer (any) at least twice.
If the wall has an uneven color, and the primer did not hide it, you will also have to paint it. Because when applying a thin layer, darker and lighter areas will shine through. You can take the most inexpensive water-based paint and paint the wall with it. Ideally even color is not needed, there should not be sharp transitions.

One more moment. If there are metal fragments in the wall - nails, screws, etc., it is advisable to remove them. If you can't remove it, paint the area with some kind of water-repellent paint the same color as the base. If this is not done while the liquid wallpaper dries, the metal will rust, and the rust will “come out” with an ugly yellow spot. Will have to repair immediately. So it is better to isolate all metal objects in advance.
Composition preparation
Liquid wallpaper is sold dry in bags. Before use, water is added to the composition, everything is well mixed. The amount of water depends on the volume of the bag, the type of composition, the manufacturer. The specific amount is written on the package.
It is more convenient for this work to have a large plastic bucket - 12 liters or more. Pour the contents of the package into it, add water. The mixture should be stirred until smooth. It turns out something similar to minced meat.

Since liquid wallpaper does not contain harmful chemical additives, you can mix it with your hands. If the mass is unpleasant for you, you can wear gloves. The finished mass is usually transferred back to the bag, the “neck” is twisted and left for several hours (at least 4-5 hours, but preferably 10-12) - for uniform swelling. Please note that the dried composition will be noticeably lighter than wet.

It is better to knead at once all the amount necessary to finish a room or at least one wall. If you put it in "pieces" you can see the borders. They are almost invisible on light shades, but can spoil the picture if the color is bright. If the borders are still visible, until the wall is completely dry, you should not take any action. Perhaps the borders will disappear when completely dry. If the liquid wallpaper is dry, but transitions are visible, the composition can be removed with a spatula, soaked again for several hours, mixed and applied again.
Wall or ceiling application
To work take a new trowel. To make it easier to follow the process, there is a trowel with a transparent plastic work surface. It is easier for beginners to work with such a trowel. The process itself is simple:

It is advisable to process the entire wall at a time, otherwise the junction lines of the two "pieces" may be visible. If, nevertheless, it was not possible to process the entire wall at a time, sprinkle the joint well with water, wait 20-25 minutes, you can continue finishing. Most likely, the joint will be subtle or almost invisible.
In the corners, you can use an ordinary spatula, but it is easier to make even corners with the help of special corner ones. First, a mass is applied on both sides of the corner, carried out with an angular spatula, the excess squeezed out is rubbed from the corner onto the wall, leveling the surface.
Liquid wallpaper dries for a long time - about 48 hours. The composition contains a substantial amount of water, so that when dried indoors high humidity, which inevitably falls into other rooms. But in the process, you can turn on the heating, open windows, arrange a draft. There are no restrictions.
Roller application
Applying liquid wallpaper with a trowel or spatula is good for everyone, except that the process takes a lot of time. To speed up the process, you can try applying liquid wallpaper with a roller. Only the roller should be special: with hard short hairs collected in groups. The width is about 15 cm. If this is not found, you can use fur with a hard short pile or foam rubber, but hard.

Before starting work, dilute liquid wallpaper according to the instructions, prepare the wall. After trying to work with the resulting composition. If the mass is poorly distributed on the wall, add a little water. But add little by little, because too liquid will “creep”. The technique is slightly different:
- Apply a certain amount of mass to the wall with a spatula, not worrying too much about the thickness of the layer. Just make a "flip".
- Roll out with a roller.
- Apply the next batch of mortar, roll out.
With the help of a roller, it is easier to maintain the same thickness of the material. This works well for smooth walls. Moreover, the finishing speed is 6-8 m².

Different application techniques produce different effects
When applying liquid wallpaper with a roller, the surface is more rough, textured. If you don’t like this effect, after the wall is finished, moisten it with a spray bottle, wait 15 minutes, go over the surface with a clean trowel soaked in water, smoothing the relief.
How to make patterns with liquid wallpaper
It is unlikely that beginners will be able to make complex patterns on the walls with liquid wallpaper, but it is quite possible to try something simple. The easiest way to make two-color patterns, and the easiest - geometric.
You can find any image. But then you need to transfer the outline of the drawing to the wall. If you have artistic ability, you can try to do it "by hand". If it doesn’t work out, you can enlarge it to the required size, print it on paper, but it’s better on cardboard, cut it out and attach it to the wall. Fill around with one wallpaper color. When the liquid wallpaper is dry, remove the paper/cardboard using a second fill in the empty area. But it is necessary to work carefully, without dirtying the already finished part.

If the drawing is simple - geometric figures, for example, you can install some kind of hard barrier to separate colors. For example, beacons for plaster. They are fixed, filled with liquid wallpaper of the same color. After drying, you can remove the beacons and carefully, without crawling onto the finished part, use the second color.
There is a way to transfer complex drawings without printing. You will need glass, a black marker, a lamp. Draw a contour on the glass with a black felt-tip pen, highlight it with a lamp. A clear outline appears on the wall, which we simply direct. We fill in the way that is more convenient, but usually first large areas, then smaller ones.
Liquid wallpaper is good because it has excellent adhesion (adhesion) with almost all building materials. Whatever the walls in the house consist of, with proper preparation, they can be finished with liquid wallpaper. They are well applied to any surface (concrete, drywall, plywood, wood, chipboard, whitewash, paint), but first you have to work with it.
One of the characteristics of liquid wallpaper is their tendency to moisture absorption. That is, the surface of the coating will accumulate excess moisture from the air in the room. By itself, this positive quality finishes - a normal microclimate will always be maintained in the house.
But too humid environment interacts with other materials. The base of the walls and ceiling must be resistant to such exposure, and moisture-intensive materials (plywood, wood, concrete) must be isolated as much as possible.

What preparation should be carried out on plastered walls

If the walls in the room are plastered, they must be puttied gypsum mixture. This will not only add hydrophobicity to them, but also give them a uniform white color.
After the putty has dried, the surface does not need to be sanded - for high-quality gluing of liquid wallpaper, the wall must be rough. But applying the primer in two layers - compulsory procedure. By itself, putty cannot reduce the absorption of walls, while the primer is able to cope with this. When the surface dries, you can apply liquid wallpaper.
How to remove whitewash and paint

Most likely, the whitewash and paint that previously decorated the room will have to be removed. If this is not done, the appearance of the new wallpaper may suffer:
- Surfaces containing whitewash should be cleaned of it. Mortar may turn yellow, then the spots will certainly appear on the liquid wallpaper and spoil the appearance of the finish. Wash off whitewash with warm soapy water using a sponge or rag. Then coatings are applied.
- If the ceiling and walls were painted water-based paint, it is not necessary to wash it off. Only in the case when the color of the base is too different from the shade of the wallpaper, the surface is repainted in a more suitable tone. Otherwise, the substrate will look ugly through the liquid wallpaper.
- Acrylic and latex dyes are easy to remove, harmless washes are sold for them. Paint that does not contrast with the new coating color may not be removed. Acrylic or latex are able to strengthen the base, in some cases they are specially applied to the walls before installing liquid wallpaper.
- It is much more difficult to clean off oil paint, but this should only be done when the coating is weak, with bubbles and cracks. You will also have to remove too dark paint - it is very difficult to paint over it even with several layers. white color. To remove oil paint, several methods are used: they are scraped off by hand or with a grinder, heated with an iron or building hair dryer, washed away chemicals. All methods are dangerous and unhealthy, so you need to proceed with caution.
What activities are carried out with concrete walls

Serious preparation is needed here. Just painting the concrete with a water-based emulsion will not work - the walls will absorb the pigment and the gray base will still shine through the liquid wallpaper. Oil paint is also not an option; it is impractical to apply it over large areas. It is toxic, clogs pores and does not allow the walls to "breathe", it is very difficult to remove during the next repair.
The concrete surface must be puttied. To do this, it is better to use a gypsum mixture, apply it thin layer so that the base does not shine through. The puttied surface is covered with two layers of primer, and after drying with 1-2 layers of white water-based paint.

Advice! If PVA glue is added to the paint (in a ratio of 2: 1), this mixture can not only paint the walls, but also significantly strengthen the surface.
Small scales will bind and securely fix - this will prevent peeling of the coating. Another plus - glue will improve the adhesion of liquid wallpaper and walls.
How to prepare drywall for finishing

By its structure, drywall is a rather moisture-intensive material. Therefore, its usual processing (puttying seams and joints) is not suitable in this case. To prepare plasterboard walls or a ceiling for finishing with liquid wallpaper, the entire surface is puttied with a gypsum mixture. The layer of material should be uniform and dense enough so that there are no “bald spots”. After that, the base is primed and painted in the same way as in the case of concrete.
Another nuance is fasteners. Self-tapping screws that fasten the plates and the frame can rust under liquid wallpaper, even through a layer of putty. It is recommended to use galvanized fasteners.
Important! If drywall construction already assembled using conventional metal fasteners, the screws must be “drowned” as much as possible into the material, and the hats should be painted with white oil paint.

Drywall - very smooth, the coating is easily applied to the surfaces finished with it. This is ideal for a beginner trying to apply liquid wallpaper for the first time.
How to prepare plywood, wood elements, chipboard, MDF

Wooden walls and ceilings - a rarity in modern houses. If walls are built from them, then not in order to cover them with liquid wallpaper. Such materials are decoration in themselves.
And here are the structural elements from wooden materials, including plywood and chipboard, can be found in your home. These are all kinds of arches, mezzanines, door frames. Of course, all wood-based materials absorb moisture strongly. This is not only harmful to the coating, but also adversely affects the material itself (plywood, fiberboard, chipboard). Wet wood warps and deforms, it will be impossible to return the structure to its previous shape.
In order not to spoil these elements, plywood and other wood materials are covered with a layer of oil paint. It will become a kind of barrier between the base and the coating. If the base area is large, you can try to open it with several layers of soil and water emulsion with the addition of PVA.

Advice! It is best to test this treatment on a small area. If liquid wallpaper will lay down well and hold tight, you can process all the walls in this way.
Results and conclusions
- Liquid wallpaper can easily mask wall defects (cracks, bumps), but they are very "sensitive" to the quality and material of the base.
- If whitewash, old wallpaper and oil paint have to be removed unambiguously, then you can experiment with other coatings.
- In doubtful cases, you can first process small plot(preferably behind furniture) and see the result.
- Be sure to process metal parts and structures. If reinforcement lies in the thickness of the walls, rods, anchors or nails protrude from the surface, they are smeared with oil paint (at least the part that will be in the wallpaper).


