Shelves on the windowsill for seedlings. Seedling Racks: Successful Solutions by FORUMHOUSE Users
It is convenient to use seedling racks when growing plants from seeds until the weather becomes favorable for planting strengthened seedlings in open ground. They allow you to save space, simplify the care of plants. In addition, if you attach artificial lighting to the shelves, then seedlings can be grown regardless of the location of the rack.
Basic requirements for the rack
A seedling rack can be made from various materials, but in any case, it should be:
- durable;
- reusable;
- convenient, i.e. provide comfortable conditions for caring for plants (it is important to have quick access to seedlings for watering, inspection and loosening);
- aesthetically pleasing.
The dimensions of the structure can be completely different, but racks with the following parameters are considered universal:
- the number of shelves - from 3 to 6;
- shelf length - sufficient to accommodate standard fluorescent lamps (i.e., from 50 cm);
- height between shelves - from 40 to 50 cm;
- distance from the floor to the bottom shelf - from 10 cm.
Often the bottom shelf is used to store various garden tools or household items.
If you do not plan to keep seedlings on the last shelf, the top of the rack can be left open by installing a front and rear horizontal support instead of the top shelf. They will not only hold the entire structure, but will also be a great place to attach lighting elements.
Material selection
The rack must be strong, waterproof and durable, which should be taken into account when choosing a material. Let us consider in more detail the possible materials for the manufacture of the rack:
- Wood. One of the most popular materials, because it breathes, looks natural and beautiful, but has a significant drawback - it absorbs moisture. In this regard, when choosing a breed, hard varieties should be preferred, since they absorb moisture worse than others. These include maple, ash and oak. In addition, it is worth using special impregnations that help solve the problem of wetting wood.
- Metal. It is better to choose stainless steel, as it will not allow corrosion to form. Profiles and even metal pipes can be used as racks, and shelves can be made from a sheet of metal or a strong mesh. In general, iron structures are durable and quite reliable, but they will cost more and require considerable effort in the manufacture of the rack, since working with metal requires certain skills and the availability of expensive fixtures.
- Plastic. Such material has many advantages - it is durable, easy to clean, does not absorb moisture. In the manufacture of racks, you can use not only plastic sheets, but also pipes.
- plexiglass. From this material, you can assemble a transparent original design that looks stylish and modern. Plexiglas comes in different colors, so you can assemble a rack with multi-colored shelves.
- Plywood. It is easy to process, but gets wet quickly, so it is not the best choice in the manufacture of seedling racks. However, if plywood is still used, then it is worth preparing several pieces of film or oilcloth to wrap the shelves with it, otherwise their quick damage is inevitable.
The choice of material depends on financial capabilities and engineering design decisions, however, if the choice is between plywood, plastic and plexiglass, then it is better to give preference to the second or third option. Such materials have a long service life, and also do not require any coating to protect against moisture.
Having prepared the material, you should also acquire the necessary tools for the construction of the rack, namely: a saw (ordinary or end), a drill, a screwdriver or a conventional screwdriver, etc.
Construction types
For seedlings, you can assemble a structure of the following types:
- Stationary. A suitable option for a specially equipped room for growing plants, since the structure is not disassembled, but fixed in several directions. Its advantages are that it is reliable and durable.
- collapsible. If free space is limited, then it is better to choose such a design, since it is convenient to move it, and after growing seedlings it can be completely removed.
- window. This design is installed on the windowsill in the window opening. This design is suitable for germinating a small amount of seedlings. Often window shelving is used to grow greens for the table throughout the year.
Each design has its own advantages, so it is better to make a choice based on your own preferences and financial capabilities.
Wooden rack for seedlings
If you plan to make a rack out of wood, you will initially need to draw a sketch of it so as not to forget what dimensions to adhere to. Here is an example of a suitable schema:

It is better to make shelves from timber in the form of a longitudinal lattice. They will be stronger than plywood shelves, although the design will be more bulky and heavy.
After preparing the sketch, you need to collect the following materials and tools:
- wooden beam for racks with a section of 45x60 mm (2 pieces of 3 m each, you can immediately ask to cut 1.5 m each);
- wooden beam for cross-sections with a section of 20x60 mm (2 pieces of 2 m each, you can immediately ask to cut 50 cm each);
- a wooden board for shelves with a section of 22x100 mm (one shelf takes 5 parts 75 cm long, then for all 4 shelves you need 4-5 boards of 3 m each);
You can save on boards for shelves if you lay them not end-to-end, but at a small distance from each other. A shelf will come out in the form of a wooden lattice.
- saw;
- self-tapping screws, nails;
- chisel;
- hammer;
- joiner's glue;
- roulette;
- pencil.
After preparing all the necessary materials and tools, you can go directly to the construction of the rack. This process, in fact, consists of two main stages - cutting parts and assembling them. We will consider each stage separately.
Cutting parts
The timber purchased at the hardware store must be cut taking into account the following parameters:
- the length of the bars for the manufacture of the supporting parts of the rack (racks) - 1.5 m each;
- bar length for crossbars - 50 cm;
- the length of the boards for the shelves is 75 cm.
On each beam, you will need to measure the required length, draw a line and cut along it using a miter saw or a regular saw. To save total time, it is advisable to use a circular saw or electric jigsaw. As a result of cutting, you need to get the following elements of the future design:
- 4 supports 1.5 m long;
- 8 short bar crossbars;
- 15-20 boards for shelves.
To further strengthen the rack, you can prepare bars that will need to be screwed to the finished structure diagonally at the back wall.
Assembly
Prepared boards need to be connected like a designer to get the finished product. You need to act in this order:
- Mark with a pencil where the groove for the crossbar will be located, attaching it to the support bar:
 The first crossbar should be located at a distance of 23-24 cm from the edge of the support beam, and the subsequent - 40 cm from each other. Measurements should be taken from the end of the support beam, which is in contact with the floor. This will ensure that the shelves are at the same height.
 - At the marking points, first make cuts, taking into account the thickness of the crossbar, and then cut the grooves with a hammer and chisel.

Please note that the cross member must be recessed into the groove. - Fasten the first cross member between the two support bars by driving it into the groove with a hammer (measurements in mm in the photo).

- After 40 cm, fix another crossbar, and behind it - two more (the last crossbar will be at the very top edge). The result should be a kind of staircase.

- Prepare the second side of the structure in the manner described above.
- Lay the boards from which the shelves will be between the two support posts. Fasten them to the crossbars with screws or nails.

- Cut corners in the extreme boards so that the support beams enter them.

- Create the top two shelves in the same way.
- The top shelf can be made longer.

The finished design will look like this:
If during assembly the joints were not treated with glue, such a rack can be easily disassembled by simply unscrewing the screws. In order not to waste time on disassembly, after growing seedlings, the rack can be moved to another place and used to store books, tools, jars of blanks, etc.
metal structure
This version of the rack is made of a metal corner. It is lightweight, which is its undeniable advantage.
Before proceeding with the assembly, you will need to prepare the following materials and tools:
- metal corner 40x40 mm in size;
- boards for shelves;
- end saw;
- self-tapping screws for assembly;
- drill for metal;
- electric drill for preparing holes for fasteners;
- roulette;
- marking marker.
The amount of material needed should be calculated based on how high the racks will be and how long the shelves will be.
Having prepared everything you need, you can cut the metal and proceed to assemble the rack.
metal cutting
From a metal corner, cut the elements of the future design:
- 4 racks 1.5 m high;
- 4 crossbars of 50 cm;
- 4 shelves, the length of which should correspond to the desired length of the rack.
The length of the rack must be determined taking into account the place where it is planned to place the structure.
Assembly
The rack is assembled according to the following instructions:
- Drill holes in the places where the elements are supposed to be connected.
- Fasten the parts with self-tapping screws (or you can use rivets).
- Cut the boards with a saw into sheets of the desired size in order to cover the space between the supports of each level with them and get the shelves.
- Lay the shelves between the rails to get the finished rack.
How to assemble a shelf rack only from metal profiles is shown in this video:
The problem of limited space will be solved by a window rack, on which you can keep a large number of seedlings.
For the manufacture of such a rack you will need:
- wooden beam with a section of 20x20 mm;
- a sheet of plywood (if you decide to make shelves from it);
- jigsaw;
- screwdriver and screws or nails and hammer;
- roulette;
- pencil.
Having prepared everything you need, you can start making the rack:
- The mode of the beam into parts: for the support you will need 4 bars of 80 cm each, for the crossbars - 4 bars of 27 cm in length.
- Mark each support bar. We measure from the top edge 5 cm, and from the bottom - 37.5 cm.
- To assemble the side part of the structure, it is necessary to nail two crossbars to two support bars in the places where the mark was made. For structural stability, a diagonal profile can be attached to each supporting structure.
- Assemble the second side of the structure in the manner indicated earlier.
- Nail between the sidewalls of the shelf. They can be made from the same timber or cut from a sheet of plywood. The shelves of the rack can be not only wooden, but also glass, but for reliability they should be fixed with adhesive pads.
- If necessary, you can fix the backlight under each shelf.
The diagram shows standard dimensions that can be adjusted to the width and depth of a particular window opening.
This type of construction is assembled like a metal rack. It has a small specific weight, so it is easy to move around the room.
To make a rack, you will need:
- PVC pipes;
- hacksaw;
- tees (4 pcs.);
- corners (12 pcs.);
- corner crosses (4 pcs.);
- roulette;
- marking marker.
- Cut 4 long pipes for supports (180 cm each), 6 crossbars (50 cm each), 4 crossbar pipes (150 cm each) and 4 "short" pipes 30-40 cm each.
- First, take one cross-piece 50 cm long, and put two tees on it at an equal distance from each other. Do the same with the second crossbar.
- Take 4 pipes of 180 cm and cut each in half (i.e. 90 cm each). Connect the two parts together using the corner cross. Connect the rest as well. You should get 4 of these elements. Place two elements parallel to each other.
- First, insert one assembled cross member into the cross, forming the letter "H" from the pipes. Do the same with the second pair of elements. It turned out two separate designs in the form of "H".
- Take two more crossbars 50 cm long. Using the corners, fix one on top and the second on the bottom of the H-shaped structure. You will get a new figure - the figure eight, as on an electronic watch. There will be two such details. These are vertical support walls. Place them parallel to each other.
- Insert the crossbar pipe into the last free holes of the crosspieces. Thus, the two side support walls will be interconnected and will be able to stand stably.
- In the resulting frame, only the “shelf” is missing. Attach one "short" tube to each end of the crossbar tube using angle bars. Get a design in the form of a bracket. Such parts of the shelf will come out 2 pieces. Insert them into the remaining free holes of the tees, placing the parts of the shelf parallel to each other.
- Place pots with seedlings on the "shelf". From above, you can install a pendant lamp, firmly fixing it on the side racks.
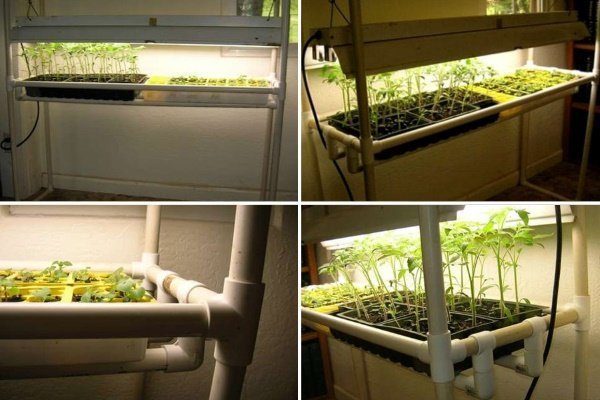
You can put a sheet of plywood on the bottom of the shelf if you are using pots, but it is better to just choose tall cassettes or roomy seedling boxes.
Homemade pallet rack
If the seedlings will be grown in a small apartment, the problem of placing containers with plants can be solved using a narrow vertical pallet structure fixed to one of the walls. For its manufacture you will need:
- pallet (cargo box);
- wooden beam (4 pieces of 3 m each);
- wooden slats;
- hammer;
- nails;
- pencil;
- roulette.
You can assemble the rack according to the following instructions:
- We make a rack for three spans. Cut the timber 1.5 m long. You will get 8 parts.
- Cut 18 strips as long as the width of the pallet.
- Take two bars and place them parallel to each other. Step back from the top as much as the thickness of the pallet (about 10 cm). Fasten the slats to the bars with nails so that you get a structure that looks like a ladder. Pallets will be mounted on these rails as shelves. The distance between the shelves should be about 40 cm.
- Place pallets on rails. For reliability, you can fix them with nails or put them on carpentry glue.

Choosing a lighting fixture and setting the backlight
If you plan to place the rack in a fairly well-lit place, then you do not need to install additional lamps, otherwise they still need to be installed to guarantee the seedlings the necessary daylight hours.
Lamps should provide bright light, but at the same time emit a minimum of heat, otherwise the seedlings can get serious burns. In this regard, any lighting devices, except for incandescent lamps, can be used for lighting. Here are the best options:
- High pressure sodium lamps. Such lamps emit an orange-yellow glow that promotes the growth of seedlings. In addition, it does not irritate the human eye, so these lamps can be used in residential areas. Their disadvantage is the high cost and the need to use a power regulator when installing them.
- Phytolamps. Although the spectrum of such lamps is well suited for plants, it is dangerous for human eyes. When installing, they must be adjusted in such a way that the light falls on the seedlings from above and from the side. The distance from the lamp to the tops of the plants should be at least 10 cm.
- Fluorescent lamps. Such lamps give a cold light, which lacks the red component of the spectrum. They need to be installed at a distance of 30-60 cm from the seedlings. In addition, to ensure uniform heating of the plant, the lamps should protrude 5 cm from the edge of the shelves.
- LED lamp. Plants that are illuminated by such lamps give a greater yield, so they are used more often than other options. In addition, such lamps consume little electricity, and also combine the spectra most needed for plants - blue and red.
Since LED lamps are in the greatest demand, consider installing the backlight using their example. In an electrical goods store, you need to purchase fixtures whose length corresponds to the dimensions of the rack (or rather, the length of the shelves).
At the same time, it is extremely important to observe safety precautions - do not leave a bare electrical wire in the public domain, and turn off the electricity altogether during the preparatory work.
Required materials and tools:
- red and blue diodes on the tape;
- glue "Moment" (transparent);
- plastic base or plinth with cable channel;
- screwdriver and screws;
- switch;
- plug and electrical wire;
- insulating tape;
- reflectors.
The backlight installation instructions are as follows:
- Fix the chain of LEDs on the plastic base.
- Connect the tape to the switch, and from it stretch the wire with the plug to the outlet. If you plan to pass electrical wiring through metal corners, then holes must be drilled in them. Of course, you can go in a simpler way - carefully distribute the wire along each metal element.
- Fasten the base with tape to the bottom of the shelf. To do this, you can use transparent glue "Moment".
- Attach mirrors or sheets of foil to the sides of the rack to reflect light.
If the shelves are made of plexiglass, then through them the light will freely fall on the seedlings, which is an additional advantage of this design.
In the following video, you can clearly see how the lighting from the LED strip is mounted into the finished plant rack:
4
City: Tomsk
Publications: 98To grow good seedlings, in addition to high-quality soil, timely watering, a sufficient amount of light is required. Lack of lighting will lead to the fact that the plants will start to hurt, growth and fruiting will be delayed. Well, of course you need a place to place all the seedlings. To solve the problem with placement and special racks will help. Ready-made racks for seedlings can be purchased at the store. And for those who want to show their imagination and creativity, you can make a do-it-yourself seedling rack that will be combined with your home interior. You can put it not, but even if there is lighting in any convenient place. Before the onset of cold weather, take it out to the balcony or veranda.
The choice of material for the rack
What can a seedling rack be made of?
First, let's decide on the material that we will use in the manufacture. It can be either wood, iron or plastic. It all depends on the material possibilities and engineering and design wishes. If you prefer wood, then it is better to choose hardwoods that will not absorb moisture well. If metal, then stainless steel is better. It will protect the structure from corrosion. As shelves, you can use plywood, plastic or plexiglass. Here, the advantage is given to plexiglass and plastic. Such materials will last a long time without losing their appearance. Shelves made of plywood will have to be covered with polyethylene so that they do not deteriorate under the influence of moisture.
Basic requirements for a seedling rack
Whatever design the seedling growing rack has, it must meet the requirements:
- have strength, reliability;
- be resistant to moisture;
- with the expectation of repeated use;
- provide comfortable conditions for plants;
- quick access (watering, inspection, loosening);
- have an aesthetic appearance.
The number of shelves can vary from 3 to 6. The length of the shelves should be such that standard fluorescent lamps can be installed. The width of the shelves should not be more than 60 cm with a shelf height of 40 - 50 cm.
We make a rack on the windowsill
Initially, having calculated the number of storeys of the rack (in our case, there will be 4 of them) and its parameters, we proceed to construction. For simplicity and convenience, we take ready-made furniture panels in the size of the window sill, 1200 mm long by 200 mm. For side racks, we install furniture panels 1500 by 200 mm long. We fix with the help of a comforter. The height of the shelf in our case is 350 mm. If desired, for greater stability, the structure can be additionally fixed to a slope or frame. You can make a backlit seedling rack by attaching lighting to an already finished structure.

Why do seedlings need lighting?
 In winter, plants especially lack natural light. As a result, photosynthesis proceeds sluggishly, the normal development and growth of biomass slows down. The lack of light is compensated by the installation of artificial lighting. In stores you can buy lamps of various designs, capacities. But how many lamps, and what power is suitable for growing plants? First, let's decide which lamps are suitable for lighting.
Choosing the right lamp for seedlings
Suitable for seedling illumination device:
- Incandescent lamps (17 Lm/W)- a simple, affordable, but not the most effective way to arrange lighting. They give little light, they heat a lot.
- Fluorescent lamps (70 – 100 Lm/W) type LBT or LB daylight with low power. Provide cold light. They have a low proportion of red light.
- LED (80 – 110 Lm/W)- durable, economical lamps. With them it is easy to choose the necessary spectrum, intensity.
- Sodium metal halide lamps (up to 100 lm/W)- easy to use, economical, efficient, but they do not have a share of the blue spectrum.
- Domestic sodium discharge lamps (200 lumens per watt) emit a yellow-orange glow that does not cause eye irritation. Requires additional installation of a control device.
- Mercury. They have the largest "section" in the daylight area.
- Phytolamps– economical, environmentally friendly, efficient, compact and durable. The most popular for lighting seedlings. Even the close location of such lighting will not lead to leaf burns.
- Other: halogen (25 Lm/W), linear (47 - 93 Lm/W), xenon discharge lamps (100 Lm/W), neodymium.
In order to illuminate a shelf 50 cm wide, 140 cm long, it will be enough to install a “warm” lamp and a “cold” spectrum lamp with a power of 36 W. And it is best to make up for the lack of sunlight with fluorescent lamps or special phytolamps. Reliable and efficient sodium gas discharge lamps will also help to illuminate the seedling growing racks.
When choosing a luminaire with chokes, take into account the strong heating of the choke and the shelves above it. To reduce heating, the gap between the shelf and the lamp is made 4 - 6 cm. If you use a lamp with an electronic ballast, then there will be no problems with heating.
Regardless of the type of lighting chosen, try to place seedlings on the south window. For greater effect, you can install additional reflective screens on the sides and back of the seedlings. The intensity of lighting is selected individually for each plant. Depending on the requirements of the plant, the intensity can be adjusted by increasing or decreasing the distance from the lamps to the plant.

Summing up
Having picked up the necessary material, having calculated the parameters of the shelves, you can easily make a rack for seedlings with your own hands. Do not forget about the need for additional lighting of plants.
Having decided on the choice of lamp (phytolamps, fluorescent, sodium are considered optimal), you can make a backlit seedling rack.
Video: seedling rack with LEDs
Every summer resident knows how much depends on how correctly and efficiently the seedlings will be grown. Often this has to be done at home, and it’s good if the house has a large area, and creating a small greenhouse is not difficult.
But what if we are talking about an ordinary apartment, where every meter counts? In this article, we will talk about how to make a do-it-yourself seedling rack and fit it into a small area.

Such a question, probably, can only be asked by a person who has never encountered the problem of growing seedlings at home.
Of course, there are always window sills in the house, on which all sorts of jars, cones and boxes can be placed, but this location has a number of disadvantages:
- The most important point is the lack of natural light. Planting seedlings begins in February-March, and in many regions of our country, at this time there is a very short daylight hours, and the sun's rays still do not gain enough power to fully warm the soil.
- Jars and boxes on the windowsill- this is constant dirt and debris, which in the process of seedling growth will only increase, and it will be more and more difficult to deal with them.
- Insufficient temperature. The optimal soil temperature for seedlings is considered to be 20-25 degrees, and the cold emanating from the window can prevent this, and given the battery under the windowsill, the soil will constantly dampen, which will also negatively affect the seedlings.
- Lack of space. As a rule, a rack for seedlings on a windowsill is made in several levels, which can significantly save space. If you simply arrange the boxes on the windowsill, then even with a large number of windows in the house, there is only enough space for a couple of planted beds.
Of course, these are not all the disadvantages of placing seedlings directly on the windowsill, but even they are enough to think about making reliable shelving with your own hands.
What can be racks

Some readers may now be thinking - "why make DIY seedling racks when you can buy ready-made ones in any specialized store." Maybe there is some truth in this, but we will still give a few arguments in favor of self-production.
- Most seedling racks are very unreliable and are produced under a material austerity regime, and this can lead to disastrous consequences - if such a rack breaks, you will not only lose all the seedlings, but also provide yourself with a job cleaning the apartment for a long time.
- Despite the low quality and durability, a distinctive feature of such racks is their price. For comparison, for the independent production of a standard rack, you will spend about 2,000 rubles, while in a store, it can cost up to 5 thousand or more.
- Most ready-made shelving comes in standard shapes and sizes, which is why it is often simply impossible to place them in your home. With self-production, there will be no such problems. And you can collect exactly what you need.
In a word, self-manufacturing of the rack is a good idea from all sides. The whole process will not take much time and effort, but the result can be enjoyed for more than one season.
Stationary rack

Stationary type plant rack, ideal for those who plan to regularly grow seedlings, and the area of \u200b\u200bthe house allows you to place a structure that cannot be disassembled.
Such racks are installed according to the method of "dead" fixation, that is, they are attached in several directions, which gives them strength and durability. As for the materials from which they can be made, both wood and metal are equally suitable here (see). Moreover, the metal is considered more preferable because of its strength, of course, subject to its processing and protection against corrosion.
The main thing in the manufacture of such a rack is a thorough calculation. It is important to take into account all the nuances that may affect the seedlings, since it will be very, very difficult to remake such a design later.
Advice! When making a stationary rack, try not to save on paint, the coating must reliably protect the metal and last a very long time, and cheap paint rarely meets these criteria.
Rack collapsible
Your living space is not large? Then collapsible shelving for seedlings is what you need. They can only be installed during disembarkation, and put away in the pantry after the need is gone.
It is somewhat more difficult to make such a design, but it has a number of advantages over stationary shelves:
- You can move the rack as needed.
- Adjust the height and size of the structure.
- The rack does not interfere in the apartment, and is removed as needed.
As for the materials for manufacturing, in principle, wood can also be used, but it must be remembered that with constant assembly and disassembly, it will quickly become unusable, so a metal corner and profile is considered more preferable.
window rack

This design is also called a proofing rack, that is, it is installed on racks that burst the rack from the window sill to the top of the window. This fastening gives the rack additional strength, and if necessary, it can be easily removed.
The main disadvantage of window structures is that they have a height limitation, that is, if the distance between the racks is planned to be 50 centimeters, then it will be possible to fit a maximum of three shelves per window, and then, provided that the seedlings should not be high.
The choice of the optimal design entirely depends on the characteristics of the room where it will be located, which is why it is so important to take into account all the nuances, even those that at first glance seem insignificant. Well, in order to visually see how various shelving in a house or apartment will look like, we suggest you watch the video in this article.
Manufacturing

Any construction work, and the assembly of shelving can be attributed to them, begins with preparation. We strongly recommend that you make a detailed drawing on paper, in real proportions. This will help not only to visualize how the rack will look in the interior, but also help to correctly calculate the required amount of material.
Next, we will talk about the manufacture of metal structures, since working with steel is somewhat more difficult, and a certain skill is required. If you plan to make wooden shelving, then the process will not differ much, you just have to make adjustments for the material.
So, the first and most important rule of the home master is the preparation of tools and materials. During manufacture, each tool should be at hand, otherwise you will not only lose time searching, but also pretty much get on your nerves and your household.
For the manufacture of metal shelving, we need the following tool:
- Roulette and pencil.
- Household grinder, or hacksaw.
- Drill and drill to it.
- Building level.
Depending on the design, you may need some other tools, but what is listed above is the main set that you cannot do without. In some cases, you will also need a welding machine, and, accordingly, the ability to work with it.
Now materials. We will not give quantitative values, as this depends on individual characteristics.
- A profile pipe with a diameter of at least 20 by 20. With a significant load, you can take 40 by 20, it is much stronger, but also more expensive.
- Corner No. 25 will serve as a support for the shelves.
- Plywood or chipboard at least 1 cm thick.
- Bolts with nuts for fastening shelves.
- Anchor bolts, if it is decided to make a stationary rack with fastening to the wall.
- Fluorescent lamps with shades and electrical accessories for them.
Important! The lamp shades should be about 5 centimeters longer than the shelves themselves. This is necessary so that the seedlings warm up evenly, since at the edges, fluorescent lamps are much hotter than closer to the center.
Illuminated seedling racks are the most popular type of construction. Plants need light and warmth to survive, and fluorescent lamps provide them. We will not delve into the topic of selecting lamps, since this is a completely different article, and it depends on so many factors and features.
The main thing to remember is that the lamps must be fixed in such a way that they can be raised and lowered. This is important due to the fact that the lighting should always be at the same distance from the top of the seedling, regardless of its height and size.
Assembly of a stationary rack

We weld two rectangles from a profile pipe, in which the long part is the height of the rack, and the short part is the width of the shelf divided by two.
On the lower and upper parts of the rectangles, we weld a bundle that will unite the structure and give it strength. Next, we drill two holes in each pipe of the adjacent wall. Mounting anchors will be hammered into them.
Now, we drill holes in the perpendicular wall, with a distance of about 25 cm from each other. The holes should be in all four long pipes of the rectangles. These are places for attaching shelves, and moving them depending on the growth of seedlings.
Now, we cut the corners along the width of the shelves, and by attaching a segment to the holes, we make marks. Here, too, you need to drill holes.
When everything is ready, paint all the elements and let dry thoroughly. Now it remains only to fix the rack to the wall, and with the help of bolts, fix the corners in the necessary places.
That's it, we cut the plywood of the desired size, lay it and the shelves are ready. If necessary, simply unscrew the bolts and move the shelf to the desired distance.
Rack on brackets

Such do-it-yourself shelving for seedlings is the easiest to make, and brackets can be either independently welded from a corner or bought ready-made in a store.
Here we simply drill holes in the profile pipe in which the brackets will stand and fix them to the wall. In principle, the rack can be considered ready. The brackets are simply inserted into the holes, and plywood is laid on top of them, and the lamps are fixed.
As for mobile racks, they are assembled according to the same principle as stationary ones, with the only difference being that there is no need to attach to the wall, but additional horizontal supports below will be needed. They should be about twice as wide as the rack itself, this will ensure the stability and reliability of the structure.
Window rack

This design is very similar to the stationary rack described above, but there are no wall mounts. Simply put, we need to measure the height of the window and the depth of the niche, after which we cook two rectangles from the pipe, in which the width corresponds to the depth of the window niche, and the height is five centimeters less than the window itself.
Now, in the upper and lower parts of both rectangles, to the ends of the pipes, we weld the nuts.
Important! When welding a nut using electric welding, be sure to screw a bolt onto it. This will help keep it in position and keep the threads from getting welded on.
We make corners for attaching shelves in the same way as on a stationary rack. Now the structure can be painted and installed.
We screw the bolts into the welded nuts and insert the rectangle into the window opening, now we gradually unscrew the thread so that the bot opens the structure. It is important here not to overdo it and open the rack exactly as far as necessary, and so that the bolt does not leave an imprint.
For reliability, you can put small pieces of rubber in the spacers to protect the finish.
Our rack is ready, it remains to fix the shelves and hang the lamps. Everything is simple and reliable. For such a design, you can not worry that it will not withstand the load, and if necessary, it can be easily disassembled and put away in the pantry until the next season.
We also recommend
 Switching power supply: repair and refinement
 Remote control of light
 Swimming lessons for preschool children
 Notes for the master - home household alarms
 Clock propeller on Atmega8
 Device and relay application examples, how to choose and connect a relay correctly Microcontroller and relay simple switching circuits