A small do-it-yourself fountain on the site. Homemade mini fountain
Foreword
There are many ways to create a cozy corner for relaxation on a suburban area, but the most effective technique is to make a fountain in the country with your own hands. Pleasant freshness in the air, soothing murmur of water, sun glare on the surface of a small reservoir surrounded by flowering shrubs - all this will transform the familiar environment beyond recognition and make it simply luxurious. What can a fountain be made of and what equipment will be needed for this?
- flowing;
- with water circulation.
In designs with circulation, the same volume of water is driven by the pump in a circle. From time to time it is replenished, compensating for evaporation and splashing. Such designs are most often found in summer cottages.
The water cycle in the fountain is provided by a circulation pump
In flowing fountains, water is supplied from a well or well and then discharged into the sewage system. They are used when it is necessary to constantly irrigate the garden and other plantations. Such structures look better, and the water in them is potable, while in structures with circulation it stagnates.
Flowing fountains are fed from a well or well. Waste water is used to water plants
According to the nature of the outflow of water, fountains are divided into:

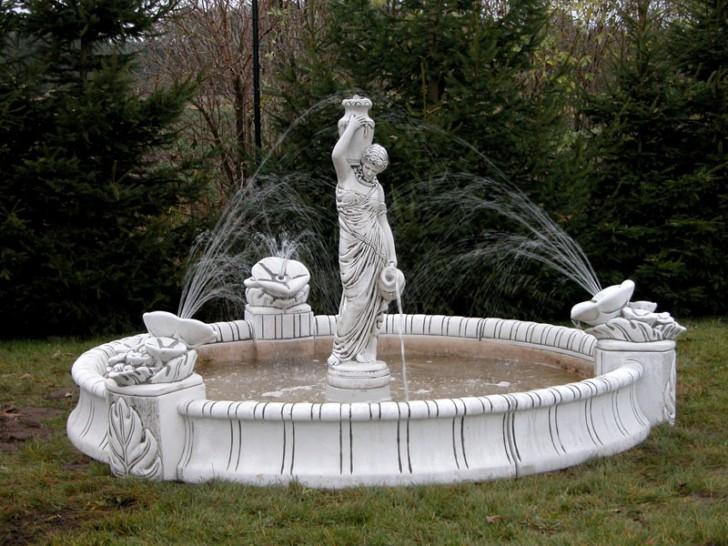
Nymphaeum fountains freshen the air no worse than jet fountains, but they consume less water. In places where its supplies are limited, this variety is most preferred.
The waterfall device requires an expensive special pump with high capacity and low pressure. If you can adapt an ordinary household pump for other types by making minor changes, then in the case of a waterfall, this option is excluded.
Fountains are also divided into:

Video: fountain in the country - varieties
Location selection
A suitable location has the following features:
- visual accessibility. The fountain serves as a decoration of the site, so it should be visible from everywhere.
- The presence of penumbra. The fountain plays with highlights in the sun and therefore looks spectacular, but the water in it quickly blooms.
- No buildings nearby. Otherwise, with gusts of wind, the walls are constantly sprayed with water and building materials quickly become unusable.
- Absence of tall trees in the immediate vicinity.
They are undesirable for the following reasons:
- powerful roots will damage the bowl;
- leaves and seeds falling from trees litter the water;
- Excess moisture damages trees.
The fountain should be built a little further from the house in a place slightly shaded by several ornamental shrubs.
Equipment and materials
The design is extremely simple: it is a bowl filled with water with a pump installed in it, to which a diffuser is connected. In the nymphaeum there is also a stone slide, along which water flows. But for all this to work, each component must be chosen correctly. Let's consider the most important ones in detail.
Diffuser
This is an element of a jet fountain, the shape of the jet depends on its design. It is impossible to repeat a branded diffuser at home - these parts are developed and manufactured using complex computer technologies. The most accessible models give the jet the shape of an umbrella.
Water jets passing through the umbrella diffuser fall into the tank, forming a kind of umbrella
The jet retains its shape even when strong wind, but there is a drawback: you will have to buy a pump as well - it will not work to remake an ordinary one for such a diffuser.
It is cheaper to use a shower head as a diffuser. It is not as effective as real diffusers, but it freshens the air just as well and can work with household pump. Some variety is achieved by adjusting the pressure and deepening of the nozzle. You can connect the diffuser to the pump with a flexible hose and fix it on the float - the fountain will turn out to be "wandering".
Shower heads with a self-cleaning effect are more practical. In the holes they have elastic polymer inserts that change their shape when the pressure changes and thus prevent the deposition of scale.
Pump
The question of choosing a pump is solved in two ways:
- expensive option: a special pump for fountains is purchased;
- cheap: a regular household pump is used.
A conventional pump differs from a special one in two ways:
- supplies water with strong pressure (a fountain requires a maximum of 4 m);
- requires periodic shutdowns.
Solution: while maintaining performance, reduce the pressure, thereby unloading the engine and extending the time of continuous operation. The ideal option is an adjustable pressure that allows you to change the shape of the jet. Achieve it from centrifugal pump it’s impossible, but from the vibrational one (Aquarius, Kid, Brook) - it’s very simple: you only need to connect it through a thyristor voltage regulator (instead of standard automation).
A small fountain can be equipped with an aquarium pump: it supplies water to a height of 0.6 m with a capacity of 200 l / h, which is enough for a nymphaeum fountain in the form of a stream.
You can use an aquarium pump in the design of a small fontanel fountain
Filter
Instead of a branded one, an inexpensive aquarium will do.
Regular cartridges can be replaced with sponges for washing dishes. Such a filter is buoyant, so in the fountain it is pressed down at the bottom with stones.
stones
Stones in fountains are used dense - porous ones quickly collapse when water freezes. If the design provides for the flow of water over stones (cascade or fountain-stream), hardness is also required from them. Suitable:
- granite;
- labradorite;
- gneiss;
- gabbro.
Shale rocks do not satisfy these conditions.
Bowl
It is most rational to use a ready-made plastic bowl - these are commercially available. Price at this product cheap, waterproofing a homemade concrete bowl will take a lot more money.
Preparatory work
Before starting work on the device of the fountain, do the following with your own hands:
- Take off fertile layer soil throughout the area where water is expected to enter (sprinkler circle). Its radius is 3–15 jet heights. After the fountain is installed, the remaining part of this zone will be covered with a blind area.
- Dig a hole under the bowl. The recess exceeds the bowl by 15–20 cm in depth, and 20–25 cm in width in each direction.
- The bottom of the pit is covered with sand or gravel, then the filling is rammed.
Instrument preparation
Here's what you need to get it to work:
- mini-concrete mixer (in the absence of such, concrete is kneaded in a trough with a shovel);
- vibrolayer (optional);
- building level;
- electric welding machine (when using steel pipes);
- brushes for applying waterproofing;
- hammer (knocking off the formwork);
- screwdrivers (connecting the power supply to the pump).
Water connection
In case of flow type to the place of its installation, a pipe is laid from a well (well) or water supply, and then another one - from the fountain to the irrigation system. The circulating fountain can also be supplied with water if the user does not wish to replenish it manually.
The country fountain works only in the warm season, so there is no need to lay a pipe in a deep trench. In places where vehicles pass, it is placed in a tray with a solid lid. With the advent of cold weather, water is drained from the fountain's water supply system.
Do-it-yourself fountain in the country: step by step instructions
Work is carried out in the following order:

A bathtub that has lost its attractive appearance can still serve as a fountain bowl. Install it like this:

bath with her correct form and white enamel coating does not fit well into the natural landscape. To make it look natural inner surface cover:
- Dark blue paint. The technique creates the illusion of great depth.
- A mixture of cement glue and mineral-based coloring additives. The latter are available in liquid or powder form.
- Gravel, crushed stone or mosaic (glued).
- A decorative film specially designed for the improvement of reservoirs.
To lubricate a rectangular shape a little help:
- The sedge planted along the perimeter is hairy. The plant will hide the sides of the bath and the fountain will look like a partially overgrown rounded pond.
- curly wooden shields along the edge of the bath with potted plants planted on them.
Fountain in Japanese
When designing a fountain in Japanese style on a rectangular shape, on the contrary, they emphasize.
For its manufacture you will need:
- several pieces of bamboo stem inside diameter 20–60 mm;
- transparent hose for watering;
- leg-split.
Procedure:
- Bamboo is treated with tung oil or a synthetic anti-rot compound.
- 3-4 pieces of bamboo are placed on the edge of the bowl and tied with twine.
- Another segment, the thickest one (with a clear diameter of 40–60 mm), is reamed on one side so that it fits tightly into the hole watering hose. The second end is cut obliquely.
- A piece of bamboo is placed with a hole down across those installed on the bowl and screwed to them with twine.
- Connect the bamboo spout with a watering hose to the pump.
Another option is the Tsukubai Fountain. It is made from 3 bamboo trunks: one is installed vertically, the rest pierce it at a slight inclination to the horizon. Water is fed through a hose into the upper pole, flows out of it into the lower pole and then into a concrete vessel.
From bamboo trunks, you can build a wide variety of designs of calm fountains.
Bamboo elements in Japanese fountains, when treated with oil or an antiseptic, last for several years, after which they are changed.
Tire Fountain
Small tire fountain truck it is cheap and quickly produced. Build it like this:
- Make a hole in the ground according to the size of the tire.
- Pour on the bottom, carefully tamping, a bedding of crushed stone and sand and put on top of it concrete screed 10 cm thick.
- After the solution has hardened, a tire is laid on it. Its side, which is on top, is partially cut off so that the tire looks like a bowl.
- Inside the tire, a concrete screed is poured thin layer mastic, thus sealing the junction of the rubber to the base. Now the tire is a waterproof reservoir.
- A formwork made of tin is installed around the tire.
- A reinforcing cage is laid inside the formwork and concrete is poured.
- The fountain is decorated with stones and other decorative elements.
- Next, they put a pump with a diffuser in the tire, cover it with a mesh and pour water.
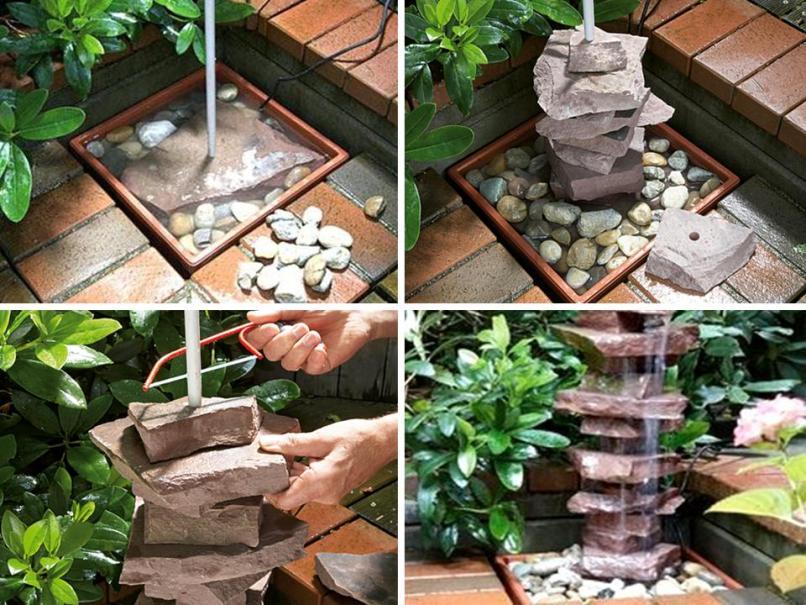
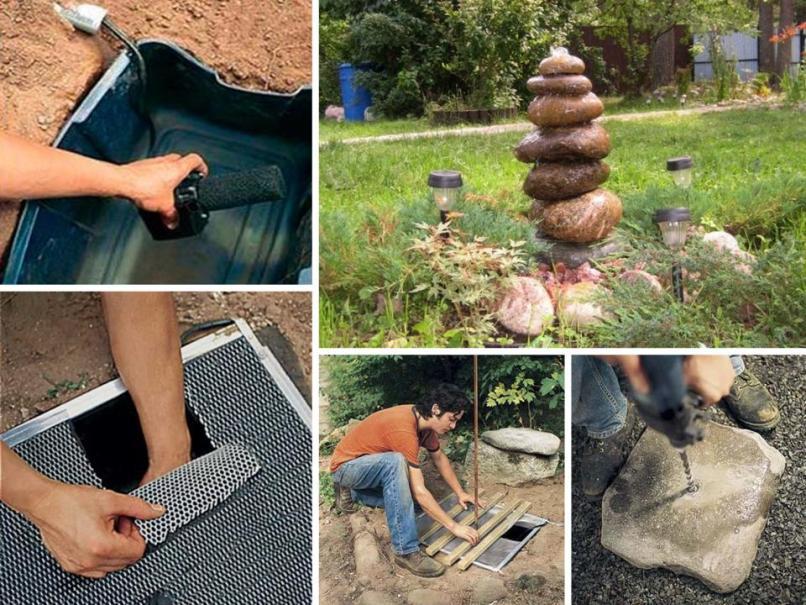
Fountain "stone tower"
Simple to implement, but at the same time quite a spectacular design. Mounted as follows:
- In the order described above, a bowl with a pump is installed.
- The pump is covered with a stainless mesh, then a support contour of bars is placed on it.
- Several flat stones are stacked and the entire structure is drilled through. The diameter of the hole corresponds to the diameter of the pipe through which water will be supplied.
- A spout pipe is attached vertically to the pump and stones are strung on it. Between themselves, the stones are fastened with silicone-based construction adhesive.
- Close the gaps between the stones with small pebbles.
Decoration techniques
Various techniques help to turn a modest garden fountain into a work of art:
- Cultivation of ornamental moisture-loving plants near the reservoir, for example, European bathing suit, hosta, astilba, miscanthus, loosestrife, etc.
- Setting the backlight. Multi-colored lamps with a high class of dust and moisture protection - IP54 (waterproof version) are used.
- Installation of sculptural compositions.
- The use of interchangeable diffusers that give the jets a different shape.
Fountain equipment manufacturers offer the following options for water dispersion:

Video: do-it-yourself fountain in the country with decorative elements
The fountain in the country is not only a delight for the eyes and ears, but also a source of freshness on a hot summer day. For its device it is not at all necessary to spend money on expensive branded equipment. The solutions proposed in this article allow you to enrich the landscape with an elegant decoration for quite reasonable means.
Even if the pond on your site is small, it can make a good contribution to the improvement of your territory. And if you decide to build a fountain with your own hands, it will be interesting. It will not just be a place of leisure, but you will also receive a mountain of praise from friends, acquaintances and neighbors.
However, not everyone wants to take on such an idea, because they think that the construction of such a hydraulic device is very expensive and time-consuming, and also requires the intervention of a specialist. If you want to know how to make a fountain at home, then we want to please you that anyone can afford to build a fountain with their own hands at home, you just need to know all the points of design and construction. In this article we will look at how to make a fountain.
Fountain types
Due to the type of construction, products are divided into two types:
- Open fountain. As a rule, in such buildings, water is supplied to the nozzle. The jet is formed due to the fact that there are differences in water levels. Here you need to monitor the water level, and the water quickly becomes dirty. In order to create such a pressure, you need to raise the container by a meter from the nozzle.
- Pump fountain. This is the most common design option. Here the pump is placed on the bottom, which creates a constant cycle of water. For structures of this type, the pressure is quite strong and visually looks more beautiful.
 tiered fountain
 According to the type of pumps, fountains are divided into submersible and stationary.
- Submersible pump. It is placed at the bottom of the pond. With the help of a pipeline, water rises to the surface, and the nozzle creates a certain form of flow. In this embodiment, water seems to erupt from the earth.
- A stationary fountain is usually built from stones in the form of a figure, the shape of which can be any to your taste. Such structures are installed in a park or square, as they are a kind of art.
Ideas for a fountain (video)
Where to install the fountain
When choosing the optimal place for construction, it is important to take into account such a factor as the slope of the earth. If the surface on the site is uneven, then it is better to install the structure at the bottom. This will make it easier to adjust the volume. ground water and the oxygen saturation of the air will also increase.
 Install the fountain where it will be convenient to admire it
 It is not advised to build a fountain:
- Near the house, as with a strong wind, water will fall on the house itself.
- In an area with direct sunlight, which will contribute to the rapid flowering of water.
- Under a tree, as fallen leaves or overgrown roots can ruin the product.
It is necessary to place the fountain so that it does not interfere with moving around the yard, but on the other hand, so that it can be clearly seen from different sides. We advise you to locate it near the place of leisure.
The smallest distance that should be between the structure itself and green spaces is 0.5 m. Thus, the plants will be protected from a large number moisture. The same principle is relevant for furniture near a water feature. The most optimal location of the structure is a place in the shade and without wind, near water and an electrical network. So I will save your efforts and material costs.
 After we have decided where the fountain will be, you can proceed to its design or what will be the shape and depth of the building
 Construction materials
To save money and power costs, it is possible to build a pond with a pump placed in it.
Materials for building a fountain:
- Capacity
- Pump
- water insulator
- Shovel
- Stone different size
- Decor elements
How to choose and install a container
 In the case of a small fountain, an ordinary small basin can serve as a reservoir.
 For more major variant you can use a bath or a pit dug with your own hands. When using a bath, you need to dig a hole so that its edges are below ground level. First, all holes are closed in the container, then it descends into the pit, where it needs to be strengthened with stones and earth.
If you want to dig your tank, use a film for this. It, in turn, should be dense and of high quality. In a dug hole, the film is pressed against stones. Also, stones are lined to the bottom. They should not be sharp, as this may damage the film. They need to be evenly distributed throughout the bottom.
How to choose a pump
To build a fountain, it is not necessary to buy expensive materials, since you can use the elements used in the household. But you don’t need to save money on buying a pump, since the quality of the pump determines how long it will work without problems, and the more beautiful the end result will be.
 Most the best choice for construction is to use a submersible pump. But if you have a large or cascading fountain, installation of a surface pump is welcome.
 The main indicator when buying a pump is its power. If your fountain has a small water pressure, then you do not need to buy a powerful pump. It is important to know that the power corresponds to the diameter of the pipe, and the pressure must be strong, otherwise it will be the result of an unsuccessful fountain.
The erection of the fountain
The construction of the fountain consists of five stages:
- Digging a pit
- Trench reinforcement
- Fixing the tank or installing the film
- Pump installation
- Fountain decor
Now consider some options for building a fountain with your own hands.
Examples of building fountains
With the use of a tire
For this we will need
- Old used tire, for example, from under a tractor
- Cement, water, gravel and sand
- concrete mixing tool
- Film
- Level
- Stones of various sizes
- Mastic or silicone
- Pump
 Fountain made of tires lined with stone
 Sequencing:
- Preparing a concrete solution.
- Pour the solution onto the bottom 10 cm high and level using a level.
- After the solution dries, put the tire on the bottom, after cutting off the sidewall on one side.
- Using mastic or silicone, glue the tire to the base.
- Concrete is poured along the edge of the tire, thereby strengthening the structure.
- We put the pump in the center of the tire.
- We decorate the fountain. With the use of a tire
Using film
For this type of fountain you will need:
- Thick film
- Shovel
- Sand
- Pump
- Stones of different sizes
 Fountain in a film pond
 Sequencing:
- First, you need to dig a pit, remove everything superfluous from the pit, for example, stones and ram the bottom.
- Next, you need to fill the pit with sand.
- The next thing to do is to lay the film. We lay it so that the edge goes beyond the hole. Then we press the film with stones along the contour of the pond.
- Then we install the pump, depending on its type and instructions.
- We decorate an almost built work of art according to your taste.
- Fill the pond with water.
Using an old bath
For this case, you need to have in stock:
- Shovel
- stones
- Pump
- Bath
- Insulating tape
- Metal shears
- Metal sheet
- Drill
 Fountain from old bath
 Sequencing:
- We tear out a hole according to the size of the bath.
- We lower the bath into the pit and clog all the holes
- From a sheet of metal, you need to cut wide strips and lay them around the perimeter of the bath, pressing down with stones.
- Decorative gravel can be placed in the bath itself.
- Installing the pumping system.
- It is possible to set the backlight, and change the color of the water with the help of blue. Thanks to this, the bath will not be noticeable.
- We decorate our design.
Using a plastic bottle
For such, if I may say so, a fountain, you need to have available:
- Plastic bottle
- Carnation
- Insulating tape
- garden hose
 Practicality in everything!
 Sequencing:
- Remove all stickers from the bottle.
- We punch holes in the bottle with a hot nail.
- We install the hose in the bottle and tightly wrap it with tape.
- We place our structure in the planned place and turn on the pressure.
This mini fountain is suitable for watering the garden and garden.
home decorative fountain
For this we need:
- Flower pot
- Glass paint
- water pump
- contours
- aquarium decoration
 Flower Pot Fountain
 Sequencing:
- We paint the pot with paints.
- Make a small hole in the bottom of the pot.
- We mount the pump under the pot stand.
- We pass the tube through the hole made.
- We put pebbles on the bottom.
- We make decoration.
- We fill the container with water.
Decor
If you decorate your fountain, it will further emphasize how unique it is. Next to the pond you can put natural stones, you can even different colors, put up indoor plants, put various figures of toys or animals, etc.
Design lighting can amaze your guests with its originality. This is done using special equipment. Lamps are placed along the perimeter of the structure, and lighting is installed at the bottom.
 Plants and decor for the fountain
 Aquatic plants can be placed at the bottom of the reservoir, and shrubs can be planted around it.
Fountain Care
After you make a fountain at home, it will, of course, need to be well looked after. In order to maintain order, and the water was clear, and the building had a pleasant appearance, it is important to constantly clean the tank. Using special tools, you can remove leaves and similar things from the pond that can spoil the water, as well as damage the equipment.
When the summer season is over, you will need to drain the water from the reservoir, remove the equipment into the room, and cover the rest with oilcloth to protect it from dirt.
Make your own fountain suburban area or in your apartment is not so difficult and does not require large material expenditures. Before erecting a structure, you need to find out what its shape, size and location will be. You can place it anywhere - in your garden or near the gazebo. Subsequently, the fountain needs to be well looked after - control the cleanliness and water level, as well as remove fallen leaves.
Such structures are often installed in suburban areas. The fountain can decorate any free area or become its oasis. If you connect your imagination and use various decorative elements, the fountain will look even better and more original.
How to mount a fountain in your garden (video)
There is hardly a person who would not like to have their own small pond on the site near the house to make it special.
And if you create such a reservoir yourself, then it will really become a unique and favorite vacation spot, from which you will receive a lot of positive emotions and words of delight from all your acquaintances and friends. All the splendor of the fountain in the country house is shown in the photo.

However, not everyone decides to build a pond on their own. Probably, many are afraid of the unknown process of hydraulics, believing that it is difficult and expensive, and only specialists can figure out such a design. But it's not.

If desired, anyone can afford to build a fountain in the yard near the house, the main thing is to know some details of the technology for creating a fountain.
Determining the type of fountain
There are two types of fountain depending on their design:

When water enters the nozzle, the so-called open view. A jet of water in this case appears due to level differences in water. But because of this, the water pressure is weak and constant monitoring of the water level is needed. The water quickly becomes cloudy as a result.

When creating such a fountain, it is worth taking care of a medium-sized tank installed 1 m above the nozzle.
When a pump assembly is required. This option is more suitable and effective in application.

The pump, located at the bottom, provides a constant circulation of water. As a result, the water pressure is higher and the spray of the fountain is more effective.

Pumps by type of device are also divided into two types:
- Submersible. The pump is located at the bottom of the reservoir. The structure includes: a pipeline, a pump and a nozzle, on which the shape of the jet at the outlet depends. This fountain looks like a spring, strongly beating from the ground.
- Surface or stationary. Basically, such a fountain is made of artificial stone in the form of various figures: a girl, an animal, a vase, a flower, etc. As a result, it looks like a sculptural masterpiece. Such facilities are available in city parks of culture and recreation.

Locations
When determining a suitable location for organizing a garden fountain, do not lose sight of the slope of the earth's surface.

On a hilly plot of land, it is better to install a picturesque decorative part in a lowland. This will adjust the amount groundwater and provide a more complete saturation of the air with oxygen molecules.

Do not build fountains:
- almost next to the house, so as not to oversaturate the walls with moisture.
- under the open sun, otherwise the water will quickly bloom due to the direct rays of the sun.
- near massive vegetation and trees, as roots can break the waterproofing, and falling leaves, fluff, etc., clog the water.
The fountain must not obstruct access to various places use and must be visible from all angles. Place it near your resting place.

There should be at least 50 cm from the fountain to the area of vegetation, houses or furniture so that the plants do not die from waterlogging, and the furniture does not fail for the same reason.

The most advantageous location for the fountain will be a slightly shaded place, hidden from the wind, next to sources of water and electricity, in order to reduce the consumption of wires and the time to isolate them.

Once a suitable place is chosen, you can proceed to the next step: choosing the shape and depth.
Note!


Necessary materials
In order to save money, time and own forces, to build your own fountain, it is better to use the technology of building a reservoir with a pump device.
For this you will need the following materials: container, pumping system, polyethylene, shovel bayonet, artificial or natural stones, sandy and gravel soil, decorative elements.

Tank selection and installation
To build a compact mini fountain with your own hands, it is better to use an ordinary plastic basin or a similar container.

For large structures, used bathtubs are often used or they dig a pit of the right size on their own.

Under the bath, they also dig a hole of a certain size so that its edges do not rise above ground level.

Note!

Check in advance whether cracks or holes need to be sealed in the bath. If not, feel free to lower it into the prepared pit and fix it with stones, sand and earth.

In the absence of the necessary capacity, you can dig a pit yourself, taking into account the selected dimensions. Then they are covered with durable polyethylene and reinforced with stones along the edges. The bottom is completely and evenly covered with various smooth stones.

Choosing the Right Pump
It is not at all necessary to purchase expensive materials to build a fountain with your own hands; you can safely use used ones. But it’s still better to fork out for a pump and get a good one.

Pump submersible type- most suitable option. It acts like a centrifuge. The surface type of the pump is more often used for large fountains and reservoir cascades, and when installed in a summer cottage, installation is carried out from the edge of the reservoir.

To select the right pump, it is necessary to take into account the constant water pressure in the pipe and its differences. Otherwise, a pump of greater power will not be able to work at full strength and will have to be replaced with a less powerful one.

Note!

The diameter of the pipe is also important in determining the power, because the jet should powerfully beat out of the fountain, and not ooze, depicting a kind of fading spring.

Step-by-step construction of a home fountain
The construction of the fountain consists of the following stages:
- digging a pit;
- strengthening the trench ditch;
- immersion of the tank or covering it with polyethylene;
- pump installation;
- decorative arrangement.
Fountain with polyethylene film
This requires the following materials: durable polyethylene, shovel, sandy soil, pumping system, stones.

Execution steps:
- We prepare the pit, remove the stones and ram the base;
- The bottom is completely covered with sand, sifted in advance;
- We cover the entire pit plastic wrap, capturing the edges around it;
- The pit, covered with a film, is securely fixed around the entire perimeter with stones;
- We mount the pump;
- We decorate the fountain with decor;
- We fill with water.

Fountain from an old bath
To do this, you will need: a shovel, small stones, a pump, a used tub, tape insulation, metal shears, non-ferrous metal sheet and a drill.

The procedure for the construction of the fountain:
- The swarm of the pit is slightly larger than the size of the bath;
- We lower the bath into it and close up the holes and cracks;
- We cover the sides inside the bathtub with strips of non-ferrous metal, covering them with stones;
- At the bottom we place small multi-colored stones;
- We put the pump in the center of the structure;
- To give brightness to the fountain, you can supplement the structure with lighting, and tint the water with blue.

Fountain from a plastic bottle
You will need: a plastic bottle, hard wire or nail, tape insulation and a watering hose.

The device of such a fountain is very simple:
- Take an empty bottle previously cleaned of unnecessary parts;
- Use a nail or wire to make holes;
- Put the bottle on the watering hose and securely fix it with electrical tape;
- Place in the garden and run water.

Home fountain without pump
For its construction, prepare: a large flower pot, a pallet, paints, a water pump, contours, decor.
- We paint the pot with paints;
- We make a hole at the bottom of the pot;
- We place the pump under the pallet;
- We pass the pump tube through the pot hole;
- We cover the bottom with pebbles;
- We decorate with different things and vegetation;
- We fill with water.

Decor
Various decorative things will help to make the fountain beautiful: multi-colored stones, potted plants, figurines, ceramic products etc.

For the dark time of the day, provide multi-colored lights and lamps around the fountain.

Fountain Care
To ensure the cleanliness of the territory and the reservoir (fountain), constant care is required in the form of cleaning. Regularly clean the surface of the water from debris with special equipment.

At the end of the season, the water must be drained, removable appliances should be removed in the pantry, and the rest should be covered with a film for wintering.

Do-it-yourself fountain photo


For those who want to update the exterior, make it special and memorable, we suggest using a small homemade fountain. The step-by-step instructions for making a fountain with your own hands are quite simple and anyone who has a certain set of tools and materials can create this beauty in their yard.
We install a fountain in the country
The first point of the fountain installation plan is planning its size and type. Consider the size of the yard, do not make the fountain too big or small - this will not give a positive visual effect. Remember power pumping equipment directly proportional to the size of the structure.
Now you have to choose right piece of land for installation. Firstly, the fountain should be located where it will be clearly visible. Secondly, it should be close to the place of rest. The sound of running water and cool freshness in the summer heat are important components of a pleasant and peaceful holiday on fresh air. Try not to install the fountain in the open sun. Water will have to be changed frequently due to its flowering. There is also no place next to the construction trees, the roots can damage the thicket and for repairs you will have to disassemble the entire decor element.
To install a fountain with your own hands on the site correctly, do not choose places near the walls. In this case, the structure will not avoid acquaintance with mold and fungus. And this, in turn, will not only spoil the appearance, but also cause an unpleasant musty smell.
Plan ahead for future buildings on the site. Do not install a fountain on the road to them.
Do-it-yourself step-by-step guide for installing a fountain in the country
Let's talk about how to make a fountain with your own hands using the example of a very simple design - fontanel fountain. This type of building has several advantages:
- Effective appearance;
- Easy care;
- Easy access to parts for the purpose of repair;
- The possibility of parsing for the winter.
Having picked up a place for installation, we dig out foundation pit slightly larger than a fountain bowl. Additionally, a shallow hole should be dug around it. gutter(about 10 cm).
Do-it-yourself fountain. Instructions in the photo
At the bottom of the pit should be sand cushion 15 cm thick. This will protect the underground part of the structure from plant roots. We level the surface and install on it plastic bowl. We set the font according to the level, pour and ram the sand. The container should be installed in such a way that its edges protrude by 5-8 cm.
The next step is to fill the plastic container under the bowl with water. It is not necessary to pour “with a slide”, leave 4-6 cm to the edge.

Now you need install a fountain and check the operation of pumping equipment. If power pumps can be adjusted, then we adjust so that the water falls back into the bowl. Approach to the choice of equipment should be very careful. Ideally, at the time of purchase, explain to the seller what bowl size and bowl volume is expected. Then he will help you choose the equipment of the required power.

Do-it-yourself fountain. Instructions in the photo
After installing the bowl and pump, you need to do waterproofing fabric. Cut out the canvas with a diameter of a hole for the fountain. Starting from its center, cut into strips. This must be done so that the diameter of the resulting inner circle is equal to the diameter of the bowl of the structure. We bend the resulting strips of material and lower them into a container. You can fix them with a sealant. Do-it-yourself fountains always require a lot of patience and accuracy in work, especially this stage construction.

So that the base of the structure does not lose its shape and is stable, we put a couple of rods on the sealed fabric fittings, and on top of them - galvanized fine mesh. The cell size will affect the size of the stones or rubble used. used in the decor of the fountain.

Do-it-yourself fountain. Instructions in the photo
The final stage of construction - decoration designs. The border of the fountain can be laid out with larger stones, but you should not make it too clear. Small stones like sea pebbles or gravel are laid out on the grid. If you want to add a natural fountain, then its boundaries should not be too clear. Various plants will look good along the edges of the structure.  Thematic japanese fountainfor lovers of oriental exoticism, it is installed in a similar way. A step-by-step instruction for making a Japanese-style garden fountain with your own hands consists of the same points. You will find a diagram of the structure below.

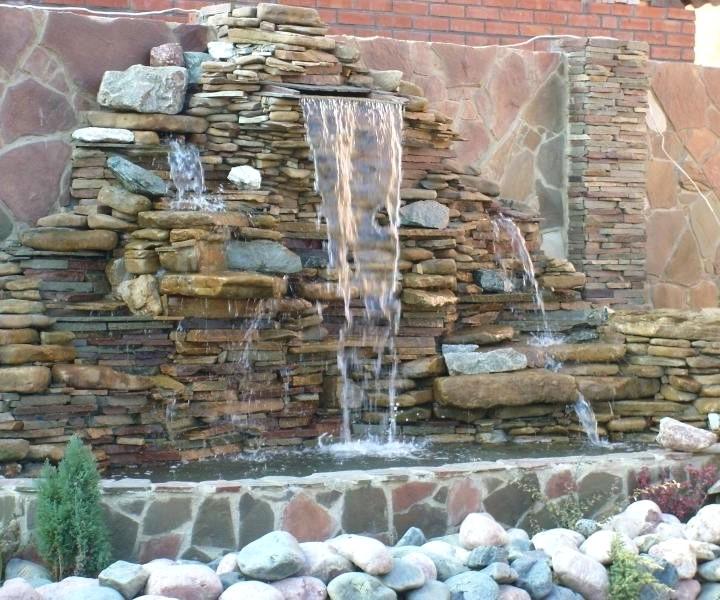
Do-it-yourself waterfall fountain
We will not build anything grandiose, but small, about 1 m high, cascading waterfall we are quite capable. It has already been described in detail above how to prepare a foundation pit for a pond bowl. But this time we are building a waterfall. And if there is no natural elevation for him, he will have to create it himself.
Do mound convenient in the process of digging a pit. We just throw off the ground where the hill should be, and carefully ram it. For the hose supplying water to the point where the water falls, make a small groove in the wall of the pit and embankment.

Do-it-yourself waterfall fountain. Instructions in the photo
After the foundation pit and the base of the waterfall are ready, we begin to cover the bottom and walls of the mini-pond waterproofing material (for example, PVC film). It is necessary to lay the canvas in such a way that it not only completely covers the bottom and walls of the pit, but also protrudes about half a meter on the sides of the pit.

Be sure to lay a pipe for supplying water to the top of the waterfall in a pre-prepared channel-ditch. Bend one of its edges 30-40 cm up.

This time we are making a permanent structure, and therefore it is best concrete pond bowl. To begin, carefully lay out metal mesh at the bottom of the pit. Do not allow the waterproofing to be damaged. Next, pour a layer of concrete with a thickness of about 12-15 cm.

How to make a fountain in the country with your own hands. A photo
Now you need to prepare bowl walls. We lay out the grid, strengthening it in a solution that has not yet hardened. You can continue to install a fountain with a pump with your own hands, which will look like a cascading waterfall, in a day. We fill the walls of the pond bowl and finish the most difficult stage of construction.
The next part of the build is decoration the resulting structure. We build steps on a pre-rammed hill. The step should be about 30 cm and three ledges will be enough.

On the resulting smooth surfaces lay out flat sandstone, pebbles or any other material you like. We decorate the rest of the fountain, including the film around the perimeter, with stones, rubble, marble or other pre-prepared materials.

It remains only to turn on the pump and fill the font of the structure with water. We observe how the stream falls steadily down the steps of the waterfall and enjoy the originality of our suburban area. 
DIY stone fountain
How to build stone fountain? We will talk about this right now. First you need to take care of the availability of all necessary devices and materials. We will need:
- Water pump (underwater with medium power is suitable);
- Plastic container for a bowl;
- Tube made of metal or PVC for holding an electric cable;
- Coupling;
- Flat stones and gravel;
- Bars of wood;
- Water flow power regulator;
- Copper tube with a diameter of 15 mm.

foundation pit for the bowl of the fountain should be a little more than the capacity prepared for these purposes. By filling the space between it and the walls of the pit with soil, we will significantly strengthen the position of the bowl. As in previous cases, do not forget to create at the bottom of the pit sand cushion. Lay a layer on top pebbles.

Water pump located freely in the water tank. This will make it easier to repair it if necessary. From debris, the water tank can be secured by a simple fine mesh. To give structural strength over metal mesh are placed wooden blocks(if desired, they can be replaced with metal fittings).


The base of the fountain will be metal pipe which is attached vertically to the pump.
The next step is preparation flat stones. To do this, using special tools, we make holes with a diameter slightly larger than the diameter of the metal pipe - the base of the structure.


Further, according to the principle of the children's pyramid, we “plant” the stones on the pipe. It remains only to add decorative elements to the fountain and connect the pump. A very simple, but spectacular and beautiful do-it-yourself fountain in the country is ready for use.


A variety of do-it-yourself fountains on personal plots
Submersible fountains
If there is already a pond in the yard, then it can be used as a basis submersible fountain. The principle of its work is simple. Water is supplied by a pump directly from the pond. In this case, to install a submersible fountain, you will need:
- Pump;
- Pipe for water supply;
- Appropriate nozzle for shaping the water jet and setting it in the right direction.
Nozzles are very different. For instance, bell nozzle is a two-disk design. The flow of water passes between them and changes when the gap is adjusted. Nozzle " geyser” - a tube narrowed to the top - quite effectively copies the corresponding natural phenomenon.

Such structures have quite a lot of possibilities. For example, you can create the effect of a key beating out of the ground. To do this, do-it-yourself fountain is mounted in such a way that the end of the pipe does not protrude above the surface of the reservoir.
Using more complex nozzles, you can significantly expand the possibilities of decor. The effect of spraying water, the simultaneous combination of several nozzles and many other variations for the choice of those who design a fountain in their country house.
Stationary fountains
A fountain of this type is a real find for lovers and professionals of design art. Structures can take the form of natural stone fonts, antique structures; they are made from clay pots, plastic bottles and any material that is at hand. Fountains for Japanese gardens are especially popular recently.
Any frost-resistant material will do: marble, artificial stone, sea pebbles, etc. To decorate such fountains, they often resort to painting. There are two ways to do it:
- Staining of the material before the manufacture of the structure;
- Painting of the finished figure.

The first option is much more expensive, but it is also much more reliable. To protect against moss, fungus and mold, it is useful to treat the fountain structure with special means.
Small stationary fountain will look good in family recreation areas or close to playgrounds. Our master class "Do-it-yourself fountain in the country" will help novice designers to correctly build, perhaps, one of the main elements of decor in a suburban area. And it doesn't matter if it's a small fountain-geyser or a large-scale cascading waterfall 2 meters high. The main thing is that he pleases the owners and does not cause problems.
Video instructions for making a fountain in the country
Whether it's a hot afternoon or a warm summer evening, the play of silver jets of water in the fountain does not leave anyone indifferent, and their freshness and coolness do not let go for a long time. At the same time, practice shows that it is easier to implement the life-giving movement of water in your country house than it might seem. If you are already a happy owner of a reservoir in the yard, then the reason to equip the fountain increases doubly.
Choosing the design and placement of a homemade fountain
Before proceeding with the arrangement of the fountain, you should think about how its appearance is in harmony with the design of the suburban area, and its dimensions correspond to the size of your allotment.
How less area plot, the more modest the fountain should be. On the contrary, a large area allows you to implement a whole complex with sculptures, a stream and a waterfall.
In a classic garden with a well-defined layout, a fountain with a sculptural composition of ancient gods, animals and amphibians will fit in perfectly. It is most convenient to make such figures from artificial stone, that is, polymer concrete. The named material can withstand any frost.
Garden modern type will decorate the fountain, built of glass and concrete, polymer materials and stone. The design of this type should be concise, which is emphasized by thin silver jets of water.

Country style landscape design supported by a composition consisting of large stones and wood elements. In this case, a cart or a mill will serve as a successful addition to the design.

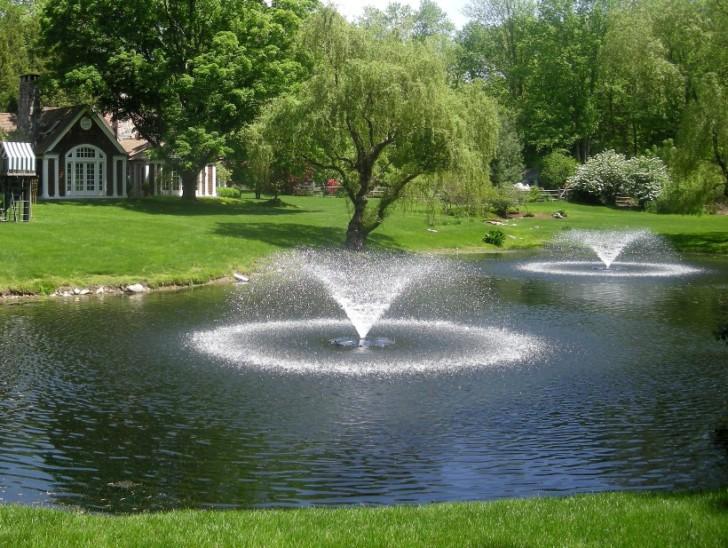
A factory-made floating fountain deserves special attention. It can be fixed in one place or another. In a large pond, it is appropriate to place several torches of crumbling water.
A great idea for creativity - soaring fountains. It is easy to realize the miracle of levitation with your own hands in your yard, if you pay attention that the supporting element and the supply tube of the structure are hidden in the water jet. For example, a heavy stone can be imitated using plastic facade panels, and a thin stainless steel tube will provide support.

An interesting effect can be obtained if two jets of water are directed against each other. In this case, high precision and accuracy of design execution is required.

If you don't like bathing in a barrel, you can put a mock head and hands in it and then shoot a jet of water out of his mouth. Others will definitely pay attention to such an unusual decision.

The streams of water flowing down the glass look original. Obviously, such a product is subject to do-it-yourselfers, however, the holes for the exit of water jets from the upper distribution tube must be made especially carefully.

You should take seriously the choice of the location of the fountain. So, too close proximity of trees and shrubs will lead to the appearance of leaves and debris in the water. In this case, the filter of the device will have to be replaced or cleaned frequently. Moreover, the roots of trees can destroy the bowl of the reservoir, which will lead to water leakage.
It is better if the sun visits the surface of the water for half of the daylight hours. This lighting regime is conducive to optimal activity aquatic plants, which can also contaminate the filter of the device.

No need to take risks and mount the decoration from the water too close to the wall of the building. Otherwise, moisture can lead to the destruction of both the foundation and the walls of the building. Another addition to the reservoir in the yard can be the arrangement of a stream and a waterfall, as discussed in the article.
The principle of operation and types of fountains
Fountains according to the scheme of movement and use of water are divided into closed and open type. In a closed system, the same water is used, which is pumped in a circle using a pump, but in open version- water is constantly updated.

If we talk about economy and convenience, it is better to choose a closed-type fountain. Of course, you still have to add water, but it is already possible to do this as needed, for example, during evaporation or change when contaminated. This choice saves time, effort and money. At the same time, in any design, the essence of the work is that water is supplied under pressure to the nozzle and sprayed.
According to the water outlet scheme, cascade-type options, a geyser, atomizer and a bell can be distinguished. The cascading fountain consists of several containers placed on different height. In this case, water is supplied to the uppermost of them, and then sequentially overflows from the upstream bowl to the next one. In this design, the role of overflowing elements can be played by stones, pipes, jugs and everything that can withstand the effects of water.

A geyser is a natural source of water spouting from the ground. Vertical jet fountains have a similar name. During operation, such a device creates a characteristic noise and moistens nearby plants and decor.
The sprayer can have many holes of very different diameters and directions, which allows you to organize the movement of water in bizarre shapes. There are also nozzles that rotate under the influence of water, as is done in sprinklers for irrigation.

An elegant hemisphere of water or a bell is organized by nozzles in the form of two parallel discs. A small water bell makes a gentle sound of water.
Necessary materials and equipment
Even in the case of creating a small fountain of a closed type, you still need a storage reservoir and a pump. For the smooth operation of the system, a filter must be installed, and a nozzle is required to spray water. You probably want to decorate your own work with special lighting. It may be necessary to stabilize the flow of water, and a receiver is required.
Fountain pumps
According to the principle of operation, the units are divided into surface and submersible. The submersible pump is installed directly in the bowl, where it takes in water and delivers it through the filter to the nozzle. Such a unit is characterized by ease of installation and small size. It is fixed on a small elevation in the center of the reservoir, so as not to capture sediments at the bottom.
 The surface pump lasts longer and is easier to maintain. A similar unit is mounted outside the reservoir. In this case, water is sucked in by the pump through the filter and hose and supplied to the sprayer.
A pump with a power of 70 W will provide a jet lifting height of up to 1.5 m. A convenient unit with the ability to adjust the water supply pressure. You can roughly select the pump using the following table.
| Fountain pump selection table | ||
| fountain type | Maximum fountain jet lift, m | Pump capacity, m3/h |
| Geyser | 0,2 | 2 |
| 0,3 | 3 | |
| 0,5 | 4 | |
| 0,7 | 5 | |
| 0,8 | 7 | |
| hemisphere | 0,3 | 0,9 |
| 0,4 | 1,2 | |
| 0,55 | 3 | |
| 0,8 | 4 | |
| 0,9 | 6 | |
| cascading | 0,6 | 1 |
| 1 | 2 | |
| 1,5 | 3 | |
| 2 | 5 | |
| 2,5 | 6 | |
| 3 | 8 | |
The water in the country fountain cannot remain clean by definition, so a filter is required for the normal operation of the entire system. An important element of the design is the nozzle, which determines the number, direction and shape of the jets (jets) of the fountain.
In specialized stores, pumps with built-in filters are sold, as well as equipped with replaceable nozzles. You just have to fix it in a container and fill it with water - the work has begun! Depending on the model, additional manipulations may be necessary, so read the instructions first.

Power is an important factor to pay attention to, as it depends on the volume of the reservoir and determines the height of the fountain jet. The pumps are powered by alternating current.
The factory units are well sealed and safe, so connection is easy and simple.
If you want to save a little, you should pay attention to conventional irrigation pumps. True, you will have to tinker with the installation a little and buy a sand filter. In this version, the pump wiring diagram its connections should be added circuit breaker and a residual current device to ensure proper safety. A reliable solution is the use of an isolating transformer that provides galvanic isolation of power and consumption circuits.
Fountain bowl container
The container for the bowl can be made by hand using a film, cast from concrete, or purchased ready-made from plastic. In addition, the range of such products in trade is quite wide, and with small sizes their cost is low.

It is also possible to use various improvised materials. The capacities of the original and small models of the fountains can be selected, as well as made in a variety of options.
Backlight
Modern technologies make it possible to make a bewitching illumination for a fountain not only simply, but also safely. LEDs with a supply voltage of 12 - 24 V or lamps with batteries (powered by solar energy) will come to the rescue. Good for fountain lighting LED Strip Light in a waterproof design, as well as spotlights and special water lights. They need a power supply with an output voltage of 12 or 24 V. The adapter can be purchased at the same place where the backlight is sold.
 The right lighting will make any fountain magical
 Spotlights are attached to the mounting brackets that are present in their design. The easiest way to do this is with self-tapping screws. It is better to fix the tape with a stapler, if the material of the fountain construction allows. In this case, the brackets must be chosen wider than the tape: the integrity of the backlight and its tightness must not be violated. You can learn more about lighting for the fountain from the following video.
There are fountains without a pump
In the event that a fountain with a pump is not a suitable device, an open type of water supply should be preferred. A water pipe with a tip on will provide a jet of a certain height without any pump. A well with a standard unit can also act as a source.
However, water must still be discharged somewhere - for example, into a drainage well, a river or a pond. In this case, it is necessary to think over the control of the overflow of the bowl. The issue of water diversion is solved by using water from a vessel for irrigation. Of course, water heated under the sun is useful for plants, only with this option, the operation of the fountain will be linked to the time of irrigation, which will not suit everyone. The positive thing is that in this way it is realistic to create a fountain without a pump.
 You can consider the following option: the tank, which in this case will play the role of the receiver, is installed at a height of at least 3 meters to ensure an acceptable and constant jet height. If you place a container with an elevation of 0.5-1 m, you get a fountain-stream with a slow flow of water. At the same time, it will still have to be supplied with water.
Otherwise, you will have to collect water from a container located under the fountain using a submersible pump and send it back to the tank through the hose. A submersible pump is inexpensive, but a filter is required in the system. To mask the equipment, a pit should be equipped. To prevent the storage bowl from overflowing, a water level control valve can be installed at the inlet of the tank - the simplest one from the toilet bowl will do.
Practical schemes of fountains
When fulfilling an original idea, it is useful to show imagination, and this applies not only to the functional side of the fountain, but also to its appearance. Below we will look at decor, design, decoration, diagrams and photos of several practical options that will help you create your own unique piece.
Original and simple stone fountain
A very simple and very interesting fountain can be assembled from stones. To do this, stock up on the following:
- small submersible pump for the fountain
- a plastic container measuring approximately 30x30x30 cm;
- pebbles and flat stones;
- three moisture resistant bricks;
- metal-plastic tube about 70 cm long.
The container for the device must be selected so that it fits three bricks installed on a small edge, and their upper plane should be somewhat lower than the edge of the bowl. The tube is selected according to the diameter so that it is well kept on the protruding nozzle of the pump. At the same time, the excess gap between it and the tube can be eliminated by winding the PVC electrical tape. The pump is installed in the center of the tank.

Now you can pour water and test the performance of the fountain. The next step is to select and prepare the stones. The lowest of them should fit in the bowl and rest on bricks, the size of others can be successively reduced. Flat stones should be drilled in the center with a concrete drill, the diameter of which should be slightly larger than the water tube. Drilling is more convenient to perform on the machine, and if it is not available, you will have to use a puncher.
We put the first stone on the pipe and lay it on the bricks. We will decorate the base of the structure with pebbles, filling all the free space of the pond with it. The remaining stones are sequentially stacked on top of each other, putting on the protruding part of the tube. Now you can cut off its protruding part with a hacksaw. It remains to find a place for crafts and turn on the pump.
Fountain in the rock garden bigger size has a little more complex structure. To equip it, you first need to dig a hole slightly larger than the selected container. The size of the bowl is selected so that it is guaranteed to collect water from a hill of stones of the planned dimensions. It is more convenient to level the bottom of the hole with sand, which is compacted. After installing the bowl, it is also better to fill the remaining gaps with sand, and then compact it.
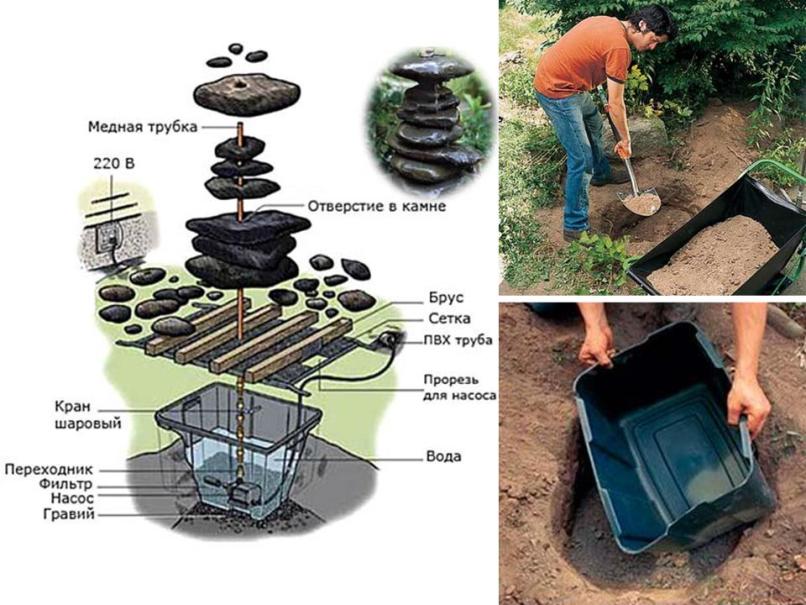
A pump with a tube put on it is installed at the bottom of the bowl. For a fountain of large and heavy stones, it is better to use a copper pipe. You can fill in water and test the operation of the pump. From above, the container is closed with a stainless steel mesh with a small cell, and then wooden bars are laid as a support for the stones. It may be more convenient and reliable to first lay a few pieces of reinforcement, and then lay the mesh on them. The cells of the grid should not miss the pebbles of the selected size.
The stones should be drilled in the center and sequentially put on the tube. The mesh around the stones is covered with pebbles. The surrounding space can be decorated with plants and LED lights. Turn on the pump and enjoy! Do not forget to add water to the fountain as it evaporates.
japanese style bamboo fountain
It is not difficult to build mini-fountains with your own hands in the same way as all the others. The only difference is the low power pump. It is quite possible to use even an aquarium pump, and aeration is not needed. A nice feature: the small pump makes almost no noise.

To assemble the presented model, you need to purchase decorative bamboo shoots and a bamboo stick about 0.7 m long (these are used to support plants) in a gardening store. In addition, a small vessel and a number of small pebbles will come in handy. It is better to use a ceramic or plastic container, without drainage holes. Following are the instructions:
- First, we cut the bamboo stick into three parts of different lengths, the largest of which will be equal to 35 cm. Each segment should have one oblique cut, and the second one should be even. The lower end of the longest bamboo tube should be 0.5 cm below the "joint", then it will fit well on the pump outlet. It is most convenient to perform cutting with a hacksaw for metal.
- Now we put the longest segment on the pump outlet and install the last one in the container. In the other part of the planter we place decorative bamboo sprouts and fill the free space with small pebbles.
- The two remaining segments bamboo stick fasten with twine to a segment protruding from the pebbles. Now you can fill in the water and turn on the pump.
 small pump
Instead of decorative shoots, you can also place a living plant. In this case, you should divide the bowl with a plastic partition into 2 zones. One half must be filled with soil and a moisture-loving plant should be planted. Moreover, instead of a partition, it is allowed to use a separate pot of earth, which will be placed in a common container. The second zone will become the reservoir for the pump.
Now you need to properly organize the filtration, since the water will initially be very dirty. Multi-stage filter - the solution to the problem. It is necessary to insert successively into each other cups made of filter materials with different transmission capacities: first - a wire or plastic mesh, then - a fabric filter with a finer structure, and inside this combination - a small pump.

In Japan, bamboo is used to organize the fountains of the different design. Above is a scheme for arranging a fountain in the ground using this material. As you can see, it's easy enough to repeat. Below are several options for the design of the fountain using bamboo. Obviously, having studied the presented crafts, it will be easy to design and implement your own version.

Pebble fountain
It is easy to arrange an original “dry” fountain in your own yard if you mask the container with small pebbles. First you need to purchase a small round plastic bowl and follow the instructions:

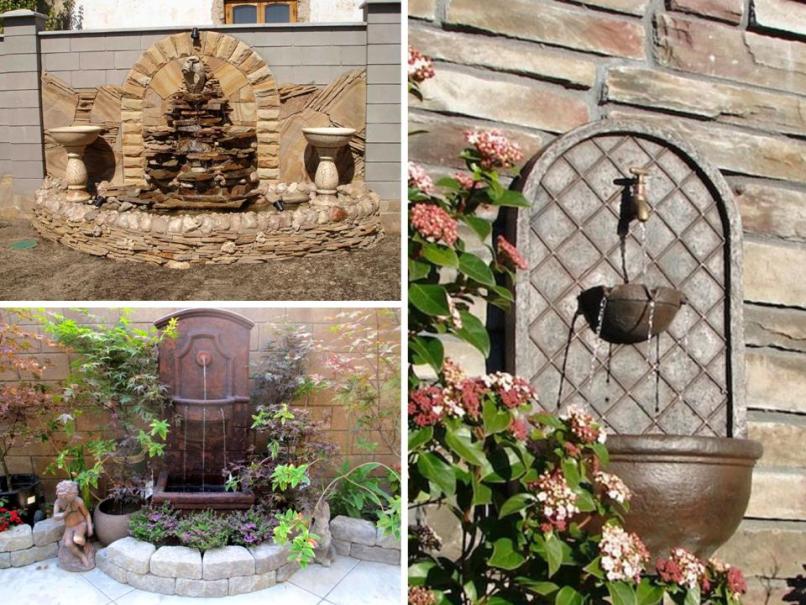
Fountain on the wall
The option looks original when water flows out of the wall and flows into the bowl. This is a common version of the fountain, and it is not so difficult to bring such a design to life. Of course, a pump is hidden in the lower bowl, from where it delivers water to the spout with a hose.
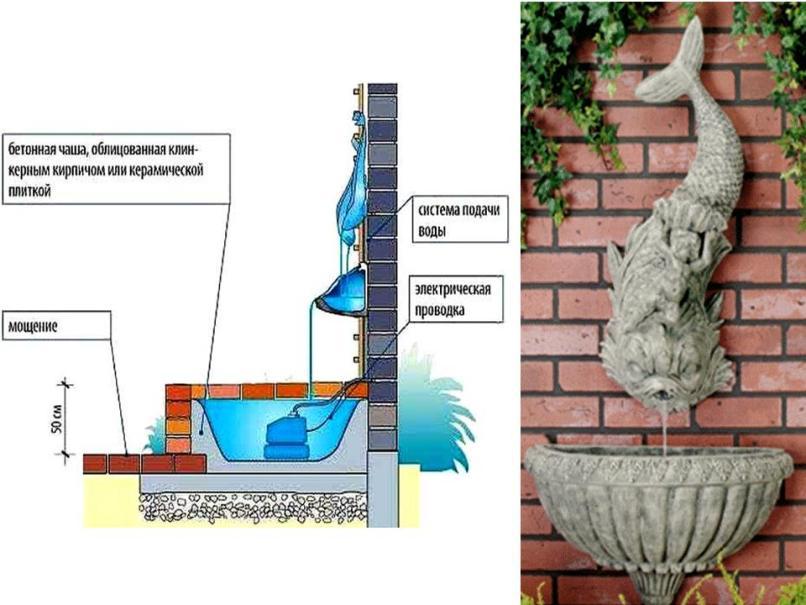
To prevent the pump from swimming, it is important to secure it well. In this situation, it is convenient to “ground” the device with a heavy stone load. When buying a unit, think in advance about the possible option for mounting the pump. As soon as water is constantly near the wall, it is necessary to think over waterproofing. Hydrophobic composition to cover the wall is the right solution, and it is better to choose an option that does not change the color of the surface.
In terms of design, there is another interesting option: Water flows down a perfectly flat horizontal surface. If you manage to pick up a bowl with similar properties, you will get a wonderful decorative effect.
Cascade type fountain
When choosing a type of fountain for a house or a summer residence, be sure to pay attention to the cascade type with iridescent streams of water. The idea is that water will sequentially overflow from one container to the next one below. Anything can be used as a container. So, for example, it can be a fountain of watering cans - then the trickle will not even be one, but several. You can also take a few buckets, kettles with a spout, or even garden carts.
The simplest bottle fountain
plastic fountain - simplest design, which is easy to handle with your own hands. We thoroughly rinse a plastic bottle with a volume of 1-2 liters and remove the label from it. Next we take metal wire with a diameter of 1-2 mm and a heated (for example, over a candle or a lighter) end, we pierce holes in the bottle. Keep in mind that water will then spray out of these holes.
To connect to the irrigation hose, the end of the bottle neck is pre-sawed with a hacksaw to a depth of 10 mm in several places where there is no thread. The next step: the hose is pushed into the neck of the bottle and secured with a clamp so that it does not come off under the pressure of water.

Do-it-yourself fountain in the country house is made, it remains only to find a suitable place for it. Through the hose, water enters the bottle, fills it and pours it out in the form of beautiful streams through the holes made. This is the simplest and cheap option fountain.
Similar fountains at their summer cottage can be used not only for beauty, but also for watering. garden plot. In this case, the holes will need to be made evenly throughout the body, in order to end up with a sprayer. Another good idea is Summer shower. Hang a homemade fountain on a tree or attach to a wall. Refreshing design is ready.
You can combine beauty and usefulness in the country by making a mini-fountain in a flower bed. Make holes in one place and place a plastic bottle between the flowers and plants. Additionally, you can hide or decorate it with stones and artificial ornamental plants. Such a fountain in a summer cottage will not only decorate the territory, but will also water your flower bed.
The fountain needs to be taken care of.
Recall that water evaporates during circulation and it has to be topped up periodically. Moreover, over time, dust and debris enter the reservoir, the water loses its transparency and acquires an unpleasant odor. Large foreign particles are easy to collect with a net. Natural cleaning of the reservoir can be ensured by placing shells and algae in it. Atomizing the water with a fountain nozzle will help enrich the water with oxygen and keep it clean.

You can do the exact opposite and chlorinate the water with special pool tablets. Significantly reduce the flow of debris into the reservoir will help to cover it with suitable material. Nevertheless, despite the measures taken, the water will still have to be changed periodically. In this case, all surfaces of the fountain are thoroughly washed and the pump filter is cleaned. Read more about cleaning a pond in the article "How to clean a pond with your own hands from mud, silt and algae - a vacuum cleaner and aerator."
(2 rated for 3,00 from 5 )


