Bath tub. Pond from an old bath: master class
If you have an old bath and you want to use it in the garden, we advise you to consider the idea mini pond. It does not require a lot of expenses to create it, but you can get a very successful result that will delight you for a long time.
To create it, prepare:
Old bath.
Gravel or any small stone.
Black film or paint.
8 bricks.
1. First of all, you need to decide on the location of the future pond in the country. We recommend choosing a bright and open area. Try not to have mini pond under dense canopy of trees. Otherwise, it will clog very quickly, which will ruin its entire appearance. It is also necessary to take into account that for healthy development and growth, aquatic plants (about the types of such plants) need light and relatively clean water.
2. After the location is chosen, we take measurements for the future pond in the country from old bath and transfer them to the surface of the ground with the help of pegs.
3. Now that the measurements are made and marked on the ground, you can start digging a hole under mini pond.
Please note that the depth of the pit should be greater than its height, by about 35-50 centimeters. This is done in order to have enough space for a drainage cushion made of sand and gravel, as well as brick supports.
4. When the hole is dug, you need to determine the location of the drain in it, and then make a recess there approximately 40X40 centimeters. And then fill it with gravel. Thus, we will get an excellent drain hole for the future reservoir in the country from the old bath.
5. We cover the bottom of the pit with sand, controlling its level. It is necessary to consider whether you want to deepen the edges of the bath or, on the contrary, make them more convex. If you plan to lay a bath along the shore with a stone, then the sides should be made a little higher than ground level. And if it is not the main coast, and after the sides there will be a continuation mini pond with the help of a covered film, then old bath for pond in the country needs to be deepened a bit. Thus, in the end you will get a smooth depression from the shore, which will allow you to further arrange aquatic plants in the best possible way.
6. When the bottom of the pit is covered with sand, it must be carefully leveled and tamped using a building level.
7. After that, we evenly place the brick supports along the entire bottom and lower the bath onto them.
The white color of the bath is not very suitable for the future mini pond. Optimal will be very dark colors. Future garden pond can be painted with dark paint or covered with a black dense film for reservoirs, it all depends on your wishes. old bath for pond in the country inside can be decorated with pebbles or tiles. To do this, use a specially designed glue.
Tips for summer residents: before you start building pond in the country with your own hands from an old bath, think over all the details in advance. So you can avoid unsatisfactory results. Collect pictures different options mini ponds. Think right away how to technically implement your ideas. You may want to make a small fountain or arrange a backlight from the bottom. mini pond from an old bath.
8. After the old bathtub is lowered into the prepared hole and decorated in the desired way, it can be filled up. This is best done with wet sand. This way you will avoid the formation of empty spaces.
9. Then we make out the coastal zone. You can use stones for this. different shapes, wood (processed and not). You can also show imagination and decorate your artificial mini pond in the country in your own way.
10. When the coastal zone is formed, it remains only to distribute and plant plants in the coastal and water parts.

Fig.1 coastal zone mini wooden pond

Fig. 2 Coastal zone of a mini stone pond

Fig.3 Mini pond with open sides

Fig. 4 Mini pond from an old bath

When creating an artificial reservoir, it is necessary to take into account the subtleties of building a country landscape. For example, it is desirable to have a reservoir close to the house, and according to the teachings of Feng Shui, the reservoir should be located in the eastern or southern part of the site.
But all this is important when there is a lot of space in the country house, and its owner has enough funds. If both are not enough, then a small decorative pond can be built from improvised material, for example, from an old bath or even a baby bath. Even such a pond will improve your mood and calm your nerves.
How to make a decorative pond from an old bath in the country with your own hands?
Place for a bath in the garden under the pond
It is advisable to choose a place for a small-sized reservoir so that it is partially hit the sun, and for a while would be in the shade. For example, let a tree grow near the pond, which will close the pond from the sun for a while.
The terrain is important. It is undesirable to place a reservoir in the lowest part of the site, since in this case, upstream waters can enter it, which will pollute it.
Materials and tools
In order to create the simplest pond from the bath, needed the following materials :
- bath;
- tile adhesive;
- stainless steel mesh;
- pieces of wire;
- clay, sand, gravel, cement mortar;
- decorative stones.
From the tool you will need a shovel, trowel, metal shears and pliers.
foundation pit
 After the place for the reservoir is chosen, the first step is to dig a foundation pit in which the bath will be placed.
Pit size should correspond to the size of the bathtub with a margin at the edges and a depth that should be 30 cm more than the height of the bathtub.
After installation in the pit, its edges should rise to the edges of the bath by approximately 30 cm. When installing the bath in the pit, it is necessary to control the horizontal position of its position and, if necessary, level the level of the bath by adding soil.
Video on how to make a pond from the bathroom with your own hands in the country.
https://youtu.be/vrVmlYhiJYM
Device
 How to make a pond with beautiful edges from an old bathtub? The next stage in the construction of the reservoir - coating the surface of the walls of the bath with glue. This operation is used to ensure that the surface of the bath is similar in color and structure to the bottom of a real pond. To perform the coating, it is necessary to dilute the glue in accordance with the instructions and apply it to the walls of the bath. If this glue is white color, then it is desirable to add pigment to it Brown color. It is not necessary to cover the bottom of the bathtub with glue. After coating, the glue should dry within a day.
After drying the walls of the bath, it is necessary install metal mesh . The mesh is installed on the edges of the bath and reaches half of the walls of the bath. At the corners in the grid it is necessary to tie wire rings, on which it will later be possible to strengthen the shelves for aquatic plants.
After installing the grid, it is installed rubble. To fix the mesh and crushed stone, a cement mortar is applied on top, which is not leveled. These surface irregularities better mimic natural look pond. Within a few days, the solution hardens.
After the cement hardens, a layer of clay is poured onto the bottom of the bath. A thick solution is made from this clay, which is coated with the walls of the bath, covering concrete pavement and filling all the voids in the grid.
As soon as the clay dries, the reservoir is filled with water from a hose. At the same time, care must be taken to ensure that the water does not erode the clay.
Another video about creation garden pond from an old cast-iron bath with their own hands.
pond decoration
Around the reservoir plant plants and install decorative stones. Inside the reservoir, aquatic plants can be planted on the bottom and on the shelves on the walls. It is advisable to plant plants from a nearby pond along with lumps of soil in a pond. Thanks to this, in artificial reservoir microorganisms that exist in natural conditions will appear.
Bath for a pond in the country? Is it worth it? Of course, in this gallery you will see many photos of beautiful artificial reservoirs from an old bath, which you can do with your own hands both in the country and in personal plot your house.


To create an ecological balance in the reservoir, you can launch fish into it.
And to make the pond look beautiful in evening time, you need to make it backlight. For example, using LED lamps powered by solar panels.


Video about the construction of a pond from an old bath in the country with your own hands.
Preparing the pond for winter
 Ponds of small size, which include a pond from a bath, with severe frosts freeze completely. In this case, damage to the structure of the reservoir is possible, since water expands when it freezes. Therefore, in preparation for winter water from such a reservoir must be removed.
Naturally, they are removed from the reservoir and sent for wintering in more warm place all the fish and plants that live in the pond.
After draining the reservoir, it is cleaned of any debris and rotting residues.
Conclusion
- To improve the dacha, it’s good to arrange a reservoir in it. The easiest way to create a small reservoir in a limited space of a summer residence is to use an old bathtub.
- After installing the bath in the pit and processing the walls of the bath, water is poured into the reservoir, aquatic plants are planted and fish are launched.
- Planted around the pond ornamental plants and decorative stones are installed. To decorate the reservoir in the evening, the reservoir is equipped with lighting.
- When preparing a reservoir from a bath for winter, taking into account its freezing, plants and fish are removed, the reservoir is drained and cleaned from pollution.

By purchasing the old Vacation home, do not rush to get rid of what you inherited from the previous tenants. Especially if it is made of cast iron. This archaic item of Soviet plumbing will serve you well when decorating the site. For example, you can make a pond out of an old bathroom - so beautiful that all the neighbors will envy, and you will long years be proud of your man-made reservoir.
The area of the bath is approximately 2 m2, which is ideal for a mini-pond. The bath has rigid, durable walls that will become an excellent waterproofing agent that does not allow water to seep into the soil, especially for old ones. cast iron bathtubs. It has a hole for a spillway, which can be used when arranging communications for further functioning or.

In a word, for making a pond with your own hands, an old bathtub has a lot of advantages, and most importantly, it eliminates the need to buy a new container for a pond.

True, if used cast iron bath, and it is very heavy, then under it you need to create a very strong and reliable foundation.

Also, when making a pond from a bath with your own hands, keep in mind that the dimensions of the container do not allow, if desired, to create a more voluminous water ensemble.

There are two options for making a pond from an old bathtub in the garden: with a deepening in the ground and on the surface.
Look at the photo of the ponds from the bath and choose the option that is best for your site:
Photo gallery
How to make a recessed pond from an old bath with your own hands (with photo)
Do-it-yourself work on installing a recessed pond from a bath in a country house consists of several main stages and requires certain materials and tools.

For the construction of this mini-reservoir, the following materials will be required:
- stakes;
- spirit level;
- leg-split;
- shovel;
- PVC pipes with a diameter of 50 mm or more;
- sand;
- crushed stone;
- old bath;
- hose;
- decorative stones and materials for pond design.
Since the pond is small in size, there is little space for its devices.
Before you make a pond out of the bath, make sure that there is a source of electricity nearby.


It is also desirable to have a pond with a house or a recreation area so that this miniature ensemble does not get lost in the wilds of the garden plot.


First you need to mark the pit: set the contours of the future reservoir according to the size of the bath, marking them with pegs and using twine for measurements. The pit must be bigger size than a bath, so an allowance of 10 cm is required on each edge. This space is necessary for a drainage device, which will serve to quickly drain excess water. If it is not done, the soil near the pond after each rain will soak, wash out and form a mud swamp.


In the depth of the pit for the pond in the country from the old bath, you also need to dig 10 cm more than the height of the container.


At the bottom of the pit, you first need to pour about 3-5 cm of small river pebbles or rubble. On top of the rubble should be poured river sand(layer thickness is 10 cm). Next, the bottom must be carefully leveled using a rake and float, checking the evenness of the surface using a spirit level. Then the bottom must be filled with water so that the layers of the substrate are slightly settled. After this, a cement screed should be made, which will not allow groundwater destroy the foundation.


The thickness of the cement screed layer is 3-5 cm. When the screed is completely dry (after about 1 week), you need to pour a layer of gravel 20-30 cm thick on top. The drainage cushion is ready, now you can lower the bath into the pit. If the soil on the site is mobile, then you will have to install additional reinforcement for the reservoir: first dig a pit, 2 times the size of the bath; then build wooden box, inside which to spread a waterproofing film, and then arrange drainage, etc.
As you can see in the photo, do-it-yourself pond baths must be installed exactly:
Photo gallery
To check its position, you need to use a level. The edges of the bath should not protrude above the ground level, otherwise the pond will not look natural.

The empty space remaining between the walls of the pit and the bath must be filled with gravel or crushed stone to the middle, and then with sand, carefully compacted so that in the future this layer does not sink after the first rain and the bath does not begin to sway.

If it is not planned to make or a stream, then the lower drain hole must be sealed. To do this, you can use a regular bath plug and sealant. After that, the bath must be filled with water and left for several days for the complete shrinkage of the substrate.
How to make a pond out of an old bath

In conclusion, you can proceed to the direct design of the bath itself and the surrounding area.

To make the bath look like a pond, the interior space needs to be decorated with stones. First, you should pour out all the water from the bath and dry the container.

Then it is necessary to stick on the enameled walls of the bath, hewn rounded river or sea stones, using waterproof glue. It is better to start gluing stones from the bottom, moving up the walls. The gaps between the stones should be smeared with glue with a brush and sprinkled with river sand.

At the bottom, you need to leave larger holes - for installing pots with aquatic vegetation in them.

The edges of the bath along the entire perimeter can be overlaid with pebbles, preferably flat, and the rest of the space can also be decorated with stones in a chaotic manner.

And how to arrange a pond from a bath with plants? For a mini-reservoir, you need to use shallow-water plants, which in their natural environment grow in the coastal zone.

These are calamus cereal, three-leaf watch, marsh feces, tabernamontana reeds, water ranunculus, lagorsiphon, many types of cattail and arrowhead, marsh turkey, urut, marsh calamus, etc.

These plants grow at a depth of 10-50 cm, so they are ideal for a bath pond.
Pay attention to the photo of a do-it-yourself pond from an old bath: you can plant several plants around it that feel great in soil with excess moisture:
Photo gallery
These should be broad-leaved decorative moisture-loving plants, such as water zizania, ludwigia, eared boletus, butterbur, m and buzilnik.

Plants will complete the look of the pond and, in addition, they oxygenate the water, which allows it to remain clean and clear throughout the summer.

As a final touch, fish can be placed in the pond. Then they will have to arrange a water filtration system or install a fountain or a small waterfall. After all, fish need flowing, oxygenated water.

Since the reservoir is small, it will be possible to launch several aquarium fish, and on winter time they definitely need to be moved to a home aquarium.

If there is no desire to mess with fish, you can put less impressive, but more hardy animals in the pond - water snails and frogs.

They overwinter well, burrowing into the soil around a pond. Frogs may not look very aesthetically pleasing, but they will complement the overall picture perfectly, and, in addition, they eat mosquitoes and their larvae.

If the relief of the site has a slope, then you can install the bath here, strengthening it on one side with large stones (by making a dig for one side and a partial one for the other, which will be free).

As a result, the outwardly free side of the pond will resemble one made of stone. Here you can also plant some suitable plants.
As you can see in the photo, if a pond from an old bath is installed in a recreation area, then a pergola can be installed near the bench with climbing plant- it will simultaneously complement general form mini water area and give shade in hot weather summer days:
Photo gallery
How to make a pond from a bath on the surface of the earth (with video)
And how to make a pond from a bath with your own hands, if it is not possible to install it with a deepening into the ground (the site is located on a steep slope, there is no desire to perform excavation, a child or a dog can fall into a pit, etc.)?

In this case, you can make a reservoir on the surface of the earth. True, this method will require some costs for the purchase of additional materials - bricks and tiles for execution and cladding. external walls structures.
Photo gallery
To work, you will need the following materials and tools:
- old bath;
- shovel;
- crushed stone;
- sand;
- cement;
- putty knife;
- brick;
- river pebble.

It is necessary to clean the area under the pond, carefully tamp and level it. Then you need to make a markup taking into account the external walls of brick.
For the installation of a bath, it is required to build a foundation on the basis of cement mortar, you must first perform drainage from crushed stone and sand (30 cm). Under the drainage, you should dig a hole of small depth (to the height of the layer). It is advisable to drive several large stones into the sandy area, with which you can use construction garbage which is not washed out by water.
The thickness of the cement foundation is 25 cm. After the construction of the foundation, you need to let it dry for 14 days, periodically watering the cement with water for better setting.

If the bath is on its own legs, then you can immediately install it on the foundation and finish it with bricks. And if you plan to keep it with the help brickwork, then you first need to make the walls of brick, and only after that install the bath.
Watch the video "How to make a pond from a bath" to better understand the process technology:
A decorative pond from an old bath can be decorated with tiles, also making out the sides to make a monolithic square niche.

Then proceed to the design of the internal space of the bath: the walls can be decorated with stones or painted water-based paint in any desired color.

In such a pond, plants with large leaves and flowers will look great. Any plants can be planted around the pond, not just water plants, the main thing is that they are not too large and are at some distance from the pond so that the leaves and flower petals do not fall into the artificial reservoir.

If desired, you can make two such ponds on the site at once, installing them symmetrically, for example, on the sides of a recreation area or a large flower garden.
Make a small pond with your own hands suburban area from an old bath is not at all difficult. There have already been many instructive articles written about this. And of course, we will repeat in this note those simple steps to help create it.
But in order for the reservoir to please the eye and fit into environment as if he had always existed here, the main thing is to beat him correctly. This must be done in such a way that it really looks like a natural reservoir, to which a person only shaped, decorated, added a few strokes, and not like an old bathtub dug into the ground, which is often found on our sites.
Compare here:
- these reservoirs:


Feel the difference? In the first photos, white or yellowish edges of the bathtub stick out here and there and all the naturalness of the reservoir is immediately lost. 
We draw conclusions: you need to carefully mask the bath, so that no one guesses that it is here.
The second thing you should pay attention to is the form. Nature rarely creates reservoirs with a clear rectangular or oval outline. Therefore, it is worth either slightly changing (making it more asymmetric) the shape of the reservoir with the help of stones and plants, or, conversely, emphasizing interference in human natural affairs by creating a very clear outline, for example, using plates, as in our master class below.
The first method is used much more often. In our video, we have selected the most successful examples how to beat a pond from a bathtub, making it a creation of nature:
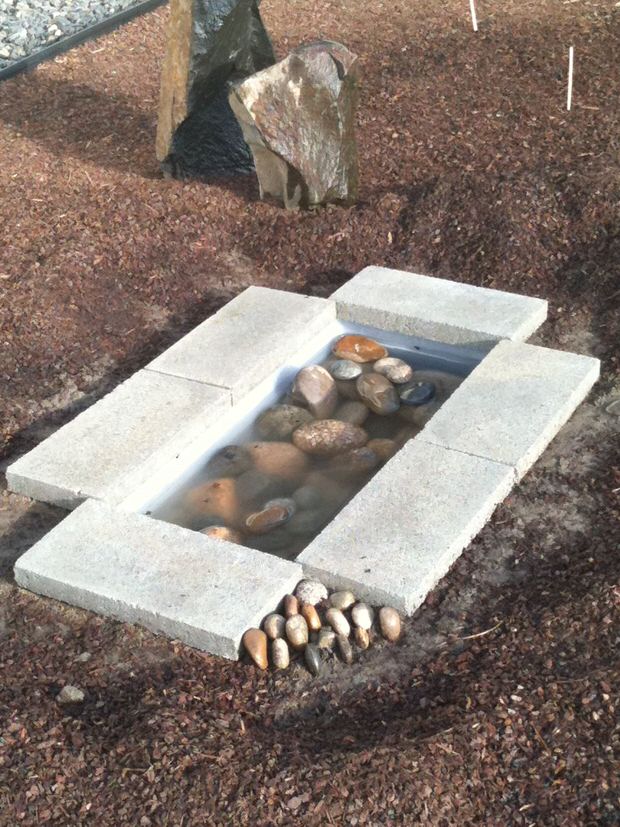
But for the master class, we decided to choose a very unusually beaten reservoir in modern design. At the same time, we will repeat the steps of creating such highlights on our site.

Required Consumables:
- flat concrete plates, suitable for the size of the bath - 6pcs
- Sea and ordinary stones different sizes and flowers
- Aquatic plant of your choice
- And, of course, the bath itself.
Step 1.
Decide on the location of the pond. Please note that if you plan to plant live plants next to it or directly into the water, you need to take care of their light preferences (most plants need a sufficient amount sunlight). Also make sure that branches of nearby trees do not hang over the pond. They will not only create a shadow for the plants, but leaves will constantly fall from them into the water.
Prepare your bath. If it has drain holes(and they probably are), they must first be cemented and, after the solution has dried, treated with a sealant.
Step 2
Put the bath in the chosen place, outline its outline. Set the bath aside and dig a hole of the desired size and depth (it should be such that the edges of the bath are flush with the ground). Install a bath.


Step 3
Lay large stones on the bottom of the bath, and then smaller ones. At the edges, carefully place the concrete slabs so that they hang a couple of centimeters over the edge of the bath. Use flat sea pebbles to fill in the corners formed by the slabs.

Step 4
Set the pot with aquatic plant. fill the pond with water.

By the way, to create a reservoir in modern design, you can use not only concrete slabs, but also, for example, wood (pre-treated).


Hello dear reader. You have an old bath and you do not know what to do with it, there is a solution to the problem!
Pond from an old bath
Materials:
- Sand 55–65 kg.
- Some gravel (for drainage) 1.5 2 buckets.
- A sheet of tin or an old pan 65 x 55 centimeters.
- Bucket, shovel and wheelbarrow.
- Building level and tape measure.
- A board the size of a bathtub.
Instructions for making a pond from an old bath
1. First you need to designate what boundaries our pond from the bath will have, you need to pull the ropes on the ground, and pull them using pegs, then you need to lay the bath on the ground.

You will also need sand to make a pillow (25 centimeters)

2. The second stage is the prepared pits for the pond, you need to remove the vegetable 1-2 layers of soil in other words, turf).
We measure the depth starting from the bath, the size should be 6-10 cm below the layers of the earth, you also need to consider that we have a pillow (25 centimeters).
Interesting! Do-it-yourself pond in the country,
We choose a place for the drain, for which we need to dig an additional hole, the depth of which should be 70 cm, but the width is about 60-70 centimeters.

Which should correspond to the diameter of the tin.
It also needs to be inserted into the drain hole, and its edges should rise by 30-35 cm.

Also on the bottom you need 25 cm of sand in order to level it. Then we remove our tin sheet (old pan).
4. The installation of the bath should be in such a way that the hole where the water drains should be directly above the sand with stones (gravel), our pillow.
Also, in an instant, pour water into the bath, the water level should be the same as the level of sand. Next, we check whether the bath is level using the building level.

5. Further, according to your desire, you can form a bath with small pebbles or a vegetable layer for mail (turf). Also in the bath itself, you can plant plants such as vodokras (frog), lotus or umbrella susak.
Pond from an old bathtub photo


