See crafts from plastic bottles. Plastic bottle products
Plastic bottles are a material available in every home. If you have not yet figured out how to “put them into action”, the Motherhood portal offers craft ideas for joint activities with a child!
Plastic bottles can be used to make a lot of things, from animals and toys to sports equipment, from delicate flowers to lampshades and curtains.
Plastic bottle toys
Using plastic bottles with a volume of 1.5 liters, you can design animal figures. Look what a wonderful dog turned out of green bottles!Try to simulate an airplane. You can glue the frame with colored paper and make portholes with passengers. Or just put your favorite toy in a special slot.

From plastic bottle, straws for a cocktail and a ball for ping-pong with the help of a stapler, you can design a helicopter.

A real "waterfowl" catamaran for dolls can be made from two plastic bottles.

A more complex craft using heating and melting structural parts looks simply gorgeous. Look, it turned out to be a real Frog Princess!

By heating and melting plastic, you can make a naturalistic crayfish, and then "settle" it in an aquarium.

A series of colorful nesting dolls can be made from plastic bottles pasted over with colored self-adhesive paper. The second option is paints for glass surfaces.


From several bottles, movably fastened together with screws, you can get a bright and memorable snake or shark, as you like.

As part of the New Year theme, try making adorable colorful penguins from the bottoms of plastic bottles. We cut them, put a “hat” on the penguin, color it, add bright details: a pompom and a scarf.

If you need a craft with a Christmas theme, try making an Orthodox church out of plastic bottles. The dome tops are easiest to mold from plasticine, crosses are made from wire, and then wrapped in golden metallized paper. White edging gives a special elegance to the craft. window openings on colored plastic. They can be done with a "stroke" corrector, or a thin strip of white plasticine.

In a similar way, you can build a whole castle. Plastic bottles will form the frame for the four corner towers. Slots are made in them for windows or loopholes, on top they are coated with plasticine, on which the texture of brick and "white stone" decorations are applied. The walls of the castle are made of cardboard and also coated with plasticine. This impressive craft is sure to bring a lot of joy to your child.

Insects
Children are interested in insects. Together with them, draw and cut out a beetle, butterfly, cockroach or caterpillar from a plastic bottle. They must love it!

If you approach the issue more carefully, then you can build an insect from bottles in all details.

Starry sky in a bottle
Inside an ordinary bottle, you can create a magical and fabulous galaxy. We will need: wat, glycerin, colored sparkles and a little dye. We put a piece of cotton wool inside a transparent jar or bottle, add sparkles. Pour in a jar of glycerin to obtain the effect of viscosity. Then add food coloring. You can make several shades inside one container. But at the same time, each time we add cotton wool and sparkles. Carefully fill everything with water. We glue the bottle cap along the edge so that it is airtight.
homemade flowers
From an ordinary green bottle, you can make a bouquet of lilies of the valley in a vase. To do this, cut the bottle according to the scheme. We put large foam balls on thin twigs-stalks.
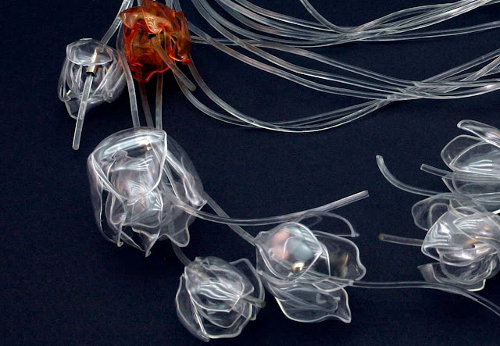
By cutting and melting the necks of plastic bottles, you can get magnificent flowers.


With a certain skill, you can depict cacti and other indoor plants.


Do you want to add color to a dull winter landscape and plant fabulous plants right on the snow? Plastic bottles come in handy!

Asters can be made from colored plastic cups. To do this, cut off the rounded edge, make cuts, wrap the edges of the cups and connect them according to the scheme.

Vases and coasters
Using the lower parts of plastic bottles, we model flower vases. Such homemade vases are not inferior to real crystal ones!

Household crafts
We offer practical craftswomen to engage in the manufacture of crafts that occur in everyday life.Make a beautiful stand for storing needles. A wonderful gift for mom or grandmother, easy to make and affordable even for a small child.

Schoolchildren and teenagers can please their mother or girlfriend with a unique mobile phone holder while charging. Such a useful hand-made, painted with stained glass paints according to your own sketch, will undoubtedly bring joy to your loved ones!

The hostess will always need a transparent container in which it is easy to find the right thing. Such a storage box can be made by a boy as a gift to his mother. To do this, you need to cut a plastic bottle, walk along the future joints of the box parts with a heated awl, forming holes. It remains to connect the parts of the product with lacing or a zipper.

If you are a schoolboy and are thinking about what to give your dad or brother, pay attention to these homemade dumbbells for sports. You will need several bottles, two wooden sticks for the handle, glue, electrical tape and ordinary sand. A fun and useful gift is guaranteed!

It is easy to make a convenient scoop for garbage from a plastic bottle with a handle.

Even slippers can be made from a plastic bottle. This product looks unusual. But the question of convenience remains open.

A stand for jewelry and jewelry can also be made from the bottoms of plastic bottles.

Interior details
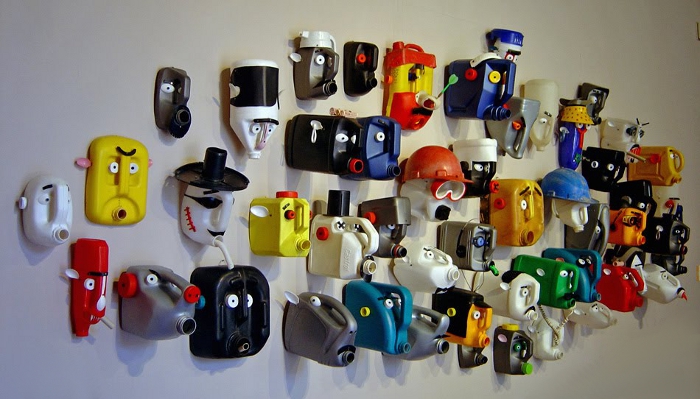
You can pretty much surprise and amuse guests at a theme party by making wall compositions-heads from canisters and plastic bottles.
From plastic bottles, you can cut out such delicate and elegant panels that the audience can hardly guess what it is made of.


Using plastic bottles, you can create a lamp, a night light or a chandelier.

And you can make a lampshade from plastic cups.

Using the bottoms of transparent bottles, you can create original and stylish curtains.


Crafts for the New Year from plastic bottles and disposable cups
A Christmas tree made from disposable cups and tinsel can decorate your lobby or classroom.
Stylish New Year's bells are obtained from the top of the bottles.

Having painted the bottoms of the bottles of bluish plastic, we create a round dance of snowflakes.

A plastic bottle can serve as a frame for a funny Santa Claus. We make the face of the New Year's grandfather from a napkin or colored paper, hair and beard from cotton wool.

And such a snowman can be made by the whole group in kindergarten. Success on the show New Year's crafts secured!

Get ideas and start creating! After all, there is so much more to do before the New Year!
Photo sources:
Summary: DIY crafts from plastic bottles for children. Crafts from plastic bottles to give. Crafts from plastic bottles for kindergarten, a photo. Flowers from plastic bottles. Craft ideas from plastic bottles.
What can be made from plastic bottles? In this article we will tell you what crafts from plastic bottles you can do with your children with your own hands. Plastic bottles - versatile material for making crafts. We will tell you how to do:
Vases from plastic bottles
Crafts for giving from plastic bottles
- crafts for the garden from plastic bottles
1. Crafts from plastic bottles. Plastic bottle toys
Catamaran from plastic bottles
By connecting two plastic bottles together with electrical tape, you can make a toy catamaran for dolls.


Craft from a plastic bottle for children - a fountain
On a hot summer day, you can’t think of a better entertainment for children than playing with water on fresh air. From an ordinary plastic bottle, you can make an educational toy for experiments and games with water in the country or on the beach.
Make several holes in the bottle with a sharp object. In the photo below, the holes are made in the center of the bottle, but, in fact, it is better to place them at the bottom of the bottle. In this case, the maximum volume of water from the bottle will be used. Plug the holes with your palm and fill the bottle to the top with water. Screw on the lid. Remove your hand from the holes. Surprisingly, water does not pour out of the bottle through the holes.
Now slightly unscrew the cap and you will see how the water begins to pour out of the holes from the bottle. It is the air entering through the neck of the plastic bottle that displaces the water from the bottle.
This toy can be used as a washstand in the country.

Crafts from plastic bottles for children using papier mache technique.
Can be made from plastic bottles interesting crafts for children in papier mache technique. Boys will surely be interested in a homemade plane from a plastic bottle, and girls will be able to make a whole home zoo.
The principle of making toys from plastic bottles using the papier mache technique is as follows. First, the frame of the future craft is made from cut and whole bottles. Everything is held together with tape. Additional parts are cut out of cardboard and also attached with tape or tape.
After that, you need to tear or cut into small pieces of paper. It can be either ordinary paper for printers or special corrugated paper for children's crafts. Dilute PVA glue with water in a ratio of 1: 1. Then, dipping each piece in diluted glue, attach it to the bottle frame. Thus, cover your craft with 4-6 layers of paper.
Once the glue is dry, color and decorate your plastic bottle craft.

How to make a plane out of plastic bottles >>>>

From plastic bottles with their own hands. Cow >>>>

Children's crafts from plastic bottles. Tropical fish >>>>

Children's crafts from plastic bottles. Crocodile >>>>
And a few more links to master classes on making crafts from plastic bottles for children:
2. DIY plastic bottles. Vases from plastic bottles
The easiest way to make a vase out of a plastic bottle is to simply cut off the top and decorate it. At the same time, it is advisable to round off the edges of a home-made vase with the help of an iron. So it will be more beautiful and safer.
To round off the edges of a plastic bottle vase, place a sheet of paper on top of it and bring a hot iron (the paper is needed so that the plastic does not stick to the soleplate of the iron). The sharp edges of the bottle from the high temperature round off. Be careful - bring the iron for a short time and constantly check what is being done under the piece of paper. Link >>>>

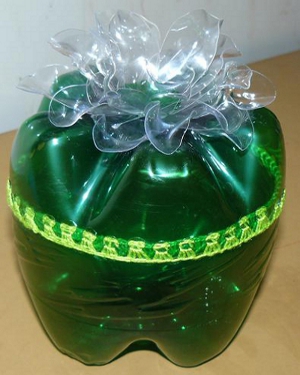
We would like to invite you to creative craft vase. To make it, you will need several plastic bottles. You can use one large bottle (1.5 liters) and 4 small bottles (0.5 liters). To make a vase from plastic bottles, you will need plastic glue or glue gun. For instructions on making a vase from bottles, see the link >>>>

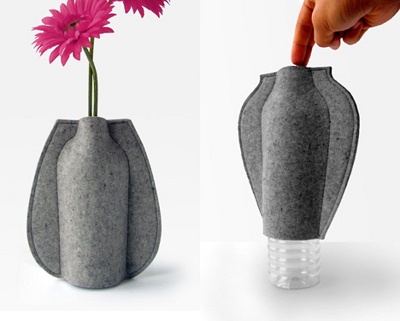
You can make a cute felt case for a plastic bottle. Insert the bottle inside the case - a vase from a plastic bottle is ready!
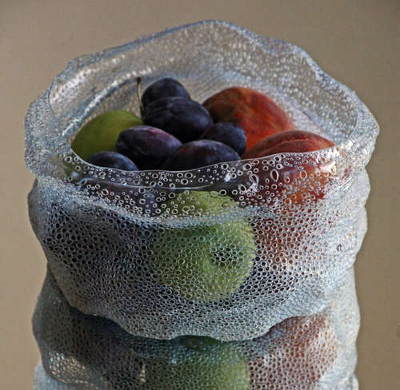
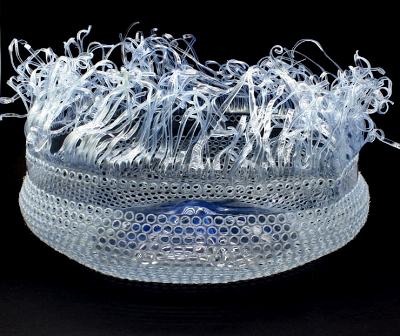
A beautiful, "airy" vase from a plastic bottle can be made if you first hold the cut bottle over the fire to give it shape. Then make numerous holes in it with a soldering iron. Only food products it's still better not to store it in it!

And one more idea how to quickly and easily make a vase from a plastic bottle.
3. Crafts from plastic bottles photo. Flowers from plastic bottles
Making flowers from the most various materials Today it is one of the most popular types of crafts and needlework. From ordinary plastic bottles, you can make original artificial flowers with your own hands.


detailed wizard see the class on making flowers from plastic bottles at the link >>>> To make this craft from plastic bottles, in addition to plastic bottles of different colors, you will also need a candle and a glue gun. However, instead of a glue gun, you can just use glue. Attention! Be extremely careful when working with fire!
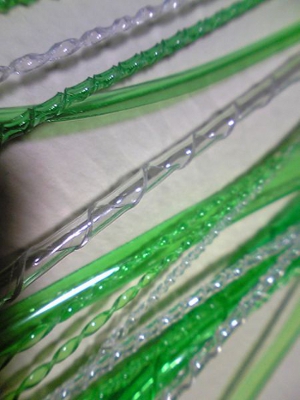
A separate instruction on how to make stems for flowers from plastic bottles can be found at the link >>>> To do this, you need to cut a plastic bottle in a spiral to get a narrow strip of plastic. Then twist it over the fire.
4. From plastic bottles with your own hands. Boxes and boxes made of plastic bottles
Take two bottoms from plastic bottles and glue a zipper between them with a glue gun or plastic glue. The coin purse is ready!

The zipper can also be sewn to the bottles.

Decorate the box with a flower, also made from a plastic bottle. How to make flowers from plastic bottles, we told above.
From a plastic bottle, you can make a beautiful packaging box for a small gift for a loved one.
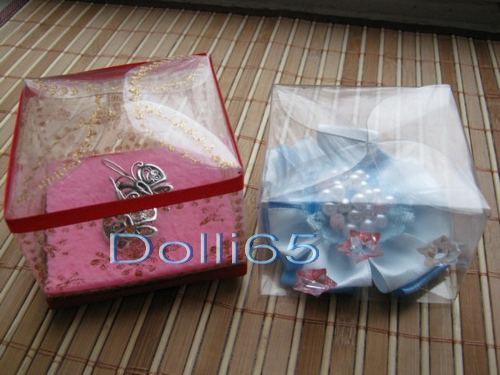

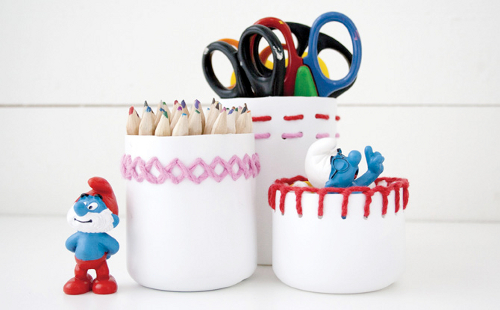
Moms or grandmothers who know how to crochet can make convenient and practical boxes from plastic bottles to store children's books.

Detailed instructions for the manufacture of this craft from plastic bottles, see the link >>>>
Link-2 >>>>
5. Crafts from plastic bottles master class. Decorations from plastic bottles
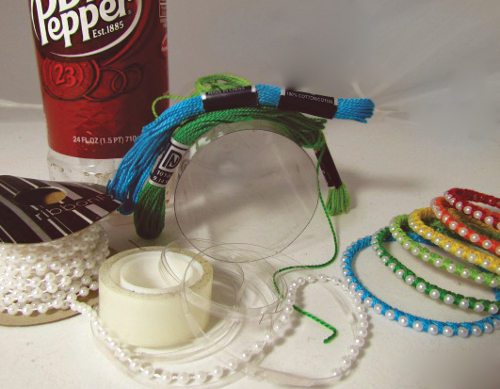
Who would have thought that you can make stylish decorations from plastic bottles! Bright, fashionable bracelets or delicate, airy necklaces.
Plastic bottle bracelets
Cut out a plastic ring of the thickness you need from the bottle. Wrap it with colored yarn or elastic fabric, glue it with lace or sew it with threads. Stylish, summer decoration is ready!

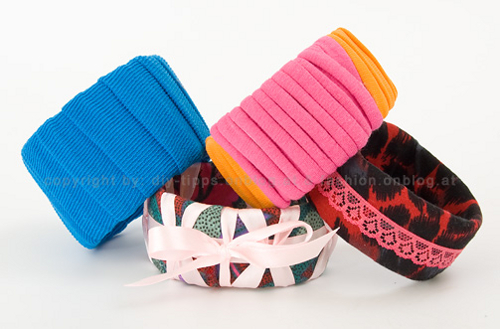
You can also buy inexpensive beads and wind them to a plastic ring with colored yarn.
For a detailed master class on making this craft from a plastic bottle, see the link >>>>
Above, we talked about how to make flower stems from a plastic bottle. These beautiful spirals can also be used to make jewelry from plastic bottles.

From a plastic bottle, following the same principle as flowers, you can make a beautiful necklace. Cut out petals and leaves from a bottle of various shapes. Hold them for a short time over the fire so that they take shape. Put them on the line.

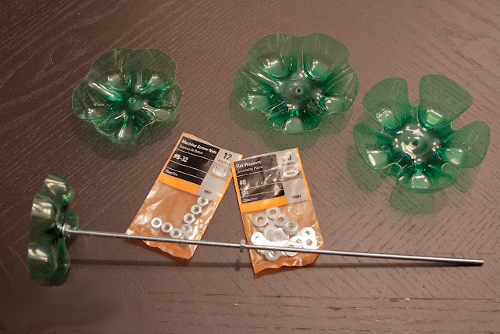
And from the bottoms of plastic bottles you can make a stand for jewelry.
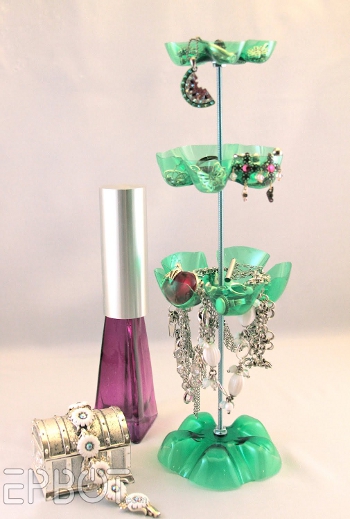
To make this craft from plastic bottles with your own hands, you will need, in addition to the bottles themselves, a threaded metal rod, as well as nuts and washers.
6. Plastic bottles crafts for giving. Crafts from plastic bottles to give
From bottom plastic bottles, beautiful decorative apples and pumpkins will turn out. To do this, cut off the bottoms of two bottles and paint them with acrylic paint, and then fasten them together. You can do without paint by putting corrugated paper cut into strips inside crafts from plastic bottles. Link >>>>
For the next crafts from plastic bottles for giving, you will need very a large number of bottles.

To make curtains from plastic bottles for a country house, you need to cut off the bottoms of the bottles and fasten them together with fishing line or silk thread. The bottoms of the bottles must be cut along the edge so that such flower-shaped blanks are obtained. The edges of such blanks can be earned a little sandpaper or singe over the fire so that there are no hooks on the cut.
With an awl heated over a fire, we pierce holes for threading fishing line or thread. We fix the position of the blanks on the thread with knots so that they do not bunch up. The work is painstaking and delicate, but such a curtain does not require financial costs.
Here's another one useful application plastic bottle in the household. 
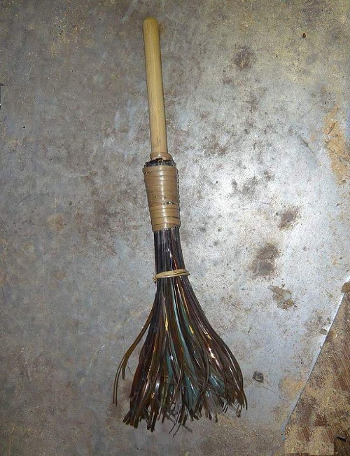
Useful craft from plastic bottles for giving - a homemade broom. Broom from plastic bottles - necessary thing in the private sector, especially during leaf fall.
7. Crafts from plastic bottles for kindergarten

Material prepared: Anna Ponomarenko
Other publications on the topic of this article:
CRAFTS FROM PLASTIC BOTTLES FOR THE GARDEN (LESSONS WITH PHOTO)
In this article, we will share with you . You will learn how to decorate flower beds and make beautiful flowers with your own hands. palm trees from plastic bottles, and also - beautiful animals from this unnecessary material. Simple and intuitive understandable master classes with photos of the sequence of stages of work will help you make amazing plastic crafts for garden! Hooked on . Take advantage of some of them:
- bright garden paths that can be made from sea pebbles, from multi-colored paving slabs, in the form of paving stones with green grass breaking through between it, from silvery large and small gravel or rounded saw cuts of a tree. Pay Special attention On the other hand, diverse paths throughout the garden plot will allow dividing its total area into interesting thematic zones - a garden, a kitchen garden, recreation area, playground and barbecue;
- solar-powered mini flashlights - the simplest and most inexpensive option decorations that give comfort to any personal plot. They absolutely do not require any professional installation, unlike other expensive street lighting options. Since they are cordless, they only need to be stuck into the ground or along garden paths or in flower beds. Also for the garden you can do your own crafts in the form of decorative lanterns from a plastic bottle ;
Beautiful hanging planters, all kinds of flowerpots , designer flower pots can be moved during the summer season. The garden plot will always look new if you make such decorations for the garden with your own hands. Pots are best placed in the barbecue area, on the veranda or around the playground. Use old waste boxes, multi-colored plastic bottles, barrels, watering cans and other items that you would never need and that you want to throw away as decorative containers. Give them a second life by decorating your garden with DIY crafts;
Hand-made wattle fences look great along the paths of the garden. From can be woven from willow or hazel. On such wattle fences as as a rule, as garden decorations like to hang beautiful old earthenware jugs and pots. Planted decorative sunflowers will look great next to such a wattle fence;
Country furniture always creates unique comfort every corner of the garden. Plastic bottles can also be used as a material for making garden furniture (in the previous tutorial we showed you how to make a durable sofa out of large plastic bottles). ). Wrought iron benches, wooden seat chairs and tables are currently the most popular. When choosing furniture, pay attention to the fact that the legs have special tips so that they do not fall into the ground. For summer verandas great fit wicker furniture from wicker and rattan. Great for our latitudes larch and teak. All unpainted furniture must be pre-coated with special compounds.
Crafts from plastic bottles for the garden become a real gem of it. Avid summer residents spend all their free time in their favorite areas. To make it more original and beautiful, it is not at all necessary to run to the store for newfangled garden figurines or expensive materials. The easiest thing to craft is a used plastic bottle. To implement your ideas, first read the helpful tips.
What you need to start making DIY crafts from plastic bottles for garden? You will need - a precious plastic bottle, scissors, plastic paint and wire. The main thing is not to be afraid to fantasize to make crafts from used plastic bottles for the garden. Can involve children in the manufacture of such crafts . This can be a fun family activity together.
Crafts from various plastic bottles for the garden are the most budget option and plastic will last at least 3 years.
Crafts from a plastic bottle, as seen on the picture, can be placed on the playground: make a palm tree out of plastic bottles or flowers, put a plastic peacock, hare or other animals.
There are ideas for a variety of crafts from a plastic bottle. This can be seen in the photo - flowers, birds, animals, toys.
PALM FROM PLASTIC BOTTLES OWN HANDS (MASTER CLASS WITH PHOTO)
Plastic bottles are excellent material used in crafts for the backyard. They can be from ordinary water or carbonated drinks. You can also use plastic from under detergents and shampoos, giving him new life. No need to treat it like useless trash. Indeed, from plastic, practically from nothing, you can make useful and interesting things for a summer residence, a garden, toys for children. Below you will find information with which you from plastic bottles you can easily make a beautiful palm tree with your own hands. If you make 5-8 of these palm trees and decorate your garden with them, then your site will look very advantageous and exotic compared to others!
As we have already told you in one of our materials, if you have a huge number of bottles of the same shape and size, it is quite possible to make country furniture . It is very easy to fasten 15-20 bottles of 1.5-2 liters with adhesive tape and thereby get the basis for a pouffe. It can then be covered with a beautiful fabric, making a soft foam seat.
A palm tree made of plastic bottles will show off on suburban area or in the garden all year round. It is sure to brighten up any garden.
How make a palm tree out of plastic bottles ? A photo with the stages of work should encourage you to do this (see below Master Class). In order to make your own garden products in the form of a palm tree, you will need some simple materials. Of course, these are plastic bottles, which are the main material.
For the trunk of a palm tree from plastic bottles you will need to stock up on 10-15 plastic bottles. Their capacity is one and a half to two liters. Depending on the height of the palm tree, a different capacity of bottles is taken. With a palm tree height of 15 plastic bottles, two-liter containers should be used. With a height of 10 bottles, one and a half liter bottles are used. Brown must be taken. plastic bottles to make a palm trunk out of them.
For the crown of the palm tree, green plastic bottles will be needed. The larger the bottle, the longer the palm leaves will be, and it will look more natural.
In order for a plastic palm tree to be reliable and durable, it is necessary to choose either a strong and thick willow rod or a thick metal rod for its base.
Tools needed to make DIY palm trees from plastic bottles:
an awl or drill to make holes in the bottles;
large scissors or a well-sharpened knife.
Manufacturing sequence plastic palm:
to make a palm tree trunk, you first need to cut brown bottles 10-15 centimeters high. For this, the bottom of the bottle with the bottom is best suited. Tops can also be used. This is also a good option, because in this case it will not be necessary to make holes;
when the necessary plastic blanks will be made , teeth are cut along their edges with scissors or a very sharp knife. They need to be bent a little in order to give the palm tree bark from plastic bottles a natural and natural texture;
for the crown of a palm tree, green bottles are taken from plastic bottles. They cut off the bottom. On the very first blank, it is necessary to leave a neck with a lid. In the future, in the process of assembling the entire structure of the palm tree, it will serve as a good fastener. The necks of the remaining blanks must be cut off;
to make leaves from blanks, they must be cut out, but at the same time not reaching the edges of about 5 centimeters or more. Next, the leaves must be fixed by screwing the lid;
the next step is drilling holes to connect all the prepared parts.
Such a hole, which serves as a connection, must also be made in the lid - fastening the crown of a palm tree. Pay special attention to the fact that the size of the connecting hole is in direct proportion to the diameter of the base rod. A red-hot awl or drill will be good helpers in this;
the last stage is the collection of a plastic palm tree with your own hands. It is necessary to plant all brown plastic blanks on a securely fixed rod, and fix the crown, which was prepared from green plastic bottles, on top.
The palm tree is ready. Now think about where to place it in the corner of the garden so that it looks the most impressive. But it is better to make several of these palms, install them side by side and plant green spaces around them.
HOW TO MAKE A PLASTIC BOTTLES FOR COTTAGE OR GARDEN
What can be done from plastic bottles to decorate the garden? Next, we will consider options with a photo of how you can make a decorative flower bed with your own hands.
Have you ever thought that the garden is a real creative territory? And this is not at all because its diversity consists only of the cultivation of diverse fruit trees, flowers and shrubs. Your unlimited fantasies and peeped ideas from other gardeners and summer residents will turn the territory of your garden into an original and unique look. 
From plastic bottles, you can create both useful little things and landscape works for summer cottages, including palm trees, flower beds, gazebos, supports for greenhouses and canopies, frames for climbing plants, and so on. To do this, it is only necessary to collect a sufficient number of the same type of plastic bottles. Palm trees from plastic bottles for any garden will become its real decoration.
But what, besides palm trees, can still be made from this waste material for decoration your garden? An easy option is a gazebo made of plastic bottles. Or rather, the basis of its design. Since the fastening of the gazebo must be rigid, small screws must be used. If you have a design with one-piece bottles, then they must be filled with sand so that they are stable. Please note that in case using plastic bottles as a frame (the base of the canopy, for example) you should not overload the structure too much and use only light fabric and film.
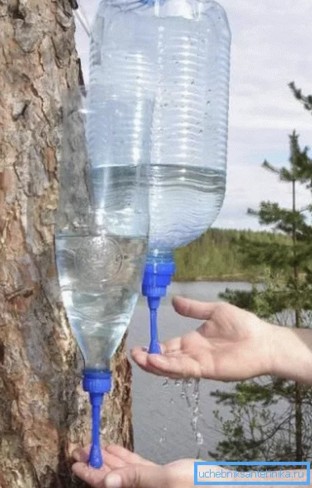
Summer residents have long used plastic bottles for growing seedlings and decorating flower beds. They serve as an excellent container for it. A very original idea is to make an outdoor washbasin out of them. Nothing complicated - just hang upside down a plastic bottle with a cut base, pour water into it. The lid serves as a tap, which you only need to turn a little so that water flows.
A modernized similar version of the outdoor washbasin is the following - a plastic bottle is hung upside down. Make a small hole in it. To supply water, you need to slightly unscrew the lid and let air into the container. In the same way, you can build a real shower. To do this, you need a plastic bottle with a large diameter. Several holes are made in the bottom of the bottle, like a shower.
Flowerbeds made of plastic bottles for the garden are quite common among amateur gardeners. They just dig into the ground, representing a small fence.
In addition, you can make a variety of pots of different sizes and shapes. , depending on the plastic containers used. So, for example, small bottles can be used for desktop and hanging pots. Try to cut off the bottom of the bottle, and you immediately get a cylindrical planter . If only the top of the plastic bottle is used, then get a cone-shaped pots . Such pots can be decorated with colored corrugated paper, cloth or tied with yarn. A simple option for decor will be painting with paints. Inverted plastic bottles with a capacity of 5 liters will serve perfectly as decorative flowerpots.
The fantasies of summer residents are irrepressible, and they build palm trees from used plastic bottles for your garden. From brown and green plastic bottles for giving, you can make real beautiful decorative palm trees.
ANIMALS FROM A PLASTIC BOTTLE (HOW TO MAKE A HARE OR A PIG WITH YOUR HANDS)
Summer residents are very fond of decorating their personal plots with all kinds of garden figurines made of clay or gypsum. In order for the territory of the garden plot to become original, it is not at all necessary to go to an expensive store to buy decor. Plastic bottle animals, which you can see in the photo, can be easily done and with my own hands. This type of decoration for the garden is also very practical for the backyard, because the plastic is resistant to both rain and sunlight. 
After reading this manufacturing review, you will learn how to make various animals from an ordinary plastic bottle (see photo with work steps). In fact, making a hare or a pig from a plastic bottle with your own hands is not at all difficult, and after reading the material, you will see it!
Plain plastic bottles can serve as a source of inspiration for creating mini-masterpieces, and not just a constant headache for environmentalists. A variety of plastic figurines of animals or birds can be made together with children, including their own and children's imagination. For this, all you need is a plastic bottle, cardboard, glue, scissors, markers and acrylic paints (you can use spray paint).
To make animal figurines (hare or pig), you can take any plastic bottles you have. Come up with interesting ideas and choose which animal you like best. We suggest you make a cute pig out of a plastic bottle. AT ready-made she is pictured.
To begin with, carefully prepare the plastic bottle for work. The label must be carefully removed from it, and then washed.
Well, now let's get back to making crafts. . Cut out ears, tail and paws from cardboard. Glue all the cut parts of the animal to the bottle. Take pink paint and paint the resulting blank from a can. Let's let the paint dry. Now the fun begins. After drying, draw with markers the eyes, snout of the pig and the mouth. You can also use another option - pre-cut these details from colored paper or paint and then stick on the bottle.
Sounds funny but a pig made from a plastic bottle and flaunting in the photo, became real, as they say now, fashion trend recently. We can say that now there are a lot of piglets. 
It is clear that thanks to different imaginations, various interesting crafts are obtained. It can also be cute little pigs made from small bottles. These are real wild boars or sows from huge plastic bottles. Some are trying to copy Piglet. Some people have such a fantasy that they create entire plastic pig farms on their personal plots.
On this, of course, the topic of all kinds numerous figurines from plastic bottles cannot be exhausted. There are still many kinds of animals that can be made with a used plastic bottle.
And such an animal can be a hare from an ordinary plastic bottle, which you see in the photo. It can be made for giving different ways. This will depend on the shape of the bottle you take and the very idea of \u200b\u200ba decorative garden hare.
To make the simplest method hare from an ordinary plastic bottle as shown in the photo, you will need: plastic bottle, acrylic or spray paint, brush, scissors, hot glue, sand and cardboard.
Note that if you are making this figurine for a child, and not to decorate a personal plot, then take a small plastic bottle. The bunny will turn out cute and very neat. But voluminous bottles are great for making garden hares.
The sequence of steps for making a plastic hare:
carefully clean the plastic bottle from the label;
Cover the cleaned bottle with spray paint and let it dry;
After the spray paint has dried, fill the plastic bottle with sand. This will give it good stability;
Carefully draw the muzzle and paws of a hare on a plastic bottle;
It is necessary to cut out ears from colored cardboard, paint them also carefully with paints and hot glue;
If the hare is intended for the garden, then his ears will also be plastic. They are cut from another prepared plastic bottle. In this case, you can only paint with spray paint. Details are drawn with acrylic paint;
at the last stage, the ears are glued with hot glue.
Here is another way to make a beautiful funny hare from a plastic bottle with your own hands. To do this, you will need the simplest things - sand, two used plastic bottles, acrylic primer or acrylic paints, a brush and scissors.
The sequence for making a hare with this method is the same - we thoroughly wash plastic bottles, cleaning them of unnecessary labels. One of the blanks must be filled with sand for stability. From the second plastic bottle we cut out the ears and bangs of the bunny. Do not touch the top of the plastic bottle with the cork.
We cover with acrylic soil all the prepared parts of the garden bunny. In this case, the paint consumption will be less. Let the well-applied primer dry. After the soil has dried, we draw a hare's shirt, a butterfly and its muzzle on the main plastic bottle. In general, we create its image at your discretion. 
As a result of such individual approach and get such funny and unique bunnies. Ears will be better painted with silver paint. Cork is usually painted with golden paint. In the place where the bangs will be, make an original fringe with scissors. After the paint has completely dried, carefully combine all the prepared parts. Your hare is ready and waiting to take his place of honor in your garden!
As you can see, making a flower bed, a palm tree or any animals from plastic bottles is not at all difficult! Fantasize yourself, do not be afraid of anything, take and process existing ideas, engage in real creativity and then yours will acquire its original unique look!
Below is a video tutorial on making a hare from plastic bottles:
NEXT ARTICLE.
A plastic bottle is not just an ordinary waste (garbage), it is a decor option, with its skillful use. Bottles, depending on the liquid stored in them, vary in shape, color and size. These features will allow you to make interesting crafts from plastic bottles for giving with your own hands.
massive buildings
Plastic bottles are used in this case as a substitute for various materials of various designs. They can replace bricks and even slate. To give the necessary strength, the bottle is covered with sand, and in order to achieve a certain shape, pressing and scissors are used.


Gazebos, greenhouse buildings
The essence of the building is PVC installation products using fastening materials in the form of wires or ropes. In the end, when using sufficiently strong frames, worthy supporting walls come out for any structures.
Enclosing elements
The principle of crafts is the same as in the paragraph described earlier. It is also possible to decorate an existing fence or gate with plastic bottles, cutting them, and gluing mosaics.


Sheds
The structure can be used by you as a shelter from the rain. You can hide not only yourself, but also leave a car or equipment. For the construction, you need to install a solid frame, on which bottles are attached with wire.


Water heater
With the right construction and combination of containers, you can make Summer shower, whose water will be heated in bottles under the influence of sunlight.
plastic furniture
Bottles can be used to make outdoor benches, chairs, and even sofas that can be upholstered for more comfort.


Plafonds for lamps
Use plastic bottles that are not heat-affected. You can make a ceiling of any shape and color, depending on the design of the summer cottage and the requirements.


Flower pots
Usually bottles act as containers used for primary planting, but with skillful processing, beautiful pots and planters can be obtained.


Flowerbeds from plastic bottles
By giving the bottle physical processing in combination with other fixing materials, such as stones, you can mount an exquisite flower bed and, if necessary, paint over the resulting products.


birdhouses
Hanging products from bottles for bird feeders are made literally in a couple of cuts at the base of the bottle. With additional processing, the feeder can look quite aesthetically pleasing.


home decoration
All kinds of animal shapes, lanterns and even curtains can be made with a skilled hand.


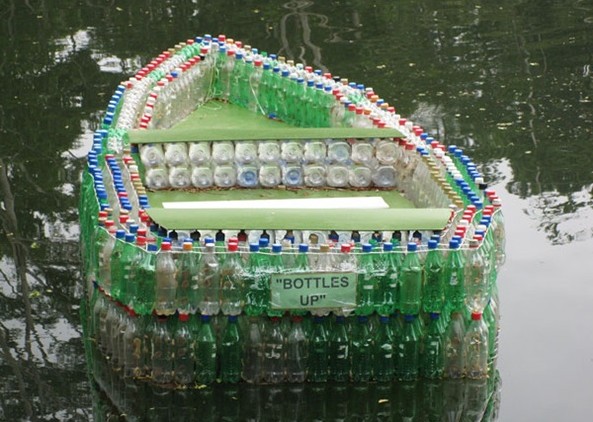
boats
With a certain number of bottles and a couple of video tutorials, you can make your own boat and go fishing.


Playgrounds for children
It is possible to cut figurines, slides, for plant lovers - artificial palm trees, flowers and much more.
Children's bottle slideLand cover installations
animal figures, aircraft and much more. The most popular crafts and instructions for making them are described below.
Swans-planter
In order to make an original design in the form of a swan, we need a certain number of large bottles (approximately 5-6, depending on the size of the bird), as well as:
- copper wire or any available metal;
- putty (finish);
- metal grid;
- tight material (bandages, gauze);
- knife (for shaping);
- spatulas of various sizes.
Step by step production:
- Cut a large bottle lengthwise, do not try to make two identical halves, this is completely unnecessary for crafts. The approximate shape as a result of such an operation should resemble a voluminous flowerpot. Next, pour in wet sand in order to achieve the desired deformation of the bottle.
- We fasten the wire to the lid, having previously made a hole in it. To facilitate this process, you can use a heated nail or hand drill. The wire will become the neck of the bird in the future. We throw the diluted putty on the prepared polyethylene bedding with a layer of 5-6 cm. Place a bottle of sand on the resulting kind of foundation, which was discussed in the previous paragraphs. Using a spatula and mortar, give the body of the swan the desired shape.
- Give the wire a curved shape resembling a neck. Fasten the knurled putty ovals onto the wire and secure everything tightly with gauze or bandage. The transition from the base of the swan to the neck should not be abrupt, otherwise the design will turn out to be unaesthetic. At the end of the wire, make a head out of putty, adding eyes and a beak.
- We attach a metal mesh to the body with a solution and get wonderful wings. A solution is applied to the mesh and the result should be wings of the shape you have chosen. The process is quite painstaking, so be patient and strong. Using spatulas, shape the curves inherent in the swan.
- After drying, sand the resulting product with emery. The next step is to prime the bird and paint, remembering to draw all the attributes of the swan's face.
cacti
Enough original idea and very easy to install. With the help of wire we make the base of the cactus and fix it in the ground. After, we dress the bottles of the required shape and color.
Cacti from plastic bottlesFlowers
To make plastic flowers, we need to have:
- knife and scissors;
- bottles of the required shape and color;
- paints and varnish for finishing works.


Step by step manufacturing instructions:
- Cut off the top of the bottle. Next, make a few cuts to the base with scissors. One strip should be wider than the next three, as it will represent the petal, and thin strips will play the role of stamens.
- Strips with a large width are cut with scissors, giving them a sharp shape. Thin strips are twisted with a knife and bent down.
- Petals - wide strips are painted with green paint or varnish.
- The stand is made from the remaining material by cutting the bottle in half, not reaching the bottom 4-5 cm. The middle of the bottom remains intact. Give the workpiece the appropriate shape and place on the ground.
Owl from discs and bottles
Necessary materials:
- bottles of different sizes (2 x 5 liters and 40 x 2);
- special glue (epoxy);
- self-tapping screws for fastening;
- discs and beads for the eyes;
- knife and scissors;
- styrofoam for framing.

Manufacturing instructions
- The outlines of the future face are organized by cutting it out of polystyrene, also take places for the eyes. With the help of packaging from tablet batteries, we make eyes. Inside the empty package we place the beads and pour epoxy glue there. After drying, the eyes are attached to the head. If desired, ordinary CDs can be glued in front of the beads, which will give the eyes a more interesting look.
- Having chosen a dark-colored bottle, a beak is cut out of it, which is then attached to the head in Right place. The rest of the bottle is not thrown away, you can make feathers out of it. After cutting, the feathers are glued along the counter of the eyes. Eyelids are cut out of the remaining plastic, which, when glued, should overlap the attachment points of the feathers.
- The next step is making the wings. Taking a large bottle, organize a frame for wings from it, pre-cut feathers from a two-liter bottle are attached to it. By gluing the feathers, you must close the mouth of a large bottle. Then, in several rows, attach smaller feathers, and bend the last row with a knife over the base of a large bottle.
- Using the second large bottle, make the base for the owl's body along with the back of the head. The body is glued with feathers in several rows, as are the wings. The part on which there should not be feathers is the back, everything else is covered with feathers in random order.
- Using self-tapping screws, we fasten the resulting parts (head and wings) to the body of the owl. Before that, glue the back of the head with cutouts from the middle of the bottles. The joints are also glued with feathers. After fixing all the details, paint the owl in the desired color.
bottle pig
Necessary materials:
- bottles different sizes(one 5-liter and 4 one and a half liter);
- aracal the color of the future eyes and nose;
- nails for fastening;
- knife and scissors;
- paints or markers;
- pen or pencil;
- paper.


Manufacturing instructions
- One and a half liter bottles are cut diagonally so as to get rid of the neck. The cut off part will serve for the hooves in the future. Draw the eyes, ears and nose on paper. Using a marker, move the drawn outline to the aracal. The part of the bottle left after the circumcision is used to organize the ears. From any bottle, cut the tail and give it a twisted shape with a knife.
- After marking the places for future attachments for the ears, hooves and tail, use a preheated nail to make holes. Details at the attachment points are notched and at the joints the resulting edges are bent for greater strength.
- The last step is painting the piglet. After it dries, glue the eyes and nostrils. Paint the hooves black. The piglet is ready, you can install it in a flower bed or anywhere in your summer cottage.
palm trees
Necessary materials:
- bottles of the desired color (green and brown);
- knife and scissors;
- copper wire or rod.


Manufacturing instructions:
- Cut the bottle in half, make cuts in the shape of teeth on the top. Prepare as many blanks as possible, as palm trees should be large.
- A metal pin or thick wire is attached to the ground. It is necessary to take care of the reliability of fastening so that the structure does not fall in the future.
- Plastic blanks are strung on a pin and bent over for a more natural structure of the palm tree.
- Green bottles are needed for branches and leaves. With the help of scissors, the bottom is cut off, and the rest takes on the necessary shape with the help of cuts. The shape of the leaves can be any, it all depends on your imagination.
- The last stage is fixing the leaves on the pins and connecting all the details into a common design. In order to fasten everything together, you can use welding or ordinary harnesses, which can be purchased on the shelves of any hardware store.
flowerbeds
Necessary materials:
- cement and sand;
- crushed stone or gravel;
- a tire or a barrel cut in half;
- bottles (can be glass).


Manufacturing instructions:
- Install the blank in the place of the future flower bed.
- Prepare a solution (mix cement with sand in a ratio of 1: 2, gradually adding water).
- Coat the workpiece with a solution (the layer must be sufficiently dense) and insert the bottles with their necks into the solution. When inserting bottles, follow the checkerboard pattern.
- After hardening to the bottom of the workpiece, pour gravel or slag to organize drainage. After, fill the flower bed with earth. The design is ready, now you can plant it with any flowers of your choice.
Crafts from the bottom (bottom) of the bottle
The bottles are cut (the lower halves are taken for work). The color scheme can be any according to your taste. After organizing the embankment from the soil so that a slide of the desired diameter is obtained from it, blanks from bottles are stuck into it. With a dense arrangement of bottles and the right color, original plastic buildings are obtained.
Ladybug from bottlesDecorating country beds
In order not to waste time on solid plastic crafts, you can simply decorate the site by making contours for the garden or paths using plastic bottles. The bottles are cut, the neck is removed to the point of narrowing, filled with sand or earth and dug in along the contour of the garden bed, flower bed or plot.
Gardening with plastic bottlesIf necessary, the bottles are painted, which gives your frame an even more aesthetic appearance. This type of decor is quite diverse, since it is possible to organize any shapes and colors according to your desire.
planter
Hanging pots or just mini flower beds are easy to make from plastic bottles. Cutting off the top, we get a straight pot, cutting off the bottom - cone-shaped, or the middle - for hanging models. After, the workpiece is covered with soil and the plants you need are planted in it. Bottles can be dyed or left clear. You can install models of pots along the path or decorate the fence with hanging planters.


bottle fence
Making a fence, in principle, is simple, such a building is very economical and will allow you to protect the site from the penetration of animals and other unwanted guests. For the construction, pins are used, tightly fixed in the ground, on which plastic bottles are strung.


Bottle gazebo
If you have the necessary material and free time, you can make a gazebo. To base the gazebo you will need a lot of wire and rods. The foundation can also be made from plastic bottles filled with sand or earth. If desired, the gazebo can be covered with a protective cloth or tarpaulin. Components of the bottle can be painted and easily replaced at any time.


Trap for bloodsuckers
To make a mosquito trap from a plastic bottle, you will need a two-liter container, which is then cut in half. Top part is turned over and inserted into the lower one, organizing a funnel, and the lower one, in turn, is filled with sweet water. Then the entire workpiece is darkened by painting or gluing. The trap is ready. To attract flies and wasps, you can add a little jam, honey or syrup to the container.
Scheme for making a mosquito trap from a plastic bottlePugach for moles
For this craft, make three cuts in the bottle, and bend the plastic so that you get the blades. Pour into the bottom of the bottle small stones, and put the bottle itself on a rod buried in the ground. In the presence of minimal wind, the structure will produce sounds that are not tolerated by moles.
Pugach from moles from plastic bottlesIrrigation structures
Bottles can also be used to water plants in your summer cottage. Uniform watering can be organized in several ways. A variant is possible with an incision in the bottom of the bottle and digging its neck into the ground. Before burying the neck, a hole is made in the lid, and grass is laid on the bottom of the hole to prevent clogging of the lid with earth.


You can also cut off the bottom of a plastic bottle and hang it over a flower bed or in the desired area of plantings. In this case, watering will be carried out through the neck of the bottle with a loose lid. Irrigation is regulated by more or less twisting of the plug.
Crafts from covers
When working with plastic bottles, a sufficient amount of corks may remain. Proper use of them can breathe new life into them and help avoid the disposal process.
Cover curtains


The organization is very simple, with the help of a drill or a thin nail, holes are made in the covers of different colors and with the help of a fishing line the elements are attached to each other and to the eaves.
Cork pictures
With some experience and a sufficient number of covers of different colors, you can make a wonderful decor for any surface.


When working with bottles of any size and color, make sure they can withstand weather your climate region. Before carrying out any operations, take care to remove the labels from the surface of the bottle.
Conclusion
Plastic bottles and caps do not have to be thrown away after their direct use, they can be indispensable decorative elements for your dacha. After reading this article, you will be convinced of the secondary rational use plastic containers and you can make good DIY crafts out of them.
Hi friends!
I continue the summer theme, last time we reviewed. Decorated the garden and garden with the cutest products, remember? We also took a look at what's new this year. Today we continue to draw up our sites, and you know what? Yes, regular plastic bottles.
With great popularity, such wonderful toys or how to call them creations are gaining more and more recognition among summer residents. Do you know why? Of course, because we all always have a couple of unnecessary bottles in the apartment that lie and gather dust on the shelf. So why don't we take and build gizmos from them that will delight not only the eye, but everyone around.
Ah-ha, let everyone go and envy such beauty. Or maybe they will come up with something extraordinary new and will brag to you. Along the way, soon competitions and exhibitions will be held in cities and villages, as well as competitions best work. And why not, so to speak.
After all, it's really great, and most importantly, it inspires everyone else to come up with cool and unique compositions year after year. Well, get acquainted with the content and quickly scroll through and look at the beautiful masterpieces that I tried to find on the Internet. Intrigued? This is good.
The PET material is lightweight and also durable, so you can easily and quickly make any thing out of it. I'll start by showing huge vehicles. Oh, and now there will be impressions.
Any bottles, even canisters, will do for this purpose. Look at how many jobs there are. If you have children, they will be interested in such products. Choose any work and make a whole composition on your backyard.

You can also take equipment or helicopters as a basis.

From a jar for shampoo, you can also make a masterpiece and get an airplane. Colorize acrylic paints so that weather conditions do not spoil the craft.

All the same, the furniture looks wonderful, it would seem, wow. Of course, here you need quite a lot of the desired material.

Entire houses are already cultivated and greenhouses and greenhouses are being built. Also, gazebos made of such waste materials began to be in demand.

And of course, furniture items such as chairs, stools and trash cans. Well, everyone will love it for sure.

You can also make an ottoman and place it, for example, in a bathhouse or in a gazebo. Therefore, do not throw away juice cans.


And under them place the mushrooms, and it can be fly agaric. Dream and success will come by itself.


They also make decorative ornaments for the fence, cut the bottoms of bottles and lay out plots.

They also decorate stumps and benches. It comes out bright and beautiful.

On playgrounds, as well as schools, flowers and the sun are cultivated. These are the most famous works.

And of course, you can’t do without flower beds and flower beds. You can even make it from one ordinary transparent soda bottle. What a wonderful mouse came out.

Or make ordinary pots and plant any climbing plant or a flower.

It looks pretty wonderful and cute, even look at the magic ball built.

Whoever is ready for something, then creates. It surprises us, but we take an example and do not lag behind.

This picture is also very beautiful, but imagine if you still plant daisies or other flowers and how it will all bloom.

Also unusual butterflies will be a great decoration. They will cheer up and make the interior even more beautiful.
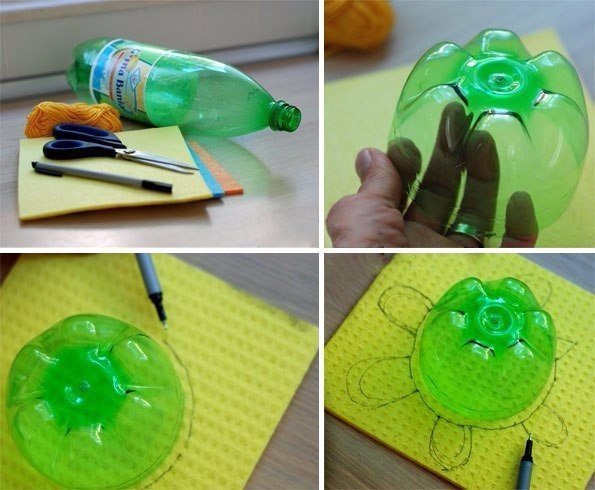
You will need a template, cut it out of paper, and then attach it to the bottle.

Circle and paint with acrylic paints, and then cut along the contour.

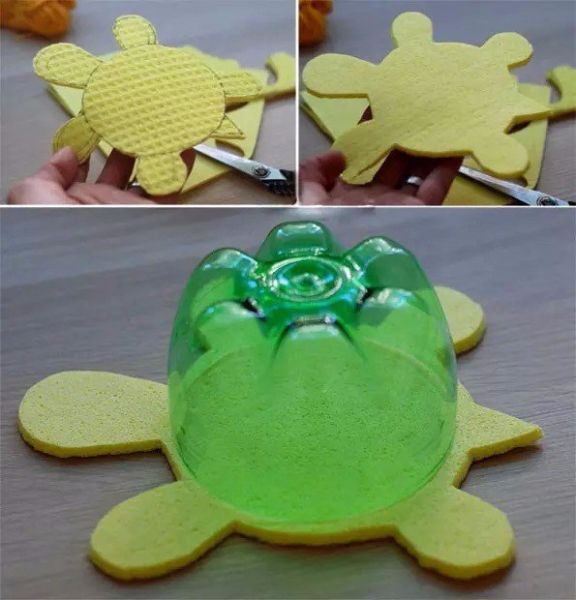
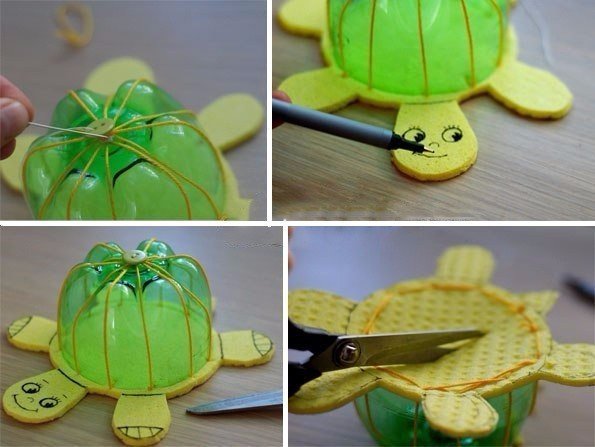
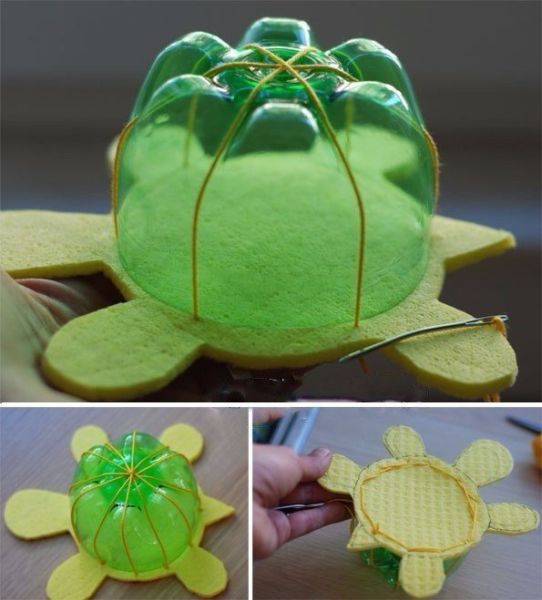
Or these funny turtles.

Make them with your kids and decorate the porch or dressing room. Here is a step-by-step photo instruction for you in detail, by the way, this is also a piggy bank.
Interesting works for beginners (photos and descriptions are attached)
If you are a beginner and you think that you will not cope, then you are deeply mistaken. Nothing is impossible, start with the simplest, and then choose something more difficult.
Look, what a funny pig turned out in the form of a wonderful flower pot, like a flower bed. Read the description right now.

And here is the end result. It remains only to cut a hole on top and place the seedlings there or leave it like that.

Also interesting idea from cans and bottles. This is such a person or a robot.

You will also need music CDs. In metal cans, make holes with an awl and thread the wire and connect one to the other.

Make the body from a large plastic bottle and also thread the wire to secure the arms and legs.

The eyes can be glued with a thermal gun, and the pupils will be beans.

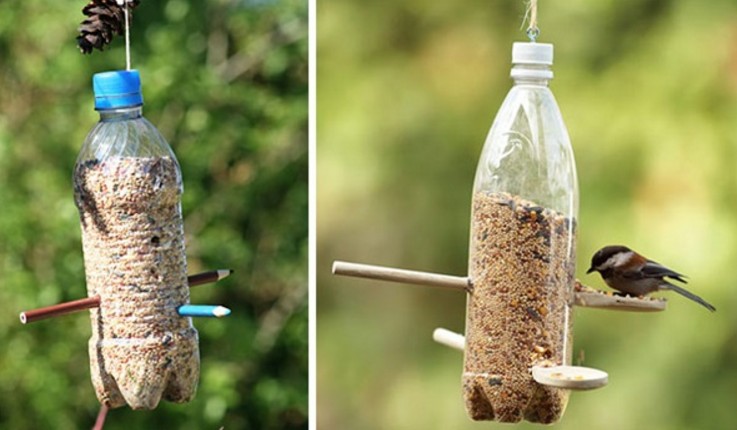
I also suggest making a bird feeder, it is done quite easily and simply. There will definitely be no questions. Cut off the top of the bottle as shown here.

Then use a knife to make a fairly large hole.

Connect like this, you get a roof.

Make holes on the cork so that you can thread a thread or wire and hang it on a tree.

Color with acrylics for fun and to attract birds.


Also, if you wish, you can make a hunting trophy.


Probably the simplest is a craft in the form of a beehive with bees. Paint any container yellow with paint.

On the lid, draw a muzzle, eyes and mouth with black varnish.

Glue the strips with black tape.

Well, already a real bee, zhu-zhu.

Only the wings are missing, draw them first on another vessel.

Then cut with scissors or a sharp utility knife.

It remains only to fix.

And such a bright flying charm will come out. Looks cool, doesn't it?

A cool bug, as my little one once called insects and bugs.

We make animals from plastic bottles
Probably many of you, when you got into this article, were looking for animals, because your dacha will certainly look great with them if you make them and seat them around the site.
Take this as a base step by step instructions with a diagram. I propose to execute waste material cockerel. Tape the three bottles together.

From multi-colored disposable cups, make an outfit for a rooster.

Of these, and feathers for the tail. But, it’s better to take disposable plates and cut off the edge from them, and then cut them. Use a glue gun or stapler to secure.

Now almost everything is ready, the head remains.

It can be made from any ball or ball, in this case, a ball for a children's pool is taken.

Draw or glue on eyes and a comb.

Now, as the animals promised, these are, for example, mischievous turtles.

Caterpillars, and they can be made from bottles and corks.

Cool options with horses and donkeys. Below, a master class will be shown, read on.

Cute pigs, one even winks at you.

Shown here are chicks and a sister fox from the fairy tale Gingerbread Man. Well, you can't do without a bear.

Look, a mischievous black cat, kittens and a poodle. And of course the brave peacock.

Frog princess, make sure if you have a pond. Bunnies and lamb.

And now, as promised, let's dwell on the donkey in more detail.

First, prepare the container for work, you will even need bottles of yogurt. Screw jar lids to the largest volume.

Then you need to make the head and neck.

This is the layout that should come out.

You can't do without ears either.

Straight really donkey came out, it looks like one to one.

Here is how the mane is done.

Don't forget to color in desired color, such as gray and white, use acrylic paints.

Then attach the box and why not another summer cottage masterpiece.

Here is such a scheme for cooking a peacock in my piggy bank, maybe it will come in handy for someone. More foam is needed.


By the way, have you thought about making a living zoo, for example, there will be giraffes and zebras in it.

And a boa constrictor or a snake will crawl nearby.

You can make a hedgehog from improvised means, taking more cones.

Or a scary toy in the form of a shark, you can have some fun at the same time.

Without birds, the garden is also not fun, make a dove.

Or a magpie, for example, here already give free rein to your imagination.

Of course, the place of honor is occupied by swans.

No area is complete without them.

Because they are very beautiful, straight queens.

You can create a ladybug from plastic spoons or cut out details from a bottle and paint it in the desired color.

But the hero from the cartoon Crocodile Gena, only Cheburashka is missing.

These are the clumsy elephants that escaped from the zoo.

And this bird really struck me, an owl or an eagle owl, and instead of eyes, CD-disks. Well thought out.

Also, such a bird, which symbolizes the birth of a child, is a stork. Plant it in cabbage, it will be quite elegant. True, you will also need plywood, wire, polystyrene foam and milk cans.


Master class on how to make a palm tree on the site
A tropical plant, like a palm tree, has long won the hearts of the inhabitants of Russia, it is it that often fills the interior in the garden. See this diagram and follow the steps you need.

And if you have any questions, you can watch the video.

In any case, you will understand, there is nothing difficult in this. So hoard stuff.)
What can be done with plastic bottles
Now I want to invite you to see the most unusual ideas that I came across. There will only be new items. I want to show such a Christmas tree from a green Fanta bottle.

They even make brooms and shovels for cleaning the territory. Great idea.

Unforgettable look topiary, take a look.

Or from traffic jams decorate fences and gates.

And in the villages, houses have already begun to be cultivated. How many of them you need to accumulate, horror.

But they even came up with the idea of using instead of a light bulb, the light and rays of the sun hit and illuminate the room in the attic.

Here is such a box for little things, or something else.

Take care of the birds, make them a feeder.
Or such an octopus will please your eye.

Girls and boys, nesting dolls and other little people.

And of course the flowers are lilies of the valley.

Or daisies, poppies, what do you like more?


And here are the lilies, how wonderful.

And someone can put a decorative teapot and a mug on the table.

We talked about butterflies above, and here is the dragonfly, but so huge.

Well, you can’t do without a washbasin, build one, especially since it’s still a great option if you go out of town for a picnic.
You can often find unique fences that can be made from bottles of dairy products.
Or decorate with strawberries, it looks just great.
 These are some pretty flower stands.

Or a watering device, screw the bottle onto the hose and make holes in it, you will get a spray, like from a watering can.

Who would have thought even cacti can be built, and even with thorns.

Also very popular are the minions, as they are to you.

Interesting ideas, right?

See you soon here. See you.
Sincerely, Ekaterina Mantsurova
We also recommend
 How to make a healthy banana smoothie
 Harvesting asparagus for the winter recipes for cooking at home
 Chicken pie with zucchini and cottage cheese Dukan's recipes zucchini pie with cottage cheese
 Gingerbread with icing
 How to cook a salad with crab sticks and carrots
 Cabbage salad with bell pepper - the best recipes