How to install a slatted ceiling with your hands. We mount the rack ceiling with our own hands: a master class with video instructions
When carrying out repairs in a room where high humidity is almost constantly observed (bathroom, swimming pool), a rack ceiling structure is often installed.
Her virtues:
- does not collapse from dampness;
- it is not subject to corrosive processes and the appearance of fungus;
- stable and reliable;
- it can be treated with detergents and disinfectants;
- it is possible to install any kind lighting fixtures;
- affordable cost;
- fastening the rack ceiling - the work is not particularly difficult and you can do it yourself.
Since the slatted structure is a type of suspension system, no preliminary preparation of the base base is required. The procedure for fixing a rack ceiling has a number of nuances that you need to know if you do it yourself.
Materials and tools for installation
Before a rack ceiling is attached, such as in the photo, they stock up on materials and the necessary tools for this, and then the work can be completed quickly.
You need these tools:
- tape measure and ruler;
- marker or pencil;
- building level;
- drill, perforator;
- pliers;
- screwdriver;
- dowels (self-tapping screws);
- metal scissors.

The design of the rack ceiling consists of the following main elements:
- decorative panel;
- guide rail;
- wall corner (angular profile);
- suspensions.
Marking
Always, before fixing the rack ceiling, you need to make markings, which are applied around the perimeter of the room. A U-shaped profile is then attached along this line. The size of the indent from the floor slabs depends on what will be in the inter-ceiling space. When they do not plan to place communications, cable, etc. under the rails on the surface of the base base, it is enough to leave about 5 centimeters, and then only for the convenience of work.

Also, before hanging the rack ceiling, they pre-mark the places for mounting lighting fixtures and make electrical wiring (as an option, use special clamps and self-tapping screws).
Installing the ceiling frame
It will help to create a rack ceiling with your own hands, an instruction that manufacturers of structures apply to a set of parts and elements.
The assembly is performed in the following sequence:

When a rack ceiling is created - how is it better to cut panels? Perpendicular cuts are made along the length of the excess segment with a knife and broken off by the method of flexion-extension. The extreme slats are tucked into the wall profiles with the cut side, and the second edge is placed on the tongues of the stringers. To make it convenient to mount the trimmed strips, they are installed penultimate, and the last elements are made 15 millimeters smaller compared to the rest of the panels. Read also: "
Overview of the main types of rack ceilings: aluminum, zinc, plastic. Analysis of how to install them. Do-it-yourself bathroom suspended rack ceiling installation guide.
In previous articles, we reviewed ceilings and ceilings from, today let's look at rack suspended structures.
Slatted ceilings, first appearing in the domestic construction market in the early 90s, and today do not lose popularity. They got their name due to geometric features, since they form such false ceilings from narrow aluminum or zinc slats.

Mirror slatted suspended ceiling
The reason for their special popularity is the attractive appearance suspended structure, under the walls of which you can successfully decorate the uneven surface of the main ceiling. In addition, they are famous for their ease of installation without the use of additional equipment. Therefore, to make a slatted ceiling in the bathroom with your own hands will be within the power of anyone.
It is enough just to correctly select the components and know key points construction installation.
Types and advantages of rack systems
The rack ceiling is a structure that includes a suspended frame system and facing panels. The material for the manufacture of finishing panels is most often plastic, galvanized steel or aluminum.

Scheme: rack system device
Polyvinyl chloride rack structures are lightweight, but low strength. Zinc ceiling rails are more susceptible to corrosion. And therefore, it is not advisable to install them in bathrooms and kitchens, the humidity in which often exceeds the threshold of 70%.
The "golden mean" can be considered aluminum panels, successfully combining the positive properties and galvanized counterparts. soft material not afraid of water and not subject to corrosion. Will save such a ceiling from extra costs in case of flooding by neighbors.
There are two options for installing rack shelves:
- Closed type - involves installation metal frame and installation of the panels themselves on it. In the gap between adjacent panels, an inter-rail insert is placed, which gives a decorative effect to the structure.

Scheme: installation of a closed-type rack ceiling
- Open type - does not provide for filling the inter-rail space. They form an integral and smooth surface.
Systems open type they have good ventilation, due to which they exclude the settling of water condensate on the lath surface. But regardless of the method of installation, the arrangement of the rack ceiling eliminates the need for the construction of powerful frame systems.

Scheme: open type installation
As for the aesthetic aspect, thanks to the variety of textures and a wide color palette, using rack structures, you can successfully implement the most daring ideas. Design ideas can be gleaned from photos on thematic forums on the net.
A spectacular design can be created using curly slatted panels. The arcuate elements help shape the curves, making smooth transition between two rooms different height ceilings.
Video selection: options for finishing kitchens with river ceilings
Suspension accessories
To make a slatted ceiling with your own hands, it is important to know the types and purpose of the main elements of the system.
All components that are used for mounting rack ceilings have a non-combustible base. And thanks to the dust- and moisture-repellent coating, the parts are durable and durable.
On sale there are rack ceilings that can be assembled, like a designer. An individual configuration of the suspension system is also possible, in which aluminum or galvanized panels can have non-standard dimensions.
The main elements of the rack ceiling are:
- Stingers - grooved planks designed to fix protrusions facing panels. They may have different sizes and are selected in accordance with the size of the rails themselves. These bars allow special trouble disassemble part of the structure for repair of failed engineering communications or replacement of damaged parts.

Accessories for rack and pinion false ceiling
- Suspensions - can be spring type or equipped with knitting needles. They are designed to hold the suspension system, preventing it from bending. Due to the length, the suspensions make it possible to lower the ceiling to a predetermined height, which allows placing ventilation equipment in the resulting niche or laying electrical wiring.
- Guides and intermediate profiles - necessary for arranging the frame. They are made of aluminum with a thickness of 0.3-0.5 mm. Length finished products is 4-6 meters.
- Facing panels - can be made of aluminum, plastic or steel. Often they have a mirror or embossed surface. The width of the rails ranges from 50-200 mm, and the length of the products can reach 10 meters.

Types of guides
Tip: To correctly calculate the number of rails, profiles and fasteners for installing a rack ceiling with your own hands, you can use the rack ceiling calculator. To carry out calculations, it is enough just to set the parameters of the bathroom, on the basis of which to obtain the exact volumes of material.
The sequence of installation work
Do-it-yourself rack ceiling installation technology includes a number of main steps:
- Surface preparation. At this stage, determine the height of the ceiling and the distance between the surfaces. These parameters depend on what will be laid in the intermediate niches, for example: pipes, ventilation ducts or cable ducts. The height of the interceiling space is also determined taking into account the dimensions of the selected lighting fixtures. For pendant lamps for halogen or LED bulbs at least 130 mm height must be provided. For the installation of recessed fixtures, it is enough to allocate the minimum area necessary for wiring and mounting fixtures.
Attention: In bathrooms, the height of the walls of which does not exceed 2.5 meters, the space between the ceilings is kept to a minimum. To do this, the stingers are fixed directly to the ceiling, leveling with special gaskets. For illumination in these cases, choose pendant lamps. The ceiling surface is leveled and cleaned, only after that they proceed to its marking.

Mounting a rack ceiling
- Surface marking. To install a rack ceiling with your own hands, you need a set of tools, which includes
- Roulette;
- Electric drill;
- Screwdriver;
- pliers;
- Metal shears or saw.
Markings begin to be made from the most even wall in the room. Stepping back from the base ceiling to the allotted distance for mounting the structure, a parallel line is drawn for the installation of the stinger.

Surface marking
Tip: In order for the line to be located in a horizontal plane, the masters recommend using the building level.
From this line, moving along the wall, parallel lines are drawn, maintaining an interval of 1.2 meters. Having drawn the main lines for the frame on the wall, points are marked on the ceiling surface for the installation of lighting fixtures.
Do-it-yourself technology for mounting a rack ceiling in a bathroom is clearly demonstrated in the video

Caring for a slatted ceiling does not require much effort. To remove contaminants, you can use traditional detergents. The washed surface is polished to a shine with a soft cloth.
How to install a rack ceiling: video
Rack ceiling: photo


Repairs have begun in your house, and you have decided that for the bathroom you will make a functional and modern slatted ceiling with your own hands. This is a good choice for a room with high humidity and high hygiene standards. Such ceilings are not affected by fungi and harmful microflora, are not destroyed by dampness and rust, are securely fixed and are easily processed with detergents and disinfectants. In addition, the rack ceiling is not burdensome for your budget and can be mounted independently, without the involvement of unauthorized hands. Like any suspended structure, such a ceiling design solution does not require pre-training the surface it forms.
It should be noted that such a ceiling can be made not only in bathrooms. Today, manufacturers create products so decorative that with the help of a slatted ceiling, you can create unique interior in a room of any direction of use.

classic slatted ceiling
We do the calculation and buy materials
Having decided on the type and color of the future ceiling, you will need to calculate the amount of materials needed.
- Measure the perimeter of the room - this is the total length of the U-shaped profile, which will be fixed on the walls and will allow you to make a neat connection of the ceiling surface to the walls of the room.
- Calculate the total length of the bearing combs - stringers. To do this, mark the ceiling perpendicular to the intended direction of the decorative panels, in increments of up to 1 meter.
- Determine the area you need ceiling covering, having calculated total area premises.
Now you can purchase a ready-made set of materials for your area or assemble it yourself, based on the calculations you made.
What will the master need?
In order to independently install the rack ceiling, you will need a set of tools and materials, consisting of:
- ceiling kit, which includes profiles, stringers and panels;
- suspension elements;
- perforator, drill and screwdriver;
- marker, building level, rulers and roulettes;
- knife, metal shears, pliers;
- dowel-nails and self-tapping screws.

Work begins with markup
The slatted ceiling in the bathroom or toilet, as in other rooms, is installed upon completion of all finishing works and is the final chord in the repair.
The most crucial moment in the installation of the ceiling is the marking. The first is the perimeter along which the U-shaped profile will be attached. If the ceiling is strictly horizontal, you simply draw a line at the desired height in horizontal projection. A multi-level ceiling will require more complex calculations. The indent from the top edge of the wall will depend on the filling of the interceiling space. If you do not plan to place anything above your decorative ceiling, then you can raise it as much as possible, leaving a gap of about 5 cm. The placement of fixtures or other communications will require more space between real and false ceiling.
The next step is marking under the stringers. Control whether the lines are parallel to each other and relative to the side wall, and perpendicular to the direction of the finishing panels and the end wall.
Video: rack ceiling assembly, part 1
Fixation of load-bearing elements
First of all, with the help of dowels, a U-shaped profile is fixed. Step back from the edges by 5 cm and drill holes, in the gap between the edge attachment points, with a step of about half a meter, make the remaining holes for the fasteners. Drilling must be done from the outside of the profile to avoid the formation of burrs, which can make it fit snugly against the wall.
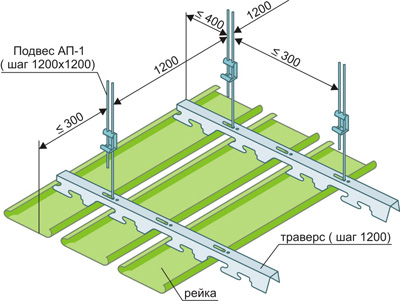
After the profile is fixed, prepare according to the marking of the place for suspensions, which can be made in various options– from plates to wire. The most convenient are adjustable suspensions, they allow you to accurately level the surface of the ceiling. Edge points are located 30-40 cm from the end walls, and intermediate points are made in increments of 1.2-1.5 meters.
Now you can fix the stringers - tires with grooves on which the ceiling slatted panels are fixed. Their length should be such that there is a gap between them and the wall profile of about 1 cm in order to compensate for the deformation of the material during temperature changes.
final assembly
Before installing a slatted ceiling, you must cut the panels to the desired length. To do this, they must be made 3-5 mm shorter than the distance between the profiles into which the ends of the panels will be inserted. After that, you can start assembling the ceiling surface. The panels are inserted into the grooves of the stringers until they click, which indicates that the edges of the rails are firmly fixed on the tongues of the tire.

If the last panel does not fit in the remaining space, it will have to be trimmed. To do this, a deep marking of the cut point is applied along the entire length with a knife, perpendicular cuts are made on the part to be removed, and the pieces of the panel formed by them are separated by breaking off due to bending and unbending of the metal. After that, the edge panel is tucked with the cut side into the wall profile, and the other edge is fixed on the tongues of the stringers. For ease of use, the trimmed panel is installed penultimate, and the last one is 14mm shorter than all the others.
During the installation of all panels, you led them into the wall profiles diagonally. And the latter will first have to be shifted to one side, bringing the first edge into the profile as much as possible, then insert the second edge into the profile and return the panel to desired position, at which both its ends are evenly located relative to the walls. After that, fix it on the carrier rail.
Video: rack ceiling installation, part 2
Additional points in installation
When planning a rack ceiling, consider the direction of the lines formed by the joints of the panels. Usually they are located from the window to the opposite wall. narrow room visually change the proportions when the panels are transversely arranged. AT square room well perceived diagonal stripes on the ceiling.
If the room is large, you will have to splice the panels, for which intermediate liners should be included in the kit, which allow you to give a neat look to the junction.
Rack ceiling allows for. To do this, you need to make holes for them. You must draw in right place the panel with a circle of the required diameter, and from its center to the outer line, use metal scissors to make radial cuts, bending the resulting petals into the ceiling space. The already the petals will be obtained, the better the installation of the lamp will be.

Rack ceilings can be varied complex shape, and you can illuminate the room with built-in spots.
The choice of ceiling finish is daunting task. Especially for rooms with a high threshold of humidity. The most practical option in this case may be an aluminum rack ceiling. Its features, attractive appearance make such a ceiling perhaps the most popular option.
Practicality and reliability of rack ceilings made of aluminum
These coatings have a number of advantages:
- Ease of installation.
- The ability to dismantle the entire structure or individual sections.
- High quality coatings.
- Moisture resistance, which allows the use of this type of ceiling finish in rooms with high humidity.
- Long life, wear resistance.
- Environmental friendliness.
- Good reflective feature.
Varieties of aluminum rack systems

Structural elements
Aluminum rack ceilings are a structure consisting of:
- Stringers (another name is traverses or combs) are load-bearing elements that are used to fix the lamellas.
- Adjustable suspensions, ensuring the reliability of fastening the combs to the draft ceiling surface.
- aluminum slats.
- Decorative elements - plugs and profiles. The latter are represented by corner strips that mask the space between the ceiling surface and the walls.

The most common are the following three types of coatings for aluminum ceilings:
- Cassette. The surface of the ceiling is decorated with aluminum sheets in the form of squares or rectangles.
- Rack got this name because they are used in interior decoration.
- Designer - separate view , more expensive, but distinguished by originality and sophistication.
The device type assumes two types:
- open- with gaps between adjacent rails.
- Closed. Presented with a smooth surface with tight-fitting panels.
The main characteristics of the rack aluminum ceiling
Technical features
Despite the variety of manufacturers, the parameters of the rails are similar to each other:
- Lamellas and decorative caps are made from aluminum sheets. Between themselves, they differ in thickness.
- The appearance of the rack panels is represented by long three- or four-meter strips. If rails are required bigger size, they can be made custom order. The maximum length of one panel is 6 meters. Such lamellas are usually installed in spacious high rooms, as standard rooms are smaller.

- The edges of the rails are bent in a special way, which makes it possible to securely fix them to the stringers.
- The slats are either solid or micro-perforated. The front surface is decorated with various color shades and textured finishes.
- The stringers are made in the form of U-shaped profiles with carved tongues on the edges, which securely hold the lamellas. Through holes are made in the upper part of the tires for attaching them to suspensions. Standard length equals 4 m.
- Depending on the material of manufacture, the stringers are either aluminum or galvanized steel.
- The thickness of the rails is 0.3-0.6 mm.
openslatted ceilings suggest the formation of small gaps between the panels (up to 16 mm). Traverses are visible through them.

decorative appearance this system acquires through the use of special layouts that are installed between adjacent rails. They are produced in the same colors as the main coating, or differ in shades from the panels. The layouts are smaller in size than the main rails, then they “sink” into the gap formed. Or match the dimensions of the panels. In this case, their fastening is carried out flush with the rails, resulting in a flat surface.
Closed slatted aluminum ceilings mounted with a tight fit of the panels to each other. The principle of installation resembles the laying of lining. Such an installation is also carried out using traverses, but without the use of decorative overlays.

The installation and installation process of rack suspended structures are not difficult, therefore they can be carried out independently.
On a note! Experts advise to pay great attention to the correct fixation of the rails to the frame.
Installation of a suspended structure takes place in several stages:
- Markup.
- Frame installation.
- Panel fastening.
- Installation of decorative caps.
Before starting work, carefully read the instructions so as not to damage the material. Professionals suggest that you first make the correct calculations, the accuracy of which depends on the success of the work. It's also a good idea if you're trained to use power tools. But even without such skills, you will be able to mount the rack aluminum ceiling with your own hands.
What materials are needed for installation

You need to buy in advance:
- Combs.
- Rails of the desired length.
- Starting aluminum or galvanized profile.
- Decorative caps.
- Fasteners - dowels and screws.
Material calculation
- For the frame. The profile is sold in standard sizes of 2.5 or 3 meters. To calculate its quantity, you need to know the perimeter of the room. Divide this figure by the length of one profile strip and get the number of elements. If the total number is not a whole number, round it up to the next whole number.
The installation of the guides is carried out in a parallel direction every 100 cm, the first is installed 40 cm from the wall surface. Calculate right amount meters of traverses by adding. And divide it by the length of one stringer.

Suspensions are calculated in the same way. To fix one profile to the wall surface, four self-tapping screws are enough for you; the suspension is attached to the base ceiling with one self-tapping screw. Count the number of hangers based on the number of guide rails. One guide profile must be mounted on four hangers.
- For rails. In this case, you need to take into account the type of aluminum slatted false ceiling - open or closed.

We have calculated the minimum amount of materials that you will need to install the ceiling. To make the work go smoothly, it will not be superfluous to add 10%.

To install an aluminum ceiling from rails, prepare the following tools:
- level or level;
- roulette;
- perforator;
- simple pencil;
- screwdriver;
- scissors or a hacksaw for metal.
Ceiling markings
Before you do it yourself, you will need to mark the rough surface. The procedure will be as follows:
- If you plan to install chandeliers or lamps on the ceilings, then outline their locations in advance.
- Step back from any corner 15-20 cm down and mark on the wall the required distance from the ceiling. In this case, the height of the lamp must be taken into account.
- Using a level or level, put another mark from the previous one at a distance of 50 cm.
- Mark points through the same gap along all the walls of the room.
- With paint upholstery thread, connect all the marks to each other.

First you need to make a frame for a new ceiling:
- Measure the wall and cut the profile to size with a grinder or hacksaw for cutting metal materials. So prepare it for all the walls.
- Attach the profile to the wall surface with self-tapping screws every 50 cm and install wall corners.
Important! The wall corner is pre-fixed by cutting its edges at an angle of 45 degrees. Holes are drilled in the corner, the element is fixed to the wall.
- Install hangers. They must be on the same level.
- Measure the length of the stringers, cut the material, and fix the bars flush with the profile in a perpendicular direction to the slats in 100-120 cm increments from each other.
- If the stringer is not long enough, add material to the existing plank.
Installation of aluminum lamellas

After you have installed the tires, you can proceed to the installation of the main cover:
- Remove from planks protective film, cut the products to the desired length. They should be 3 cm shorter than the gap from wall to wall.
- Fill the lamella into the comb and fix it along the entire ceiling. Do this with all rails except for the last one.
Important! Immediately pay attention to the evenness of the ceiling, adjust it with suspensions.
- If the finishing ceiling batten is wider than the remaining uncovered section of the ceiling, cut it along in a straight line with a construction knife. Bend the rail in different directions until it breaks.
- Close the gaps with decorative inserts.
Slatted aluminum ceilings in the interior (photo)
Such designs may vary in design. Because of this, they are increasingly being used to decorate ceilings, not only in rooms. public purpose, but also residential buildings and apartments.

Regardless of the type of installation (open or closed), you will be able to create original interior with the inclusion of these structures.
Can pick up decorative elements, which will match the color of the main coating, or differ from it in shades, creating trendy design solutions.

Currently, rack ceilings are available in different color variations. Silver, gold and white tones continue to be the most common. You can find on sale lamellas with images printed on their surface, glossy or matte textures.
Choose an Italian or German design for your ceiling and your room will sparkle with new colors.
How to make a slatted aluminum ceiling in the bathroom with your own hands video
You can also order rack ceilings and install them yourself. This will be discussed in today's article. Calculate required amount rails and place an order, you can link .
Suspended rack ceiling is designed for residential premises and premises with high humidity. In apartments, such a ceiling is used almost exclusively for bathrooms, and on this page we will tell you ...
The advantage of this design is the ease of installation, and if necessary, such a ceiling can be dismantled and mounted again.
Now let's move on to the installation instructions. Do-it-yourself rack ceiling installation starts with markup. Along the perimeter of the room at the desired level, we mark the place of attachment of the U-shaped profile.
Do-it-yourself rack ceiling installation
For the convenience of fastening the profile, we advise you to pre-drill holes in it with a diameter of 6 mm at a distance of about 40 cm from each other. And one more tip - drill the profile from the outside, not from the inside. If you drill holes from the inside, then metal burrs will remain on the reverse side, which in the future will not allow the profile to fit snugly against the wall.


 |
 |
 |
|
 |
|
How to make a rack ceiling in the bathroom
The rack ceiling mounting technology allows, depending on the distance from draft ceiling to suspended, choose one of two options for attaching the stringer.

In our case, the second mounting option will be used.
Stringers, according to the manufacturer's instructions, are installed parallel to each other at a distance of no more than 1.2 meters. We make the appropriate markings on the ceiling and mount the suspensions.


When joining a U-shaped (end) profile with a stringer, the upper shelf of the profile must be cut with metal scissors and bent up.
 |
 |
 |
After that, we hang the stringer on the suspensions and install it in the prepared grooves on the end profile.
 |
 |
 |
|
 |
|
The ceiling rail is attached to the stringer by snapping it into the groove of the stringer.

Installation of the ceiling rail begins at one end. According to the rack ceiling installation technology, the rail is wound diagonally into two end U-shaped profiles, aligned and snapped onto seat stringer.
Note (added 03/11/2016). However, with a large width of the rails themselves (from 15 cm), this technique is not entirely suitable, since their diagonal is increased and the rail does not go obliquely into the end profile. We recommend installing with the technique used when installing the last rails for all types of ceilings ()


When installing the last two ceiling rails, before installing them, it is necessary to measure the distance from the wall to the last installed ceiling rail. If this distance is not a multiple of the width of the ceiling rail, then one ceiling rail must be cut.

Ceiling strip cutting.
Mark the bending and cutting lines along the entire length of the ceiling rail. The distance from the bend line to the cutting line is 14 mm. After you have marked everything, we draw a knife along the bending line, but do not cut it off. Then we strongly draw a knife along the cutting line.

To avoid warping of the ceiling rail, cut the part of it that will be cut off with scissors into pieces of 30 cm, and alternately bending the pieces up and down, break them off.

Then we bend the trimmed edge of the ceiling rail inward along the pre-marked bending line. This is necessary in order to fix the trimmed rail in the U-shaped profile.

The cut ceiling rail is installed with the cut side against the wall. Lastly, we install the final rail. This rail is made shorter than the others by 14 mm. Next, one edge is inserted all the way into the end p-shaped profile and is inserted into the opposite p-shaped profile with a reverse movement, after which the ceiling rail snaps into place.

Installation of fixtures in the rack ceiling.
On the ceiling rail, a circle is outlined under the lamp. Then, with a clerical knife, we cut along the outlined line, but do not cut it off. After that, we cut 3-5 cm with a sharp corner of the knife, pick up the cut-off part with pliers and pull it down. The rest is thus easily torn off along the notch. This is the simplest and fast way cutting holes on ceiling rails for further installation of fixtures.
We also recommend
 How to make a healthy banana smoothie
 Harvesting asparagus for the winter recipes for cooking at home
 Chicken pie with zucchini and cottage cheese Dukan's recipes zucchini pie with cottage cheese
 Gingerbread with icing
 How to cook a salad with crab sticks and carrots
 Cabbage salad with bell pepper - the best recipes