Fixtures: production at home for the apartment and the street. How to make a ceiling lamp yourself - ideas and tips
A chandelier in any room has long been not only a device for lighting. It would not be an exaggeration to say that this is the piece of furniture that acts as the main decoration in any room.
Of course, a do-it-yourself chandelier will be a particularly valuable thing. This will not only highlight the special taste of the owners of the house, but also their creative mind.
Despite the fact that deciding to make a lampshade with your own hands for a chandelier, you will need to spend a lot of effort, because the process requires special concentration - for sure, the time of work cannot be considered wasted, since the work will bring incredible pleasure and even a pleasant aftertaste will remain after, and in the future you will definitely want to repeat this kind of work.

If you are thinking about how to make a chandelier, then you have probably already seen that today you can use a variety of materials for this, and sometimes quite unusual ones. For example, very often the ceiling for a chandelier is made of wood or glass.
However, if you want something even more incredible, then you can also use cardboard, wooden skewers, and even wine bottles. The choice here depends solely on the ideas that the creator has, as well as on various kinds of wishes from the owners of the apartment.

In addition, a chandelier made from improvised materials must also be created taking into account the general interior of the room.
Chandelier made of plastic spoons
Disposable spoons, which most are accustomed to using exclusively for a picnic, can actually also be one of the simplest and at the same time easily accessible materials for everyone to create an interesting version of a chandelier in any room.

If you look at a photo of a chandelier of such a plan, you will first of all be struck by the variety of colors, and in the future it will be easy to understand that the material will last a long time.

In addition, in order to create such an interesting piece of furniture, you will need a minimum of financial and material investments.

What materials will be needed?
- Any empty plastic bottle. The only condition is that its volume cannot be less than five liters.
- Any plastic spoons. Their number depends solely on the chosen size of the future chandelier.
- Glue that will allow you to glue the plastic together.
- Cartridge from an old, no longer working chandelier.

The process of creating an original chandelier
Prepare a plastic bottle. First of all, you need to get rid of the label and the bottom, as well as dry it properly.

Remove the plastic spoons and use a knife to remove any handles that are not needed. The only thing to do is to leave a couple of centimeters above the so-called “scoop” level.

Glue the blanks to the base of the prepared bottle. On the "tail" that remains, you need to apply as much glue as possible and then press it to the surface.
It is very important to continue to cover the entire bottle in this way directly in a circle until the entire prepared perimeter is “occupied” with plastic spoons.

It is best to arrange them in a classic checkerboard pattern and move them together a little.

In this way, it will be possible to reduce the number of "free spots" to a minimum.
- The cover is removed from the old cooked chandelier and placed in a dried bottle.
- If there is a desire, then decorative more often can be done in a similar way.

That's all. It remains only to install the chandelier in the chosen place, and also check its operation by connecting it to the power supply.

Another interesting chandelier option is the chandelier with decorative butterflies. It is worth noting that, having gone to almost any master class for making a chandelier, designers always offer to learn how to create it, which is not surprising, because it can fit perfectly into almost any room interior.
Note!

In addition to the fact that this option looks really luxurious and expensive, even a child can make it with the help of an adult, so its popularity is easily explained.

DIY chandelier photo


Note!


Handmade items fill the house with special warmth and comfort. Plus, they are exclusive. We offer an overview of lamps that will completely change the atmosphere in the room, turning into an object of envy from the groans of friends and relatives. Moreover, they are made from everyday items that are usually thrown away.


A cardboard bag for juices or other drinks is a common thing in most homes. Most of the time it gets thrown away. But the Malay designer Edward Chu spent a lot of time to cut them into hundreds of strips and build amazing lamps from them without a drop of glue, a simple origami principle.

Yaroslav Olenev proposed to make lamps from disposable plastic spoons and became the winner in the nomination "Ecology and Design" from the magazine "Future Now".


No less original application was found by Natalie Simpson for ordinary wooden hangers. But they look amazing in the form of a chandelier.
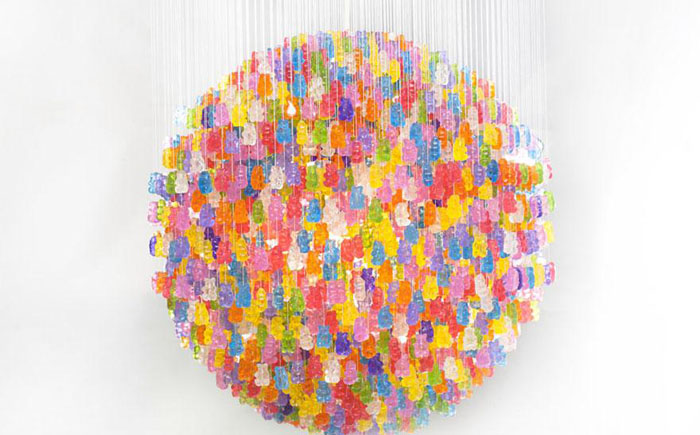

Kevin Chempeny must be given credit, not everyone has the strength and patience to string 14 thousand bears to get a chandelier.

Tira Hilden and Pio Diaz have their own vision on the problem of housing lighting. Thanks to their lamps, the room becomes like a forest. All walls come to life and turn into trees.

Talented welder Matt Ludwig was also an excellent designer. For JJ's Red Hots restaurant, he made an incredibly original chandelier from an old drum set.

Texan artists Joe O'Connell and Blessing Hancock made stunning lamps from old bike parts and hung them in a tunnel under the highway.

It will probably be difficult to find a more original chandelier than a pumpkin from a Polish artist. It carves stunning patterns on the peel that do not repeat.

Felt hat lampshades from Jeeves & Wooster look original and stylish.

Once Heather Jennings saw an amazing Rhododendron chandelier in the store, only it cost more than $ 800. Then the designer decided that she could do just as well with her own hands. To do this, she needed paper molds for cupcakes.
11. Chandelier in the kitchen

A chandelier made of ordinary metal tetrahedral graters will look incredibly beautiful.

Still fresh in my memory are vases and candy bowls made from openwork napkins. Now it's time to knit chandeliers.

Fansois Lego offers a strange option, he believes that the best way to store cutlery is a chandelier.

A large cloud is cut out of wood, but the rest and the switch are made of cardboard.

A few globes can make a wonderful cascading chandelier, a great way to light up a flight of stairs.
Lighting devices can not only dispel the darkness, but also give an unusual aura to your interior.
There are many different ideas with which you can make a wall lamp or any other type of lamp with your own hands.

You yourself are able to create a masterpiece that is not in any store.
Creating an extravagant chandelier
A very original thing is obtained from the simplest materials, most of which can be saved after a picnic. Lamps from various containers will look spectacular.

For this you will need:

- oval plastic bottle with a capacity of 5 liters;
- disposable spoons;
- cable with cartridge and plug;
- low power LED lamp;
- pliers;
- glue gun;
- screwdriver;
- stationery knife.

To avoid fire, use only LED bulb!

With a knife, carefully cut off the bottom of the bottle, then remove the handles from all plastic spoons. Apply a small amount of hot glue from a gun to the cut point, glue them on the bottom of the container.

Approximately you will need about seventeen pieces. Place the next and remaining rows in a checkerboard pattern.

In order to hide the neck of the bottle, put ten to twelve spoons without a handle on the glue so that they form a ring.

Pull the cartridge with the lamp and cable through the hole at the bottom of the bottle.
If you do not want to make this part yourself, you can purchase it in any department of household goods - the wire, socket and plug are already connected together.

Make a hole in the lid for the cord by drilling it with a drill or a hot self-tapping screw. Screw on the lid, put on the previously prepared ring of spoons on top. The exclusive LED luminaire is ready for operation.

A few ideas for creating lampshades
It is enough just to create a lamp from improvised materials for a house or a summer residence.

Idea N1
- any hollow dishes (it can be an old pan or flower pot);
- wire;
- polyurethane foam and gloves;
- paint and brush;
- sharp knife;
- pliers.

Place the object taken as a basis upside down. Wind the wire around the product the way you want to see the lampshade, since all the turns copy its shape. Put on gloves and squeeze the foam a little bit onto the frame so that it completely covers the wire, leave to dry.

Then, using a knife, give the contours more evenness and paint in any color. This option will be the best for a street lamp.
Idea N2 is a classic
- thick wire;
- pliers;
- small water bottle.

Note!
To make the upper central element on the bottle, wind a coil of wire, then remove it and cut off the excess. The ends must be fixed so that they form a ring whose diameter should allow the cartridge to pass through at the bottom, and prevent it from coming out at the top.

Next, you need to make a large outer ring from the wire. To secure it, you will need four equal pieces of wire. Connect one edge of each with a small one, and the other with a large ring. The upper part of the lamp is ready.

The largest will be the lower circle of wire, it must be attached to the second upper one, evenly placing five identical pieces of wire.

To decorate the frame, pass the wire through the second upper ring, giving it a wavy shape, wind it onto the base. Do the same for the bottom ring.


Note!
On a walk through the forest, take an interestingly shaped branch with you, an excellent wooden lamp will come out of it. Wash the branch and peel off the bark from it with a knife, varnish it for wood. For good stability, screw the lamp to a heavy stand with screws, it can also serve as a tree.

A better option is an oak, find a broken branch and saw off a circle of at least five centimeters thick from it. Coat it with varnish or paint it too.
Making a lampshade with children
There is an option for making a lampshade with children. For the frame, you need a canister or bottle with a capacity of five liters. You need to roll the paper strips into a tube, it is best to wind them around a pencil or sushi stick, then glue the remaining edge with glue.

These blanks must be glued to the frame in several layers so that there are no gaps. When the glue dries, you can put the lampshade on a table lamp or make a ceiling lamp that looks very unusual.

Experienced needlewomen can knit or crochet a lampshade, decorating it with knitted flowers and ribbons.

To give the product the correct shape, you can use a starch solution or ordinary PVA glue. Look at the proposed photos of knitted lamps, how much tenderness and comfort they have!
Note!


This article told you how to make a lamp with your own hands. Using the information received and your own imagination, now you can create an exclusive lighting fixture for any room.
DIY lamp photo


The cosiness and comfort in the room depends on the lighting. You can make your home atmosphere full of warmth by making a lamp with your own hands. Ideas that will help you make an exclusive and fashionable lampshade with your own hands and at minimal cost can be gleaned from this article.
Pendant lamp in the interior
Training
What you need to know before making a lamp:
- It is recommended to use LED or energy-saving light bulbs, creating your own designer lamp. Standard incandescent bulbs get too hot and can damage its structure.
- If the finished lamp is disassembled, you need to be extremely careful with the wires, and after finishing, make sure that they are intact.
- There are bulbs of several color temperatures. When creating a pendant lamp for the home, it is worth opting for a “warm” shade.
A clear example for distinguishing color temperature: the larger the number on the box, the higher its temperature, and the colder the shade of light it has.

Light bulb color temperatures
Frame selection
Before you make a lamp, you need to prepare the base. Most often, it is a pair of rings to which a backing of cardboard or plastic is attached to give shape.
The following ideas will help resolve the issue of finding the basis of the future lampshade:
- You can make this type of frame yourself, with only wire and pliers on hand.
- Frames are sold in hardware stores or in needlework shops.
- Often in the flea market there are old lamps, where you can get the frame.
- Instead of a frame structure, the lamp holder can hold the neck of a 5 liter plastic bottle. Therefore, there is a solution in the figure below.

DIY lampshade
Lighting Ideas
There is nothing complicated in decorating a pendant or table lamp with your own hands. But it is better to draw a sketch on paper before starting work. The process will be simple and fast, and changes can be made along the way.
"Live" lamp
This designer lampshade is called "Photosynthesis". It was designed and implemented by an author from Tel Aviv. The frame here is represented by a metal mesh, at the base of which a houseplant is placed. As it grows, the flower fills the entire interior space of the lamp and makes the design of the room look summery and fresh. It is not necessary to use a special light bulb here, a regular LED light is suitable for plants. Making such a pendant lamp is not too troublesome. You can add variety to its decor, given what accessories and tools will be available.

Suspended "live" lamp
When making such a lamp with your own hands, you can not use an overly heavy pot with a plant. Particular attention should be paid to the insulation of the wiring and run it along the supporting wire.
Making a lamp with your own hands from fabric is a great solution, because a large selection of colors and textures allows you to realize many creative ideas and create decorative lampshades for a room with any interior. First of all, you need to prepare the necessary materials:
- the cloth;
- adhesive tape or self-adhesive film;
- ruler or centimeter;
- scissors;
- simple pencil;
- metal rings for the frame;
- binders;
- tassel;
- glue;
- strip of paper.
Sequencing:
- Before you make a lamp, you need to determine its shape. For a fabric product, a cylindrical base is ideal.
When deciding on the height and width, you should take care that the base is not too close to the light bulb.
- It is necessary to cut a rectangle from the adhesive film and a flap of fabric, the edges of which are 5 cm larger. Attach the fabric to the table with the film, face down.
- Find the most beautiful pattern on the fabric that should be on the lamp and use a ruler to draw corners and a dotted line.
- Align the fabric and stick a film on it.
- Using paper clips-binders, fix the lampshade on the surface of the frame from below and above.
- With a pencil, mark the edges and the side that will be on top. Glue the parts of the lampshade to each other, let them dry.
- Turn the structure over, apply glue to the edge and insert a wire ring. Fasten with binders, let dry. Repeat the procedure on the other end.
- Glue a strip of paper from the edges. After it dries, glue the fabric strip on top. Do the same on the seam on the side of the lamp.
DIY fabric lampshade
If you make small triangular cuts in the paper while gluing it, it will bend better.
There are other ideas on how to make a lamp with your own hands. Using various materials and accessories, you can create no less impressive decorative lampshades from thread, paper and other improvised means.
photo collage
To make such a designer lampshade-photo frame, you will need:
- frame, as in the previous example, or a finished purchased lamp with a clean white lampshade;
- several sheets of tracing paper;
- scissors;
- PVA glue;
- simple pencil;
- printer (recommended to use an inkjet).
Having chosen the most beloved and beautiful photos, you need to make a collage with the help of photo editors. You can collage images by cutting them out of paper. This method leaves a lot of space for a creative idea: any decor can be applied to the lamp, not just a photo: a drawing of a child, a motivating aphorism or a map of a favorite area.

DIY table lamp photo collage
Before you make a lamp out of photographs, you should make sure that the paint dries. It is strictly not necessary to bend the paper sheets of tracing paper, because the place of the bend will always be evident.
Rope Sun
Creating such a pendant designer lamp is much easier than it seems. Required tools:
- threads;
- glue (for wallpaper or PVA);
- petrolatum;
- balloon.
Initially, the already inflated balloon is lubricated with petroleum jelly. This is necessary so that threads do not stick to it. The threads are dipped in glue and wrapped around the ball. After the product dries, it is blown off and removed. Rope sun crafting completed.
What needs to be done to make the decor of the lamp as successful as possible: firstly, you should first “get your hands on it” and make a couple of small lamps for testing. Secondly, before winding the threads on the ball, you need to mark the place where there should be no threads. Through this hole, the ball will be removed, and the light bulb will be inserted.
Making a lamp
To carry out the decor of the lamp is half the battle. The main thing is a quality work done without sad consequences. Therefore, the following factors must be taken into account:
- If a luminaire hanging from the ceiling is connected, the junction of the wires and the product itself must be covered with a protective cap.
- If during operation, the light bulb gets very hot, the designer lampshade surrounding it should not be too close. That's why you should use low incandescent bulbs.
- If the product is heavy, it is strictly forbidden to hang it on wires. For this, special rods, cables or brackets are specially provided for mounting on walls or ceilings.
- To illuminate a room with high humidity: a bathroom, a sauna or a bath, it is better not to implement your own ideas for making a lamp with your own hands, but to buy and install a special product that contains moisture protection.
- During the installation of the lamp, the wiring must be insulated to exclude the possibility of injury to the master and his relatives.
With my own hands. Video
How to create a LED lamp with your own hands from improvised materials, this video will tell.
Decor made of paper, photographs, threads, fabrics and any other means has its own advantages over finished products bought in a store. With a minimum of costs and time, decorative lamps not only decorate the home, but also emphasize the originality of its owner. DIY modeling of lighting fixtures is an opportunity to realize your creativity, decorate the interior and bring relatives together for joint work.
Decorating the house on your own is a favorite pastime of many hostesses, this article reveals how to make a lamp with your own hands. You can revive the interior of a living room, bedroom or hallway with the help of improvised means, only by changing the ceiling of a chandelier, floor lamp or table lamp. Do-it-yourself lampshades for lamps can be used not only in a residential interior, but also in the halls of cafes, pubs, pizzerias.
The choice of materials and lamps for the lamp
Products made for children's rooms should be made from natural non-toxic materials and painted with environmentally friendly paints.

When manufacturing, fire safety should also be taken into account, so lampshades made of combustible materials made of paper, plastic, feathers or threads should only be used with lamps that have a low heating temperature.

You need to use LED or fluorescent lamps. They have a number of advantages:
- long service life;
- minimum heating of the base from the glass part;
- light has three shades: warm, cold, neutral.
In addition, such lamps are also called energy-saving, their only drawback is their high cost.

It is also desirable that the connection of the wire to the base be made by a specialist. You should not try to perform this operation yourself, as this may lead to undesirable consequences. It is more convenient to decorate an existing ceiling frame or make it from durable and not very heavy materials.

The following materials are used to create fixtures: scissors, a mounting knife, fishing line, wire, pliers, a hot gun, in some cases it can be replaced with super glue. They should be used by an adult, it is unacceptable to involve a child in gluing. Since in one case he will get a burn, and in the other he can glue his fingers or stick to the details of the future product.
What can you make a plafond from?
Many craftsmen make lamps from completely unnecessary materials:
- from plastic or glass bottles;
- newspapers, thin or colored paper;
- artificial or natural threads;
- dried branches of an unusual shape;
- disposable spoons;
- old disks.

plastic lamp
From plastic containers of different sizes, a homemade chandelier is easily obtained.
- For the base, you need to take a bottle of 5 liters. The bottom is cut off. Then circles with a diameter of 1.5 cm are drawn on the surface. They must be cut with a mounting knife or small scissors.
- The bottom is cut off from the bottles for decor and the entire surface is cut with scissors into strips 0.5 - 1 cm wide, then the workpiece is heated over the lit burner. Under the influence of heat, the stripes will take on a chaotic appearance.
- Then blanks are inserted into a 5-liter container with holes, and lids are screwed on the inside. Then a wire is threaded through the large neck and a ceiling is installed. For such a ceiling, you need to use an energy-saving lamp.
- In some interiors, you can find a fancy lamp made on the basis of an ordinary hanger or a straw hat. In general, nothing can limit the scope of the imagination of both home craftsmen and professional designers.
Plafond from glass bottles
A very interesting version of a homemade chandelier is obtained from glass bottles. They are used to decorate the halls of catering establishments. It is also a good option for a kitchen in a residential building or apartment. This can be a ceiling, consisting of one or more bottles, in which the bottom is cut off. You can do this yourself, but it is better to use the services of a workshop where glass and mirrors are cut.

How to use thread
For a lampshade made of threads or ribbons, you will need: a ready-made frame made of strong wire, threads of different colors, scissors, glue.
- The frame consists of two rings interconnected by metal segments. It can be made independently from durable wire.
- One color or several shades of thread is required.
- A thread is fixed on the lower part, then it must be pulled through the upper ring, lowered down and thrown over the lower ring. It is necessary to ensure that the thread is taut and the coils fit snugly together. As soon as the thread ends, you need to attach the next segment to the lower ring.
- Carefully cut off the rest of the threads and glue them on the back.

Spoons for the lamp
You can make a multi-tiered, colored lamp from ordinary disposable spoons.
- It is necessary to make a wire frame, for a small round lamp you need to make three circles with a diameter of 12, 18, 26 cm. Then the circles are fastened together with a fishing line. The largest diameter will be at the top, there should be the same distance between them.
- In spoons, you need to make a small hole with a thick needle at the top of the handle.
- Spoons are painted with acrylic paints in three colors, for example, yellow, orange, red.
- Assembling a homemade chandelier: the fishing line is cut into a length equal to the distance between the circles. A spoon is tied to one end of the fishing line, and the other to the frame. Yellow spoons should be tied to the lower circle of small diameter, orange to the middle one, and red to the upper one.

Lightweight and sleek shade
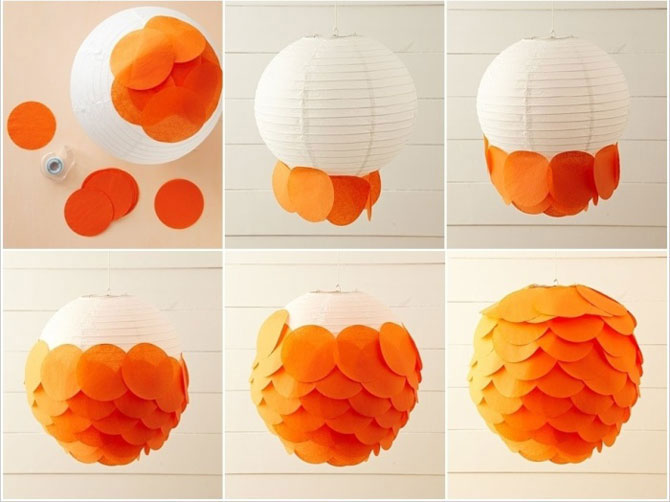
For a paper ceiling, paper or thin cardboard is suitable. Such a ceiling can be either rectangular or square. First you need to consider the size of the ceiling, the larger the room, the wider the design can be. In a small nursery or hallway, a ceiling with a diameter of 30 - 35 centimeters will look good.

The frame can be made of wire, it will consist of an upper and lower part, consider the manufacture of a cylinder-shaped ceiling.
- It is necessary to make two circles of wire of the desired diameter. They are interconnected with a fishing line, the distance between the lower and upper frame is 12 - 15 cm, the hoops are fastened with a fishing line in three or four places. The larger the diameter of the base, the more connecting elements must be made.
- On a paper blank, you can draw circles of different diameters, figures of cartoon characters. Outline drawings can be taken from the Internet and printed, then redrawn with carbon paper. A special ruler is suitable for drawing circles, or you can outline caps or buttons of different diameters. Some drawings are cut out completely with a clerical knife, some are cut along the contour.
- The paper is tried on the base and glued with an overlap. Then glued to the wire, can also be fixed with a thin wire. To do this, first make a hole in the paper with a thick needle or awl, then thread the wire and carefully tie it to the frame. It is advisable to glue thin paper, as it is easy to ruin it.

Exclusive ceiling made of metal cans
- Basins made of any metal are used, an interesting option will be obtained from copper or aluminum containers. An old, used basin will also work. If there is a through hole in it, it must be welded or sealed, for example, with epoxy.
- The inner surface must be painted in a light color so that the light reflects from it as much as possible.
- The outer surface can be painted in a dark, saturated color, in harmony with the interior.
- A fringe about 5 centimeters long is glued to the bottom of the rim with hot glue. In the central part of the basin, it is necessary to make a hole for the wire. It can be drilled with a drill or pierced with a nail.
Such a ceiling can be decorated with a mosaic of CDs. To do this, the disks are cut with sharp scissors into small fragments, which are glued to the outer surface of the pelvis. You can glue only the bottom contour, and paint the rest. Or decorate the entire surface of the ceiling with such a mosaic. The more convex the surface, the smaller the disk fragments should be.

natural materials
The original lamp can be made from a dry branch of an unusual shape. It must be cleaned of bark and covered with stain, then, if desired, treated with transparent varnish. The branch must be attached to a hook on the ceiling with a regular fishing line. Then I wind the wire with the lamp several times onto the branch. A branch entwined with several wires looks beautiful.

You can make a lamp out of plastic hangers. Detailed in the video:
Lamps in different rooms
DIY bottle chandeliers are more suitable for the kitchen. Designs made of glass or plastic will be easy to clean from dust and wash if necessary. For the kitchen, hallway or living room, a lamp made of natural wood is suitable.

For a children's room, a ceiling made of painted plastic bottles, a floor lamp made of bright threads or a paper composition is more suitable. The latter option cannot be called durable, but this option will appeal to children. Girls will like the plafond with butterflies, plant elements, boys will like designs with cars, superheroes or bright plastic plafonds.

In some cafes, pubs, original lamps made from bottles are used to decorate the hall. It could be beer bottles. They can serve as both a lamp shade and an interesting frame for a lamp.

Ideas for homemade lamps by location
With your own hands, you can give a new look to the floor lamp. You can decorate the ceiling with fabric, threads, paper with cut-out patterns, and you also do not need to ignore the base and leg of the lamp. They can be painted with acrylics, glazed, decorated with beads. The decor of the lower part of the floor lamp should overlap with the elements in the upper part. The easiest option is to decorate the ceiling of a solid color with lace or guipure.


Decoration of lamps
The lower part of the plafond of threads can be decorated with pompoms of the same size hanging on a thread. They are glued on the inside of the frame with glue. Pompoms can hang at the same or at different heights. They can be made in one color or combined in several shades.
To decorate paper lamps, you can use lace, thick tulle, beads of different sizes. You can decorate glass jars or bottles with glass pebbles, which can be purchased at hardware stores. You can also use buttons of different sizes and colors. Small buttons can be glued even on PVA.

On New Year's holidays, it is customary to decorate the Christmas tree, but you can also decorate the ceiling lamps, floor lamps. Here you can use the usual rain, do-it-yourself snowflakes, Christmas tree figurines, decorative balls and an ordinary garland. If an energy-saving lamp is installed in a wall or floor lamp, then its ceiling can be decorated with paper snowflakes.

Wall sconces are installed in living rooms, bedrooms, children's rooms. After repair, you can use old sconces only by changing their appearance. You can paint the body of the lamp in a light color, and apply bronze or silver paint on top with a hard bristle brush to create a patina effect. If the ceiling is glass, the pattern you like is applied to its surface using a glass stencil. Here you can use contour (they are used to create a stained-glass window) or spray paints.
We also recommend
 Smartphone xperia z5 premium black
 Download toilet paper business plan
 Description Nokia X2 dual sim on the Android platform, powerful processor and support for two sim cards
 Is it possible to open a hostel in an apartment?
 Services to the public: the most promising business ideas
 How to start farming?