How to change broken tiles in a bathroom. Replacing tiles on the floor
Some novice owners have no idea how to remove the tiles from the floor if suddenly one of them is damaged. The problem often lies in the fact that it is impossible to hide such a flaw, and you don’t want to call a team of masters to eliminate it.
Accordingly, everything needs to be done quickly, independently and preferably without the use of complex tools. And, oddly enough, it is indeed possible.
Main problem
It is worth noting that before replacing a broken tile, you need to take care of the material to replace the old one. Indeed, the dismantling of tiles is the least of all the owner should worry about. floor covering, because, as they say, breaking is easier. The first thing the master needs to do if some kind of tile on the floor is cracked is to find not just a similar one, but the same one.

The bottom line is that most people don't care about having spare tiles that may be needed during the life of the finished floor. Almost all construction stores every season they update their range with new collections, and remove the remnants of the old tiles from it.
Thus, damaging the tile even after six months of operation, you run the risk of not finding an analogue in trading network. This rule is especially true for tiles purchased at a sale with discounts.
Therefore, before going to the store, take a picture of the cracked tile, and write down the dimensions just in case. This will allow you and the staff involved in the sale of tiles, with maximum comfort for you to choose an analogue.
note
Ask the consultant in advance if he can sell you one tile, and not a whole package, for example.

Only after that it will be possible to safely carry out the removal of tiles and other related operations.
Preparatory activities
Before replacing the tiles on the floor, you need to take care of a number of auxiliary tools. These include the necessary tools and expendable materials. In preparation, the last category will include:
- tile adhesive(purchased or prepared by hand);
- primer for tiles;
- putty or silicone for filling joints;
- beacons (plastic crosses);
- masking tape (optional)
As for the toolkit, it will depend on which method you choose to remove the tiles. For example, a chisel will be needed for those who want to dig out tiles by hand, and an electric drill for those who want to make their task easier. But even in the second case, a chisel will come in handy.

In addition, it is worth taking care of the presence of protective gloves and construction glasses that will protect you from dust and fragments obtained during the work. The best way to collect them - a vacuum cleaner, since it will be difficult to collect all the sharp fragments by other means.
Don't forget about the tools you need when laying new floor tiles. This is a notched metal spatula for glue, a brush or roller for soil, as well as a plastic roller for puttying joints.
And take care of the rags a little bigger size than the product, do not forget the water. It is useful when mixing glue, as well as for soaking tiles before laying.
Dismantling or complete separation
Removing the tile is a couple of trifles, if there was an opportunity and the tile on the floor came off, by the way, this is not the worst option, because it leaves due to intensive use of the coating or due to the use of low-quality adhesive. Much worse, when the tile just cracked, it will be more difficult to remove it.
Expert tips: how to remove cracked tiles from the floor
The presence of a compact perforator will greatly simplify the task. Just a few precise blows and the coating can be cleaned of ceramic fragments. Although most often at home there are no such tools, but there is an electric drill with which you can weaken the structure of the glue and the product itself.
note
To avoid unnecessary problems, you need to mark the edges of the tiles with masking tape, and cut the seams with a grinder, which will protect the rest of the floor from damage.
To do this, several randomly located holes are drilled in it, taking into account that the distance between them will not exceed 2 cm. After that, we remove some of the pieces with our hands. The rest is usually broken into more well-aimed parts with a chisel. By the way, it can be replaced with a chisel and a hammer.
In the absence of an electric drill, moisten a rag with water and put it on the damaged area so that the fragments do not scatter around the whole room, and make a couple of precise blows with a hammer on the chisel. After that, the tile cracks and is divided into small fragments that are not difficult to remove.

After that, break up the remaining adhesive, remove it and inspect the prepared floor surface. In the process, accompanying problems can be detected that caused cracked coating elements to appear.
For example, it can be a swollen subfloor or something similar, which can serve as a repeated manifestation of problems. If you do not get rid of them, the floor may crack even more after its restoration, and the coating will have to be dismantled again.
Broken tiles are thrown into construction garbage or used as a secondary raw material for garden decor.
A little more and finish
Before replacing broken tiles on the floor, it is necessary to prepare an adhesive solution. If you already have a ready-made dry mixture, you need to dilute it with water according to the instructions, and if not, replace it with a cement-sand mixture diluted with PVA glue and water to the consistency of thick sour cream.
The tiles prepared in advance to replace the dismantled tiles are soaked in containers with water to gain moisture. This operation will avoid premature drying of the adhesive composition.

Next, you need to cover the prepared surface with two layers of soil using a tool prepared in advance. This will bind unremoved dust residues on the surface, as well as improve adhesion with the adhesive.
After that, a layer of prepared glue is applied to the surface and its excess is removed using the notched part of the spatula, creating a wavy texture on the surface. Then you need to press the tile on top, and install beacons on the sides. If they suddenly did not appear - it does not matter.
They can easily be replaced with pieces of matches or a chopped ballpoint pen. To avoid distortion, they need to be installed 2 on each side, and if glue residues are visible in the seams, then using the same beacons it must be removed.

When the damaged tile is replaced, they wait for a technological pause for the glue to dry and then remove the beacons.
At the final stage, the seams are filled with silicone or grout, depending on what was used earlier, they are leveled, and the residues are removed with rags to avoid stains on the surface.
note
The shade of new and old tiles can be very striking. To prevent this from happening, use floor varnishes after the putty dries. They will even out the tone and give additional protection.
Finishing the floor with tiles is the most optimal solution for the kitchen, corridor, bathroom, pool, gazebo and other premises that require a strong and easy-to-use surface. However, very often, due to damage or wear, it becomes necessary to replace part of the trim. Before starting work, you should learn how to remove the tile from the floor without damaging it, because it will be needed when re-laying it in its original place.
Causes of Defects

Lagging of tiles from the floor surface is a fairly common occurrence, which usually occurs as a result of the work of inexperienced craftsmen and a violation of masonry technology. In rare cases, only one tile peels off, usually in violation of technology, peeling occurs in places of greatest impact on the material. So, what to do if the tiles on the floor have come off? First of all, you need to determine the cause of the detachment. There may be several main reasons:
- The presence of voids. The voids under the tiles are the reason for the weak fastening and as a result of constant impact when walking, the tiles peel off completely. If, when laying the material, the adhesive composition was applied only at the corners of the tile in order to save money and the area without glue is more than 15%, then such a tile will soon fall behind. The presence of voids can be determined immediately. If, when walking on the floor, you hear how the tile is baying, making a dull sound, then there is not enough glue under it and the coating will need to be shifted again.
- Poor quality glue. If the tile staggers when walking, but the glue was laid over the entire plane, then the reason may be an expired adhesive or a composition that is not suitable for this type of tile. For example, if glue mastic was used to glue tiles near the fireplace, then when heated, it begins to harden and lose its holding properties. Also, mastic is not used in rooms with high humidity. In such places, only cement-based tile adhesive or special liquid nails are used.
- Quick dry floor. If the tile came off along with the adhesive, then most likely quick-drying mixtures were used to level the floor in order to speed up the repair speed. Quick-drying floors contain polymer and other components that prevent the cement adhesive from sticking. In such cases, it is necessary to use other types of adhesive without cement components for laying the tiles.
- Poorly prepared surface. If the tiles on the floor have fallen behind along with the adhesive, then the cause may be poor preparation of the base, which did not provide the necessary adhesion of the adhesive to the surface.
For your information. Often when laying tiles on a wooden base without properly securing the sheets of wood, when walking, you can hear the tiles creaking on the floor. The creak is obtained as a result of the friction of the tile modules against each other, which leads to the destruction of the grout and further delamination.
- Moisture getting under the tiles. Moisture can get under the tiles as a result of poor-quality grouting or poor drying of the base before laying. Moisture that has fallen under the tile does not evaporate anywhere and causes the destruction of the adhesive structure, and also contributes to the formation of mold. If the tile has lagged behind from exposure to moisture, then it will also lag behind along with the glue and the floor must be dried well before laying. Therefore, before gluing tiles to the floor, make sure that the surface of the base is dry.
Important. It is very important to choose the right grout for the tiles. Regular grout has a porous structure and absorbs moisture well. It can also dry out and crack under the influence of high temperature. Therefore, it is necessary to select a grout with the necessary technical specifications depending on the type of room and the operating conditions of the tile.
Methods for removing damaged tiles

Damage to one or more tiles due to the above reasons is not a reason for grief, but a reason to wonder how to repair a chipped tile on the floor or how to glue a fallen tile on the floor. After all, the problem can be solved independently, without resorting to the help of specialists. To do this, it is enough to have a minimum of tools and basic knowledge.
To replace one fallen off tile you will need:
- instruments;
- repair mixture and glue;
- grout to match the old;
- accuracy and slowness during dismantling.
Required Tools
Depending on the base on which the tile is attached, and on which mortar it was laid, the choice of tool for dismantling it depends.
- Concrete or brick base, tile adhesive, grouted joints:
- middle hammer;
- spatula, flat-end screwdriver;
- scraper for cleaning seams;
- warm water and dish sponge;
- electric drill.
- Cement strainer, cement mortar, joints with cement mortar:
- turbine with stone disc for cleaning seams;
- warm water and rags - for wetting the grout;
- chisel or impact screwdriver - for dismantling small fragments;
- medium weight hammer.
Removal Technology

Removing one or more damaged tiles in order to replace them will require the use of technology that will keep the adjacent masonry intact.
If tile adhesive was used to install the tiles:
- Work should begin by removing the grout from the joints around the damaged tile. Using warm water and a sponge, loosen the seams and remove the grout with a scraper.
- The edges of adjacent tiles are pasted over with a protective adhesive tape. This helps to protect them from damage during dismantling.
- With a pencil or chisel, the diagonals of the damaged tile are drawn under the ruler, the rows of holes are carefully marked along the diagonals with a core.
- The marked holes are drilled with an electric drill.
- With a chisel and a hammer, connect the holes in a line.
- Starting from the center, the tile is chipped off in small pieces. As you approach the edges, the chisel is kept parallel to the plane of the tile.
- For final cleaning, use a spatula or chisel.
- Finally, the protective tape is removed, as it has served its purpose.
In the case where the damaged tiles have been laid on the cement mortar, it is recommended to use a turbine with a stone disc for cleaning the joints, or, for thin joints, a multi-tool with a thin disc.
Work is performed in protective glasses and gloves. When working with a turbine, use a respirator. Otherwise, the process is no different from the one described above. Now the question is how to remove old tiles from the floor in the bathroom, kitchen or hallway, will not torment you with its uncertainty.
How to remove tiles without damage
When, during the repair, it is planned to completely replace the tiles on the floor, and the old tile still has a completely “commodity” appearance, you can resort to a complicated option - this is dismantling while preserving the old tile.
It is not always possible to successfully complete the task, since it is very difficult to change the tiles on the floor. A satisfactory result is only achieved if a special tile adhesive was used to lay the old tiles. When high-quality cement mortar and skillful hands of the master were used for installation, the chances of removing the tile and not damaging it are almost unreal.
Tools and materials:
- hammer;
- scraper;
- putty knife;
- flat screwdriver or knife;
- chisel with a wide blade;
- water and sponge;
- perforator with a shovel;
- chisel.
Step-by-step instruction
Preparatory work:
- Loosening grout in tile joints. Use warm water and a sponge.
- Removing grout with a scraper, screwdriver or knife.
- In the case of cement filling, the use of a turbine. Cutting seams to the base.
- Mandatory rinsing of the workplace with water after cleaning.
Tile removal work:
- The most crucial step is the removal of the first tile.
- With a chisel with a wide blade and a hammer, slowly carefully tap the first tile along the contour, trying to pry and lift it. The appearance of a dull sound upon impact indicates the readiness of the tile to separate from the base. You can use a spatula - wetting and scratching the glue under the tile along the contour.
- After removing the first tile, you can continue to remove the remaining tile in the same way.
- You can also switch to using a puncher. Gently putting the end of the spatula to the edge of the next tile, and not reaching it, deepening to the base.
- 3-4 recesses are made - along the edges and closer to the middle, each time slightly lifting the tile.
- As a result, the tile should easily separate from the base.
Removal of glue and cement residues from the tile surface

Thoroughly hardened traces of glue, cement and other construction dirt present a certain complexity and require application. various means for their elimination, including chemical ones.
Acid-based products (Atlas, Keranet) effectively help to solve the problem of cleaning:
- dust and simple dirt are removed with a wet cloth;
- a remover is applied to the surface of stains and pieces of hardened glue with a sponge;
- following the instructions, wait for the glue to soften;
- the remains of glue and chemicals are cleaned with a sponge with a sufficient amount of water.
For best results, use a cleaner of the same trademark, which is the glue used in masonry.
It is possible to clean the old tiles removed from the floor from the remnants of glue or cement mortar using a nozzle on a drill or grinder in the form of a round brush made of steel wire. You need to work with care so as not to leave marks on the front side of the tile.
If it was still not possible to remove the cement mortar, the tile is soaked for a couple of hours in warm water and then cleaned with a sharp chisel or spatula.
In severe cases, you can resort to chemicals, which are capable of destroying and removing the structure of cement. They can be purchased at hardware stores.
Repair of chips and cracks without removing tiles

During operation, minor surface damage inevitably occurs. tiles. It can be an accidental scratch, chip, crack. Before taking drastic measures to replace the tiles, it makes sense to try to eliminate or mask the defect.
For thin small cracks, a method based on the use of a mixture of cement and very fine sand in a ratio of 1: 1 diluted with water is used. Ready solution in a circular motion rub the cracks until it penetrates deep enough. Good results are obtained by using a soft spatula for grouting.
The problem with chipping is solved differently. All sorts of materials help with this. From silicone to hard waxes and colored heat sealers to repair cracks, cavities and chips. Separately, it should be noted the use of epoxy and polyester adhesives.
For repairing chips and cracks in tiles matte surface polyester glue is used with the addition of special dyes. If the tile is glazed and has a glossy texture, an epoxy adhesive with dyes is used.
To achieve maximum color matching, the selection process is carried out by applying tinted glue directly to the chipped area. When the color is selected, the chip is cleaned of glue (acetone can be used), the surface is dried, a hardener is added and the chip is finally sealed. After hardening, polishing is carried out with a dense cloth.
There are plenty of situations when it is necessary to replace one tile on a finished cladding. Each case has its own characteristics and approaches. It all depends on the conditions: “what kind of tile, what kind of grout and where it all is located.”
The reason for the replacement can be different: a chip on the tile from a metal object falling, a difference between the tiles on a thick layer of glue, a crack due to voids. Tiles can "just" fall off over time.
Consider to the maximum, all possible replacement options.
How to "easily" remove ceramic tiles from the wall.
The video does not give a complete picture because this is the simplest case:
- The tile was glued to the paint. A little more and she would have disappeared by herself.
- An important preparatory moment is not indicated - cleaning the joints from grouting.
- Grout in specific example- the simplest. This is not always the case. It can still be epoxy or the same, cement-based, but by MAPEY. Such grouts hand tool do not remove.
Replace tiles on drywall.
How tiles hold up on drywall
Removing tiles from drywall and installing them back is easy once they fall off on their own. If it holds up, then how lucky. And "lucky" will depend on the glue used, the quality of drywall and the quality of installation - how much "crazy hands" did it :
- GKL of low quality, poor contact of the upper layer - paper with a gypsum base. Rejection of the tile will easily pass through the layer of paper, no matter what glue is used.
- "Crazy hands" can help if when facing: do not prime the surface, apply glue in the heat, on the entire wall, do not take into account that the tile has increased water absorption, and use the simplest glue.
But if you are unlucky - the stars did not match from the conditions listed above, then you can try to remove it with a sharp spatula. As an example, take the following video. Although the wall there is not made of drywall, but the method is working. The spatula is soft, so it will not break the sheet. A narrow and sharp blade will help cut tile adhesive without breaking the base:
In any case, before removing the tile, you must first remove the grout from the joint. If you do not do this, then instead of one tile, you can remove all one at a time. Due to the grout in the seams, the tile is held by the entire array. Raising one, we pick up the next one. You can not remove the grout, but then you need to break the tile from the center, into pieces, with a chisel.
How can I remove old grout between tiles?
How to remove the grout depends on the grout mixture. Cement-based grouts, similar in quality (price) to CERESITE and below, are removed with various hand tools. Most good option- construction knife with replaceable blades. The knife must be with a good fixation of the blade, otherwise the blade will constantly fall out. The knife (4) is convenient in that it is possible to renew the tip.

HAND TOOLS FOR REMOVING OLD GROUT.
In addition to the knife, there are many more options. From a hacksaw blade for metal to a screwdriver.
But all devices are not very effective, even a specially invented product for this operation (3). The last tool already has a more advanced version:

THE EVOLUTION OF THE TOOL FOR CLEANING THE SEAM.
Epoxy grout can not be removed by any of the listed devices. Need another tool:

TOOLS FOR REMOVING DIFFICULT GROWS.
MAPEI grout (and its analogues) can only be removed mechanically:
- Dremwell (4).
- Multifunction tool (2).
- Angle grinder with a cutting wheel for tiles (3).
- Screwdriver with a special nozzle:

NOZZLE ON THE SCREWDRIVER FOR REMOVING THE GROUT FROM THE JOINT.
How justified the use of DREMEL (4) when cleaning the seam is difficult to say. But if we analyze the comments of the “bourgeois”, WHICH HAVE MORE OPPORTUNITIES TO PURCHASE SIMILAR TOYS, the conclusion is not comforting:


More productive multifunctional tool (2). Its advantage is that there is no dust when removed.
How to remove one tile on a warm floor.
This situation occurs when everything is fine with the tile, it is intact and holds firmly. But heating cable under it, stopped working.
A good idea for situations like this, in the next video. The tile that needs to be removed before being beaten with a hammer is covered with a towel. The fragments do not scatter all over the floor and, most importantly, do not fly into the eyes. Goggles are not always available. The video is also interesting because it clearly shows how the tile is held on the Schluter®-DITRA-HEAT membrane:
How to glue one tile when replacing.
If you use tile adhesive, then for one tile, you need 200 gr. Glue is rarely sold by weight. It makes no sense to buy a bag - if you do not use it, in a month it will seize in lumps. For the same reason, it is reluctant to sell in small portions.
You can use other gluing options - Velcro glue, silicone, moment glue (liquid nails). In order not to make a mistake in choosing, such an adhesive in the list of glued surfaces must have ceramic tile or ceramics, brick.
One of options- Lacrisil.
Many craftsmen use LACRYSIL glue when laying tiles on a thermal joint if it is not possible to combine the tile joint with the separator:

GLUE "VELCO" FOR LAYING TILE ON THE FLOOR.
The peculiarity of this glue is that it dries longer. You can find many tests that are carried out with him and give a negative review. You need to carefully watch how the tests are carried out:
- The surface is often not primed. Glue on water based- a dry film is formed, and there is no contact.
- applied pointwise, small areas Don't pick up the tile for control. Apply to only one surface to be bonded.
"Lacrisil" is also interesting because it is sold in various packaging: from 1 kg to 5 kg, even 200 gr. - in tubes.

VARIOUS ADHESIVE COMPOSITIONS.
Use of glue on acrylic base convenient in that you can not remove the old tile adhesive under the tile and on it. It is enough to brush its surface a little with a tile edge (a couple of millimeters). Clean the recesses, prime and fill with silicone or Velcro. Apply glue to the tiles. For silicone, the surface must be dry and free of dust.
- Tiles are numbered before dismantling.
- All dismantled tiles are glued with tape - so as not to break.
- The glue is prepared simply and reliably - PVA + cement.
You need to number so that each tile lies in its place. The point is not only that the sizes of the tiles can be different. Cheap tiles and the curvature of each tile can be different. If such tiles fall out of place, thin layer glue is difficult to align.
In this particular case, the tile fell off, most likely due to the fact that it was not wetted when laying on the mortar. This is the case when the tiles necessary before laying.
The liquid mixture (PVA + cement), which is used for gluing, will be drawn into the ceramic structure and cannot be torn off a second time.
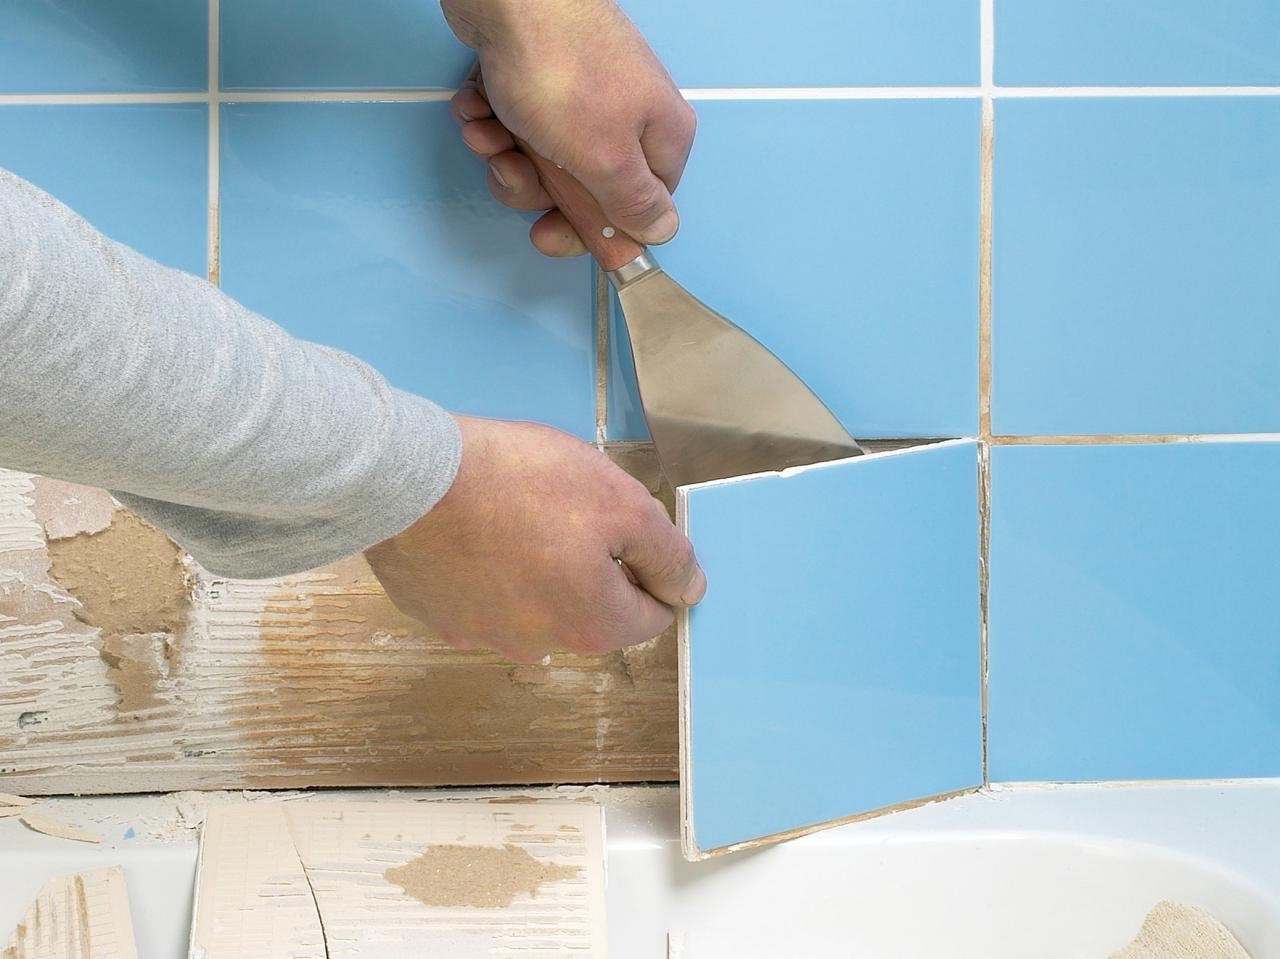
How to remove one tile without damaging it.
This is the most difficult question and arises when there are no tiles to replace.
To remove the tile without damaging it, you need a special tool (2) and luck. This tool has a vague name - a spatula-scraper (there may be others). Distinctive feature- a durable canvas that makes it possible to pick up a tile with a lever. The wide blade allows you to cling to the tile over a large area without breaking it into pieces.
The scraper must be inserted into the cleaned joint, while the adjacent tile must be protected from possible chipping. To do this, first insert the paper from the tile package, folded in half, into the seam. Then insert the scraper. The paper should be located near the adjacent tile to avoid chipping. Press on the scraper. If it doesn’t blow up right away, shake it from different sides. Break somewhere.
Something like below in the video. It's hard to say how much water helps. Perhaps it helps.
This is not always possible. On tiles without a beveled edge and with a thin seam, it will not work:

TILE WITHOUT BEVE EDGES AND ON A THIN JOINT.
If it is decided to lay the tiles on a cement-based tile adhesive, then the reverse side of it must be clean.
Hand tools remove cured glue hard on the other side. This can be done quickly and efficiently with diamond cup at USM. One drawback is a lot of dust. You need a vacuum cleaner + a device for an impeller.
Lucky cup for removing glue and epoxy resin at MONTOLIT:

CUP FOR REMOVING OLD GLUE ON TILE.
Similar cups are available from many manufacturers of cutting discs. Quality set. But visually, Montolit has a better solution. The location of the pimples on the processing surface allows you to achieve effective work without disturbing the balance of the cup with its minimum weight.
To remove the hardened glue, such cups are not necessarily needed. Any cutting wheel(even for metal) will handle it.
Finishing the floor with tiles is the most optimal solution for the kitchen, corridor, bathroom, pool, gazebo and other premises that require a strong and easy-to-use surface. However, very often, due to damage or wear, it becomes necessary to replace part of the trim. Before starting work, you should learn how to remove the tile from the floor without damaging it, because it will be needed when re-laying it in its original place.
Causes of Defects
Lagging of tiles from the floor surface is a fairly common occurrence, which usually occurs as a result of the work of inexperienced craftsmen and a violation of masonry technology. In rare cases, only one tile peels off, usually in violation of technology, peeling occurs in places of greatest impact on the material. So, what to do if the tiles on the floor have come off? First of all, you need to determine the cause of the detachment. There may be several main reasons:
- The presence of voids. The voids under the tiles are the reason for the weak fastening and as a result of constant impact when walking, the tiles peel off completely. If, when laying the material, the adhesive composition was applied only at the corners of the tile in order to save money and the area without glue is more than 15%, then such a tile will soon fall behind. The presence of voids can be determined immediately. If, when walking on the floor, you hear how the tile is baying, making a dull sound, then there is not enough glue under it and the coating will need to be shifted again.
- Poor quality glue. If the tile staggers when walking, but the glue was laid over the entire plane, then the reason may be an expired adhesive or a composition that is not suitable for this type of tile. For example, if glue mastic was used to glue tiles near the fireplace, then when heated, it begins to harden and lose its holding properties. Also, mastic is not used in rooms with high humidity. In such places, only cement-based tile adhesive or special liquid nails are used.
- Quick dry floor. If the tile came off along with the adhesive, then most likely quick-drying mixtures were used to level the floor in order to speed up the repair speed. Quick-drying floors contain polymer and other components that prevent the cement adhesive from sticking. In such cases, it is necessary to use other types of adhesive without cement components for laying the tiles.
- Poorly prepared surface. If the tiles on the floor have fallen behind along with the adhesive, then the cause may be poor preparation of the base, which did not provide the necessary adhesion of the adhesive to the surface.
For your information. Often when laying tiles on a wooden base without properly securing the sheets of wood, when walking, you can hear the tiles creaking on the floor. The creak is obtained as a result of the friction of the tile modules against each other, which leads to the destruction of the grout and further delamination.
- Moisture getting under the tiles. Moisture can get under the tiles as a result of poor-quality grouting or poor drying of the base before laying. Moisture that has fallen under the tile does not evaporate anywhere and causes the destruction of the adhesive structure, and also contributes to the formation of mold. If the tile has lagged behind from exposure to moisture, then it will also lag behind along with the glue and the floor must be dried well before laying. Therefore, before gluing tiles to the floor, make sure that the surface of the base is dry.
Important. It is very important to choose the right grout for the tiles. Regular grout has a porous structure and absorbs moisture well. It can also dry out and crack under the influence of high temperature. Therefore, it is necessary to select a grout with the necessary technical characteristics, depending on the type of room and the operating conditions of the tile.
Methods for removing damaged tiles
Damage to one or more tiles due to the above reasons is not a reason for grief, but a reason to wonder how to repair a chipped tile on the floor or how to glue a fallen tile on the floor. After all, the problem can be solved independently, without resorting to the help of specialists. To do this, it is enough to have a minimum of tools and basic knowledge.
To replace one fallen off tile you will need:
- instruments;
- repair mixture and glue;
- grout to match the old;
- accuracy and slowness during dismantling.
Required Tools
Depending on the base on which the tile is attached, and on which mortar it was laid, the choice of tool for dismantling it depends.
- Concrete or brick base, tile adhesive, grouted joints:
- middle hammer;
- spatula, flat-end screwdriver;
- scraper for cleaning seams;
- warm water and dish sponge;
- electric drill.
- Cement screed, cement mortar, cement mortar joints:
- turbine with stone disc for cleaning seams;
- warm water and rags - for wetting the grout;
- chisel or impact screwdriver - for dismantling small fragments;
- medium weight hammer.
Removal Technology
Removing one or more damaged tiles in order to replace them will require the use of technology that will keep the adjacent masonry intact.
If tile adhesive was used to install the tiles:
- Work should begin by removing the grout from the joints around the damaged tile. Using warm water and a sponge, loosen the seams and remove the grout with a scraper.
- The edges of adjacent tiles are pasted over with a protective adhesive tape. This helps to protect them from damage during dismantling.
- With a pencil or chisel, the diagonals of the damaged tile are drawn under the ruler, the rows of holes are carefully marked along the diagonals with a core.
- The marked holes are drilled with an electric drill.
- With a chisel and a hammer, connect the holes in a line.
- Starting from the center, the tile is chipped off in small pieces. As you approach the edges, the chisel is kept parallel to the plane of the tile.
- For final cleaning, use a spatula or chisel.
- Finally, the protective tape is removed, as it has served its purpose.
In the case where the damaged tiles have been laid on the cement mortar, it is recommended to use a turbine with a stone disc for cleaning the joints, or, for thin joints, a multi-tool with a thin disc.
Work is performed in protective glasses and gloves. When working with a turbine, use a respirator. Otherwise, the process is no different from the one described above. Now the question of how to remove old tiles from the floor in the bathroom, kitchen or hallway will not be tormented by its uncertainty.
How to remove tiles without damage
When, during the repair, it is planned to completely replace the tiles on the floor, and the old tile still has a completely “commodity” appearance, you can resort to a complicated option - this is dismantling while preserving the old tile.
It is not always possible to successfully complete the task, since it is very difficult to change the tiles on the floor. A satisfactory result is only achieved if a special tile adhesive was used to lay the old tiles. When high-quality cement mortar and skillful hands of the master were used for installation, the chances of removing the tile and not damaging it are almost unreal.
Tools and materials:
- hammer;
- scraper;
- putty knife;
- flat screwdriver or knife;
- chisel with a wide blade;
- water and sponge;
- perforator with a shovel;
- chisel.
Step-by-step instruction
Preparatory work:
- Loosening grout in tile joints. Use warm water and a sponge.
- Removing grout with a scraper, screwdriver or knife.
- In the case of cement filling, the use of a turbine. Cutting seams to the base.
- Mandatory rinsing of the workplace with water after cleaning.
Tile removal work:
- The most crucial step is the removal of the first tile.
- With a chisel with a wide blade and a hammer, slowly carefully tap the first tile along the contour, trying to pry and lift it. The appearance of a dull sound upon impact indicates the readiness of the tile to separate from the base. You can use a spatula - wetting and scratching the glue under the tile along the contour.
- After removing the first tile, you can continue to remove the remaining tile in the same way.
- You can also switch to using a puncher. Gently putting the end of the spatula to the edge of the next tile, and not reaching it, deepening to the base.
- 3-4 recesses are made - along the edges and closer to the middle, each time slightly lifting the tile.
- As a result, the tile should easily separate from the base.
Removal of glue and cement residues from the tile surface
Thoroughly hardened traces of glue, cement and other construction dirt present a certain complexity and require the use of various means to eliminate them, including chemical ones.
Acid-based products (Atlas, Keranet) effectively help to solve the problem of cleaning:
- dust and simple dirt are removed with a wet cloth;
- a remover is applied to the surface of stains and pieces of hardened glue with a sponge;
- following the instructions, wait for the glue to soften;
- the remains of glue and chemicals are cleaned with a sponge with a sufficient amount of water.
For best results, use the same brand of cleaner as the adhesive used in the masonry.
It is possible to clean the old tiles removed from the floor from the remnants of glue or cement mortar using a nozzle on a drill or grinder in the form of a round brush made of steel wire. You need to work with care so as not to leave marks on the front side of the tile.
If it was still not possible to remove the cement mortar, the tile is soaked for a couple of hours in warm water, after which it is cleaned with a sharp chisel or spatula.
In severe cases, you can resort to chemicals that can destroy and remove the structure of the cement. They can be purchased at hardware stores.
Repair of chips and cracks without removing tiles
During operation, minor damage to the surface of the tile inevitably occurs. It can be an accidental scratch, chip, crack. Before taking drastic measures to replace the tiles, it makes sense to try to eliminate or mask the defect.
For thin small cracks, a method based on the use of a mixture of cement and very fine sand in a ratio of 1: 1 diluted with water is used. Cracks are rubbed with the finished solution in a circular motion until it penetrates deep enough. Good results are obtained by using a soft spatula for grouting.
The problem with chipping is solved differently. All sorts of materials help with this. From silicone to hard waxes and colored heat sealers to repair cracks, cavities and chips. Separately, it should be noted the use of epoxy and polyester adhesives.
To seal chips and cracks in tiles with a matte surface, polyester glue with the addition of special dyes is used. If the tile is glazed and has a glossy texture, an epoxy adhesive with dyes is used.
To achieve maximum color matching, the selection process is carried out by applying tinted glue directly to the chipped area. When the color is selected, the chip is cleaned of glue (acetone can be used), the surface is dried, a hardener is added and the chip is finally sealed. After hardening, polishing is carried out with a dense cloth.
Hello friends! Continuing the theme internal works in the house, I decided to write an article on how to replace the tiles on the bathroom wall. But we will not change all the tiles, but only those areas that are somehow damaged and spoil the view of the entire wall.
There are times when in the bathroom (read interesting about bathrooms) on the wall, one or several tiles at once became cracked or damaged. Is this phenomenon familiar? In addition, it is not possible to disguise them, for example, with a shelf or a shower holder.
Do you think this will cause the entire tile to be replaced? Not at all. Damaged tiles can be replaced locally. How to do it right?
 Local replacement of damaged areas of tiled flooring
It is clear that to replace a damaged tile you will need another one, and so that it does not spoil the look, it must be exactly the same. This is probably why some far-sighted homeowners purchase tiles with a margin. But here what to do if there is no stock? Calm down, even from this situation there is a way out.
 Tiles are damaged and need to be replaced.
You can go to the nearest construction market and there pick up a few decorative tiled or simple (depending on the model on your wall) modules of contrasting colors. A few inserts will not spoil, but on the contrary, they will add expressiveness. Even more so, if these tile modules are picturesque, like paintings, they can transform the bathroom beyond recognition - how can you not remember the proverb - What does not happen is for the better!
 Such an insertion of a picturesque tile module in place of a damaged tile will noticeably transform and enliven the bath
 What will be required for this job?
For local repair of tiles, it is recommended to use ready-made adhesive mastic. It is much more convenient than a dry mixture, which must be diluted in water, strictly observing the proportions. Moreover, when you knead a small amount of a dry mixture, it is very difficult to achieve the required consistency, especially if there is no experience in this matter. A mixture that is too thick or too thin simply won't hold the tile..
Keep in mind that mastic is an expensive pleasure, and just because you need very little of it, this will not be a disaster for you. In addition to mastic, you will need grout - exactly the same as on the wall being repaired, plastic crosses and some tools: spatulas, chisel, hammer, sponge and building level .
Getting started with tile replacement
Before you replace the tiles on the wall (speaking of replacing floor tiles read this) you need to scrape off the old grout around the damaged tile. But this must be done very carefully - otherwise you can damage neighboring tiles. Then we proceed to the most important task - removing the damaged module.
Here I want to warn you that even if in tiles have deep cracks do not try to immediately release it or pry it with a chisel. The adhesive still holds the tile tightly - this grip needs to be loosened. For this you can drill a few holes in the tile drill with a special drill for stone. And so that during drilling the drill does not jump to the adjacent tile mark the drilling locations with a center punch.
 A chisel and a hammer into the "teeth", and let's beat off the tile - but only carefully - somewhere with confident filigree movements (in the center of the replaced area), somewhere gently and very carefully (at the edges where the tile adjoins the adjacent one, which does not require substitutions)
Tiles ready to be replaced
After several holes have been made in the tile and the tile has become covered with small deep cracks, cover it with a rag and hit it several times with a hammer.
The remains of the tile are removed with an old knife or chisel. Perform all actions without applying great force and slowly, otherwise there is a risk of damaging adjacent tiles. If some fragments do not give in, they are broken into smaller ones - by the same method.
After removing the damaged tiles, you still need to clean the place of the old adhesive. This is done with a hammer and chisel (also keeping accuracy). Next, the place is thoroughly cleaned of dirt and dust. Before inserting a new tile, it is necessary to moisten the place so that the mineral surface of the wall does not draw moisture from the mortar. For the same reason new tile should stay in the water for a while.
Applying mastic to the repair site
Glue or mastic is applied with a notched trowel a little on the tile itself and on the repair site (you can see how to work with a trowel correctly). When inserting the tile, make sure that the tile does not protrude forward beyond the base of the cladding and does not sag inward. The construction level or rule will help to trace this. The mastic that comes out is immediately removed with a damp sponge. The width of the gaps between the tiles is adjusted using plastic crosses. The replaced tile must be left alone until the mastic has completely hardened - this is at least a day.
Grouting tiles
 Grouting tiles
 The last step in replacing tiles is. After the mastic has completely hardened, the crosses are removed, and the grout mass is placed in the inter-tile gaps and rubbed rubber spatula(a metal spatula can scratch the enamel of the tile). The remains of the grout are not removed immediately, but after 20-30 minutes, when moisture begins to evaporate from it. A slightly dried mixture is easier to remove with a damp sponge. Finally, you can walk over the entire surface with a soft cloth.
Well, now you know how to change the damaged tiles in the bathroom, and if you do everything as written above, then even the most picky inspector will not notice the place of replacement.


