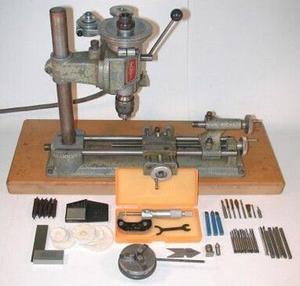
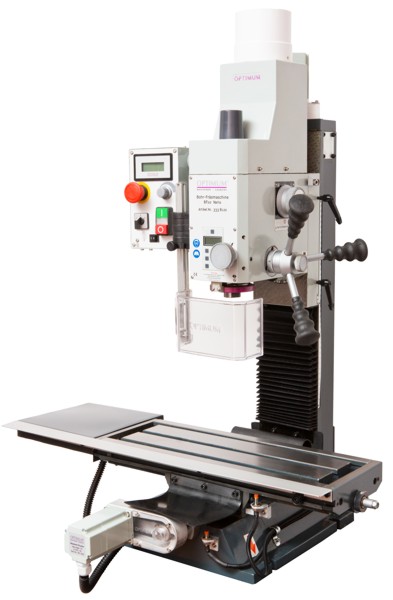
Homemade desktop milling machine for metal. Trying to make a homemade milling machine
Desktop manual machine, equipped with CNC and designed for metal processing, in household is a very useful thing.
In addition, you can make such a device with your own hands by attaching not a large number of efforts.
To do this, you will need such equipment and components as an electric motor with a suitable power level, a table and a guide structure.
1 Drive for homemade machine
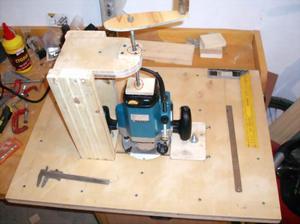
Going to make a simple hand-held portable or hand-held desktop small-sized milling machine for metal with CNC do-it-yourself, first of all, attention should be paid to the electric drive.
The main and decisive factor here is the power level. Most do-it-yourself homemade metal milling machines are made to produce a shallow selection of metal blanks.
In this case, the unit can be made using a motor Russian production, which has a power equal to 500 watts.
However, such a CNC-equipped unit will stall from time to time and is unlikely to justify the resources of time and money that have been invested in it.
Most the best option generally accepted is the one in which a desktop manual small-sized machine for metal, made by hand, equipped with an engine, whose power, on average, is 1100 watts.
The drive of the CNC machine with a power equal to 1-2 kilowatts facilitates the use of any type of cutter.
Processing of metal blanks will be carried out in the usual mode. For a do-it-yourself metal router assembled and equipped with a CNC, both a stationary electric motor and a drive that was previously used in powerful hand-held power tools can be suitable.
This detail can be borrowed from a grinder, drill, or manual router. Another significant factor when creating a do-it-yourself milling machine for metal is the number of revolutions.
The higher it is, the the cut will have greater cleanliness and uniformity. There will be no problems if the motor used in the CNC machine is designed to work in a household network of 220 volts.
In the event that you decide to make a unit equipped with a three-phase asynchronous motor, you will have to connect it with a focus on a special circuit.
It is expressed in a star-delta connection algorithm. Thanks to the implementation of such a scheme, the motor will produce a smooth start and issue the maximum possible power.
It should be borne in mind that in the case when a three-phase electric motor is connected to a single-phase network, it will lose 30-50% of its efficiency.
2 How to make a homemade elevator for a router?
It is quite easy to assemble a homemade CNC milling machine for metal. Particular attention should be paid to the adjustment lift, which can be assembled using ordinary thick plywood sheets.
The whole structure must be fixed on the desktop cover. In this case, the unit itself will not need to be equipped with pulleys and belts.
The nozzle of the cutter on desktop milling machines for metal will be carried out directly on the rotating shaft of the electric motor. It is important to use a drive that will have the ability to rotate at high speeds. The elevator itself, assembled for milling machines for metal at home, consists of such parts as:
- frame;
- carriage;
- sliding skids;
- threaded axle;
- fixing screw.
When the axis rotates, the carriage with the attached motor will be able to move up and down in the direction of the axis.
The skids are used to act as guide stops. With the fixing screw, the carriage will need to be fixed to give it a high degree of immobility, after it has been set in height.
The bearing body, which will hold the entire structure, is fastened to the bottom cover of the workbench.
When performing these steps, you will need to carefully ensure that the carriage and motor do not loosen while in the housing. This can lead to the fact that during milling the selection of metal will be uneven.
The presented device for the milling unit will be able to provide smooth adjustment of the offset of the replaceable cutter above the surface of the desktop.

To ensure a high degree of convenience, you can equip the elevator with homemade gears. In this case, the swivel vertical arm can be placed on the side, and not from the top edge.
If there is no ready-made desktop at home, then when making it yourself, it is important to consider individual characteristics each individual material for metal milling machines.
For example, that table for a manual desktop milling machine for metal for metal, which will be made of wood, afraid of moisture. However, along with this wooden structure the easiest to make, besides, the tooling is able to effectively absorb vibrations.
Guides that will provide emphasis on the processed workpiece can be made at home from plywood or chipboard. It also provides for adjusting the position of the snap with an orientation to the horizontal plane. To collect metal shavings, you can use an ordinary old household vacuum cleaner.
2.1 We make a cover
As a material for the cover, it is necessary to use plywood with a thickness parameter equal to 19 millimeters.
In this case, the length of the cover should be 0.6 meters, and the width - 0.5 meters. In order to significantly improve the basic characteristics of a homemade metal milling machine, you must first increase the strength of the table.
To do this, lining is made of textolite with a thickness of 2 millimeters. To this end, you will need to cut a sheet with the same dimensions as the first one cut out of plywood.
It is important to remember that in the process of cutting out the cover and lining for it, allowances equal to 2.5 centimeters should be added to the already indicated dimensions.

After that, you need to apply thin layer glue on the textolite surface and the upper part of the plywood cover.
In this case, you need to step back from the edge of the plywood by 0.3 centimeters and glue the textolite. After joining the surfaces, they will need to be walked with a rubber roller.
The resulting workpiece and equipment is installed on cutting machine or a circular saw. This is done in such a way that the edge of the plywood sheet can be pressed tightly against the stop.
Further, 6 millimeters must be retreated from the edge of the stop and sawed off plywood and textolite cladding with one blade. After that, you need to turn the resulting workpiece and do the same with the opposite edge.
The processed edges are moved all the way to the stop and cut off in order to give the slab the desired shape. From the plywood sheet, it is necessary to cut out the lining of the longitudinal and lateral type with a focus on strictly fixed dimensions.
The width of the longitudinal lining should be 0.4 centimeters with a length of 70 centimeters. Side width - 0.6 cm, with a length of 60 centimeters.
![]()
- Four pieces of plywood are taken with dimensions of 10 × 10 cm.
- Grooves with dimensions of 5 × 5 cm are cut in each piece.
- They are fixed with clamps at all corners of the manufactured cover.
- Attachment of the lining is carried out with glue, fixation - with the help of clamps.
2.2 Fitting the stop
The linings and accessories are pressed against the already mounted auxiliary part, after which they are glued to the upper edge of the cover. Through the pre-made grooves, you can see how correctly the linings were docked in all corners.
After that, a 19 mm disc cutter is installed on the cutting desktop machine. The stop is attached using a fabricated wooden lining with a height of 25 centimeters.
The setting of the cutter and the stop should be carried out in such a way that it becomes possible to select the tongues that fit into the edge plates. The accuracy of the settings should be almost perfect. To do this, it is better to practice on unused scraps.

The lid must be firmly pressed against the stop with the side that was originally covered with textolite. Then you will need to select all the tongues in the edge trims located on the sides.
Milling machine for metal and tooling will be needed to facilitate installation aluminum profile. To do this, in a segment of any size, you need to cut a tongue with a disk cutter.
After that, you should make sure that the slider in it passes to the very corner stop. If it moves without difficulty with normal backlash, then in the lid it will be necessary to cut a groove of the same size and place it with plywood to the top.
2.3 How does a homemade desktop metal milling machine work? (video)
- Design features
- Self-manufacturing
Before making a router with your own hands, it is recommended to prepare a drawing. The diagram shows the main elements of the tool.
A drill cutter is made quickly, but is used to a limited extent.
Design features
A homemade wood router is used for chamfering, edge trimming, and decorative carving. A similar device for metal is equipped with special cutters and is designed to work with soft metal. If necessary, you can make a milling cutter for working with plastic, plexiglass and other materials.
The main elements of the tool are the spindle, motor and cutter. The rotation from the motor is transmitted to the spindle with a working cutter. Some wood and metal routers operate on single-phase AC power. You can make hand-held routers with your own hands on a small DC motor.
For this, various cutters are used. The choice of element depends on the purpose of the future tool and the material being processed. Simple Models designed for woodworking. Such units are characterized by low speed. It is more difficult to make a metal router with your own hands, since this material has a high degree of rigidity and strength.
Back to index
Principle of operation and classification
Used to make a spindle solid metal, which must meet certain requirements for rigidity and hardness. The principle of operation of any router is as follows: the rotor is connected to the spindle, on which the cutter is fixed. When the tool is plugged into the mains, the spindle starts to rotate. The material is cut with sharp knives.
The accuracy of the work performed depends on the speed of rotation.
The stand for the router is also sawn out of a piece of chipboard.
Since the number of revolutions depends on the density of the raw material, then homemade tool it is recommended to complete the regulator.
- lamellar - makes grooves;
- upper - used to perform any woodwork;
- edging - makes edges and chamfers.
The top milling cutter is classified into the following types:
- fixed - rigid motor mount;
- submersible - the motor moves with the cutter.
Narrow-profile tools are subdivided according to the material and parts to which it is applied:
- tenoning machine;
- for drywall;
- to get a groove, etc.
Back to index
Self-manufacturing
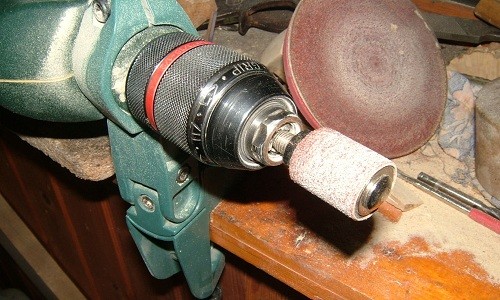
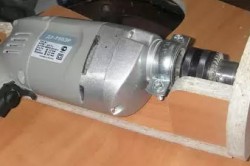
A hand tool, represented by a motor that rotates the cutter, can be made by hand. This will require a cutter, an electric motor and a chuck. The engine can be taken from any working electrical appliance. The cartridge can be taken from a perforator, as this part can withstand high power.
The basis for the motor is PVC or standard chipboard sheets. The base is cut out and fixed to the motor. The cartridge is connected to the engine using a special adapter. This will require the help of a specialist. Appropriate milling cutters are selected for the material obtained. The tool is ready for use.

Received hand device can be turned into a machine. To do this, you need to equip the bed suitable sizes and make holes in the appropriate places. Such a universal machine, made at home, will not be able to give sufficient speed for high-quality work. It can be used for "rough" woodworking.
At home, you can make a CNC machine. It is intended for the production of a product designed on a computer. The device with numerical control allows you to perform the following work:
- Milling.
- Laser cutting.
- Engraving.
- drilling.
Homemade machine must be multifunctional. To make it you will need MDF board size 1.5x1.5 m and accessories. Details and drill. So that the chips do not scatter during operation, a dust extractor is made. The resulting tool is not used for metal processing. It can be used on aluminium, bronze, foam and plastic.
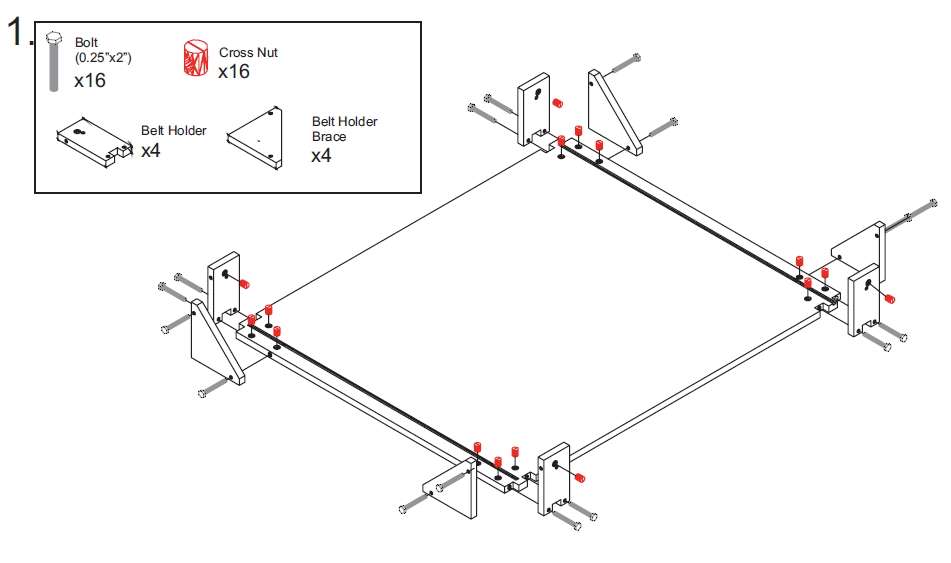
The CNC machine is made by hand using an aluminum profile with a cross section of 80x40x4 mm. Beams are cut from it:
- 2 pcs. 1300 mm each;
- 4 things. 460 mm.
Guides are entered into 2 channels with a cross section of 50x30x4 mm. The legs of the machine are made from similar elements of the sofa. The base frame is ready. At the heart of such a multifunctional tool are stepper motors.
The main elements of a manual router are the motor and the cutter. The remaining parts of the device act as an intermediary, ensuring the smooth operation of the device. Therefore, when manufacturing a manual router, it is recommended to take into account the parameters of the motor and cutter.
A handmade homemade tool has the following advantages:
- low price;
- processing of various surfaces;
- easy assembly and maintenance;
- easy operation.
The disadvantages of home-made devices, experts attribute the low speed of material processing. If the device is equipped with a standard motor, which is equipped with modern Appliances, then there will not be enough speed to process complex elements and surfaces. To eliminate this drawback, high-speed motors are used. They can be removed from a modern perforator. A powerful unit will allow you to adjust the number of revolutions to perform carpentry work of any complexity.
Homemade milling tool has low rigidity and strength, as it is made from improvised materials. The above advantages and disadvantages should be taken into account when manufacturing and working with a hand-held home-made device.
Most craftsmen dream of having a variety of versatile equipment in their household, which means that they will be interested to know how do-it-yourself milling machines for metal are assembled.
Such a powerful unit will allow you to independently perform many different specific operations, not only with metal, but also work with wood.
A device of this type has long been used in the industrial sector for the manufacture of a wide variety of products.
Of course, an industrial milling unit has a sufficient amount of functionality and great potential for work, however, even at home, you can make a machine for working on metal and wood.
It should also be noted that in the presence of all the necessary components, you can quickly assemble and turn milling device manual type. This will require a copy router and much more.
The simplest version of a homemade milling device is a vertical mini unit from a hand drill, which can be done as quickly as possible.
A more advanced milling machine, with the right approach, is also assembled by hand in a short period of time.
The principle of operation of a home-made milling unit must fully comply with the principle of operation of industrial equipment, and for this it is necessary to have an appropriate drawing nearby and know the assembly technology.
It often happens that a home craftsman is faced with the need to process a workpiece made of wood or metal, and there is no suitable equipment available.
Of course, you can turn to the appropriate workshop for help, but you will have to pay a decent amount of money for this.
In this case, a home-made milling unit becomes relevant, the assembly of which will not take much time.
The device, with the right approach to business and the presence of all the necessary components, will allow you to work both on wood and on metal.
It is worth noting that and turning-milling machine with the appropriate technology, can be done in the shortest possible time.

a - general form; b - kinematic scheme;
1, 5 - guide lines; 2- gear sector; 3- cutter; 4- fence; 6 - control panel; 7- additional spindle support; 8- bracket; 9- handwheel for lifting the bracket; 10 - belt tension handwheel; 11- electric motor; 12- spindle; 13 - handwheel for adjusting the spindle in height; 14 - bed; 15- spindle speed switch; 16- switch; 17- table
The easiest way is to make a mini device from an ordinary hand drill, the principle of operation of which will practically not differ in any way from a professional turning milling equipment.
A more versatile and functional turning and milling machine is assembled not from a drill, but on the basis of an engine with sufficient power indicators. In addition, some specific components will be required.
Assembled according to the rules and in accordance with the technology, a home-made metal milling machine will allow you to easily and quickly cut out almost any curved surface.
In addition, with the help of such equipment it will be possible to independently produce a workpiece with irregular shape and configuration.
The master will be able to choose grooves, folds, as well as a variety of slots at any time with his own hands.
Such homemade machine from a drill will help to complete transverse section, as well as a number of other complex operations, both on wood and metal.
Of course, the functional set of a home-made mini unit assembled from a hand drill will be much smaller than a more complex milling machine, however, a real craftsman will also find a use for it.
Experts recommend that immediately before starting work, it is good to study the principle of operation and the design of this type of equipment from a drill or not, to draw up detailed drawing and prepare all the required materials and tools.
The video below shows a universal homemade machine in action.
Device and principle of operation
Professional milling equipment has enough complex structure and consists of many mechanisms and nodes.
A machine assembled at home will have enough simple design and minimum set required elements.
Anyway, homemade device manual type should consist of some mandatory elements and nodes that will allow it to perform its functions for its intended purpose.
Any manual type unit must necessarily have a sufficiently rigid and durable frame that can withstand a certain load.
Also, the composition of the home-made milling unit must include a drive that will be responsible for the rotation.
For these purposes, you can use the usual hand drill, or you can take the engine a little more powerful, which will only increase its overall performance.
An obligatory element of any milling type equipment is a desktop, on which you should mark with your own hands and fastening elements for workpieces.
Of course, any milling unit includes cutting tool, in the role of which, as a rule, a sharply ground cutter acts.
Certainly, House master will strive to make a sufficiently functional unit when minimum investment, however, it is recommended to use only high-quality components made of durable materials.
In any case, on specifications and the capabilities of a home-made milling unit will be influenced by some factors and parameters.
First of all, these are the dimensions of the desktop, as well as the maximum weight and dimensions of the workpiece, which can later be processed on the machine.
Also, the operating parameters of the milling device will be influenced by the power of the installed drive and the number of maximum revolutions.
Of great importance will be the correct assembly of a home-made mini-unit with your own hands, as well as a correctly drawn up drawing.
The video below details how to assemble a milling machine for working with metal with your own hands.
Beginning of assembly
One of essential elements mini-looms of this manual type is a table, and special attention should be paid to its assembly.
For his self assembly you will need a sheet of plywood, which can be replaced with plexiglass or sheet metal.
In addition, you will need to purchase high-quality contact glue and double-sided tape.
It will also require a large number sandpaper. You will need to purchase a copy router, hardware and clamps.
The copy router must be highly accurate and have a sharp and smooth surface.
The functionality of a home-made machine largely depends on which copy milling cutter will be used.
Assemblies begin with the manufacture of the cover. The lid is assembled mainly from plywood, which is cut into the necessary blanks and mounted together.
All work must be done with maximum precision and accuracy.
After self-assembly of the plate for the homemade milling device, proceed to the installation of the mounting plate.
To do this, a deepening of a certain size and configuration is made in the desktop.
Also, along the contour of the plate, lay the gaskets in a certain sequence and fix them with clamps.
Particular attention should be paid to installing the bearings directly under the copy router.
All the necessary technological holes on the desktop are easiest to do with a hand drill.
All wooden surfaces the future machine must be carefully sanded with sandpaper.
At the next stage, the foundations are assembled, for which it is necessary to take a drawing and do all the work in accordance with it.
With special care, it is necessary to carry out work on the installation of the stop and the clamping comb.
These components have great importance for a milling machine, and therefore the work must be done with maximum precision and in accordance with the technology.
The final stage
On the final stage performing work on assembling a home-made universal machine for metal and wood, it is necessary to carefully cover all the wooden components special impregnation oil based.
This will protect them from external atmospheric influences, thereby increasing their durability.
In addition, all necessary switches and controls should be installed in an accessible location.
You should also protect the copy router, for which it is necessary to make and mount a special sleeve.
Particular attention should be paid to the installation of the selected drive type. For these purposes, it is best to use a motor with sufficient power.
The video below shows how to assemble the milling unit yourself, the principle of operation of which will be similar to professional equipment.
When assembling a unit for milling at home with your own hands, you should definitely have an appropriate detailed drawing in front of your eyes.
It is also necessary to follow the assembly technology and the established sequence.
If all the work is done correctly and accurately, then home-made milling equipment will have good functionality and performance.
At present, there are a huge number of devices and machines that carry out milling activities. You can process almost all metals that are suitable for certain jobs. You can buy a new tool, or you can assemble exactly the same with your own hands. But the engine of progress is moving forward. At the same time, the use of a simple manual machine becomes impractical. To date, everything technological equipment equipped with numerical software. Below will be information about CNC metal milling equipment.
Automatic control of a console with a cutter or a portal with a cutter allows you to get the most accurate metal parts, make various grooves, holes, process complex contours and much more. As a rule, ferrous and non-ferrous metals are subject to processing. For processing metal products, various cutters are used.
Tip: For thicker metal processing, the structure must be assembled stronger to prevent equipment breakage!
purpose
The direct purpose of milling equipment is metal processing and the manufacture of various metal parts and products. There are a wide variety of units for milling metal. However, various modifications of milling machines, whether in production or at home, work on the same principle. They also have very similar designs. Below we will consider all types of such equipment.
Variety


Machine tools for metal processing are divided into several categories:
Stationary equipment
It is located in factories and is intended for large-scale production. As a rule, they have a huge weight and dimensions of the structure. Such devices are capable of processing thick metal of large sizes.
household equipment
AT ready-made, which can be easily purchased in the online store. They are mainly used in everyday life, for the manufacture of certain, necessary products or details. Have small size, which makes it possible to place such a tool anywhere. Such devices are capable of producing small parts for any mechanisms. For work, not thick material is used to achieve more accurate processing.
Desktop
This type of machine is used both in production and in everyday life. They are predominantly small in size and are not suitable for processing thick materials. Unlike household machines, this machine can handle slightly thicker material. However, the dimensions of the workpieces should not exceed the dimensions of the working table, so that the cutter or spindle can move freely over the entire area of the workpiece being processed. Due to the rigid design, it is possible to produce in batches. At the same time, the quality of the resulting products will be remarkable.
Homemade
prototypes of household and desktop, created from improvised means, which significantly saves family budget, as well as the installation location. Such devices can replace household machines. Metal processing entirely depends on the rigidity of the entire structure. With the help of such a device, you can make various parts intended for mechanisms, make holes in the workpiece, and much more. AT home use this tool is irreplaceable.
Tip: Regardless of the model you choose, you need to decide what you will do on this machine, what material you will process. Depending on this, you should think about the rigidity of the structure!
Now that you have at least some idea of such equipment, you can consider the design and assembly of a homemade milling machine. If the budget is limited, then it is enough to choose suitable items for your offspring and order electronics for full-fledged work. If you have a computer, it will be enough to install professional program for directed work. These programs are freely available on the Internet. The most common programs are:
- Mach3
- Artcam
- machine
- kcam4
These are not all programs. There are a lot of them.
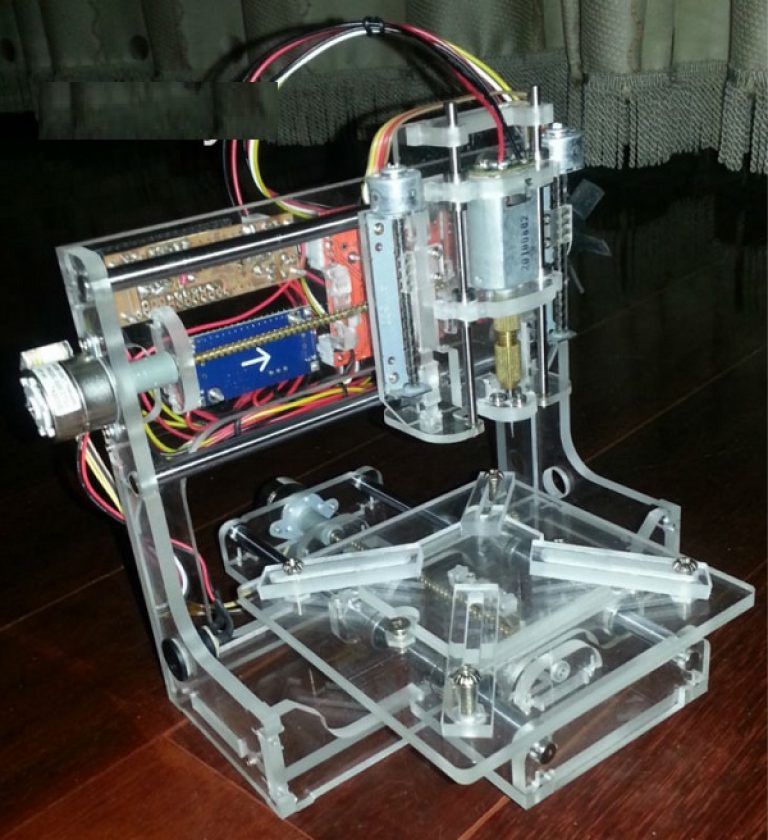
The design of a homemade CNC metal machine

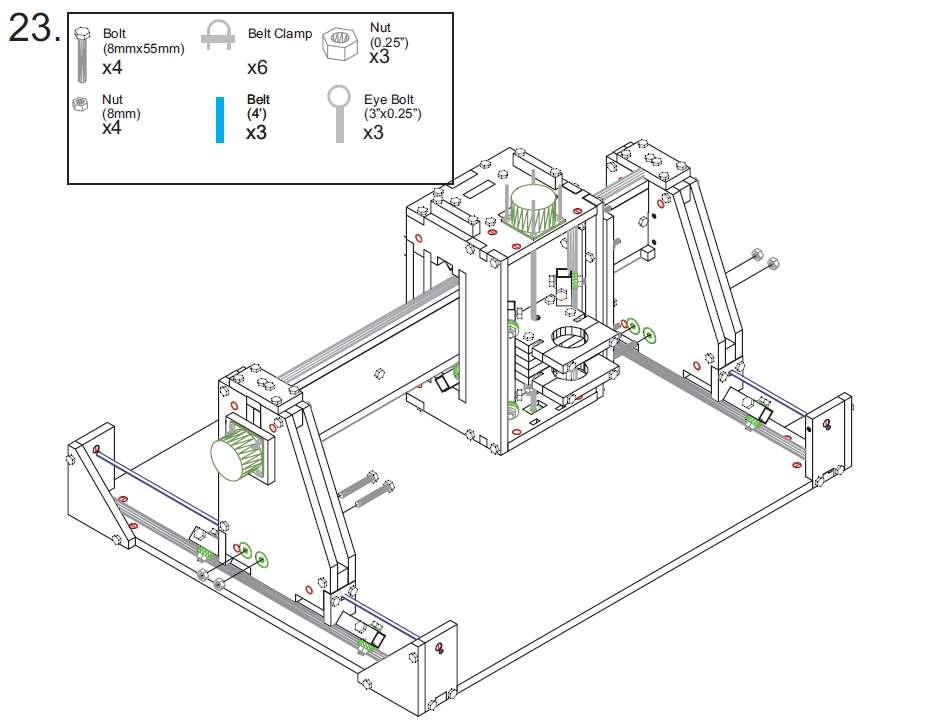
The main elements of such a machine are listed on a photo. Let's list them:
Z axis ball screw - ball screw
Such a transmission is intended for converting rotational movements into reciprocating movements and in the opposite direction.
Vertical guides
Are intended for implementation of the movement of a portal with a spindle on a vertical.
Cross guides
Designed to move the desktop to the right and left.
Longitudinal guides
They are located directly on the machine bed and allow the working table and the entire column to move along them.
The column, as a rule, in this element of the machine there is a counterweight, which is designed to compensate for the weight of the spindle assembly.
Base
The most important part of the machine equipment, on which all the equipment is located.
Spindle
The working part of the unit, which, by means of a cutter fixed in it, processes metal blanks.
Desktop
This is the plane on which the milling work is directly performed.
As a rule, such machines also use a milling tool cooling system, which is designed to prevent overheating of the cutter and spindle assembly.
Now, knowing the design of the main elements of the unit, we can consider the principles of operation of the machine unit.
Tip: To save your budget, when creating your own milling machines, you can take printer carriages.
Principle of operation
As already mentioned, any milling machine equipped with software works directly on commands sent from a computer. Increasingly, the use of electronics firms Arduino. A special program in which a future product is created is calculated with accuracy and vice versa into special G-codes, which in turn are recognized by the controller and distributes signals to stepper motors. ShG (stepper motors) according to a given program move the spindle or milling cutter along several planes, projecting a given part on the workpiece by means of a cutter.
As you can see, this process is not very complicated. The main thing is to make the correct assembly and installation, as well as program control and electronics. Consider below the assembly process of the milling machine.
Tip: During the assembly process, one of the main processes that must be monitored is sliding along the guides. After all, if you do not ensure smooth sliding, which occurs with improper assembly, you can break the machine at startup or ruin all metal blanks.
Do-it-yourself assembly according to drawings

Consider the scheme with dimensions and figure out which elements are attached and where, as well as how to do homemade machine do it yourself. By the way, the complete assembly instructions can be downloaded for free. Let's analyze the main stages of assembly:
Beginning of assembly
The first and main stage in the assembly of your unit is the assembly of the frame. After all, it is on it that the machine and its components should be located. These include the bed, guides and fasteners. The main thing is to make sure that the frame has a fairly strong frame and stands firmly on a flat surface.
At this stage, the router console, column, stepper motors and other guides are installed. In this process, the main thing is that the sliding along the guides is smooth and smooth. And also, it is necessary to check the operation and fastening of all mechanisms. After that, you can safely proceed to the next stage of the assembly. The instructions will clearly show what parts, how many of them will be needed for this assembly stage.
The final stage
On the this stage the performance of the entire milling unit as a whole is checked. Sliding along guides, operation of stepper motors, etc. Upon completion of the assembly, an important and integral step is the installation of electronics on the machine.
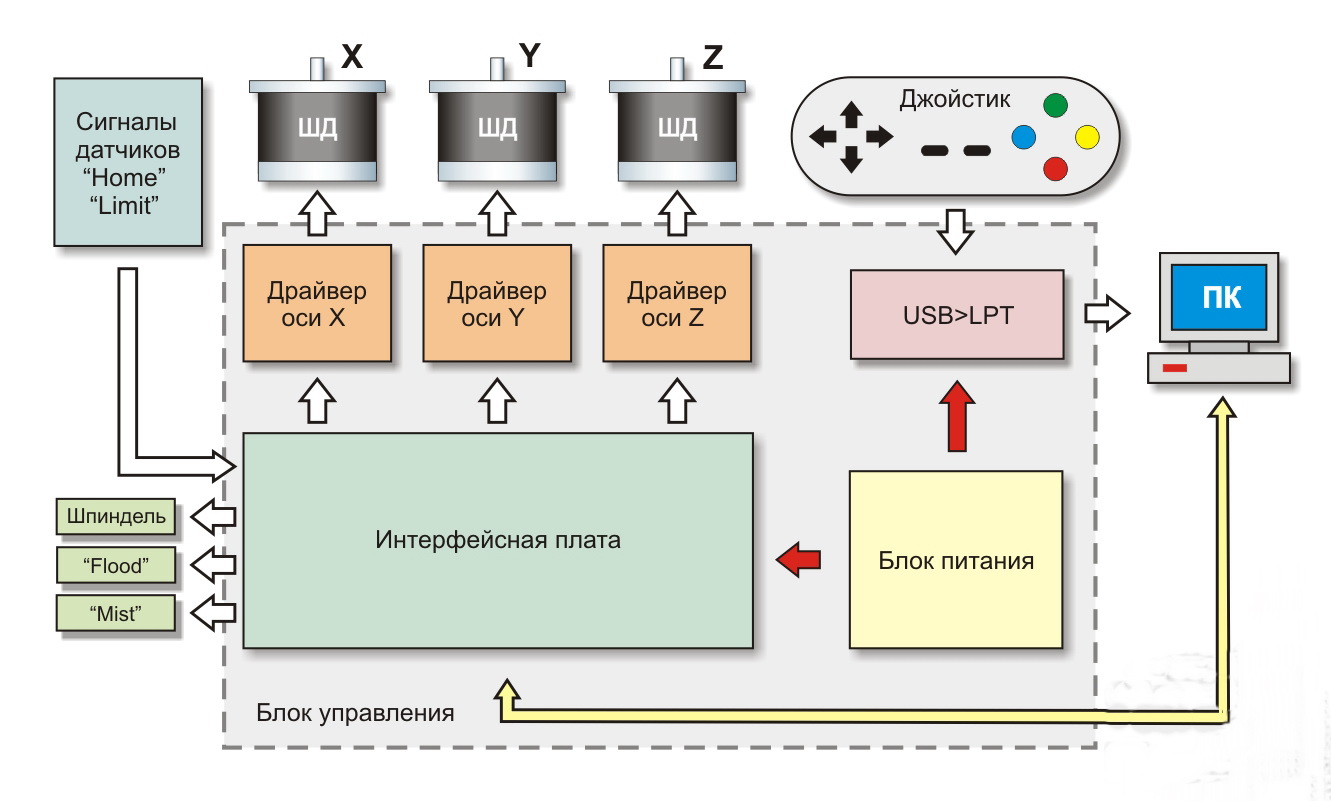
Installing the controller and software on a computer
The controller diagram is shown below. It shows a complete chain of branches from the controller to stepper motors, to a computer, to various sensors.
After all the above stages have been successfully completed, you can proceed to the first start-up of the machine equipment and the first pass of the metal workpiece.
Equipment setup
Before the first launch, you need to install everything required drivers and software on a computer or laptop. Of course, the program is freely available on the Internet. Therefore, when the program is installed on a PC, you should load the necessary sketches into it for the manufacture of parts or necessary elements(recesses, grooves, holes of various diameters and much more). When everything is done, you can load the material onto the work surface and proceed with the selection of a direct tool - a cutter, for subsequent metal processing.
When the cutter is selected, you can carry out the first run on your machine.
Tip: When cutting metal, it is necessary to specify a thin removal of the metal layer so as not to burn the cutter and material.
When everything is done, you can safely start working on your invention. However, without observing the safety rules, in no case should you even touch the machine without familiarizing yourself with the rules and safety precautions.
Safety
All rules and safety precautions are the same, however, when working with metal, they must be special. Let's look at them below:
- When working with metal, the most important protection is to protect against metal chips so that they do not accidentally get into the eyes.
- The milling unit must not be allowed to overheat, otherwise it may fly apart and cause serious harm to your health.
- The cooling system of the cutter must be strictly present.
- All electronics and the machine must be grounded.
- Children should not be in free access to the machine, because if the machine is running, the chips may bounce in the face of the child.
- AT electrical network automatic packages must be present to prevent fire in the event of a short circuit.
A complete list of all safety rules can be found on the Internet. By setting the appropriate query in the search bar.
Video reviews
overview of CNC milling machine for metal
Assembly video review
Video review of the budget example
Video review of the operation of professional equipment
Video review of the manufacture of products on a CNC machine
Many do-it-yourself lovers dream of getting a wide variety of tools and fixtures into their arsenal, and in particular a home-made milling machine for metal processing. Such multifunctional equipment makes it possible to engage not only in the processing of metal products, but also in wood. In the industrial sector, such units have been used for a very long time.
Naturally, industrial machines are complex and multifunctional products, but also homemade milling device allows you to perform many manipulations for metal and wood processing. With everything available necessary tool and Supplies such a device can be made with your own hands, and quickly enough. The simplest unit is considered to be a vertical milling machine, assembled from improvised and, most importantly, inexpensive materials.
The purpose of homemade milling equipment
 Often, home craftsmen are engaged in the manufacture of complex parts made of metal or wood that cannot be turned or cut by hand, and for this they need a milling machine. Naturally, you can ask for help from an enterprise where everything exists. necessary equipment but you will have to pay for such services.
If a person constantly makes something out of metal, then trips to specialists will eventually result in a round sum. Therefore, it is advisable to make metalworking equipment with your own hands. With the proper approach to this process, it is quite possible to assemble equipment that is not in many ways inferior to industrial equipment. Having made a homemade milling machine, a person will be able to process both metal blanks and wood products.
Making a homemade elevator for a router
 There is nothing difficult in assembling a milling machine with your own hands. special attention in this process, an adjustment elevator deserves. Wherein cutter attachment can be made on the movable shaft of the electric motor capable of operating at high speeds. In turn, the design of the elevator itself consists of the following components:
- corps;
- carriages;
- sliding skids;
- threaded axle;
- fixing screw.
During the rotation of the axis, the carriage with the connected motor can move vertically in relation to the axis. In turn, the skids are used to secure the guide stop. With the help of a fixing screw, the carriage will be fixed in a stationary state after it is directly set to the required height.
The mounting of the bearing part of the body, designed to hold the entire structure, is carried out on the bottom cover of the milling machine. Carrying out these activities it is necessary to ensure that the carriage and the electric motor do not have any play, located directly in the case. Failure to comply with this rule leads to the fact that the selection of metal during the milling process is uneven.
If there is no ready-made table design for milling equipment for metal, made by hand, then when assembling it, it is necessary to take into account the characteristics of the materials used for its manufacture. For example, wood is afraid of moisture, but it absorbs vibration qualitatively and is easily processed. Metal, more durable, but if such a table is not fixed, then it will vibrate strongly during the operation of the router.
Self-manufacturing of the machine cover
In most cases, sheets of plywood 2 cm thick are used to make the cover. The blank must correspond to 60 cm in length and 50 cm in width. To improve the basic performance of metalworking equipment it is necessary to achieve maximum strength desktop, for which to do simple activities.

- Four plywood blanks are prepared with dimensions of 100 by 100 mm.
- A groove of 50 by 50 mm is cut out in each part.
- To strengthen them, they are fixed with clamps at all corners of the lid.
- Individual elements are connected with the appropriate adhesive composition.
Setting the machine stop
After the preparation of the cover and the elevator proceed to the installation of the stop, for which they follow a certain sequence of actions.

As you can understand from the article, designing and manufacturing a home-made metal milling machine with your own hands is not a very complicated process, especially if you approach it with due responsibility and listen to the recommendations of professionals. Following the exact sequence and technological features assembly of the machine, ultimately get a high-quality metalworking unit, according to its characteristics close to the factory analogue.
We also recommend
 Productive and reproductive thinking
 Reasonable egoism - what is the theory of reasonable egoism?
 Boris Nikolaevich Yeltsin, the first President of Russia
 Underground fights. Underground kings. What is “fighting not for the masses”? Where can you fight for money?
 Yakov Pavlov and Other Heroes of Stalingrad You Need to Know
 Survive an accident at sea in a dream - in reality experience a new love