Make a drill press from a hand drill. Homemade drilling machine and other devices from a drill
It is not necessary to spend money on a bench drilling machine, because it is not so difficult to make it yourself. To do this, you will need to purchase, manufacture or use used parts. We will walk you through the creation of several designs, and you will be able to choose your own model for assembly.

Almost every owner who builds or renovates his house or apartment, repairs household and garden equipment, and various crafts made of metal and wood has a drill. But for some operations, a drill is not enough: you need special accuracy, you need to drill a hole at a right angle in a thick board, or you just want to make your work easier. This will require a machine that can be made on the basis of various drives, machine parts or household appliances, other improvised material.
The type of drive is a fundamental difference in the designs of home-made drilling machines. Some of them are made using a drill, mostly electric, others - using engines, most often from unnecessary household appliances.
Desktop drilling machine from a drill
The most common design can be considered a machine made from a manual or electric drill, which can be made removable, so that it can be used outside the machine, and stationary. In the latter case, the switching device can be transferred to the frame for greater convenience.
Main elements of the machine
The main elements of the machine are:
- drill;
- base;
- rack;
- drill mount;
- feed mechanism.
The base or bed can be made from a solid cut of hardwood, furniture board or chipboard. Some prefer a metal plate, channel or brand as a base. The bed must be massive in order to provide stability to the structure and compensate for vibrations during drilling in order to obtain neat and accurate holes. The size of the frame made of wood is at least 600x600x30 mm, from steel sheet - 500x500x15 mm. For greater stability, the base can be made with lugs or bolt holes and fastened to a workbench.
The rack can be made of a bar, round or square in section of a steel pipe. Some masters use the frame of an old photographic enlarger, a substandard school microscope, and other parts that have a suitable configuration, strength and weight as a base and stand.
The drill is fastened with clamps or brackets with a hole in the center. The bracket is more reliable and gives greater accuracy when drilling.

Design features of the drill feed mechanism
The feed mechanism is needed to move the drill vertically along the rack and can be:
- spring;
- articulated;
- screw jack design.
Depending on the type of mechanism adopted, the type and arrangement of the rack will also differ.
The drawings and photos show the main designs of bench drilling machines that can be made from electric and hand drills.
 With spring mechanism: 1 - rack; 2 - metal or wooden profile; 3 - slider; 4 - hand drill; 5 - drill clamp; 6 - screws for fastening the clamp; 7 - spring; 8 - square for fixing the rack 2 pcs.; 9 - screws; 10 - emphasis for the spring; 11 - wing bolt for fastening the stop; 12 - machine base
 With spring-lever mechanism
 With a spring-hinge mechanism: 1 - frame; 2 - washer; 3 - nut M16; 4 - suspension struts 4 pcs.; 5 - plate; 6 - bolt M6x16; 7 - power supply; 8 - thrust; 9 - spring; 10 - M8x20 bolt with nut and washers; 11 - drill chuck; 12 - shaft; 13 - cover; 14 - handle; 15 - bolt M8x20; 16 - holder; 17 - stand; 18 - a glass with a bearing; 19 - engine
 With articulated springless mechanism
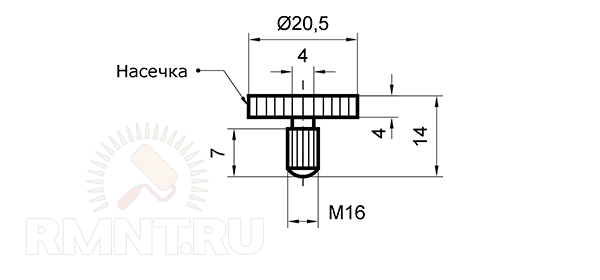
 Rack, working on the principle of a screw jack: 1 - frame; 2 - guide groove; 3 - M16 thread; 4 - bushing; 5 - nut welded to the sleeve; 6 - drill; 7 - handle, during the rotation of which the drill moves up or down
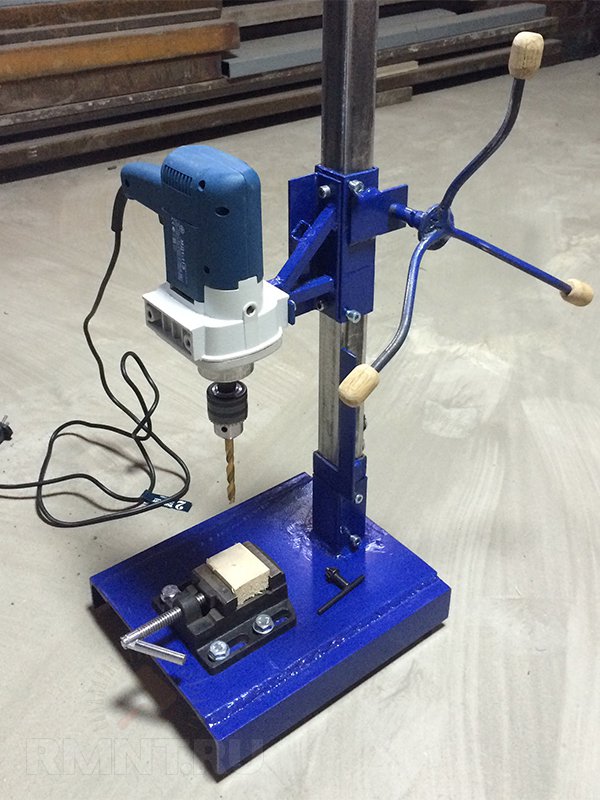
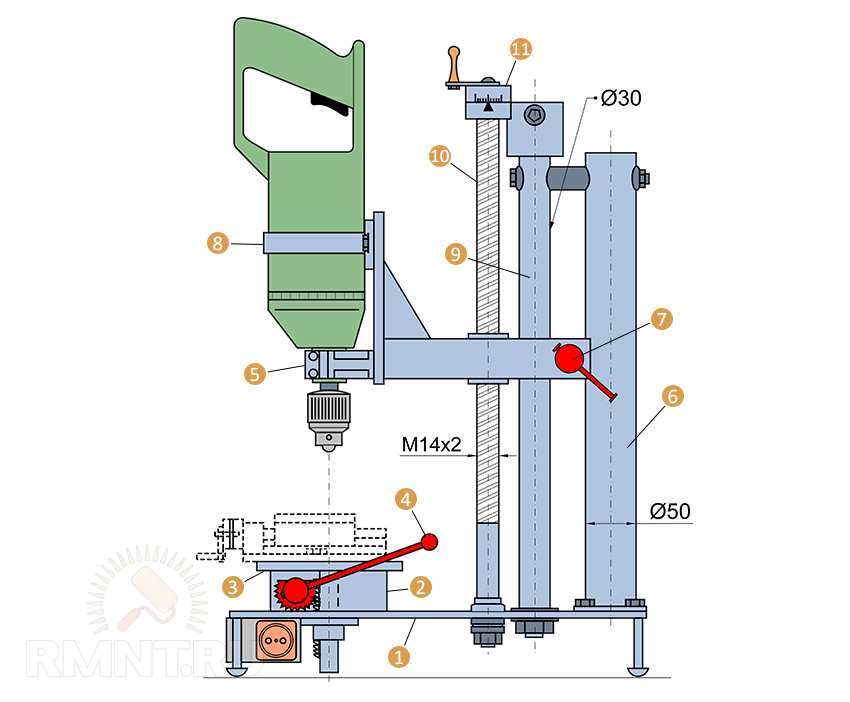 Drilling- milling machine: 1 - machine base; 2 - table lifting plate supports 2 pcs.; 3 - lifting plate; 4 - table lifting handle; 5 - movable drill holder; 6 - additional rack; 7 - screw fixing the drill holder; 8 - drill clamp; 9 - main rack; 10 - lead screw; 11 - drum with Nonius scale
 Machine from a car jack and a drill
 The carriage is made of furniture guides
 Mini-machine from a decommissioned microscope
 Base and stand from an old photographic enlarger
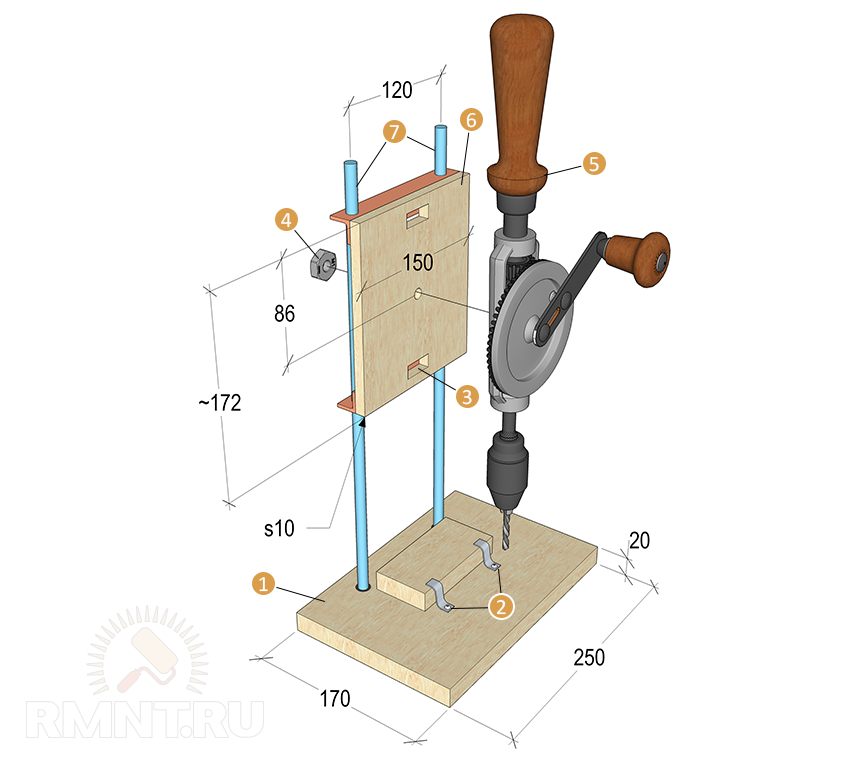 Machine from a hand drill: 1 - bed; 2 - steel clamps; 3 - grooves for attaching a drill; 4 - drill fastening nut; 5 - drill; 6 - slider; 7 - guide tubes
Video 1. Walkthrough for an inexpensive machine. The bed and the rack are wooden, the base of the mechanism is a furniture guide
Video 2. Drilling machine- a jack from the Zhiguli and a drill
Video 3. Spring-lever stand for a drill
Video 4. Step by step creation steel stand for drill
Machine based on the steering rack of a car
The steering rack for a car and a drill are quite massive products, so the frame must also be massive and, preferably, with the possibility of fixing the machine to a workbench. All elements are welded, as the connection with bolts and screws may not be sufficient.

The bed and the support post are welded from channels or other suitable rolled products, about 5 mm thick. The steering rack is fixed to the rack, which should be 70–80 mm longer than the rack, through the eyelets of the steering column.
To make it more convenient to use the machine, the control of the drill is taken out in a separate block.
Video 5. Drilling machine based on the steering rack from Moskvich
The order of assembly of drilling desktop machines:
- preparation of all elements;
- fastening the rack to the frame (checking the verticality!);
- assembly of the movement mechanism;
- fastening the mechanism to the rack;
- drill mount (check verticality!).
All fasteners must be made as securely as possible. It is desirable to connect steel one-piece structures by welding. When using any kind of guides, you need to make sure that there is no lateral play during movement.
Advice! To fix the part in which the hole is drilled, the machine can be equipped with a vice.
On sale you can also find ready-made racks for a drill. When buying, you need to pay attention to the mass of the structure and the size of the working surface. Light (up to 3 kg) and inexpensive (up to 1.5 thousand rubles) racks are suitable for making holes in a thin plywood sheet.
Drilling machine using asynchronous motor
If there is no drill on the farm or it is not desirable to use it in the machine, you can make a design based on an asynchronous motor, for example, from an old washing machine. The scheme and manufacturing process of such a machine are quite complex, so it is better to do it by a master with sufficient experience in turning and milling, assembling electrical circuits.
The device of a drilling machine with an engine from household appliances
To get acquainted with the design, we present assembly drawings and detailing, as well as the characteristics of assembly units in the specifications.
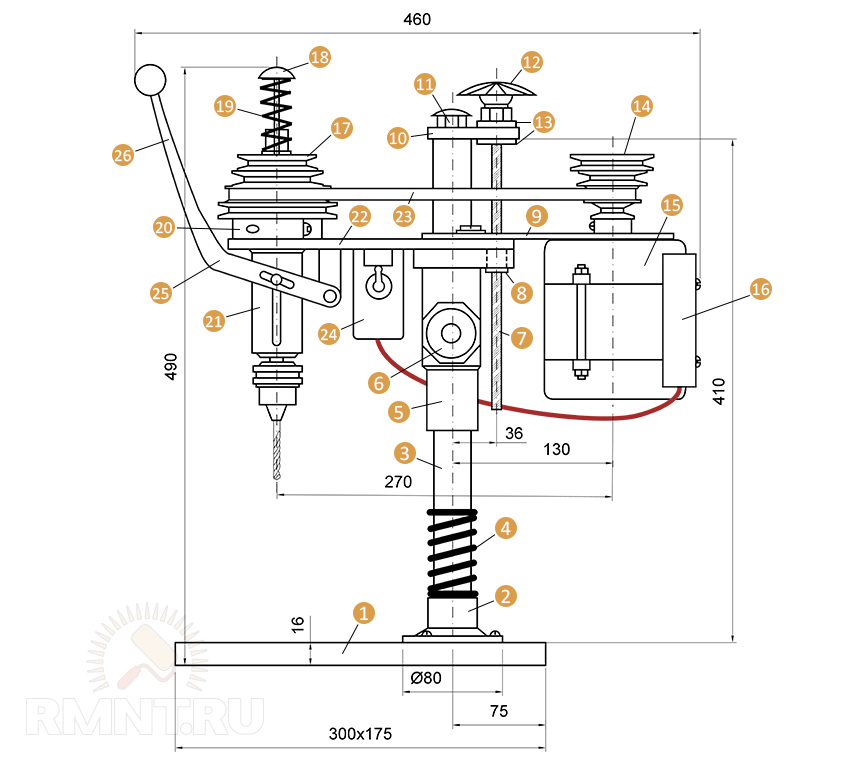
Details and materials for the manufacture of the machine are shown in the table:
Table 1
| Pos. | Detail | Characteristic | Description |
| 1 | bed | Textolite plate, 300x175 mm, δ 16 mm | |
| 2 | Heel | steel circle, Ø 80 mm | Can be welded |
| 3 | Main rack | Steel circle, Ø 28 mm, L = 430 mm | One end is turned to a length of 20 mm and threaded M12 |
| 4 | Spring | L = 100–120 mm | |
| 5 | Sleeve | Steel circle, Ø 45 mm | |
| 6 | Locking screw | M6 with plastic head | |
| 7 | lead screw | Тr16х2, L = 200 mm | From the clamp |
| 8 | Matrix nut | Тr16х2 | |
| 9 | Steel sheet, δ 5 mm | ||
| 10 | Lead screw bracket | Duralumin sheet, δ 10 mm | |
| 11 | Special nut | M12 | |
| 12 | Lead screw flywheel | Plastic | |
| 13 | washers | ||
| 14 | Four-strand block of the driving pulleys of the V-belt transmission | Duralumin circle, Ø 69 mm | Changing the spindle speed is done by moving the drive belt from one groove to another |
| 15 | electric motor | ||
| 16 | Capacitor block | ||
| 17 | Duralumin circle, Ø 98 mm | ||
| 18 | M5 screw with plastic mushroom | ||
| 19 | Spindle return spring | L = 86, 8 turns, Ø25, made of wire Ø1.2 | |
| 20 | Duralumin circle, Ø 76 mm | ||
| 21 | Spindle head | see below | |
| 22 | Duralumin sheet, δ 10 mm | ||
| 23 | Drive belt | Profile 0 | Drive V-belt "zero" profile, so the pulley block grooves have the same profile |
| 24 | Switch | ||
| 25 | Mains cable with plug | ||
| 26 | Tool feed lever | Steel sheet, δ 4 mm | |
| 27 | Removable lever handle | Steel pipe, Ø 12 mm | |
| 28 | Cartridge | Tool Chuck No. 2 | |
| 29 | Screw | M6 with washer |


The spindle head provides both translational and rotational motion. It is mounted on its own base - duralumin console.
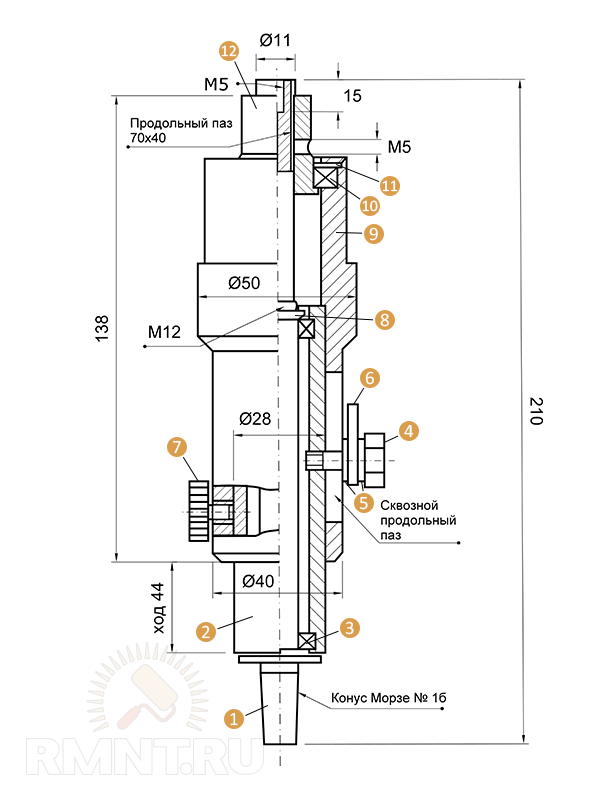
Details and materials for the manufacture of the spindle head are shown in the table:
table 2


 Drilling machine assembled
The electrical circuit depends on the type of engine.
 Simple circuit diagram for factory machine 2M112
Homemade machines for drilling printed circuit boards
Mini-board drilling machines for radio amateurs also borrow a drive from various low-power devices. At the same time, cutters for cropping photographs are used as levers, soldering irons, collet pencils instead of a cartridge. The drilling site is illuminated with LED flashlights - there are enough opportunities for technical creativity.


![]() A simple electric motor control circuit
A simple electric motor control circuit
Video 7. Mini board drilling machine
An electric drill is a versatile tool, since not only drills and cutters can be clamped into its chuck, but also wooden details, in case the machine is used in a lathe. The need for a drilling machine arises when the home master needs to drill holes at right angles. In this case, the master faces a choice: buy a ready-made drilling stand or make a machine from a drill with his own hands. We will show you how to implement the second option.
In the manufacture of a stand for fixing a drill, it is necessary to understand the principle of its operation, and show imagination in the manufacture of its individual components.
Rack Option #1
For example, the following is an instruction for making a drill fixture from simple improvised materials.
Rack Option #2
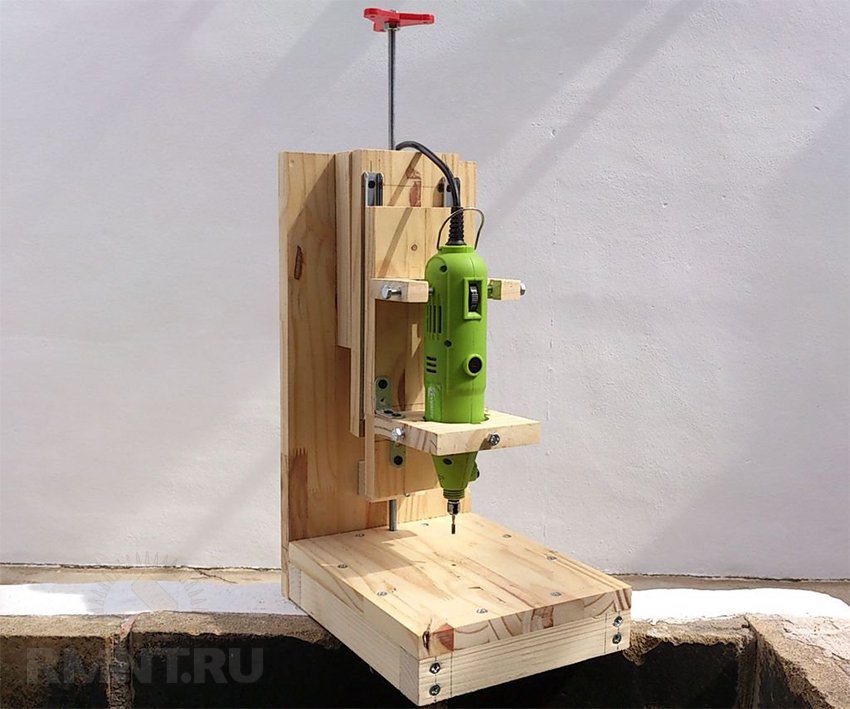
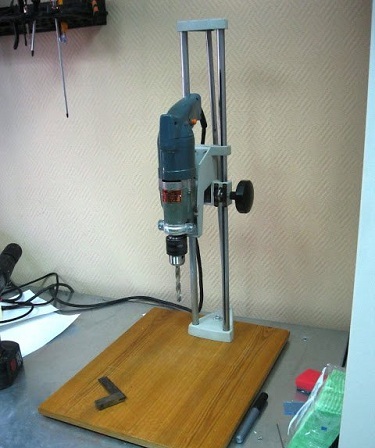
The figure below shows another homemade drilling machine, the stand for which can be made from thick plywood, and the rest of the parts from a wooden beam.

The role of the guide in a drilling machine made from a drill is played by an aluminum profile. But, if you do not find such a profile, then you can replace it with furniture guides(telescopic).

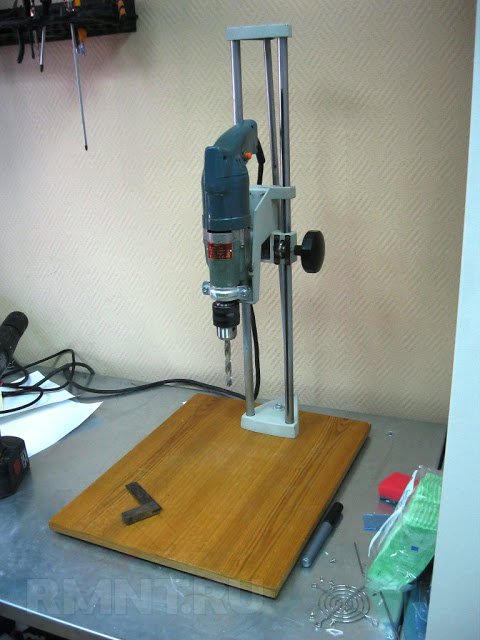
Rack Option #3
If you have a house lying around soviet era photo enlarger, then it can serve as the basis for a stand for a drill. This design already has rigid guides, as well as a gear mechanism that provides vertical movement of the carriage along them.
You only need to slightly modify the design by attaching clamps to the carriage, and comfortable handles to the height adjuster.
Well, if you don’t have the desire to design devices for a drill with your own hands, or you just don’t have time for it, but you still need to drill a hole with a drill strictly at a right angle, then you can buy a ready-made stand at a price of about 1200 rubles.

Other options for drill machines
The drilling machine can serve as an engine for constructing various woodworking tools. Consider what else you can make a machine from a drill with your own hands.
Frazier
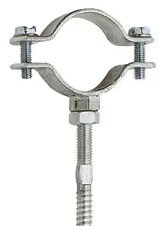
To make a router with a drill, you will need to take a regular clamp used for water pipes.
You will also need to find some chipboard (you can use a slab of old furniture), and then assemble such a structure as in the figure below.
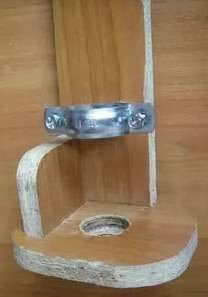
This kind of router can be used, for example, for milling a groove at the end of a tabletop, for stuffing a T-shaped profile, or for shaped milling of the ends of wooden parts. Of course, good quality milling in this way is difficult to achieve, since the device does not have enough speed. For comparison: the spindle of a router can rotate at a speed of 26,000 rpm. and more, thanks to which high quality surface treatment.
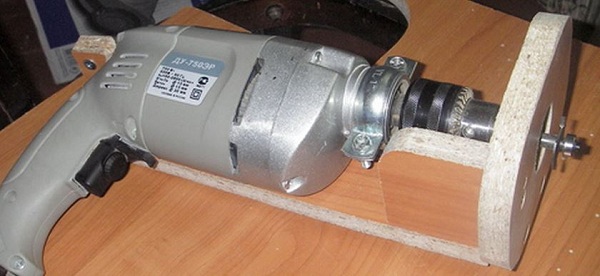
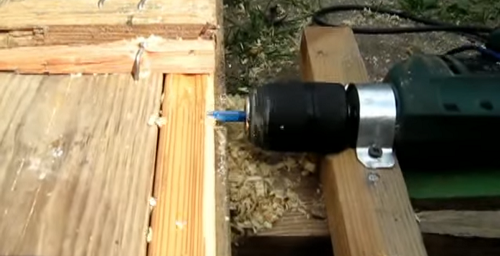
You can also make a milling machine out of a drill, if you clamp it in this way, as shown in the figure below. In this way, a quarter is selected in a bar for inserting glass, for example, in the manufacture of a window leaf.
![]()
For turning small, round parts, you can make a device in which the drill will give rotational movement to the workpiece. by the most in a simple way to perform turning work on wood can be called the one indicated in the figure below.
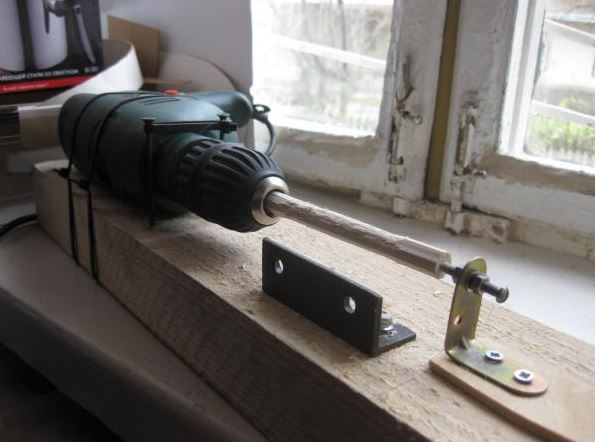
Such a wood lathe can be made in minutes. To make it you will need wooden beam or a board, a couple of corners, as well as a sharpened bolt.
More "advanced" drawing lathe, which can be made from a drill with your own hands, is presented below.
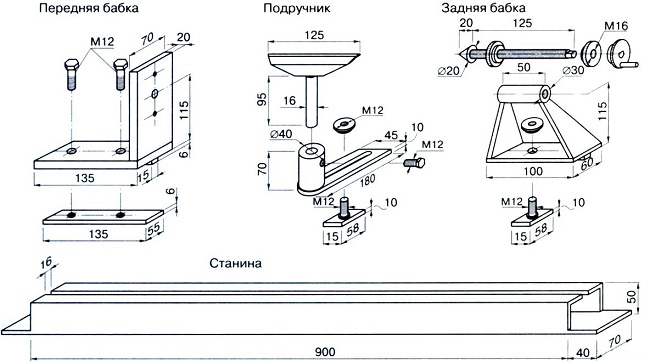
If you do not have the opportunity to make such a device from metal, as shown in the drawing, then you can do a pair of clamps attached to a workbench.
The first clamp with a clamp can be used to secure the machine to the workbench.

As a clamp for a drill, you can use a small vice with a clamp clamped in them. With the second clamp, you need to clamp the homemade tailstock with a screw screwed into it to center and maintain the part. The end of the screw must be tapered.

As a handpiece, a bar of the required thickness is pressed against the workbench.
It is also not difficult to design a homemade lathe from wooden blocks as shown in the following figure.

For precision turning work with long and large parts, it is recommended to make a lathe from metal profile (square).

In the manufacture of this design, it is necessary to accurately maintain the alignment of the headstock and tailstock. The unit to the headstock can be secured with a pair of clamps.

The tailstock must be movable in order to be able to process parts of various lengths.

The tool rest must also be movable and move both along the bed and across it so that you can move it closer to the workpiece to reduce the leverage. If the lever is large, the tool may be pulled out of the hands, and the part out of the chuck, which is fraught with serious injury.
It is important that the support platform rotates, for example, when machining a part at an angle.
If you make such a machine, then it can easily be converted into a universal one. It is enough to clamp an emery or felt wheel in the cartridge of the apparatus, and the design turns into grinding machine from a drill. In the same way, you can make a grinding unit out of it.
More simple model a universal machine is easy to make from an ordinary planed board. To do this, you need to cut it into parts, and assemble the structure, as shown in the figure.
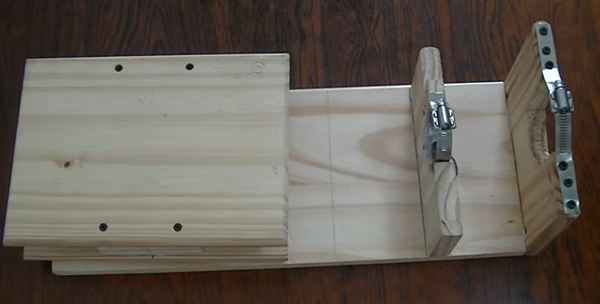
This is what the bed looks like when the table is removed.

The thickness of the board used in the construction is 2 cm. The length of the product is 50 cm. The width of the fixture is 20 cm.
The height of the racks is 9 and 14 cm. The height can be different and depends on what diameter the grinding wheel will be used. The whole structure is twisted with self-tapping screws. It is recommended to smear the joints of parts with glue before assembly.

On top of the racks, 2 clamps are fixed, one of which is cut and unbent. As a soft pad used cut polyethylene tube, nailed with carnations.

On the frame, it is necessary to make a small cut (groove) and expand it from the bottom side so that the head of the coupling bolt does not interfere.

Next, you should twist 2 boards measuring 20 X 27 cm with a bar between them, the thickness of which is 4 cm (this way you get a table). The bar is needed so that the hand can freely pass between the planes while screwing the table to the frame.

A groove is also cut in one plank to secure the table to the base. After that, the table can be attached using a screw with a washer.

Thanks to the grooves, the table can be moved to the required distance to the cartridge. If the table is rotated, it will be possible to move it across the machine. The length of the groove determines the distance that the table can be moved.
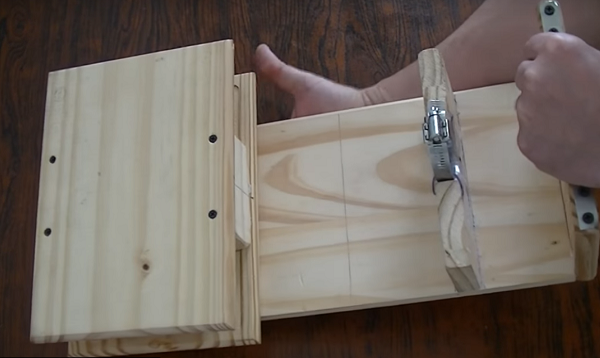
After fixing the drilling machine, you will get a universal fixture.
Now, if you clamp the drill chuck grinding wheel- You will receive a grinding unit. The presence of a reverse in the unit during grinding is desirable, but not necessary.

If set abrasive disc(for metal) from a grinder, then it becomes possible to cut metal rods. When cutting metal, be sure to wear safety goggles. You can also install a gear cutter, and cut thin plastic with it.
When installing abrasive wheel- it turns out a sharpener.
Such a unit can be used for turning knives, drills, planer knives, and also for sharpening tools for a wood lathe.
If you fix the guides on the table, and install the drill in the chuck, you get a filler machine.
Thus, the drill, thanks to the clamping chuck, is the basis for creating machines for various purposes. Such an increase in the functionality of a conventional drill will be very useful for home master, at the disposal of which there are various technological operations.
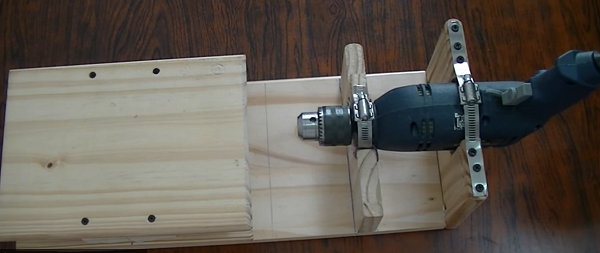
If for some reason (due to functionality, quality, inadequate price) a stand or guide for a drill does not suit you (see), you can make a drilling machine out of a drill with your own hands. For comfortable work on such a machine, it is important that it is massive enough to absorb the vibration of the drill and that the machine is stable with a heavy drill attached to it.
The homemade drilling machine discussed below is intended to demonstrate the principle of operation of such a design, and when reproducing it, there is no need to blindly copy the design. And it is best to show your imagination in the selection or creation of guides and fastening the drill.
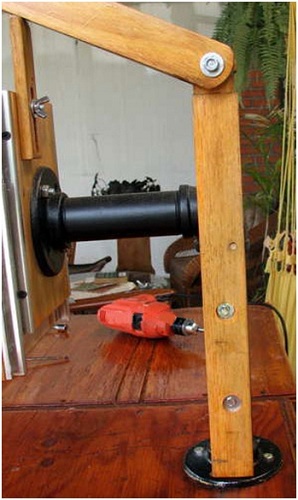
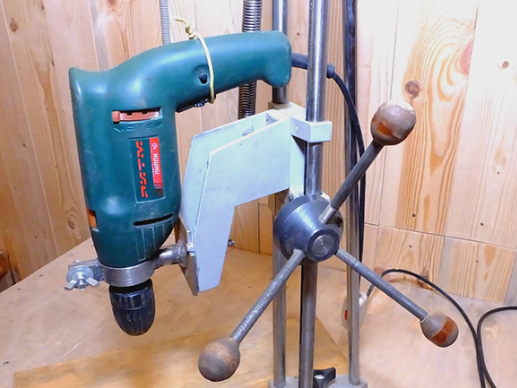
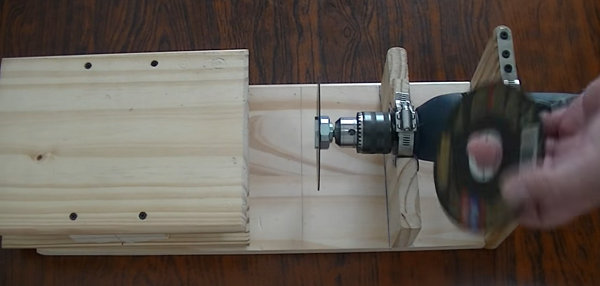
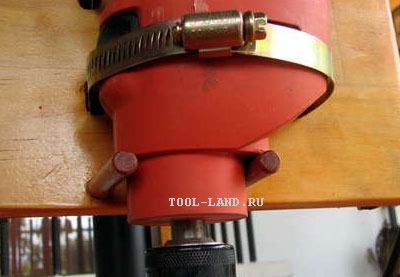
The drill is fastened with two clamps (it is better that between the drill and the clamp there is rubber gasket) to the board, which can move along the guides fixed on this board (movable) and on the fixed board. The movement of the movable board up and down is controlled by a lever associated with it. The downward movement of the lever, in order to limit the movement of the movable board, can be limited by a bar that supports the lever in its lowest position. The fixed board is attached to horizontal pipe through the flange. The horizontal pipe is attached to the vertical pipe, which is attached through a flange to the base of the machine (to a wide thick board) or, as in the photo, to a workbench.

The height of the bar limiting the lower position of the lever is adjustable, which allows you to adjust the drilling depth.
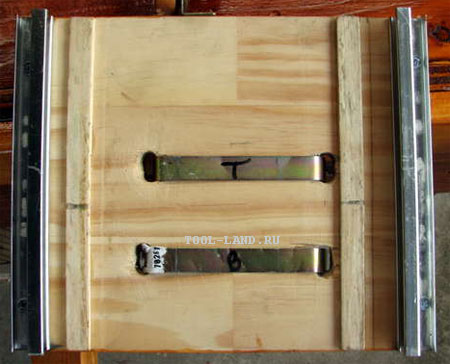
The movable board has 4 holes for clamps fixing the drill. Narrow laths are glued on its side facing the fixed board. These rails are lubricated with wax for better glide.
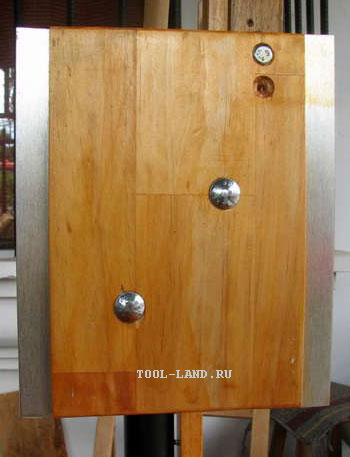
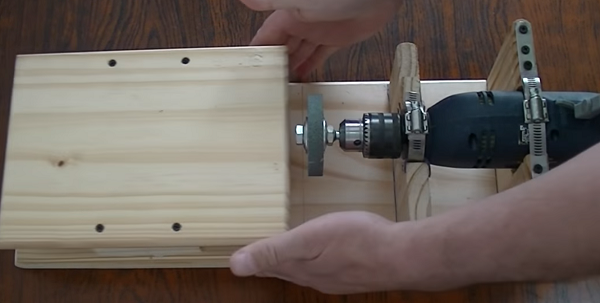
In addition to clamps, the drill is fixed by two rods supporting it from below.
Since the shape of the drill, with such a mount, does not provide a strictly vertical position of the drill, a rail is glued to the board to compensate for this.

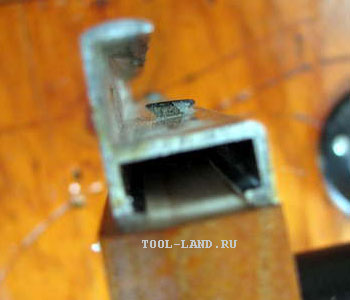
Used as guides aluminum profiles, which are screwed to the boards with screws threaded along the entire length. The guides must ensure good pressing of the movable board to the fixed one, that is, there should be no play.


When assembling the lever, since it is impossible to tighten the moving parts, a second nut is used to lock the nuts.

The rail leading from the lever to the movable board, at the end with which it is attached to it, must be rounded.

In order for the drill itself to rise to the upper position and remain in it, the design of the machine must be supplemented with a spring. One end of the spring can be attached with a wire to a horizontal pipe, and the other end to the very bottom of the movable board, if the spring is not flexible enough and the fixed board interferes, then through the rope.
When using the content of this site, you need to put active links to this site, visible to users and search robots.
We also recommend
 Switching power supply: repair and refinement
 Remote control of light
 Swimming lessons for preschool children
 Notes for the master - home household alarms
 Clock propeller on Atmega8
 Device and relay application examples, how to choose and connect a relay correctly Microcontroller and relay simple switching circuits