Mini lock for decorating the cottage with your own hands. How to build a mini stone castle in the country
Do you want to surprise your neighbors in the country? Do you dream of plunging into the atmosphere of the Middle Ages? Then build a medieval castle on your site. You can, of course, purchase a prefabricated version in a children's toy store, but at a cost of several thousand rubles, it will look like a large plastic toy. The castle, created by yourself, will look like a real one, and its size and appearance are limited only by your imagination.

Materials: stone or wood
For a structure consisting of three walls with towers, you will need the following materials:
- Styrofoam - 5 sheets measuring 100 x 60 cm x 3 cm
- Insulation for pipes "foam", diameter 110 mm - 4 pcs x 1 m
- Decorative plaster based on colored chips - 1-2 large cans
- Small stone or marble chips - 1 kg
- Acrylic paint to match the plaster - 1 can or can
- Dark acrylic paint (black or brown) - 1 can or can
- Plastic flower pots (for roofs) - 2 pcs.
- Glue for polystyrene foam (for example, "Moment Installation") - 2 large tubes
- Long screws (for flagpoles) - 2 pcs
- Mounting foam + gun - 2 cans
Instruments
- Thin knife - 1 pc, screwdriver - 1 pc.
- Meter ruler, short ruler, felt-tip pen or marker.
- Narrow paint brushes - 4-5 pcs.
- Spatula - 1 pc.
- Large brushes for painting teeth - 2 pcs.
- Insulating tape - 1 pc.
- Modeling mass (black or brown) - 1 pack
Stage 1. We draw a diagram of the future structure
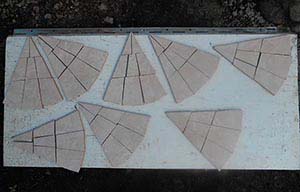
First you need to determine the constituent parts of the future castle - the number of walls and towers. I offer schemes of three types of walls that can be combined in any quantity. I decided to start with three walls and six towers - three round and three square. You can start work from any wall.

Stage 2. How to make a DIY wall layout
WALL-1. To make it, we need two sheets of foam (preferably white) and two plastic flower pots.

This is how it looks when finished:

We draw a scheme of walls
On one sheet of foam, draw a diagram of the wall with a felt-tip pen. She will be the carrier. The height of the towers is equal to the height of the sheet. The width of each tower is equal to the width of the cache-pot (roof) minus 1 cm. The distance between the teeth must be at least half the width of the teeth. The height of the walls and the middle part is approximately two thirds of the height of the towers. At the edges of the wall, it is necessary to leave 5 cm of an area free of teeth. You will then hide this part under the tower. Carefully cut out with a knife. In the middle part we cut out the gate. We do not cut out windows on the towers.
We draw blanks of towers
On the second sheet of foam we draw blanks for towers - 6 pieces, 3 for each tower. The size of the blanks is equal to the size of the towers. We cut out windows on four blanks. We do not throw away the cut pieces, they will later be useful to us when painting. We glue the blanks of the towers on top of each other on the load-bearing wall in the place marked for the towers - we glue two blanks on the front side of the wall (glue the blank with windows on top), glue the second blank with windows on the end side of the bearing wall. As glue, you can use Moment Installation glue. If you intend to use a different adhesive, be sure to first test on scraps of Styrofoam to see if the adhesive is corroding the Styrofoam. The same goes for colors. As a result, we get a wall with two towers, each of which has a thickness of 4 foam sheets. There are blank windows on the front and back walls of the towers. Windows need to be painted inside with dark paint. You also need to paint over the inside of the gate arch and the gate itself. If the side walls of the towers turned out to be protrusions due to the discrepancy in the dimensions of the blanks glued to each other, it is necessary to cut the towers on the sides, aligning the side walls.
We try on the "roof" on the towers. The cache-pot should be freely put on the tower and go on it by 1-2 cm. Please note that after painting the dimensions of the tower will increase by 5-10 mm. Therefore, if the "roof" is difficult to put on, then the tower must also be cut.
After the dark paint dries, a “lattice” can be made on the gate. To do this, using a ruler with a screwdriver or scissors, we make deep grooves in the form of a lattice on the painted gates so that unpainted light foam shines through them.
Painting the castle walls
Let's start with the teeth. Painting the teeth with plaster is the most time-consuming operation, so they must first be painted with paint to match the plaster, and the composition itself can only be placed on the front and back sides. You can generally not cover the teeth with plaster, but paint with paint from a spray can in a contrasting dark color, as we did on the third wall.
So, first we paint the teeth with paint to match the plaster. We use spray paint to paint over each tooth from all sides. Let's dry. Then we cover the front surface of wall-1 with decorative plaster. At this time, it is better to lay window openings with pieces of polystyrene foam so that the plaster does not get inside. The brush should be fairly hard and clean. After painting, if possible, it should be washed off the plaster and put into water. It is better not to use one brush more than twice because of stuck plaster. We are not painting the side walls of the towers yet. We will paint them last. We leave the wall blank-1 to dry in the sun for two days. After two days, we turn the product on the back side and also cover it with decorative plaster. In the meantime, it dries, you can do other walls.
WALL-2. For its manufacture, we need two sheets of foam.

This is how it looks in finished form (the outermost prong on each side then had to be cut off):

This wall is a variation of the first wall. Only here the tower is in the middle, and the gate is on the side. In addition, the teeth, as well as the tower, are cut from another sheet, and the windows are made through. The windows on the right side of the wall are lined with tabs painted dark. The windows on the left side are through. The height of the walls and the tower is equal to the height of the sheet.
So, we mark the gates, windows and a place for the tower on the first sheet. We cut out all windows, incl. and on the tower, we paint the cut out pieces of windows in a dark color. Then we paint in dark color the openings of windows and gates, as well as the gates themselves. After applying the plaster, you will need to insert the dark pieces of windows on the right side of the wall back into the openings. Leave the rest of the windows blank.
From the second sheet we cut out two blanks with windows. We make windows on the same level with the windows located on the tower, on the load-bearing wall. Separately, we cut out two or four blanks for the teeth for the right and left parts of the main wall. We glue the tower blanks on the front and back sides of the load-bearing wall, aligning the window openings. Then we also glue the teeth - on both sides of the load-bearing wall. I glued the teeth on only one side, using only two blanks, because. originally planned to make an extension behind the second half of the wall. The tower is made up of three layers. The thickness of the tower can be increased by adding an additional false wall glued to the front side of the tower (as we did when making wall-1).


Do not forget to leave the edges on both sides free from 3-5 cm teeth, which will then be hidden under the towers, and make rectangular cutouts for joints measuring 3 x 1.5 cm along the edges on the back of the wall.
We paint over the teeth with paint to match the plaster. After the paint dries, we cover the front side of the wall with decorative plaster (you can not cover the teeth with plaster). Then we sprinkle a part of the wall around the gate with small stone chips and, patting, melt the crumbs into the plaster. Crumbs can be sprinkled on the second half of the surface. After that, we leave the entire structure to dry for a couple of days, while we ourselves will be engaged in the manufacture of the third wall.
WALL-3. For its manufacture, we need one whole sheet of foam and pieces of the sheet remaining after the manufacture of the second.

This is how it looks in finished form (the extreme teeth then also had to be cut off in order to hide the edge in a round tower):

This type of wall is quite simple to manufacture, but looks quite impressive. Three and teeth are glued to the main sheet. The teeth are painted with acrylic paint in a contrasting color. After painting with plaster, the wall is covered with a thin layer of stone chips.
The teeth on this wall have a more complex structure - the top row is formed from wide teeth (3x3 cm), and the bottom row from narrow ones (4x1.5 cm).

We cut out the teeth from strips 10 cm high. To do this, the strip must be divided into 3 parts - 3 cm high, 3 cm and 4 cm high. On the first strip 3 cm high, we cut out teeth 3 x 3 cm in size, the distance between them is -1.5 cm. On the lower strip with a height of 4 cm, we make a triangular cut at an angle along the length of the entire strip, leaving a strip 1 cm thick at the bottom. After that, on the lower strip, we cut out long teeth measuring 1.5 x 4 cm. The distance between the lower teeth is no more than 1.5 cm Then we paint the teeth with paint using a spray can and a thin brush, carefully painting between them. The teeth can be painted either to match the plaster or in a contrasting color.
Then, from the remnants of the foam, we cut out three retaining walls in the form of triangles or trapezoids, the height of which should be at least a third and not more than half the height of the wall. We glue the supports and teeth on the main wall. Do not forget to leave 3-5 cm free from teeth on both sides, which will then be hidden under the towers, and make rectangular cutouts for joints measuring 3 x 1.5 cm along the edges on the back of the wall.
We put the structure face up and cover everything except the teeth with decorative plaster:

Then we sprinkle the entire surface with small pebbles, gently pressing them into the plaster.
While the third wall dries, you can paint the reverse side of the first two with plaster, if their front sides have already dried by this moment. Lastly, we paint over the sides of the towers, placing the walls on the end. Let each side dry for two days.
Now you can start working on the corner round towers.
Stage 3. Round towers of the knight's fortress
For the manufacture of round towers, you can use any thick pipes of the desired diameter that can be processed with a knife, for example, “shells” for pipe insulation made of foam. If they are not there, then you can use a foam pipe insulation with a diameter of 110 mm, which is sold on any construction market.

For the manufacture of three towers, we need four meter pieces of foam. From each of the four pieces we cut off cylinders 8-10 cm long and cut out teeth half the height of the workpiece. We cut the ring of teeth along the height and glue them on top of each of the three towers, wrapping them around the main part of the tower. We cut off the missing pieces with teeth from the fourth workpiece. While the glue dries, for a better fit, we fix the seams with electrical tape.
Next, on each tower we make longitudinal cuts along the length, equal in height to the height of the walls (60 cm) and in width - a little more than twice the thickness of the walls. The width of the cuts can be increased after painting, when you insert walls into them.
For variety, one or more towers can be decorated with an additional cylinder with tall narrow windows. The overlay is made from the remaining fourth piece of foam.

While the glue dries, we paint over the windows on the tower with black paint, and only after that in three or four steps we cover the elements with plaster, turning them by 90-120 degrees. Carefully paint over the teeth.
While the towers are drying, you can start making small parts for them and walls, such as roofs, flags, coats of arms, cornices, small windows. The number of details depends only on your imagination and patience. You just need to keep the proportions.
Metal buttons and stripes can be used as a coat of arms. Flags can be made from colored self-adhesive paper, but it is better to use self-adhesive film. We stick the flag on a long screw. Screws are screwed into plastic flower pots. We paint the cache-pot in red, drawing some details with black paint. The coat of arms is attached above the gate with the same plaster or glue.

Masonry elements can be added to rectangular towers and walls. To do this, you can use the black modeling mass, which is sold in children's stores and in the stationery departments. You can also use plasticine, but the advantage of the mass for modeling is that in air, unlike plasticine, it freezes.


We made the roof for the middle tower from a half of black paving slabs.
By the way, after the plaster on the round turrets dried up and the towers stood in the rain for several days, the plaster began to move away from the foam near the edges of the cut, like an orange peel, and we had to additionally glue this “crust” with Moment Montazh glue. Helped.
After drying, you can proceed to the most important stage - the assembly of the castle.
Stage 4. Assembling a medieval castle
Despite the fact that the design of the castle allows it to be moved to any place, it is still better to assemble the building on the site where it will stand.

The site for the castle must be prepared in advance. It should be flat and preferably without a slope. We made a castle to decorate the pond, so our platform had a slight slope towards the pond, which added additional difficulties for us when installing it. In order for the castle to stand evenly, it was necessary to cut the walls at an angle from below, since the foam plastic, even covered with massive plaster, is easily cut.
Having installed and connected the walls to each other, it is necessary to tighten the entire structure around the perimeter with a rope or cable, and then “glue” the walls at the joints with mounting foam. After the foam dries at the joints, remove the rope and begin to install round towers. To do this, we put the towers on top of the corners of the castle, inserting the walls into the longitudinal cuts made in the towers. If the cut is small, we increase it to the desired size so that the turrets fit snugly against the walls from the outside. The missing part of the towers on the inside of the castle can then be formed using polyurethane foam. We tightly press the edges of the cuts to the walls of the castle, if necessary, supporting each tower with stops, and fill the towers from the inside with mounting foam, making small protruding slides on top. In addition, it is possible to form the missing parts of the turrets from the inside of the building using mounting foam. To do this, we form a protrusion of the desired shape from foam at the junction of the walls, and after the foam hardens, cut off the excess with a knife and plaster. We limited ourselves to covering the internal joints of the walls with plaster.
After the foam dries, we carefully cut off the slides protruding above the towers with a knife so that a flat area is formed on top, which we also cover with plaster.

Then we remove all the remnants of the foam in the places where the towers adjoin the walls and paint over them with plaster. After that, the castle must be covered and allowed to dry for two or three days until the plaster is completely dry.


Now you can move on to the last step - highlighting.
The final stage. Building lighting
Undoubtedly, a castle built with your own hands will decorate your site at any time of the day. But it will look most impressive in the evening if you make a special highlight.

As a backlight, you can use solar-powered diffused light fixtures that need to be placed inside the castle. Then, through the through windows and open gates of the castle, located on the second wall, a faint light will stream at night, enlivening the castle and giving it mystery. And solar directional light fixtures built into the “stones” and installed outside will illuminate the walls from all sides.
But to illuminate the front wall, it is better to use a stationary directional light, into which a color-changing light bulb is screwed. And then the effect will be extraordinary.
And finally, a few more practical tips.

I, like some of you, had an idea-fix to do something pleasing to the eye against the backdrop of a country landscape. The choice fell on a mini-castle, since it is the easiest to enter it anywhere in the site, taking into account its geological features. Moreover, you can build creatively, adding or changing its elements on the go.
The main material is sand and cement for the longevity of the composition. After experimenting, I settled on a composition of 2 to 1 (i.e. 2 parts sand and 1 part cement). Sand is best dried in the sun, then it is easier to mix with cement, and also sifted for use in elements with fine detail, as debris can ruin the part.
The castle has a fairly decent volume, so building it all at once is unrealistic. To do this, first I make separate parts of the castle, so that later I can build it from cubes in a couple of days. The last, third castle was assembled in two days. Neighbors thought he fell from the sky when they saw him.
So, consider the elements of a typical design.

Let's start with the towers. A cylinder of the desired radius is rolled up from a sheet of iron (I have about 2-30 cm). The cylinder is fixed with wire or self-tapping screws so that it can be easily disassembled later. Anything is placed inside the cylinder - bottles, cans - to reduce the consumption of the solution, but the thickness to the ballast must be at least 5 cm. Fill with a fairly thick solution. We give him several hours to set to such a state that when the formwork is removed, it does not crumble. You can choose the height of the cylindrical formwork yourself. It can be equal to the height of the tower, or less, but then the formwork will have to be disassembled and assembled above the already seized lower part.

We immediately begin to cut the raw, slightly seized solution. The cutting technology is the same as that of the sandboxes. For cutting, I use a set of tools available to everyone. I have these screwdrivers, chisels, a medical scalpel, a hacksaw blade for metal and various strips of tin to form various architectural elements.
A simple cylinder is boring, and this is where the flight of fancy begins. I make various grooves by wrapping a cylinder with a long strip of tin, using this strip as a guide, with a screwdriver or chisel I choose annular recesses. Then, in the lower part, you can imitate masonry, destruction, chipped plaster, cracks - after all, the castle is ancient.

For me, aging is the most exciting part of the process. At the same time, we do not amuse ourselves with making windows, loopholes, picking out the desired recess with a knife. If there is a desire to make a turret in the upper part of the tower, then we turn off a cylinder with a diameter a couple of centimeters larger and a height of 10-15 cm, insert a plastic bottle inside to save the solution (it will be removed after complete setting).

We fill the form with a solution and, after partial setting, carefully remove the cylinder formwork and make the required number of windows, teeth - as fantasy tells. I cut the teeth with a hacksaw blade for metal - I make cuts of the required depth and pick off the excess solution between the cuts.

The roof can be made from tin cones, and you can use this tin cone as a mold for pouring mortar (I do this). After complete setting, carefully knock out our roof from the mold. Do not forget that we are still preparing individual elements of the castle. We'll put it all together later. So we figured out the tower. We have all the elements ready and stacked somewhere in the corner.

Let's start building walls. Our walls will be either fortress (1) or an element of the building (2).

There is no difference in their production. We assemble a rectangle of the right size from boards 5 cm wide. We put it on a flat surface (I have an old kitchen table) after placing either a film or a piece of roofing material so that the solution that is then poured is not absorbed. You can place a metal arch in this frame - this will be a door or gate. Pour the solution into the frame. Where no windows or doors are planned, gravel or broken bricks can be poured to the bottom to save mortar. After the solution is poured to the desired height, you can take pretty pebbles from gravel and poke them at the base of the foundation so that they protrude with flat edges above the general plane of the solution by about 5 mm.
If there is no gravel, then after partial setting with a sharp knife or scalpel, you can imitate the foundation. You can also mark future windows with pebbles. Thus, your task is to make such flat elements. To speed up, I make 2-3 such rectangles at the same time. Having made such a wall once, you will understand that they are made easily and very quickly. As a rule, we are interested in the outer side of the castle, the inner part does not represent anything, because it is not visible.

So, after a few hours, the mortar of our future walls seized very (!) This moment so that it was pliable, but did not collapse, and if it was overexposed, it would be difficult to process. We carefully disassemble the frame and we are left with a flat rectangle on the table. If you are making a wall with teeth, then we make the gaps between the teeth by gradually removing the solution with a flat tool (I use a metal ruler for this). Next, loopholes and windows are made. Draw whatever your fantasy tells you. To remove the remnants of the solution, I use a soft brush (probably seen in the movies how archaeologists work). In the end, you will have something like the following on your table.

Leave the finished walls for about a day on the table. Then they can safely be removed from the table and also put in a corner. When the required number of elements has already been made, we select a sunny day for installation in a summer cottage. There is another important point here. The castle looks more beautiful on some kind of elevation, on a pile of stones. So prepare a foundation for it. If you use stones, always place the stones on a small layer of mortar first. If this is not done, then the stones will move over time and destroy your beauty.
When the foundation is prepared, we proceed to the assembly. First, we install it on a cement mortar previously applied to the foundation, for example, tower No. 1. We attach wall No. 1 to the tower for mortar. Then we install the tower number 2.
The castle is already beginning to take shape. You are filled with excitement. Next, add wall No. 2 and finish with the installation of tower No. 3. My towers were heavy, so men need to tinker. Thus, at this stage, we got this design (top view)
But wall #2 will be part of the building, so I take some bricks and form a rectangle of this building. In order to prevent the solution from getting into windows or doors from the inside, I close them with something flat from the inside (I use pieces of flat slate or fragments of flat tiles).
I have the inside of the castle hidden. But if you want it to have a beautiful view, you need to make both wall No. 3 and the inside for the monolith, fill it with concrete mortar or fill it with construction debris.

When this structure grabs, form a gable roof over the building. It takes me two or three bricks to do this (a mortar is thrown with a spatula and leveled under a cone).
So, from the main basic elements, slightly changing them depending on your imagination (for example, if you are tired of round towers - make rectangular formwork and the towers will be square, etc.) you can make a complex castle - like this for example.
Decorating a garden plot with various figurines and structures is a very popular activity lately. It also captivated me. This is the stone castle I built in my flower bed with no experience with mortar. If someone likes this idea - go for it!
1. For work, it took me three trimmings of an asbestos-cement pipe, concrete mortar (1 part of cement + 3 parts of fine sand + water). The prepared solution should not spread.
The work was done in the following order:
Pipe cuts dug up and concreted (for stability). Then she began to lay out stones around the perimeter of each pipe. After several rows of masonry, it is necessary to let the solution "grab", then start working again.
I made windows from a plastic bottle (1.5 liters), cut lengthwise into two parts.

2. The roof for the castle can be made by molding a cone on top of the tower with a thick concrete solution and laying out a mosaic of broken tiles on it.
I made cones out of polyethylene foam, filled them with concrete, let them dry (3-4 days).
3. This is what roof blanks look like.

4. With the help of a tile cutter, I cut the tiles of the desired shape (I saw and used the tile cutter for the first time).
5. I installed the cones on the towers and coated them with mortar around the perimeter. Then she laid them out with cut tiles on the same concrete mortar.

6. I laid out the arch of the castle, using for support a form previously cut out of polystyrene in the shape of an arch (after the solution hardens, the foam is easily removed).
Under the arch and walls of the castle, for their stability, I made shallow grooves and filled them with mortar.
I sculpted the castle for about a month :). It took approximately 10 - 12 hours to build it, excluding the time for concrete drying in each stage of work.

7. For greater decorativeness of the castle, you can pour a path of marble chips from the arch, plant flowers, install a garden figurine or a flashlight next to it, as fantasy tells.

I did not find a ready-made figurine for the castle to my taste. Therefore, remembering the modeling lessons from plasticine at school, I blinded such a dragon. True, from cement. Soon he will settle in the castle.

So he was in the process of sculpting.

I had an idea to make a fix under the tree for garden pleasing eye, do it yourself. The choice fell on the mini lock , since it is most simple to enter it at any point in the site, taking into account its geological features. Moreover, you can build creatively, adding or changing its elements on the go.
The main material is sand and cement for the longevity of the composition. After experimenting, I settled on a composition of 2 to 1 (i.e. 2 parts sand and 1 part cement). Sand is best dried in the sun, then it is easier to mix with cement, and also sifted for use in elements with fine detail, as debris can ruin the part.
Lock
It has a fairly decent volume, therefore it is unrealistic to build it all at once. To do this, first I make separate parts of the castle, so that later I can build it from cubes in a couple of days. Last, third lock was assembled in two days. Neighbors thought he fell from the sky when they saw him.
So, consider the elements of a typical design.

Let's start with the towers. A cylinder of the desired radius is rolled up from a sheet of iron (I have about 2-30 cm). The cylinder is fixed with wire or self-tapping screws so that it can be easily disassembled later. Anything is placed inside the cylinder - bottles, cans - to reduce the consumption of the solution, but the thickness to the ballast must be at least 5 cm. Fill it with a sufficiently thick solution. We give him several hours to set to such a state that when the formwork is removed, it does not crumble. You can choose the height of the cylindrical formwork yourself. It can be equal to the height of the tower, or less, but then the formwork will have to be disassembled and assembled above the already seized lower part.

We immediately begin to cut the raw, slightly seized solution. The cutting technology is the same as that of the sandboxes. For cutting, I use a set of tools available to everyone. I have these screwdrivers, chisels, a medical scalpel, a hacksaw blade for metal and various strips of tin to form various architectural elements.
A simple cylinder is boring, and this is where the flight of fancy begins. I make various grooves by wrapping a cylinder with a long strip of tin, using this strip as a guide, with a screwdriver or chisel I choose annular recesses. Then, in the lower part, you can imitate masonry, destruction, chipped plaster, cracks - after all, the castle is ancient.

For me, aging is the most exciting part of the process. At the same time, we do not amuse ourselves with making windows, loopholes, picking out the desired recess with a knife. If there is a desire to make a turret in the upper part of the tower, then we turn off a cylinder with a diameter a couple of centimeters larger and a height of 10-15 cm, insert a plastic bottle inside to save the solution (it will be removed after complete setting).

We fill the form with a solution and, after partial setting, carefully remove the cylinder formwork and make the required number of windows, teeth - as fantasy tells. I cut the teeth with a hacksaw blade for metal - I make cuts of the required depth and pick off the excess solution between the cuts.

The roof can be made from tin cones, and you can use this tin cone as a mold for pouring mortar (I do this). After complete setting, carefully knock out our roof from the mold. Do not forget that we are still preparing individual elements of the castle. We'll put it all together later. So we figured out the tower. We have all the elements ready and stacked somewhere in the corner.

Let's start building walls. Our walls will be either fortress (1) or an element of the building (2).

There is no difference in their production. We assemble a rectangle of the right size from boards 5 cm wide. We put it on a flat surface (I have an old kitchen table) after placing either a film or a piece of roofing material so that the solution that is then poured is not absorbed. You can place a metal arch in this frame - this will be a door or gate. Pour the solution into the frame. Where no windows or doors are planned, gravel or broken bricks can be poured to the bottom to save mortar. After the solution is poured to the desired height, you can take pretty pebbles from gravel and poke them at the base of the foundation so that they protrude with flat edges above the general plane of the solution by about 5 mm.
If there is no gravel, then after partial setting with a sharp knife or scalpel, you can imitate the foundation. You can also mark future windows with pebbles. Thus, your task is to make such flat elements. To speed up, I make 2-3 such rectangles at the same time. Having made such a wall once, you will understand that they are made easily and very quickly. As a rule, we are interested in the outer side of the castle, the inner part does not represent anything, because it is not visible.

So, after a few hours, the mortar of our future walls seized very (!) This moment so that it was pliable, but did not collapse, and if it was overexposed, it would be difficult to process. We carefully disassemble the frame and we are left with a flat rectangle on the table. If you are making a wall with teeth, then we make the gaps between the teeth by gradually removing the solution with a flat tool (I use a metal ruler for this). Next, loopholes and windows are made. Draw whatever your fantasy tells you. To remove the remnants of the solution, I use a soft brush (probably seen in the movies how archaeologists work). In the end, you will have something like the following on your table.

Leave the finished walls for about a day on the table. Then they can safely be removed from the table and also put in a corner. When the required number of elements has already been made, we select a sunny day for installation in a summer cottage. There is another important point here. The castle looks more beautiful on some kind of elevation, on a pile of stones. So prepare a foundation for it. If you use stones, always place the stones on a small layer of mortar first. If this is not done, then the stones will move over time and destroy your beauty.
When the foundation is prepared, we proceed to the assembly. First, we install it on a cement mortar previously applied to the foundation, for example, tower No. 1. We attach wall No. 1 to the tower for mortar. Then we install the tower number 2.

The castle is already beginning to take shape. You are filled with excitement. Next, add wall No. 2 and finish with the installation of tower No. 3. My towers were heavy, so men need to tinker. Thus, at this stage, we got this design (top view)
But wall #2 will be part of the building, so I take some bricks and form a rectangle of this building. In order to prevent the solution from getting into windows or doors from the inside, I close them with something flat from the inside (I use pieces of flat slate or fragments of flat tiles).
I have the inside of the castle hidden. But if you want it to have a beautiful view, you need to make both wall No. 3 and the inside for the monolith, fill it with concrete mortar or fill it with construction debris.


When this structure grabs, form a gable roof over the building. It takes me two or three bricks to do this (a mortar is thrown with a spatula and leveled under a cone).
So, from the main basic elements, slightly changing them depending on your imagination (for example, if you are tired of round towers - make rectangular formwork and the towers will be square, etc.) you can make a complex castle - like this for example.


A castle made of concrete is not very beautiful. Need to decorate it.


About imitation. The boulders at the base of the foundation are made very easily as they are of arbitrary shape. Imitation brick requires more patience. Under the ruler, I scratch a series of horizontal lines and then make vertical notches at characteristic intervals. We brush off the debris with a brush. Where the surface is very rough, it can be smoothed by moistening with water from a spray and ironing with a soft brush. When the assembled castle is completely dry, you can tint it a little. Roof to give the appearance of tiles. I use acrylic paint with the right color, for painting brick imitation I purchased such colors for acrylic - black, red, brown, yellow. Green can be taken to simulate moss. With a soft brush, lightly touching the masonry with different colors of color I paint the surface. In this case, only the convex surface is painted, while the recessed part remains gray. The effect is amazing. From half a meter it seems that everything is made of small bricks. In one place of the castle, I even simulated a destroyed brick wall. I did not expect such an effect. For a year the castle survived the winter and the paint is like new.
Can you make parts at home? I work in a garage. But in principle, you can do it at home if you don’t litter too much. In this case, the details can be broken down into even smaller ones. Those. for example, make a wall in two parts - the upper one where the battlements and the lower one where the gate. Similarly, make a tower from two or three cylinders or cubes. Then it's easier to transport. This allows you to prepare the castle even in the winter-spring time, and in the summer to assemble it in a couple of days. This is how I prepare dry mix. I fill half a bucket with dry sand, add cement and it mixes very easily with a small children's spatula. I pour all this into a small tub and do the next batch until I fill it. Thus, the dry solution is always in sufficient quantity.
I wish you all success in your work. And be sure to share your results.
Everyone wants to make their site original and special. But how to do it? Here, various decorative figures will come to the rescue, only now they require costs.
Therefore, you can build a castle with your own hands on the site. This will not be a problem for those who do at least something with their own hands. In addition, this does not require special costs.
Decorations for the site
To decorate their territory now exists many options:
- Entire zoos are literally built from old tires. There are swans, cats, giraffes and elephants.
- From unsuitable logs and stones, you can arrange flower beds and flower beds.
- From mounting foam and bottles you can create figurines for the garden.
- And if you use cement and have some skills in working with it, you can create simply magnificent sculptures that will decorate any area.
You can also build a castle with your own hands from improvised materials or even build a whole kingdom that will delight not only kids, but also adults. This building will add mystery to the garden, and in order to make it look more alive, you can make a rockery or rock garden.
For a stronger and more durable building, you should use cement-sand mixture. For the composition, it is better to use 2 parts of sand and 1 part of cement. Before starting, it is desirable to dry the sand - the drier it is, the easier it will be to sift and subsequently use.
Most often, castles are quite large in size, and besides, their construction is a bit of a challenge. To deal with this, you can try to build some parts separately, after which they can be easily assembled in the right place, like from cubes. Here's how to make a castle with your own hands.
Structure for building a castle
To build a tower from an iron sheet, you need to roll up a cylinder of the required size and fix it. You need to fix it so that after use it can be easily disassembled. To reduce solution consumption a bottle or jar should be placed inside the cylinder, but keep in mind that the thickness of the solution around the ballast should be about 5 cm.

When pouring the solution inside, make sure that it is thick. After that, he needs to give a few hours to harden, so that when removed, the formwork does not crumble.
The height of the formwork should be chosen in this way: it should be approximately equal to the tower, if it is less, it should be dismantled and assembled above the already set part.
You can cut the solution after it sets. To perform such work, the following tools are used:
- chisel;
- screwdriver;
- scalpel or similar blade;
- blade from a hacksaw for metal;
- strips of tin that will help form the elements of the castle.
A castle made of simple cylindrical shapes will look a little boring, in order to avoid this, you should experiment and imitate masonry, chips or cracks at the bottom of the castle with a chisel to give the castle an antique effect. With a knife, you can make windows and loopholes.
The roof is constructed from tin cones, and they can also be used as a mortar mold. The roof should be knocked out of the mold only after the mortar has hardened reliably.
Wall making
For the manufacture of walls, a rectangle of the required size is assembled from boards, after which it is placed on a flat surface, which is previously covered with a piece of film or roofing felt. The solution is poured into the resulting frame. To make windows or doors in the wall, the frames should be placed in advance in the right place.
 After the solution has been poured to the desired height, stones or gravel can be inserted into the lower part, so that as a result a kind of imitation of the foundation is obtained, or when using a knife, draw grooves - characteristic gaps between the foundation stones.
When the mortar hardens, the frame is removed and, if required, details are added: windows, loopholes, etc. After that, the walls are left to dry for another day.
It is better to choose a sunny day for the construction of the castle. It is best to place it on a hill, it can serve as a bunch of stones. In order for the walls to stand securely, a foundation is erected for them, on which a thin layer of cement is then applied. And only after that it is worth installing walls. And they can also be strengthened in another way, for example, the internal cavity is filled with stone, rubble or mortar.
Since just castles made of concrete look gray and dull, many decorate them. To do this, use acrylic paint. This decorative element will become a real decoration of the garden, besides, both children and adults will be happy with it.
We also recommend
 Switching power supply: repair and refinement
 Remote control of light
 Swimming lessons for preschool children
 Notes for the master - home household alarms
 Clock propeller on Atmega8
 Device and relay application examples, how to choose and connect a relay correctly Microcontroller and relay simple switching circuits