Installing the hob in the countertop: a video on how to install a gas one, the correct tie-in with your own hands. Installing a hob How to cut a worktop for a hob
The boring gas and electric stoves were replaced by more compact and functional built-in kitchen furniture hobs and ovens. It is difficult to overestimate their advantages - this is both ease of use, and switching on with one movement of the handle, and the most important advantage is their simple and quick installation hob, elementary simple do-it-yourself.
How to install the hob
The first step in the installation process is to mark the hole into which the hob will be installed. The hole is marked based on the dimensions of the hob and its location on the kitchen desktop. To maintain the rigidity and integrity of the countertop, you do not need to place the hole close to the edges, otherwise the weakened edges may break over time.
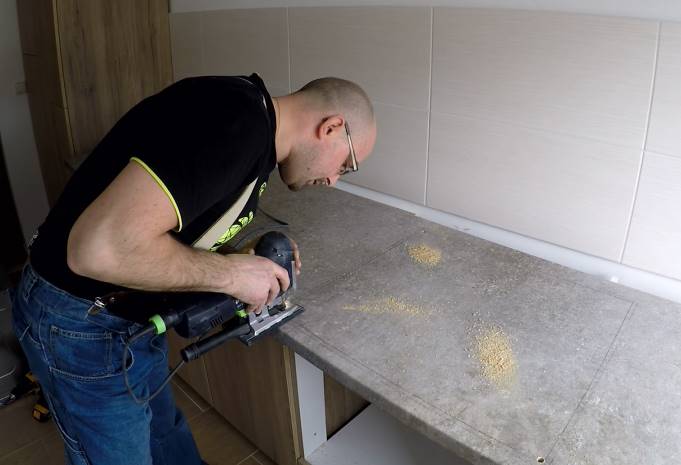
Using an electric jigsaw, we cut a rectangular hole along the previously marked lines.

To make it easier on the question of how to install hob, before cutting, it is necessary to drill a small hole in the part to be cut, from which the whole cutting process will begin. You only need to use a new file with fine teeth, sawing will take a little longer, but you will get smooth edges without chipping.

We try on the hob in a freshly cut hole and, if the markup was done correctly, we proceed directly to the installation.

First, you need to stick a sealant on the edges of the hole, which will prevent dirt and water from getting under the panel and quickly ruining the kitchen countertop. The self-adhesive sealant is sold as a set with the hob. There is nothing difficult in this process.

Now, when the seal is glued, we install the panel in the hole. If the hole turned out a little larger, align hob relative to the edge of the table. It remains the case for the small.

With the help of special clamps, also included in the delivery, we fix the hob. Clamps are installed from the bottom of the tabletop, they seem to wedge the panel between its top and the bottom of the tabletop base.

Well, a brand new and shining hob is installed, to improve the sealing of the gap between the countertop and the hob, you can additionally use sanitary antibacterial silicone. There is only one thing left - to bring gas to it and connect it to electrical network.

This moment also does not cause much difficulty. Like gas stove, the hob is connected to the gas pipeline using a flexible hose. The connection is made with a union nut through a paranitic sealing gasket. The nut is tightly crimped and checked for gas leakage soapy water. Electrical part plugs directly into a power outlet.

Everything, you can install gas burners and coasters for pots and pans, make the first start. And, if everything works as expected, put the brand new hob into operation. It may be necessary to slightly adapt the hob to the gas used in your area. For this, additional gas nozzles are included in the delivery set. Pulling out the burner at the very bottom of the mounting hole, you can see a small brass nozzle. We unscrew it with a flat wide screwdriver, and in its place we screw in a new one suitable for your gas.
And again a photo-lesson for installation. This time I got my hands on a gas hob from Hansa. Not a bad company, by the way, had many years of experience with the stove of this company (albeit electric) - only pleasant memories.
The design of this panel is quite original - I liked it - separate burners are fixed on the frosted glass ...
Instructions are also included. Here are some pictures of the installation. The first scheme, in my opinion, is rather useless. 
The second scheme is of much greater practical importance. We will be guided by her. True, this was not fully done, due to the peculiarities of the kitchen project. But more on that along the way. 
We take a joiner's square and transfer these dimensions to the countertop. It was impossible to move the panel to the adjacent box due to the nature of the project, so I just moved it as far as possible from the wall (as a result, instead of the recommended 100 mm, I got 80 mm). 
The next step is drilling out the marking angles with an 8 drill and connecting them with straight cuts using an electric jigsaw (it is better to use a file with a reverse tooth - the cuts on the front side are simply exceptional) 
Since the panel should go onto the wall of the box, I took out the box itself and made a centimeter cutout on its side wall. By the way, after installing the plate in the tabletop, it turned out that I did it in vain on the left, it is thinner by about 4-5 mm and does not go beyond the thickness of the tabletop. But, guided by previous experience, I did just that in advance. 
The instructions do not say anything about the next step, but I always silicone the ends of the chipboard in places where the equipment is tie-in. This case was no exception. 
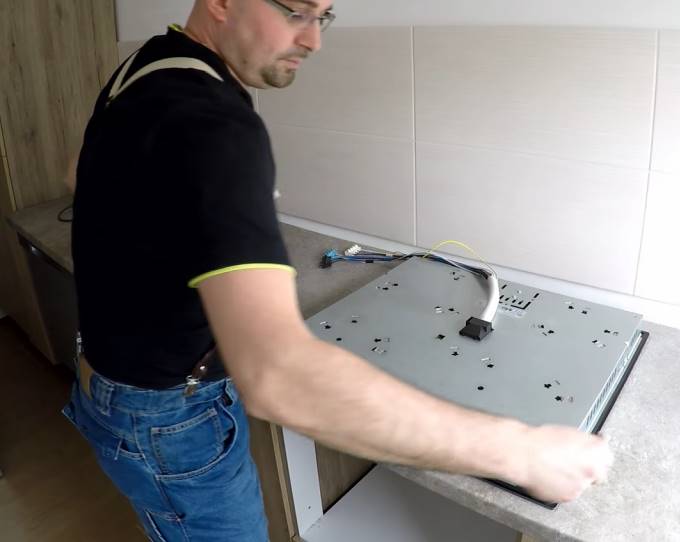
Now we take up the hob itself. We turn it over (trying to make the burners crumble at the same time - they can be removed in advance))) and paste a foamy insulating tape around the perimeter (it is included in the kit)  Now we need the help of a professional, namely a gasman, to make the connection. It is forbidden to do it yourself. But the lesson needs to be completed, so I will put the stove, and then I will take everything apart)).
It remains for us to push the plate into the cut out niche, align it and screw it with special clamps. 
The instruction sees this process as follows: 
True, the width of the tabletop did not allow to do it as in the diagram, namely, to place one edge of the clamp into the cutout on the plate, and the second on the tabletop ... 
But this did not affect the degree of fixation much ... As a result, you should get something like this: 
By the way, this hood for the functioning of auto-ignition requires connection to a power outlet.
If you want to make repairs in your kitchen, then you can independently replace the stove with a hob. Today, a modern and functional solution for every kitchen is the installation of a hob in the countertop with your own hands. In addition, you can make a combination that will consist of oven and hob, so you don't lose anything at all. In this article, we will tell you in detail how to independently install the hob into the countertop, without resorting to the help of specialists.
If you have ever dealt with repairs at your dacha or in an apartment, or you were engaged in construction, then correctly installing the hob in the countertop will be a simple matter for you. It is enough to clearly measure its thickness and dimensions during installation. Well, let's get started.
In order to properly install the hob yourself, you need to know how to cut a hole in the countertop. All the required dimensions are marked in the instructions on the diagram, do not invent anything new. So, you will speed up the process and significantly reduce the likely flaws in the measurement. Measurements can be made independently, for this you need to put the hob upside down, then find out the length and width of the surface on the sides inside.
Note that the instructions write the minimum allowed indents from the edge of the countertop. You can make the indentation sizes a little larger, as narrow edges can break after a while. It is necessary to make markings on the surface of the table in accordance with the size and thickness of the hob. This is where you will embed it. To keep the lines visible and more visible on the surface dark color, you can glue strips of adhesive tape from paper, and transfer each line to them.
Then you need to drill a hole from which the cutout begins. Cutouts are made with an electric jigsaw. To ensure that the edges of the cutout are even and do not crumble around the edges, it is advisable to use manual router, and rounding off the corners with a radius cutter, while grinding each cut. The resulting sawdust, you can collect with a vacuum cleaner.
When you're done with the hole, take your cooktop and make sure you cut it right. If you carefully cut a hole, then the surface will easily pass into the resulting cut. 
Sealing and sealing
Before installation, it is necessary to process the slices of the countertop with silicone sealant or nitro-lacquer. So, you protect the surface of the countertop from water, dirt stains, swelling and extend its life. You can also use a seal for installation, since it glues itself and performs the same role.
The self-adhesive seal is placed on top, the edges of the surface should lie on it. You can also use aluminum tape for sealing, which, by the way, protects against temperature fluctuations. If the seal is of high quality, then the hole in the countertop will serve you longer, it will not need to be repaired or replaced.
Also, the installation differs depending on the type of panel - they are gas and electric, plus individual characteristics mounts. You can fasten the fasteners with screws.
Today's electrical panels are highly functional, with correct installation surface, they rarely fail, therefore, for a long period they do not need repair work. When the repair is still needed, the panel quickly detaches and is carried by the master on its own, or the repair can be done independently, so you save your money on calling a specialist.
Before installing the hob, lay it on the worktop, turn it over and connect the wires according to the diagram. You can find the diagram on the back of the panel, this is done for your convenience. It is necessary to take into account not only its size, but also its thickness. When you install and connect yourself, then pay attention. If you connect the wires incorrectly, then you will not adjust the burners and their heating value later.

In the case when to connect the hob electrical panel there is a special shield wire, then you do not need a socket or plug. It is enough to connect the panel to the wire. Connecting an induction hob is carried out according to the same principle.
When installing a gas hob with your own hands, you need to look at the type of attachment. Do not forget about the thickness and dimensions of the hob. Then it must be installed by aligning it with the edge of the countertop, and then fixed. As a rule, brackets for fastening are included, they are located below. electrical wire plugged into an outlet.

To connect a gas hob with your own hands, you need to carefully study the safety rules. The gas is shut off, after which the hob is connected to the gas pipe with a flexible hose. A paronite gasket is necessarily placed in the nut. Then turn on the gas and burners, check the hose connections so that there are no leaks. To do this, you need to soap all the joints, if the foam does not have bubbles, there are no leaks, the installation is done correctly. In addition, gas analyzers are used for verification.
If everything is done correctly, then there should be no problems when installing the hob. The main thing is that you do not rush and do the work efficiently, taking into account all the nuances of installation.
An integral attribute of the kitchen is a gas stove, behind which, ideally, a husband stands and prepares breakfast for his wife. Increasingly popular are non-classical gas or electric stoves, and cooking surfaces. Their convenience lies in their compactness and the possibility of a separate installation of the oven. But their installation on the countertop will make an inexperienced craftsman sweat. Is it possible to fix such a module on my own and what is needed for this? This will be discussed in the article.
Varieties of cooking surfaces
All cooking surfaces can be divided into two large groups. The power source unites these groups, its role can be played by:
- electricity;

By appearance hobs that are connected to the gas main are practically no different from conventional stoves. An option for such modules may be an automatic start system, which may be self-contained or dependent on electricity. In the first case, it is represented by a piezoelectric element, which delivers a spark at the right time. Burners on gas surfaces may vary in size for greater ease of use.

Electric hobs can be of two types:
- classical;
- induction.

In a classic hob, the role of a burner is performed by a heating element or another a heating element. Such a module is cheaper and does not differ in particular profitability. Induction hobs are the dream of any modern housewife. The essence of the operation of the product is to heat the product due to electromagnetic field. At the same time, if you put your hand on a working burner, you will not feel anything. For the normal functioning of the product, a metal pan with a thick bottom is required. In this case, the material from which the dishes are made must necessarily be magnetized. The installation process for each of these surfaces is very similar. The difference lies only in the need to connect the gas hose for the first version of the stove.
Installation Tool

The whole installation process does not take much time and requires a tool that you may already have in your arsenal home master. The main tools include:
- screwdriver or drill;
- electric jigsaw;
- roulette;
- marker or pencil;
- silicone sealant.
Additionally, you may need a level or a long metal ruler to make it easier to draw straight lines.
Preparatory stage

If we are talking about the hob, which is powered by the mains, then preparatory stage will be in the power supply. The average power consumption of such modules is within 3.2 kW. This means that a regular but good outlet will suffice for connection. If the outlet was not installed in advance, then you can purchase an overhead version, since it will be easier to mount it and will not be needed additional tool in the form of a puncher or drill with a crown. The cable for such an outlet must go directly from the switchboard.

This step is taken in order to provide such a powerful device with a separate circuit breaker that would control its operation. The rated current for which the machine must be designed is 16 amperes. The best solution there will be installation differential automaton, which is able to catch the slightest leaks. The socket is mounted slightly below the countertop. This is done not for greater ease of connection, but so that moisture and fats do not get on it when cooking. The outlet must be grounded in case of a short circuit.
Note! It is worth noting that a standard outlet can withstand a load of 3.5 kW and a current of 16 amperes.
Step-by-step instruction
An important step during the installation of the hob in the countertop is the markup. Usually the manufacturer technical documentation, which comes with the hob, indicates what the dimensions of the installation hole should be. One option would be to make a cardboard swatch that can be used to draw the outline of the future hole. There is another option, how you can markup, it is visible in the photo below.

It is necessary to place the hob on the countertop, but turn it upside down. She will be a model. It must be located in the place where direct installation will be carried out. The photo clearly shows that it is important to make a small gap from the edge of the countertop to the hob. Usually it is about 5 cm. It is done so that the edge of the cooking surface is not damaged from constant interaction with it.
The next step, as shown in the photo, is to apply the markup. To do this, the hob is simply outlined in a circle with a pencil. The lines must be accurate so that they do not have to be redrawn several times, because this will only confuse them later.

The photo shows that the hob has a small protrusion, thanks to which it is fixed in the hole. This protrusion has a certain size that must be taken into account. It is also important to mark it on the contour of the future hole, as shown in the photo below.

In this case, it is necessary to make a small gap. If the protrusion has a length of 15 mm, then the size of the hob must be deviated from the main line by only 10 mm. A gap of 5 mm is required to ensure that the hob can be easily installed in the prepared hole.

After marking for the hob, it is necessary to prepare holes to make it easier to cut out the necessary part. Holes are drilled with a drill or screwdriver at four corners. In this case, it is necessary to ensure that the drill does not cause damage to the facade or other elements of the kitchen set. The diameter of the drill should be such that the nail file freely enters the hole.
To continue the process of mounting the hob, you will need a jigsaw. His file is inserted into the prepared hole and the cut is made. It is important to remember that it is necessary to cut along the inner, and not along the outer line. If a mistake is made, then the surface will simply fall into the hole without fixation.

In the process of work, it is necessary to remove sawdust in a timely manner so that they do not overlap the cutting line, since you can easily get off it and damage the countertop. During the cut, it is necessary to ensure that the nail file does not damage the walls of the cabinets or their surface. Before going through the last side, it is necessary to provide the tabletop with sufficient support so that the nail file does not bite, and also so that part of the tabletop does not fall on the foot.

After the hole is ready, you can try on the hob to make sure it fits the way you want it to.

The process does not end there. The tabletop is usually made from chipboard. If moisture gets on it, it swells and deforms. When cooking on the hob, this scenario is inevitable, so it is important to protect the place that has lost the laminated layer. To do this, a special sealant is applied to it, which is used when installing panels. It also acts as a fixing basis for the entire structure. The layer should be sufficient to cover all places accessible to moisture.

An adhesive-sealant is applied to the reverse side of the hob rim, which additionally fixes the product on the countertop. After that, the panel is inserted into its place and gently pressed down until contact with the surface of the countertop is felt. The sealant that has come out must be removed immediately, because after drying it will be more difficult to do. It is important to check that the abutment is the same on the entire surface. If this is not done, then under pressure from a heavy pan, the glass may burst.
Advice! If the hob is glass, then it is important to be careful when applying pressure so that it does not burst.
This fixation does not end there. The surface comes with special metal plates as seen in the photo above. They must be screwed in such a way that they provide a stop and prevent the panel from rising above the worktop. You can watch a video on installing the hob below.
Network connection

Upon completion of the installation process, you can proceed to the connection of the electrical part. Most often, hobs are supplied in single-phase version, but there may also be three-phase ones, which will be useful if three phases come to a house or apartment. Usually the hob has a built-in power cable. But if it is not, then you will need to buy it separately. To connect, you need a wire marked PVA 3 × 4. Each strand of this cable is rated for a rated continuous load of 8 kW.

This is necessary for a small margin, which will prevent overheating of the conductor. The wires are stripped from both sides. A plug is mounted on one, which in terms of current strength must correspond to that specified for the hob. If this is not observed, then it can simply melt. The wire is non-monolithic, so you will need to crimp the cores with tips. Near the terminal block, where the connection to the hob will be made, markings are usually applied.

The Latin letter L indicates the cable through which the phase comes, the letter N indicates zero, maybe the third letter E, which indicates the place where the ground wire is connected. Most often, instead of the third letter, a drawing is applied that indicates grounding. It is important to firmly fix each core that is crimped with a lug with a bolt. The service life will depend on the quality of the contact. If an oven will be installed under the hob, then it is imperative to provide a separate outlet for it. The total power consumption of the surface and the cabinet is twice that allowed for a single-phase outlet.
Summary
As you can see, the installation of the surface can be done independently without significant skills. During operation, all precautions and safety precautions must be observed. While drilling and working with an electric jigsaw, goggles must be worn in front of your eyes, which will protect you from flying sawdust. During the installation of the socket and the connection of the electrical part, it is necessary to use tools that have dielectric handles that protect against breakdown electric shock. Before starting work, it is necessary to de-energize the machine, which is attached to the prepared wire in the kitchen.
Installing the hob in the countertop: 6 steps
You can install the hob yourself if you first read the instructions Many years ago kitchen sets did not represent the possibility of mounting a hob in them. Today, this is a common phenomenon, which saves space in the kitchen, and also makes cooking more convenient and comfortable. Installing the hob in the countertop can be done independently. The main thing is to correctly determine the sequence of actions and follow it. It is very important to correctly determine the size of the future opening.
Do-it-yourself hob installation
Modern technologies do not stand still. Today it has become possible to integrate hobs into kitchen sets, which qualitatively affects the interior of the kitchen and its functionality. Inserting the hob does not take much time.
You can read more about the features of electric hobs in the article “3 types of hob”.
First of all, on the countertop, you need to make a markup that will fit the size of the hob.
Next to each side of the niche, you need to drill a hole, the diameter of each should be from 8 to 10 mm. The next step is to cut out the niche and treat it internally with silicone. The tabletop is installed on the lower level of the headset. Attach the inside of the panel double sided tape or some plasticine. The tabletop is covered with silicone.
 In order to properly install the hob, you should follow the step-by-step instructions
Step by step installation:
- The tabletop is placed on the bottom of the headset. If the walls are uneven, the countertop will need to be trimmed. And if they pass through it gas pipes, for them it is necessary to make special holes. The countertop should be ready for installation down the kitchen.
- Inside the box in which the hob will be installed, it is necessary to make markings. To do this, you can simply make pencil outlines that will help you make further markup.
- The tabletop is laid face down, and markings are made on the reverse side for a future tie-in.
- In each intended cut, small holes must be made so that you can work with a jigsaw.
- Carefully cut out the niche with an electric jigsaw.
- You need to make sure that the tabletop does not deviate under its own weight. In the process of cutting, it is better to carefully support it.
The inside of the cut is treated with silicone. After installing the panel, you can additionally coat it with silicone with outside. This is done in order to create an additional hydro-barrier, since the fasteners may not be pressed against the countertop enough.
The gas hob must be chosen very responsibly, because it must last long years. After the choice is made, the panel must be installed so that it is convenient and safe to use. You can embed the panel yourself, but you should not do this if you are not confident in your abilities. In any case, you can contact a specialist for help.
At self installation it is important to prepare everything necessary materials: panel, measuring instruments, pencils, sealant, adjustable wrench, saw, gas winding, steel hose.
All work related to gas is unsafe to carry out. It is best to perform the installation together with a wizard or someone who thoroughly knows the entire installation process. One of the most milestones settings - hose selection.
 If you need to install a gas hob, it is better to seek help from specialists
Hose Selection Tips:
- Check hose for damage. There should not be a single defect on the hose.
- The hose must be certified. When buying, you should ask the seller to present all the documents for the goods.
- The hose can be corrugated metal or rubber.
When installing the panel, the calculation of dimensions must be given Special attention. Sometimes in the kit for the hob you can find a template that you need to use in order to properly saw through the countertop. It is important to remember that water should not get on the surface of the panel. The gas countertop must be placed at a safe distance from furniture and textiles.
How to install the hob in the countertop
Built-in electric stove handy device for installation in the kitchen. It works just as efficiently as a stationary stove, but does not take up as much space. Installing such a panel can be quick and easy, without resorting to the help of specialists. The surface can be combined with an oven, which will make cooking even more convenient.
If the master conducts self repair not the first time, then installing the hob will not cause difficulties.
Before installing the panel, you need to properly cut a hole in the countertop. To facilitate the installation work, manufacturers indicate required dimensions in the instructions for the device. Pre-marking greatly simplifies and speeds up the installation process.
 Before installing the hob, special markings must be made on the countertop
Installation steps:
- On the countertop, you need to make markings that will correspond to the dimensions of the panel.
- Using an electric jigsaw, you need to make a cutout in the countertop. To get started, you need to drill a small hole for a jigsaw. The cut will be even if you use a jigsaw file with fine teeth.
- The dimensions of the hob must match the cut hole. Sections must be treated with a sealant or nitro-lacquer. Sealing self-adhesive tape can be used for processing.
The electric tabletop is connected, focusing on the diagram. It can be found on the back of the panel. It is important to connect the wires correctly in order to be able to control the activation of the burners and their temperature.
What to look for: fixing the hob to the countertop
The installation process of the hob is simple, but requires careful pre-training. First of all, it is tedious to choose the right hob, check its passport data, prepare the tools and decide on the installation location. The installation of a gas and electric hob is practically the same.
You need to mount the panel on the countertop, in which you need to make the appropriate cutout.
It should be noted that to install the electrical panel, you will also need to install an electrical outlet. For a gas panel, care must be taken to carry out gas communication. The built-in panel must be installed so that the maximum gap between it and the worktop is 1-2 mm.
 When installing the hob, special attention will need to be paid to attaching it to the countertop.
What to look for:
- Correctly measure the dimensions of the panel and transfer them to the cutout in the countertop.
- Cut out the necessary segment in the countertop in order to perform the installation correctly.
- Process the countertop special materials which will protect it from the influence of external negative factors.
- Push the panel into the cutout.
It is important to remember that the mortise panel should not enter the gap with force. If there is a backlash, the location of the countertop must be aligned, focusing on the front edge. Fastening the seal over the entire surface of the countertop will avoid contamination of the panel.
hob seal
The sealing gasket must be attached to the hob. If the panel is removed after some time of use, you will notice that the seal will be covered in dirt and grease. The gasket needs to be replaced from time to time.
If there is a gap between the panel and the countertop, then the plate can be fixed in the plane, but this must be done so that debris does not fall into the vertical gap.
You can buy a special tape, or you can use a glass seal. The table and cutout can be pretreated with a transparent sealant. Sealant residues must be wiped off or carefully removed with a spatula.
 Many prefer to use sealing tape because it is safe and environmentally friendly.
Benefits of sealing tape:
- Reliability;
- Ease of use;
- Environmental friendliness.
His high quality Bosch seals are known. Just placing a panel is not enough. It must be protected from moisture, grease and debris. If the panel is installed in a large opening, and a gap is formed, then the tape and the treatment of the gaps with sealant will help save the situation.
Installing the hob in the countertop (video)
The built-in hob is a convenient device that saves space in the kitchen and provides comfortable cooking. The rules for installing the panel are simple, so you can install it yourself. It is possible to embed a panel qualitatively only when the dimensions of the panel are measured correctly. After cutting a hole in the countertop, it must be well treated with sealant to protect the panel from water and dirt. All actions should be phased and coordinated.
Similar content


We also recommend
 Switching power supply: repair and refinement
 Remote control of light
 Swimming lessons for preschool children
 Notes for the master - home household alarms
 Clock propeller on Atmega8
 Device and relay application examples, how to choose and connect a relay correctly Microcontroller and relay simple switching circuits