Rules for the installation of air conditioners. Self-installation of the air conditioner Connecting the air conditioner in the apartment
The main tasks of climatic equipment are the supply of cooled / heated, purified air inside an apartment, house, office and other premises. This is especially true with the onset of the warm season (cooling), off-season (heating). The main thing is that the device does its job well. The high-quality, efficient functioning of the climate system largely (up to 80%) depends on professionally organized installation. By following certain rules for installing an air conditioner, it is possible to extend the life of the equipment, enjoying its flawless operation every day.
Indoor split system unit above the bed
Air conditioning. What is it?
Increasingly, on the facade of the house you can see the outlines of the external unit of the air conditioner. The use of climate equipment has long become the norm, its sales are gaining momentum, the model lines are replenished with enviable constancy. But what is this unit, commonly called the word "air conditioner"?
As a rule, by this concept, the majority means precisely split systems, consisting of two parts: an indoor unit designed for installation indoors, and an external one - on the facade of the house. These are the most popular options for climate equipment, which have become such due to an acceptable balance of price-quality-functions.
The blocks are interconnected by pipes with freon, electrical wires, forming a well-coordinated working system for cooling, heating, air purification inside the living space of an apartment building, a country cottage. A split system is just a variety among other air conditioning devices (monoblocks, chillers and fan coil units, cassette, channel, column devices, central systems, etc.).
When purchasing equipment, it is necessary to decide, of course, on the model, functional equipment, design. But in addition, it is important to take care of the professional installation of the system, because its further high-quality work, duration of service life, and the level of comfort created depend on it.
Rules for installing the indoor unit
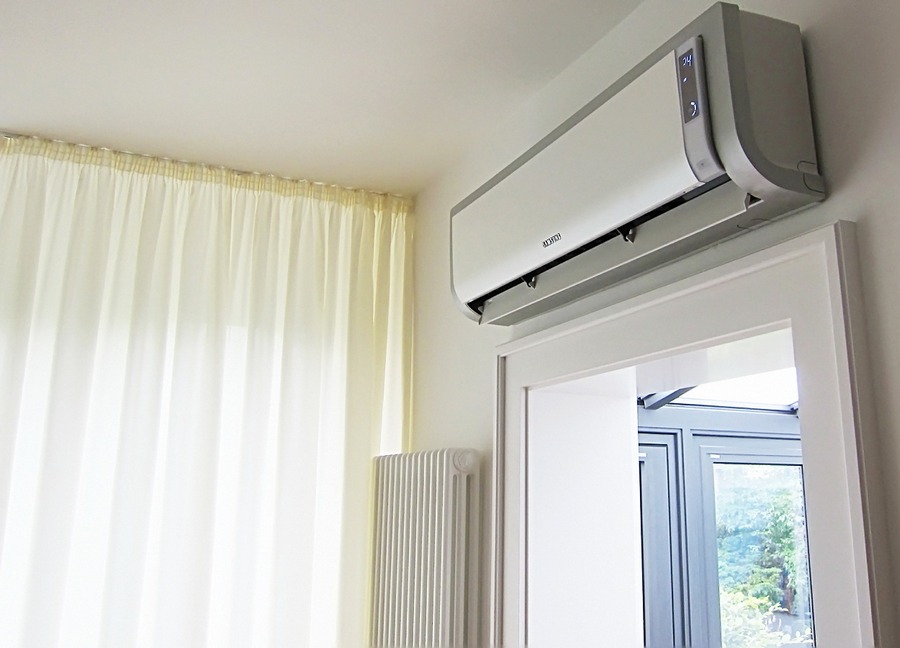 Indoor unit above the door
 The indoor unit is that part of the split system, the design, the functional improvement of which is given great attention. And not in vain, because it is located indoors, one might say, it is the "face" of the climate equipment.
The installation of the indoor unit of the air conditioner is subject to many requirements that are designed to organize it in the most qualitative way. We list the basic rules for installing the indoor unit of a split system used by specialists:
- Installation of the device is best done before or after repairs in the room. So you can lay communication paths in the most convenient, less costly way.
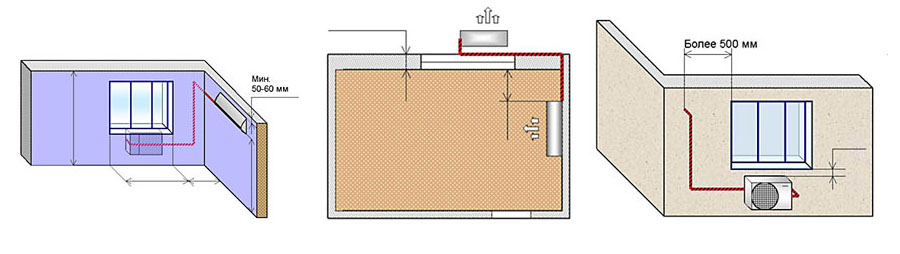
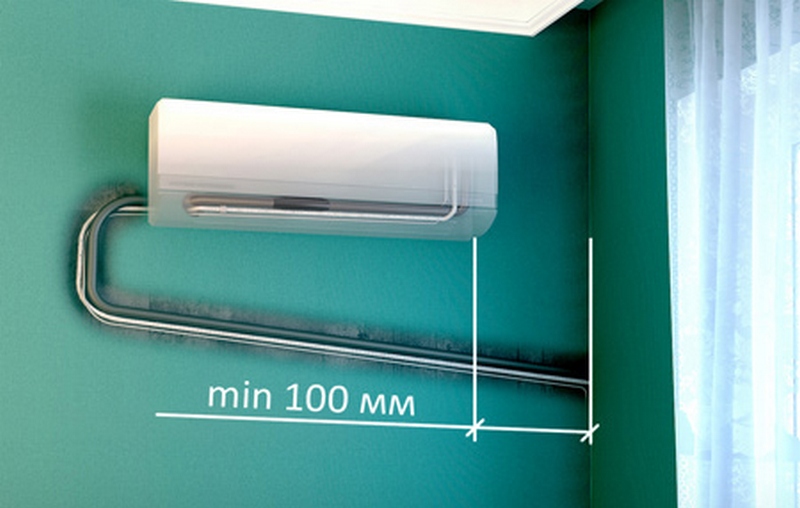
- It is necessary to observe strictly marked distances to the nearest walls, ceilings: at least 10 cm to the ceiling, at least 10 cm to the walls, taking into account the fact that from the device to the communications exit point - at least 50 cm.
- It is impossible to install windows behind curtains, in niches. This will limit the cooled air flow, it will circulate only through the space of the window opening.
- It should not be installed above high chests of drawers, cabinets (minimum - 1m). The airflow will also be limited by the obstruction, and the dust accumulated on the furniture will enter the room.
- Cannot be installed above elements of the heating system. The temperature sensor inside the unit will continuously detect high temperatures, prompting it to continuously operate in cooling mode. This will lead to rapid wear of parts, failure of the climate system.
- Arrange in such a way that places of rest, work, frequent stay of people are outside the direct cooled air flow.
- The climate device must be located strictly horizontally to avoid accumulation and then overflow of condensate from the drainage tank.
Rules for installing an external element of a climate device
 External block of the climatic split system
 Strict regulations also determine the installation of air conditioners on the facade of the building. Factors such as:
- Mounting fasteners are installed with a margin of safety, 2-3 times the weight of the device. Mounted with anchor bolts.
- The outer surface of the building must be smooth and durable. Fastening to a dilapidated wall is excluded. The vibration force will loosen the mounts, and the unit may fall.
- When installing air conditioners on the facade, it is necessary to take into account its finish. If it is insulated with foam, or a ventilated facade is designed, you must make sure that the fasteners are mounted to the wall itself, and not to the facade finish.
- There must be a distance of at least 10 cm between the wall and the climate device, and at least 10 cm from any object at the top of it. This ensures the natural circulation of the air flow around, allowing it to cool in time.
- Fasteners are carried out taking into account further unhindered access for maintenance.
- It is placed strictly horizontally in all planes in order to organize the correct free movement of freon along the cooling circuit.
 Scheme of installation of the external unit of the split system on the facade of the building
 - From the ground, the location is not lower than 1.8-2 m, preferably in a protective crate.
- When installing on the upper floors, it makes sense to think about placing the system on the roof of the house. This will avoid calling industrial climbers. It is important to remember that the maximum distance between the elements of a split system is 15 m.
- It is recommended to install on unglazed balconies, loggias, which will significantly protect the climate device from mechanical damage, adverse atmospheric conditions.
- Installation inside a covered balcony is highly undesirable due to insufficient air flow convection, which is so necessary for the external element of the split system.
The rules for installing air conditioners on the facades of buildings are general, applicable to all split systems to the same extent.
Rules for the installation of communications
During the installation of the air conditioner, a significant amount of time is allocated for the correct installation of the route for the cooling circuit, which is due to factors:
- The maximum distance between the blocks is 30 m. At a distance of up to 5 m, all properties of the coolant are preserved. The greater the distance, the greater the loss.
- The connection of copper pipes must be airtight, the freon supply system is insulated as much as possible to avoid gas leakage, which will reduce the performance of the climate system, up to its failure.
- It is best to drill a route in the wall for the cooling circuit. Communications will be hidden, which will preserve the aesthetics of the room. If the repair has already been made, the pipes are closed with a plastic box. At the same time, it is necessary to provide access to the connections for service maintenance.
 Minimum distance
 - The freon pipeline must not be kinked so that the coolant circulates freely.
- For the climate system, it is recommended to run a separate electrical cable with a separate switch in the shield in order to relieve the load on the general power supply, especially if it is already old.
- All connections of electrical wires are securely insulated.
- It is best to lay the drainage tube in a separate strobe.
- It would be correct to lead a pipe to the sewer pipe to drain condensate.
- If this is not possible, the pipe can be brought out near the external element of the climate system, while making sure that the condensate does not subsequently spoil the facade of the building, does not fall on passers-by.
- A glass holder is installed inside the opening of the outer wall, through which connecting communications are passed.
- Refrigerant pipes, electric cable, drain pipe must be packed with foam rubber pipe, wrapped with vinyl tape.
- After fastening the outer part of the air conditioner to the facade and connecting the climate system, it is necessary to vacuum (at least 50 minutes) using special equipment. This ensures complete removal of air and liquid from the cooling circuit, eliminating the appearance of corrosion on the inner surface of the pipes.
- Be sure to conduct a test run of the air conditioner at the end of the installation work.
- It is necessary to check the device for the absence of refrigerant leakage, the presence of constant pressure inside the circuit, the timely removal of condensate. The main functions of the climate system are being tested.
Features of installing air conditioners in residential buildings
 Installing the indoor unit of the air conditioner on the wall
 The regulation for the installation of air conditioners in residential buildings is the same as in an apartment building. A distinctive feature - when planning the purchase of a climate device, it is necessary to take into account the availability and capabilities of the ventilation system at home.
For suburban housing, the use of multi-split systems (one outdoor unit + several indoor units) is typical. Often, a central air conditioning system is used for ventilation and air purification. Also, private houses can be equipped with channel air conditioners, which is very convenient to arrange in the space of a large building.
The main condition is that the climatic equipment should not create obstacles for the operation of the main ventilation system. Their work is a harmonious, complementary functioning.
Improper installation of the air conditioner will certainly affect the quality of its work in the future. The consequences can be serious, it is often necessary to replace a faulty climate device with a new one. One of the common problems is the leakage of coolant through leaky pipe joints. Undetected in time, it threatens to damage the compressor, condenser, and other important components.
Also, the consequence of improper installation of the air conditioner on the wall of the apartment is the overflow of condensate from the drainage tank to the outside, into the room (strictly horizontal arrangement is not carried out).
Ignoring the basic rule for installing the outdoor unit of the air conditioner is fraught with its fall down. At best, it will create a lot of noise during operation.
Professional installation of climate control equipment is a prerequisite for its reliable, efficient operation for a long time.
Problem: The main difficulty faced by the buyer of a split system is the problem of proper installation. Installation determines the quality and service life of the air conditioner by 90%. If errors are made during installation, then it is very difficult to correct them later.
Decision: Installation must be carried out by specialists licensed to install air conditioners, in compliance with the instructions and using special equipment. After installation, no debris, no dust, no boxes should remain in the room. The word "air conditioner" has taken root only in our country. This is actually a piece of the phrase air-condition, which in English means “air condition”. The air conditioner is used to maintain the desired temperature and humidity in the room. By ventilating the air, the air conditioner cleans it by passing the air flow through special filters.
Today we will talk about installing a more modern type of air conditioning system - a split system. What are the advantages of a split system over a "regular" air conditioner? The split system does not block natural light, like a “window”, which is cut into the window frame. This is the first difference. In addition, it does not depend on the house's general air conditioning system, if any (this is when one hefty unit stands somewhere in the basement and drives air around the house). And it differs from the "ordinary" air conditioner in that it consists of two blocks - external and internal. If there are more than two indoor units, then this is already called a “multi-split system”.
But let's agree: for simplicity of presentation, I will talk about the split system, calling it the word “air conditioner”, which is more familiar to our ears.
First - repair, then - split
So, a split system (from the English word split - “split, split”) consists of two separate blocks: an internal (evaporator) and an external or external (condenser). The blocks are interconnected by electrical wires and two copper tubes through which the refrigerant (freon) flows. A plastic thin tube (drainage) also extends outward from the indoor unit - to remove condensed moisture. Ideally, it should be connected to a drain (sewer) pipe or to a special tank, but often it is simply taken out into the street, and then drops of water fall on the heads of passers-by (for how to properly drain, see below).
The principle of operation of the split system is as follows. If the room needs to be cooled, then from the heat exchanger of the external unit, freon enters the heat exchanger of the indoor unit through one copper tube. It is blown by a fan, as a result of which cold air comes out of the indoor unit. If the air in the room needs to be heated, then with the help of a heat pump, the external condenser turns into an evaporator, and the evaporator becomes a condenser. In addition to the condenser and evaporator, the split system includes a compressor, which is installed in the outdoor unit. The main function of the compressor is to compress freon to give this gas properties that significantly increase the efficiency of the air conditioner.

Split system:
1 - outdoor (external) block
2 - indoor wall unit
The indoor unit operates almost silently (for Daikin models, the noise level of some indoor units is 28 - 31 dB, and for Mitsubishi, when the engine is turned on at the lowest speed, it is 26 dB; a flying butterfly creates the same noise level). But the fan and compressor of an external device can “buzz” and louder.
According to the mounting method, indoor units are wall-mounted and floor-ceiling (floor-ceiling are called so because they can be attached to both the ceiling and the floor). There are also cassette and multi-zone indoor units, but we will talk about them next time.
In apartments, wall-mounted indoor units are most often installed. With the help of movable shutters of the wall unit, you can change the direction of the air flow. But the power of wall blocks is specially limited - otherwise a strong stream of cold air will simply “blow off” everything in its path. But if a room (for example, in an office) requires a more powerful air conditioner, a floor-to-ceiling unit is installed. It will allow you to direct a strong jet along the wall or ceiling and thus ensure an even distribution of temperature in the room.
Our advice: if the length of the room significantly exceeds its width, it is much more efficient to install a floor-to-ceiling air conditioner!
Split systems differ in power (cooling capacity) and design. The choice of design is at the discretion of the buyer. But about the power, you must definitely consult with a specialist. In doing so, you need to know:
1. The area (volume) of your premises.
2. Dimensions of the window, the direction of the world to which it goes.
3. The presence (absence) of blinds on the windows.
4. The number of constantly working equipment that generates heat (TV, computer, etc.).
5. The number of radiators in the rooms.
6. The number of people who are constantly in the room.
7. Is there forced ventilation?
Another tip: if the company where you want to buy an air conditioner didn’t ask you anything about it, then it’s better not to buy from them. Because there is a danger that you are offered a "typical not that." In reputable companies, before selling the air conditioner, the consultant, as a rule, travels to the place of the intended installation of the device, takes measurements and finds out all the necessary details. Then all this data is entered into the program, and only after that the computer selects the optimal model. So, for example, they work in the Aeroprof company specializing in Carrier air conditioners (USA), in the Meteomarket company (Daikin air conditioners) and the KlimatSS company (Hitachi air conditioners) ).

This is how the distribution of air flows from a wall-mounted indoor unit looks like
What else do you need to know? Experts advise INSTALLING A SPLIT SYSTEM BEFORE or DURING REPAIR, and not after all repairs have already been completed. Then you do not have to gouge and drill freshly painted and leveled walls to lay the electrical wiring for the air conditioner and strengthen the brackets for fixing the indoor unit. You can, of course, hide communications in external boxes, but this will not decorate the interior.
Moreover, installation work in a freshly renovated apartment is much more expensive, especially after renovation.
Now about other possible "ambushes". Very often mistakes begin even when buying an air conditioner. Wanting to save money, we go to the nearest store (or even to the market) and buy an air conditioner. So what? And that's all: we are one on one with him. At best, after carefully reading the instructions, we undertake to install it.
Meanwhile, installing a split system in an apartment is not at all the same as installing a refrigerator or TV: they say, they brought it home, put it in the chosen place, turned it on and it works! With air conditioning, such a room will not work. Air conditioning requires proper installation. This is exactly the case when it is impossible to save on installation. The better it is installed, the longer it will last. It is no coincidence that installation work is 18-30% of the cost of the unit.
I remember how one experienced and restrained-looking installer, answering my completely innocent question: where to start installing the air conditioner, suddenly got excited and yelled: “People! You are all smart! Each air conditioner is given an instruction in Russian, in which both installation and operating rules are described “for fools”, point by point. Read it, damn it, before sticking your hands in! Better yet, call the experts. And, alas, he is right.
Installation: where to start?

Split system installation diagram
1. Communications (in the strobe)
2. Drainage (in the gate)
3. Sewerage
4. Siphon
5. Electrical wiring - to the shield (in the strobe)
6. Hole in the wall, punched with an inclination of 1–3°
First stage: separate electrical wiring is carried out
To any, even a low-power (1.5 kW) air conditioner, it is necessary to carry out a separate electrical wiring and put a separate machine in the electrical panel. Because the old wiring may not withstand the load and, God forbid, catch fire. If, however, a separate wiring for the air conditioner is laid by specialist installers, the possibility of fire is reduced to almost zero.
Be especially vigilant if your house is older than 1990. In old houses, the wiring, alas, is not designed for the loads from the use of powerful electrical equipment. Installers remember the case when the owner of the apartment was forced to replace all the wiring because of the air conditioner: the old one simply could not stand it and constantly knocked out plugs.
Second stage: installation of the outdoor unit
To do this, installers drill holes for brackets, on which they then install the outdoor unit.
If you put it on an open balcony, then there is no problem: they attached it with bolts, the breeze blows it - and everything is in order (if the balcony is glazed, then the device will not have enough air to work and it will soon break). If you want to attach the unit to the wall, then you can not do without strong brackets. Moreover, they must withstand a weight several times greater than the weight of the block. On high floors, the "outdoor" is mounted from a machine equipped with a sliding ladder. Or they call climbers (if the installation goes above the 5th floor). Such calls are paid separately and cost from 60 to 150 dollars. And sometimes equipment is required in the form of a car with a fire escape-boom, and a climber.

External and internal (wall) units of the split-system "Kerrier"
If you live on the upper floors, then the outdoor unit can be placed on the roof. But keep in mind that the difference between the indoor and outdoor units in height should not exceed 3-20 meters (depending on the brand of air conditioner and model).
If your apartment is located on the ground floor, I strongly recommend hanging the outdoor unit above 1.8–2 meters above the ground and “hide” it in a cage. And they can steal it. At one of the firms we were told a story. A man came and ordered only an external unit. Managers were surprised: "Why don't you want a whole split system." - “Yes, I have an air conditioner inside, but the outer “box” was cut off yesterday. On the first floor, under the window hung. Regardless of the height at which the external unit is “screwed”, it is necessary to make a metal visor above it. This will save the block from snow and icicles, which in the spring tend to fall from the roofs, breaking everything in their path.
In general, installing an outdoor unit is a responsible matter. If it is loosely fastened, it can fall down ... on someone. During the warranty period, the company that installed the air conditioner is responsible for the consequences of this. And then you will be responsible.
What can not be done with the outdoor (outdoor) unit?
There are space limitations for installing the outdoor unit:
1. The surface of the wall on which the block will be installed must be strong (otherwise it may collapse under the weight of the block) and smooth (otherwise the block will vibrate and deform).
2. Do not bend the tubes with refrigerant (freon) several times in a small area and unscrew their connections (this will lead to a refrigerant leak). If the tubes are twisted into a ring with a radius of less than 100 mm, then it will be more difficult for the compressor to pump freon.
Third stage: installation of the indoor unit

Air conditioner control panel
Installers fasten special brackets to the wall (if the unit is wall-mounted) or ceiling (if the unit is ceiling-mounted) with screws and install blocks on them. After that, it is necessary to check the strength of the fastening (does the structure stagger? Does it vibrate when the air conditioner is turned on?). Otherwise, sooner or later, the whole structure may simply collapse on your head.
But for the floor unit, special fasteners are not required. He, as they say, "stands on foot." You just need to immediately choose a place for it (when choosing a place, keep in mind that the unit does not blow on the curtains or on the wall and stand away from the heat source). And although the block is not attached to the floor, but after laying all the communications, it is no longer possible to move it from place to place.
So, the indoor unit cannot be installed:
1. ... above a heat source (for example, above a battery). Otherwise, the air conditioner will work for cooling “until the pulse is lost” and will fail very quickly. Imagine that you opened the door of the refrigerator, and it will cool not only the chamber, but the whole room. It will "work" and fail by the end of the day. The same will happen with the air conditioner. In addition, the heat from the room battery may deform the plastic housing of the unit.
2. ... in rooms where devices with high-frequency electromagnetic oscillations are constantly working (for example, a drill, a drilling machine). High-frequency vibrations can "knock down" the chip (processor) installed inside the air conditioner.
3. ... directly above the bed or workplace, otherwise there is a danger of constantly catching a cold or, worse, getting pneumonia.
4. …where air circulation will be difficult, such as behind curtains, etc. The distance to the obstacle should not be less than 3 meters. Otherwise, the air conditioner, which maintains the set temperature automatically, will fail. The cooled (or heated) air flow from the air conditioner will be reflected from the obstacle and will return back with the same temperature with which it “came out”. The air conditioner will decide that the work has been done, the desired climate is set and turn off. This is exactly what happened to my friends. Their air conditioner constantly “got confused in the curtains” and turned off before it had time to bring the room temperature to the set one. I had to call specialists and reinstall the system.
5. ... with a skew - then water (condensate) will flow out of it onto the floor, which, according to the installation rules, must be discharged through a drainage pipe into a special reservoir (see our certificate of drainage). Fourth stage: chasing walls or floors
In order to connect the electrical wires and freon tubes between the air conditioner units, installers punch gutters in the walls or on the ceiling (or, as the installers say, you need to “probe the line”). This is done if you want to make a hidden highway. Sometimes you have to “stroke”, for example, not the walls, but the floor of the apartment.
Don't want to ditch? Then you can hide the wires in decorative plastic boxes (sometimes the boxes are removed under the plinth). But before that, installers will need to connect two copper pipes (for refrigerant) and "ends" of electrical wiring between the outdoor and indoor units. Make sure the installers do this with the connection fittings. And in a pre-punched hole in the outer wall, they laid a “waterproof glass” with a connecting hose.

Installers come to the site with all the necessary equipment, communications are laid in the strobe, the drainage tube is placed in the strobe at a slope
After that, they must carry out the so-called evacuation of communications, and be sure to do so for 50 minutes (it is during this time that “extra” air and moisture will come out of the communications). This manipulation is done with the help of special equipment.
And keep in mind - for the drainage tube, as a rule, they make a separate hidden line (in the wall or under the floor).
Fifth stage: checking the operation of the system using a special program
At this stage, installers must turn on the split system (air conditioner) by installing it on the test program. If everything works and the case does not vibrate, then it is in order. The work is almost finished. By the way, we advise you to independently conduct such a check of the system operation every year (using the same test program).
Sixth stage: garbage collection
I must warn you: laying the line and other installation procedures are dirt, dust and noise. But good installers (with a license to install air conditioners) will come with special tools (including a metal detector to examine the walls for fittings and hidden communications).
In addition, installers must have a vacuum cleaner and other cleaning machines. With their help, after the work is completed, they must independently remove all garbage. If the installers are trying to dodge the "dirty" work, strictly demand - "cleaning the territory" is included in the payment for the installation of the air conditioner. In addition, you can conclude an agreement with a reputable company for preventive maintenance of a split system. Then you don't have to, risking your life, leaning out of the window to the waist, clean the outdoor unit with a vacuum cleaner or call climbers with your own money. When concluding such an agreement (it also includes warranty repairs), of course, you will have to pay a certain amount, but believe me, it's worth it. By the way, we hasten to inform you of a pleasant detail: Meteomarket, which sells Japanese Daikin air conditioners, will replace your air conditioner with a new one free of charge after the three-year service contract expires. However, if you are satisfied with the old unit, you can not change it for 20 years. The company guarantees its uninterrupted good work. By the way, in the notorious building on Lubyanka, Daikin air conditioners have been standing since the time of the “corn secretary general” Nikita Khrushchev and are still working properly.
The outdoor unit must be regularly cleaned of dust and dirt. A particularly difficult period of the outdoor unit is the time of flowering of poplars. The fluff instantly clogs the filters, and the air conditioner (if it is not cleaned immediately) breaks down. Of course, you can vacuum it if you are not afraid of heights. But it’s better not to risk it and call the “air conditioner rescue service” - that is, a service company.
At temperatures below -15 ° C, the air conditioner may refuse to work "for heat", and then low-temperature equipment (a heat pump, a compressor heater and even a drain pipe heater) will be needed. By the way, some models are already equipped with these devices (see table).
What did the installers say?
Experienced installers do not advise buying air conditioners "from whomever you have", on the market or from hands.
“How many times it happened, such illiterate buffoons will carry out the installation, and then people call us, begging for help,” one experienced installer from a very reputable company told me. - It used to be that such unfortunate installers would bring with them a copper pipe for freon, and it had no plugs. If there are no plugs, then moist air will get inside. And humidity is unacceptable for the air conditioner: when combined with the insides of the entire system, it forms an acid that corrodes the air conditioner mechanism from the inside! And instead of serving properly for many years, such an air conditioner is, of course, sent to a landfill in three years.
The installers told me that sometimes they come across especially stubborn customers, they say, “I'm crying, do as I say!”. How to be? Here was a case recently. The client ordered to install the outdoor unit not from the side of the street, but inside the apartment, moreover, in the children's room. He motivated this by a strange statement that his children, they say, will live in the country for another two months. He ignored all the persuasion and arguments of the installers that the outdoor unit should not be placed indoors, and even more so in a residential area. It is clear that after two months the stubborn buyer called the installers to reinstall everything on a new one.
Or here's the case. The client wanted the indoor unit to blow directly onto the bed and the air temperature to be 18°C. They tried to prove to him that it would be cold, in addition, a directed stream of cold air could cause a cold. "Not! I won't catch a cold! Bet!” Nothing to do, set. The next day they came to install the air conditioner in another room, they see, and the temperature on that, yesterday's split, is set to 22 ° C.
– What is it? they ask.
- It's true, guys, I froze at night.
In general, with the correct operation of the air conditioner, a person should not feel that something is cooling or heating him. Just comfortable - that's all! Once a friend called the company and asked to come. He says: “I didn’t buy it from you, though.” Okay, let's go. They opened the block, and there was a dead rat.
That's it. Hence the conclusion - it is not enough to buy and install a split system. The main thing is that professionals do it for you.
The procedure for installing a split system
1. Wiring a separate electrical wiring for the air conditioner and installing a separate "machine" in the switchboard.
2. Installation of the outdoor (outdoor) unit:
3. Installation of the indoor unit:
4. System wiring connection:
5. Testing the system:
6. Cleaning of the premises (by the installers).
How should proper drainage be arranged?
To do this, installers must:
1. Proshtrobit highway.
2. Shut off the water in the apartment.
3. Drill a hole in the sewer pipe.
4. Firmly insert a drain plastic tube with a siphon into the hole. A layer of water in the siphon will delay the smell coming from the sewer.
Attention! The drainage tube, through which the accumulated moisture is removed, must necessarily go at an inclination of 5–10 mm so that there is a natural flow of water. If for some reason the tilt cannot be done, you must install a special pump for “forced suction of moisture”. But! This pump is not included and must be purchased separately. The purchase will cost 70 - 190 dollars, depending on the pump model you choose.
The main problems that arise during the operation of the air conditioner
Problem 1: The air conditioner blows directly on you, creating a drafty feeling.
Solution: It is necessary to enable the auto-oscillation function of the horizontal blinds (then the draft will turn into a light breeze) or fix the horizontal shutters in a better position. If this does not work, you need to turn the air flow to the left or right using the vertical air flaps. In most air conditioners, this operation is done manually, but in some models it can be done using the remote control.
Problem 2: On hot days, the air conditioner does not provide the necessary coolness, despite the fact that it works all the time.
Solution: In this case, you should check if the filters are clogged, if the windows and doors are closed, if additional heating devices (boilers or toasters) are working in the room. It can be recommended to hang thick white blinds on the windows, which reflect heat and light well, thus reducing the heat gain through the windows by almost half. If this does not help, the model must be replaced with a more powerful one.
Problem 3: Water is dripping from the indoor unit of the split system.
Solution: Apparently, the drain pipe is clogged. Most often, this situation occurs when an air conditioner with a drainage pipeline brought outside is turned on for cooling at sub-zero temperatures. In this case, the condensate may turn into an ice plug. To avoid this, it is necessary to heat the drainage pipeline to +5 °C using a special cable. If an ice plug nevertheless arose, then it is worth waiting for a thaw, and until that moment do not turn on the system for cooling.
Problem 4: Weakened airflow.
Solution: Clean the air filter. This can be done with a vacuum cleaner or washed with a soft sponge in warm water. It is not recommended to operate the air conditioner without a filter, as it protects not only your lungs, but also the heat exchanger of the indoor unit. When the latter becomes dusty, the efficiency of the air conditioner decreases.
Problem 5: Icing of the outdoor unit during the operation of the air conditioner for heating in conditions of small negative temperatures and high humidity.
Solution: If the air conditioner is not equipped with an automatic defrost system, try turning it on in cooling mode. In this case, the outdoor unit begins to give off heat to the street, heats up and gradually thaws.
Problem 6: Premature failure of the air conditioner.
Solution: To avoid this, do not operate it at temperatures below -10-15°C. At lower temperatures, the oil in the compressor thickens, and its wear increases many times over. There are various rumors about the dangers of air conditioners. But in the press center of the capital's SES, we were told that there is nothing to be afraid of: with the timely replacement of filters and subject to the operating rules, the split system does not hide any harm. At least, there were no complaints to the sanitary and epidemiological supervision.
Unlike mobile air coolers, which consist of a single unit, household split systems require additional financial costs for installation. It is quite possible to reduce costs: study the detailed guide on how to install a new air conditioner in an apartment and do the installation yourself.
Preparatory stage
Split systems are most often used for air conditioning of private houses and apartments, as they are reliable, convenient and compact. The air conditioning unit consists of two blocks - internal and external, interconnected by two freon tubes, an electric cable and a drainage line.
Warning. When buying a new air conditioner, keep in mind an important nuance: all the freon is pumped into the outdoor module, and the indoor one is empty. Do not open the valves on the side of the machine until the piping is connected.
Installing "splits" is much more complicated than installing floor and window air conditioners. Here, 2 separate blocks must be correctly placed outside and inside the room, lay and hermetically connect the lines. The issue of connecting to the mains is solved more simply - a line is laid to the installed indoor module, protected by a circuit breaker.
What you need to do before proceeding with self-assembly:
- Buy additional materials.
- Prepare special tools and fixtures.
- Determine the location of both units and the route for laying highways with freon.
The location of the split system blocks is subject to certain rules. The flow of cooled air from the indoor unit should not directly blow people, and the maximum distance from the outdoor unit should not exceed 5 m. Most often, the unit is placed on the side partition next to the window and the outer wall. Technological indents from walls and ceilings are indicated in the diagram.

Now some tips on where to install the outdoor unit:

Note. Inverter-type air conditioners are quieter than conventional ones, but the fan noise is still audible at night.
List of tools and materials
The following installation materials are not included in the delivery of the split system, they will need to be purchased independently:
- metal bracket for suspension of the outdoor module (you can weld it yourself from steel equal-shelf angles 35 x 3 mm);
- four-core copper cable type VVG with a cross section of 1.5 or 2.5 mm², depending on the power of the cooler;
- tubes of freon pipelines copper with a diameter of 6.35 mm and 9.52 mm of the required length;
- rubber heat-insulating sleeve of the K-Flex type along the length of the line;
- corrugated drainage pipe (metal-plastic Ø16 mm is also suitable);
- winding tape PVA or PVC;
- polyurethane foam - 1 bottle.
Note. Depending on the conditions for laying inter-unit highways, a plastic cable channel or dry mortar may be needed to seal the furrow.

In addition to a home set of locksmith tools, installing an air conditioner requires the use of special tools and equipment:
- perforator with a long drill or crown drill for concrete;
- vacuum pump;
- manifold with pressure gauges and hoses;
- device for manual flaring of copper pipes and scissors that do not form metal chips.
Often on the Internet there are instructions on how to install and run a split system without a vacuum pump, where the air from the pipelines and the evaporative heat exchanger is pushed out by freon pressure. We categorically advise against following such recommendations and strictly observing the technology of evacuating the system before filling. Otherwise, the compressor may fail much earlier than the due date.

Advice. There is a way to save money on buying or renting a rolling tool and speed up the assembly of freon lines. Ready-made installation kits are available for sale, including factory flared tubes, insulation and a cable with a drain hose. The price depends on the length of the bundle (3, 5 or 7 m).
Air conditioner installation instructions
It is assumed that you have already purchased a split system of the required cooling capacity, you know exactly the dimensions of the devices and have allocated places for them. Installation work is carried out in several stages:
- Marking the route for laying inter-unit communications, supplying electricity and sawing a furrow in the wall (if necessary).
- Fixing the indoor unit, laying lines through the wall and connecting.
- Installation of an external module, connection of communications.
- Refrigerant charge and start up.
Depending on the conditions of the work, the main bundle is laid in two ways: openly in a PVC cable duct or hidden inside the wall. Use the first option in a residential apartment, the second - in the process of repairing the premises.

Reference. Ninety percent of manufacturers of split systems provide for the output of communications from the left end of the indoor unit. When hanging to the left of the window and hidden laying of pipelines, the groove in the wall will have to be cut out with a turn, as shown in the photo.
The first stage of work is carried out as follows:

How to make furrows yourself and prepare for the installation of an air conditioner, an experienced master will tell in his video:
Indoor unit installation
Before starting work, take the device out of the box and read the attached technical documentation, where the manufacturer makes his own requirements for the installation of the product and provides a diagram. Do-it-yourself installation of the air conditioner according to the step-by-step instructions:

Advice. In order not to peel off the winding tape of the bundle, it is better to insert a plastic sleeve into the technological hole. Alternatively, make it from a plastic bottle.
After hanging the indoor unit, straighten the wiring harness and lay it inside the furrows. With an open laying method, immediately install the cable - channel and hide the pipelines there. How to accurately connect the highways, see the video:
Outdoor module installation
Mounting the unit on the balcony will not cause any particular difficulties. When installing under a window, secure yourself with insurance and have an assistant support you while screwing the bracket and outdoor unit. Work is carried out in the following sequence:

Advice. In order not to get out of the window waist-deep, tightening the nuts under the bracket, buy special plastic clamps or make them yourself. The bolt is inserted into the corner, a lock in the form of a washer is put on the thread and prevents it from falling out. At the end, the module fastening nuts are screwed with a long socket wrench, as is done in the video.
Startup instructions
At this stage, it is important to remove air and water vapor from the freon circuit by vacuuming. Then the lines are filled with refrigerant pumped into the outdoor unit at the factory. To refuel a new air conditioner, the following technology is used:

After successful refueling of the lines and the indoor module, turn on the split system for cooling, then test it in different operating modes. Make sure that the condensate flows from the drain and not along the wall under the indoor unit. Do not forget to close the ends of the service ports with standard plugs and put the cover on.
Conclusion
The success of the event depends heavily on the quality of the installation work. If you are careless when installing the air conditioner, then at best you will lose freon, and with it the money saved on calling the masters will fly into the atmosphere. In the worst case, the compressor will “grab” steam or dirt that has entered the pipeline, and will fail in just a year. So take your time and pay close attention to all connections.

Structural engineer with over 8 years experience in construction.
Graduated from East Ukrainian National University. Vladimir Dal with a degree in Electronic Industry Equipment in 2011.
Related posts:

In the past few decades, household air conditioners have firmly entered our lives and turned into ordinary household appliances, as happened earlier with other household appliances - refrigerators, food processors, etc. The air conditioner is a complex technical device, the installation of which is usually entrusted to specialists. However, in some cases, when the services of specialized organizations are not available, and the owner of the dwelling has sufficient skills, the installation of this unit can be done independently.
Varieties of household air conditioners
The whole variety of air conditioning systems can be divided into two main types - monoblocks and split systems.
The main distinguishing feature of monoblocks is the assembly of all units and assemblies in a single housing. Such systems include:
- Window air conditioners, in which there is a separation of nodes inside the case, while the compressor node is located on the back side and must go outside the room.
Installing a window air conditioner reduces window area
- Cases of floor or mobile conditioners are equipped with wheels for a possibility of free movement in the room. Such systems have an air duct that is led outside, outside the room.
Floor air conditioners can be moved indoors
The advantages of monoblocks are directly related to the features of their design:
- Cheapness combined with a long service life.
- Simplicity of design and operation.
- These systems achieve the highest possible efficiency.
- Rapid air cooling.
- Most modern systems are equipped with remote control panels.
Such systems are not without a number of design flaws:
- The number of possible installation options is limited (either in a window opening, or in a place where it is possible to bring the duct sleeve out).
- High noise level.
- The need to change the geometry of the window and fix complex suspension units in the case of installing a window air conditioner, which entails additional costs.
- In the case of installation in a window opening, the illumination of the room is reduced.
A design feature of split systems is the division of air conditioning units into two blocks, one of which is a compressor, which is taken out into the street. Unlike monoblocks, split systems have more varieties, but only some of them are used in residential premises:
- Wall-mounted devices are most widely used when a hair dryer or indoor unit is attached to the wall of the dwelling, and the compressor in the outdoor unit is displayed on the facade. As one of the types of such systems, inverter and non-inverter models are distinguished. In the first, the alternating current is converted to direct current, which allows you to adjust the compressor speed.
The split system hair dryer can be installed anywhere on the wall of the house
- Floor and ceiling systems are used less often. Their highlight is the ability to install a hair dryer either under the ceiling or on the floor. Accordingly, the air flows in the first case will spread from top to bottom, and in the second - from the floor up.
Indoor unit floor-ceiling split system
- Another variety is multi-split systems. Their design provides for the presence of one outdoor unit with a compressor and several indoor units that are installed in different rooms of a house or apartment.
Multisplitsystem is optimal if you need air conditioning for several rooms
The undeniable advantages of split systems include:
- Low noise level.
- The function of cleaning the air from bacteria and dust.
- The presence of a heating function in the cold season.
This is interesting: quite often, the heating function is provided by manufacturers in modern monoblock systems, both window and mobile.
- The compact size of the indoor unit, which can be mounted in a room of any size.
- Many modern systems have the function of dehumidifying and humidifying the air, which allows you to create a comfortable microclimate in the room.
Disadvantages of split systems:
- Their cost is higher compared to monoblock models.
- The need for a large amount of specialized work, including facade, both during installation and when the need arises for repair and preventive maintenance.
Ways to install air conditioners in an apartment
- Monoblock models of window air conditioners are currently being purchased less and less. The reason for this is a significant increase in the percentage of installation of plastic and other windows with standard double-glazed windows in dwellings. It becomes difficult to change the geometry of the window opening, because such air conditioners are installed directly in the window block so that the rear part with the compressor is outside the room. Such a system can be installed both at the bottom of the window, in which case it rests on the window sill, and at the top, using brackets to the ceiling or wall.
- Mobile fastening systems are not required. The place of their installation is selected based on the possibility of outputting a soft corrugated duct pipe outside the premises. The technical solution to this problem is left to the buyer.
- Options for installing split systems are more diverse. This is due to numerous options for the relative position of the indoor and outdoor units and depends both on the wishes of the owner regarding the location of the indoor unit, and on the technical ability to fix both the outdoor and indoor units in a specific place. Equally important is the possibility of laying communications between the blocks. The optimal solution is usually based on a scheme in which the distance between the outdoor and indoor units is minimal. This solution allows you to minimize the amount of work associated with laying communications and saves energy by reducing the heat that occurs during the circulation of the refrigerant.
Photo: the most commonly used layouts of the external and internal blocks of a split system
Cooking Tools
If the decision to independently install a split system is finally made, first of all, you should check the availability of the necessary tools and consumables. For complete work you will need:
- Perforator with a drill section of 40–45 mm and a length of at least 800 mm.
- A set of drills with a diameter of 6–12 mm.
- Screwdriver with a set of bits.
- Metal shears and reamer.
- Ruler, pencil and building level.
- Wrench.
- Vinyl insulation, masking tape and plastic bags.
- Brackets for mounting the outdoor unit, bolts with dowels 120 mm long.
When deciding on self-assembly, it is worth considering the degree of accessibility to the installation site of the outdoor unit. If it is mounted at a considerable height, you will have to include the rental of an aerial platform in the costs.
How to install a split system with your own hands
- At the first stage, the installation of a split system hair dryer, that is, an indoor unit, is carried out. The perforated steel panel on which it is attached is removed from the back wall and applied to the wall at the place of future installation. It is very important to make an exact leveling, after which the holes for the fasteners are marked. The presence of slopes is not allowed, as this will entail the pouring of condensate from the housing onto the floor of the room. Another important point is that the distance to the ceiling should be left at least 7 cm. Holes are drilled in the wall with a perforator, after which the plate is fastened with self-tapping screws and plastic dowels. Dowels with a section of 8 mm and a length of at least 32 mm are usually used. After hanging the hair dryer block on the latches, the horizontal fastening accuracy is checked again using a level.
The hair dryer is hung on a steel curly plate
- At the next stage, communication channels are prepared. If a hidden gasket is used, strobes will have to be made using an impact puncher. However, such a decision entails the production of cosmetic repairs in the room. Therefore, at present, communications are most often hidden using a plastic box of a suitable section. With the help of a puncher and a drill, a hole is made in the outer wall to bring the power and control cables, PVC pipes for condensate drainage and freon circuit pipes to the outdoor unit. Marking is done using a ruler and a level. An important point: in order to ensure the removal of condensate, a slight inclination of the outlet towards the street should be ensured. During drilling, it is worth using a vacuum cleaner and fixing a plastic bag directly under the hole with masking tape to avoid significant contamination on furniture and walls. If the length of the drill is not enough, drilling is done from both sides. In modern houses, the thickness of the wall rarely exceeds 1 m.
The hole is drilled with an inclination towards the street
- After that, the most difficult stage begins - the installation of a street block. Since the compressor is located in this unit, it weighs more than 20 kg, and often the installation is carried out at a considerable height. Therefore, do not forget about safety measures, in particular, use safety equipment. Most often, the outdoor unit is mounted on the wall using L-shaped brackets. First, the location of the brackets on the wall is marked and holes are drilled. Then fastening is done with bolts and nuts using washers. The external unit of the split system is bolted to the brackets, while thick rubber pads are mounted under the legs to reduce vibration and noise.
The outdoor unit is mounted on L-brackets
- As a possible option, the installation of an outdoor unit on the roof of a building or directly on the ground is used. In this case, U-shaped brackets or frame metal stands are used. Such a solution can significantly increase the length of communications and is used when it is impossible to mount the unit on the wall, for example, if the wall surface materials are not strong enough.
- The next stage is the most responsible. In the course of it, the communications of the external and internal blocks are connected. First, the plastic protective cover is removed on the outdoor unit and, in accordance with the manufacturer's diagram, the power and control cables coming from the indoor unit are connected to the terminals using bolts. Then the length of the freon line is measured and the copper tubes are cut with a margin of 10 cm. The ends of the tubes are rolled and a chamfer is removed using a reamer. The copper pipeline is connected first to the outdoor unit, then to the hair dryer with an adjustable wrench using union nuts screwed onto the fittings in both units. Before the copper tubes are passed through the hole in the wall, vinyl insulation is put on them, the ends are insulated with tape so that debris does not get inside. A drainage drain pipe is also being installed; it is made of a corrugated PVC plastic pipe, which is attached to the unit with plastic clamps.
- The last stage is the introduction of freon into the refrigeration circuit. First, the gas is removed from the circuit by opening the valve, followed by evacuation. The refrigerant is located in the outdoor unit of the air conditioner. The valves with which freon is introduced into the system are located there. If the length of the contour is equal to or less than the data indicated in the data sheet, the introduction of additional volume is not required. Before this operation, experienced craftsmen evacuate the circuit using a special pump with pressure gauges that allow you to control the pressure loss. These actions allow not only to check the tightness of the system, but also contribute to the maximum removal of moisture and air from the system, which reduces the load on the compressor.
- Upon completion of the work, the assembled split system is checked in all operating modes. There should be no vibration, and the fans on the indoor and outdoor units should rotate. There should be no odors, drainage should remove moisture. Of course, the air conditioner must perform its functions of both cooling and heating.
Before introducing freon into the system, professionals evacuate the circuit
Video: installation of a split system without using an aerial platform
It is hard to imagine an apartment without air conditioning. As can be seen from what has been written, even this complex technique, if necessary, can be installed independently, without the involvement of a specialist.
This article will discuss how to install the air conditioner with your own hands. Experts strongly recommend preparing the climate device for intensive use in advance. Installation of air conditioners is a responsible and rather complicated event from a technical point of view. With a certain desire, practical skills and a theoretical base, installation work can be done by hand.
The efficiency and duration of the operation of a split system depend on how accurately the installation rules are followed. An unsuitable place, improperly selected equipment for installation, its non-compliance with technical operating conditions, violation of technology - all this can eventually lead to a breakdown of the unit. And even the most expensive devices fail without revealing their potential.
Properly organizing the whole process will not work if you do not have an idea about the principle of operation of this climate apparatus.
- 1. High-pressure refrigerant (freon) is supplied through a nozzle, the diameter of which corresponds to the outlet pipes.
- 2. It goes to the inside of the evaporator, where it gradually expands, and after some time it completely boils. The generated steam actively absorbs heat.
- 3. In the process of absorption, condensate is certainly released in the form of water, which settles on the surface of the radiator.
- 4. Moisture is transferred to the tank, and then discharged outside the walls of the house.
- electrical tester;
- bicycle and vacuum pumps;
- pipe cutter;
- perforator;
- indicator;
- example;
- pipe flaring kit.
- choice of location for the installation of the unit.
- installation of brackets on which the unit will be installed.
- Initially, the installation of the external (outdoor) unit of the unit is carried out.
- then the indoor unit and other elements of the system are mounted inside the object.
- remoteness from the side wall - from 30 cm;
- distance from the ceiling - at least 15 cm;
- to the nearest large object that disrupts the movement of air masses - from 150 cm.
- 1. The fixing points of the brackets are indicated and marked with a level.
- 2. Holes are formed under the anchor bolts.
- 3. For communications, it is necessary to prepare a through hole, its diameter should be at least 8 cm. It is better to make mounting recesses and recesses in the space between adjacent bricks, this will not only simplify the work, but also make them visually neater.
- the outdoor unit of the air conditioner should be blown by the wind from all sides (if possible);
- the body is better placed under a canopy;
- residents of the upper floors of apartment buildings can place them directly on the roof;
- the maximum line length is 15 m, if this value is exceeded, then cold losses increase.
Show all
The principle of operation of the unit
All models of split systems offered for sale are built and operate according to the same principle. They consist of a compressor and an evaporator unit. To connect them, special pipes are used. The outdoor unit is mounted outside the wall.
Unit device
An evaporator is installed inside the room. More productive and expensive models are equipped with several with a common compressor.
The principle of operation of the air conditioner at home:
If the installation of the air conditioner is done professionally and correctly, the compressor will constantly pump out freon vapors from the internal chamber, while the internal pressure increases in parallel. As a result, the refrigerant heats up, which contributes to its transformation into a dense fog.
The refrigerant is redirected to the condensation chamber, where it is cooled by an integrated fan, transforming into a liquid. In this state, it is sent to the evaporator (through the nozzle) and everything closes in a circle.
note! If you install an air conditioner inside a room near a heating device, then the energy consumption will increase significantly, and the device itself will most likely fail after a few months of operation..
Even ordinary dust can lead to breakage of the climate unit. Wet cleaning is not only necessary, but also prescribed, and thorough, regular and thorough. Indoors, it is strictly forbidden to put any products or objects on the unit itself. It is also impossible to cover it with a tablecloth.
Scheme of work
Do-it-yourself installation of an air conditioner necessarily involves sealing all connecting elements and joints, which will eliminate the likelihood of refrigerant evaporation. Experts recommend placing the outdoor unit in such a way that it is lower in level than the indoor unit. The standard installation of the air conditioner involves the location of the outdoor unit in a cool place, in the shade.
The device and principle of operation of the air conditioner


Tools and preparations
Do-it-yourself installation of an air conditioner cannot be done without preliminary preparation of tools:
Required Mounting Tools
This is just a basic set of accessories necessary for the installation of air conditioners. Additionally, you will need a full coil of copper tube (note that its ends must be rolled initially, at the factory). Any visual defects (dents, scratches) are simply not acceptable.
note! Installation of air conditioning systems is impossible without making holes in the walls, damaging the exterior and interior finishes, so the work should be carried out in parallel with the repair.


Step-by-step instructions for installing the climate system
After purchasing the climate unit and preparing the necessary tools, you can proceed to the main pool of work. The installation scheme is quite simple:
note! In the process of performing the relevant work, it is extremely important to strictly observe safety standards, especially when it comes to a height of 2-3 floors. Knowing how to install the air conditioner yourself should not go against the precautions.


The choice of a place for the installation of the unit is no less important than the purchase of the climatic device itself. Experts advise taking into account a number of requirements when choosing a place for the indoor unit:
Unit placement options
As for the placement of the outdoor unit, the balcony is considered the ideal place, but on condition that it is open. In the case of a glazed loggia, you can stop at the option of mounting on the fence, with sufficient bearing capacity of this design. We recommend that residents of the first and second floors place this part of the split system above the window so as not to cause inconvenience and level the likelihood of theft.
note! In the case of a private house, no strict recommendations are provided.
Choosing a place for the unit
If there are several air conditioner units, then the minimum distance between them should be at least 1.5 m, optimally - 3 m. A number of manufacturers do not regulate this value and you can select it yourself. But it is better to refuse the “sandwich” option, in which neighboring blocks are located with the back side to each other.
The distance between 2 blocks indoors is from 6 m. More is allowed, but in this case, refueling with refrigerant cannot be avoided. It is better to invest in the specified value.
Where to install the air conditioner
Installation of brackets for air conditioning
Brackets for installing the unit
So, where is the best place to install an air conditioner? – The climate control unit is fixed in an unhindered access zone. Installing an air conditioner on a balcony is the best option. This type of equipment requires periodic and high-quality maintenance.
Experts strongly recommend placing the outdoor unit on the north or east side. Installation of a window air conditioner is often performed at the bottom of the balcony. This zone is considered the best, because it allows you to freely open the window, service the unit. The sequence of actions is simple:
Bracket dimensions
The brackets are installed in accordance with the preliminary marking, adjusting them according to the level and screwing in the anchor bolts. It is necessary to pay attention to the fact that there should be about 10 cm of free space between the base of the wall and the air conditioning unit. Gaps must be carefully sealed. After making sure that this block is securely fastened, the installation steps continue, but already inside the room.
ATTENTION! Don't skimp on brackets.
Brackets for air conditioners. What is the difference?
Outdoor unit fixing
Starting to fix the outdoor unit, you need to make sure that the wall is structurally reliable and durable. Large models can weigh more than 50 kg, and in some cases more. Household climate units weigh about 15 kg, and there are no problems with their fastening. Experts advise to provide a margin of safety for all fasteners and walls at least 2 times.
Advice! If your house has external insulation, you should make sure that the brackets are fixed not to it, but to the wall itself.
In recent years, in the segment of private development, such material as aerated concrete has been especially popular. With all its positive qualities, it is not able to provide sufficient strength for the installation of an air conditioner. The same is the case with the ventilated facade.
note! During the installation process, it is extremely important to ensure a horizontal level for the product, while you can use the building level. The slightest deviations are fraught with improper circulation of the refrigerant.
Proper fixing of the outdoor unit
Professionals pay close attention to the competent arrangement of the drain for condensate drainage. In accordance with the rules and regulations, this tube must be connected to the sewer system. That's just our compatriots in the vast majority neglect it, completely in vain.
The outdoor unit should be at least 10 cm away from the wall surface. It is required to ensure high-quality blowing of the unit. If you do not withstand it, then the device may completely fail. Remember that any activities associated with the installation of the outdoor unit are associated with a high risk to health, since these are high-altitude work.
Fixing the indoor unit
Professionals categorically forbid placing the indoor unit behind curtains, near electrical appliances, above the battery. Self-installation of the air conditioner in these places is fraught with failure of the device's processor. Having decided on the place, it is imperative to check the wall for other communication solutions (heating pipes, plumbing, electrical wiring).
Fixing the indoor unit
Direct installation of a window air conditioner is possible only if there is a free area. First of all, a metal plate is mounted: at least 10 cm must be retreated from the ceiling, and about 7 cm from the base of the wall. Distances are marked with a pencil. Holes are made for fasteners, and the plate is securely screwed.
Fixed plate for indoor unit
The further installation scheme involves fixing the indoor unit on an already attached plate. A hole is made in parallel in the wall for laying a copper cable, condensate hoses, pipes, and electrical wiring. Standard includes all necessary products, solutions and elements.
Electrical connection
Electrical connection diagram
The indoor unit functions only if it has its own wiring, the cross section of which must be at least 1.5 square meters. mm. A mandatory requirement is the presence of a shutdown machine, especially if it is the installation of industrial air conditioners. The wiring is connected to the shield only when it is fully laid: a yellow wire with a small green stripe is connected to the neutral wire.
note! In order to determine the phase and zero, it is most effective to use an indicator.
The rules for installing an air conditioner require the connection of individual units using insulated stranded wires, previously passed through a hole in the wall. Each climate control unit comes with instructions that clearly indicate the wiring diagram and sequence.
Answering the question of how to properly install an air conditioner, professionals invariably state that the key to the success of this entire event depends on the quality and literacy of laying copper pipes. They are cut in such a way that there is a small margin (about 0.8-1 m) for bends.
Pipe laying
It is simply not possible to bend them, since dents, wrinkles will form, and the metal may even crack.
note! The installation of industrial air conditioners, as well as household ones, involves the use of special pipe benders. They allow you to maintain the structural integrity of the tubes. For window air conditioners, this moment is the key to effective functioning.
Only after this, the tubes can be covered with polyurethane foam hoses, which play the role of thermal insulation. As for the traditional foam rubber, it is completely unsuitable in this context, due to the short service life. Flanges for threading are worn solely on the fact of pipe insulation.
Installation and installation of air conditioners is carried out with mandatory flaring, while the process itself requires utmost care in order to eliminate the risk of grooves and microcracks. Be that as it may, spare parts and the necessary tools should always be at hand. On rolling, the nut should be placed easily, but when tightening, it is better to use a torque wrench, which eliminates the likelihood of small particles being squeezed out of the machined area.
Further, it is enough to fix the corresponding pipeline at each fitting. A small piece of pipe in a reinforced casing is attached to the drain pipe (for such cases, it is better to use heat-shrinkable tubes).
Advice! An important component of the successful installation of an air conditioner at home is the presence of a drainage pipe located at the maximum possible distance from the bearing walls.
The next step is to insert pipes into the holes in the wall, while they should be placed as evenly as possible. At the wall, the canvas is fixed with clamps. An air conditioner with installation outside the home must be mounted extremely securely. Small holes are filled with mounting foam. To check the tightness, you can use a soapy solution.
Vacuum system
To install air conditioners, it is necessary to evacuate the system. Even if the activities are carried out at home, this is indispensable, since moisture and fine dust are removed as part of the evacuation. During the installation of the air conditioner, connections and threads are sealed, otherwise it will not work to remove air from the unit. A vacuum pump is used to pump out air for 20-40 minutes.
vacuuming
After the installation of the air conditioner is completed, the refrigerant in the cylinder is supplied to the system. A small adapter is attached to it, and then a pressure gauge. The filling of the air conditioning tank is independently carried out taking into account and correcting for pressure. Upon completion of the process, the disconnector is activated and the system enters the test mode.
note! The uniform circulation of cold air indicates that everything is done correctly. The air conditioning unit can be used for its intended purpose.
Results
Now you know how to install the air conditioner yourself. This work is quite feasible. Naturally, this is not a simple and easy task. The key recommendation is to strictly follow the instructions and if any defects occur, they must be eliminated in a timely manner. In this case, the air conditioner will work effectively for a long time. Be sure to watch the video on installing the air conditioner from A to Z.
We also recommend
 Hero pioneers in the Great Patriotic War Heroes of the Patriotic War pioneers presentation
 Presentation "Formation of posture in preschool children Hygiene of correct posture presentation for children
 Sciences of the human body
 Presentation "history and prospects for the development of robotics"
 The value of the struggle of Russia with the Polovtsy
 Asia and Africa after World War II