How to hang kitchen cabinets on a brick wall. Installation of kitchen wall cabinets: quickly and efficiently
Modern kit kitchen furniture necessarily includes wall cabinets, shelves and other elements that are attached to the wall.
It is practical, aesthetically pleasing and extremely convenient for storing food, utensils and kitchen utensils at hand.
It is important that their installation (hanging) is reliable. How to achieve this?
Hinged elements of kitchen furniture are installed at a certain height, using special fasteners.
To carry out the installation of hinged kitchen cabinets on your own does not constitute special work if you stick to a pre-planned plan and follow certain rules. Let's take a closer look at some of the points that we will have to face during the installation of hanging furniture.
Height selection
The most important thing is the comfortable use of kitchen cabinets, therefore, when choosing the right height, we first of all focus on the owner’s height.
The hostess or the owner of the kitchen should be able to reach the middle shelves of the cabinets without the help of chairs or stepladders.
Let's remember! The minimum distance between hinged kitchen cabinets and the worktop according to GOST is 45cm. This distance contributes to comfortable work and will allow you to place such small Appliances, as Electric kettle, microwave oven, blender, toaster and others. The standard in many kitchen salons is recognized - 60 cm.
For comfortable use wall cabinets in the kitchen, it is necessary to take into account the individual physical characteristics of the user, and in particular his height.
We suggest using the following calculations of the ratio of human height and distance to the topmost shelf:
- height from 155 to 160 cm - height to the top shelf 175 cm;
- height from 160 to 170 cm - height to the top shelf 190 cm;
- height from 175 to 190 cm - height to the top shelf 200 cm.

Based on this, we determine at what height we will hang the upper cabinets.
Mechanisms for fixing kitchen cabinets to the wall

After we have decided where to hang, we should decide how to hang the top kitchen cabinets and shelves on the wall.
There are two main installation methods: on the corners and on the rail
- The first way is already obsolete. When using hanging furniture corners or other fasteners, it is necessary to determine the upper limit on which the corners will be installed. All of them should be fixed on the same horizontal line. The success of the installation of wall cabinets depends on how evenly the fasteners are installed. Unlike the rack-and-pinion hinge mechanism, installing hinged kitchen furniture on the corners is a very laborious and long process. In addition, with a slight error, you will have to make new holes in the wall.

Kitchen cabinets with corner fixings
Nuance: outdated - does not mean bad. It is this method of hanging the upper cabinets that you should use if the walls were not leveled during the repair.
- The mechanism for hanging furniture using a mounting rail or strip is much simpler and faster in its execution. This method of hanging can be handled by one person who does not have special training, without anyone's help. The essence of this method is as follows: a rail is horizontally attached to the upper boundary of the wall, and a hinge is attached to the inner wall of the cabinets. Next, the cabinets should be hooked onto the rail according to the hook principle.

Mounting mechanisms for wall-mounted kitchen cabinets

Mounting mechanisms - view inside the cabinet
Preparing the walls for work
Before proceeding with the installation of wall cabinets on the wall, it is necessary to carry out preparatory work.
First of all, make sure that the wall is absolutely flat and vertical in level, and the corners of the kitchen are strictly 90 degrees.

Preparing a drywall wall for wall cabinets
Any electrical and plumbing work must be completed in advance.
Wires and pipes are hidden in the wall, sockets should be installed in a place that will provide easy access to them and will not interfere with the installation of kitchen furniture.
The final decoration of the walls with wallpaper, cladding or painting should be done before mounting the wall cabinets, since after hanging it will not be possible to do this.

Choice of mounting accessories and tools
When fastening kitchen furniture to the wall, you need the following tools and accessories:
- roulette,
- water level,
- drill / perforator,
- hand screwdriver or screwdriver,
- wrench,
- clamps,
- a hammer.
Let's remember! If the wall on which you are going to hang the kitchen cabinets is wooden, you can use hardened pan-head screws. If the wall is made of concrete or brick, use a dowel and cork, an anchor bolt, or a regular bolt. If the wall is drywall, buy Molly's dowels.
Step-by-step instructions for installing wall cabinets

Hanging kitchen cabinets can be hung by yourself
- Using pre-prepared adjusting screws, bring the hooks on the hinges to the middle position.
- Fix the awnings on the side walls of the cabinets so that the hooks stick out a few millimeters (2-4 mm) from the wall of the cabinets so that it can catch on the fixing strips.
- Next, you need to make marks on the wall for drilling the holes that are needed for mounting the hinged rail.
- Drill required holes using a drill of suitable diameter.
- If the wall requires it (especially if you have drywall), drive dowels into the holes in the wall. Fix the hanging mounting rail.
- Next, hang the kitchen cabinets and shelves on the rail. Immediately align them with each other and horizontally using pre-prepared adjusting screws.
- Using clamps, install and firmly fix the cabinets to each other.
- Drill through the cabinets fixed together, fasten them with an intersection screed.
- Next, you just have to put all the shelves and hang the doors on the cabinets.

The height of the kitchen cabinets to the wall is determined individually
- The hinged rail should be attached slightly below the uppermost edge of the kitchen cabinet, about 3-4 cm.
- To adjust the horizontal position of wall cabinets, it is better to use the water level, and not measure the height from the floor and ceiling, because. they are not always perfectly aligned.
- If your walls are drywall, you need to use the so-called butterfly dowels, which will ensure that the fastener is firmly pressed against the drywall surface.
- If, while drilling holes, the wall begins to crumble, which is often the case with drywall, make holes first with a thinner drill. Then, in small holes, feel free to make holes with the right drill.
- When drilling holes, take Special attention wall areas where wiring can pass.
- In order to prevent the kitchen cabinet panel from being damaged by clamps, it is necessary to place between the clamp and the cabinet panel wooden plate or wedge.
- Often, during the through drilling of two walls, chips can form on the surface of the cabinets. To prevent this from happening, make thin holes first with a thinner drill.
And now short video: how to hang a kitchen cabinet on a mounting rail.
The interior of modern kitchens impresses with its diversity. Some housewives choose a strict practical style, while others prefer to make the kitchen a place for culinary improvisations.
But when it comes to the headset, most kitchens are similar. After all, usually in every kitchen there are such furniture elements as a table, cabinets and hanging cabinets. We will talk about the latter in this article, or rather, how to properly hang kitchen cabinets.
Fastening hinged elements of kitchen furniture
Often given element kitchen set acts as a small storeroom. Various canned food, seasonings, cereals, etc. find their place in it. However, they are also great for storing various kitchen utensils, which have a lot of weight.
Obviously, the fastening of this type of furniture has a very great importance, because hardly anyone can please the pogrom from his fall. When choosing what to hang kitchen cabinets on, you should take into account all possible options.
Fastening with canopies (ears)

The simplicity of this mounting method makes it possible to avoid serious investments. Canopies are attached to the cabinet with 3 self-tapping screws (the 4th hole, as a rule, is not used).
A hook must be installed in the wall for each canopy. You can, of course, get by with dowels with screws, but in this case there is a possibility that the ears will simply come off them.
How to install awning hooks for mounting in a concrete or brick wall
But even if you are on “You” with these tools, the following tips will come in handy:
- so that the drill does not “walk”, small holes should be made in the places for drilling (a hammer and a thick nail will help you with this);
- if the drill goes very tight, you can resort to the help of all the same hammer and nail, but you should not focus on them, because we are drilling, not punching (a couple of blows may be quite enough);
- if the wall crumbles when drilling, you can use a smaller diameter drill. After the hole is drilled with an “auxiliary drill”, drilling should be done again, but with a drill of the desired diameter.
So, when we got acquainted with the nuances of working with a puncher, you can proceed directly to installing hooks.
Here is the instruction for this action:
- drill holes in the wall for dowels;
- insert dowels (dowels with hooks are best suited);
- twist the hooks.
In contrast to the simplicity of this method, its impracticality stands out. It happens that the dowels fly out of the holes (depending on the wall).
But the main disadvantage, perhaps, is the inability to adjust the cabinets. If the hanging set includes several elements, then it is very difficult to achieve their perfectly even position in relation to each other.
We have already determined that hooks must be installed before hanging the kitchen cabinet on the wall, but how to do it right?
To begin with, draw a straight line on the wall. horizontal line. To do this, it is better to use the level, since if you take the floor or ceiling as the zero reference point of the distance to the line, the result can be disappointing. Unfortunately, often the ceiling and floor have an uneven surface.

After the line is drawn, we proceed to measure the distance between the ears. To do this, you can use an ordinary ruler.
Helpful advice! Instead of a ruler, you can use a strip of paper or tracing paper. It must be attached to the back wall of the cabinet and mark the edges and holes of the ears. Then the data marked on paper should be duplicated on the wall.
When the measurements are made and the hooks are installed, you can proceed with the installation of cabinets (shelves and facades must be removed). It is not easy to do this with your own hands, so installation is best done with an assistant. It is important that the top edge of each locker matches the horizontal line drawn on the wall.
Fastening cabinets by means of the “hinge - mounting rail (rail)” mechanism
This mounting method is more practical than the previous one, but its price is an order of magnitude higher.
The advantages of this mounting method:
- Possibility to adjust the position(left-right, up-down); (weight is distributed evenly along the entire length of the bar);
- the ability to fix the bar with the desired number of fasteners(tire has a large number of mounting holes).
The principle of operation of the mechanism "hinge - mounting rail"

As you can see in the photo, the hitch has a hook that "clings" to the mounting rail. The canopy is screwed to the inner side wall of the cabinet, and the hook comes out rear wall(For this, you must first make a hole in it). It should be remembered that the mounting rail is located below the edge of the cabinet so that there are no unpleasant surprises.
At this method installation, the question of how to hang kitchen cabinets evenly will not arise, since the ability to adjust their position allows you to eliminate all minor flaws.
How to install a mounting rail
First of all, you need to draw a flat horizontal line (the level will help you with this). A mounting rail will be attached along this line. Next, you should attach the rail to the wall (the horizontal line is the top of the rail) and mark the places for drilling holes.
At the next stage, we drill holes and fasten the tire to the wall.

Helpful advice! In order to save money, you can attach the mounting rail in pieces of 10 cm (only where the hangers are located), but only if the wall is strong enough.
Now that everything is ready, you can mount the cabinets on the rail (it is better to remove the shelves and facades). At the final stage, it is necessary to align all the modules (again, one cannot do without a level). This can be done with awnings.
The final stage of hanging kitchen cabinets
When the modules are already hanging, they should be connected to each other with furniture screws (the method of suspension does not matter). To do this, they must first drill holes (an electric drill is ideal for this action). For a tighter joint of the walls, various clamps can be used during connection.
And, finally, we fasten the decorative cornice (if there is one), insert the shelves and install the facades.
Note! Before you hang cabinets in the kitchen, you need to determine the height of their location. As a rule, the optimal distance from the countertop to the hanging headset is 60 cm.
During installation, this distance should be maintained (it is enough to use household appliances), but you should not mount the cabinets too high either. The main thing in this matter is, perhaps, practicality. Attach the headset at such a height that you can get everything you need from the top shelf without resorting to the help of foreign objects.
So let's summarize the above
Let's go through the checklist again:

- We determine the location of the hanging headset;
- We determine the optimal height;
- We install fasteners on the wall and cabinets;
- We remove shelves and facades;
- We fix and adjust (if possible) lockers;
- We connect all the elements of the hanging headset to each other;
- We attach a decorative cornice (if any);
- We install shelves and facades in place.
If you have any questions, you can find answers to them in the video related to this topic and posted just below on the page. Having theoretical knowledge and seeing their practical application, you will undoubtedly cope with the installation of a hanging headset with your own hands.
The package of modern kitchen furniture must necessarily include hanging cabinets, shelves and other elements that must be fixed to the wall. This allows you to effectively use the free space for storing food, dishes and other kitchen utensils.
To hang the cabinets, you will need a drill, tape measure, level, fasteners and a pencil.
It is recommended to start with the attachment of hanging furniture. There is nothing complicated in this process. The main thing is to stick to a pre-planned plan and follow some rules. Therefore, further it will be considered how to properly hang a wall cabinet in the kitchen.
Preparatory work
Before proceeding directly to the mounting of the wall cabinet, it is necessary to achieve certain conditions:

Figure 1. Lockers can be hung with an adjustable canopy.
- the walls on which the installation will be carried out must be vertical and even, and if the kitchen is angular, then the wall interface must be 90 °;
- walls near cabinets should be painted, tiled or wallpapered, because after fixing it will be difficult to process the wall;
- all must be completed electric installation work, including the installation of a socket for a kitchen hood (if necessary), and all wires are laid for connecting fixtures that will be placed on the roof or visor of the headset.
When installing wall cabinets, it is very important to ensure that they are convenient to operate. This is achieved by fixing cabinets at a certain height, the value of which directly depends on the growth of the hostess or the owner of the kitchen. Owners should be able to reach the middle shelves without using a high chair. In this case, one should take into account GOST, which states that minimum distance between the worktop and the wall cabinet should be 0.45 m. Given value allows you to place some household appliances on the countertop (microwave oven, electric kettle, toaster, blender, etc.).
When choosing the mounting height of wall cabinets, you can use the table below.

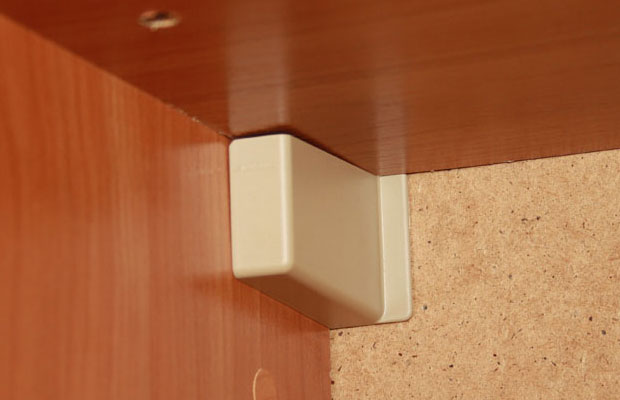
Figure 2. Thanks to the back pad, the furniture does not fit snugly against the wall.
For the successful installation of wall-mounted kitchen furniture, you also need to prepare the following tools and materials:
- electric drill with drills;
- screwdriver;
- level;
- roulette;
- a hammer;
- clamps;
- fasteners;
- pencil.
Back to index
Mounting mechanisms for wall cabinets
The use of modern mounting devices can greatly simplify the work associated with hanging wall-mounted kitchen furniture. They allow you to eliminate small errors that were made in the work, as well as increase the strength of the entire structure.
You can fix the cabinet on the wall with mounting plate or furniture hinges. Using a mounting plate has the following advantages:

Figure 3. Line marking for lockers.
- all work can be done without outside help, since there is no need to support the cabinet when marking, this not only greatly facilitates the work, but also allows you to achieve high accuracy;
- there is no need to use a border for alignment;
- there are special notches on the mounting rail that make it easy to adjust its length;
- with the help of adjusting screws, it is possible to change the mounting height and distance to the wall in a small range;
- this mechanism makes it easy to both mount and dismantle kitchen furniture;
- the canopy can be carried out even when the apron is already fixed.
Among the shortcomings of mounting strips, it is worth highlighting their considerable cost.
The second installation method is cheaper than the first, but it takes much more time and requires the additional help of another person.
Back to index
Fastening with a mounting plate
This installation method consists of two elements: an adjustable canopy installed inside the cabinet, and a bar that is fixed to the wall (Fig. 1). When using such a mechanism, the canopy can be carried out in 2 ways:

Figure 4. Lockers can be fixed using furniture hinges.
- The back wall of a locker is the consignment note. It is nailed from behind to the ends of the box (Fig. 2). In this case, the furniture will not fit snugly against the wall. You can install one long bar on which all lockers will be hung.
- In this case, the rear wall is mounted inside the cabinet by 12-15 mm using special grooves.
Whichever installation method is chosen, the procedure will be the same in both cases. First, the top level of the locker is marked on the wall. After that, the distance from the top edge to the canopy hook is measured. This value must be measured from the drawn line down and draw a second line, which will be the upper edge of the mounting plate (Fig. 3).
After that, the bar is attached to the wall with dowels and the cabinet is hung, at the same time its vertical position and depth are adjusted using canopies.
After installing all the cabinets, they are interconnected by an intersection screed, after which the shelves are installed and the doors are fixed.
The kitchen wall is divided not only into sections, but also into 2 separate bases, floor and wall, and for the second, any suspensions should be as reliable as possible. There are several mounting options, and below we will look at the most effective ones, including their installation and use.
The position of the suspended modules of the kitchen unit - we determine the height
Before mounting the kitchen set on the wall, markings should be made, taking into account all the features of the upper base. The fact is that all models differ somewhat in size, and in some cases the difference in size can be very significant. This refers to both the total height of the cabinets, which is usually observed for all wall sections of the block, and the spans between the shelves, as well as their depth. Moreover, the last 2 values have the greatest impact on the usability of the upper base. Let's look at a few examples.
The most effective solution for - sections of 3 shelves with a depth of no more than 30 centimeters. Moreover, the height of each span should be such that it is possible to reach the middle level without resorting to auxiliary means in the form of a chair or, moreover, a stepladder. As for the upper shelves, they can also be made in the direct access zone or left at a height exceeding the height of a person with an outstretched arm, relegated to rarely used utensils. At the same time, the lower plane of the cabinet should not interfere with tilting over the work surface intended for cooking, with a standard one.
Of course, in order to increase the capacity of the hanging sections, you can make them as deep as possible, up to half a meter, providing each with 4 shelves, divided into compartments. However, at the same time, an increase in internal space will be achieved by restricting access to it. The fact is that hanging kitchen cabinets below eye level is not the best way as it will reduce the usability working area. Especially if the "apron" of the kitchen wall is used for hanging auxiliary utensils and dishes. And hanging high means making 2 upper shelves inaccessible at once.
Thus, based on GOST, minimum height the lower plane of the cabinet above the countertop is considered to be 45 centimeters, moreover, the depth should be less than 30 centimeters. This will allow you to conveniently use the cutting area and at the same time leave room for microwave oven and an electric kettle. But the most comfortable height for a person of average height is 60 centimeters with the same width of the tabletop. The recommended height of the middle or second shelf from the bottom with a user height of 155 to 160 centimeters should not exceed 175 centimeters so that the raised arm reaches the entire depth of the compartment. With growth in the range of 160-170 centimeters, the average shelf should be at a height of 190 centimeters, and with a range of 175-190 centimeters - no more than 2 meters.
Ways of fastening the wall base - the choice of strength
The main thing to pay attention to before installing kitchen cabinets is whether the walls in the room are sufficiently even. The fact is that there may be some deviation from the plane, and the bend, imperceptible at first glance, is quite easy to detect using laser level and plumb. Based on how smooth the wall is, you should choose the method of attaching the cabinets. There are 2 ways of installation - rigid, using steel corners or plates, and on movable hangers for kitchen cabinets. The first option is possible when the wall is bent only if the screws are screwed to different depths so that the caps are on the same line, while The best decision- attach to hanging loops. In general, it is preferable that the surface be leveled, especially if corners are considered as fasteners.
Mounting plate for wall mounted kitchen cabinets can be used with a relatively slight wall curve. The fact is that a special groove, for which adjustable suspensions cling, can be easily deformed with a strong curvature of the bar along the base relief. In this case, the cabinet is suspended on adjustable systems with small protrusions facing down and exactly entering the longitudinal groove of the bar. Thus, the upper base simply clings and is held by its own weight. But it is worth a little lift the locker, and it will fall off along with the contents. In this regard, corners and plates with screws for screws are still quite popular: the former tightly fix the kitchen base, the grooves of the latter also prevent the box from falling off.
Plank for hanging wall cabinets - advantages and disadvantages
So, we briefly talked about rigid fasteners, but their main drawback is the difficulty of aligning along one line, especially if the holes in the corners or hinges are made on different levels which happens most often. In such cases, it is necessary to make careful measurements for each hole vertically relative to the floor and horizontally from the nearest corner of the room. For hanging loops, you can only use screws or nails, the caps of which go into the ears, that is, anchor bolts are no longer applicable in this case, or you need to screw them right through the hole, holding the canopy cabinet. The bracket for mounting wall cabinets eliminates all these inconveniences by the fact that it is mounted to the wall in the kitchen separately from the hangers, which are mounted directly on the box and then cling to a special groove.

To disadvantages of this type fixing the upper kitchen base can be attributed to the problems already mentioned above with the curvature of the wall. The plank can only be mounted on a prepared, leveled surface. However, nothing prevents sawing it into several parts, if this is due to irregularities that are too large to eliminate, and at the same time it is possible to use the described fixing of kitchen cabinets on a metal bar. Often, a plank already cut into pieces is included in the kit, in this case it is enough just to beat off a line on the wall according to the level and fix all the segments according to the resulting markings, even with small gaps between them. Thus, such a design is distinguished by the versatility of fitting in relation to the length of the suspension base and the dimensions of the room.
Most often, the plank has special notches that allow you to divide it into separate parts without the need to saw, but only by pressing and breaking off along the fold.
It is worth voicing 2 more obvious "minuses" of using slats, which you will inevitably have to face. The first is the price. The entire suspension system, including anchor bolts or dowels, or special screws with drywall cartridges, will cost a very tangible amount for the budget, compared to hinges or corners. You can save a little by taking a shorter bar and dividing it into segments according to the number of suspensions. The second drawback is the resulting slope of the suspended cabinets relative to the vertical due to the plank protruding above the plane of the wall. You can fix it by gluing a narrow strip of fiberboard at the bottom of the back wall of each box. You can also hang the kitchen by pulling out the cabinets just below the top edge of the apron, which will even out the slope.

Let's summarize. Despite the seeming fragility of the suspension, it is hard to imagine that it would occur to someone to try to lift an already securely suspended locker and throw it off the bar. But the convenience of this method of fixing the upper base is undoubted. It is enough to strengthen the strip metal profile strictly horizontally with a few screws or dowels, depending on the material of the wall. Further, the suspensions are mounted on the cabinet box. And, finally, the finished parts of the kitchen wall rise and are simply hung on the bar, one after the other, successively moving towards the already fixed cabinet. Moreover, if you need to press the back wall of the cabinet closer to the wall or vice versa, move it away, it is enough to adjust the suspensions by turning the screws. All this can be done by 1 person, and it is not necessary to be a professional.
Suspension design features - how it works
As a rule, this furniture fitting has a decorative plastic case, inside of which the adjustment mechanism is hidden. From the outside, only the heads of the adjusting screws can be observed, in addition, there are through holes in the body, reinforced inside with metal plates that are part of the suspension mechanism block. However, some models are made entirely of metal, which makes them more durable and, accordingly, more expensive. And for any external differences, the design always includes the main part, with the help of which the cabinets are hung - a bar with hooks at the end, connected inside the case with adjusting screws.
The movable mechanism gives the suspension some freedom to move the latch bar back and forth and up and down, and the main amplitude along the second vector falls on the end with hooks. Thus, by turning the screws, you can extend the suspension from the case by 2 centimeters, and vertically adjust the height of the cabinet box within 22 millimeters. This is more than enough to ignore some of the unevenness of the wall and still get the perfect line of position to hang each cabinet evenly on the kitchen wall relative to its neighbors.
We install accessories - installation in the cabinet box
As a rule, the top base of the kitchen block has, in addition to the side walls made of chipboard or MDF, also the back, which is usually made of thin sheet MDF or fiberboard. It can be mounted both over the edges of the side, top and bottom panels, as well as in specially made grooves, which, in fact, does not play a special role during the installation of suspensions. The main rule when marking for fittings is that its body must be recessed into the box so that there is a gap of 5 millimeters from the edge of the rear edge of the panel. Even if the rear wall is not recessed into the grooves, the hook plate has enough freedom of movement to move forward and catch on the bar for hanging kitchen cabinets.
In order to install the hangers, you must first make cuts in the back wall, and exactly the width of the hooks. As a rule, for this it is enough to remove sections in upper corners rear sheet, dimensions 35x55 mm, taking into account the thickness of the side and top panels. However, these values may be different, depending on the material used for the manufacture of cabinets. Kitchen cabinets are fastened to the wall on a plank, so you need to make a preliminary measurement of the total length of all sections of the upper base. Based on the value obtained, the length of the profile bar is calculated, which, however, can be divided into small segments, as we said earlier, in order to save money.
To fix the metal bar, one mark is enough at the desired height, after which, using the level, we get a horizontal line along which we drill holes for the fasteners. As a last for concrete base anchor bolts or dowels are preferred, for a brick wall - only anchor bolts. For drywall - screws with special clamping cartridges. If the attachment for kitchen cabinets to the wall is divided into segments, each of them is screwed with two bolts or screws. Now it remains only to hook the hooks of the suspensions and adjust the height of the box with screws and minimize the deviation of its rear wall. Before installing the cabinet, make sure that the hooks are extended enough so that the box does not fall off when hooked.
Kitchen cabinet furniture consists of various cabinets and sections, which are arranged in two rows. The first is located below and does not require additional systems mounts. The second is mounted on the wall above the lower section.
It is such a device that raises questions about what to hang kitchen cabinets on and how to do it.
Mounting
The installation of the upper sections of furniture requires great accuracy in calculations and accuracy in work. Therefore, it must be performed in several stages, which will ensure the correct installation and not only good appearance, but also the correct functionality.

Tool
Many guides on how to hang cabinets in the kitchen usually describe the process itself, forgetting what tools and materials are needed for this. Therefore, when starting the installation, the master only then notices the lack of certain elements, which causes interruptions in the robot.
In order for this not to happen, you should prepare everything you need in advance.
- Impact drill or hammer drill - for making holes in the wall.
- A hammer.
- Pliers.
- Water level.
- Paint thread.
- Roulette.
- Special impact dowels with hooks.

Create a project
On a piece of paper it is necessary to display the location of all furniture elements. At the same time, they must be drawn to scale, indicating all required sizes. It is worth noting that it is better to determine the distance from to the bottom of the upper drawer on the spot, based on ease of use.
That is why the question of at what level to hang kitchen cabinets can be considered irrelevant, although there are certain sizes for this, but they are very conditional. For determining optimal distance it is best to attach the box to the wall and in practice understand the required height.
Advice!
Some masters make the mounting level of the upper section so that it can be placed under it necessary devices and appliances. This will create additional convenience during operation.

markup
To properly hang kitchen cabinets, it is necessary to accurately mark the walls.
- First, measure the distance from the countertop to the bottom edge of the drawers.
- Then, with the help of a paint thread, the lower limit is beaten off, which, for fidelity, can be controlled by a level.
- From the resulting line, we retreat a distance equal to the height of the upper boxes.
- At this level, also with the help of a paint thread, we beat off the upper limit.
- Further instructions on how to hang kitchen cabinets involve the use of two methods.
- The first is that you just need to attach a section to the wall, in accordance with the lines, and, using the fastener loop as a template, put a hole on the wall.
- The second method involves measuring the distance between the loops, which is also marked on the wall.
Advice!
When marking, it is worth constantly monitoring all lines using a water level, otherwise you can get an error that will be noticeable after installation.

Installation
- In the marked places, using a drill or a puncher, it is necessary to make recesses for impact dowels. At the same time, the installation instructions require that they be a centimeter deeper than the plastic material placed there.
- Then plastic inserts are hammered into it, into which hooks are screwed. They must be fixed in such a way that the finishing position allows you to hang the cabinet.
In this case, it is necessary to twist the hook as close to the wall as possible, as this will help to avoid skewing deep into the room.

- After the fasteners are installed, we hang kitchen cabinets on it. At this stage, you need to use the level. If after checking a slight distortion is found, then it can be corrected with a hammer. To do this, it is enough to slightly bend the fasteners in the right direction.
- It should be noted that recently practiced the use of special canopies to secure kitchen drawers. You can work with them in the same way as with loops, setting them on additional lines that will run in the middle of the extreme markings.
- Some masters prefer to seal the gaps between the wall and the box after installation. silicone sealant.
The fact is that the price of this material is relatively low, and there will be many benefits from this action. This will serve as a kind of protection against dirt and insects.

Advice!
For a stronger fixation, you can fasten nearby cabinets together. Some manufacturers provide special mounting elements for this, but if they are not available, then ordinary bolts are used.
However, it is worth remembering that such an action will spoil the side appearance, and the box will only need to be moved to another place by closing the hole.
- Do-it-yourself installation alone is very difficult, so it is worth enlisting additional support.
- It must be remembered that dishes are usually placed in the upper section, which together have a rather large weight.
To avoid falling boxes, it is necessary to choose strong and powerful fasteners. - The entire top section should be on the same level, so when marking it is best to use painter's thread, which will help beat off a straight line along the entire length of the wall.
Conclusion
After reviewing the proposed video material, we can conclude that this process is simple and does not require much effort. However, it is best to do it with an assistant, to simplify the work. It also requires precise calculations and measurements, especially when marking.
We also recommend
 Hero pioneers in the Great Patriotic War Heroes of the Patriotic War pioneers presentation
 Presentation "Formation of posture in preschool children Hygiene of correct posture presentation for children
 Sciences of the human body
 Presentation "history and prospects for the development of robotics"
 The value of the struggle of Russia with the Polovtsy
 Asia and Africa after World War II