Hydraulic testing of the internal heating system. Hydraulic testing of pipelines of heating systems
You have probably heard that before starting a water heating system, after its installation or repair, it is necessary to pressure test it. Therefore, many are interested in when pressure testing of the heating system must be carried out, what it is, by whom and how it is carried out, depending on the type and number of storeys of the house. In this article, we will try to answer these questions.
Pressure testing of a heating system is a hydraulic (or pneumatic) test of its elements to determine their tightness and ability to withstand the design working pressure of the coolant during operation, including water hammer. This is necessary in order to identify possible leaks, its strength, quality of installation and ensure reliable operation of the system throughout the entire heating season.
When should it be done?
Pressure testing or hydraulic (using water), and sometimes pneumatic (using compressed air) testing of heating systems is carried out in the following cases:
- In new, just mounted - after finishing installation work and putting it into operation;
- Those that have already been used:
- after the completion of the repair or replacement of any of its elements;
- in preparation for each heating season;
- in apartment buildings also at the end of the heating season.
Who Should Carry Out the Examination
In multi-apartment residential buildings, industrial or administrative buildings, pressure testing of heating systems should be carried out by certified specialists of the services entrusted with their operation and Maintenance. In private houses, independent heating, this work can be done either by specialists or independently (most often, in cases where the heating system in the house was installed by hand). In any case, the requirements (by method, maximum pressure, time) and the regulatory rules for conducting such tests, which are regulated in SNiP for this type of work, must be observed.
How is pressing done
The procedure for crimping heating system largely depends on the type and number of storeys of the building (a large multi-storey building or a small private house), its complexity (number of circuits, branches, risers), wiring diagrams, material and wall thickness of its elements (pipes, radiators, fittings), etc. Most often, such tests are hydraulic, that is, they are carried out by forcing water into the system , but can also be pneumatic, when excess air pressure is created in it. But hydraulic tests are carried out much more often. Therefore, we will first consider this option.
Crimping in an apartment building
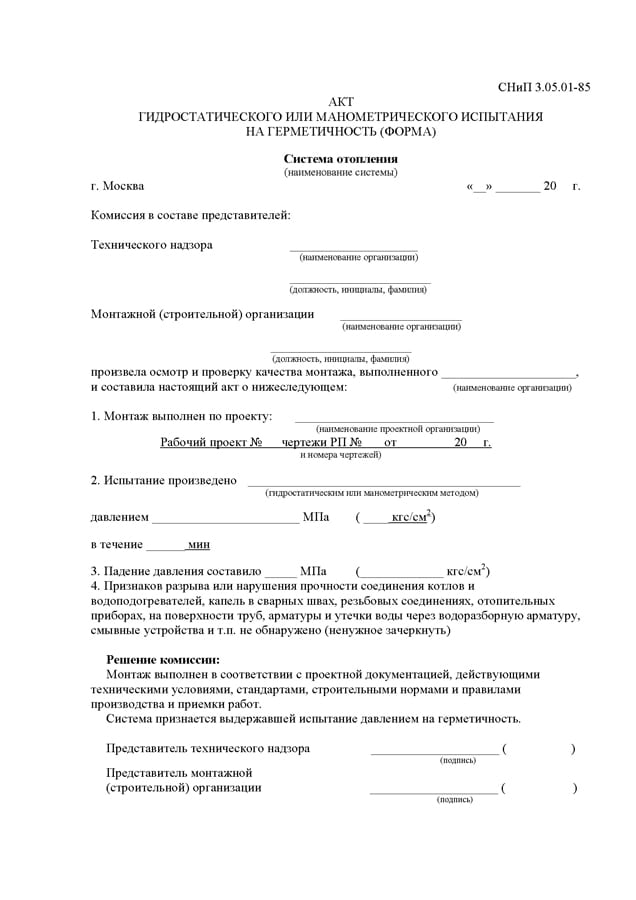
As already mentioned, in such buildings, pressure testing of the water heating system is carried out by special services, after installation and before commissioning, after repair, before the start of each heating season and at its end, using special equipment. Based on the results of such tests, as a rule, a pressure test report of the appropriate form is drawn up.
Pressure testing of the heating system of an apartment building
Before carrying out hydraulic tests, preparatory work is carried out:
- Visual inspection of the state of the elevator (supply unit), main pipes, risers and all other elements of the heating system;
- Checking the presence and integrity of thermal insulation on thermal mains.
If the system has been in operation for more than 5 years, it is advisable to flush it before pressure testing. To do this, the coolant present in it is drained and it is washed with a special solution. After that, you can proceed to hydraulic tests.
The sequence of work during hydraulic pressure testing is as follows:
- The system is filled with water (if it is only installed or flushed);
- With the help of a special electric or manual pump, excess pressure is created in it;
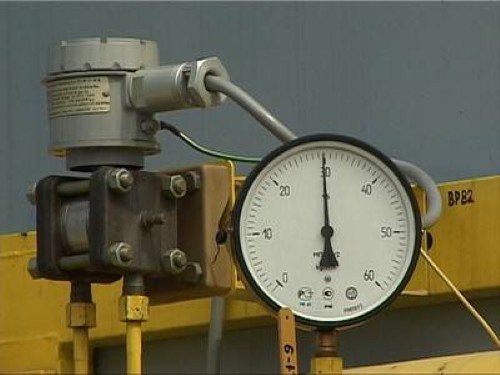
- The manometer controls whether the pressure is maintained or not (within 15-30 minutes);
- If the pressure is maintained (the readings of the pressure gauge do not change), then the tightness is ensured, there are no leaks and all its elements withstand the pressure of the pressure test;
- If a pressure drop is detected, all elements are checked (pipes, connections, radiators, additional equipment) for detection of water leakage;
- After the place of the leak is determined, it is sealed or the element is replaced (pipe section, connecting fitting, shutoff valves, radiator, etc.) and the hydraulic tests are repeated.
What should be the pressing pressure?
The fluid pressure that is created during hydraulic testing of heating systems depends on the working pressure in them, which, in turn, depends on the material of its pipes and radiators that were used during their installation. For new systems, the pressing pressure should exceed the operating pressure by 2 times, and for existing systems, it should exceed it by 20-50%.
Each type of pipes and radiators is designed for a specific maximum pressure. With this in mind, the maximum operating pressure in the system is selected and it must be taken into account when choosing the pressure test. So, for example, in apartment buildings with cast iron radiators working pressure, as a rule, does not exceed 5 atm. (bar) and is usually within 3 atm. (bar). Therefore, as a rule, pressure testing of such systems is carried out with a pressure of no more than 6 atm. Systems with convector type radiators (steel, bimetallic) can also be pressure tested at higher pressures (up to 10 atm).
Pressure testing of the input unit is carried out separately, at a pressure of at least 10 atm. (1 MPa). To create this pressure, special electric pumps are used. The tests are considered successful if the pressure drop within 30 minutes is no more than 0.1 atm.
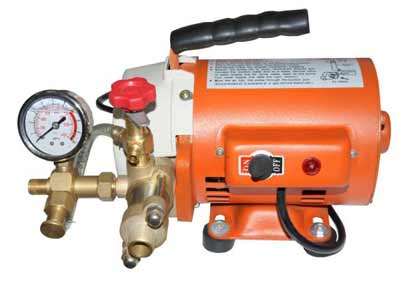
Electric pressure test pump for heating system
Pressing in a private house
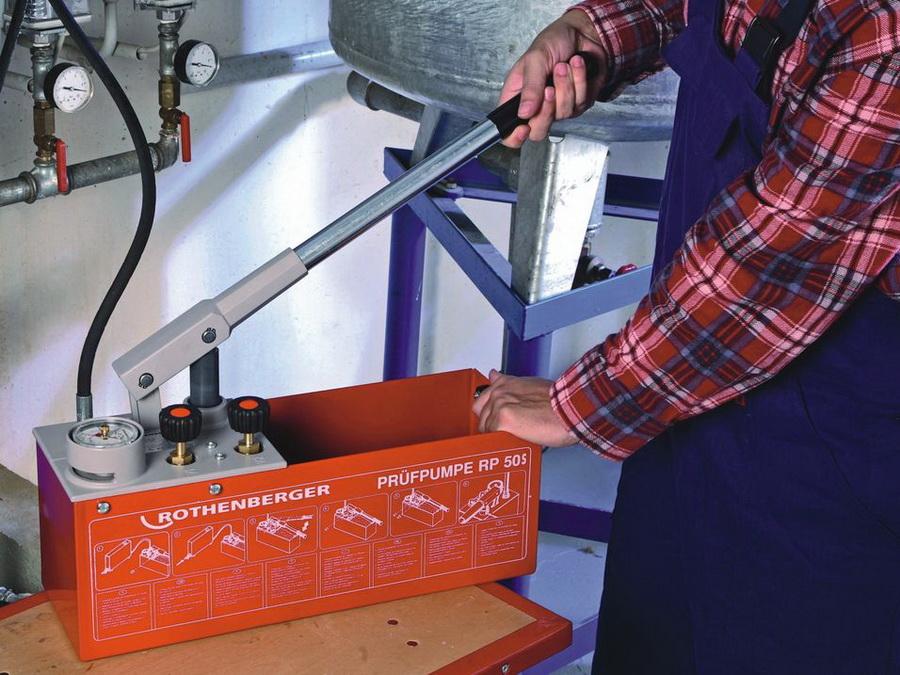
Offline closed systems water heating of private houses, the working pressure rarely exceeds 2.0 atm. (0.2 MPa) and, as a rule, is within 1.5 atm. Therefore, to create pressure (1.8-4 atm.) In such a system, you can use both electric and manual pumps, or connect it to the water supply system at home (usually the water pressure in it is 2-3 atm., Which happens quite sufficient for hydraulic testing).
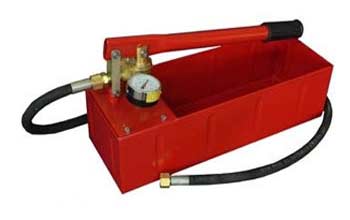
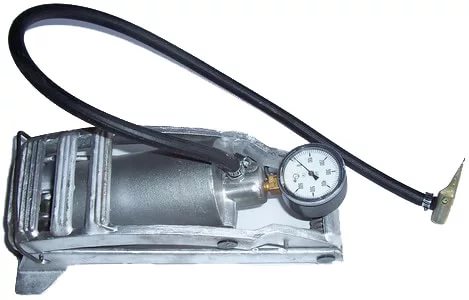
Hand pump for pressure testing of the heating system
Filling the system with water must be carried out from below through a drain or a specially designed tap. In this case, the air will be easily pushed out of it by the liquid coming from below upwards and removed through the air valves, which must be installed at its highest point, in places where air pockets may form, as well as on each radiator.
It must also be remembered that the temperature of the water used for testing should not exceed 45 ° C.
If the system is quite simple, and besides, it was assembled by hand, then it can also be pressure tested independently, performing work in the same sequence as in an apartment building.
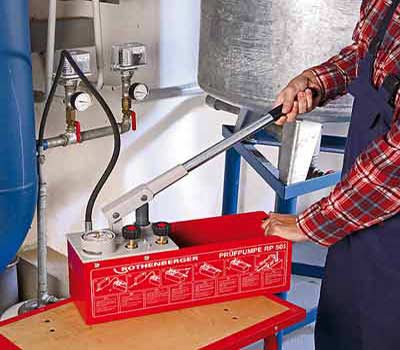
Pressurization of the heating system with a hand pump
In the event that, after pressure testing, the pumped water will be used in the future as a heat carrier, then it is necessary that it be “soft”, that is, it should have a hardness of no more than 75-95 units (mainly, this is the presence of magnesium and calcium salts) . An example of "soft" water can be rain or melt, from snow or ice. If there is no confidence in the hardness of the water, and an indicator of its increased hardness may be the formation of scale in the electric kettle, heating elements washing machine or boiler, it is better to do the analysis in the laboratory.
In the same case, if the water used for hydraulic tests will not be used as a coolant, then after pressure testing it should be drained and the system immediately filled with the appropriate coolant. This is especially important if black steel pipes were used for wiring, and cast-iron or steel pipes were used as radiators without protecting their inner surface.
Air pressure features
Air pressurization is used less often, as a rule, for small buildings, private houses, if for some reason hydraulic tests cannot be carried out. For example, if it is necessary to check the tightness of the installed system, but there is no water or equipment for its injection.
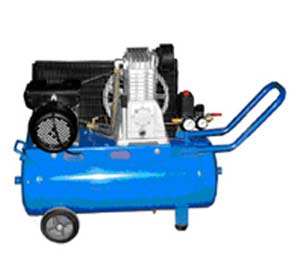
Compressor for pressure testing of the heating system
In this case, an electric air compressor or a mechanical (foot, hand) pump with a pressure gauge is connected to the make-up or drain cock and with the help of it excess air pressure is created in it. It should not exceed 1.5 atm. (bar), since at higher pressure, in case of depressurization of the connection or rupture of the pipe, injury to the people conducting the tests may occur. Instead of air valves, plugs must be installed.
Pneumatic tests require more time to hold the system under pressure. Since, unlike a liquid, air is compressed, more time is needed to stabilize and equalize the pressure in the circuit. Initially, the pressure gauge reading may slowly drop even if it is sealed. And only after the air pressure stabilizes, it is necessary to withstand it for at least 30 minutes.
Pressure testing of open heating systems
In order to carry out pressure testing of an open heating system, it is necessary to seal the connection point of an open expansion tank, for example, using ball valve installed on a pipe supplying water to it. When pumping water, it can be used as an air valve, and after it is filled, before creating overpressure, the faucet must be closed.
The working pressure in such systems, as a rule, is determined by the height of the expansion tank, based on the calculation that for every 1 m of its excess above the level of entry into the return boiler, there is 0.1 atm of excess pressure in this place. AT one-story houses open expansion tank, usually located under the ceiling or in the attic. The water column in this case will be 2-3 m high, and the excess pressure, respectively, will be 0.2-0.3 atm. (bar). When the boiler is located in basement or in two-storey houses, the difference between the level of the expansion tank and the boiler return can be 5-8 m (0.5-0.8 bar, respectively). Therefore, in this case, hydraulic testing also requires a lower liquid overpressure (0.3 - 1.6 bar).
Otherwise, the procedure for pressure testing open systems (one-pipe and two-pipe) is the same as for closed ones.
Related videos
Hydraulic test. After the installation of the heating system is completed, it is subjected to liquid filling and hydraulic testing. The filling of the heating system is carried out through the return pipeline (from bottom to top). In this case, liquid and air move in the same direction, which helps to remove air from the system through air outlets, an expansion tank or plungers.
With the gradual filling of the heating system, the liquid rises evenly, due to which the liquid level in vertical pipelines and heating devices is in the same plane, this contributes to the displacement of air from the heating system. In the event of a rapid filling of the heating system, the risers can be filled faster than the heaters, as a result of which "air pockets" can form.
Water heating systems are being tested hydraulic pressure, in this case, the pressure during the test must exceed the working pressure by 100 kilo Pascals and at the lowest point not be lower than 300 kilo Pascals. The hydraulic test is carried out with the boiler and expansion tank switched off.
AT winter time year system central heating, which is made by the method of open laying of risers, is not subjected to a hydraulic test. Also, if the system has worked satisfactorily for about three months, it can be accepted without a hydraulic test.
In the case of laying pipelines of a hidden heating system, hydraulic tests are carried out before the furrows are closed, and in the case of insulated pipes before applying insulation. During the hydraulic test of the heating system, it is necessary to use only proven pressure gauges, the division value of which is 10 kilo Pascal. Work on testing the heating system must be carried out using a drive or manual hydraulic press, before performing painting work.
In the case of testing steam heating systems with an operating pressure of up to 70 kilo Pascal, the test is carried out at a pressure of 250 kilo Pascal at the lowest point of the heating system. When checking steam heating systems, the operating pressure of which exceeds the value of 70 kilo Pascal, the tests are carried out at a pressure that is 100 kilo Pascal higher than the working one, but not lower than the value of 300 kilo Pascal at the top point of the heating system.
It is believed that steam or water system heating passed the test, if within 5 minutes the set pressure in the system does not fall by more than 20 kilo Pascal.
After completion of the hydraulic test of the steam heating system, it is checked for the tightness of the connections due to the admission of steam into the system, which has a working pressure. In this case, steam leakage from the heating system is not allowed.
After completing the tests, the heating system is washed, for which a coupling or tee is installed at its lower point, the cross section of which is at least 60-80 mm2, through which water is drained. The heating system is flushed cold water several times until its maximum clarification. The panel heating system is subjected to a hydraulic pressure test of 1000 kilo Pascal for 15 minutes, until the stage of sealing the installation windows, in this case a pressure drop is allowed, but not higher than a value of 10 kilo Pascal. When negative temperature environment allowed pneumatic testing these systems. After completion of the hydraulic test, for 7 hours, thermal test heating systems. If the ambient temperature is positive, then the temperature of the liquid that is supplied to the line must not be lower than 60 ° C, and at negative temperatures not lower than 50 ° C.
Pneumatic testing of the heating system.
Pneumatic testing of the heating system is allowed if the ambient temperature is below 5 °C.
When conducting a pneumatic test of system components and pipelines under a pressure of 100 kilo Pascal, it is not allowed for the pressure to drop by more than 10 kilo Pascal within five minutes.
When testing a heating or water supply system, as well as their components, pressure gauges are used that have an accuracy class of 2.5 and a division value of not more than 5 kilo Pascal.
Pipelines of ground and above-ground laying, which are mounted from polymer materials, are subject to pneumatic testing in the following cases:
- for technical reasons, the use of liquid is unacceptable;
- ambient temperature below 0°C;
- there is no liquid in the volume required for the test.
If the pipeline is made of polymeric materials, then the course of pneumatic testing of pipelines and the safety requirements for their implementation are established exclusively by the project.
This is due to the fact that the technology for performing pneumatic testing of pipelines made of polymeric materials is not regulated.
Due to the fact that during the pneumatic pressure test it is difficult to find the place of the leak (defect), the hydraulic crimping is more convenient.
Thermal testing of the heating system is carried out in order to determine the uniformity of heating of heating equipment.
To carry out a thermal test, it is necessary that the temperature of the liquid in the supply pipeline is not lower than 60 °C.
In the case of a negative ambient temperature, the thermal test of the heating system is carried out according to the relevant temperature chart.
The thermal test of the heating system lasts about 7 hours, at which time the uniform heating of the heating equipment (batteries, radiators) is checked and, if necessary, adjustments are made.
Commercial metering of heat energy consumption is carried out in order to conduct financial settlements of heat-consuming organizations with heat supply organizations according to the actual heat load based on the readings of a heat meter - a heat energy meter. In the absence of commercial metering of heat energy consumption, its payment is carried out according to the calculated loads. In the case of installing a metering unit (heat meters), the costs associated with heat supply are reduced by 25-40 percent.
The organization of a heat energy commercial metering unit makes it possible to register and account for the consumption and supply of heat energy, it also provides:
- more expedient use of the coolant and heat energy;
- registration of emergency situations during the operation of the heat supply system;
- rather high accuracy of the volume of consumed heat and heat carrier consumption, as well as the possibility of making monetary settlements of thermal energy consumers with heat supply enterprises;
- documentation of the coolant parameters: its mass, pressure and temperature;
- control over the hydraulic and thermal modes of operation of the system, both heat consumption and heat supply;
- various operational conveniences during operation;
- combining various nodes into a single network (data transfer is carried out via the RS 232 and RS 485 interface).
A heat meter is a set of devices that record the indicators of consumed heat energy and heat carrier in water heating systems, namely:
- temperature difference in pipelines, °C;
- thermal power;
- coolant consumption in the pipeline, cubic meters per hour (tons per hour);
- the total level of consumed thermal energy (cumulative total);
- coolant temperature, °C, both in the supply and return pipelines;
- the total mass (tons) and volume (cubic meters) of the coolant that flows through the pipeline (cumulatively);
- daily and average hourly values of all the above parameters.
Heat meter installation diagram:
1 - supply pipeline; 2- shut-off valves; 3 - return pipeline; 4- counter hot water; 5 - resistance thermal converter.
The heat meter consists of elements: a calculator for the amount of heat, a primary coolant flow converter, a resistance thermo-converter, an overpressure converter, a power supply unit for sensors and flow meters (if necessary).
Most widespread on the market Russian Federation received composite heat meters, which are equipped with the following flow meters:
- mechanical- equipped with a heat calculator and mechanical rotary or vane water meters (flow meter). It is the cheapest option for a heat meter, at the same time it should be noted that the cost of special filters must be added to their cost, which must be installed in front of each flow meter;
- eddy– equipped with a heat calculator and a vortex flow meter, quite often their own power supply is required. The peculiarity of the vortex flow meter is a metal prism, which is installed across the flow meter pipe, in this regard, it is necessary to install filters in front of each flow meter, these filters often become clogged and torn, in connection with this, heat meters that are equipped with this flow meter are subject to constant maintenance.
During the passage of the fluid flow, vortices will be created on the faces of the prism, the number of which is directly proportional to the flow velocity. Whirlwinds are caught by electromagnetic method (for example, Sayany or VEPS flowmeters) or using ultrasound (for example, Maklo or Metran flowmeters);
- ultrasonic– these flowmeters received wide use in European countries, since they use pipelines with enamel coated very clean water circulates inside and in them. In the conditions of the countries of the post-Soviet space, ultrasonic flow meters can only be used if pre-filters are installed, this is due to the fact that there are protruding parts and rather complex turns inside the flow meter pipe, on which scale quickly forms and dirt accumulates.As practice shows, about 30-40 percent of ultrasonic flow meters that are installed in Russian heating systems fail in the first two to three years of operation, the main cause of failure is scale and dirt;
- electromagnetic flowmeters are optimally adapted for operation in Russian system heating. There are no protruding parts in the flowmeter tube, and there is no need for additional filters for them. Due to this, these flowmeters provide almost zero pressure drop. It should be noted that the deposition of oil products or scale on the pipe walls of this flowmeter practically does not affect its performance.Also, certain types of electromagnetic flowmeters (for example, "Magika", KM-5 and SA-94) quite well withstand changes associated with water saturation with scale, rust and other types of solid impurities. These heat meters are capable of conducting in open systems heat supply measurement of the reverse flow of liquid, which is quite common in the post-Soviet space. Moreover, such models as "Magika" and KM-5 can automatically control the direction of fluid flow in the pipeline, in the absence of water in the system they will automatically turn off.
Important! It is not allowed to operate electromagnetic meters in the absence of liquid in the pipeline.
The disadvantages of electromagnetic meters (compared to other types) include the fact that these devices cannot work for a long period of time from offline source power supply.
Composite heat meters equipped with electromagnetic flow meters consist of the following elements: one or more electromagnetic flow meters (KM-5, VKT + PREM, Vzlet TCP, SPT + PREM, etc.) and a heat calculator.
The components of an electromagnetic heat meter have their own metrological certificates, and the manufacturer of this meter also issues a metrological certificate for the entire set of a heat meter.
The composition of the electromagnetic heat meter includes an electric unit containing itself and a heat calculator (Magika, SA-94, Katra, TEM-05, Thermik, VIST, etc.) and the electronics of a one- or two-channel flow meter. Electromagnetic flow meters of heat meters are calibrated together with the electric unit, so they do not have their own electronic components.
How to conduct a hydraulic test of a heating system without involving specialists? The accumulated experience allows me to assert that in private homes this can be done independently. And as a bonus, I will tell you in detail how this is done in two versions and what is needed for this.
A bit of theory
According to the rules, pressure testing can be carried out at temperatures from +5 ºС to +40 ºС. Compliance with these standards is especially important when testing with water:
- High-rise buildings with centralized heating should be checked after the end of each heating season, that is, in the spring, this is due to the fact that during the summer all defects can be eliminated;
- In private houses, it is not necessary to check the system so often; one pressure test is enough here before the first start-up or after replacing important components of the heating system.
General order of work:
- The system is disconnected from the supply and the coolant is drained;
- If there are heating boilers and control equipment in the system, they are disconnected or isolated;
- Pure water with a temperature of up to 45 ºС is pumped into the system;
- Equipment is connected to the supply and pressure is applied. To avoid water hammer, the pressure rises gradually;
- The system must withstand at least 10 minutes of overpressure.
The practical side of the issue
Pressure testing of the heating system can be carried out with air and water, each option is good in its own way.
Option number 1. Pneumatic crimping
It is believed that pressurizing the heating system with air is not enough reliable way, but I have repeatedly checked and I can say with confidence that it is suitable for an average private house of 2 floors.
By the way, you can find the norms and rules for hydraulic testing of a heating system in SNiP 41-01-2003, SNiP 3.05.01-85, and there are also “Rules technical operation thermal power plants "under the number 115.

I would call the main advantages of the pneumatic version simplicity, almost zero cost and safety. After all, if the house is not residential, and you do not plan to drive into it yet, then pouring water is dangerous, since even a slight frost can break pipes, and you do not risk anything with air.
| Illustrations | Recommendations |
 | Instruments.
|
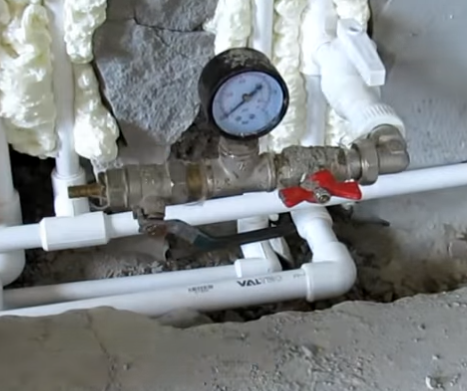
 | fixtures. To connect the pump to the system and control the pressure, you need to assemble the structure shown on the left in the photo, this includes (from left to right):
|
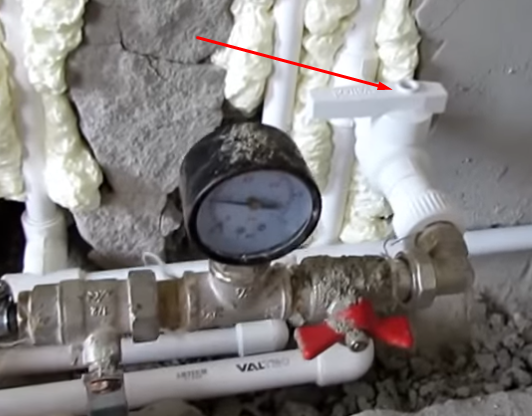
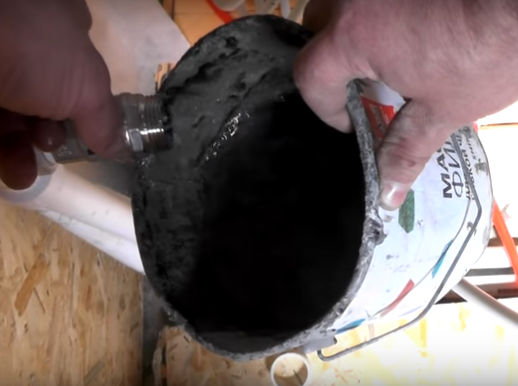
 | Connecting to the system. We will connect our device to the outlet designed to drain water. But first we need:
|
 | We fasten the adapter with a pressure gauge. |
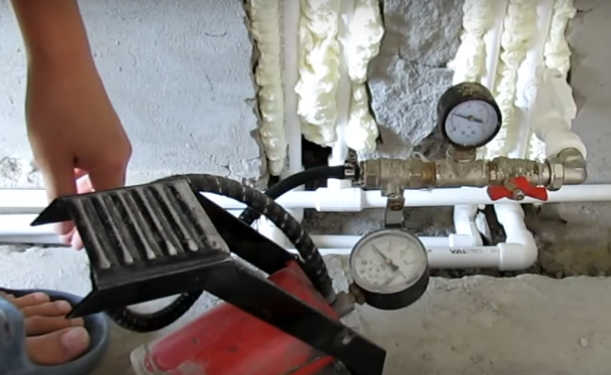 | Building up pressure. Now we need to remove the car adapter from the pump hoses, connect this hose to the fitting and tighten the clamp with a screwdriver. |
 | We control pressure. When the system has become pressurized, the first valve of our assembly with a pressure gauge can be closed and the pump can be disconnected. After about half an hour, if the pressure holds, turn off the tap on the drain pipe and leave it like that for a day. The next day, the pressure may drop slightly or, on the contrary, increase (within half an atmosphere), do not be alarmed, this is due to temperature changes. Air, compared to water, is much more fluid and with the slightest damage, the pressure will drop in a few minutes.
|
Under air pressure, the heating system can stand for an arbitrarily long time, moreover, while the house will go Finishing work, it is better not to bleed the air, so in case of damage to the pipe, for example, when installing a baseboard, you will immediately find a problem (the air will hiss).
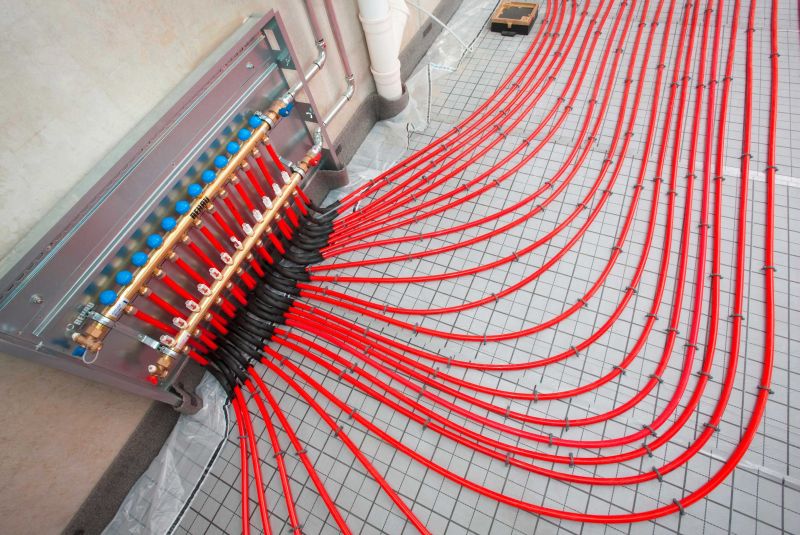
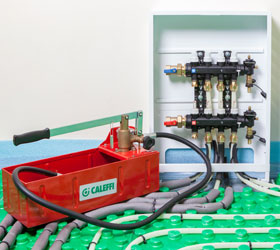
Option number 2. Crimping underfloor heating
Carrying out hydraulic tests of a heating system in which there is a warm floor is slightly different from the above option. In a private house, such work can be done with your own hands, but a highly specialized tool is needed, plus the instructions here are more complicated.
| Illustrations | Recommendations |
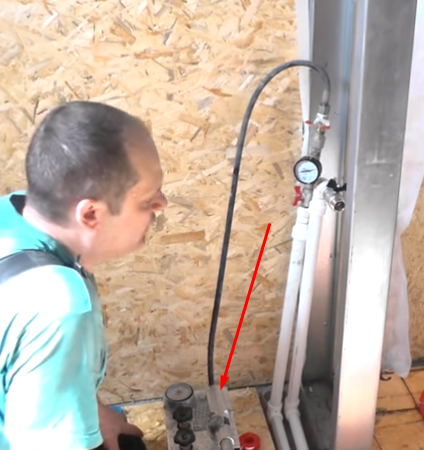
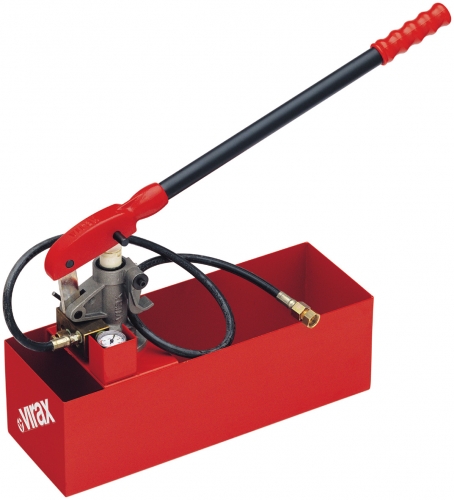 | Instruments. Hydraulic tests of the underfloor heating system are supposed to be carried out with water, and to pressurize you will need a “Hydraulic pressure tester”, a manual apparatus with a capacity of 12 liters is enough. It makes no sense to buy such a device for one-time work, and its price is decent, so it’s easier to rent it, you need it just for a couple of hours. |
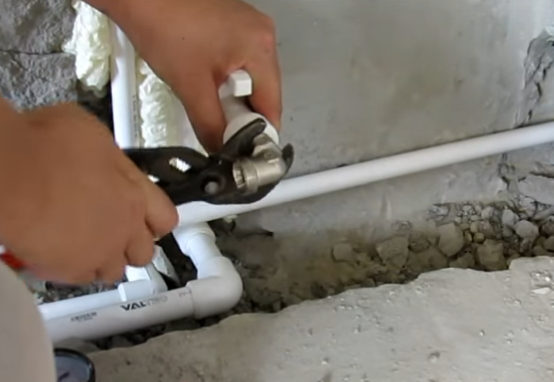
 | split wrench, with it you will stretch the connections on the combs. |
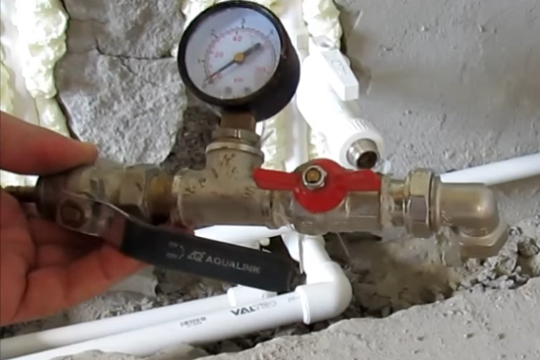
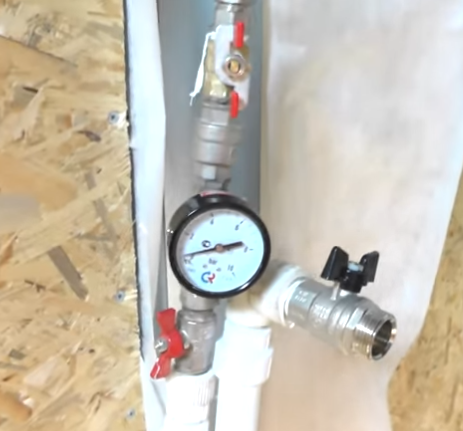 | Priming system. First we need to populate the system. To do this, we connect a pressure gauge with two ball valves to the input, as in the photo, and on the return line we simply put ball valve and turn on the water supply. |
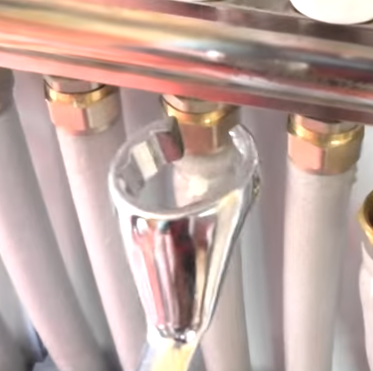
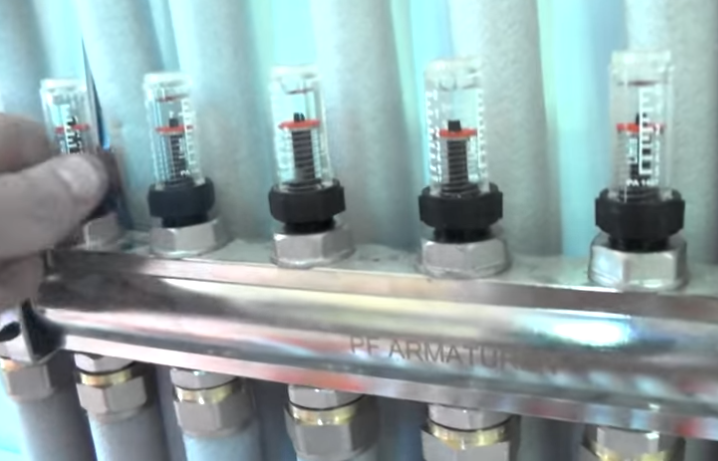
| System check. For the underfloor heating system, a distribution cabinet is installed, in which there are 2 combs, supply and return, as well as a pump and a number of valves for adjusting the operation.
|
|
 |
|
 | Checking the reliability of the distribution cabinet components.
|
 | Checking the operation of the system. With a threefold excess of the working pressure, after half an hour you will see defects, if any. Half an hour later I turn on the pump and the system works for another half an hour. Then you can relieve the pressure to the working one and pour the screed. |
Conclusion
Now you know how a hydraulic check of a heating system is carried out. The video in this article has Additional Information on this topic. If you have any questions, write in the comments, I will try to help.
Only reliable and proper operation of the heating system can ensure the normal and peaceful life of the population in cold period of the year. Sometimes there may be various extreme situations in which the operating conditions of the system may differ significantly from civilian conditions. Pressurization of the heating system is needed just in order to avoid various unpleasant situations that may arise in heating season. Hydraulic testing of pipelines of heating systems can be regarded as an exam for repair services and as technical check equipment.
The owners of private houses usually know the most about this process, since, first of all, they themselves are responsible for the comfort and warmth in their home.
Hydraulic calculation
The hydraulic calculation of pipelines of the heating system is very important. To calculate what diameter of the pipe for heating is needed, you need to know the following values:
- Pipe material.
- Inner diameter of the pipe for heating.
- Diameter of fittings and fittings.
- The nominal value of the inner diameter.
- Pipe wall thickness.
If you make an incorrect calculation of the heating pipe, and therefore the choice of the diameter of the pipes for heating, then heat losses and pressure drops in the system may occur.
It is for this that the correct calculation of the diameter of the heating pipeline is required (selection of the diameter of the pipe for heating, the distance between the heating pipes).
Consider a simplified diagram of how to calculate the cross section of a heating pipe:
D = √354∙(0.86∙Q:∆t):V
D is the diameter of the heating pipes in the heating system (cm).
Q is the load on this section of the system (kW).
∆t is the temperature difference between the supply and return (degrees Celsius).
V is the coolant velocity (m/s).
A professional calculation of the diameter of a pipe for heating takes into account much more values.
With it, you can determine not only the size of the heating pipe, but also the distance between the heating pipelines, and the narrowing of the diameter of the heating pipe.
Start of work
Each type of building has its own operating pressure. The heating of the building and the circulation of the coolant through the heating system depend on this indicator. The operating pressure primarily depends on the number of floors in the building. If there are many floors, then a higher working pressure will be required.
As the heat source moves towards the house along the highway, various hydraulic processes can occur, and of a rather complex nature.
Such processes can cause pressure surges in the system that can be several times the normal operating pressure. Such jumps are called hydraulic shocks. For this reason, the pressure testing of the system is carried out at a pressure that exceeds the working pressure by at least 40%.
Preparatory work is a condition under which:
- Valves are checked, as well as an audit of all valves of the shut-off type.
- To provide more high level tightness, various gland seals are added. This is optional, only if necessary.
- Restoration of insulating layers of pipelines is being carried out.
- By means of a blank plug, the house will be cut off from the general system.
A drain-type tap, located on the return line, is the place where water from the water supply is connected in order to fill the system during the next stage.
Correct crimping technology
The liquid, which enters under slight pressure, displaces up the air that has accumulated inside. Then she fills in all the elements. Several times you will need to bleed it from time to time.
In a multi-storey building, in order to detect the presence of leaks, a test is carried out by increasing the working pressure by about 20-30%. A press for pressure testing of heating systems is usually used for these purposes. The setpoint must be monitored with a pressure gauge. It must also be ensured that the set value is maintained for at least 30 minutes.
If the pressure gauge needles start to fall, this will tell you that there are leaks in the system or there are places where depressurization is observed.
Thus, immediately in hot pursuit, you can find places where problems are observed. Such places can be heating radiators, various gaskets, section of pipes for heating, valves or connections threaded type. Systems such as systems embedded in the floor require special attention. Repair work can be carried out immediately after partial or complete draining of water from the system.
The crimping procedure must be repeated until the pressure gauge shows that the arrow has stopped falling. To create the desired level, regardless of the type of coolant, you will need a pump for pressure testing heating systems.
AT high-rise buildings, in buildings of administrative type, in nurseries or medical institutions acceptance of systems must be mandatory carried out by special supervisory authorities. In the act conclusion, which will be compiled by a specialist, both the time when the test was carried out and all control parameters will be indicated.
During the installation work in various parts of the heating system, it will not be possible to avoid clogging of the equipment through small debris, sludge, dust, as well as residues of materials that were used in the assembly of the system. All this dirt can interfere with the normal functioning of the heating system.
Add a comment
We also recommend
 Hero pioneers in the Great Patriotic War Heroes of the Patriotic War pioneers presentation
 Presentation "Formation of posture in preschool children Hygiene of correct posture presentation for children
 Sciences of the human body
 Presentation "history and prospects for the development of robotics"
 The value of the struggle of Russia with the Polovtsy
 Asia and Africa after World War II