How to cover chipboard. Chipboard furniture
Sometimes you need to fix old furniture or suddenly the husband decided on! Then you will definitely need information on how to paint chipboard so that it looks and surface quality were not damaged.
The resistance of the chipboard surface to damage is greatly influenced by the type of processing, and in addition - the transportation and storage of the product.
Painting or varnishing- one of the most effective ways protection of chipboard products. Moreover, such processing provides not only protection, but also an explicit decorative effect, which is why laminated chipboard is so valued today.
So the steps are:

Chipboard can be varnished or painted. Chipboard is usually varnished for aesthetic reasons, such processing of the product immediately “ennobles” its appearance. But, for example, to protect against adverse effects.
Before coating the surface of a chipboard product, it is necessary putty. We must not forget about grinding. If this is not done, then tiny damage will appear on the surface of the varnish or paint on the chipboard, which will spoil the whole picture, and your homemade table will be terribly unaesthetic.
Putty should be applied evenly with a spatula. When it dries, we process the surface with sandpaper.
Only when an absolutely flat surface is felt under your hands, you can  apply varnish or paint.
Typically, varnish or paint on chipboard is applied in one or two layers. It all depends on the level of your skills and what you want to see in the end.
The main detail of any (or almost any) interior is furniture. Its role in organizing the internal appearance of an apartment or house is difficult to overestimate. Therefore, we all pay great attention to the elements of furnishing our homes. But in the process of operation, furniture, like everything else, loses its technical characteristics and appearance. In a word, sooner or later, each of us comes to the disappointing conclusion that some detail has begun to fall out of the furniture ensemble.
Not always replacing this part (buying a new one) leads to the desired result, and such a radical decision is not always possible. In addition, often, the previously mentioned, disappointing conclusion is a consequence of the fact that you just wanted to change something in the environment. In this situation, it is better to give preference to a less expensive way to update the interior. It is possible to repaint furniture elements and thereby not only give them a new look, but also extend the service life of these products.
Modern industry uses a wide variety of materials for the manufacture of furniture. In this article, we will talk about how to paint chipboard, about painting methods and the tools and materials necessary to complete this work.
Chipboard, chipboard, is widely used for furniture production. Coloring chipboard has a number of fundamental features that are a consequence of the manufacturing technology of this material. It is made from wood chips, which are pressed together with special resins. Painting chipboard with your own hands does not require special knowledge and skills from you.

Applying paint on chipboard, according to the algorithm, does not differ much from painting other materials (, or MDF). As in other cases, the algorithm includes the following traditional steps:
- Surface preparation;
- Selection of type and color of paint;
- Coating;
- Coating protection.
Surface preparation
At the stage of preparing furniture parts for painting, it is necessary to free them from fittings. Those. if we are talking oh, then you should unscrew the handles, remove the doors, etc.
Before starting dismantling, evaluate the risks associated with possible problems during dismantling and, especially, when installing the cabinet after painting. Having freed the product from the "accompanying" items, we proceed to prepare the surfaces for painting. Preparation of chipboard for painting consists of three stages:
- Removing old paint;
- Elimination of minor surface defects;
- Padding.
Remove the layer of old paint with coarse sandpaper. It is necessary to carefully remove all paint and traces of contamination on the surface. It is not allowed to use any solutions for removing paint, because. damage the structure of the material.
The paint removal process involves large quantity dust. It is best to use a vacuum cleaner to remove it.
The video shows how furniture is made from chipboard:
It is not recommended to use rags for these, especially wet ones, because. in this case, you will not remove the dust, but will drive it into the pores of the material, which will significantly degrade the surface quality.
After the layer of old paint is completely removed, the surface should be treated with fine-grained sandpaper. The purpose of this operation is to make the surface as smooth as possible.
If there are traces of mechanical damage on the surface, then it is desirable to repair them. To do this, it is best to use a mixture of small wood shavings with glue (for example, PVA). In the absence of such, it is possible to process irregularities with wood putty. After the putty has dried, once again treat the surface with fine sandpaper.
The next step is priming the surface. To do this, use an acrylic primer, which is characterized by high rates adhesiveness. Primer needs to be applied thin layer, using for this paint brush or roller. When the primer is completely dry, you can start applying paint.
Paint selection
The quality of the coating directly depends on the correct choice of paint. When choosing a paint for chipboard, it is recommended to give preference to paints of the acrylic family. These paints create a durable, high-quality coating. An essential advantage of these paints is their environmental friendliness - they are made on the basis of water. They do not have, traditional for most other paints, an unpleasant odor. These paints are easy to use but require careful handling. A wet coating can be easily damaged by careless movement.
The paint is prepared by mixing the dry mixture with water. The manufacturer indicates the mixing ratio on the packaging. The paint is recommended to be mixed in two stages. Thoroughly stir the contents of the bag with water until the desired consistency is uniform and allow the mixture to “rest” for several minutes. Then mix thoroughly again.

The choice of paint color depends entirely on your taste preferences. Modern industry produces acrylic paints various colors and shades.
Paint application
Acrylic paint can be applied to the chipboard surface with a brush or roller. It is up to you to choose, there are no recommendations in this regard. Whatever tool you use, you should pay attention to its quality. Not worth saving. Cheap rollers and brushes willingly and generously “decorate” the coating with their pile, which does not always have a beneficial effect on the quality of the coating and its appearance.
The paint must be applied with unidirectional movements of the brush or roller. In this case, you will get an even coating pattern. This requirement is optional. You may want the surface to look like it has been repainted many times, in which case the paint must be applied in multidirectional movements.
You also determine the number of layers of paint yourself. But each new layer should be applied only after the previous layer has completely dried.
Cover protection
For all their merits, acrylic paints wipe off relatively quickly. Therefore, the coating must be applied in several layers.
Chipboard varnishing is carried out using a foam sponge. The varnish does not need to be “smeared” over the surface. It is applied with soft "punching" movements.
After the last coat of varnish has dried, you can begin to assemble the furniture.
How to cover and process chipboard from moisture
The low cost of chipboard, high performance, versatility of use have made them a very popular material. Most private spheres applications - furniture manufacturing and construction. The main enemy of these plates is water - the chips increase in volume, the plate swells, warps and crumbles.
Even at the very beginning of manufacturing, sawdust and shavings after drying are impregnated with formaldehyde resins. After pressing, the surface of the plates is laminated, sometimes even varnished.
But the surface protection does not save the ends from the penetration of moisture through which it enters. Accumulating inside, water gradually begins to penetrate into the wood fibers, which leads to the destruction of the plate. Therefore, the ends must be saved from liquid penetration during operation. If they are tightly sealed, the service life of the plates will increase significantly.
In the photo - the effects of water on a chipboard countertop
Why exactly the ends are the launching pad for destruction? Yes, because the production of plates is necessary standard sizes, as well as the preparation of different-sized pieces of material, requires cutting. In this case, the integrity of the wood fibers is violated.
Thus, the protection of chipboard from moisture is carried out in three directions:
- impregnation of wood fibers with resins;
- special surface treatment;
- end sealing.
The first step towards moisture resistance
Already at the beginning of chipboard production, a process is carried out to protect them from water penetration - the so-called chip gumming. Thanks to this operation, two goals are achieved - the saturation of the fibers with resins and their bonding. For most of the manufactured boards, formaldehyde resins are used, which by definition are already a hydrophobic component of the product.

Green blotches in chipboard - special water-repellent components
In cases where even greater moisture resistance is required from the plates, another binder is used, that is, formaldehyde resin is replaced with urea-melamine. It glues the chips together much stronger, thereby being a stronger barrier to moisture. With the additional introduction of molten paraffin or its emulsion into the particle carpet, the moisture resistance of chipboard increases even more.
Plate surface treatment
The front and back surfaces of the plate, as the largest areas of contact, without any protection, can pass through themselves and absorb, respectively, the largest amount of liquid. It will not be superfluous to cover these planes with something moisture-proof. Some of the methods of such coating are possible only in the factory, some - and at home.
One of the main methods of protection is lamination. With it, on a polished chipboard with high pressure and a high temperature, a melamine film is laid. The essence of this process is not in pressing, but in the fact that under these conditions the film polymerizes the surface of the plate, becoming one with it.
There is another method performed in the factory - this is caching. Pressure and heat are also applied here, but more sparingly. The already hardened film is pressed against the adhesive-coated plate. If lamination is a chemical process, then lamination is a mechanical one.
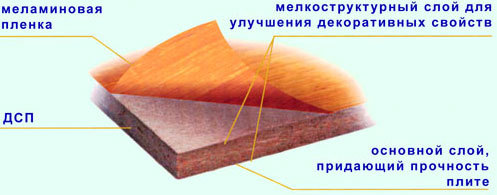
Components of laminated chipboard
At home, unlaminated chipboard is often coated with several layers of paint for protection. Pre-treat the surface before painting:
- dust is carefully swept away and erased from the surface;
- for the first time, the plate is smeared with hot drying oil;
- then this is done with cold drying oil until the outer crust is formed;
- the top is painted. With any painting method, it must be remembered that each subsequent layer of paint is applied to the already dried previous one.
There are several other ways to protect against getting wet. For example, a surface that will not be subjected to mechanical stress can be protected as follows: rub with stearin, then heat with a hairdryer. Let cool and repeat this a couple more times. Or: one part of bituminous varnish is mixed with five parts of drying oil. Coverage is carried out twice.
Seam and edge processing
Water is always looking for the lowest place, the depression. And what, if not a recess, are the joints on horizontal planes? There are especially many such joints in cabinet furniture, which is made just from chipboard. Kitchen furniture is in general, as on the front line: there is plenty of water and enough fumes. The most exposed to moisture is the sink, drying cabinet, countertop, furniture near and above cooker.
Faucets all start leaking at some point. So in the sink, the most promising dangerous place is where the mixer crashes into the countertop. This is the point of contact between metal and wood. It is possible not only for the tap to leak, but also for water to condense at the point of contact. Therefore, this place is cleaned, dried with a hairdryer. Next, a layer of PVA glue is applied, after which it dries - silicone. You can use building sealant, this is also a silicone mass, even window frames are sealed from leakage.

The edge not only protects the chipboard from moisture, but also reduces emissions of harmful substances.
In the cupboard, you should check the presence or absence of a pallet: if it is not there, then the liquid, draining to the bottom of the cabinet, will ruin it. For all kitchen furniture where it is possible to get wet, you must make it a rule: degrease this place and then do not spare the sealant.
For sealing seams, it is better to use sanitary silicone suitable shade: dark mold spots will not appear on the surface.
The non-laminated edges of the tabletop are closed with connecting or end strips. They are metal or plastic. The protection is not so hot, so the end of the countertop should first be treated with silicone. Another way to protect is to apply furniture varnish or PVA glue to the place of the cut. Suggested construction market self-adhesive films or tape reliable protection cannot be named.
Sealing chipboard joints on the floor
The difficulty lies in the fact that on the floor the slabs are constantly exposed to significant physical activity, they "play" relative to each other. For this reason, the putty does not want to stick. There are several folk ways to seal such seams.
The seams are covered with epoxy mixed with sawdust. Sawdust is pre-sifted finely. The composition seizes very quickly, so you should not prepare a large volume of such putty at once. Such protection serves for a long time and reliably. But the price of epoxy is high, and grouting is expensive.
You can replace the epoxy with hot wood glue. It is necessary to knead sawdust in it and go through the seams.
The effect is even greater than with epoxy, as hot glue penetrates deep inside. This method also saves from moisture, and the joint stops “playing”. True, it is advisable not to walk on such a floor for several days, since carpentry glue dries for a long time.
This method is much cheaper. And if the floor is still covered with linoleum on top, then about damage chipboard boards can generally be forgotten.
How to impregnate chipboard from moisture
Chipboard is one of the most affordable building materials, so many are interested in the question of how to impregnate given material from moisture? And, if in the summer time the ingress of moisture on the floor has a low probability, then in winter it is formed in any case. In this article, we will give good advice about how and with what to impregnate chipboard from moisture?
Oil varnish or drying oil
 In Soviet times the best way was oil varnish or drying oil. and now - special impregnating substances. Naturally, this does not mean that drying oil cannot continue to be used as protective agent from moisture. It is allowed to use it, but it is almost impossible to achieve a high level of protection. Yes, and you need a large amount of the mixture, while the working procedure will have to be done several times.
Polyurethane Blend
One of the most popular means for processing chipboard is a polyurethane mixture, which is similar in composition to a primer. Impregnation based on solvents organic type and polymers, which, when processed, penetrate deep into the pores of the material. At the same time, the strength level building material increases significantly.
Nitrocellulose varnish
There is another way to protect chipboard from moisture - nitrocellulose varnish. Its protective effect is similar to polyurethane varnish: it forms a kind of protective covering on the surface of the product, preventing the penetration of moisture, while the resistance to damage is equivalent to the maximum rate. A significant advantage of nitrocellulose varnish over its predecessor is the application of the substance without preliminary preparation of the workplace, but for best results we strongly recommend that you prime the chipboard.
To significantly protect chipboard products, you need to use combined method protection. It is best if it not only consists of a deep penetration impregnation step, but also includes the application of additional paints and varnishes.
Tell friends!
Methods for processing chipboard from moisture
Chipboard is an excellent structural material, but not very attractive compared to wood, and is also particularly susceptible to environmental factors. Chipboard products receive a certain protection during the manufacturing process. For this, various impregnations and additives are used. However, under intensive operating conditions, such factory measures are not enough, so it is recommended to additionally protect the material. How to protect chipboard, as well as process it with finishing materials, will be discussed below.
Plate surface treatment
The front and the inside of the slab have the largest areas, so if they are not protected, they receive the most moisture. Simultaneously with protection, you can decorate the material. Below are a few of these methods.
lamination
The lamination process is the finishing of chipboard with paper-resin films. Facing is carried out at high temperature (150-200 degrees) and high pressure (25-30 MPa). The protective and decorative layer arises due to the spreading of hot resin over the surface. Next, the resin polymerizes, forming a solid uniform coating.

If the technological process is observed, reliable adhesion occurs between chipboard and resin. During lamination, a certain surface texture is created - usually it is gloss or “wood-like”. Laminated surfaces are resistant to mechanical stress, moisture, ultraviolet radiation and high temperatures.
Laminating
During laminating, chipboard is covered adhesive layer, on which hard paper-resin non-varnished films are then placed. The difference between laminating and laminating is that when laminating decorative coating glued to the finished board. For example, wood grain embossing is done in advance. Such films are called "finish".

As with lamination, laminating also uses high pressure and high temperatures. However, the parameters in this case are more gentle: temperature - from 20 to 150 degrees, pressure - from 5 to 7 MPa.
The disadvantage of lamination is the instability of the coating to mechanical stress and moisture. Such a surface is easily scratched and swollen. Laminating is used mainly in the manufacture of inexpensive furniture, as well as for the production of parts that are not exposed to aggressive environmental influences (for example, rear walls cabinet).
Paint coating
Non-laminated chipboard sheet can be covered with several layers of paintwork material. The sequence of work on painting chipboard is presented below:
- remove dust and dirt from the sheet;
- coat the chipboard sheet with heated drying oil;
- coat the sheet again, but this time with cold drying oil (a thin crust should appear);
- apply the first coat of paint;
- after the first layer has dried, apply the second.

Laminated finish
Laminate is a polymer in which there are niches for the filler. As a filler, fabric, paper, veneer and other materials are used. At the heart of the manufacture of paper-layered filler is paper. It acts as a reinforcing layer, and also gives plasticity, strength and visual appeal to the layered polymer.
Finishing begins with cutting sheets of chipboard of the desired dimension. With the help of compressed air and brushes, dirt and dust are removed from the sheets. If dirt is not removed before painting, high-quality adhesion will not work.
Sticking facing material is carried out by direct pressing of a paper-laminated polymer, on which glue and chipboard are preliminarily applied. Pressing can be done hot (carbamide or PVA-based adhesives are used) or cold (PVA-dispersion contact adhesives are used). In practice, cold pressing is not used as often, because the process requires large areas, and productivity is relatively low.

Finishing is completed with postforming. The task is to give the plastic bends and other irregular shapes. The process is carried out on special equipment at elevated temperatures.
Pasting with polymer films
The process of applying polymer films is similar to decorative cladding plastics. The difference lies in the materials used. In this case, we are talking about a thermoplastic film applied by pressing on a chipboard treated with an adhesive composition.
Polyvinyl chloride films are used for finishing chipboard. Occasionally, polystyrene and acrylic films are used.
Finishing with polymer films is carried out on the same technological equipment on which such finishing materials as veneer or paper-laminated polymers are applied. The cladding process can be either hot or cold.
The advantage of cladding with a polymer method is the possibility of processing profile parts. However, the use of polymer films has a limited potential, since the coating does not have high physical and mechanical properties, and is also unstable to temperature effects.
vacuum pressing

Vacuum (or as it is called otherwise - membrane) pressing is a technological process during which furniture is covered with a decorative film. The main advantage of the method is the ability to cover parts of complex shape.
For example, with the help of membrane pressing, it is possible to veneer handmade furniture with all kinds of recesses, cutouts, miniature details, etc. The part is placed in a vacuum press, where it is densely, repeating the surface relief, covered with a heated PVC film.
Veneering
The correct name for the process is veneer. However, in everyday life the term "veneering" is often used. natural veneer can be finished with both chipboard and furniture board. Veneered furniture is of a higher quality than laminated furniture. However, it is quite difficult to maintain the safety of veneered furniture, since veneer is not as durable as laminate.

Tabletop made of chipboard or MDF
To finish a chipboard or MDF sheet, you will need plastic (laminated paper, polycarbonate, polystyrene).
Work progress:
- We cut out the necessary parts from chipboard, connect them with a stapler.
- The joints between the parts of the chipboard base must be the same. If this is not the case, smooth them out with sandpaper.
- We make lining for ends.
- We cut the facing part with the help of a grinder.
- We glue the finishing material and fix it with light blows of a rubber hammer.
- Install the end cap flush with the bottom edge of the countertop.
- At the same time, glue the base and apron with glue.
- When installing a laminate, we use separators. After installing the sheet, remove the separators.
- Smoothen the surface with a roller.
- Using a router, cut a hole under the sink.
- When the structure is assembled, we grind all the edges.
Seam and edge protection
Any liquid always seeks and finds the lowest place on the surface. The joints are recesses, therefore vulnerable to water ingress. A considerable number of joints are available in cabinet furniture, where the main structural material is chipboard.
Due to high humidity and frequent contact with liquids, it is especially vulnerable kitchen furniture. The sink, countertop, furniture next to the stove are the most frequently wetted pieces of furniture in the house. An example is the part of the countertop that is in contact with the faucet. The faucet leaks sooner or later, which means that unprotected chipboard will inevitably get wet and collapse.
To protect the joints, we first clean these places and dry them with a hairdryer. Then we apply PVA glue to the joints, and when it dries, we treat the surface to be protected with silicone or, as an option, building sealant.

If there is no tray in the cupboard, then sooner or later the liquid flowing from the wet dishes will destroy the chipboard. Therefore, the material must be degreased, and then treated with a sealant.
We seal the seams with sanitary silicone of the corresponding furniture color. This will prevent the appearance of mold on the furniture.
In those places of the edge of the tabletop where there is no lamination, we install end or connecting strips. These elements can be made of metal or plastic. The slats are not perfect protection, so the edges still need to be pre-treated with sealant. Another common method of protecting chipboard is applying PVA glue or furniture varnish to the edges.
Floor joint protection
The main difficulty in protecting joints on the floor is that such plates are subject to increased mechanical loads and constantly shift slightly under loads. Because of this, the putty does not adhere well to chipboard.

To ensure the protection of the joints on the floor, the seams are processed epoxy resin mixed with sawdust. Moreover, sawdust should be very small - they must be sieved in advance.
Note! Epoxy-sawdust composition seizes extremely quickly. Based on this, you should not knead too much putty at once.
A mixture of epoxy and sawdust will reliably protect the joints, but the cost of such a solution is quite high. Epoxy resin can be replaced with wood glue. You need to add sawdust to the hot glue, and then process the seams with the resulting composition. If everything is done correctly, the effect will be even better than with epoxy, since the glue penetrates deeper.
After processing the seams, the chipboard joints will become more resistant to moisture and, no less important, they will stop “playing” with each other. If you trim the chipboard with linoleum, you can no longer worry about the safety of the plates.
After processing the seams, it will take several days for the putty to dry. At this time, it is impossible to walk on the slabs, so as not to break the joints.
Coating chipboard with protective and finishing materials in many cases requires certain experience and qualifications, and sometimes the availability of special equipment. If there is no self-confidence, it is better to entrust the work to specialists.
Primer for chipboard
Personal website - how to prime chipboard
How to prime chipboard?
Chipboard can be primed with a conventional primer. If the chipboard structure is located in a dry room, then any primer is suitable for priming the chipboard. If chipboard will be exposed to moisture, then it is necessary to treat it with a moisture-resistant primer, which contains additives that protect chipboard from the destruction of microorganisms. There is a wide range of primers on the market, which will protect chipboard from destruction in wet areas, such as a bathroom, kitchen, and a combined bathroom. Primers of this type are represented by the brands "Tex", "Tikkurila", "Neomid", "Escaro" and others. trademarks. It is best to prime chipboard twice on all sides, for reliability. Priming compositions form a polymer film. This film with additives will protect chipboard from destruction.
How to putty chipboard?
After the surface of the chipboard has been primed, it must be puttied. Since the surface of the chipboard is rough, but you want to make it smooth and beautiful, so that it pleases the eye, you need to putty the chipboard. For puttying chipboard, ordinary dry putty is suitable for finishing alignment. Putty is applied to chipboard in two stages. The surface of the chipboard is puttied for the first time to cover all the irregularities. The second time puttied to eliminate minor defects. If necessary, you can putty a third time. Putty for the second time can be oil-adhesive putty. Can be putty with latex putty. When puttying chipboard with latex putty or oil-adhesive putty, the surface will be smoother than putty with ordinary dry putty. Putty is easier to sand with sandpaper. If you putty chipboard with latex putty or oil-glue carelessly, then it will take more time to sand the puttied chipboard surface. Therefore, it is recommended to putty the first layer with ordinary putty, and the second, after sanding the first, with latex. If the surface of the chipboard is smooth, then you can putty with oil-adhesive and latex putty twice. If you carefully putty chipboard with oil-adhesive putty or latex putty, then you will hardly need to sand the surface. If chipboard is puttied with latex putty, then the surface will be less exposed to moisture.
How to paint chipboard?
Chipboard after priming and puttying can be painted with any paint. What paint and varnish materials can cover the surface of chipboard.
Raw chipboard can be varnished with a water-based or alkyd-based varnish. But before varnishing chipboard, it is necessary to treat it with a primer that is suitable for varnish. Only in this way the varnish manufacturer guarantees the reliability of the coating. Thus, before varnishing chipboard, you need to learn about primers. Primers are mainly provided by foreign manufacturers.
Domestic varnish PF (pentophthalic) can be applied without a primer. On the other hand, if the chipboard is not very good quality, or old chipboard, it must be primed before applying varnish. The primer composition can be done by yourself. Thin with 50% varnish and 50% white spirit. Get about a liter of liquid for priming chipboard. A liter of such a primer is enough to prime 15 square meters or even more. It all depends on humidity, air temperature, atmospheric pressure and the condition of the chipboard. After priming chipboard, it is necessary to allow time for the surface to dry.
After drying, you can apply the first coat of alkyd or water-based varnish, i.e. acrylic, latex. It all depends on what goals you are pursuing. For example, PF varnish (aka Pentophthalic) makes the surface translucent. Acrylic or latex based varnish makes the surface less transparent.
The surface of a chipboard that is coated with PF will be more transparent than that that is coated with an acrylic or latex based lacquer.
The advantage of acrylic and latex-based varnishes is that they are impact resistant, which cannot be said about Pentophthalic and Alkyd-based varnishes.
Chipboard can be coated decorative plaster, can be covered with decorative putty. Patterns can be applied to any, it all depends on the goals. For such purposes, there is a whole set of tools. Special rollers, sponges, brushes, spatula. On the other hand, the texture can be created by any improvised means.
Decorative plaster or decorative putty applied to chipboard can be varnished. So that the decor does not collapse and the color of the decor does not fade.
Chipboard can be painted with ordinary alkyd paint, any color. Can be painted with water based enamel.
Primers - types and properties
A primer is a mixture that contains a binder. By type of binder primers are divided into: acrylic, epoxy, polyurethane.
Acrylic the primer can be applied to all surfaces (screed, concrete, wood, chipboard, fiberboard, etc.). This primer is diluted with water, odorless and dries in 2-4 hours.
Epoxy and polyurethane primers are used to ensure good adhesion of the laid materials to the base and to reduce the porosity of the base.
In the process of laying floors, primers are used to treat all kinds of screeds, concrete and cement floors, painted and unpainted wooden substrates, stone and ceramic tiles, as well as self-leveling compounds.
It is also necessary to highlight the protective properties of primers, such as: preventing the appearance of rust, salt stains, mold.
A number of primers with special properties are available:
- suitable for underfloor heating;
- electrically conductive (electrically conductive coatings can be laid on this primer using antistatic adhesives);
- to make the surface water-repellent.
Description of the properties of Bamard primers
UZIN-PE 260 Has White color. Possesses adhesive properties and does not pass water. Dries within 2-24 hours. 100-150 Dispersion primer for treating chipboard, fiberboard, wood substrates with firmly adhering adhesive residues, asphalt and magnesite screeds. Apply for internal works. When processing absorbent cementitious screeds, a mixture diluted with water in a ratio of 1:1 can be used.
UZIN-PE 260L Has a black color. Possesses electrical resistance
Homestead primer for fiberboard, chipboard, plywood for coloring, 2.5kg — products » buy
PRIMER on fiberboard, chipboard, plywood, 2.5kg
The composition stabilizes the absorbency of porous wood, fiberboard, chipboard, plywood, significantly reducing paint consumption. Provides reliable adhesion of a highly absorbent wood surface with alkyd, oil enamels, acrylic compounds, water-based paints. Contains fungicidal and insecticidal additives that prevent the formation of rot and mold on the treated surface. After applying the PRIMER, it is enough to apply one coat of paint to obtain an optimal staining result, which allows you to reduce paint consumption by at least 3 times. Increases the service life of the painted layer.
The surface to be treated must be dry (humidity not more than 20%), cleaned with a brush from peeling and dust, including wood dust. Carefully remove peeling varnish and oil coatings with a spatula. The PRIMER can be applied with a brush or roller, thoroughly impregnating the surface. For best results, 1 coat is sufficient. Work at air temperature above +5°C.
Water, acrylic latex, tannin inhibitor, functional additives.
Store the composition in a hermetically sealed manufacturer's container, in a dry room at an air temperature of +5 to +30°C. Shelf life - 3 years.
More related posts
Because The topic is archived.
This question is very common on the Internet. Google brings up hundreds of pages. The essence is the same everywhere: One bought a chipboard, laid it on the floor and asked how to process it, while others, speaking about hot drying oil, floor paint and ship varnish, discuss that it is not best material chose for the floor and he would have passed it.
I HAVE ANOTHER THING:
I buy chipboard as countertops for folding portable tables. There are no alternatives to chipboard. A table is a thing on which liquid is constantly poured.
Let's think about how it is really possible to protect chipboard from moisture? In addition to moisture, even with a careful move, the tables are still scratched. The question of the fact that the corners can simply break off and crumble soon is not to be discussed.
It would be ideal, of course, to create some kind of lacquer surface at all. though not necessarily. to process, of course, I will be on all sides and especially the ends. It would be better if it didn't smell too bad. The option with drying oil, which will stink in my warehouse for another six months, is not suitable. 
What chipboard do you want to use? sanded or laminated? 
the difference in price is not great, you can take laminated. but (according to the experience of using the original countertops that were originally on the tables), the laminate is scratched very noticeably, and this part immediately becomes available for moisture. and the laminated edges start to swell and fall off. Therefore, if it is possible to impregnate and (or) cover something polished, then it may be more useful. 
There is a moisture-resistant chipboard, although the choice of colors is poor. Either make out plywood fsf, there you can no longer process anything. 
To renew old cabinet furniture, you can paint chipboard at home with your own hands. Most often, interior items are made from this material, it is also widely used in construction and repair work gender. Chipboard has been used in Russia for several decades.
 Painting chipboard will ennoble the appearance of the most worn item
 Chipboard is compressed and glued wood chips with formaldehyde. But chips are subject to various negative influences, therefore they are easily pasted. To avoid this, they are covered with various materials: polypropylene film, paints, varnishes and others. In addition to the protective function, painting chipboard improves the appearance, since this method allows you to create the necessary texture of any color on the surface.
In order to improve the aesthetic properties of furniture or chipboard flooring and to give an individual and original design, it is necessary to cover the plate with a new layer of paint. It should be noted that in addition to improving aesthetic data, painting improves moisture-proof properties and protects the material from negative impact ultraviolet rays. With proper do-it-yourself restoration work, the life of the furniture increases. Formaldehyde evaporates over time, which negatively affects human health, so the coating of the plate prevents this process.
Chipboard can be coated with varnish, film, paint, veneer. The hardest thing. It is necessary to use several layers of primer, however, even in this case there is no guarantee that the coating will be of high quality.
Preparatory work
Before processing a floor finished with chipboard with colorful products, you need to prepare tiled surface. The quality of staining will depend on this stage of restoring furniture. Over time, paint or varnish loses its appearance and begins to crack. Therefore, the old polished surface must be removed, but this is not so easy to do. Despite the fact that this is a complex process, you need to do a quality job.
 For a chipboard floor to last a long time, it needs to be painted.
 To do this, you can use one of the existing methods:
- Thermal method. The surface of the chipboard is exposed to steam or hot air. To perform such work, you need to prepare a spatula and a special hair dryer. Hot air is directed onto the coating, as a result of which the paint becomes softer. After that, it must be removed with a spatula. If the air is too hot, the stove can be damaged, so you need to monitor the temperature.
- Chemical method. In this case, the surface of the floor or furniture is treated with special chemicals. The choice of chemistry depends on the composition of the coating. To avoid undesirable consequences, it is necessary to strictly follow the attached instructions on the packaging of the product.
After that, the surface must be puttied and treated with sandpaper. This allows you to get rid of small scratches and defects that are not visible under the coating layer.
Before using putty, it is necessary to prime the floor surface with a quality composition. For processing chipboard, it is recommended to use elastic putty. This is necessary to prevent the formation of cracks on the chipboard.
The putty is applied with a conventional spatula. The layer must be applied evenly over the entire surface. When the putty is completely dry, the slab must be sanded with fine-grained sandpaper to get rid of small irregularities. The surface is cleaned of dust, after which you can start applying the coating.
Surface paints
 The main point in painting chipboard- choice of paint
 It is recommended to paint the surface of the plate using a special spray can or spray gun. This will allow you to evenly distribute the paint without the slightest smudges. But before that, you should practice a little if such work has never been done before. You also need to choose which paint is best to refresh the surface of the stove.
You can use different types of paints: acrylic, oil, alkyd and others. It should be noted that the final result will depend on the choice of paint. Painting is done with a roller or brush. After painting, a layer of varnish is applied to the surface to increase the resistance of the product to mechanical damage, since the varnished surface is more difficult to damage.
Painting process
- First of all, the polished surface must be cleaned of dirt and dust, then degreased.
- Clean the product with coarse sandpaper so that small scratches appear. As a result, the primer can achieve better adhesion to the chipboard surface.
- Then you need to apply an alkyd primer.
- The next layer is an acrylic primer.
- With the purchased paint, the surface is painted in several layers. To do this, you can use a roller or a small brush. It should be noted that the final result depends on the number of applied layers. Some want to get rich color and others translucent coating.
- If irregularities appear after the first layer, then the product must be processed with fine-grained sandpaper, and then painted again.
 The painted chipboard surface should look perfect
 - Before proceeding with the painting of the plate, it must be treated to avoid the release of formaldehyde. This is done using NC varnish, but experts recommend using impregnations, as they are harmless.
- If it is necessary to highlight the texture of the product, then the surface is treated with special alkyd pigments or other patination agents.
- To achieve an absolutely smooth and even surface, it is recommended to use a roller that has small villi. Otherwise, unwanted patterns may appear on the stove. But if you need to achieve the manifestation of texture, then it is a roller with a long pile that will help to realize this idea.
- If the chipboard is painted in dark color, then to resume the old surface, several layers of primer must be applied to it, otherwise, the dark shade will show through the paint.
If necessary, particle board can be painted in different colors to achieve general style in the interior. To split the plots various shades you should use masking tape. After painting work, it is easily removed, while the surface is not damaged.
It should be noted that the combination of different colors allows you to change the visual perception of the room. Light shades visually enlarge the room, so this technique is often used to decorate a room with a small area.
If you doubt that you can do the work yourself, then repaint the surface of the chipboard furniture or floor should be entrusted to qualified specialists. Today, you can easily find workshops that provide such services. In addition to painting the surface, experts use various techniques that can improve the appearance of chipboard products.
Chipboard, acting as a sheet composite material, is very popular in the construction environment, as well as in the manufacture of various furniture. Therefore, a topic that tells about how to paint chipboard at home is relevant.
On sale there are usually sanded and laminated sheets, which differ from the first only in the presence of a layer of varnish on the surface.
Suitable paint products
Before you know how you can paint laminated chipboard or ordinary uncoated boards, you need to consider the properties that the protective compound. First of all, it should have good adhesion to the wood-chip surface, then its service life will be long.
However, at the same time, we must not forget about environmental performance and strength characteristics.
Acrylic paints
Such compositions include three substances: pigment, water and a binder based on an acrylic polymer emulsion. These tools are used to process various kinds surfaces, can be tinted with special pastes, after drying they become resistant to water.

- Products are used on almost all types of surfaces, with the exception of certain types of plastics.
- Complete drying occurs after a short period of time, after which the coating becomes immune to water.
- Such compositions are environmentally friendly, so they do not contain harmful substances. The weak smell emanating from the product is not capable of strongly irritating the respiratory system.
- Good resistance to external influences makes it possible to reliably protect the base.
Note! When thinking about how to paint laminated chipboard or regular chipboard, you should take into account the listed advantages similar products, after which they can be compared with the advantages of other analogues.
Latex formulations
Another type of water-dispersion products is made on the basis of another synthetic substance - latex. These tools allow you to get thin-layer coatings of various color shades.
Paints are produced by grinding pigments in a special emulsion.

- The most important advantage of the material is the high abrasion resistance of the layer, which increases the service life of the coating.
- Products are able to form surfaces with high level gloss, and this in some cases improves the aesthetic perception.
- Compounds based on latex contain the least amount of fillers and pigments, therefore they are not prone to sticking.
- The high drying speed makes it possible to use the painted structure in the near future.
Addition! If it is planned to treat surfaces with latex compositions directly with your own hands, then it should be borne in mind that such coatings are applied only on dry bases, otherwise bubbles may appear on top.
Alkyd enamels
Production of products is carried out on the meringue of a special varnish and a certain set of solvents and fillers. In some situations, manufacturers add antiseptic substances that protect the processed material from the effects of fungal infections ().
The main component of such enamels is an alkyd varnish, consisting of vegetable oils, glycerin and rosin.

- One of the important advantages is the elasticity of the product, due to which the coating is able to withstand quite significant mechanical loads.
- After complete drying, alkyd enamels do not shrink, nor do they lose their original brightness.
- The low price makes the product quite affordable.
Important! Most often, with the help of these paints and varnishes, chipboards located on the floor are processed, since the coating is considered wear-resistant.
Additionally
AT modern world many formulations have become universal, so they can be used for different types surfaces. For example, Polystil fire-retardant paints for metal, which can withstand difficult thermal conditions, can also be used to carry out such work.

Work procedure
- At the initial stage, the obsolete coating is removed, for which chemicals or thermal operation. In the first case, processing is carried out with washes, and in the other, softening is carried out with steam.
- Next, work is carried out to improve adhesion, for which the surface is primed. It is advisable to use mixtures deep penetration to block the entry of harmful substances from the material.
- The paint is applied to the surface using a roller with a small pile, a regular brush or a spray gun. The latter option allows you to distribute the composition more evenly.
- After the final drying of the coating, varnish is usually applied to strength characteristics increased.

We also recommend
 Productive and reproductive thinking
 Reasonable egoism - what is the theory of reasonable egoism?
 Boris Nikolaevich Yeltsin, the first President of Russia
 Underground fights. Underground kings. What is “fighting not for the masses”? Where can you fight for money?
 Yakov Pavlov and Other Heroes of Stalingrad You Need to Know
 Survive an accident at sea in a dream - in reality experience a new love