We are building a bathhouse insulation ceiling. Do-it-yourself ceiling insulation in the bath: we do the right ceiling insulation by studying the available methods
Specialization: master of interior and exterior decoration (plaster, putty, tile, drywall, wall paneling, laminate, and so on). In addition, plumbing, heating, electrical, conventional cladding and balcony extensions. That is, repairs in an apartment or house were done on a turnkey basis with all the necessary types of work.
If you need to insulate the ceiling in the bath, then there are at least two ways for this - internal and external. But the external method is possible only if the room has an attic, which is not often the case. I suggest you understand both methods, learn about materials for such insulation and watch the video in this article.
Outer: 1 way
What are the ceilings

So, if there is an attic above the bath, then you can insulate it from the outside, and for this there are many materials that transmit heat very poorly, but some of them are better and others are worse:
- be that as it may, but you can’t do without such insulation - according to the laws of physics, warm air rises, and it is quite natural that the ceiling is the most vulnerable area for its leakage. In addition, the correct selection of material will ensure the safety of the overlap for many years;
- There are two main types of such structures - these are buildings with and without an attic. The presence of an attic greatly expands your options when deciding which insulation to choose;
- the attic in the building involves a reinforced structure, therefore, the instruction allows you to lay the insulation in several layers, and it can be laid during the construction of the building;
- in addition, the attic is already an insulator in itself, since it is a reservoir of air;
- no matter what material the walls will be built from, the ceiling structures of the steam rooms are the same - they are made of wood;
- here, in addition to boards for sheathing, wood, chipboard, OSB and moisture-resistant plywood are also used.
How to fall asleep

Modern technologies have stepped far forward, and the construction market offers a variety of insulation for a bath on the ceiling, which is easy and simple to install. It could be:
- mineral wool,
- Styrofoam,
- extruded polystyrene foam,
- penoizol, etc.
They are simply laid on the ceiling in a dense layer so that there are no gaps anywhere. But if natural components are used, you need to consider the compatibility of the components, the thickness of the layer and their weight, that is, the ability of the structure to withstand it.

If you follow the old-fashioned methods, then you can insulate the ceiling in the attic with earth and clay mixed with straw, sawdust or large wood chips, or you can even cover it with dry oak leaves.
This option is good because it is practically free. Therefore, based on the state of your budget, you can choose it, and besides, the insulation will turn out pretty good.

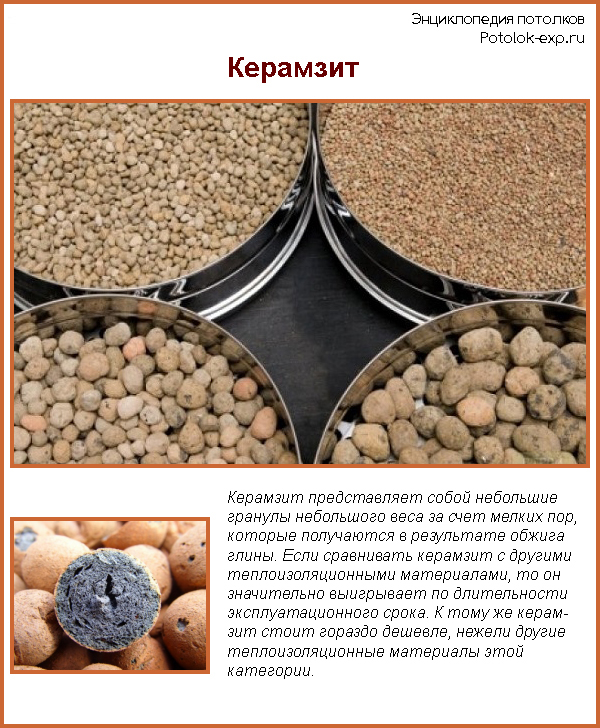
Expanded clay is one of the cheapest materials, and if you are looking for how and how to insulate the ceiling in the bath with your own hands, then you can use this particular material. It falls asleep in a thick layer.
However, there is one important condition here - it must be dry, since moisture is a good conductor.. Therefore, it is possible to fill up expanded clay only after the installation of the roof and the laying of roofing material.. On the inside of the room there should be natural wood paneling, which will not allow even a small fraction to wake up.
To protect the material from moisture that can penetrate the boards, before insulating the ceiling, you need to lay cut-off waterproofing. For this you can use:
- dense polyethylene,
- roofing felt, kraft paper in several layers,
- or even cardboard pre-impregnated with drying oil.
The strips of this cutoff overlap with a margin of 10-15 cm for density, and then are fixed with some kind of staples.
On the cut-off, you fall asleep or lay the material you need, but if you ask yourself which insulation is better, then we can say that this is clay, which is applied in several layers. Clay is mixed with river sand, straw or sawdust, diluted with water and placed in two layers of 10-12 cm.
![]()
In this case, you need to wait until the bottom layer dries to such an extent that you can walk on it.. When drying on clay, cracks are necessarily formed, which are sealed with a rarer solution, allowed to dry and covered with expanded clay on top.
Note. If you do not use clay coating, then you will have to increase the layer of expanded clay by 3-4 times.
Internal: 2 way

Now let's figure out how to properly insulate the ceiling in the bath from the inside. To do this, you first need to mount a crate of wooden boards, the width of which will depend on the intended insulation. Most likely, you will sheathe the ceiling with wooden clapboard, so set the step of the crate according to the length of the panels, but usually it is 50-60 cm.

In this case, it is difficult to say what is better to insulate the ceiling from the inside - with mineral wool or foam. But the thermal conductivity of polystyrene is definitely lower than that of any type of mineral wool.
When laying mineral wool, you need to cut pieces 3-4 cm longer than the crate step width, and you can fix it with nails or self-tapping screws. It is not necessary to fix the foam plastic - it is simply cut exactly to the desired width and inserted between the crate profiles, and all the remaining slots are blown out with mounting foam.

Before hemming the ceiling with wooden clapboard, you need to provide waterproofing for the insulation, and this is usually done in two layers:
- the first layer is dense construction polyethylene, which is very easy to nail with a stapler. You need to work here carefully so as not to tear the material;
- and the second layer is foil, which is also fastened with a stapler.
If you have foil tape, then I recommend sticking boards on the crate with it so that moisture does not get on them through the lining.
Note. The foil serves not so much for waterproofing as for thermal reflection. The fact is that it has the property of reflecting infrared radiation, therefore, the power of the insulating layer will increase significantly. Foil can also be used for external insulation, simply laying the front paneling on its floor.

Conclusion
The only thing worse than not having a bath is a cold bath. Those who do not want to face such a problem in the future think about warming in advance. This will significantly reduce the consumption of firewood. Before you insulate the ceiling in the bath, you need to choose the material suitable for this and carefully study the technology.
When the ceiling of the bath needs insulation
The laws of physics state that warm air is lighter than cold air, which means it tends to rise. The ceiling, on the other hand, restricts this movement, causing it to accumulate in the upper part of the room. Further, much depends on the thermal conductivity of the ceiling itself. If it is not insulated with anything, it causes a loss of 20% of heat. It is quite possible that this is not a problem for a summer sauna with a full firewood. In all other cases, it is worth taking care of reducing heat loss and insulating the ceiling with your own hands.
Insulation will also come in handy for those who do not want to spend the whole day on the firebox, because the ladle is easier to fill if it does not leak. It's the same with heat.
Which method to choose for warming inside and outside the room
The choice of insulation method is influenced by what is above the ceiling - a cold attic, a residential attic or a flat roof with a small slope, which leaves a minimum attic space. In total, there are only three methods for arranging the ceiling:
- grazing;
- hemmed;
- panel.
Flat ceiling with expanded clay insulation, clay and sawdust
For those who have an attic, but do not want to equip it in a warm warehouse or recreation room, the design of the flooring is suitable. It is considered the simplest, since it is not supposed to walk in the attic, which means that there is no need even for floor beams. The draft ceiling is placed on the piping of the building, that is, directly on the walls.
Important! There are limitations associated with this. The boards will withstand a layer of insulation if their length is no more than 2.5 m with a board thickness of 4–5 cm.
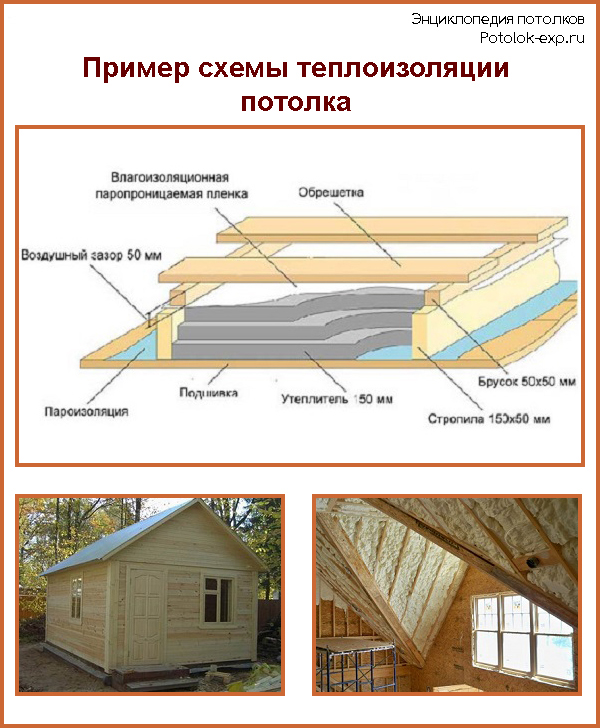
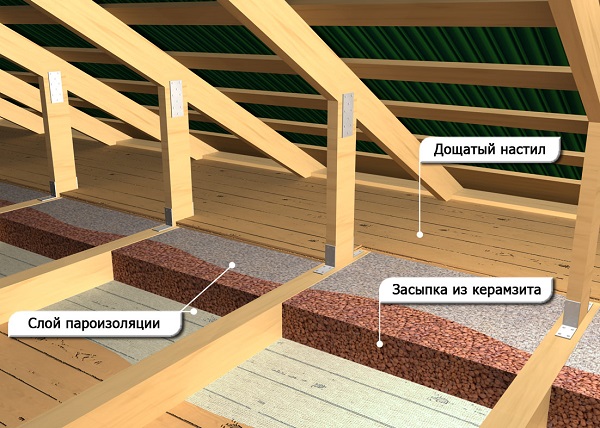
Different materials can be used, but the structure of the "pie" is the same in any case. It consists of layers (from top to bottom):
- insulation;
- wax paper;
- boards;
- vapor barrier;
- clean ceiling.
The vapor barrier material must not only be hydrophobic, but also withstand high temperatures, so its choice is limited. Most often, foil is used as a vapor barrier. The last layer is made of expanded clay (slag) or clay with straw.
In the first case, expanded clay is poured on a layer of waxed paper (so that it does not wake up through the cracks) with a layer of 20 to 30 cm. This thickness is enough to show the thermal insulation properties of this material. Fractions of expanded clay should be taken different, so that small ones fill the voids between large ones.
Often, before filling, divider boards are stuffed onto the draft ceiling from the side of the attic.
In the second case, the clay is soaked, and then straw or sawdust is added to it. There is another way. First, a layer of clay of 5 cm is laid, which is allowed to stand for 4 days. Then the cracks are smeared with fresh mortar, and a layer of 10 cm oak leaves is placed on top. Then clay again, but already dry (5 cm).
From the side of the bathhouse, a vapor barrier is attached to the draft ceiling, which is sealed with metal tape. Next, a crate is made, leaving a ventilation gap, on top of which a finished ceiling is mounted, for example, from a lining.
Each of these heaters has one significant drawback: a lot of weight. The draft ceiling will cope with it only if the boards are thick and the span is small. The advantage can be considered the cheapness of the material. If desired, the same flooring can be insulated with mineral wool, and expanded polystyrene in combination with expanded clay, and ecowool, but their cost is much higher.
You will need:
- tools: stapler, saw, hammer;
- materials: boards, foil, waxed paper, metal tape, galvanized nails, expanded clay.
For a bath measuring 225 by 225 cm, with a layer of expanded clay 30 cm thick, the volume of material required is 1.5 m 3.
Video: how to insulate the ceiling with expanded clay with your own hands
The sequence of arranging a false ceiling with a vapor barrier
This is a more complex design, suitable for those who want to build a second floor in the future. If you plan to walk in the attic, put furniture there, then you need to mount floor beams. On them, a hemmed ceiling is made.
You will need:
- tools: construction stapler, hammer, saw, knife, tape measure, mallet;
- materials: beams, foil, metal tape, galvanized nails, lathing slats, grooved board or lining, insulation, edged boards, membrane or film
To calculate the material, you need to know the area of \u200b\u200bthe ceiling, which is divided by the standard dimensions of the slab or roll of insulation. If it is bulk, then its volume is calculated: the height of the embankment, which depends on the climatic zone, is multiplied by the area. For example:
- room length - 380 cm;
- width - 350 cm;
- the height of the bulk insulation layer is 20 cm.
The volume is 380x350x20 \u003d 2.66 m 3.
The ceiling scheme is as follows (from top to bottom):
However, the work is carried out in a different order. The sequence of actions is as follows:
- First of all, floor beams are placed on the strapping of the walls.
- Then they are hemmed with a layer of vapor barrier from below. Usually foil, a construction stapler and metal tape for sealing are used for this.
- The vapor barrier is additionally nailed to the beams with slats to form a ventilation gap of 2–3 cm.
- For finishing the ceiling, either a good quality grooved board or lining is taken.
- After that, the work is moved to the attic, where insulation is laid between the beams on the vapor barrier. Most often, basalt wool is used for this.
- Waterproofing is placed on top of the insulation. For a bath, the membrane is preferable to polyethylene, because the previous layer must get rid of condensate.
- Everything is covered with a flooring of edged boards, which will become the basis of the floor. It is better not to use cement.
- Attic floor finish.
Video: hemming construction technology
How to insulate a panel ceiling
The most complex version of the ceiling device, so it is rarely used in baths. For him, you need to make pallets in which the insulation will fit.
You will need:
- tools: saw, hammer, construction stapler, knife;
- materials: galvanized nails, foil, mineral wool, bars, boards (pair quantity).
A standard mineral wool mat for baths and saunas has dimensions of 60x100 cm with a thickness of 5 or 10 cm. The material is easily cut with a knife, and when laying it, it can be compressed a little so that it lies more tightly in the spacer. The length of the "pallet" corresponds to the length of the room, the width of its inner part is 50 cm.
Knowing the length and width of the ceiling, for example, 360x360 cm, we can conclude that we will have to make 6 pallets 360 cm long. Each of them will fit 3.6 standard mats (60x100 cm). If the density of the mineral wool is high, it will not be possible to compress it strongly, so the trimmings will go into the “pockets”.
To insulate a panel ceiling measuring 360x360 cm, you will need 22 standard mineral wool mats.
Thermal insulation materials deserve special consideration. The fact is that not everyone is suitable for a bath. This is due to the increased temperature and humidity in its premises. The steam room is especially demanding on the material of the insulation. It should be:
- non-flammable, does not emit a lot of smoke during a fire;
- withstand temperatures over 100 degrees;
- absorbing little water;
- does not emit toxic substances into the air in any condition.
There is no ideal material, each has its advantages and disadvantages.
All work takes place in several stages:
- First, on any flat surface (for example, on plywood), a structure is made from new bars and boards 60 cm long.
- The bars are located at a distance of 50 cm from each other, the boards are nailed with 4 nails perpendicularly. In this case, you need to indent 5 cm from the edge.
- As a result of the work, a shield is obtained in which the vapor barrier is laid. It, in turn, needs to be fixed with a stapler. It remains only to strengthen the shield with temporary braces that make it easier to carry, and raise it up.
- At the top, the shields are placed end-to-end with protruding boards. Due to this, additional voids for insulation are formed.
- The walls of the bath are the supports for the shields, so they should be the same in length. Insulation (mineral wool or glass wool) is placed inside the shields with vapor barrier. "Pockets" are also insulated. After that, flooring boards are nailed across the shields, on top of which a finishing floor is made.
A panel ceiling is an alternative to a hemmed one, since both are used in two-story baths. The owner is free to choose between the laboriousness of the panel and the financial cost of the hemmed one.
For the installation of a panel ceiling in the bath, it is undesirable to use plastic lining, polystyrene foam and plastic film.
It is difficult to name the best heater. Most often, basalt wool is used for arranging a bath.
Table: advantages and disadvantages of various heaters
| Insulation name | Scope in the bath | Advantages | disadvantages |
| Sawdust | Ceiling insulation. | Cheap. | Combustible and flammable. |
| Expanded clay | Insulation of horizontal surfaces - floor and flooring. | Cheap, easy to install, durable. | Needs increased stability of the foundation and walls of the bath. In some areas, expanded clay is produced with increased radiation. Needs moisture protection. |
| Styrofoam | Nowhere. | Cheap, lightweight, easy to install. | Combustible, emitting a lot of smoke with harmful substances. Easily spoiled. |
| Styrofoam | One of the layers of thermal insulation of the floor or ceiling (can be placed on top of expanded clay). | There are varieties that can withstand high temperatures. Doesn't get wet, insulates well. It has a small thickness with low thermal conductivity. | Needs leveling of surfaces (this does not apply to expanded polystyrene in granules). |
| mineral wool | Everywhere. | Does not burn, withstands high temperatures, easy to install. | During installation and operation, it partially collapses and turns into dust, which is harmful to humans, so it can be used for insulation outside the premises. Needs hydro and vapor barrier. |
| Ecowool | Everywhere, but with the condition of reliable hydro and vapor barrier. | Does not burn and does not support combustion. Rodents do not like this material. Environmentally friendly. | Loses the properties of a heat insulator when moistened, caked during long-term operation. |
| Clay | Ceiling insulation. | Cheap, affordable, reliable. Non-flammable and environmentally friendly material. | The same requirements for increased structural stability as for expanded clay. |
| Growing aerated concrete | Uncharacteristic material for insulation. | It seals more than it insulates. 10–12 cm of aerated concrete corresponds to a layer of expanded clay of 30 cm. | Difficulties will cause the reconstruction of the ceiling. Needs formwork made of glass-magnesium sheets. |
Insulation of the ceiling must be carried out even during the construction of the bath. And you can do it yourself, if you carefully study the installation technology of various heat-insulating materials.
The operating conditions of the bath are different from those that most buildings have to face. Therefore, the issue of high-quality vapor and thermal insulation should be given special attention. Consider how to insulate the ceiling, floor, walls in the bath and what technology to prefer in order to create a suitable microclimate and minimize heat loss, saving your own efforts and resources.
A bathhouse is a room that is periodically heated in order to adopt wellness procedures. Inside the room, a special microclimate is formed, characterized by high temperature and humidity. Of course, this cannot but have an impact on those building materials that have to be exposed to such an impact.

In addition, one has to take into account the costs associated with the use of a particular amount of fuel. If the building is prone to rapid cooling, a large amount of fuel will be required to maintain the appropriate temperature. And given the fact that, according to the laws of physics, warm air is lighter than cold air, it is the roof of the bathhouse that requires insulation, through which a significant loss of heat occurs.
But on the way to building a barrier to keep warm air indoors, there is another aspect that all bath owners should pay special attention to. High humidity becomes a source of a large amount of condensate, which, if the roof is not properly insulated, can accumulate. Often this causes the destruction of the wooden elements of the structure.
Interesting fact! High humidity is a favorable environment for the growth and development of various microorganisms: fungi, mold and bacteria. Ill-conceived steam and thermal insulation can cause their appearance and reproduction.

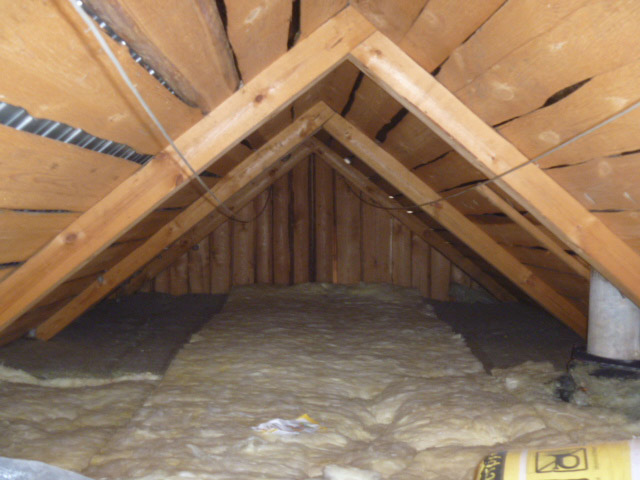
Insulation of the ceiling in a bath with a cold roof, depending on the characteristics of the roof
The bath roof can be represented by one of two types: having attic space and without it. In the first case, the layer of air itself creates a fairly effective barrier, which has a positive effect on the building's ability to retain heat. But this does not mean at all that the presence of an attic completely eliminates the need for insulation work.
If the bath does not provide for an attic or attic, then high-quality thermal insulation is an almost indispensable condition for the further use of the building for its intended purpose.
Regardless of what type of room you have to deal with, the first and extremely important step is to provide a vapor barrier layer. Available materials such as aluminum foil, high-density cardboard that is pre-impregnated with drying oil, or wax paper are perfect for this.

Before laying the heat-insulating layer, it is worth taking care of a reliable vapor barrier of the roof
Helpful advice! If work is being done to insulate the ceiling in the bathhouse, where there is an attic room, then it is recommended to cover the ceiling boards from the side of the roof with a layer of clay of about 2-3 cm.
How to insulate the ceiling in the bath: the best thermal insulation materials
In the process of kindling the bath, the temperature and humidity in the room reaches extremely high levels. Therefore, special requirements are imposed on the building materials that are used in the process of arranging this room, namely, they must be resistant to such effects and at the same time not emit hazardous substances when heated.
In addition, it is not recommended that the weight of the insulation be too large. It is preferable to opt for a lightweight material that is simple and convenient both in transportation and installation. And of course, we must not forget about such a characteristic as fire resistance, which is important for such a room as a bath.

DIY bath ceiling insulation: advantages and disadvantages of mineral wool
Mineral wool is by far the most popular option among all. It is often used for warming not only baths and garages, but also for residential buildings. By itself, it is a fibrous material that has excellent thermal insulation characteristics and can be presented in one of three types:
- glass wool;
- stone wool;
- slag wool.
But if the first option is familiar to almost everyone, then the other two were not seen by everyone. Stone wool is a material derived primarily from basalt, although it is sometimes made from other rock melts. Slag wool is very similar to cinder blocks, for the production of which blast-furnace slags are used.

In addition to the fact that mineral wool has a low thermal conductivity, which allows it to be used for thermal insulation of ceilings and walls, it has another significant advantage. Unlike other materials, it cannot serve as a breeding ground for microorganisms: fungi, mold, small insects or rodents, which is very useful for summer cottages.
As for other characteristics, mineral wool is not prone to fire and does not react in any way to temperature changes: it does not deform or shrink. Light weight and convenient packaging (usually in the form of rolls or rectangular plates) make it easy and convenient to work with the material even alone.
Of course, this material also has disadvantages, which one way or another will have to be reckoned with:
- mineral wool is able to absorb moisture;
- it contains phenols, which can potentially pose a risk to human health.

Both of these shortcomings can be neutralized during the installation process, providing the insulation with high-quality vapor and waterproofing, completely eliminating the risk of mineral wool contact with air under the ceiling. This is especially true for warm and humid air, which is concentrated indoors.
Helpful advice! Despite the fact that, subject to all the installation rules, mineral wool does not pose a real threat to health, during its installation it is necessary to be careful and use protective equipment, since its small fibers can irritate the skin and eyes.
Insulation of the ceiling in the bath with expanded clay: features of use
Expanded clay is small pebbles, which consist of clay and have a porous structure. If all factors are taken into account, then expanded clay can be called the most suitable material for insulating the ceiling in the bath. Of course, if the building provides attic space and there is the possibility of using it.

The advantages of this choice can be confidently attributed to the following aspects:
- expanded clay is completely safe: it does not support combustion, it is environmentally friendly and even in the event of a fire it will not emit hazardous substances into the atmosphere;
- over time, as well as under the influence of external factors, expanded clay does not deteriorate and does not decompose;
- the cost of the material is quite low;
- bacteria and fungi do not consider expanded clay an attractive environment for life.
In addition, expanded clay is superior to mineral wool in the ability not to absorb moisture. And although the need to equip vapor and waterproofing layers remains, the risk of moisture accumulation inside the insulation layer is much less. It should also be noted that the operational life of expanded clay is one of the longest when compared with other materials.

Is it worth it to insulate the ceiling from the inside with foam
At a certain period, foam plastic was the leader among heat-insulating materials that were used to insulate not only baths, but also residential buildings. But with the advent of alternative options, its significant shortcomings became noticeable. So, for example, in the event of a fire, foam plastic burns well, while also releasing toxic smoke that can harm human health.
In addition, the foam is not very resistant to external factors, collapsing under the influence of high temperatures, which is inevitable if it is used in a bath.
For these reasons, we can conclude that foam is far from the most suitable material for this purpose and it is better to give preference to another material that is more stable and suitable in terms of characteristics.

Using ecowool as a heater for a bath
Another material that is popular among heaters and is often used, including for baths and garages, is ecowool. This fibrous material is made from cellulose, adding special impurities to it, designed to provide protection against insects, bacteria and rodents. In addition, they make ecowool resistant to ignition.
Related article:
Video review of the technology for creating a bath with your own hands, the main stages of building a building, requirements and tips. Common types of baths.
The advantages of this material include environmental friendliness, as well as low weight and the ability to fill even the smallest cracks and gaps, which is very convenient when it comes to working with a not too flat surface. It does not emit any toxic substances, so, like expanded clay, it is completely safe for human health.
But there is also a significant drawback: the efficiency of using ecowool is directly related to the presence of ventilation, as well as a high-quality waterproofing layer, which is designed to remove moisture. This is due to the fact that ecowool itself is very prone to absorbing condensate, which negatively affects its thermal insulation characteristics.

There are two ways to apply this heat insulator to the walls, the so-called "dry" and "wet". The main difference and at the same time the complexity of the second option is the need to use special equipment for this, the rental of which will cause rather high prices for ceiling insulation in this way.
Warming the bath inside with a mixture of cement and sawdust
This method can certainly be called the oldest among all those described, since these materials were used for insulation long before such heat-insulating materials as polystyrene and mineral wool appeared on the market.
Interesting fact! Usually, cement and sawdust are used to create a suitable mixture. Although it is quite acceptable to replace these components with clay and straw.
First of all, a dry mixture is prepared, which includes sawdust, lime and cement in a ratio of 10/1/1, respectively. After mixing all the dry ingredients, 1.5 parts of water are added to them, pouring it in gradually and mixing thoroughly so that the solution is homogeneous. After that, it remains only to lay the mixture on the surface and level it to an even layer.

In case of compliance with all recommendations and technologies, as a result, you can get high-quality, environmentally friendly material. Although we have to admit that in terms of thermal insulation characteristics, it is still inferior to both mineral wool and even expanded clay. So, perhaps, its only advantage is its low cost, which, nevertheless, entails quite a lot of trouble.
Features of the arrangement of vapor barrier and waterproofing layers
The presence of a vapor barrier layer is not a whim, but a real necessity. Especially when it comes to rooms such as a bathhouse, where hot air is an integral part of using the room for its intended purpose. Rising in the form of steam, moisture can have a devastating effect on the insulation and contribute to the occurrence of mold and fungus on the wooden elements of the bath frame.

In order to avoid problems that may arise from the accumulation of moisture on the ceiling and walls, special films and coating materials are used, such as anti-condensation membranes. When choosing a suitable material, it is advisable to purchase one that has a foil layer.
Helpful advice! In the process of installing a vapor barrier film, it is very important to pay attention to its integrity. It is necessary to prevent the appearance of gaps, as this will greatly affect the technical characteristics of the coating.
To ensure waterproofing, special films are used, which can be purchased at hardware stores. Sometimes the most ordinary polyethylene of sufficient density or cheap roofing material is used.

Do-it-yourself insulation of a floor ceiling: step by step instructions
A deck ceiling is a great option for buildings that are used seasonally and have a small area. But in this design there is not a lot of space for bulk insulation. In addition, such a ceiling is also unable to withstand a large weight. Therefore, the choice of material should be approached more responsibly.
In order to have enough space for laying the insulation, the deck ceiling should be placed slightly lower than the height of the walls. And after that, you can proceed to the phased work according to the following instructions:
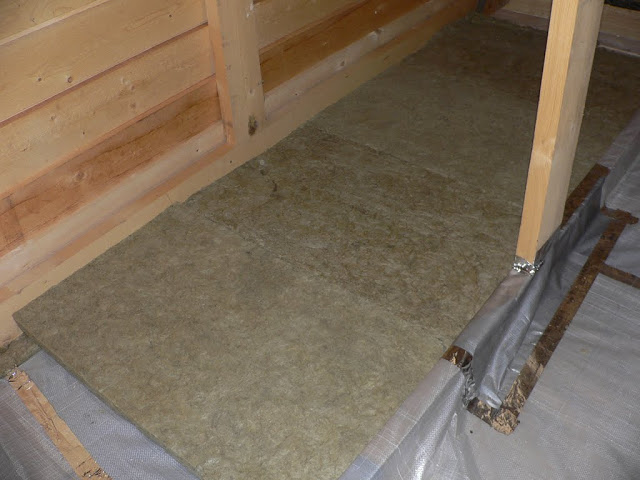
- First of all, it is necessary to lay a vapor barrier layer from the side of the attic. In this case, the side on which the foil is located should be facing down. The material is laid with an overlap of about 10-15 cm, and in order to ensure tightness, it is also necessary to glue the joints with adhesive tape.
- The selected thermal insulation material is laid on top. In this case, mineral wool or expanded clay is best suited, since the floor ceiling is not designed for heavy loads.
- A layer of waterproofing material is placed on top, which is suitable for roofing felt or plastic film. Laying must be overlapped, and the seams are carefully glued with adhesive tape.
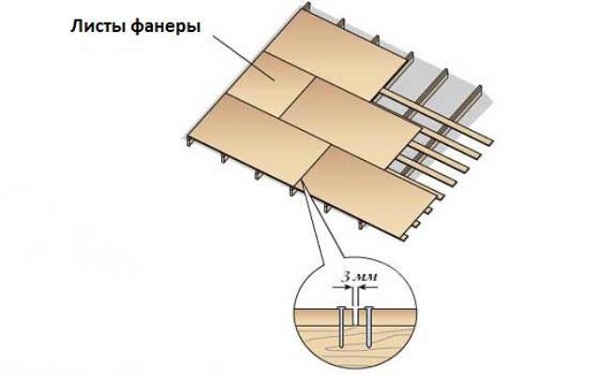
- The final layer should consist of sheets of plywood or boards, which will become a reliable protection for the previous layers.

This is a simple method that is relevant if you do not plan to spend too much money and time on it. If the bath area is large enough or you need to use a place under the roof for storage, then this option will not be very suitable because of its fragility. In this case, it is better to give preference to a false ceiling.
Do-it-yourself insulation of a false ceiling: step by step instructions
The design of the hemmed ceiling provides for fastening to the upper part of the wall not the flooring itself, but the supporting beams, for which a wooden bar or several boards spliced together are most often used. Above and below, a ceiling is attached to the beams, which simultaneously serves as the floor of the attic. Well, in the middle between the upper and lower layers, a layer of heat-insulating material is laid, as well as hydro and vapor barriers.
The installation process may differ slightly depending on which insulation was chosen, however, in general, the technology is preserved. In the case of using mineral wool for this purpose, the procedure is as follows:
- the first is a layer of waterproofing material, which is attached to the upper surface of the beams using a furniture stapler. As in all other cases, overlaps must be at least 10 cm, and the joints are additionally glued;

- boards or plywood are laid on top of the waterproofing, thus providing the structure with strength and reliability;
- mineral wool of suitable thickness is laid in the gaps between the beams based on the following standards: 150-180 mm for regions with a temperate climate, 200-250 mm for regions that are characterized by severe frosts. As with waterproofing material, the connection of two separate parts of the material must be overlapped;
- the vapor barrier film is attached to the floor beams from the underside. At the same time, it is highly recommended that its edges are attached to the top of the walls. Since this is a very delicate material, it is important to work with it carefully, avoiding damage and tears;
- perpendicular to the beams, wooden slats are attached over the vapor barrier material;
- the final stage is the fastening of the lining with self-tapping screws or nails to these rails.
Such an insulated ceiling is very durable and able to withstand heavy loads, so that the attic space can be used to equip the attic or as storage for various accessories.

Warming the ceiling of a bathhouse without an attic with your own hands: the nuances of work
The technology of warming a wooden or panel bath, in the case of the complete absence of an attic space, has some differences from those that were considered earlier. In this case, it is necessary to fix the vapor barrier material, and then attach the insulation itself. Already on it, the beam beam and the final layer - the ceiling boards - are fastened.
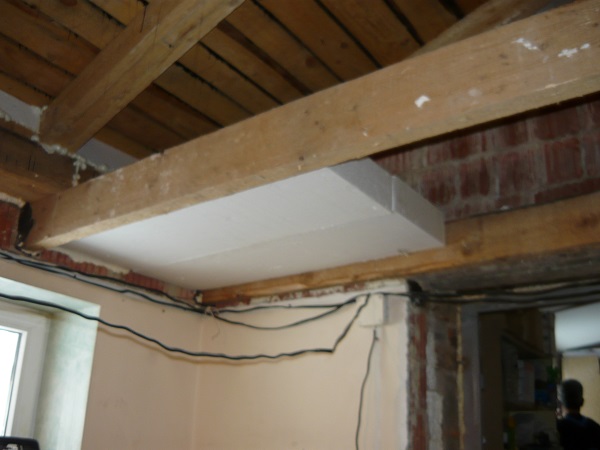
Particular attention should be paid to the junction of the insulation and the pipe. First of all, it is necessary to ensure compliance with fire safety standards. The distance provided for by the rules must be at least 200 mm. Naturally, it is impossible to simply leave a hole, and therefore a simple box is mounted, consisting of rafter legs. Its main role is the separation of insulation and pipes.
Helpful advice! The inside of the box can also be filled with heat-insulating material. True, it must be fire-resistant and not succumb to high temperatures. For example, stone wool is suitable for this.

Another important task facing the owner involved in warming the ceiling of a bath without an attic is the complete elimination of the risk of condensation. Therefore, all vapor and waterproofing materials must be of high quality and fastened in strict accordance with the rules and regulations.
2 options for floor insulation in the bath with your own hands: instructions for use
Of course, when carrying out work on the insulation of a brick bath or a wooden building, laying heat-insulating material only on the ceiling will not be enough. Therefore, it is worth taking care that the room has a warm floor. Consider how the work is carried out depending on what materials you have to deal with.
Option 1. Warming the wooden floor in the bath
In order to make the floor in the bath warmer and reduce heat loss, the same materials are used as in the case of ceiling installation. Often, the method of warming the floor in the bath with expanded clay, mineral wool, ecowool is used.

Helpful advice! One of the most effective ways to keep the heat in the room is to install a bath on screw piles. In this case, floor insulation will not be required so urgently due to the presence of an additional air cushion under the building.
The insulation procedure begins with the dismantling of all elements that may interfere with the work. Skirting boards and floorboards are removed. After that, all remaining wooden elements are carefully examined and checked for damage. If they are found, the damaged elements are replaced with new ones. Be sure to carry out the treatment with antiseptics, which will protect against rodents, insects and fungi.
Using small bars, the lower edges of the log are built up to create a reliable support for the rough coating. Using cheap lumber, a rough coating is mounted, leaving gaps of about a centimeter between the lags and boards. The subfloor boards should not be laid too tightly, as when the air humidity increases, the wood tends to expand, which can lead to deformation of the coating if the laying is too dense.
It is imperative to lay a vapor barrier layer, especially if the ground levels are located in close proximity to the surface. The vapor barrier must cover the entire surface, including the logs. If the groundwater is high, then glassine or roofing material is best suited, and for a low groundwater level, a vapor barrier membrane.

The fastening of the material for vapor barrier must be carried out in such a way that it also captures the lower edges of the wall, by about 15 cm. It is most convenient to fasten the material to the logs using a construction stapler, gluing each joint with adhesive tape.
The heat insulator is laid between the lags in such a way that approximately 2 cm of air cushion remains on top. This will provide natural ventilation.
Helpful advice! If the thickness of the heat insulator is so large that it is impossible to leave free space, then a crate can be placed on top of the material in increments of about 40 cm.
To eliminate the risk of moisture ingress, another waterproofing layer is placed on top. It is most preferable to use a membrane material for this purpose. If there is a need to install a crate, then the membrane must be laid under it. Finally, floorboards and skirting boards are attached. All protruding edges of materials are trimmed.

Option 2. Description of the technology for insulating the concrete floor with polystyrene foam
The procedure for warming the concrete floor in the bath is carried out somewhat differently. You need to do this after completing the draft work:
- A layer of waterproofing material is laid on top of the rough screed. Unlike a wooden floor, in this case, the use of ordinary high-strength polyethylene is allowed. At the same time, the approach to the walls must be at least 5 cm. The material is laid on the surface, and the excess is cut off. If the polyethylene was originally in a roll, its parts must be overlapped by 10 cm, sealing the joints with adhesive tape.
- After that, heat-insulating material is laid. Expanded polystyrene is best suited for this, since it has all the characteristics necessary for this. To attach the sheets to the surface, you can use special glue and screws, and in some cases make a crate.
- A reinforcing mesh is laid on top and another screed is made, the thickness of which must be at least 2 cm.
- When the reinforcing screed is completely dry, you can start leveling the floor. For this, special self-leveling compounds are commercially available. It is only important that its layer is at least 5-8 cm above the level of insulation.

Helpful advice! In the process of pouring, be sure to level the mixture with a needle roller. This will get rid of excess air bubbles and make the coating as even and smooth as possible.
Insulation of the bath outside and inside: features of thermal insulation of walls
The first thing you should pay attention to when planning the work on warming the walls of the bath - from the inside or outside, you want to place a heat-insulating layer. Both options are acceptable, however, the first one is used extremely rarely for a number of reasons:
- insulation from the inside of garages, baths and modest houses is an irrational use of the small space that is available. Obviously, laying all the necessary layers will reduce the room, which in some cases is not ergonomic;
- the humidity in the bath is so high that even if all the necessary conditions are met and the installation of vapor and heat-insulating layers, it is almost impossible to guarantee that the heat insulator will not be exposed to moisture sooner or later;
- warming the walls in the bath from the inside with your own hands allows you to keep warm inside the room, but is not able to protect the walls from freezing from the outside. This temperature difference often adversely affects the condition of the building.

Consider the features of wall insulation, depending on the material that was used to build the building.
Features of insulation in a wooden bath: a steam room from a log house
At first glance, it may seem that log buildings do not need much thermal insulation, since the wall looks quite airtight, and the wood does a good job of keeping warm. But in fact, the problem lies in the fact that the timber is highly susceptible to shrinkage and cracks form over time. They are the main sources of cold.
The most effective way to close up the gaps that are formed is to lay out the insulation between the logs at the construction stage. Then, with the help of a hammer and caulking, all the remaining, even the smallest cracks, are clogged and treated with a sealant.
Interesting fact! To this day, fans of environmentally friendly materials continue to use plants such as moss or cuckoo flax to fill gaps in the walls.

Thermal insulation occurs even at the construction stage, when interventional insulation is laid between the logs
Do-it-yourself warming of the bath from the inside: brick, block and frame buildings
Perhaps one of the most time-consuming processes is the insulation from the inside of a bath of expanded clay concrete blocks, bricks or other materials to which it is not so easy to fasten, and you also have to carefully choose the material, taking into account its weight and size.
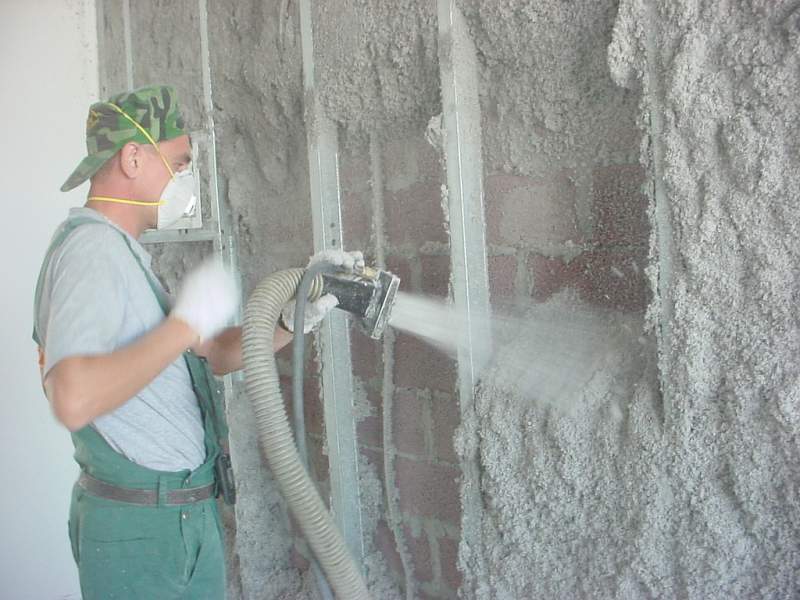
For example, if we are talking about the insulation of a frame structure that is not able to withstand serious loads, it is simply impossible to do without careful preliminary calculations. As an expensive, but ideal option for this purpose, spraying can be considered. This method can be used both for insulating a foam block bath from the inside, and for buildings made of almost any material.
In some cases, extruded polystyrene foam boards are used. For internal insulation, this is not a very suitable option, since it takes up a significant amount of space, but for external cladding there is no better solution.

Helpful advice! Insulation by polyurethane foam spraying must be carried out by professionals and in compliance with all technological requirements and standards. Also, the availability of high-quality specialized equipment is required.
Insulation of a block brick bath inside: video instruction
There are many different ways to insulate the floor, ceiling and walls of the bath, using various materials and technologies for this. You can learn more about one of these methods by reading the detailed video instructions for insulating a brick wall from the inside. In addition, this technology can be used not only for baths. According to this instruction, you can also carry out the insulation of the garage from the inside with your own hands.
The working conditions of baths (especially steam rooms) are not similar to the usual modes of operation of residential premises. The parameters of the microclimate of high-temperature spa areas are important not only for creating comfort, but also for extending the life of the buildings themselves. In addition, the problem of energy saving is becoming more and more urgent every year. “What is the best way to insulate the ceiling in the bath?” - This issue is given special attention, since the heat loss from the ascending flows of heated air and steam can be up to 30% - 35% of the heat exchange of the steam room.
In addition to the fact that it is necessary to significantly reduce energy losses, it is required to reach certain parameters for vapor barrier. At the same time, we must not forget about the special requirements for the safety and environmental friendliness of all materials used. When choosing the design of the ceiling lathing for the bath, the types of strength elements, membranes and insulation, one should proceed from the observance of three basic principles:
- fast kindling;
- slow cooling (comfort and heat saving);
- a special microclimate characterized by the accumulation of steam (it is required to avoid its condensation).
The classic approach to arranging the ceiling in the steam room involves sewing the draft plane (adjacent to the supporting beams) with wide thick boards - the “magpie”. A thickness of 50 mm is considered excessive. It is known from application experience that such flooring begins to accumulate moisture, which does not have time to evaporate between steam sessions. As a result, the likelihood of getting a ceiling prone to condensation increases.
When equipping a room with a classic crate from the "magpie", the ceiling of the bath is most often insulated with mineral wool, expanded clay or other proven heaters from above - from the side of the roof.
The modern trend is associated with the use of two types of insulation, one of which is reflective, and the second plays the role of the main one. The better to insulate the ceiling of the bath in order to implement the functions of infrared reflection and thermal break - will be discussed in the following sections of the article.
The role of foil materials and vapor barrier films
Ideal heaters for baths do not exist. It is not possible to equally realize the reflection of heat rays, resistance to heat transfer and vapor barrier with one material. Aluminum foil and foil sandwiches of the foilizol type allow you to select the optimal combination of materials for equipping baths of any design.
For example, folgoizol makes it possible to install non-hygroscopic mineral wool, as it is an ideal vapor barrier.

The reflective layer is located immediately behind the decorative ceiling lining. If the main heat-shielding layer is further placed, then an air gap of at least 2–3 cm must be provided between it and the reflector.
It is advisable to limit the use of polyethylene films to waterproofing in under-roof areas. Vapor barrier without the formation of condensate is much better provided by foil sandwiches and membrane materials with special microvilli.
Ceiling insulation with mineral wool
Mineral (aka basalt) wool is more often than other materials used as the main insulating layer. For many specialists involved in the construction of baths, the question of "how to insulate the ceiling in the bath" has long been resolved in its favor. The main advantage of stone wool over all other insulating materials is its high heat resistance and fire safety. Unlike glass wool, the structure of fibers based on molten basalt is not harmful to the respiratory system. However, the insulation of the ceiling in the mineral wool bath has serious limitations. This is a high hygroscopicity of the material and the presence of hydrophobic impregnations designed to resist the penetration of moisture. Impregnations are made on the basis of waxy low-melting compounds, which are prone to unwanted gas emission when heated above 70 °C - 80 °C.

Ceiling insulated with mineral wool
Not every mineral wool is suitable for arranging baths. Use only brands without impregnations with a direct indication of the intended use in spa areas: for example, "ISOVER Sauna" or "ROCKWOOL Sauna Butts". The first material is roll type, the second is made in the form of plates. Both are lined on one side with a vapor barrier based on aluminum foil. The ceiling of the bath should be insulated with mineral wool while providing double-sided hydro- and / or vapor barrier. When mounting foil or other types of protective layers, it is necessary to leave an air heat-insulating gap between the wool and the membrane.
Use of Styrofoam
In a number of sources, one can find statements about the inadmissibility of using foam plastics (PPS) and extruded polystyrene foam (EPS) for bath and sauna equipment due to the release of harmful substances by these materials when heated. Others argue that the thermal degradation of this insulation begins at 160 ° C, and the subceiling space of the Russian bath can only warm up to 100 ° C - 110 ° C. And therefore, they say, restrictions on lining the steam room with foam plastic or EPS do not make sense.
Let's dot the "and" in this matter. The fact is that neither the first nor the second position is fully justified. Surface emission of styrene can begin even before thermal degradation (in the range of 90 °C - 130 °C).
Therefore, the material cannot be used as an inner layer of insulation that is in direct contact with the decorative lining of the ceiling in the steam room. But under the condition of using reflective two- and three-layer foil materials, it is quite possible to place a heat-shielding layer of PPS or XPS behind them, since the temperature on the back surface of the sandwich does not exceed 50 ° C.

Expanded polystyrene for the ceiling of the bath is only possible with a reflective multi-layer screen
It is advisable to use expanded polystyrenes to insulate the ceiling in the bath with your own hands, working alone. It is especially convenient to use XPS boards, if necessary, to mount a layer of insulation on the lower surface of the draft ceiling. Without assistants, it is extremely difficult to carry out such work with loose materials such as mineral wool.
Expanded clay
Ceiling insulation with expanded clay is used in baths with under-roof rooms (attics, attics). The properties of expanded clay are in many ways similar to those of mineral wool. The same pluses: environmental friendliness, resistance to high temperatures ... and the same minus: the material absorbs moisture too well. From below, it must be protected from the penetration of steam, and from above - from the effects of atmospheric and condensation moisture.
In addition, the fired pellets of this heat insulator have a much lower resistance to heat transfer than mineral wool. For this reason, the required effective embankment thickness is at least 30 cm.
The option is suitable for steam rooms of a large area. Since the floor beams above the spacious rooms have a significant vertical section, deep natural niches are formed for filling the required amount of expanded clay.
Self-growing foam concrete and other DIY insulation
Insulating the ceiling with clay with sawdust, homemade cellular concrete, moss and other exotic materials is advisable if you have access to these relatively cheap or free thermal insulators.
If during the construction process you have an excess of basic draft materials (for example, cement), then some of them can be used to equip a heat-insulated ceiling in a steam room. The technology of self-growing aerated concrete is based on the interaction of three main components: cement, water and a special gas-forming powder. In addition to the listed materials, density-reducing components such as sawdust and straw can be added to the mixture.

The main advantages of the technology in comparison with expanded clay backfills are lower thermal conductivity and greater moisture resistance. The resulting cellular material is enough to fill with a layer of 10 - 12 cm. Expansion under the influence of gas-forming additives, in addition to heat-saving properties, helps to obtain a continuous surface without cracks and gaps. In addition, waterproofing is not required with this option.
If you have your own carpentry, and the under-roofing zone of the bath allows filling in large layers, then you can implement ceiling insulation with sawdust, combining them with sand, clay and some other building and natural materials. Clay has good steam and waterproofing qualities. Therefore, before backfilling sawdust, first a clay layer is made about 2 cm thick. Then sawdust is backfilled with a layer of about 10-15 cm in height. Sand, dry earth or moss is laid on top of the sawdust, mixed with needles with a layer of about 15 cm. Mixtures of sawdust with clay are also used as masses that have both heat-saving and waterproofing properties.
Any bath needs high-quality insulation of the ceiling - warm air, according to the laws of physics, tends to rise up. And if there is no heat-insulating layer on its way, then significantly more fuel will be needed to heat the bath and maintain a consistently high temperature in it.
But that's not the only problem - in the absence of insulation on the ceiling of the bath, condensation will accumulate, and drops dripping from above on the head and back are unlikely to bring great pleasure to anyone. And the moisture going up along with the heat will contribute to the destruction of the ceilings and the roof support system. The only way to avoid these troubles is to make high-quality ceiling insulation in a bath with a cold roof. And our material will tell you what and how to do it.
We plan work
Before you buy materials and take on tools, you should carefully plan your actions. A clearer understanding of the matter will save you from annoying mistakes and the need to redo everything in the future.

The first question is whether it is possible to insulate the ceiling in the bath on your own.? Or is it worth entrusting this business to a team of builders? The process of insulating the ceiling itself is not something complicated, therefore it is not difficult to perform it on your own, even without much experience in repair and construction. The main thing is to carefully observe the technology and approach the matter responsibly. The availability of the necessary materials also speaks in favor of self-insulating the ceiling - they can be found in any large hardware store or on the market.
The second question is what, in fact, needs to be done? Insulation of the ceiling in a cold bath consists of three stages:
- vapor barrier;
- thermal insulation;
- waterproofing.
As a result, a kind of “layer cake” should be obtained, the lower layer of which is the ceiling covering, and above it, vapor barrier, thermal insulation and waterproofing are located sequentially from bottom to top. More details about why this is necessary and how to do it will be described below. Now it's time to think about the choice of materials.
We select a heater
The melted bath maintains a very high temperature and humidity. The heat-insulating material must meet these conditions and, most importantly, not emit harmful substances when heated. In addition, a good heater for a bath should be fire resistant. It is undesirable that the thermal insulation material be too heavy or inconvenient to carry and install. Now consider the materials in more detail.

It is the most common type of insulation for baths and private houses; This is a fibrous heat-insulating material that exists in three types:
- glass wool;
- stone wool, which is made from basalt or other molten rocks;
- cinder wool, made, like cinder blocks, from blast-furnace slags.
The main advantage of mineral wool, in addition to its very low thermal conductivity, is that it is not a breeding ground for fungi, mold, insects or rodents. For a bath located on a private plot, this is especially important. It is also worth noting that this material does not burn, does not change its volume and shape when heated or cooled, and is very easy to install due to its low weight. Mineral wool is produced in the form of rectangular panels or in the form of rolls.


As for the disadvantages, there are two of them - the ability of mineral wool to absorb moisture (especially slag wool) and the potential harm of the phenols contained in them. Both of these shortcomings can be eliminated if you correctly approach the issue of vapor and waterproofing and prevent contact of mineral wool with the air flow, especially inside the bath.
Important! Small particles of mineral wool can have a damaging effect on the eyes, skin or lungs of a person, therefore, when working with it, be sure to wear tight clothing and use gloves, goggles and a respirator.
Table. comparative characteristics of various types of mineral wool.
Expanded clay
It is a small pebbles of clay with a porous structure. In terms of its advantages, expanded clay is the most suitable material for insulating the ceiling in a bath.
- Security- it does not burn, is environmentally friendly and does not emit harmful substances into the air.
- Durability- expanded clay does not decompose under the action of sunlight and does not collapse over time.
- This material not an attractive environment for fungus or bacteria.
- Has a low cost and is easy to install.
Also, expanded clay absorbs significantly less moisture than mineral wool, but at the same time, the need for vapor barrier and waterproofing layers still remains.
Expanded clay
Styrofoam
At one time it was one of the leaders among heat-insulating materials. But even taking into account all its advantages, you should not choose polystyrene foam as a ceiling insulation in a bath - in case of fire, the material burns well, and its smoke is very dangerous for human life and health. It is also capable of decomposing simply under the influence of high temperatures (and they are inevitable in a bath), therefore polystyrene foam can hardly be called a reasonable choice in this case.
Styrofoam
Ecowool
A natural fibrous material made from cellulose with additives that make it flame resistant and repel rodents, insects and micro-organisms. Ecowool has a low weight and the ability to fill all the cracks and gaps. Like expanded clay, it is environmentally friendly and does not emit any substances harmful to humans into the air.
However, ecowool is able to absorb a lot of moisture, which worsens its thermal insulation properties. Therefore, when using it, good ventilation under the roof and high-quality waterproofing are desirable. Another disadvantage of its use is the complexity of installation - with the "wet" method of application, special equipment is required.
"Wet" method of applying ecowool
A mixture of cement and sawdust
It is a "classic" material for insulation, which was used even before the appearance of mineral wool or polystyrene on the market. In some cases, clay can be used instead of cement, and straw instead of sawdust.
First, a dry mixture is prepared in the following proportion: one part of cement and one lime is taken for 10 parts of sawdust. The resulting dry mass should be poured with one and a half parts of water and a sufficiently thick and homogeneous solution should be obtained. The mixture is spread on the surface and distributed in a fairly even layer.
Important! It is advisable to use sawdust that has been dried for several months or better than a year.
Such material is very cheap and environmentally friendly, but it does not have such high thermal insulation as expanded clay or mineral wool. In addition, the process of its manufacture is laborious, and after laying it is required to repair the resulting cracks (and they are inevitable).

Materials for vapor and waterproofing
For a bath, ceiling vapor barrier is vital, otherwise rising moisture will not only worsen the thermal insulation properties of the insulation, but will also contribute to the development of fungi and mold on the ceiling itself and on the roof rafters. As a material for vapor barrier, specialized films and coatings are used. Particular attention should be paid to anti-condensation membranes. When buying vapor barrier films, it is advisable to choose those that have a foil layer.
Important! When working with such films, be careful not to allow any breaks in the vapor barrier material or foil layer, otherwise its protective properties will deteriorate significantly.
As for waterproofing, for it you can use both special films that can be found in any hardware store, as well as cheaper roofing material or dense polyethylene.

Common vapor barrier materials: 1. Geosynthetics. 2. PVC membrane. 3. Glassine. 4. Tol. 5. Aluminum foil. 6. Thermofol.
Floor ceiling insulation
There are three main types of ceilings in the bath:
- hemmed;
- panel;
- grazing.
Now we will consider the last type and find out how to insulate it and what nuances should be taken into account.
The floor ceiling is usually used for small-sized baths, which are heated quite rarely and seasonally. Sheet piling or simple edged boards are laid on the upper part of the wall, adjusted to each other and fixed, without the use of support beams. The resulting design is very simple, but at the same time it is unable to withstand a large load, therefore it is impossible to use a thick layer of thermal insulation here.
Important! It is advisable to lay a flat ceiling slightly lower than the height of the walls in order to leave space for filling expanded clay or laying mineral wool. If this is not possible, then along the perimeter of the ceiling under the roof, the sides should be nailed.
Step-by-step insulation of the bath flooring ceiling is as follows.
- From the side of the attic, a vapor barrier film is laid on the flooring so that the foil layer is directed downwards. The material should be overlapped by 10-15 centimeters, the seams and joints are sealed with foil tape.
- Mineral wool is laid on top of the vapor barrier, expanded clay is poured or a mixture of cement and sawdust is laid, depending on your choice. Please note that it is undesirable to use too thick a layer of insulation, since the flooring is not suitable for high loads.
- The heat insulator layer is closed from above with roofing material, polyethylene film or waterproofing coating, overlapping and with careful gluing of the joints.
- The final step will be laying sheets of plywood or boards on top of the resulting “layer cake”.

It makes sense to use a flat ceiling in small baths and in the case when simplicity and speed of its installation and installation of insulation are important to you. If you are planning to make a large enough steam room or arrange an attic under the roof for storing bath accessories, then you should stop your choice on a false ceiling.
False ceiling insulation
Here, not the flooring itself is laid on the upper part of the wall, but support beams made of wooden beams or boards spliced together. And already from below and above, the ceiling and the floor of the attic are laid on the beams. At the same time, layers of steam, hydro and thermal insulation are laid in the space between them.

The process of insulating a ceiling with a similar design depends on what material you use. For mineral wool, this happens as follows.

Video - We insulate the ceiling in a bath with a cold roof using mineral wool
The process of warming the hemmed ceiling of a bath with a cold roof looks a little different in the case when expanded clay or a cement-sawdust mixture is used. Let's put it in the form of a step by step guide.
- From below, a rough flooring of boards is laid on the floor beams. The gaps between them must be treated with a sealant or smeared with a mixture of clay (or concrete) and sawdust.
- A vapor barrier film is laid on the flooring both from the side of the steam room and from the side of the roof, and not only the boardwalk, but also the beams themselves should be covered.
- Expanded clay is poured into the resulting boxes or ecowool is laid.
- Roofing material or other waterproofing material is overlapped on top of the insulation and attached to the beams using a construction stapler.
- Boards or plywood are laid on the waterproofing to form the attic floor.
- A lining is laid on the draft boards from below.

If you use a mixture of clay and sawdust to insulate the ceiling, then it is advisable to put a layer of mineral wool or expanded clay on top of the frozen mixture - this will improve the performance of thermal insulation.
Important! The optimal thickness of the layer of a mixture of clay and sawdust for using a bath in the warm season is 50 mm. If you plan to bathe in it in winter, then you will need to make a layer of insulation of at least 150 mm.
Panel ceiling insulation
Such a ceiling design is the most difficult for self-manufacturing - first you need to make the panels themselves, and then lift them up and fix them either on the transverse beams or directly on the top of the walls.
Each of the panels is made as follows.
- A layer of boards, carefully adjusted to each other, is laid perpendicular to the supporting bars. This layer will serve as the ceiling for the bath.
- Boards are attached to the inside of the resulting shield, which will serve as the sides of the panel.
- A vapor barrier material is laid on the boards and sides and fixed with a construction stapler.
- Mineral wool or ecowool is laid in the interior space of each panel. You can also use a cement-sawdust mixture or expanded clay, but in this case the panel will turn out to be especially heavy.
- A polyethylene film or roofing material is laid on top of the heat-insulating material, with overlapping joints of 5-10 cm.
- The top layer of boards is laid, which will serve as the floor for the attic.

The resulting panels should be lifted and mounted, and it will not be superfluous to lay solid boards on top and bottom of them, connecting all the panels to each other. The joints between them also need to be insulated with strips of mineral wool scraps. Alternatively, you can take the same mixture of cement and sawdust.

Advice! The assembly of ceiling panels, their lifting and installation is very laborious. Therefore, it is advisable to use some kind of lifting device and work not alone or in pairs, but as a whole team.
Choosing the type of ceiling and the insulation material used should be based on the budget, your own experience in construction work, the area of \u200b\u200bthe bath and how often it will be used.
Video - Device ceiling in the bath
We also recommend
 Hero pioneers in the Great Patriotic War Heroes of the Patriotic War pioneers presentation
 Presentation "Formation of posture in preschool children Hygiene of correct posture presentation for children
 Sciences of the human body
 Presentation "history and prospects for the development of robotics"
 The value of the struggle of Russia with the Polovtsy
 Asia and Africa after World War II