How to glue tiles on the ceiling: installation technology. How to stick ceiling tiles: choosing materials and preparing tools, preparing the ceiling, marking and gluing products
How to glue ceiling tiles, everyone knows, even those who for the first time have to deal with the fascinating process of pasting the ceiling with tiled material. The simplest, at first glance, the process will require some skill and skill before you can glue the tiles into a monolithic ceiling surface. And try to eat for something, after a little practice, gluing a ceiling finish made of polystyrene tiles is no more difficult than gluing wallpaper, but visual effect much higher and more expressive.
Ceiling tiles: description, characteristics
The raw material for the manufacture of ceiling finishes is foamed and extruded polystyrene or foam. Depending on the technology used, tiles for ceiling decoration are produced in several versions:
- Dense, textured tile with a large number of micropores, with a slightly rough, as if untreated surface. The material is produced with an edge of 20-60 cm, a thickness of 9-14 mm. Thanks to the mixture of polystyrene fibers and balls sintered in an injection mold, the material is quite strong, light, with a porous surface;
- The pressed ceiling board has a smooth, almost glossy surface. The wall thickness is 4-5 mm, the structure of the finishing plate is quite strong and dense, like PVC;
- Ceiling slabs made by hot semi-pressing of blanks from foam or low density polystyrene foam. Instead of a scattering of balls, sheets cut from a block are used in the production process.

The latter method is the simplest, so the ceiling tiles are relatively inexpensive, but not the most durable. Glossy boards are considered the most resistant to dirt and damage; it is enough to simply glue such a lining on the ceiling even without helpers. It is easy to change, if necessary, paint or add new trim elements.
Note! Due to the use of heat pressing, the finishing tiles, even within the same pack, may differ slightly in external dimensions.
Most tiles for finishing the ceiling are made with a small processing allowance, which does not interfere with gluing plates or lamellas. A small spread is not considered a marriage. Before gluing the coating, the plates are sorted and cut exactly according to the pattern.
When choosing a ceiling tile, more attention should be paid to the presence of chips, cracks and striae in the material. Such plates are immediately rejected and sent for cutting, ceiling surfaces are glued in separate pieces in “blind” corner zones, or a repair adhesive mass based on dichloroethane is made.
Calculation of the number of tiles on the ceiling and the choice of glue
Before gluing foam ceiling tiles, it is necessary to at least calculate the required amount of material. The calculation procedure itself is relatively simple and is performed in three stages:
- We measure the size of the ceiling of the room;
- We count the number of tiles;
- We make an adjustment for the width of the seam.
After measuring the dimensions of the room from wall to wall, we get the size of the ceiling in width and length. Knowing the dimensions of the tile that we will glue, we alternately divide the sides of the ceiling into the leg of one tile. Get the number of pieces tile material, which fits on the ceiling along each of the walls, we multiply and find out the total number of pieces.
Note! If the room in which the ceiling tiles are to be glued occupies several hundred squares, for greater accuracy it is necessary to take into account the width of the inter-tile joint.
Calculation features
Calculating the width of the seam is simple. It is enough to take three or four single tiles, lay them in a row with a minimum gap at the seams or even with a slight overlap, approximately as they will be located on the ceiling. It remains to measure the total length of the laid out row with a tape measure and subtract from the result the size of a single tile multiplied by the number of pieces. This determines the installation joint allowance for a certain amount of ceiling cladding. For small rooms seam correction can be neglected.

If the ceiling tiles are to be glued in wooden house, the material must be laid with a slight overlap of the edges, approximately 1.5-2 mm. In this case, the estimated number of tiles must be increased by 4-5%. Without overlap, the ceiling cladding will separate over time, and thin strips of seam will appear between the plates.
If there is no desire to mess around with such difficulties, you can simply divide the quadrature ceiling covering, which is supposed to be pasted over with foam trim, on the area of \u200b\u200bone tile. The ceiling must be measured with your own hands, the dimensions of the tiled material can be taken from the catalog. With this approach, the material will need to be bought with a margin of 5-7% in order to be able to experiment with ceiling cladding cutouts in more critical areas.
Choosing the right glue
The modern market offers more than two dozen different adhesive compositions and products that can easily be used to glue anything on the ceiling, from wooden laths to plastic and cardboard.

If a base of plasterboard, plywood or fiberboard has already been assembled on the ceiling, then it is best to glue it with polyurethane and acrylic adhesives. They provide a very viscous and durable seam. The only drawback is that such adhesives are always made in opaque form and inconvenient packaging. You can use "Super-Moment", rubber glue, "Globe", but such adhesives are quite expensive.
It is best to glue the tiles with a transparent "Titan" or "Dragon", you can use polypropylene hot melt adhesive, especially with a heating gun it is much more convenient to glue than with a regular tube.

It holds transparent silicone sealant well, over time it becomes whitish-cloudy and can stand out at the seams. Acrylic and methacrylic sealants turn yellow over time, like the popular "liquid nails", so they are used for mounting ceiling cladding in limited quantities.
Ceiling tile options
The manufacturing technology of the ceiling slab is designed in such a way as to make the cladding as adaptable as possible to all irregularities and defects in the ceiling. The use of a soft edge for glue, the rejection of gloss and the application of a relief pattern to the surface of the tile, in addition to purely decorative qualities, helps to glue the tile to the ceiling surface with defects, peeling or a slope to one side.
Ceiling tile layouts
If the ceiling is flat and smooth, like a table, you can glue the ceiling cladding in any order, you just need to choose the right direction for the incidence of daylight and flows from the chandelier. If the ceiling surface has small defects, then it is best to glue the material according to one of the most common schemes:
- Laying material from the far corner or the main window of the room;
- Installation of plates from the geometric center or suspension point of the chandelier;
- The arrangement of the ceiling tiles with a diagonal pattern, snake, chess, with bandaging of rows.
Advice! Masters advise gluing the ceiling decor so that the lower part of the ceiling is primarily illuminated. In this case, the decorative finish will visually look more even.
If the ceiling base has slopes or defects in several places, then it will not be possible to solve the problem by tile orientation alone, it will be necessary to glue the material with a more complex pattern, for example, a snake or diagonal stripes of several colors.
Why glue the ceiling decor from the chandelier
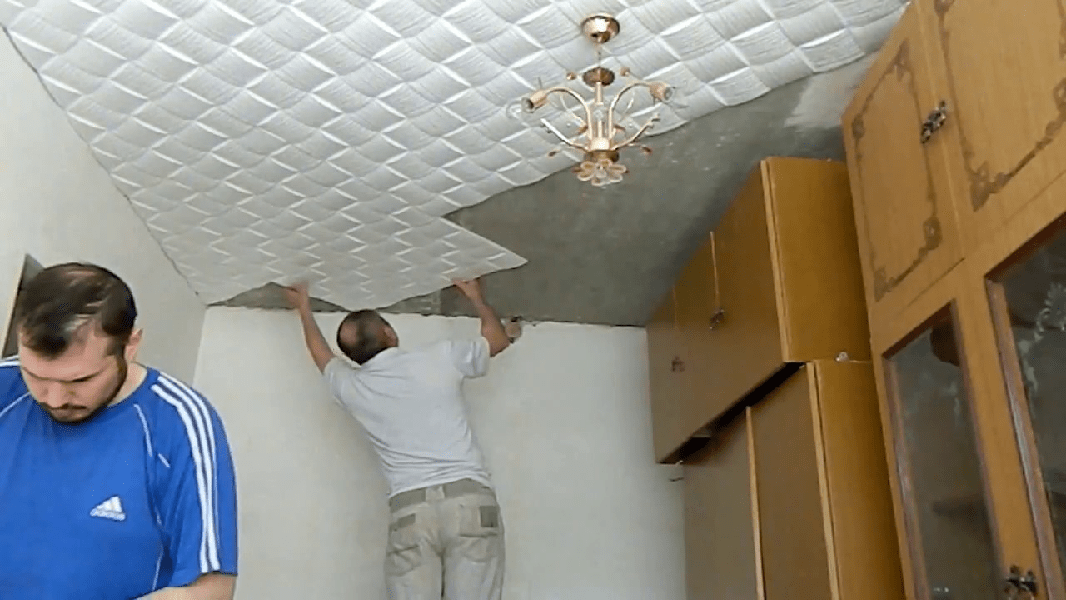
The first and basic rule for installing ceiling tiles is that it is necessary to start gluing the material from the place where the chandelier is suspended. Only in this way can a stable impression of even and symmetrical rows be ensured, even if the tiles are glued with a slight error.
It often happens that, at the whim of electricians or builders, the central ceiling lamp or chandelier is suspended not in the center of the room, but with a shift of half a meter to one side. In this case, it would be correct to move the laying start point from the geometric center of the ceiling to the fixture of the chandelier.
If the room is perfect smooth walls, the proportions and dimensions of the ceiling plane correspond to the correct rectangle or square, it is possible to glue the plate material from a window or corner, but with the obligatory use of marking cords or a laser level.
How to glue ceiling tiles
The quality and durability of the plates directly depends on how well the surface is prepared and the method of fastening the ceiling cladding is chosen correctly. You can glue in two ways:
- Directly on concrete base ceiling covering;
- With the use of an intermediate sublayer laid on the surface of the ceiling.
The second option allows you to get best quality fastening, gluing on a prepared base is easier and easier than on concrete. In addition, the use of a slab base allows you to level the plane of the ceiling and make it as smooth as possible.
The first option is the fastest and easiest, but the quality of the sticker is worse, in addition, it will take a lot of effort to level and clean the concrete surface, otherwise it will not work to stick the tile evenly and beautifully.
Ceiling surface preparation
In any case, the ceiling surface must be cleaned of old decorative finishes, it is necessary to remove the remnants of the primer and the water-based paint layer, wallpaper and adhesive flakes. At first glance, the ceiling plane may seem quite flat, but the impression can be deceiving. In any case, at the end of the stripping, two cords are pulled, one of which is basic, the second is movable.
The base cord is pulled along the midline of the room and leveled along the horizon using a building level. A movable cord stretched perpendicular to the base one is sequentially rearranged along the ceiling in increments equal to the width of the tile. By the distance from the ceiling to the cords, the failures of the ceiling surface are determined and eliminated with the help of finishing putty. After drying, the stains are cleaned and primed.
Ceiling markings
To perform marking work, the same two cords are used as when stripping. If the tiles are planned to be glued in the classic row way from the far corner, the cords do not change, the movable cord is transferred to the first line of laying the material. To simplify the work, it is recommended to apply marking lines to the ceiling, along which you can glue the tiles without being distracted by rearranging the marking cords.
If it is supposed to glue the plates diagonally, the cords are pulled along the corners of the room, or with an offset if the initial point does not coincide with the geometric center of the ceiling surface.
How to glue tiles on a flat ceiling
The first tile must be glued in the center of the row. The technology of the sticker is quite simple, the slab is laid in place of the future gluing and risks are applied to the concrete with a pencil, indicating the dimensions of the spot. Glue is applied on the back at five points - in the center and at a distance of 3-4 cm from the corners.
The slab is laid on the spot and leveled according to the previously made risks. To be sure of positioning accuracy, we apply a thin wooden strip 80-100 cm long to the front edge of the tile, and align the position of the slab along it before gluing the next one. It is advisable not to rub the tile to the base, as is usually done with wallpaper, to expel bubbles. Before gluing the next part of the finish, you must wait at least 5-7 minutes.
Uneven ceiling tiles
Often, tiled cladding has to be glued without careful alignment of the ceiling base. In this case, an additional thread is pulled along the row, which determines the lower level of the facing surface. With the help of a thread, you can align the tiles even on a crooked ceiling, but it will take three times as long.
As in the previous case, initially the risks of the border of the spot are applied to the ceiling, on which the tiles will need to be glued. If there is a depression on the ceiling, an increased amount of transparent silicone is applied under the tile, the material is laid on the base. After 30-40 minutes, the plate can be aligned along the thread without pressing and fixed with an invisible pin.

Whitewash ceiling tiles
The answer to the question of whether ceiling tiles can be glued to whitewash sounds simple. You can glue on whitewash, paint or lime, subject to the pasting technology. The ceiling surface is pre-treated:
- Sweep dust, chalk or lime with a damp cloth, rag, sponge;
- It is treated twice with a water-based primer so that the whitewash layer is saturated and saturated with a primer solution to concrete.
After the primer layer dries, the whitewash turns into a strong crust, to which any tile can be glued. Sometimes the dried primed surface is rubbed with coarse-grained emery to increase the adhesion of the adhesive to the ceiling surface.
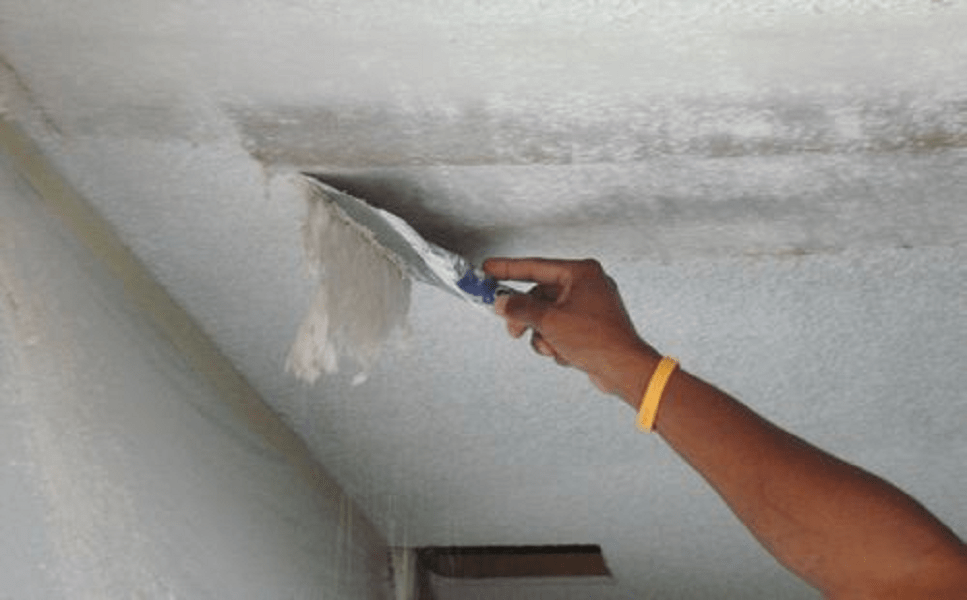
A more difficult option is to glue the slab on the ceiling, covered with water-based emulsion or lime with soap. The coating must be carefully cleaned with a spatula along the marking lines.
Cleaning and Sealing
No matter how carefully they try to glue the ceiling cladding, the remains of the adhesive mass remain in the seam lines, and sometimes on the edges of the tile. If a facing material laid with overlap, problems, as a rule, are not present. It is necessary to carefully remove the protruding traces of glue with a carving knife. We leave everything that got on the front of the foam until the adhesive mass dries completely.

Any attempts to wipe off the adhesive ahead of time and even accidental touching will lead to the appearance of dirty spots, therefore, it is necessary to glue the material only with clean hands, preferably with cotton gloves.
In the event that it is necessary to glue the plates butt-to-butt, the resulting seam must be painted over with a special toner or covered with a plastic edging.
Ceiling tile painting
With all the advantages, foam tiles have one significant drawback - the material collects and absorbs, like a sponge, a huge amount of dust and fumes. Instead of gluing new plates every year, it is easier to paint the surface with a quality water-based emulsion or acrylic paint.

It is enough to remove the dust accumulated on the ceiling with a vacuum cleaner, and carefully apply a double layer of paint with a roller or spray gun.
Conclusion
How to glue ceiling tiles, and what is the secret High Quality work, can be understood only after a little self-practice. In each specific case, any master has to look for his own installation method, the most convenient layout scheme and the best option glue. To glue the ceiling decor with high quality, you do not need to save on two things - on glue and on the time allotted for the job.
Among the numerous options for ceiling finishes, gluing foam tiles is simple and fast to implement. The decorative qualities of the finished coating can be assessed as average, which is suitable for most apartments.
Varieties of material
Ceiling tiles are commercially available in several varieties. The differences relate not only to the pattern or texture, but also to such characteristics of the material as density, resistance to mechanical stress, thickness, ability to color, etc.

Classification of products is carried out according to the method of manufacture:
- extruded. It has a smooth, non-grained surface. Good density of the material allows to reduce the thickness individual elements up to 2-3 mm. Extruded tiles other than traditional white color, can be decorated in various shades. Especially beautiful look imitations of such natural materials like marble or wood. The elements are painted in factory conditions: if you try to do it yourself, the paint starts to “roll off”. Foamed polystyrene is used as a manufacturing material. Due to their light weight, this type of product is easy to stick and maintain. The price of extruded products is quite high.
- Foam or stamped. It has a looser structure with clearly visible grains. Due to the presence of pores on the surface, it becomes dirty rather quickly. In order to create an additional barrier to dirt, acrylic dispersion painting is used. Stamped plates have a thickness of 6-12 mm. For drawing a picture on a foam surface, a pressing method is used. The fragility of the products must be taken into account before gluing the ceiling tiles. Considering possible losses, when purchasing material, it is recommended to make a margin of at least 10%. Stamped ceiling panels are considered the cheapest.
- injection. During manufacture, polystyrene foam is baked in special matrices. The material of this type is distinguished by a well-defined pattern. The cost of injection products is average. It's easy to work with her.

For a beginner with no experience construction works, for gluing the ceiling with foam tiles, it is better to choose extruded polystyrene products. Next in terms of quality are injection panels. In the last place - stamped tiles.
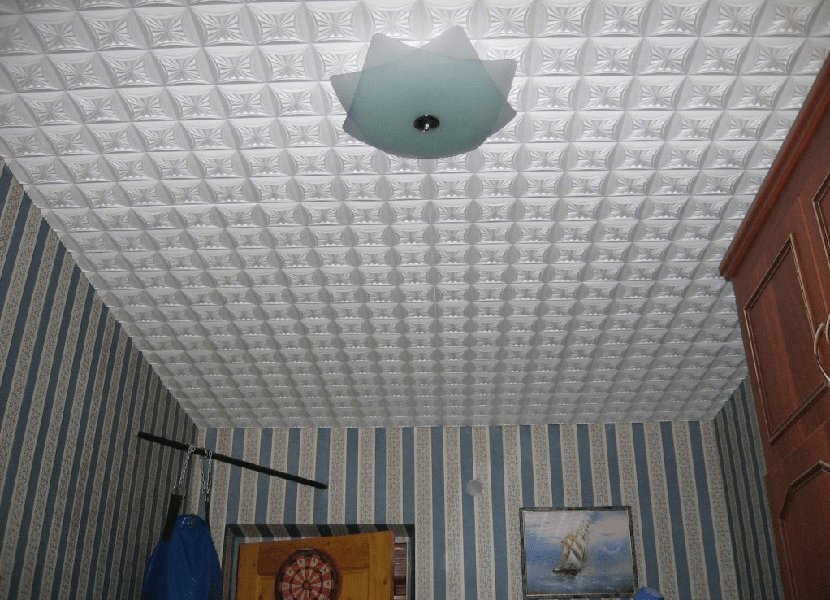
The following can be said about the appearance: all ceiling tiles most often look like 50x50 cm squares. Rectangular elements are less common. According to the type of joining, products are divided into seamless and with seams. Concerning decorative design elements, they are geometric, floral, without a pattern, with a variety of textures.
How to calculate the required amount of material
Before pasting the ceiling with tiles, it is necessary to accurately determine right amount material. The task is simple, given the fixed dimensions and the square configuration of the elements. A simple calculation shows that 4 tiles are required for pasting 1 m 2 of overlap. Knowing the total area of \u200b\u200bthe ceiling, you can determine the amount of finishing material by simply multiplying the area by 4.
For example, you can calculate how many ceiling tiles you need for a room measuring 3.2 x2.8 m. Multiplying the width and length, we get an area indicator of 8.96 m 2. You need to round up: it turns out 9 m 2. Next, the number of ceiling elements is determined - 4 pcs x 9 m2 = 36 pcs. It is recommended to always take a little more material, taking into account undercutting and unplanned losses. The specific number of spare elements depends on the installation scheme, but usually it is 10-20% of the total.

To achieve external aesthetics foam ceilings need to pay attention not only to external design. Another important point- product geometry. All elements must have the same size, thickness and even 90-degree angles. The drawing should have good clarity, without any layers on the side ends. When buying pressed boards, it is recommended to choose models with the smallest possible grains.
Adhesive selection
As a fixing agent for gluing the ceiling with tiles, the following means are used:
- Glue. It's about about compounds such as "Titan", "Naset", "Moment" or liquid nails. The holding capacity of these compounds is very good. The speed of gluing is limited by the need to maintain a pause after laying each element for 10-15 seconds before. The Moment “grasps” a little faster.
- Adhesive mastics for ceiling tiles. They have a pasty consistency and are packaged in plastic buckets of small volume. These compositions are more convenient: they are odorless and provide instant sticking of the smeared element. As a result, the process of finishing the ceiling is implemented without any hitches.
- Gypsum putty. This option mounting material usually used in cases where the finished surface contains noticeable defects (for example, differences at the joints between ceiling tiles). If the irregularities are small (up to 5 mm) - finishing putty is used, if significant - starting material.

It should be understood that it will not be possible to smooth out too large differences with ceiling tiles. In such cases, it is better to carry out a full leveling of the ceiling, or to use suspension systems (plasterboard, tension, armstrong).
Preparatory activities
The quality of the implementation of the procedure, how to prepare the ceiling for gluing tiles, largely depends on the durability of the finish. Before pasting the ceiling with ceiling tiles, the floor surface must be completely cleaned of the previous finish - wallpaper, whitewash, paint, putty, etc. In order for it to lag behind better, pre-wetting the entire surface with water is used. In cases where the old paint or putty is holding tight, it can be left. It is also necessary to knock down all protruding sections, using a pickaxe or hatchet for this.

All cavities discovered during the preparation of the ceiling for the tile are sealed with a starting putty. To fill the joints between individual floor slabs, special composition"Perfix" or glue for tiles. The cleaned surface must be impregnated with a primer: it washes away dust residues and helps to improve the adhesion of the base. Concrete plates it is recommended to treat with "concrete contact", gypsum bases - with any deep penetration impregnation. At this stage, a pause is made in the work for the complete drying of the primer.
Layout scheme
There are two ways of gluing ceiling tiles - regular and diagonal. Diagonal placement is more beautiful, but requires more material. The fact is that the remaining trimmings cannot be applied anywhere. However, the finish obtained in this way does not have pronounced seams.
It is most convenient to start sticking from the chandelier. This makes it possible to organically fit it into the skin: the holder is placed at the intersection of 4 elements that need only a little trimming. If the lighting in the room is organized without the main central chandelier, gluing starts from one of the walls of the room. It is recommended to choose the one that is opposite front door. This will make it possible to place the last cropped row above the head of a person entering the room, which will somewhat hide the discrepancy in size.

Sticking from a chandelier will require preliminary marking. Easiest with square room: the center is determined, and work begins from it. This is done with a masking cord stretched between opposite corners. The point of intersection of the broken lines will become the place of laying the first slab. If a parallel layout is used, two guides are also beaten off through the center to opposite walls.
Two other marking lines connect the installation start point with the nearest walls. Taking this parameter as a guideline, a drawing of squares is made. To get guides for gluing squares, you need to draw diagonal lines. It is on them that the side of the first row will be aligned. If you set the first strip of tiles as correctly as possible, further finishing will not encounter any obstacles.
Sticking technique
The main advantage of foam tiles is the speed of its installation, without the use of special crates or frames. Unlike a conventional ceiling screed, this type of finish can be completed in one working day. Smooth bases can be pasted over with a special glue, applying it in a thin layer.
If there are separate drops on the base, then ordinary mounting glue will not help here: the tile simply will not stick to the surface of uneven areas. There is not always time and effort to carry out labor-intensive leveling activities. Moreover, ceiling tiles are often used when carrying out cosmetic repairs in rented apartments or at various social facilities. Therefore, investing large resources in finishing is not very reasonable.

To stick ceiling tiles on an uneven ceiling, as a rule, putty or adhesive for drywall helps. These solutions have good adhesive characteristics. When starting to implement the procedure on how to properly glue the ceiling tiles, it is necessary to check all purchased products for the same color and size. The sags and defects found on the edges are cut off with a clerical knife.
Mounting on a flat base
The procedure for how to properly glue the foam ceiling tiles on a flat surface:
- Glue on the tile is smeared with a thin strip around the perimeter and diagonally. You don't need to brush too close to the edge.
- The detail is laid out according to the markup.
- The attached tile must be held a little on the weight, waiting for the glue to set.
- Mount the next panel in the same way. It must be attached to the side of the first element. If there is a drawing, it is combined. When docking, it is important to observe accuracy and accuracy, avoiding the formation of drops.
- The same algorithm is repeated when working with the rest of the details.
- If there is a need for adjustment, cutting the tiles is carried out on a stable table.

The whole procedure, how to glue tiles on the ceiling, is implemented very quickly and simply. The main thing is to achieve docking accuracy and immediately wipe the glue that comes out at the seams. To make the joints as tight as possible, it is recommended to use a wooden plank when moving the next tile. If you do this by hand, dents may remain on the surface of the squares.
Sticking foam tiles on a curved ceiling
Curved surfaces cannot be shaped in the usual way. Sticking ceiling tiles, as a rule, in such cases, plasterboard glue or putty helps. It is prepared in such a way that a pasty mixture is obtained. For spreading on the ceiling, you will need a notched trowel that forms grooves. The amount of mortar to be applied depends on the degree of curvature, but it is best to use the smallest possible layer. It is recommended to spread no more than 1 m 2 of the ceiling at a time (for gluing 4 tiles).

This will make it possible to avoid premature setting of the solution: in this case, the alignment of the elements will not encounter any particular difficulties. Plates are mounted on top of the smeared mortar: they adhere quickly and can be easily moved. After combining the sides of the stacked fragments, they are aligned along the plane using a rule or a building level. To do this, press the square in the right place.
After sealing the first section, spread the second, acting in the same way. Orienting the following plates along the plane, you need to take the first section as a basis. If you cannot achieve full horizontality, then you need to at least avoid sharp drops. If possible, it is better not to allow a rapid build-up of the adhesive layer: if its thickness exceeds 3-5 mm, there is a real threat of falling of the finish of the structure. If the adhesive gets on the surface of the tile, it must be immediately wiped with a soft sponge. Upon completion of the procedure, how to glue the tiles on the ceiling, separately pass through the seams, filling them with the same putty.
Despite the wide variety finishing materials ceiling tiles are still popular. Such love on the part of modern consumers is provided by the affordable cost, as well as the ease of installation of this ceiling covering, which I would like to talk about in more detail in this article.
How to glue ceiling tiles, what materials may be needed, how long it will take to complete the work - these are the questions that most often concern those who want to deal with gluing on their own.
Dealing with tiles
In this matter, you should be guided solely by your taste preferences. Indeed, with the help of a seemingly simple ceiling tile, you can achieve any desired effect. Laminated tiles are very popular. It is distinguished by a denser texture, a glossy surface, and is also subject to cleaning and washing, which every hostess will appreciate. With the help of such tiles, you can finish the ceiling not only in the room, but also in the kitchen and even in the bathroom.
Moreover, modern manufacturers offer a wide color palette of tiles, so everyone can find for themselves the option that matches their idea. If you want to emphasize your own individuality, then before gluing the tiles to the ceiling, be sure to take the opportunity to paint the tiles water-based paint. It gives a number of undeniable advantages: firstly, you get the shade that you need, and secondly, you develop your Creative skills.

Apply glue
Now, as regards physical characteristics the tile itself. Be sure to pay attention during the selection process Special attention at the corners, they should be exactly 90 degrees. Only in this case you will be able to carry out installation work quickly and efficiently. Moreover, none of the corners should be jammed. That is why, during the purchase process, check each package with tiles in order to avoid unpleasant consequences.
If you settled on a polystyrene tile with large grains, then make sure that its edges do not crumble or break off, otherwise the process of working with such material will turn into a real torment for you. Be aware of the fragility of the material and during its transportation, be careful.
And, of course, if there is a pattern on the surface of the tile, then it must be clear, otherwise this seemingly small flaw on the general canvas will attract attention and catch the eye.

Spread the adhesive over the tiles
Preparatory work
Before proceeding with gluing ceiling tiles, you should carefully. To do this, remove the old coating. If it is whitewash, then you will have to wash off all the layers. The fact is that the result of the work related to the transformation of your room largely depends on how carefully you remove the whitewash from your ceiling.
Before you stick the ceiling tiles on the cleaned surface, take care of the primer. can be purchased at any specialized store. Using the ordinary paint roller and an extension cord for it, it is recommended to cover the ceiling with several layers of primer.
If washing off the whitewash is very tiring for you, then you can use the building one. With it, you will have to scrape off a layer of whitewash, and then also go through a layer of primer.
Ceiling markings
On the this stage work, you need to clearly define how the tile will be located on your ceiling. In fact, today there are many ways and variations of gluing polystyrene tiles. However, the simplest is the installation of tiles parallel to the walls, less often the tiles are placed diagonally.
If you can not decide how to glue the ceiling tiles, then choose the easiest way to perform. Your starting point should be the center of the ceiling. Usually this is the place where the chandelier is installed. Moreover, special importance should be given to the first rows, since the whole result of the work you have done depends on how even they are.

You can start to tile from the center
Applying glue to tiles
How to glue tiles on the ceiling? Of course, with the help of building glue. Today, a sufficient range of adhesive compositions is offered to the attention of consumers. It is advisable to use a special adhesive for polyurethane foam tiles. It will not only ensure a reliable fixation of the coating on the ceiling, but also will not damage the texture of the tile, which quite often happens when using, say, " liquid nails» a wide range of applications.
So, it is recommended to apply the glue pointwise and hold for 5-7 minutes before laying. During installation, it is important to pay special attention to the edges of the tiles. Given that the material from which it is made is rather fragile, the edges can look very careless, crumble, which will certainly affect the appearance of the finished surface.
The first tile must be glued so that one of its corners is at the center point of your ceiling, which you were able to determine using the correct markup. And one more thing: it is important to properly press the tile to the ceiling, but this should be done very carefully to prevent the formation of dents on its surface. All subsequent tiles must be glued in parallel, trying to leave a minimum gap. If excess adhesive is formed during the gluing process, it must be removed immediately from the surface of the tile.

Can be installed diagonally
Eliminate existing gaps
If until today you did not know how to glue the ceiling tiles with your own hands, then you probably did not even think about the possibility of cracks. Yes, indeed, this happens, especially with beginners.
If you do not want to face this problem, then get a seamless tile that creates a perfectly flat and smooth surface. Although it must be admitted that this kind of polyurethane foam tiles is quite expensive.
So, with regard to the cracks formed, you can get rid of them with the help of building sealant. It is advisable to use silicone sealant, as it is resistant to moisture, as well as temperature extremes.
Final touches
So, now you know everything about how to stick tiles on the ceiling. All that needs to be done is to remove all excess glue, cut a hole for ceiling chandelier with a construction knife. In this case, remember that it is not at all necessary to cut a hole with extreme precision and utmost accuracy, because it will be closed with a patch. This hole is primarily intended for the release of wires, so it should be quite small in size.
See inaccuracies, incomplete or incorrect information? Do you know how to make an article better?
Would you like to suggest photos for publication on a topic?
Please help us make the site better! Leave a message and your contacts in the comments - we will contact you and together we will make the publication better!
A beautifully finished ceiling attracts the eye of visitors, making the room interesting and unique. One way to achieve this effect is to use ceiling tiles. Using minimum funds, you can quickly transform any room. But before you start gluing tiles, you need to carefully prepare for this.
Ceiling surface preparation
Preparing the surface of the ceiling will save you from the possible difficulties associated with the installation of tiles. To ensure that the work is of high quality and the result is durable, follow these instructions:
- If there is old whitewash, paint, cladding, crumbling plaster, wallpaper, etc. on the ceiling, remove it so that nothing prevents the tile from sticking.
- After cleaning the surface of the ceiling, cracks, depressions, irregularities, etc. may appear. To correct defects, use putty. It is ideal for leveling the ceiling, as well as for grouting damage of any complexity.
- When the putty is completely dry (after 12 hours), prime the ceiling. Apply several coats at intervals to dry. The primer improves adhesion, and the tile holds firmly.
In some cases, the ceiling is not cleaned of whitewash, but immediately proceed to priming. So, they do it under one condition - the lime layer is in fairly good condition. This method does not guarantee a long-term result, but, as an option for a quick cosmetic repairs can be applied.
Determining the area of the ceiling
- The ceiling area is very easy to determine. To do this, measure its length and width using a tape measure, and then multiply the resulting numbers. This method is applicable if the room is in the form of an even rectangle.
- But there are rooms that have cut corners or L-shape. To measure the area of a non-standard ceiling, draw a plan on a piece of paper, indicating the dimensions of all sides. Then divide the drawing into even rectangular plots. Determine the area of each rectangle and add up the data. As a result, you will get the total area of \u200b\u200bthe ceiling.
Example:
You have made the necessary measurements of the ceiling and received the following data: width = 4 m, length = 5 m. Multiply these numbers: 4x5 = 20 m2. Thus, the ceiling area is 20 m2.
Material Quantity Calculation
- To understand how much material you need to buy, first determine the area of one tile. This is done in exactly the same way as in the case of the ceiling. Most tiles have a standard size - 50x50. Multiply these data: 0.50x0.50 \u003d 0.25 m2. As a result, the area of one tile is 0.25 m2.
- Now you have the following data: 20 m2 - ceiling area and 0.25 m2 - tile area. Divide these figures: 20 m2 / 0.25 m2 = 80 pcs. As a result, it turns out that you need to buy 80 tiles for a room of 20 m2.
But do not rush to go to the store and buy just such an amount of material. The fact is that errors can occur during operation that will lead to the breakdown of a certain number of tiles. Considering possible losses, buy material with a margin - 10% more.
There are many ways to lay tiles on the ceiling. For example, you can arrange tiled squares in a checkerboard pattern or diagonally, combine different colors to create simple geometric figures. There are a lot of options, but any method requires accurate marking.

Tiles are laid most often from the middle (the exception is rooms with a small area where installation is carried out from the corners), so first determine the central part of the ceiling. To do this, draw diagonals with threads. Then make perpendicular lines through the center. This markup is universal and will help to arrange the tiles in any convenient way.
The main ways of laying tiles:
- Diagonal. This option is often used and is suitable for any room. The drawn lines allow you to control the laying of tiles in a diagonal direction. The result is smooth and beautiful.
- Chess order. To create the effect of a checkerboard, tiles of two colors are used. They begin to be glued from the central point of the ceiling, so that the edges are parallel to the walls. Tiles, arranged in a checkerboard pattern, well hide the imperfection of the ceiling surface.
- snake. In this option, two matching or contrasting shades of tiles are used. Gluing starts from the center, creating a graphic image of a snake twisted into a spiral. If you can't find the material suitable color, use water-based paint.
Rules for laying ceiling tiles
- You can not glue the tiles on the whitewash. This will cause the lime layers to peel off over time, and with them the tiles. Before laying, the ceiling must be cleaned of chalk and primed.
- The tiles are glued starting from the center of the ceiling or the location of the chandelier. It is necessary to control that the rows close to the walls have the same width.
- Buy tiles with a margin. For ceilings with protrusions of various heights, you will need an additional amount of material. Also, during the installation process, it is easy to damage or spoil the tile.
Tile installation
After painstaking preparation, a new stage of renovation begins - the installation of tiles. The quality of the appearance of the ceiling depends on the work done correctly. Follow the instructions below and you'll be fine.

- Choose a few tiles and look at each one carefully. They should not have burrs on the edges. If you see these, cut them off, otherwise they will prevent you from making the joints minimal.
- Apply adhesive to the material. Distribute it around the perimeter, stepping back one centimeter from the edge, and also make a few strips in the center. Allow 1-2 minutes for the glue to thicken.
- Attach the first tile to the ceiling, aligning with the diagonal and horizontal marks. Use a rag to smooth for better bonding.
- Glue next tiles next to each other in the same way, creating a central square.
- Focus on the laid tiles to stick the rest. Do not forget about the markup, periodically aligning the material.
- Approaching the edge of the ceiling, it is necessary to cut the tiles. First make a fitting, and then cut. Try to cut so that the gap between the edge of the tile and the wall is minimal. The plinth will then close it.
- After installation is complete, allow the glue to dry well.
Seam putty
- Performing the work, it may not be possible to make quality seams. As a result, a ceiling is visible between the joints of the tiles. It will be possible to fix the imperfections with the help of a white sealant. It is sold in spray cans, and is supplied with a special elongated nozzle, with which it is easy to penetrate into the cracks. To work with sealant, you need a gun.
- All you need to do is gently extrude an even layer of white compound between the joints. The sealant closes the gaps, and at the same time strengthens the tiles on the ceiling.
Ceiling tile painting
- Having completed the correction of defects with seams, you can leave everything as it is. But, if you want to decorate the surface, complement it various shades, then the most accessible way is the painting of tiles.
- As a coloring agent, water-based compositions based on acrylic or latex can be used. They do not exude a pungent odor and are resistant to wet cleaning. But first, prepare the surface of the tiles by applying a coat of primer.
- For staining, it is better to use a roller with a foam rubber surface. It will help to apply an even layer of paint. The principle of operation is the same as when painting wallpaper. To keep the coloring composition well, apply at least two layers. Thus, it will turn out to make a unique geometric pattern that will surprise any visitor.
Any hostess knows that it is important not only to be able to glue the tiles beautifully, but also to keep them in proper condition. The tiled ceiling needs regular maintenance, this will extend the service life, retain the original novelty.

During operation, dust gradually accumulates on the tiles. The result is a blackened surface that is unpleasant to look at. You can be flooded with neighbors from above, if you do not take timely action, rust spots appear on the tile that cannot be removed.
To avoid all these problems and not re-glue the tiles, follow a few simple tips:
- Dry brush once a month using a vacuum cleaner or a fluffy brush.
- Carry out wet cleaning every two months, using a special mop.
- Do not use solutions containing caustic substances. Safe to use for cleaning detergents for dishes.
- Clean patterned areas with a sponge or soft cloth soaked in the solution.
After each wet cleaning, moisture remains on the surface of the tiles (especially in hard-to-reach recesses), which must be wiped off. For this it is convenient to use paper napkins. Thoroughly wipe the surface and patterns so that no wet streaks remain.
Ceiling tiles are glued quite easily, so anyone with minimal experience can handle this task. The main thing is to prepare the surface well and make the markup correctly. The result is not long in coming. You will get a room with a unique ceiling that no one else has. Remember to maintain it by dusting it regularly. And you can enjoy the result for years to come!
Ceiling cladding with foam boards - cheap way renew the surface of the ceiling and give it a beautiful appearance. The richness of patterns and patterns and colors allow you to choose best option which suits you.
What you need to consider when choosing a material and how to properly glue the ceiling tiles, you will learn by reading the material to the end.
Types of foam materials
There are three types of tiles to consider when choosing. They have a different texture and differ not only in price, but also in surface quality.
extruded
Made of expanded polystyrene, it is characterized by high density and strength. There is big choice, including in terms of color, there are imitations of wood or marble. So even such a cheap facing material can look rich and interesting.
It does not make sense to paint additionally such plates, besides, the surface does not absorb paint due to its high density. The paint just "rolls off". The thickness is only 2-3 mm.
Styrofoam
Large porosity, graininess is visible and looks more loose. Strength is achieved due to the thickness of 6-12 mm. Under pressure, a relief pattern is applied to the foam sheet. The low price is the advantage of the material, which determines its popularity.
injection
It has a clear pattern, there is a wide choice. It is baked in a special form, that is, you can choose an interesting relief. Good value for money makes injection material a popular cladding.
What is taken into account when choosing?
- Correct product geometry. Make sure all corners are 90 degrees, there are no ripples at the edges, and the pattern is clearly visible. Remember: the miser pays twice, so don't try to save money on such a cheap cladding option.
- The material from which the board is made. It should not break under its own weight. If you took it around the corner, then the plate should not crack in your hands. Increased porosity and fragility are the negative properties of the future lining. It will be hard to work with it, besides, the lining will not last long.
- A product with a smaller grain size is considered to be of higher quality, because it has a greater density and, consequently, strength.

How to calculate how much is needed?
- Measure the area of the ceiling. To do this, the width of the room must be multiplied by the length, so you get the number square meters that need to be lined.
- Decide on the format of the tile, the most commonly used size is 50x50. You can see which size suits you to avoid a large number unnecessary pruning.
- Material is always taken with a small margin for trimming and in cases of defective fragments or force majeure. Take 10% more.
- If you want to combine two or more shades or textures of foam boards, you can calculate how many tiles you need per piece. Draw a laying pattern on paper and you will find out how many shades you need.
Choosing glue
- There is special adhesives for work with foam ceiling tiles. They are sold in small buckets in the form of mastic. Practical and economical option with low consumption. In addition, installation is simplified, and the foam quickly adheres to the base.
- Also popular are "liquid nails", superglue "Moment", as well as "Titan" and "Econaset". When using "liquid nails", be prepared to stand with outstretched arms for several minutes and hold the plates so that they adhere securely and lock in the correct position. The "Moment" is the fastest to seize.
- If the ceiling is uneven and there are differences of more than a centimeter, of course, a plaster screed is required. Buy gypsum-based putty, such as Perfilks glue. Installation of foam will be carried out on a small layer of putty.

Foundation preparation
How to glue tiles on the ceiling? Where to begin? Before starting work, you need to prepare the ceiling, on which the durable ceiling cladding and ease of installation depend.
If there is on the ceiling thick layer whitewash, it is better to remove it. Styrofoam slabs weigh a little, but if the whitewash itself is already poorly held, then over time everything can fall off. You can clean off the whitewash layer with a small spatula or brush, after wetting the surface with water first.
The surface to be clad with expanded polystyrene boards must be relatively flat, clean and primed. Priming is mandatory to improve adhesion and further strengthen the base if it is loose. In this case, deep penetration primers are suitable.
If the whitewash holds well, you can prime it with a deep penetration primer, which will strengthen the base. After that, you can install the tiles on the old whitewash, which will save time.
Marking and choosing the method of placing tiles on the ceiling
The most common options for how to stick ceiling tiles are gluing in rows or diagonally. The sticker parallel to the walls is faster, a beautiful and regular geometry is created.
The right advice: how to properly glue ceiling tiles without seams - video
A diagonal sticker requires more trimming, but the seams are more difficult to see, and the pattern turns out to be intricate and interesting.
How to markup:
- You need to find the center of the room. To do this, take a diagonal opposite corners and hit the line. After that, repeat the procedure with another pair of corners. The intersection point of the corners will be the center of the room. If you plan to mount the slabs diagonally, then you already have guide lines. If you need lines for mounting in rows, beat off the line between opposite walls through the center of the room.
- Often the laying of plates starts from the chandelier. The corners of the plates are cut to make room for the wire, then the cut will hide the chandelier socket.
- Visually how to make markup is shown in the photo below.

You can choose not only plain tiles for the entire ceiling, but also combine several colors. Among the combined options are popular:
- chess order;
- snake;
- alternating or intersecting diagonals;
- darker shades of tiles are used around the perimeter of the ceiling.
It is worth noting that the installation of the combined version is no different from the installation of plain tiles. It only takes a little attention so as not to confuse anything, as well as pre-calculate how much of which tile will be needed.
How to glue boards
Laying tiles on the ceiling is possible in two main ways. It all depends on the surface, on how smooth it is. Such a ceiling cladding is designed cheaply and angrily, to hide surface defects.
About the types of marriage or what to look for when buying - video
Often foam lining is considered as a temporary measure, and then you can easily remove it and make it more expensive and beautiful. stretch ceiling, For example. Depending on the differences, the method of fastening depends.
On a flat surface
In this case, adhesives for foam or polystyrene foam boards are used, we wrote more about possible materials for gluing above.

The technology of how to glue ceiling tiles with your own hands is as follows:
- Glue is applied along the perimeter of the plate and diagonally. A thin layer is enough, no slippers are needed, no need to apply glue to the entire surface.
- The tile is mounted in the right place, after which it must be held for several minutes until the glue “grabs”. Depending on the adhesive that you have chosen, you need to hold the tile from a few seconds to a minute or more.
- We mount the next part of the cladding in the same way: we apply it to the right place on the ceiling, and then hold it so that it is securely fixed. You need to make sure that the pictures match. The result should be a solid picture, so make sure that there are no gaps and gaps between the tiles, and the pattern matches.
- If there is a need for trimming, use a pencil and a paint knife for this. Mark with a pencil the dimensions you want to cut. Do not cut on the fly, but lay the tile on a level surface.

note
If it becomes necessary to touch up an already glued board, use a small wooden plank. Gently press it against the edge of the plate and try to move it to the desired distance. Do not do this by hand, because the foam materials are fragile and brittle, so you can easily break off a corner or the plate will crack.
On an uneven ceiling
Mounting on liquid nails or foam adhesive on a ceiling with visible irregularities will not work. There will be too much consumption, and these materials are not intended for leveling uneven bases.

In this case, you can use putty mixes which one depends on the magnitude of the differences. If they are within 5-7mm, you can use finishing putty, if more - use starting draft mixtures.
Video tips for pasting the ceiling with foam tiles with your own hands
How to glue ceiling tiles on an uneven ceiling:
- Dilute the putty to the consistency of sour cream.
- Apply the solution to the ceiling, using a notched trowel, remove excess. A notched trowel will save glue consumption and minimize the layer thickness. The solution is applied to the area of several fragments, after which laying begins.
Do not apply too much solution at once, so that it is comfortable to work with, and it does not have time to set and dry.
- Lay the first tile on the applied mortar, press it down to make sure it is fixed on the surface.
- Align the edges of adjacent plates so that there are no gaps, check that the pattern matches.
- You can check on the plane of the plate building level. With gentle movements, you can press the tile, which frankly protrudes. If this fails, remove the tile and remove the excess layer of putty underneath.
If the surface of the foam plates is embossed, then visually the differences will not be so noticeable. But still, watch the joints and check the plane with a level.
The advantage of this fastening method is that the cladding adheres immediately, so that the tile does not need to be pressed and held, and then wait for it to fix.
note
Do not lay tiles on a layer of putty more than the maximum indicator, otherwise everything may collapse.
Grouting
Ceiling tiles are laid by applying glue or putty to the front surface of the cladding. Immediately remove all remnants of adhesive mixtures, dried glue will be much more difficult to remove.
Fresh mortar is removed with a fiber, sponge or soft cloth. Pre-check the rag for the absence of lint and inability to shed. If it turns out that, despite your efforts, gaps have formed between the plates, they should be repaired.
Use for this putty, which could remain, or white acrylic sealant. Gently apply sealant to the seam, and remove excess with a wet finger or sponge. Acrylic will mask the gaps well, besides, it is in excellent contact with the foam.
Outcome
Styrofoam ceiling covering is an inexpensive but practical option if you need to improve the interior quickly and inexpensively. There are a lot of tips on how to stick tiles on the ceiling, we have given only some of them, you have the right to choose interesting option and implement it on your own.
We also recommend
 Smartphone xperia z5 premium black
 Download toilet paper business plan
 Description Nokia X2 dual sim on the Android platform, powerful processor and support for two sim cards
 Is it possible to open a hostel in an apartment?
 Services to the public: the most promising business ideas
 How to start farming?