Beautiful do-it-yourself flower pots - ideas, photos, step-by-step master class. A useful decoration for a summer house and a house - flower pots How to make a simple flower pot from a rope
Let's see how you can transform your favorite indoor flowers? For example, if you create a flower pot with your own hands, then such decor will please the eye and add zest to the interior. In addition, having equipped flower stands and / or shelves for flowers with your own hands, it will also become convenient for you to take care of your pets.
Pot design options for indoor flowers
What is the difference between a planter and a regular flower pot? Translated from French cache-pot means "to hide the pot". Thus, the planter is a decorative "wrapper". Certainly, best home there will be a clay pot for flowers, but it quickly loses its attractive appearance, since ceramics let water through and stains appear on its surface that cannot be removed. Often as protective film glaze is used, but it also cracks and crumbles over time, and then the pot will either have to be replaced or decorated. In this case, a planter comes to the rescue - with its help you can easily hide unsightly places and create decor in the same style.
If you have a couple or three pots, then the easiest way is to arrange them beautifully on the windowsill. But if there are more than a dozen colors, then placement can be a problem. The most common way to hang a planter is to use ready-made hanging hooks or make holes for a rope. But you can make the mounting method creative.
You can organize a simple crossbar or build a whole structure under the ceiling, on which, for example, hang several.

The design of a one-piece planter does not provide for drainage holes, and openwork ones do not hold excess moisture, so when watering this must be taken into account.
Or here is such an idea of \u200b\u200bhanging a planter, even those who can’t do it can implement it:
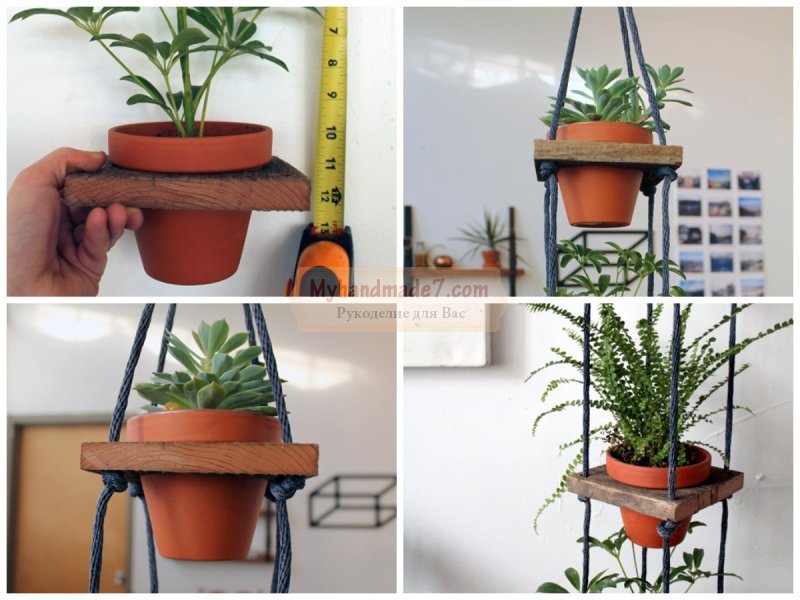
If you need to small space place a lot flower pots then this idea is for you!

Via simple tricks from wooden bars and rope, you can make a whole flower shelf with your own hands by equipping hanging structures. More detailed instructions in this video:
Imagine, combine different ways The more flowers you can place, the cozier your home will be.
Making flower pots with your own hands from scratch: materials and master classes
In this section, we will consider options for independent "cases", which are made separately, and then a flower pot is "populated" in them. For indoor planters, the choice of materials is unlimited and correlates only with the overall design and your preferences. The most common and used for hand made:
- cardboard,
- paper tubes,
- felt,
- recyclables.
From felt
From simple materials for needlework and children's creativity wonderful things turn out, you just have to apply your imagination. Look, a charming planter from.


Do-it-yourself stands and shelves for pots
Making a planter or decorating a pot is not all. This beauty needs to be put somewhere! Here you can not do without special shelves and stands. You can build a structure on the wall.

And you can order a whole bookcase on the floor.

Or here is such a bookcase-ladder.

And it is not necessary to ask someone. If you buy blank parts sawn to size in a store, then even a gentle female hand can cope with the assembly. Like in this video:
But it is much more interesting to turn on the fantasy and adapt unusual objects under the shelves to place the flower pots. For example, pallets. Paint with a stain or dark paint and now - a great shelf is ready.

And in this tool trolley, various plants coexist perfectly, creating a mini-.

"Cross" will not advise bad! :)
Categories ,For flowers with your own hands. Almost all families grow houseplants or flowers in the garden. It looks very interesting if standard flower pots are placed in an unusual planter. Of course, there are a lot of bright and original planter models on the market, but any person wants to bring individuality and some zest to their home or garden. There are a lot of options on how to make a planter with your own hands, it remains only to choose the material that will look most appropriate in your home or yours.
Advice! It is worth remembering that a planter, unlike a flower pot, does not have special holes in the bottom from which water could pour out after watering. Do not forget to drain it from the pots so that the roots of the plants do not rot. Free space between pots and flower pot or another container in which flowers grow, usually lined with moss or gravel so that the pot does not “dangle” inside.
DIY flower pots: building material
Surely, after the repair, any housewife has some unused materials that can be adapted to create flower pots:
- If there are slats, bars or other boards, you can create wooden planter . First you have to cut out equal parts for the walls, and then connect them with nails or glue. The walls and bottom of the pots can be designed in the form of a lattice, or they can be solid. For oblong bowls with flowers, a pot-box in the form of a small fence. This design is appropriate in an apartment or.
- Pretty easy to do DIY planter for the garden from the remains of logs However, it is better to entrust this business to a man. A log about 1-2 meters long can be rested on two small logs to make a kind of bench, or simply laid horizontally on the ground. Then the inner part is cut out in a large log, only the walls and the bottom remain. Inside you can put small bowls with petunias or others.
- From leftovers ceramic tiles you can make a bright pots . To do this, you need only 5 parts, one of which will become the bottom, and the rest - the walls. The easiest way to connect the parts with glue. Spectacular interior items are obtained from mirror tiles, they are easy to fit into modern minimalist interior or style.
- When from construction and garden work burlap or other remains dense fabric, can be made pots for small plants . To do this, you need to cut out two identical square or semicircular parts and sew them on three sides. For a more complex pattern, you will have to choose a base in the form of a wire that will shape the product. These pockets look great on the fence country house or on the balcony.
Cache-pot from natural materials
What could be easier than using the materials that gives us to create flowerpots and pots. nature? In the nearest forest or by the river you can find something that will subsequently significantly transform your interior:
- A beautiful planter will turn out from pebbles - small streamlined stones. They are glued together, giving the future product unusual shape. Similarly, you can use nut shells, tree cuts, small twigs, cones, etc.
- Can do pots for giving do-it-yourself from a stump . A core is cut out in it, where it is placed big plant eg fern. If you make several of these stumps at the same time, you get a whole clearing in the garden.
- Eco-style planters can be weaved from the vine. Weaving from a vine is a rather difficult task for a beginner, but the products are very effective. You can hang or put such planters both in the house and in the garden.
Warm days are approaching, and many will want to take their flowers to the balcony or loggia. But sometimes there is not enough space for flowers and you have to look for ways to place them. I really like vertical gardening.
For a convenient vertical arrangement of flower pots, you can make pots for them with your own hands using improvised means.
Hanging planter from strips of fabric
Almost every woman collects several knitted T-shirts during the season, which there is no longer a desire to wear and throw away. You can make a lot of useful things out of them, as well as make cords for weaving pots.
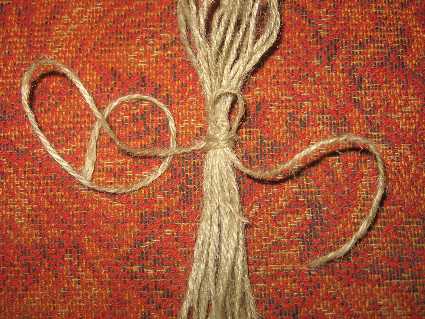
To do this, cut strips, about 2 cm wide across the product. It is better not to use a hemmed edge. You should get a ring with two seams, one of which needs to be cut, and then the strip is stretched. You will need 4 to 6 strips depending on the length.
If the strips are long, then 4 pieces will suffice. They need to be tied into a knot in the middle. For short stripes, make the knot closer to the edge.
Weaving a hanging planter
Then you can start weaving pots. For convenience, you can use an empty flower pot. 
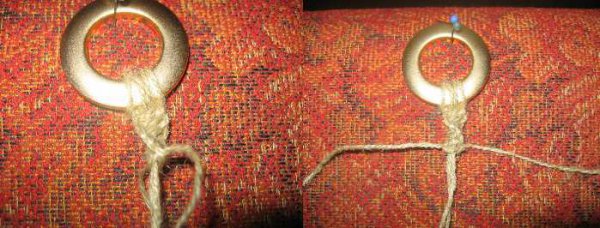
The photo shows in some detail the scheme for tying the strips. Repeat the process of tying the knots depending on the height of the pot so that it does not fall out of the pot in the future. 
The remaining ends of the cords can simply be tied into a knot, or can be tied to a ring to make it more convenient to hang. 
Cache-pot from a plastic bottle
This pot is more suitable. From plastic bottle cut off upper part the right size. It is better to melt the cut edges so that later you do not get hurt and damage the plants. Make 3-4 holes and stretch the rope through them. 
Such a planter can be hung or used on the balcony, having previously planted flowers or herbs in it. 
The main knots of macrame have already been mastered, you can start making the first simple product using the macrame technique - flower pots. To make your flower pots beautiful, we tried to make a selection of master classes on weaving flower pots using the macrame technique with our own hands.
See how modern and aesthetic these planters look.
DIY Gardens of Babylon

beautiful wall decoration
A cache-pot is not a whim for plants at all, and all flower lovers know this. ampelous, climbing plants they feel best, and accordingly look, in hanging planters.

Plants in the interior look much more elegant if the flower pots are decorated with weaving using the macrame technique.

Material for pots
What material is needed for macrame planters? The material must be durable, not easily soiled, pliable, resilient, not slippery.

To weave knots, so that they turn out to be clear and expressive, it is necessary to be tight enough.
Concerning colors, then everything here is up to you. Here are some examples:


Pots for several flowers can be as one color ...


Basic rules for creating a simple planter (for beginners)
1) Choose a scheme and a suitable material.
2) Cut the threads into segments desired length.
3) Fasten the threads to working basis. You should get four ends (sometimes three or another number).
4) We make a loop for hanging pots. Often use a ring for fastening.
5) Then we begin to knit twisted. They need to be tied four of the desired length (or another number, according to your plan).
6) We measure the diameter of the pot so that it fits well in the pots.
7) We select the scheme of knots with which we will braid the base - a flower pot. Most often this is .
8) We knit a recess for a flowerpot.
9) At the end, we fix the work with a tight knot so that the flowerpot does not fall out of the pots.
10) Cut off the threads, leaving long ends. They can be fluffed up or beads can be attached to them to give the product an original look.

The scheme of weaving flowerpots using macrame technique for beginners
You will need:
- cord with a diameter of 5 mm (length 40 m)
- metal or wooden ring with a diameter of 4.5 cm

Cut the cord into 8 pieces of 5 m.
Fold the thread so that one end is 3.5 m and the other 1.5 m and fasten it to the ring. Make a loop by bringing it under the ring. Bend it over the base towards you and pull the ends of the thread into the loop. Lock from below.

Fasten the parts of the rope on the ring so that 2 long (working) ones are located at the edges, 2 short ones (axial) between the long parts.
So that the threads do not interfere, tie them into a skein and secure with elastic bands

Weave pots handles
Divide all the threads into 4 groups (2 long and 2 short parts). Weave single long pieces of rope.
You need to tie about 30 knots or about 50 cm (their number depends on the thickness of the rope and on the required length of the product).

Secure the twisted chain with two flat knots:

In the same way, weave three more twisted chains.

Weave a basket for pots
To do this, weave 1 flat knot with two right ropes from one group and 2 flat knots with left ropes from the group closest to the right at a distance of 8 cm from the last knots. We repeat 4 times, sequentially including all the ropes in a circle.

We measure 8 centimeters ...

... we fasten the threads with a flat knot ...

Knit three rows of warp.

Step back a little from the last knots and use the braiding method to gather the ropes into one bundle.

Braid method
The braid must be very strong so that the flower pot does not break!
We pull all the threads into a bundle. We take a piece of thread, fold it in half and add to all the threads with a loop up.

With one thread from the bundle from top to bottom we make several turns.
We insert the end of the cord into the loop and pull the ends of the loop down so that the cord comes out from below under the turns. We stretch the second end of the loop up and pull it under the winding.

We carefully cut off the upper end of the thread, and hide the lower end along with the rest of the threads.

Braid weaving pattern
Leave the length of the thread for the brush about 20 - 30 cm, cut the ends with sharp scissors. The pot is ready!
Video tutorial for weaving a simple planter for beginners:
Cache-pot two-level "Yuliana" in macrame technique
Most often, a planter is woven for one flowerpot, but it can be two- (or more) level. The shape, size, patterns, material for it are also very diverse.
Cache-pot "Yuliana" is woven from an ordinary linen cord. It is designed for two flowers, located above and below.

Length finished product about 70 cm
Required material:
- linen cord 5 mm thick (length 40 m)
- 2 rings with a diameter of approximately 4 and 6 cm
- 8 beads for decoration
The order of weaving planters "Juliana"
1) Cut the cord into 8 pieces of 5 m each. Mark the middle of the thread.
2) We make a ring for fastening. We take 4 threads, put them parallel and horizontally to each other. From the marked middle we weave “up” and “down” about 8 flat square knots. This resulting lace is folded in half and threaded through a ring of smaller diameter. And if you don’t have a ring, then weave a few more knots, make a “loop” and tie 1-2 flat knots on all cords to strengthen. Another option is to secure the thread by braiding.
3) We divide 8 ropes into 4 groups of 2 pieces and weave about 6-8 knots. It can be replaced with ordinary flat knots or weave a twisted chain.
4) We fix it on the second ring, stepping back from the last knot 5-6 cm, with horizontal rep knots. Between these cords we hang the remaining threads, folded in half. Now we have 16 threads at work.
5) Weave beads. We divide the threads into groups of 4 pieces. We knit 8 flat knots in each group, first weave one bead for decoration. Then we weave 2 more flat knots, weave the second bead and again 8 flat knots.
6) Weave the base for the first pot. We retreat 5 cm from the last knots, weave twisted chains, working with threads from neighboring ropes, shifting the knots.
7) Check if our flowerpot fits. If it does not fit or, conversely, falls out, untie the knots and tie correctly. Weave twisted chains about 20-25 cm. (Their length depends on the height of your pot.)
8) Weave the base for the second pot. We retreat 10-12 cm from the last knot, using 2 threads from adjacent chains, weave one flat knot at a time.
9) Again we retreat 12 cm, we collect all the cords using the braiding method.
Be sure to try on the pot when you finally fasten the threads. This will be the place for the second pot. It must fit securely in there.
10) The design of the "brush". Step back 25-30 cm and cut the cords. You can fluff them up, untwist them, or add beads for more decorativeness.
To make it clearer, watch the video on how to knit Juliana planters:
Cache-pot openwork pattern "Butterfly"
To weave such an openwork planter you need:
- rope - 50 m
- three rings with a diameter of 7 cm, 10 cm and 21 cm
- scissors
- thread fastening pins
- work cushion
- hook for fastening pots

Operating procedure
1) Cut the threads: 3 parts of 8 m, 6 parts of 3 m, 2 parts of 1 m, 1 thread - 2.5 m
2) Wrap the rings with a diameter of 10 and 21 cm tightly with a rope so that there is no gap. A ring with a diameter of 7 cm must be braided with double flat knots with a thread 2.5 m long.

Schemes of the main macrame knots of this planter
3) All the threads, marking the middle, lay vertically and secure in the middle with pins.
Place the shortest (meter) along the edges. With these threads on both sides of the middle, tie 8 cm chains of double flat knots. All other threads will be the basis.
4) Distribute the threads into 6 (long - along the edges) and in each part, first tie in a chain of 4 double flat knots, then perform 4 more of the same knots, leaving 3 pico air loops between them (pattern "Butterfly" , rice. 6).
5) Fasten the ends of the chains with horizontal rep knots ( rice. 2) on a ring with a diameter of 10 cm. Next, weave first 3 "butterflies", and then simple chains of 4 knots without pico. Pull the bundle of cord under the chains using the “braiding” method.
6) Again, divide the threads into groups of 6 and tie 3 hanging cords 40 cm long. Each weave like this: first with single flat knots 17 cm of a twisted chain, then a “butterfly”, then a “pea” ( rice. eight), again a "butterfly" and then 13 cm of a twisted chain.
7) Attach the ends of the hanging cords to a ring with a diameter of 21 cm, tying 3 threads in between them (a total of 9 threads of 1 m, folded in half). On every 6 threads under the ring, perform a "butterfly".
8) Connect together the two extreme cords from adjacent butterfly patterns and tie 6 chains of 6 double flat knots, and leave the two inner ones free. We make a bundle of all the threads and tighten using the “braid” method.
We decorate the ends of the cords with “rollers” ( rice. 12). Linked brush length in ready-made- 25 cm.
Video tutorials on weaving flower pots using macrame technique
Channel Macrame style will teach you to weave a two-color openwork planter for indoor flowers:
Channel macrame school teaches to weave hanging planter with round beads:
Channel Panduro webtube shows how to weave the simplest pots with large beads:
The originality of the macrame technique is that by spending a little money and time, you can decorate your home with a useful and pleasant decor element.

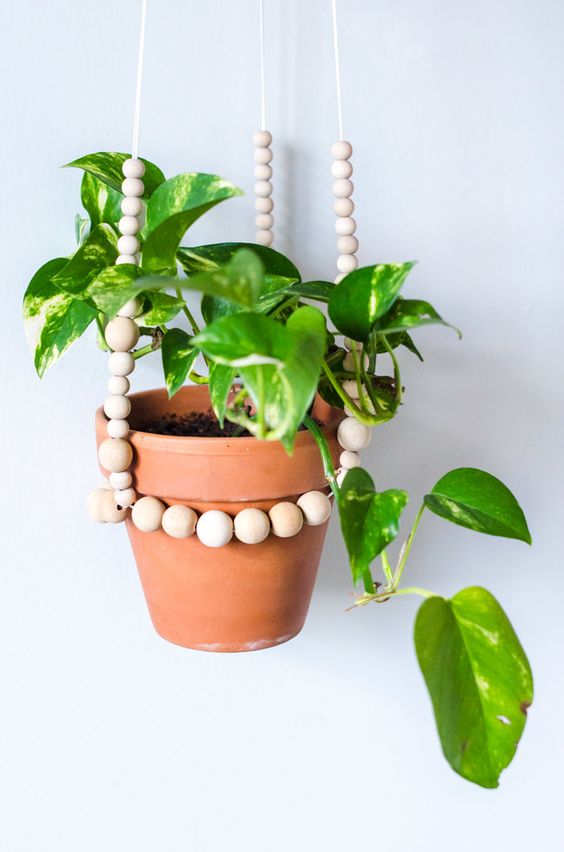
Flower pots are quite popular, and you can find a lot of instructions for making them on the net. In one of ours, we already told you how to make hanging flower pots with your own hands, today we offer you a different approach. There is no need to make pots themselves, we offer completely ordinary flower pots to turn them into hanging pots.
Materials and tools for making hanging flower pots:
- 3 small flower pots with planted plants
- skein of thin clothesline
- 15 raw wooden beads, approx. 18 mm in diameter
- 9 wooden beads with a diameter of 25 mm
- 11 beads with a diameter of 38 mm
- copper tubes¼ inch diameter
- pipe cutter
- acrylic paint
- tassel

DIY hanging flower pots
Color the beads in different colors. If you want the paint to lay down in an even layer, the beads can first be sanded with sandpaper.
Advice: The easiest way to dry the beads is by putting them on a wire.
A rather interesting effect is obtained if you paint beads for each pot in different shades one color.

Pull two strings through each group of beads. In our case, for the manufacture of each pot, six ropes were used, tied at the top into a knot.

The beads can be placed in any order. In our case, their diameter first increases and then decreases.

Decide on the height at which you want to fix the wooden beads, and tie a knot in this place on each pair of ropes.
Divide each pair of ropes, and knot the left rope of the first pair with the right rope of the second. In the same way, tie all six ropes in pairs. Repeat the procedure again, moving down.

Tie all three pairs of ropes in one knot, cut off the ends of the ropes, or leave them as they are.

By the same principle, we make a second hanging pot.
Cut the copper pipe into pieces about 70 mm long.
Alternating multi-colored wooden beads and pieces of copper tube, decorate each pair of ropes. In this case, it is better to use beads small size so that their diameter is slightly larger than the diameter of the tubes.

Secure the beads and tubes with knots.

Separate each of the pairs of ropes and tie them with ropes from adjacent pairs. Repeat the same, moving down slightly. Tie all the ropes into one knot.
In each of the resulting rope sleeves, place flower pot. Now it remains only to hang the pots in the window or doorway, decorate them with a veranda or living room.


It is not necessary to use wooden beads and copper tubes to decorate hanging pots, it all depends on your imagination.

Original article in English.
We also recommend
 Switching power supply: repair and refinement
 Remote control of light
 Swimming lessons for preschool children
 Notes for the master - home household alarms
 Clock propeller on Atmega8
 Device and relay application examples, how to choose and connect a relay correctly Microcontroller and relay simple switching circuits