Master class “Sea turtle made of paper. DIY turtle from improvised materials: cones, tires, felt, gypsum, crocheted, rubber bands, clay, bottles, beads Garden fountain with leaves
Turtles, turtles, they are so cute! Today you can make them yourself. Yes, with their with my own hands. And it will be easy and simple thanks to our detailed instructions with large quantity a photo. A family of funny plastic bottle turtles is waiting for you :)
Look how cute they are. Do you want one of these turtles for yourself? Then let's get started. In the picture above, you see a piggy bank turtle, a musical toy turtle, and their friend the seafaring turtle. Yes, she can swim! You can make all of them, or one of the little animals.
For manufacturing you will need:
- plastic bottle
- thick foam cloth
- thread, needle

Take a plastic bottle, cut off the bottom. The figure used a 1.5 liter bottle.
Circle the circle with a pencil, retreating about half a centimeter from the edge. Draw the head, paws and tail.

Cut out the blank with scissors or a clerical knife. If you are making a musical turtle, fill the contents of the bottle with coins or pebbles.

Fix the plastic bottle by stitching around the workpiece with threads. Attention: no need to pierce the plastic! Stitches are made on a foam blank.

For piggy bank turtles make a small cut with scissors. Such that a coin can slip through, no more. Otherwise, your treasures will fly out :)
Draw the muzzle and fingers on the paws. For beauty, you can sew a button on top.
For sea turtle that will float to make an incision no need otherwise she won't be able to swim for a long time :)

Cool piggy bank turtle plastic bottle ready!

You can fill the turtle with beautiful pebbles or beads. Then it will become musical and it will be fun to strum :)

Or you can leave the turtle empty so it can swim. Toddlers love to splash in the bathtub with such a fun toy. Especially when it's handmade!
Help us develop the site, tell your friends about it by clicking the button :)
In many countries of the world, the turtle has always been revered and praised, someone considers it a symbol of the feminine, the Indians believed that our whole world rests on its mighty back, the Chinese believe, to this day, that it symbolizes longevity, wisdom, welfare, prosperity and can protect against adversity. And is it possible to bypass all these legends? We invite you to make a wonderful symbol - a turtle with your own hands, to protect your home and garden.
There are many options for making this souvenir, and we will try to cover the most popular and interesting ones.
Soft pillow
For every needlewoman who owns a crochet, it will not be difficult to knit a turtle pillow. Such a cute little thing will perfectly fit into your interior and will serve not only as a decorative role.
We will need:
- leftover yarn;
- hook No. 2 or No. 3;
- cover fabric;
- filler.
We make a pillow. According to the fabric pattern, we make hexagons, sew them together and fill them with filler.

We start knitting the shell, for this we need to knit the hexagons according to scheme 1 and sew them to our shell case.

In order to tie the head, you need to dial 4 air. loops and tie them with 8 single crochets. We continue in the same way, not forgetting to increase in every 4th row. Head size should be approximately 6-7 cm.
We knit the tail and paws according to the same principle and fill it with filler. With buttons or other suitable material make eyes and put our parts together.

So our turtle Tortilla is ready.
garden decoration
If you're looking to transform your garden into something fun and budget-friendly, here's a Tire Turtle Tutorial.
We will need:
- 2 tires;
- empty bottle.
We do everything according to the photo:

Such a turtle can be used not only as decorative element, but also as an original flower bed.
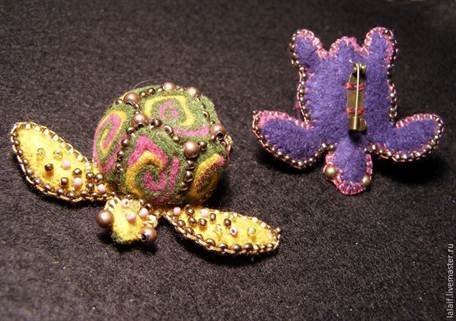
felt turtle
Another very interesting option felt souvenir. Such a souvenir can be decorated as a fridge magnet, a charming brooch for a handbag, or simply left as it is, in the form of a toy.
The size of this turtle, you can vary as you like, if there is enough material, you can increase it several times. Let's take a look at a small example.
We will need:
- pattern;
- felt different colors 2 mm;
- scissors;
- beads for decoration;
- glue "Moment";
- filler.
First of all, you need to draw a pattern and cut out the details on it.

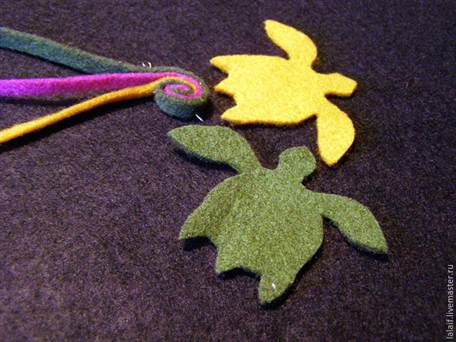
From felt, cut into thin strips, it is necessary to roll up the spirals and chop them with a pin to hold them.

In the future, carefully sew them together.

Using a needle, we collect our shell.

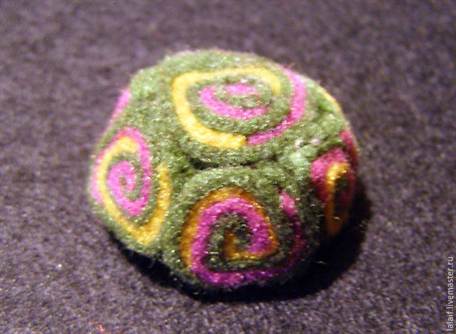

We embroider the gaps with beads.

We fill our shell with filler and sew it to the base.
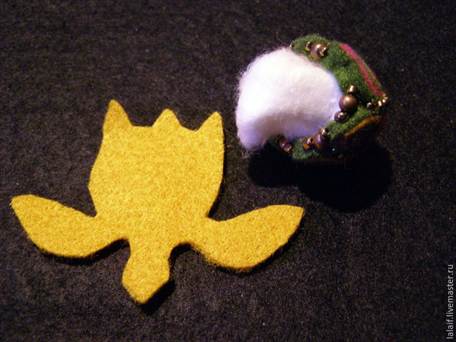
We glue pieces of felt in the form of fins on the wrong side of the belly so that our turtle seems more voluminous, and sew the belly together.
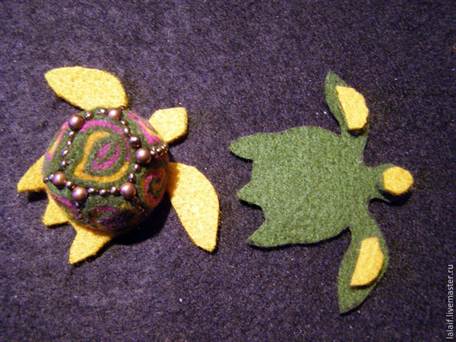

Our turtle is ready.
In fact, there is a lot of material from which you can make a turtle, the main thing is to connect your imagination. We bring to your attention a few more interesting ideas with photo.
- beautiful piece of cones. This craft will be very interesting to do with children.

- rubber band turtle the new kind art, which has already conquered the whole world with its originality and simplicity in execution.

- from polymer clay You can do original decoration or a brooch.


- The gypsum turtle will be a stunning decoration for your garden. Of course, you will have to work hard, but the result is worth it.


The voluminous paper turtle consists of a simple flat body and an imposing shell made from circles of colored paper. It’s not at all difficult to make a craft, because the main part of the work is cutting out circles from paper.
Materials used:
- Double-sided colored cardboard;
- Double-sided colored paper;
- White paper;
- Scissors, compasses, felt-tip pens, glue stick.
Volumetric paper turtle step by step
We make a shell
At the first stage, you need to make a beautiful voluminous shell. It consists of 12 circles. Cut them out of paper. You can make the shell multi-colored and cut out circles of two or more colors, one-color is also beautiful. The diameter of the circle is arbitrary, but I don’t recommend doing less than 2 cm, since the turtle will turn out to be very small, and the work itself will be more difficult.

Fold the circle in half.

Then again to make a quarter. At the top of one of the sides (where shown as a cross), spread glue and glue the sides. Gluing only in the upper part will provide a beautiful opening of the shell from below.


Make such quarters from all 12 circles.

Now they need to be glued together, but in a certain form and order. Look at the quarter. If you put it on the surface at a right angle, the lower part will seem to bifurcate. It is in this position that you need to glue all the quarters: single corners to single corners, and bifurcated parts to the same ones. Glue also needs to be applied only in the upper part, where it is shown by a cross.


Glue all quarters together, alternating colors if you also have more than one.

Then apply glue to the last sides and complete the circle. You will get a beautiful voluminous shell.

Exactly the same technique is used in , and .
We make the body of a turtle
Cut out a circle from cardboard, the diameter of which is equal to the circles on the shell. Also cut three strips from the same cardboard, two identical for the paws, and the third is slightly thicker, from which the head will be. Also, cut out two circles for the eyes from white paper and draw a pupil in the middle with a felt-tip pen.

Glue two thin strips crosswise onto the cardboard circle.

Then fold the strip in half and glue the ends together. Some semblance of a thick loop will turn out. Glue it between the two paw stripes and press down a little.

Apply glue within the circle with paws and glue the volume shell to it.

If necessary, make the paws shorter and draw patterns on them, glue eyes to the head, draw a smile. Volumetric paper turtle is ready.


Easy-to-make garden crafts are sometimes so beautiful that they impress once and for all.
Here is such an amazing Turtle made of ordinary cement mortar, decorated with ordinary pebbles, can settle on the site and cause the constant delight of absolutely everyone. And its bright coloring is able to lift even the dullest mood.
How to make similar crafts for the garden is described in detail here (a hippopotamus and another turtle). How to make a multi-colored beautiful turtle?
Materials for creating a garden turtle
- stones various sizes for filling crafts for the garden.
- Mortar - 1 part cement, 3 parts sand. Add water, knead the cement "cream" - not thick and not liquid.
- Pieces of a metal rod on which the head and paws of the Turtle will be held. Although not necessary, both the head and paws can perfectly lie on the ground.
- Impregnation for concrete (sold in construction stores in different containers, you can buy 1 liter). Not necessary, but very desirable: the craft after processing with such a tool is very durable, the cement between the pebbles will not collapse, crumble.
- Acrylic paints for external works. You can immediately buy paints for concrete. If you want any special shell colors, use pigments. AT construction stores there are a lot of them, you can at least make a “golden” Turtle (by the way, this is an idea!).
Craft for the garden Turtle step by step
1. Depending on the planned size and shape of the Turtle, we fill in a "pile-small" stones.
2. Between the stones, immediately lay the pieces of the rod for the paws and head.
3. Fill with a solution.
4. We are waiting for it to harden a little, add more, while leveling (as if plastering with a thick enough layer.
5. We add more cement to the usual solution (to make it thicker) and fashion the paws and head of the Turtle on segments of the rod. Or we glue suitable pebbles with cement.
6. We press pebbles into the “plaster” layer, which will imitate shell plates.
7. We leave the semi-finished garden crafts to dry.
8. We process with impregnation for concrete (if we were going to).
9. We are waiting for drying.
10. Coloring.
WHAT ELSE TO DECORATE THE GARDEN:
Moshkina Galina
Master Class"paper turtle"
Our walks turtle.
She is without a dress or shirt.
Of course she is wearing a shell
It's hard to dance in it
well she doesn't get discouraged
Quietly visit us!
AT master class step-by-step instructions for making crafts from paper. Material suitable for children preparatory group, teachers and parents.
Material:white paper or cardboard, stapler, scissors, simple pencil, markers or colored pencils.
1. On dense paper or cardboard draw an outline turtle and cut it out.

2. From the tail to the center of the shell, make an incision and then apply a pattern to the shell with a simple pencil.

3. Coloring turtle colored pencils or felt-tip pens.

4. Take the colorized turtle at the incision, we turn it so that one tail lies on the other and fix it with a stapler or glue. This will give the shell volume.

5. The turtle is ready!

Related publications:
"Shrovetide" made of paper (master class) Necessary materials and tools: Colored paper or printer paper - 2 sheets.
Let's try to mold one of the rare pets, it is very slow and mostly sleeps in winter. We will need: - plpstilin.
Good evening everyone! I bring to your attention how to make the sun out of the usual office paper, such a sun can be used in the classroom.
"Second life" for didactic games! Manufacturing master class didactic game"Turtle Dashenka" for younger preschoolers. We,.
Origami paper bow. You can decorate an envelope or a gift box with such a bow. We make a square out of colored paper.
Dear colleagues! I bring to your attention a master class on making paper dahlias. Making such a flower is not at all difficult.
We take a white paper napkin. We fold the napkin along the indicated lines. We make cuts on four sides (as marked with a black marker, we outline.
We also recommend
 Switching power supply: repair and refinement
 Remote control of light
 Swimming lessons for preschool children
 Notes for the master - home household alarms
 Clock propeller on Atmega8
 Device and relay application examples, how to choose and connect a relay correctly Microcontroller and relay simple switching circuits