What can be made from a paper clip and paper. Crafts from office supplies
And ideas for rest and relaxation of office workers.
Some Western companies came to the conclusion that office worker needs to be done from time to timeshort breaks
and be distracted from their immediate duties for rest and unloading.
Advice - do some simple game, better - collectively. At these moments it is removed operating voltage,
jokes sound and thus, unintentionally created warm atmosphere helps team building. And this, in turn, will lead to more productive work in the future.
Your attention several ideas are proposed can be used for short respite office workers.
Warm up
|
|
|
improvised darts A couple of minutes to relax.This is much better than smoking cigarettes one by one during a break or traditionally drinking coffee.
Fighter from office supplies
Crafts from paper clips
Paper Clip Crafts
|
For some, the game may seem too childish.But for those who love humor and want to relax their brains, this opinion is not a hindrance.
|
Dodecahedron of 120 paper clips without a drop of glue and other fasteners
Möbius strip of 110 colored paper clips
Only six clamps ... It would seem that the simplest design. And you try! The secret is that when creating such a thing, your fingers should not strain more than with normal use of clamps.
Сosidodecahedron of 30 clamps.
|
Shadow theater on the office table. The work day was not in vain ...
|
For this creation, a thorough preliminary preparation in the form of the accumulation of coins is needed. But the result is amazing!
|


I woke up one morning with a new project idea in my head. I got into bed thinking about the presentation I was going to give to middle and high school teachers in a couple of weeks. I wanted to come up with simple and inexpensive projects that they could use to teach students some aspects of technology. I really hoped that my ideas would inspire them to their own creativity. All night I dreamed about how I made various devices from paper clips, and this project was born. Regarding the cost - a piece of wood and paper clips cost me about 15 rubles.
I was already working on a few projects at the time, so it took a couple of months of thinking until I actually sat down at the table with a bunch of paper clips and started my attempts to build something out of them. While I was busy with other projects, I thought about the design and manufacturing process of my car parts, as well as the way they were assembled. For this I needed very few tools and materials. I thought the process would be pretty simple. Paperclip mechanisms are very interesting to create, and it is also interesting to “play” with them later. It seems to me that the sculptural forms of these creatures are also a kind of art.
For educators, this project is a great way to teach children the physics of mechanical machines, including concepts such as levers, knee, pivot point, circular and linear motion. Products from this project can be used as a miniature working model or as a prototype in the production of various designs. Also, similar mechanisms can be used for students studying energy. A similar project helped me a lot, in which groups of participants, as well as individual inventors, created separate mechanisms, and then connected them together to create a chain reaction. It seemed to me that something similar could be done with staple mechanisms. This will enable each student to create their own part of the overall mechanism, and then connect everything into a large chain, and also simulate a chain reaction.
This video shows how I built my paperclip mechanism:
Step 1: Such a Versatile Paperclip
As a lifelong Creator, I have always loved taking apart even the simplest appliances. At meetings, I constantly take apart and reassemble my pen. In cafes, I constantly play with my straw and the wrapper in which it was brought. One of my favorite things to do is play with paperclips. I have always been fascinated by their original but simple form, as well as their working principle. I know it's just a piece of wire bent in a certain way and nothing more. My cursory internet search reveals that I'm not the only paperclip aficionado. My fellow community members have already published a ton of paper clip projects. These are toy helicopters, and, and even chandeliers, of various geometric shapes. I've seen picks, catapults, and trebuchets. So my post will be just another item on the list of what can be created from paper clips.
Step 2: What you need.
From this we will create today:
- A box of large paper clips (mine were made from wire with a diameter of 1 mm).
- Two small pieces of wood. I bought two samples of flooring from a local hardware store. Each cost me no more than 10 rubles.
- A pair of wire cutters and a pair of long-nosed pliers. I recommend the ones pictured above. If you have pliers with long, round tongs and a cutting edge, those will work too.
- A couple of drills for 0.8, 1.0 and 1.2 mm.
- Bulgarian with a cutting wheel to cut off one of the drills.
- Drill to drill holes in wood. Hand or electric drill - it doesn't matter.
- A small ruler and pencil for measuring and marking holes.
NOTE: You can use staples of other sizes. Smaller paper clips are easier to bend, but the design will be smaller due to the shorter wire length of each element. You will also need different drill bits for staples of a different size.
Step 3: Make a staple bender.
From the unsharpened end of a 1.2 mm drill, we cut off two pieces with a grinder. One piece should be approximately 10 mm, and the second - 20 mm. Grind the edges to make them smoother with a grinder.
Drill a 1.0mm hole in one of the pieces of wood. The depth of the hole should be 8mm so that the 10mm piece of drill protrudes 2.0mm over the wood. The metal should fit tightly into the wood.
Make a second 1.0mm hole of the same depth approximately 1mm from the first. The paper clip should fit snugly between the two metal posts. Stick a 20mm piece firmly into the wood.
Step 4: Practice twisting the coils.
Almost all the parts that we will have to do will have one or more turns, so it's better to practice and learn how to do them well.
- Using pliers, completely align the paperclip.
- Place a paperclip between the two bits of your bender's drill we made in the previous step.
- Gently wrap the paperclip around the longer post while the short one will just hold the wire in place.
- Keep turning the paperclip around the long piece of the drill until you have 4 turns of the wire around it.
- Carefully remove the twisted paper clip from the bending “machine” and check the coils. They should fit snugly against each other. If the turns do not turn out even and dense, practice more.
Here's how to do it:
Step 5: Making different details.
Here is a complete set of staples I made for this design. There is a connecting rod, bipedal and quadrupedal supports, connectors and levers of various shapes and sizes. There can be an infinite number of other details and modifications. Only your imagination limits the choice.
The second photo below shows each part with its name.
Step 6: Make a base for the machine.
I used one piece of wood for the bender and another for the assembly of my invention. I first tested the assembly on the back side, and when I got everything set up and measured, I started drilling holes on the front side. The beautiful texture of the finish looks very advantageous for the base of the car.
I used a 0.8mm drill bit to make 10mm deep holes in the wood for each of the supports. A little effort with pliers, and the legs of the supports are in place. I think you can make a lot of holes in a grid pattern, like on electronic circuit boards. So it will be easy to change the positions of the supports in the assembly, testing and debugging the design. I decided to drill holes only where necessary, so it looked better to me.
Step 7: Putting it together on the go
Inside every man forever remains a little boy who loves to play with cars and, of course, will never refuse to shoot and play war games.
We offer you a selection of weapons that can be assembled from what you can get your hands on in almost any office. You can’t even imagine what the fantasy of a simple office employee is capable of;)
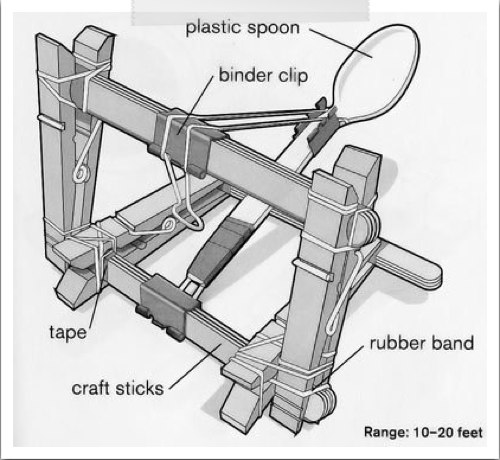
So, number 1! For this catapult, you will need a plastic spoon, a wooden coffee stirrer or pencil, rubber bands, clothespins and binders (black paper clip). According to the creator, the affected area is 3-6 meters.
Number 2. Meet the double gun. In order to build this miracle of technology, you will need pencils, rubber bands, binders, tape, clothespins and a tape holder. The affected area is 2.5-6 meters. 
Number 3. For this crossbow you will need pencils, rubber bands, tape and a pen. As well as detailed instructions, which you will see by clicking on the link. 
Number 4. The simplest crossbow I've ever seen. To do this, you will need a spool of tape, an elastic band and, of course, live ammunition. 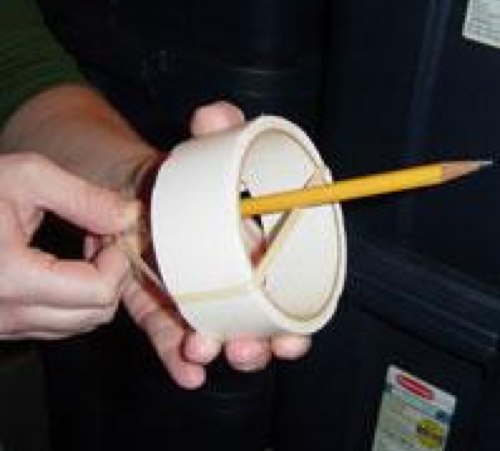
Number 5. Here you can make yourself elegant darts of any color. To do this, you will need colored paper, simple paper clips, and cork board tacks. 
Number 6. In childhood, all the boys used this shooter. Because it was even easier to make it than an ordinary slingshot. To do this, you need a neck from a plastic bottle, scotch tape and either an inflatable ball or a fingertip. It is very painful to shoot mountain ash and other berries. The affected area is up to 10-15 meters, I tell you this from my own bitter experience. 
Number 7. The crossbow parade continues. Another simple option for which you will need a large paper clip and an elastic band. And for the arrow - tape, digging and paper. 
Number 8. Rubber TEC, and if it’s completely simple, then it’s just an elastic band with a handle. You thread the elastic around the cap of the pen so that if you pull on the elastic and release the pen, it will fly straight at the target. The main thing is to aim well. 
Number 9. Double Maul or just one small binder nested inside a larger binder. The affected area is about 7 meters. 
Number 10. Super Maul is a miracle technique with a laser sight! For this giant, you will need a laser pointer, rubber band and binders of different sizes. It is better to be more careful with this weapon, as a well-sharpened pencil released will pierce a can of drinks. The affected area is 16.2 meters. 
Happy holiday, dear defenders of the fatherland;)
If it’s raining outside and it’s completely impossible to get out for a walk, then you should look for entertainment at home. But what if the apartment is in perfect order, dinner is ready, and the TV is tired? Perhaps you should get creative and make some crafts. By the way, you can involve the whole family in this interesting business and have fun.
You can craft from anything, for example, try to make crafts from paper clips, and if you don’t know how, then read the article, it will contain some interesting ideas.
Flower from paper clips
The simplest thing that can be made from paper clips is a bouquet that will not only please the eye, but also perform a practical function, be responsible for the safety of stationery.
To make beautiful flowers you will need the following items:
- Colored paper clips (2-3 boxes), choose shades to your taste;
- 2 sheets of A4 paper;
- Glue, scissors, compasses.
If everything is ready, then you can start making crafts from colored paper clips:
- On one sheet of A4 format, draw 4 circles with a compass: 2 large ones of the same radius and 2 smaller diameters (with a difference of about 3 cm). If you are going to be creative with a small child, then instead of a compass for drawing circles, use cups of different diameters;
- Armed with scissors, cut out the drawn circles. By the way, if there is colored paper or cardboard at home, then blanks can be made from these materials;
- Now coat two large round blanks with glue and connect them together;
- From the remaining sheet of paper, fold the stem for the flower. It should turn out flat, and to keep it better, coat it with glue;
- Now, on the glued circles, place the stem, but not on the edge, but so that it lies along the entire diameter. This will make the flower more stable;
- You have a blank that looks like a tennis racket, but that's not all. On the big circle you need to stick a smaller circle. In this case, apply glue only to the center of the leaflet, and the edges should be in free flight. The smallest circle is attached in the same way;
- The paper flower is ready, now you need to use paper clips to make colored petals and a beautiful stem. To do this, multi-colored stationery is placed along the free edges of three circles of paper, and green paper clips are attached to an impromptu stem.
After all the manipulations, the flower is ready, it will look very good in the organizer on the desktop, and so that the craft from paper clips does not fall, it is recommended to press it a little with a ruler.
In principle, if you make a flower not with 3, but with 2 circles of paper clips, then it will be more stable.
We make a garland
With the help of paper clips with your own hands, you can make a very attractive garland, which will certainly decorate the room for any holiday. To make such beauty, you will not need so many improvised materials: scissors, bright sheets of paper, magazines and any thick printed matter, glue and paper clips will do.
Now you can make a garland:
By the way, if desired, the decoration can be made in several rows. And using paper clips of different sizes, create a very interesting garland in general.
It is worth noting that assiduous women make curtains according to this principle, and children make funny bracelets for themselves and their friends.
We make Christmas decorations
With the help of paper clips, you can make cute Christmas toys in the form of ice skates for figure skating.
To implement the creative idea, you will need the following materials:
- Felt of different shades;
- Beads or sequins;
- Sheet of paper and pencil;
- Large staples;
- Thin tapes;
- Glue;
- Threads and needle.
On a piece of paper draw a skate, but without a blade, one shoe. Cut out the stencil, then transfer the image to the felt.
Before cutting out the image from the fabric, fold it in half so that you can then make a real skate. You don't need to cut in the middle. After cutting out, you should get two skates in a mirror image.
We also recommend
 Smartphone xperia z5 premium black
 Download toilet paper business plan
 Description Nokia X2 dual sim on the Android platform, powerful processor and support for two sim cards
 Is it possible to open a hostel in an apartment?
 Services to the public: the most promising business ideas
 How to start farming?