Sharpening machine for knives do-it-yourself scheme. Powerful do-it-yourself grinding machine

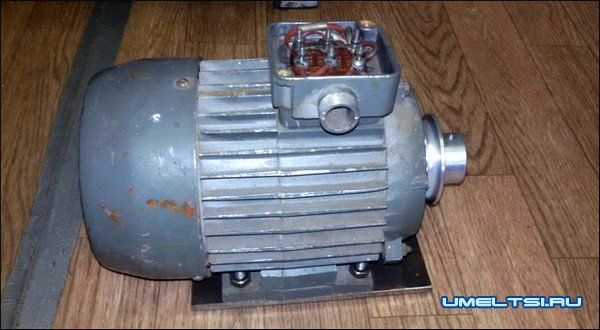
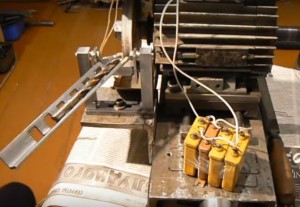
For a village or a summer residence, one simply cannot do without such an indispensable thing as a machine tool. With it, you can always sharpen a shovel or ax. It is also possible to carry out processing on the machine various materials, for example, carve some element for homemade. The article will consider an example of how you can make a powerful and durable grinding machine with your own hands. The author used a 750-watt motor as a power element.
Materials and tools for manufacturing:
- welding;
- Bulgarian;
- drill;
- pulleys (on the motor and on the shaft);
- belt;
- shaft (the author ordered from a turner);
- bearings for the shaft;
- corner, metal plates to create the machine body;
- electric motor (used 750 watts / 1500 revolutions);
- control buttons, magnetic starter;
- paint, bolts with nuts and other little things.
The manufacturing process of the grinding machine:
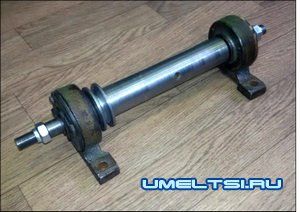
Step one. Shaft for machine
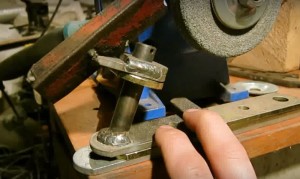
The machine shaft must either be searched on the market or ordered by a turner. There must be a pulley on the shaft, the shaft itself is on two bearings. At both ends of the shaft there are special places for installing grinding wheels.
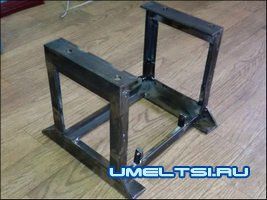
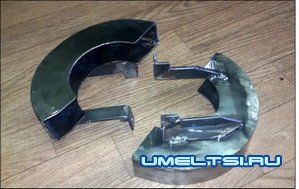
Step two. Machine body
For the manufacture of the case, you will need corners, metal plates, welding, a grinder and other elements. The frame must be such that it is possible to install a shaft on it, as well as to fix the engine. In the photo you can see how the author did at home.

The engine is mounted on metal plate, it is securely fastened with screws and nuts. It is advisable to use a grower.
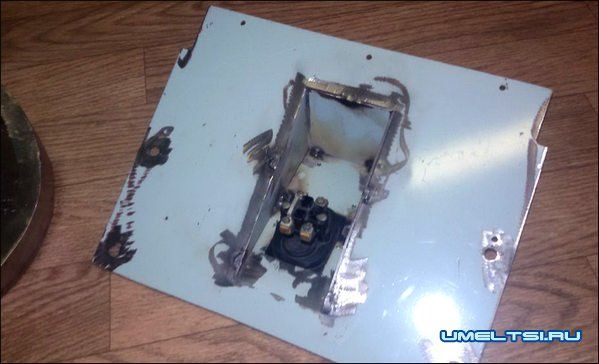
Step three. The final stage assembly
After the engine and shaft are installed, and there is a belt on the pulleys, you can already start the homemade product and see how it will work. If everything is fine, you can proceed with the installation of electronics and control devices in the housing. The frame must be sheathed with metal sheets. On one sheet there will be a magnetic starter, as well as buttons to turn on the device. For these purposes, a special case is made.


It is also important to make protective fences, circles and armrests. It is also desirable to cover the shaft; for these purposes, you can make a special shield.
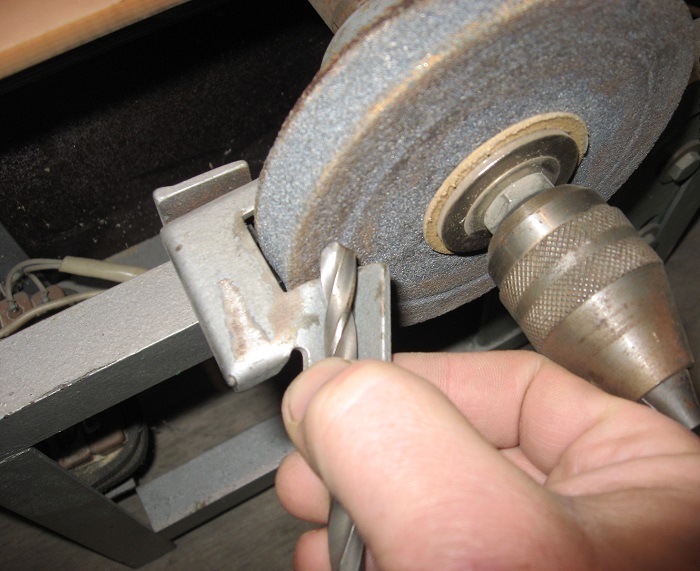
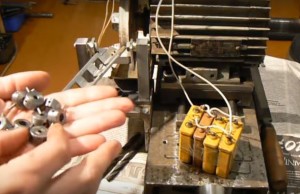
Drill sharpening can be done manually, on machines or special abrasive discs.
If you sharpen the drill by hand, then it is necessary:
- firmly hold the shank, and with the other hand guide its spiral part;
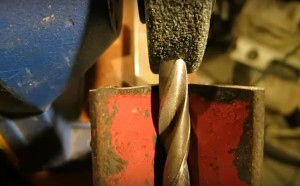
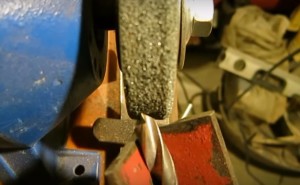
- press the cutting edge of the drill against the side surface of the abrasive wheel;
- after sharpening one side, it is necessary to smoothly turn the drill, while the cutting edges must necessarily have the correct inclination to the axis and take the desired configuration.
The drill is sharpened alternately on both sides. When doing this, be sure to control the cutting edges.
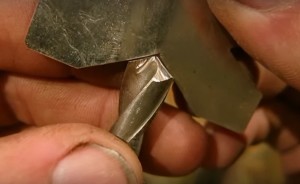
Remember! The tip of the drill should be exactly in the center.
Otherwise, it will be rejected during operation. It is worth noting that in no case should you press hard on the drill, otherwise it may get defects (bend).
For example, if after sharpening you notice that the cutting edges are uneven and tilted under different angles to the axis, this means that the middle of the transverse edge is not in the center of the drill, and it will not work correctly.
When sharpening, be sure to pay attention to the original angle of the tool. It is he who will become your guide in the future. Then inspect the gimlet for damage:
- if you find serious defects, then you can use coarse sandpaper;
- if the defects are small and the drill is blunted quite a bit, use a lapping wheel. This operation is necessary for thin drills;
- if the concrete drill has defects in the shank cone - process the upper part of the tool, gently pressing it against the grinding wheel;
- after processing, carefully inspect the back surface of the drill again;
- if you notice, or determine with a template, that you have a perfect cone, you have sharpened the tool correctly.

After that, process the cutting edge of the drill. The size of the jumper for rational turning of the tool should be 1-1.7 mm.
What are the features of grinding machines
A home-made device for sharpening drills is designed for through and deaf gimlets made of steels, cast iron and various hard alloys. Depending on the type, the machines can be endowed with different functions. On some of them during operation, you can vary the angle.
Sharpening machines are:
- universal - used for various cutting tools;
- specialized - for one species.
It is to universal machines that devices for sharpening drills, because they can be processed:
- taps;
- cutters;
- dugouts;
- countersinks.
Machines are divided into two categories:
- Industrial - have high power and are designed for tool sharpening large diameter. Power depends directly on the engine.
- A household drill grinder is quite compact and is often used for home use. With it, even small-diameter drills can be processed.
There are seven sharpening methods:
- Single plane.
- Complicated-screw.
- Shaped.
- Elliptical.
- Conical.
- Biplanar.
- Screw.
How to make a drill sharpener
To make a homemade machine you will need:
- toggle switch;
- abrasive wheel;
- plug;
- engine;
- stand;
- wires.

Follow our advice:
- For safety reasons, place homemade machine into the housing, leaving only the axle and abrasive wheel outside. Remember, the device will work from the mains.
- Choose in advance the place where your drill sharpener will stand. It is desirable that it be on a metal table.
- Next, put the electric motor on the tabletop with the help of fasteners (clamps) and mark the locations of the bolt holes, if it has paws.
- After that, remove the electric motor and make 4 holes.
- Later, reinstall the motor and secure it carefully with the bolts.
Advice: If the engine does not have legs, you can strengthen it with metal strips (clamps).
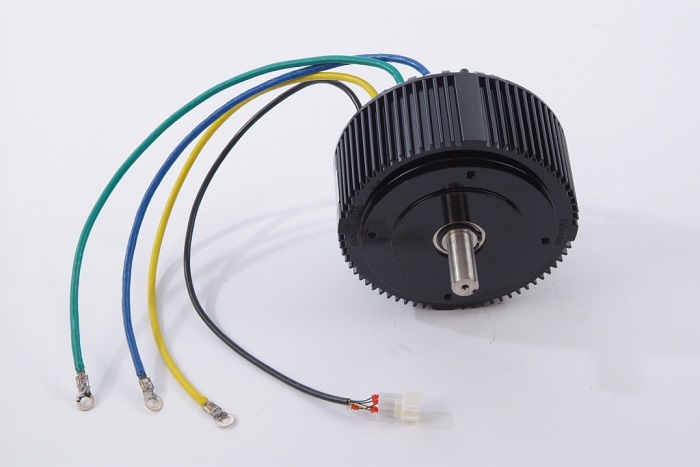
The electric motor for our future machine must be equipped with a special elongated shaft, on which a granular disk should be put on. For this:
- Install the fixing nut, having previously cut a right-hand thread on the end of the shaft.
- Secure the disc with washers and nuts.
If the diameter of the shaft and the hole of the disc match, then install the washer on the shaft, and then the abrasive disc. If the diameter of the shaft and hole do not match, then you need to add a bushing.
Pre-make a special side hole in it with a thread for the bolt in order to be able to tightly fasten it to the shaft. After that, you can put on the sleeve.
If you can't decide on an electric motor, then just take the motor of the old washing machine. It is ideal for homemade device sharpening.
It is worth noting that you must prepare the starter and wires in advance, which will later need to be connected. It is very important that the starter has at least three or four open contacts. Its winding must be connected using two buttons to the phase line.
Attention! The electric motor will be unsafe, regardless of the type - during operation, the rotating shaft can accidentally wind the cord, wire, hair.
Advice: Fabricate metal box to protect the machine from dust, abrasive particles, and you from accidental injury.
How to sharpen a drill on a machine

- When sharpening, it is necessary to ensure that the two shoulders of the drill are the same. If you achieve such a correspondence, then the axis of rotation of the drill will completely coincide with the center of the hole.
- Before sharpening, always make sure that the abrasive disc is firmly fixed.
- Always start the process with a coarser abrasive. After a burr appears on your drill, you can change the abrasive to a finer one.
- Watch the sharpening angle.
- Do not allow the windings to be switched so that the abrasive disc rotates in reverse. It should always move only in the direction of the blade.
Please note that drills do not tolerate excessive heat. Cool the gimlet regularly while sharpening. But in no case do not lower a red-hot drill into the water, as cavities may appear in it.
Accessories
- guide
In order not to keep the drill in the process of sharpening on weight (this can lead to injury), provide a substrate or guide in the form of a small attachment. It is made from a strip of metal, bent as shown in the figure and screwed to the frame (base). The drill rests on it and is brought to the circle at the right angle.
- Goniometer
Make on the guide described above, risks (marks) at the required sharpening angles. It will become much more convenient to use it.
If this is difficult for you, cut off the top of a regular protractor and glue it onto the guide.

Angles less than 30 0 are not used for sharpening, so we sacrifice them.
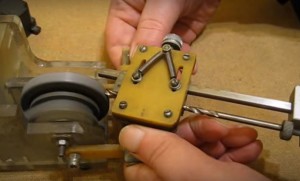
- Universal fixture
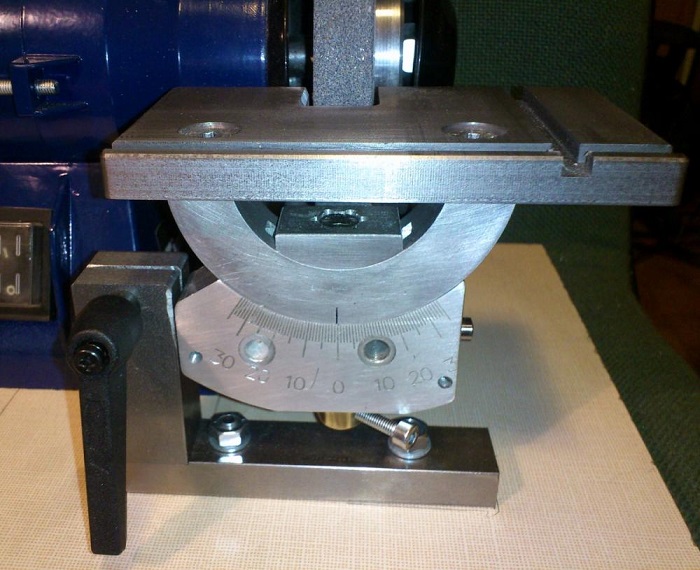
To facilitate the sharpening of tools, in particular drills, a mechanism has been developed, consisting of a drill chuck, a shaft, roller guides (sled) and a protractor.

The base substrate described above is made wide. A protractor is glued to it. A hole is drilled into which a bolt is inserted, which serves as the axis for the rotary surface.
A plate is installed on it on a roller slide, on which a pipe with a cartridge is fixed on the axis. The plate itself moves forward/backward using a conventional feed mechanism (threaded axle).
At the bottom of the rotary plate, a displacement limiter is fixed. It serves to rotate the device to the desired angle and for its stopper.

Working with fixture
- A drill is inserted into the chuck.
- The plate is rotated to the desired angle and locked with a pointer.
- Turn the handle, achieving necessary sharpening half drill.
- Notice the division.
- Rotate the drill by 90 0 and repeat the operation, bringing the drill to the noticed point.
Drilling metal or wood is a job that you do regularly. A high-quality nozzle does not require sharpening for a long time, but there are some errors in which blunting occurs ahead of time:
- The use of a drill that does not match the material being processed. This does not necessarily mean drilling reinforced concrete with a wood drill, although in this case you will instantly turn cutting tool into a rod with a rounded end. For drilling various kinds metal and hard plastics, there are specially made drills. In case of discrepancy - the cutting edge quickly becomes unusable;
- Wrong sharpening angle. This value must also correspond to the type of material in which the hole is made;
- Overheat. The most common reason. When working with durable material, we want to quickly finish drilling, and we often forget about such trifles as cooling the work area. If it is not possible to ensure the supply of coolant to the tool, it is necessary to take breaks to cool down. cutting edge. You can dip a hot drill into a container of water.
The mechanism of hot blunting is simple: The hot edge is “released”, that is, it loses its hardness. Cutting properties deteriorate, resulting in increased friction. Heating increases more strongly, and the process is aggravated in an arithmetic progression.
As a result, we may lose a good and possibly expensive tool. If there is a grinder for drills at hand, the problem is solved on the spot, if not, you have to invent your own methods of sharpening.
Manual sharpening without tools
Locksmiths with extensive experience sharpen drills with their hands, using only a sharpener with a handy tool. But not all home masters can boast of such skills.
In addition, in this way it is possible to restore sharpness only to products of large diameter. Then it is easier to control the angle. The most popular size (3-5 mm) cannot be sharpened in this way. Even a template won't help here.
Craftsmen who regularly carry out drilling work will be interested in the variety of grinders for drills offered in power tool stores.
However, such devices (despite the obvious ease of use) are quite expensive. So the “home-made” run to the store for another Chinese tip. But home craftsmen with experience still use a tool from the times of the USSR, which corresponds to GOSTs in terms of strength and durability.
The secret is simple - many old-school locksmiths have a homemade sharpening machine in stock.
IMPORTANT! For most household chores, you can get by with simple sharpening tools. Especially if the word "machine" scares you.
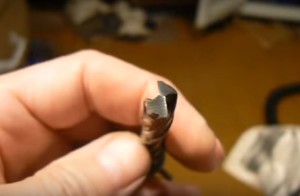
The simplest devices for dressing the cutting edge of the drill
To understand the process, take a look at constituent parts tip.

Clamp "swift". To use this device, it is enough to have an emery wheel (grindstone) equipped with a durable handpiece. The drill is clamped in the device at the desired angle of rotation of the edge. Controlling the feed angle of the cutting edge, we form it on the grindstone, then, without changing the angle, we “leave” for sharpening the backing.
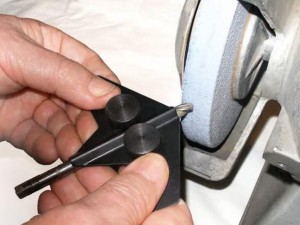
The device necessarily rests on a handpiece, the angles are controlled by hands. If you have certain skills, you can get a good result with obvious savings.
IMPORTANT! Before using the device on quality tips, practice on defective ones. This will allow you to “fill your hand” and “feel the angle”, as the masters say.
Of course, the use of a template is mandatory.
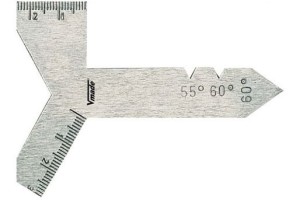
Also, before starting work, you should familiarize yourself with the standard tables of sharpening angles for various drilling materials.
Sometimes it is enough just to change the angle and level setting of the tool rest, and sharpening large drills becomes an easy task.

This method is appropriate for small amounts of work and the absence of high requirements for the quality of drilling. If you drill regularly and accuracy is important, you will have to buy a grinder or make one yourself.
Homemade grinding machine - basic design principles
There are two main tasks:
- Feed the cutting edge of the drill to the flat side at a strictly fixed angle. To do this, the machine must have an angular graticule. Moreover, the angles are maintained in two planes - horizontally and vertically;
- After forming and sharpening the cutting edge, it is necessary to form a backing. To do this, the fixture must have an axis of rotation;
No matter how modern those offered in stores look, the principle of their work has not changed for more than 100 years. This is evidenced by a photo of a manual from a vocational school of the sample of 1905.

Consider step by step how to make a device for sharpening drills from improvised materials.
Tools used:
- angle grinder (Bulgarian);
- Drill;
- The standard set of a locksmith - pliers, hammer, vice.
Materials used (found in a pile of metal junk that is in every home workshop):
- Corner 30-30 mm. Length 100-150 mm;
- Metal plates 3-4 mm thick;
- Steel circle or hairpin with a diameter of 10-12 mm;
- washers different sizes, standard fixture.
We take the angles of the factory sharpening as a basis. Based on this scheme, we assemble the entire structure.
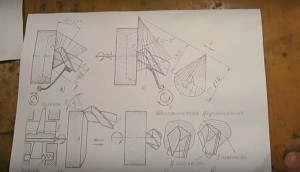
The bed is made of a steel plate, on which, according to the factory drawing template, an axis from a circle with a diameter of 12 mm is welded. Axis tilt angle 75°.
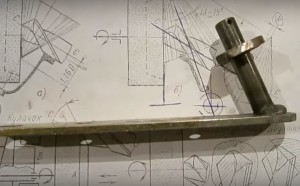
A washer is tightly fitted onto the axle, which will serve as a support bearing for rotary mechanism lodge. Since the turn will be made at a small angle, a ball bearing is not needed.
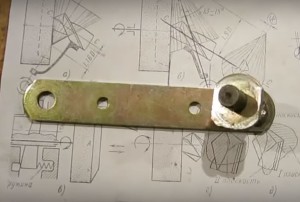
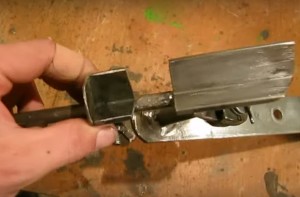
From the corner we cut out the bed for the drill. Length about 100 mm. The side that will face the grindstone is ground at an angle of 60 °. The bracket for the swivel assembly is welded at an angle, according to the drawing. As a result, we have a general design angle with a parallel position of the bed and bed, corresponding to the sharpening parameters of twist drills.
IMPORTANT! For drills for different metals, different cutting edge angles are provided, and grinders must have an adjustable angle. The proposed design has a fixed angle, for the sake of ease of execution.
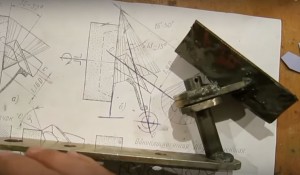
We make adjustment tests. Sharpening begins with a perpendicular position of the tip relative to the axis of rotation.
Then, by turning the bed, a plane (more precisely, a cone) of the backing is formed.
Sharpening is checked on the template and evaluated visually. All planes comply with the standard.
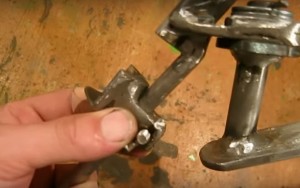
A guide is welded to the lower (rear) part of the corner bed to stop the drill shank. The emphasis itself is welded from the coupling and the corner.
Fixation is made with a screw. The stop is set to the limit value of the edge to be ground, and due to this, both cutting elements of the drill are ground symmetrically.
The sharpening of the working edge is made against the rotation of the emery wheel. In this case, the resulting burr is automatically removed by the running surface of the emery. For sharpening, two or three swings of the bed along the radius of the backing cone are sufficient.

This type of drill is sharpened along the outer surface of the emery stone, if necessary, use the lateral (radial) plane - the device can be turned to any angle.
The drill grinder is attached to the workbench with a clamp. You can fix the base permanently - but in this case, the possibility of fine adjustment will be lost.

As noted at the beginning of the material, this device has a fixed bed angle. If it becomes necessary to change the angle, for example, for dressing a drill for non-ferrous metals, you can place a wedge of the appropriate inclination under the bed.
This design is not the only one available for self-production.
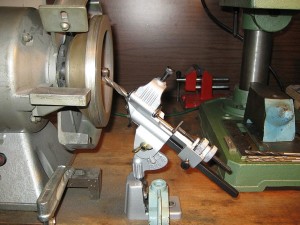
Consider a fundamentally different option that works on the same principle:
Parallel to the axis of rotation of the electric motor, a "P" shaped portal is installed with a swing bed in the upper part. The height of the bed is selected so that the drill is higher than the axis of rotation of the emery wheel.
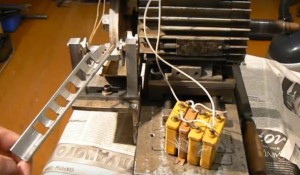
The stock has an angular range of almost 180°, which allows you to sharpen drills as top clamp, as well as the bottom one.
The horizontal angle is adjustable, depending on the type of handpiece.
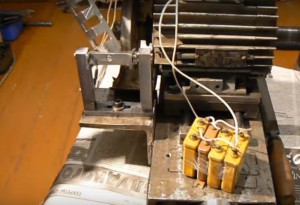
As a stop for the shank of the drills, bushings with clamping screws are used. This design allows you to adjust the drill overhang to the nearest millimeter.
The sleeve is installed in one of the rectangular grooves of the bed, and securely fixes the drill from horizontal movement. Diametrical studs in the sleeve serve for the correct orientation of the drill in the plane of sharpening. After processing one edge, the drill is turned over 180 ° and the second side is processed.

The distance to the emery is selected in such a way that too much material is not removed during sharpening. Shaking the bed several times, sharpening is performed until the drill passes freely along the emery.
The quality of processing does not differ from the use of factory machines for sharpening. Drills from 3 to 15 mm.
Autonomous drill sharpening machine
The considered options are in addition to the standard grinder. You can also make a full-fledged compact sharpening machine yourself, without the use of expensive components.
![]()
The bed is assembled from plexiglass 10 mm thick. The motor is from an old fan. The guide works on the principle of a caliper - the stop is fixed in an approximate position, then the exact distance to the grinding wheel is set using the trimmer screw. The drill moves horizontally, at a predetermined angle.
Having made any of the presented devices, you will save money, and you will always be provided with a supply of sharp drills.
Video lesson "Manual sharpening of twist drills" will help you understand how to restore the sharpness of a drill at home with a regular one.


