How to make music speakers at home. Creating columns in Microsoft Word text editor
Word text editor from Microsoft, which is included in the Office software package, has long become the unspoken standard for users for everything related to typing, layout and printing of text information. This program contains almost everything that may be needed in the process of creating text documents. Such rich functionality often turns into the fact that many users do not know or forget how to use this or that function.
Very often there are difficulties with such a simple action as dividing text in Word into 2 or more columns. Therefore, this article will remind or tell you how to split text in Word into 2 columns in different versions of the program.
In order to split text into 2 columns in Word, follow these steps.  In some cases, when you are not satisfied with the automatic division of text into columns, it is more convenient to use tables to divide the page into columns. To do this, create a table by selecting Insert –> Table in the menu and setting the table format as 2x1(two columns with one row).

After that, spread the text across the table cells that will become your columns, and make the table borders invisible by placing the cursor inside any cell and selecting the setting Borders –> no border in table editing mode.
In Word, it is possible to place text in several columns on one sheet, and then we will look at how to make columns in Word. A good example of such a text design is usually newspapers and various magazines.
You can set up text placement in Word in several columns before starting typing, or you can divide already typed text into columns. To create columns, go to the tab "Page layout" and on the menu "Columns" choose one of the suggested column placement options or choose an option "Other columns" to customize their number.
In the settings window that appears "Columns" you can fine-tune each created column by specifying its width, the distance between adjacent columns and, if necessary, set the separator line. These settings can be applied to the entire document, to the end of the document, or to selected text.

After the columns are created, the text will move to the next as it fills one column. If it is necessary to move to the next without filling one column to the end, a column break should be set before the text that should go in the next column. This is done on the tab. "Page layout" on the menu "Tears" item selection "Speaker".


Today's topic is devoted to creating columns in the Microsoft Office software product, namely Word.
If you have a need to make text in columns, then doing it in Word is very simple. It is enough to go to the “Page Layout” tab in the main menu and select the column icon in the page settings.

Here you can set one, two and three speakers, as well as two speakers with a larger one on the left or two speakers with a larger one on the right side.
If you need to do large quantity columns, you can use advanced column settings. To do this, click on the "Columns" icon again and select the last link at the bottom "Other columns" from the drop-down list.


Here we can specify the number of columns we need, set their width and specify the spacing between them. Separate them with a vertical line, or check the box so that all columns will be the same size (depending on the number of columns you specify).
At the bottom, you can specify whether to apply these settings to the entire document or only from a specific place.

In the page layout tab, using the Breaks and Hyphenation icons, you can adjust the spacing between columns and their placement.
Word text editor allows you to format text with the most different ways. Latest Versions This program has become so overgrown with various functions that now there is practically nothing that this text editor cannot do. In this article, we will talk about how to make text in two columns in Word.
Correct way to make text in two columns in Word
In order to make text in two columns in Word, you need to go to the tab " Page layout"and click on the" Speakers". After that, a drop-down menu will appear where you can select the number of columns you want to place on this page.
The following options are available in this drop-down menu:
- one - one column, the usual page format in Word;
- two - two identical columns, a page with two columns;
- three - three identical columns, a page with three columns;
- on the left - a narrow additional column on the left side of the page;
- on the right - a narrow additional column on the right side of the page;
In addition, in the drop-down menu there is an item " Other columns». This item opens an additional window in which you can set the width of the columns and the spacing between them.

Also, the size of the columns can be set using the ruler, which is located above the page.

Wrong way to make text in two columns in Word
The second way to create columns in Word can be considered wrong, but it is often more convenient. For this method Tables with invisible borders are used. Go to the Insert tab and use the Table button to create a table with two columns.

After the table is created, place the cursor inside the table and go to the tab " Working with tables - Constructor". Here you need to change the type of line that is used to draw the borders of the table. To do this, open the drop-down menu and select " Without border».
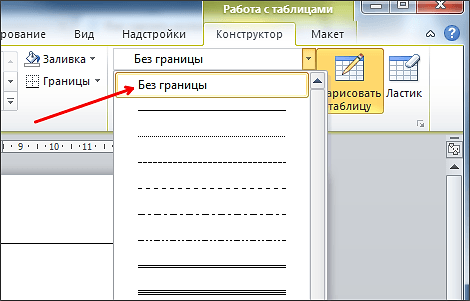

Such a line is visible while editing the document, but does not appear when it is printed.
How to make text two columns in Word 2003
If you are using Word 2003, then in order to make the text in two columns you need to open the menu " Format - Columns". After that, the "Columns" window will appear.

In this window, you need to select the number of columns and click on the " OK". If necessary, you can adjust the width of the columns, the spaces between them, as well as other parameters.
Do-it-yourself speakers are within the power of someone who knows how to handle a soldering iron, and also understands electrical diagrams. To work, you will need a small number of parts that can be borrowed, for example, from car radios. You will also need material for the manufacture of speaker cabinets. Usually wood is used for these purposes, but even plastic case from broken acoustics. Before you sit down at the soldering iron and etch the printed circuit board, you should choose the design, the microcircuit, the possibilities speaker system.
What do you need from acoustics?
It's nice when the sound played from personal computer, sounds in the entire audible range (from 20 Hertz to 20 kHz). To emphasize certain frequencies, you need to use special filters. Most of the cheap speakers that can be found on sale reproduce sounds in the range from 50-100 Hertz and up to 15 kHz. From this, the sound seems incomplete, ugly. Therefore, DIY loudspeakers must have higher performance to meet your needs.
Immediately decide which frequencies you plan to emphasize, whether your amplifier will have the ability to manually adjust. But if you decide to go the easy way, it will be enough to filter out low and high, so that devices that reproduce this spectrum work in parallel with the main speakers. You've probably heard words like "tweeters" (small speakers that filter high frequencies) and "subwoofer" (large wooden box, which houses the bass speaker). These are the ones you have to make yourself.
What do you need for a subwoofer?
Without a quality box, it will not work. Surround sound is created by air moving inside the box. Moreover, the air drives the speaker cone. So, you need to make a closed box with one air outlet. Since you are making speakers for your computer with your own hands, there is no need to use huge speakers that are used for car audio. The ideal option is car acoustics used as standard, which is installed in the front. Small diameter speakers, rubberized diffusers, soft and elastic. This is exactly what is required for a subwoofer.

Of course, it will not create strong air pressure, but for a small room it will be enough to emphasize low frequencies. You will also need a bass amplifier, there are a lot of these on the radio markets. If possible, you can remove it from an old car tape recorder. The output power must be at least 20 watts, and the power supply of the microcircuit is preferably unipolar. But the most important thing is the low-pass filter (LPF), because how to make a do-it-yourself speaker with a subwoofer without this node will not work. Do not clutter up the design with complex low-pass filters on microcircuits and operational amplifiers. A passive filter assembled from resistances and capacitors is enough. Depending on their parameters, frequencies are cut off.
How to make a subwoofer box
For the manufacture of the box you need to use durable wood. Chipboard or fiberboard is ideal, its thickness should be no more than 5 mm, so that the design is as light as possible. If there are old Soviet TVs in wooden boxes, then you can make a good box out of them. Cut out all the structural elements with a jigsaw. Acoustic speakers, assembled with your own hands, must be durable, so do not spare glue and self-tapping screws for fastening. The front part, on which the speaker is installed, is attached last.
To stiffen the box, use wooden slats triangular shape. Try to glue all small cracks and gaps. After all, the air in the subwoofer will move, and you need it not to come out of the slots, as the sound is spoiled because of this. In the back of the box, you need to drill a hole for the wire, a connector for connecting to the amplifier is mounted on the outside. It is much more convenient if the self-made sound speakers are compact and without external blocks.
How to make a power supply
As mentioned above, you should not take a chip with a bipolar supply for the design. The reason is the complexity of the power supply, it is not easy to get the current necessary for operation. Therefore, it is best to make designs that can be connected to a unipolar voltage of 12-24 V. And subsequently repairing the speakers with your own hands will be much easier, unless, of course, some kind of breakdown occurs. The power of the transformer should be slightly greater than the power of consumers - all amplifier circuits.

The best option is to make one power supply for all devices. For the effective location of all acoustic units, it is worth placing both the power supply, and the low-pass filter with an amplifier for the subwoofer, and the ULF for the main speakers and tweeters in one case. This will allow ergonomic use of the equipment, and the number of wires becomes minimal. On the back wall subwoofer, you need to install connectors for connecting the main speakers and tweeters. But keep in mind that the subwoofer is a source of vibration, so soldering must be done with high quality, and fastening to the case should be done using rubber washers.
DIY speakers: amplifier and power supply
The amplifier and power supply can be embedded into the subwoofer cabinet to save space, and outside install connectors for connecting "tulips". The hole is filled with sealant, after which the front side is installed. It is also mounted first with a sealant, and then attracted with self-tapping screws. After the box dries, it must be covered with a suitable material.

Can be used as a power supply a simple circuit: transformer, rectifier bridge and 2-3 electrolytic capacitors. Such speakers for a computer, assembled with their own hands, will work great, the sound will be clear and pleasant. If there is a slight buzz, then increase the capacity of the electrolytes. In the absence of elements with a large capacity, several pieces can be connected in parallel, then the total will be equal to the sum of all capacitors.
How to make basic speakers with your own hands
For the manufacture of the case, you can use both wood and plastic. It is better to give preference to the first, since when it is used in acoustics, the sound quality improves. If you are too lazy to cut wood, then you can ennoble the speakers from the old radio or use them without alteration. The amplifier and power supply will be assembled in the subwoofer box, so all that remains is to connect the speakers to the desired connectors. Therefore, if you have two speakers from the music center, you can safely use them.

If you decide to do everything in at its best, then, by analogy with the subwoofer box, you also make two cases for the main speakers. If desired, they can also be pasted over with attractive material. Pasting with thin felt, for example, improves the sound quality of the speaker system. In these speakers, it is most reasonable to install two speakers each - for medium and high frequencies. This will save wires for connection, and provide a more attractive appearance the entire system.
Production of a printed circuit board for amplifiers and rectifiers
Perhaps no less laborious process, which will take a lot of time. If the scheme you have chosen is simple enough, then you can apply a pattern to the foil material using a permanent marker. Pre-treat the foil with car battery electrolyte or hydrochloric acid. This will degrease the surface and improve the etching process. If the PCB pattern is complex, then it is better to use laser ironing technology and software for drawing tracks. Here's how to make a column with your own hands, namely a printed circuit board for it.
In the program, you outline the arrangement of elements, draw paths, and then print the resulting image on a laser printer with maximum black saturation. Paper is better to use glossy. Then lay the drawing face down on the surface of the textolite foil, fasten the paper and wrap it in a clean rag. The heated iron now needs to be driven over the rags so that the pattern is printed as accurately as possible. This procedure is carried out within 10-15 minutes. After its completion, moisten the paper in water, all excess will go away, and only toner will remain on the foil. If necessary, you need to draw the missing elements with a permanent marker.
Board etching
After the transfer of the picture is completed, you will need a solution of ferric chloride. Most radio amateurs use it, since the etching process with it takes little time. If using a solution blue vitriol and salt, then etching can take a day or two, depending on the concentration of substances. It also happens that a solution of ferric chloride corrodes copper poorly, so to increase the etching rate, you need to heat it. Just try not to miss the moment when the tracks are freed from excess metal, otherwise the part of the foil that is under the toner will be destroyed.

In principle, you can make music speakers with your own hands without etching printed circuit boards. There is a hinged installation, which is much easier to do. But it's a beautiful board with correct installation it looks much nicer than the wires and conclusions of the elements assembled in a heap. Yes, and the possibility of interference in the case of hinged mounting significantly higher. After etching the board, it must be thoroughly washed and dried. And only after removing the toner layer with a solvent or alcohol, you can proceed to install the elements.
Mounting elements on a printed circuit board
Now you just have to outline the location of all the elements on the surface of the board. First, make marks in those places where you want to make holes with a drill with a diameter of 1-1.2 mm. The lesson is not easy, because with strong pressure, you can simply break the drill. To improve printed wiring, it is necessary to tin (cover with a layer of tin) all the tracks of the board. To do this, you need to treat them all with a solution of rosin, after which, with a heated soldering iron with tin, go through each one so that the solder reliably adheres to the copper surface. Excessive heating is not needed, as there is a risk that the foil will begin to peel off the textolite.

Before installing the elements, their terminals must also be tinned. Only in this case, do-it-yourself computer speakers will have the highest possible reliability. In the presence of vibration, the soldering can collapse very quickly, the contact will disappear, and the amplifier will stop working or will work, but with a wheezing, unstable.
Conclusion
As you can understand from all that has been said, you can make high-quality acoustics from any material that is at hand. Pay only attention to its condition, do not use rotten wood for a subwoofer or speakers. The elemental base of bass amplifiers is very small - one microcircuit is enough, which provides an output power of 10-20 watts in two channels. Simple music speakers, designed with your own hands, will serve you long years, and the sound quality will allow you to enjoy both music and films with special effects.
We also recommend
 How to make a healthy banana smoothie
 Harvesting asparagus for the winter recipes for cooking at home
 Chicken pie with zucchini and cottage cheese Dukan's recipes zucchini pie with cottage cheese
 Gingerbread with icing
 How to cook a salad with crab sticks and carrots
 Cabbage salad with bell pepper - the best recipes