Electric switches with adjustment. Useful information about dimmers
Very often there is a need to regulate the brightness of the lamp within a certain value, usually from 20% to 100%. Setting the brightness lower does not make sense, since most lamps simply do not work in this mode or provide a tiny amount of light, which is only enough to glow the lamp, but it will not illuminate anything. You can go to the store and buy a ready-made device, but now the prices for these devices are very high and do not correspond to the product received. Since we are jacks of all trades, we will make these devices ourselves. Today we’ll look at several diagrams that will help you understand how to make a 12 V and 220 V dimmer with your own hands.
On a triac
First, let's look at the circuit of a dimmer operating from a 220-volt network. This type of device operates on the principle of phase shifting the opening of a power switch. The heart of the dimmer is the RC circuit. The control pulse generation unit, which is a symmetrical dinistor. And in fact, the power switch itself that controls the load is a triac.
Let's consider the operation of the circuit. Resistors R1 and R2 form. Since R1 is variable, it changes the voltage in the R2C1 circuit. Dinistor DB3 is connected to the point between them and when the voltage reaches its opening threshold on capacitor C1, it is triggered and supplies a pulse to the power switch - triac VS1. It opens and passes current through itself, thereby producing voltage at the output. The position of the regulator determines which part of the wave will go to the lamp. The faster it charges, the faster the key opens, and most of the wave and power will go to the load. Thus, the circuit literally cuts off part of the sine wave. Below is the operating schedule of the device.

The value (t*) is the time during which the capacitor is charged to the opening threshold of the power element. This dimmer circuit is simple and easy to repeat in practice. It works best on incandescent lamps, due to the fact that the spiral in the lamp is inert, but problems may arise with LED and other lamps, so it is necessary to check the functionality of the circuit specifically on your consumers before final installation. We recommend watching the video below, which clearly shows how to make a dimmer on a triac:
Triac power regulator 1000 W
On thyristors
You don’t have to buy a triac, but make a simple dimmer using thyristors, which can be easily obtained from old non-working equipment and boards, like TVs, tape recorders, etc. The circuit is slightly different from the previous one in that each half-wave has its own thyristor, and thus its own dinistor for each switch.
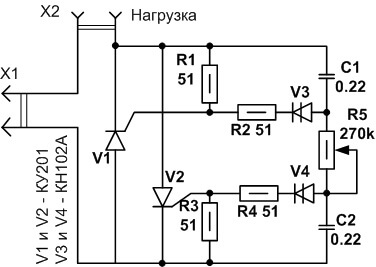
Let us briefly describe the regulation process. During the positive half-wave, capacitance C1 is charged through the chain R5, R4, R3. When the opening threshold of dinistor V3 is reached, the current through it enters the control electrode of thyristor V1. The key opens, passing a positive half-wave through itself. When the phase is negative, the thyristor is turned off, and the process is repeated for another switch V2 and capacitor C2, which is charged through the chain R1, R2, R5.
Phase regulators - dimers can be used not only to adjust the brightness of incandescent lamps, but also to regulate the rotation speed of the hood fan; you can make an attachment for a soldering iron and thus regulate the temperature of its tip to improve the quality of soldering.
Video assembly instructions:
Thyristor dimmer assembly
Important! This control method is not suitable for working with fluorescent, energy-saving compact and LED lamps due to the nature of their operation.
Capacitor dimmer
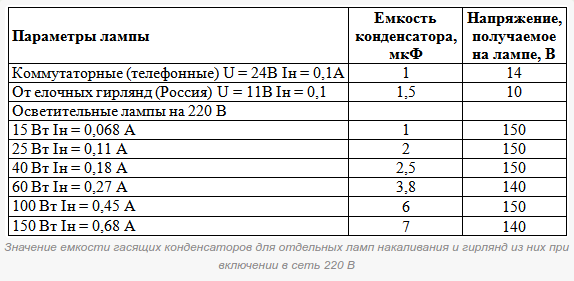
Along with smooth regulators, capacitor dimmers have become widespread in everyday life. The operation of this device is based on the dependence of alternating current transmission on the capacitance value. The larger the capacitor's capacity, the more current it passes through itself. Thus, using a capacitor, you can reduce the power supplied to the lamp, but this method does not allow for smooth adjustment. This type of homemade dimmer can be quite compact, it all depends on the required brightness parameters, and therefore on the capacitance of the capacitor, which is related to its size.

As can be seen from the diagram, there are three positions: 100% power, through a quenching capacitor (power reduction) and off. The device uses a non-polar paper capacitor, which can be obtained from old equipment. We talked about that in the corresponding article!
Below is a table relating capacitance and lamp voltage.
Based on this circuit, you can assemble a simple night light yourself and use a toggle switch or switch to control the brightness of the lamp.
On the chip
To regulate the power supplied to the load in 12 Volt DC circuits, integral stabilizers - KRENKs - are often used. The use of a microcircuit simplifies the development and installation of devices due to the small number of radio components. This homemade dimmer is easy to set up and has some protection functions.

Using variable resistor R2, a reference voltage is created at the control electrode of the microcircuit. Depending on the set parameter, the output value is adjusted from a maximum of 12 V to a minimum of tenths of a volt. The disadvantage of these regulators is low efficiency and the maximum possible power of the connected load; as a result, there is a need to install an additional radiator for good cooling of the KREN, since part of the energy is released on it in the form of heat. However, it is ideal for low power DC and low voltage circuits due to its simplicity and versatility.
This lighting controller was repeated by me and did an excellent job with a 12 Volt LED strip, three meters long, and made it possible to adjust the brightness of the LEDs from zero to maximum.
An excellent option is a dimmer on an integrated timer 555, which controls the KT819G power switch and short PWM pulses. By setting the circuit to a high frequency, you can get rid of flickering, which often occurs due to cheap commercial dimmers and causes rapid fatigue and irritation of the human eye.
In this mode, the transistor is in two states: completely open or completely closed. The voltage drop across it is minimal, which allows you to connect a more powerful load and use a circuit with a small radiator, which compares favorably with the previous circuit with a ROLL regulator in terms of size and efficiency.
![]()
Making a 12 Volt light controller
That's all the ideas for assembling a simple dimmer at home. Now you know how to make a dimmer with your own hands for 220 and 12V.
Lighting is an important system of any room. And if it can not only be turned on and off, but also fine-tuned to specific needs, then this provides additional comfort. To ensure this possibility, you need to buy a dimmer (also called a dimmer or switch with a brightness control). Devices of this type allow you to finely adjust the brightness of the lighting element. In addition to the fact that this feature is convenient for moving around the premises at night, it also provides certain savings. A consumer who is not turned on at full power spends less electricity, which affects the size of utility bills.
The brightness of the lighting changes with changes in the power of the current supplied to the lamp. Because of this feature, dimmers are sometimes referred to by the more cumbersome term “dimmer switches.” But such a definition does not fully correspond to the truth. Real rheostats for use in dimmer switches are bulky, expensive, and require significant physical effort to operate. Therefore, most modern models use semiconductor triac or transistor switches.
In addition, due to the different designs of lamps and lighting elements, dimmers also have a lot of differences between specific models. An incorrectly selected dimmer will damage the lamp or wiring. And to understand the types of such devices and buy the right light switch with a dimmer, it is enough to have a small base of theoretical knowledge.
Types of connected lighting elements
First of all, the design features of the required dimmer depend on the type of lighting elements. An LED bulb works differently than an incandescent bulb. Therefore, in order to buy the appropriate type of dimmable switch, you need to consider the type of lighting element:
incandescent lamps designed for different voltages;
several types for halogen lamps with different operating voltages;
universal device for LED and fluorescent light sources;
Energy-saving lamps are a separate case; they can be dimmed, but this needs to be checked with specialists.
If you buy an unsuitable light switch with brightness adjustment, this can result in damage to the lighting element, lamp, dimmer, or more dire consequences. The highest degree of compatibility with the dimmer is found in Ilyich lamps, halogen and LED lamps. It is noteworthy that until recently, dimming LEDs was considered impossible. But modern technologies do not stand still, and now connecting a brightness control to an LED lamp or even a strip is not difficult.
When choosing a dimmable switch for halogen lamps, you need to pay attention to the type of compatible transformer. Thus, for luminaires with a winding transformer, a dimmer marked “RL” is used, and compatibility with an electronic transformer is indicated by the marking “C”. There are separate models with a built-in transformer, but they are designed for smart home systems. The absence of a ballast in a fluorescent lamp also means the need for a special type of dimmer (if the ballast is not built directly into the lamp).
Division by installation features
In addition to compatibility with certain types of lamps, switches with a regulator are also divided by type of installation (which also affects their price):
monoblock models are installed in a standard mounting box, occupy it completely and have a front cover like switches (they have an average cost);
instrument dimmers are also designed for installation in a mounting box, but they are installed using a mechanism that already exists in it (the cheapest, but most difficult to install options);
modular dimmers are even mounted on a rail in the electrical panel (the most expensive models);
Naturally, depending on the type of installation of the device, the methods of controlling it vary. Control configuration is the last important aspect to consider when choosing a dimmer.
Variety of controls
To control a dimmable switch, three types of solutions can be used: mechanical, infrared and radio, on which the price of the device depends to a certain extent. Mechanical control is common to all types of devices. In the case of monoblock dimmers, the rotary knob or keys serve as the only control method. Instrument dimmers can be equipped with external mechanical controls. And in the case of monoblock ones, mechanical regulators serve as a backup control system.
The infrared sensor is mainly the privilege of monoblock models. It allows you to control the light intensity using the remote control. However, this method has its limitations: the sensor receiver must be in line of sight and at a distance of no more than seven meters.
Radio control is much more versatile in this regard. In theory, any type of dimmer can be equipped with a radio signal receiver module. However, in practice, this is a mandatory system for modular dimmers, optional for instrument dimmers, and almost never found among monoblock ones. The radio module allows you to control the device at impressive distances and even through several walls.
As you can see, despite its apparent simplicity, choosing the right dimmer is a matter of many nuances. Three guidelines will help you avoid getting lost among the variety of types and designs: the type of dimmable light source, the installation method and the configuration of the controls.
Lighting a home is an integral part of a comfortable stay in it. For greater ease of use, modern light sources, especially LED lamps, are equipped with a special device - a dimmer.
Light
Such devices appeared almost immediately after the invention of incandescent electric lamps. Our article will tell you what this device is and why it should be installed in LED lamps.
Dimmer purpose

Modern dimmer for LED light bulbs
A dimmer for LED lamps, as for other types of light sources, is a special device designed to change the brightness of the light. Such a device operates by limiting the current and, as a consequence, power.
At the very beginning, such devices were variable resistance. But in such a situation, a significant amount of power was dissipated in space in the form of heat. After some time, autotransformers are used to change the brightness of the lamps. They had significant dimensions, which made their operation uncomfortable.
Today, a modern dimmer is a complex electronic device that is capable of not only adjusting the brightness level of lamps, but also other functions. For example, using such devices you can turn off the lighting using timers, as well as smoothly start the lamps. Models that are equipped with a remote control can be adjusted remotely.
Note! Dimmers for LED lamps are the most popular models for private houses and apartments today.
Dimmers, as light level regulators, can be used for various types of lighting devices.
Features of devices designed for LED lamps
There are situations when the existing luminous flux emanating from LED lamps does not satisfy you in terms of its brightness. To be able to adjust this parameter, you need to buy and install a dimmer for this type of light source.
Note! This device will be especially relevant if there is a periodic need to change the level of illumination in the room.

LED lighting in the apartment
In order for the dimmer to work in conjunction with LED lamps, the design of the lamp must contain a choke. These types of devices are designed for lower power when comparing this parameter with conventional light bulbs.
Note! LED lamps are approximately 10 times less powerful than conventional light bulbs. Therefore, to work with them, dimmers with lower power are needed.
Another feature of such devices is that to adjust their operation there is no need to lower or increase the current. In this situation, the brightness of the LED lamps can be adjusted by changing the current pulses in the network. When the pulsation frequency reaches 300 kHz, a flickering effect will appear in the lamp. This effect will be invisible to the human eye.
Design and principle of operation of dimmers
All devices with which you can regulate the level of illumination have a similar structure. Externally, they look like a switch, which is equipped with a rotating wheel. Modern models can be equipped with buttons or a touch panel.

Touch control dimmer
Each device contains in its design two connections to the circuit. You can connect such a device in the same way as a regular switch. You just need to connect the wires to the terminals correctly. You can use it in exactly the same way, only the list of possibilities will be many times wider.
Such devices operate on the following principle: the brightness of the lamps can change due to changes in current pulses in the network. In this case, only the pulse width changes, not its power. Thus, the dimmer operates on the principle of cutting off the voltage amplitude.
By turning the wheel clockwise or by pressing a key/sensor, the lighting in the room will become brighter or dim.
Compatibility of LED light bulbs with dimmers
LED lighting products today are represented by a variety of products:
- separate LEDs;
- LED strips;
- LED bulbs.

Variety of LED products
An LED lamp is a separate device that is standardized specifically for connection to an existing electrical network.
LED lamps have the following characteristics:
- standard base: type G, type E – threaded (E14 and E27), type MR;
- can operate from a standard electrical network of 50 Hz, 220 V without the use of special and additional devices;
Note! If the light bulb must operate at a voltage of 12 volts, then this must be specified in the plan for the use of additional devices.
- luminous flux similar to those for standard light bulbs.

Structure of an LED lamp
The LED light bulb contains the following components:
- diffuser;
- LEDs that are mounted on a special board;
- drivers, thanks to which the required operating mode of the light source is ensured;
Note! The driver is a device that provides power to the LED components in the light bulb. It stabilizes the current flowing through the diodes. At the same time, it can be used for dimming.
- systems through which the product is cooled during its operation;
- standard plinth;
- ventilation holes.
To control the brightness level in a conventional lighting system, many leading manufacturers produce special LED bulbs. The packaging of such products always contains the inscription “brightness adjustment” or “dimmable”.

Packaging a light bulb that can be adjusted
Such light sources operate according to the usual scheme, but their driver is capable of responding to the behavior of a standard dimmer. When the knob is turned, the driver begins to generate current pulses with a higher or lower duty cycle. This way you can adjust the brightness of the light by 10%. It is with this brightness that the light bulb will light up when the dimmer is turned on.
This product costs a little more than regular products. But it has additional capabilities that will not be superfluous in a high-quality lighting system.
Range of control devices
Dimmers are quite widely represented on the lighting market today. All their diversity can be divided into the following groups:
- modular. They are placed on DIN rails in distribution panels. They are used very widely. Such devices can be used to adjust the brightness of lighting, create lighting effects, and also as part of the Smart Home system. The control mechanism here is carried out through remote controls and buttons. The regulator is located in the installation box. It can be installed instead of a switch. Such a device is controlled using a switch or buttons;

Modular dimmer
- monoblock devices. They can also be mounted in a mounting box. It is the most common type of device of this kind. Such a dimmer is installed and connected in the same way as a simple switch - into a phase wire break;

Monoblock regulator
- remote blocks. Used to connect spotlights equipped with LED bulbs. They are controlled by radio or infrared remote controls, as well as remote panels and conventional dimmers.

Remote block
Also, dimmers, according to the control method, have the following classification:
- rotary. In this situation, a rotary knob is used that rotates clockwise and counterclockwise;
- rotary-push. To turn on the device, you need to press the knob, and the control process itself is carried out by a standard turn of the knob;
Note! With rotary-push dimmers, you can turn off the load by placing the control in a certain position.
- push-button (keyboard). There are keys on the front panel that can be used to decrease or increase brightness;
- sensory. These are the most modern models. Control here is carried out by touching the touch panel.
You can use any type of dimmer in your home.
Compatibility of regulators with LED lamps
Not all dimmers can work with LED light bulbs. Here you can use the following options:
- standard devices for regulating LED light bulbs;
- special PWM dimmer.
Note! Some dimmer circuits may not work correctly with drivers from certain manufacturers.
Therefore, today leading manufacturers of light bulbs (for example, Osram and Philips) work in conjunction with tracking manufacturers of regulators: Legrand, ABB, SchneiderElectric. There are special tables to assess such compatibility.

Dimmer and driver compatibility tables (example)
Remember that when selecting a regulator, it is necessary to take into account the power of the existing light source.
Relevance of using regulators
The question about the advisability of using dimmers to regulate the illumination level of LED lamps is quite difficult to answer. After all, any regulator will cost money, and besides, it still needs to be selected and installed correctly. Therefore, many in this situation ask the question “are dimmers needed at all?” To answer this question, it is worth considering the advantages of such regulators. These include the following points:
- implementation of a flexible and easily controlled lighting system;
- reduction of energy costs;
- lack of high heat generation;
- installation of regulators operating from a remote control will greatly increase the comfort of using the lighting system;

Dimmer for LED lamps with remote control
- the ability to change the color of the glow and create various lighting effects.
At the same time, the only drawback of such a lighting system is the additional costs of purchasing and installing equipment.
- a very convenient thing, as it allows you to smoothly adjust the brightness of incandescent lamps. As it turned out, switches with a regulator can differ significantly in characteristics and this must be taken into account.
In my new house, I installed two switches with a regulator - one on the arch lamps, the other on the chandelier in the hall. Both controls were identical, and when the control was in the extreme left position, the incandescent lamps glowed at full incandescence. Those. Apparently, the simplest principle of thyristor control was applied, in which the minimum voltage was 50% of the maximum, i.e. approximately 110 volts.
After three years of operation, the switch on the arch failed: it stopped turning off due to problems with the contact disconnection mechanism. There was another switch with a regulator in stock.

Light switch with regulator in the package
The packaging of the switch once again confirms that Russian industry has completely degraded: the barcode is Russian, but the switch is made in China.
Characteristics:
- Voltage 250 V;
- Current frequency 50 Hz;
- Rated current 2.5 A;
- Protection degree IP 20;
- Power 500 W.
Actually, we are primarily interested in power. As a rule, 500 W is enough power for a chandelier, not to mention arch bulbs.
Degree of protection of this circuit breaker IP 20, i.e. The switch is designed for “standard” operating conditions, such as residential premises. This switch should not be used in the bathroom, as it has high air humidity.
The switch is designed for installation in a mounting box.

Back of the switch
I have a metal mounting box installed into which one two-wire electrical cable goes.

Metal mounting box
Installing the switch is very simple: connect two wires, insert the switch with the top cover removed into the installation box and tighten the two screws with a screwdriver until the switch is securely fixed in the box.

The switch cover is secured with a nut.

The switch cover is secured with a nut
And this is what the switch with the regulator looks like after installation.

It's time to tell how the new switch with regulator differs from the old one. The new switch allows you to adjust the voltage from almost zero volts to maximum, i.e. from 0 to 220 V. For me, this is a plus, since the arch bulbs are used as “standby” lighting at night.
The photo shows that in an incandescent lamp the coil barely heats up when the minimum voltage is applied.

I admit honestly that I have not tried to use the switch with energy-saving lamps, so I cannot yet say whether this combination will work or not.
A dimmer is a very useful device and can be used in all rooms. Using this device, the brightness of the lighting is adjusted. The second name for a dimmer is a dimmer.
Using a dimmer, you regulate the voltage and light in rooms, rooms and individual parts of an apartment or house. In addition to saving on lighting, using dimmers you can create interesting lighting designs.
- Modular. Such dimmers are usually installed in distribution panels. With their help, lighting is controlled in staircases and corridors. Control occurs with a key switch or a special button. By pressing this button, a person turns the lamps on and off, but if the button is held for more than five seconds, it becomes possible to adjust the brightness level of the lamps.
- Dimmers that are installed in the installation box. These regulators are used with halogen lamps and incandescent lamps; they are controlled by a special remote button.
- Monoblock dimmers. Such dimmers are installed in a regular socket box and connected like regular switches. However, it is recommended to observe the correct polarity when connecting.
Monoblock dimmers for control are divided into:
In addition to the above gradations of dimmers, they also are divided into types of lamps they work with:
- Dimmers for halogen 220V and incandescent lamps. Almost all light dimmers work with halogen and incandescent lamps. Provided that they operate on 220V. Lamps have inertia, but inductance and capacitance do not. It should be remembered that if the voltage decreases, the color temperature of the light changes. It will decrease, and the radiation will begin to acquire a red tint. The color may become unpleasant at low lamp voltages.
- Dimmers for halogen low voltage lamps. If 12–24V halogen lamps will be regulated, a step-down transformer is required. The marking for such a transformer is RL. An electronic transformer requires dimmers marked C. This marking shows that it is possible to operate with a capacitive load. Dimmers must be able to smoothly turn lamps on and off. The service life of such lamps is significantly reduced due to sudden voltage changes.
- Brightness controls for fluorescent lamps. Regulation of such lamps is the most problematic. This type of lamp cannot be controlled by a standard starter. In this case, you need a different starting device. Such a device is called electronic ballasts, that is, electronic ballasts. With this equipment, power is supplied to the lamp at a frequency of 20–50 kHz. By changing the frequency, you can change the current that flows through the lamp, thus changing the level of glow.
- Regulators for LEDs. Pulse width modulation is used to regulate LEDs. In other words, current pulses are applied to the LED, the amplitude is optimal, and the pulse duration is adjusted, thus changing the brightness. There is no flickering, because there is a high pulse frequency, it can reach 300 kHz.
Dimmer - connection diagram
 Having seen the dimmer, the question of how to connect it and what kind of circuit is needed disappears. It is no different from a simple switch in size. The dimmer is installed in the same way as the switch in the installation box. The dimmer is mounted in the mounting box using special claws. The regulator is connected, like a switch, into the lighting circuit. Polarity when connecting must be observed.
Is it possible to install a dimmer instead of a switch? Yes. And it's not difficult. First, the switch is dismantled. To carry out this operation it is necessary turn off the power supply, and then make sure that it is missing using the indicator. Next, the frame from the switch is removed, and the screws of the mounting tabs are unscrewed with a screwdriver. The switch is removed from the box and disconnected from the wires; to do this, you need to loosen the screws on the terminals. After these manipulations, you can begin installing the dimmer. All operations that were listed above must be performed in reverse order, starting with connecting the regulator to the wires.
Dimmer connection diagram
The connection diagrams for the switch and dimmer are similar. Like a switch, a dimmer must be installed in series with the load.
For the bedroom, the most optimal and convenient scheme is to turn on the dimmer in series with a simple switch. It is recommended to install a dimmer next to the bed, to be able to control the light without getting out of bed. Dimmers for LED lamps are becoming increasingly popular in smart home systems. The ability to control lighting allows you to create zoning of rooms depending on a particular situation; if necessary, you can highlight and highlight the desired interior items.
How to properly connect a high-quality dimmer
 To be able to adjust the lighting from different points, you can use high-quality imported push-button dimmers, for example, French-made Legrand Valena regulators. The peculiarity of this device is that the kit includes additional control buttons; they can be installed in the desired room, however, there is a limitation fifty meters from the regulator to the remote button, which will be the farthest.
The connection diagram for a dimmer with remote control buttons is as follows. The phase wire goes to the dimmer terminal number one and the first terminals of the buttons, which are remote. From the second terminals of the buttons, which are remote, the wire should go to terminal B of the regulator. The load must be connected to terminal number two of the dimmer and the zero wire N.
Before installing the dimmer yourself, you must know a few rules to have an idea how to connect a dimmer:
- Despite the fact that there are several options for connecting regulators, the dimmer connection diagram is simple - they are installed in series from power sources to a wire that is a phase wire in the electrical network.
- To be able to adjust the lighting from several points in the room, it is recommended to use an expensive and high-quality dimmer, which has additional remote buttons.
We also recommend
 Metal products - we decorate the house and yard with our own hands
 A tool bag is an indispensable thing for builders Patterns for belt bags for metalwork construction
 DIY oyster mushroom mycelium
 Airbrush for beginners: instructions from the master!
 Designation of radioelements on diagrams
 Wood gasification Biomass resources for gasification