DIY metal crafts for the home. Metal products - we decorate the house and yard with our own hands
The fastest and most reliable way to fasten metal parts is electric welding. Anyone can learn how to use it. Having bought an inverter, and also spent half a pack of electrodes to gain practical skills, you can safely try to create metal crafts with your own hands. Installation of structures, repairs at the dacha, production of garden accessories and much more from now on becomes available.
The first metal crafts
Many people now have welding. Often the device is purchased for construction or repair purposes. Not even necessarily for yourself. If there is a need for it, you can call a self-taught neighbor or a familiar specialist welder. After completion of the work, the unit simply stands idle.
But sooner or later the moment comes when you should make up your mind and try to cook something yourself. There's nothing wrong with that, if you have the desire. The main thing at this stage is not to get burned and not to catch “bunnies”, and experience comes with practice. If you have a country house, there will always be a use for welding. With its help, you can solve problems of territory development much faster.
Not everything can always be bought in a store. Welding a gate, building a base for a bench or table, “grabbing” a hook to a metal post for attaching a rope or an additional support for weaving grapes - this seems like a trifle, but it seems inconvenient to call a welder over and over again for this reason. This means you need to master the basics and solve everyday problems yourself.
Welding Basics
Of course, it’s not worth taking on serious work with critical connections right away. You can practice on a piece of scrap metal. At the first stage, you should learn how to light an arc and hold it, maintaining a constant working gap between the workpiece and the electrode as it burns.
After this, you need to work out the technique of forming a weld, fusing a layer of metal onto a flat surface. Then you can proceed to adjusting the current for different thicknesses of the workpieces being welded. Welding is a technique for joining two metal parts, based on melting their surfaces at the junction. They are joined into one by adding a layer of electrode binder material.

The current is selected in such a way as to ensure melting of only the surface layer without the formation of holes. It is better to master the technique on electrodes with a diameter of 2.5-3 mm. They must not be old and must be dry, otherwise the first experience will most likely be ineffective, which may discourage you from learning how to create metal crafts.
Welding makes it possible to correct minor and sometimes serious flaws or installation errors. It is enough to cut off the seam of the “tack”, and the parts are separated. After cleaning the area of unsuccessful welding, the process can be repeated.
Material
Any owner of a country house or owner of a summer cottage will probably have metal waste on their farm. These may be the remains of pipes after the installation of a gas pipeline, water supply or heating systems. A real owner usually does not throw away the remains of a channel or pieces of reinforcement. You can also find used nails, bolts and nuts.
Such scrap metal very often becomes a material for new repairs or improvements to old ones. There will probably be outdated garden tools, chains, old dishes, as well as spare parts from a car, motorcycle or bicycle in the garage or shed that have not yet been handed over to collection points.
From all this you can make useful and practical metal crafts. With your own hands, using welding and available materials, you can repair old garden tools or make new ones from waste, taking into account personal experience, your preferences and business conditions.

You can make your backyard cozy without purchasing new equipment. From used, but still strong metal, you can build a base for a country table or bench. Finding the right sheet of particleboard for the table top and boards for the bench won't be a problem. Racks can be made even from substandard inch pipes.
If you have a supply of material, you can swing on a swing. It is better to make the structure permanent, with the base concreted. You need two sidewalls made of pipes welded at an angle, with jumpers for rigidity. The more massive the swing seat is, the larger this angle should be. The jumpers can be welded at ground level or even below so that they are not visible.
It is better to make suspensions from chains, but you can also use a reliable rope. The beam for fastening must be massive. A thick-walled pipe, a piece of rail or channel will do. It is best to fasten frame parts and suspension brackets by welding.
At any dacha, with rare exceptions, there is a barbecue or other similar device. A couple of logs for sitting, an old stump as a table and charred bricks for limiting the fireplace and laying skewers - for some, this may be relaxation, but it is better and more convenient to use a more advanced design.
The grill can be disassembled. You can bring it with you to your dacha, or it can also have a permanent home with the possibility of transporting it to a storage location. A barbecue made from an old steel barrel is quite suitable for this solution. You can make it yourself and get by with just a grinder and a drill. However, it will be better and easier if you use a welding machine.

An empty and washed barrel is cut lengthwise along the vertical center line into two halves. Legs made of rods, fittings or pipe sections are welded to one part. The top part serves as a hinged cover and can be mounted for convenience on welded old door curtains.
Crafts made from thin sheet metal can be secured by welding only after gaining some experience. In order to reliably weld parts and not burn a hole with the electrode, you should accurately select the welding current and work with short tacks with constant monitoring of the quality of the seam.
Metal sculpture
The garden around a country house is not only an area where trees and shrubs are grown for collecting fruits and berries. This is also a place to relax! A garden sculpture will be an excellent addition to well-groomed plantings.
It may not necessarily be made of concrete or plaster. For a person with creative potential, there are no limits to its expression. If at the moment you only have at hand a welding machine, half a pack of electrodes, a crowbar and the desire to create, then from all this you can build an original and unique composition. Moreover, the complexity of execution may vary.

It depends on the available material and the idea. Such metal crafts for the garden in one case can consist of a dozen different, at first glance, incompatible parts of different origins and purposes. In another case, it can consist of hundreds of repeating elements of the same type, connected by welding into a three-dimensional model.
Where do you get ideas?
This question cannot be answered unequivocally. Someone, seeing random details in one place, imagines how they will fit together if they are combined into a common composition. Another purposefully goes to a scrap metal collection point and wanders around mountains of this trash in search of a suitable part for the chosen sculpture.
You can get ideas or simply take someone’s already realized idea as a basis from specialized book publications that are dedicated to metal crafts. There is nothing wrong with creating something you like from scrap materials available around the house.
In any case, DIY metal crafts created according to an existing drawing or sketch will be original. Welding is not copying, but a kind of creativity. Anything that is made with a decorative design and repeats a pattern or composition is perceived as a kind of masterpiece.

Safety precautions
To ensure that DIY metal crafts do not serve as a constant reminder of a bad welding experience involving a burn or injury, care should be taken. Working without a mask or shield is strictly prohibited, otherwise you may be exposed to ultraviolet radiation.
A protective suit will protect clothing and body skin from flying sparks and splashes of molten metal, and thick mittens or gloves made of dense material will protect your hands. It is not recommended to knock scale off a seam without protective glasses; sharp fragments flying in all directions can get into your eyes.
When working near wood or fire-prone surfaces, have a bucket of water and a wet cloth on hand. Random sparks or electrode residue that bounce off and land on such materials can cause smoldering and subsequent fire. When working indoors, you need to pay attention to proper ventilation.
Owners of garages and country sheds often have a question about what to do with the scrap metal that has accumulated in and around the premises. Decorative and applied art is the oldest type of folk art. Metal products have always occupied one of the main places in this area of human activity. Having mastered one of the types of craftsmanship, you can solve many issues related to metal waste.
Nowadays, people have begun to forget that in the distant past, in order to survive, it was necessary not only to skillfully use a sword and bow, but also to be a good craftsman. I had to do a lot of things with my own hands. What can be made from iron? As before, a person cannot imagine his life without metal products. As before, we want to have not only reliable tools, but also beautiful ones. You can't do this without a skilled craftsman. However, any of us is endowed with original thinking and can become an artist. You just have to decide to do it.
Any beginning is preceded by a choice. To choose, you need to know what options are available. Artistic metal processing is a very broad area of folk art. Here are the main types of this ancient applied art:
- Artistic forging.
- Minting and production of tinware.
- Art casting.
- Jewelry creativity.
- Monumental creativity.
Artistic metal processing is widespread in Russia. The village of Pavlovo, Nizhny Novgorod region, was famous for the skill of its blacksmiths even under Peter I. The filigree products of Yaroslavl jewelry masters still delight jewelry lovers. And who doesn’t know about the Dagestan and Ossetian masters of artistic coinage! Tula casting and unique creations of craftsmen from Zlatoust! One can endlessly list the numerous centers of such art, distinguished by their amazing originality and captivating uniqueness.
The choice is very extensive. Many beginning masters try to embrace the immensity, trying to master all types at once. However, it has been proven by time that it is better to take on one thing at a time. Having accumulated sufficient skills, you can try a new type of art.
The best option is to become a real master in one of the above areas.
Blacksmith art
The profession of a blacksmith is one of the most ancient. This is a job for real men, because working in a forge requires not only artistic flair, but also strong physical abilities. Blacksmiths have always been a symbol of heroic strength.
What you can make with your own hands for sale at the forge. Here is a list of some widely sought after forged creations:
This is not the entire list of what can be created in a good forge. On horseshoes alone, given the modern obsession of people with superstitions, one can live comfortably. But for blacksmithing you need to have a forge equipped with everything necessary. Of course, this will require significant investment.
All investments will certainly pay off if you master blacksmithing seriously.
The most common and accessible area for DIY crafts for sale is, of course, minting. Many have tried this type of creativity when they tried to concoct a small picture from candy foil, squeezing out a simple design on it. To work on tin, you will need a special tool, but it is much cheaper than a blacksmith's. In addition, you can do a lot with your own hands from old tools stored in the garage.
Sheet metal products require additional accessories. In particular, a torch is needed to temper metal. This could be a blowtorch or a gas stove converted for this purpose. Such work cannot be done without special cutters and chasing tools. In addition to all this, to process coinage and other metal creations created at home, chemical reagents are needed for surface treatment and wooden blocks for attaching homemade products.
Many people wonder what kind of tin or metal can be used for coinage. Here the choice is up to the master. The material can be very different: from tin cans to metal profiles.
For clarity, the simplest scheme for making coinage from a tin can. Do you want to decorate a decorative mirror frame with round metal rosettes? To do this, you will need several tin cans, scissors, a hammer, a small anvil, a sheet of thick rubber for the backing, a stencil for the pattern, a stack for extrusion, and an emboss for decorating the background. For chasing from thin tin, a round sharp coin can be made from a simple nail or screwdriver. So, the scheme of work:

In addition to embossing, thin metal can be used to make dishes and various simple tools for the garden and dacha.
Casting and welding
When the question of decorative casting is raised, the first thing that comes to mind is tin soldiers. Really, tin and lead are obviously the most accessible types of material for such creativity. In addition to soldiers, any figures can be cast and successfully sold on the market. Having built a special furnace at your dacha, you can start casting more interesting things from copper. An important condition for this is compliance with safety regulations. First of all, you should remember about fire safety, otherwise a profitable enterprise can become a major ruin.
 When it comes to casting, we can think of monumental creativity in metal. Almost no artist here can do without welding. Any unnecessary metal trinket can become a detail of a future sculpture in a country yard.
Welding metal crafts with your own hands is on trend today. Nowadays, many people pay great attention to the originality of design solutions for country estates. Avant-garde sculptures of figures of the most unimaginable shapes made from scrap metal can be an excellent solution for completing such tasks. The weld itself can serve as an excellent decoration.
Every person strives to decorate their home. For this purpose, some buy various decorative items in stores, others make figures from scrap materials with their own hands. Made from wood, glass or metal, crafts occupy a worthy place in the home and attract with their originality.
Making metal decorative jewelry
Nowadays, many people make their own decorative elements. Why spend money on purchasing ready-made jewelry if you can make it yourself from scrap materials? Of course, working with metal requires certain skills and knowledge, so it is recommended to start by creating simple shapes.
To learn how to make crafts from metal, you will need to master the techniques of working with welding equipment. Welding is the best way to fasten metal parts together. If you don't have a welding machine, you can purchase one from a hardware store or ask a neighbor. You will still need electrodes to work.
Material for your creations can be found in the garage among unnecessary spare parts and sheets of metal. Those who constantly create decorative jewelry from iron even visit landfills in search of suitable parts. Thanks to the hands of masters, already obsolete designs take on a new life, being embodied in beautiful figurines and sculptures. Moreover, such material is obtained completely free of charge.
Metal crafts
 Iron is a durable material that is used in a huge number of structures.
You can make many useful things from it, for example, a table and a bench for a summer house, a barbecue, a stove, as well as original figurines that will decorate the area. Today, landscape design, which can be supplemented with metal products, is very popular in country houses. Crafts of this kind look very harmonious on the site and evoke envious glances from neighbors.
With patience, you can bring to life the most bizarre design. You can make an iron beast or a man, a model of an airplane or a motorcycle. It all depends on your imagination. If you can’t come up with anything, you can look at ready-made metal crafts. Photos of some of them are presented in this article.
Basic safety rules
 When working with metal and welding, safety precautions should be observed. You should not handle a sheet of iron without thick gloves. The material may have uneven and sharp edges that are easy to cut on.
When starting welding, be sure to wear a mask or safety glasses. In general, it is better to work in a special suit that will protect you from sparks flying in all directions. Do not cook near flammable materials: plastic, paper, wood.
From all of the above it follows that you can make decorative metal jewelry and crafts for your home and garden with your own hands. At the same time, you will not only save on the purchase of a finished product, but also enjoy the work.
What you can do with your own hands from old scrap metal
Even in ancient times, starting from the 11th century, it became a popular craft to make handicrafts with your own hands, from scrap metal or, as they were called then, metal rocks. Gradually, this craft turned into a real art, which is now an integral historical part of architecture and ancient buildings. You will be interested in seeing sculptures made from scrap metal with your own hands.
Today, there are many types of special tools that allow you to make sophisticated cuts on a metal surface, as well as weld or solder to connect several parts of non-ferrous or ferrous scrap. Modern technologies make it possible for anyone to make a product to their liking; for this it is not necessary to have any special artistic skills. All you need is desire and perseverance. Photos and videos of such handmade crafts can be seen on our website.
Be sure to check out - DIY crafts from waste!
DIY crafts have always been in demand and were quite valuable, as they emphasize the individuality and peculiarity of their owner.
Metal is one of the most durable materials; it can be used to create garden furniture or a children's swing, as well as small jewelry, such as a ring or bracelet.
For example, steel is much cheaper than gold or silver, but has greater strength; it, like precious metals, does not lose its color and does not corrode; many individual and original things can be made from it:


- From a steel barrel, you can make a wood stove.
 You can also make many useful and interesting things from waste car parts, for example,
- the valves of an internal combustion engine will make excellent jingling bells for doors,

- piston system and connecting rod mechanism, excellent table stand, it’s easy to make beautiful legs from them.

Environmental benefits
Scrap metal is thrown away every year and simply rots in the ground; instead, you can give it a second life by making some kind of craft; this is not only an interesting hobby, but also a way to protect the ecological system from dangerous elements released during the decomposition of metal in the soil.
You might also be interested in seeing:
DIY rose from a can of cola Coin medallion Some things are made of stainless steel
DIY metal products: features, types and drawings
In modern conditions, when the market is overflowing with mass-produced goods, handmade products are becoming increasingly in demand. Specialized departments and entire shops or salons are beginning to appear in cities, selling exclusive items made by master craftsmen. If you want to give someone an unusual gift, the best option would be handmade metal products, although there are many other handmade souvenirs.
Handmade exclusive
Execution techniques can be so diverse that the range of products amazes even the most experienced person. Most often, such souvenirs are purchased for interior decoration or as a gift. You can buy or order the following items:

Products can be made using the following techniques:
- decoupage;
- ceramics;
- artistic forging and casting;
- fusing;
- batik;
- Crochet;
- beading;
- embroidery.
It all depends on the imagination and technical equipment and skills of the authors. Among customers with large financial resources, metal art products are especially popular.
Areas of application
Items made using artistic casting and forging techniques are used to decorate elements in various areas of design:
- architecture;
- furniture;
- sculpture;
- cornices;
- staircase balusters;
- fireplaces, stoves, barbecues;
- costume jewelry and jewelry.
Decorative items made of metal effectively complement any interior, giving it a certain chic and luxurious style.
Types of decorations
Do you want to learn how to make metal products with your own hands? Photos of such objects fascinate with their beauty. All things look very elegant, and most importantly, they retain the warmth of the author’s hands. That is why such products are quite expensive. True connoisseurs of style are willing to pay well for something exclusive.
You can make various metal products with your own hands. The following techniques are used to process this material:

The items that can be made using these methods are very diverse. Masters do:
- bracelets;
- earrings;
- rings;
- pendants;
- belts;
- caskets;
- flowers;
- decorative vases;
- interior decorations;
- elegant plates for fruits or sweets.
Making metal products with your own hands is quite simple. The main thing is to know the stages of the process and have the necessary equipment.
Complex items require a lot of time and expensive equipment to produce, but some souvenirs can be made from almost nothing. It all depends on what you are going to do this for. If you choose artistic metal processing as a professional field, then you should be patient and realize that some financial investments will be required. To make simple but original gifts for friends, relatives and acquaintances, you only need desire and perseverance.
Manufacturing technologies
You can easily create metal products with your own hands. Photos of drawings and process stages will help you with this. Carrying out artistic work involves stages of shaping, processing and finishing. Making things, as already mentioned, occurs in different ways.
- Casting refers to the filling of a mold with a liquid alloy.
- Forging is the plastic processing of a material with a hammer, a press, as well as bending, twisting, and chopping.
- Bending is a simple type of the previous option, performed by riveting or welding parts of the product.
- Defining is a method of processing a thin, no more than 2 mm, sheet of metal with hammer blows, thanks to which it acquires the required configuration.
- Separate elements are prepared by stamping and cutting and holes are made.
- Filigree is made from twisted or smooth, sometimes flattened copper, silver, and rarely gold wire. The curved parts of the patterns are soldered.
- When minting, a relief pattern is obtained using stamps or special tools that are placed between the hammer and the product.
Drawings of metal products can be done manually or in special programs on a computer. Three-dimensional modeling allows you to make not only a regular drawing, but also to build a three-dimensional model of the future product. It makes it possible to see the appearance of a thing, including in the interior, long before its actual appearance. In this case, it is possible to adjust the parameters of the product without the material costs of re-manufacturing it.

How to make a box from an aluminum can
Even a schoolchild can make the most basic metal thing. The main thing is that this will require practically nothing except time, hard work, imagination and the desire to create. You can make a beautiful box from an ordinary soda can.
Materials and equipment
The raw materials for production, one might say, are lying under your feet on the street. You will also need the following items:
- sandpaper (skin);
- sharp scissors;
- ruler;
- pencil;
- ball pen;
- solid base no larger than A4 format (depending on the size of the box);
- sheet of paper for the diagram.
Sequencing
At the first stage, a layer of paint is removed from the can using sandpaper. It is better to do this from an unopened container, since its walls remain elastic under the influence of the contents. The process will go faster and you won't ruin the metal. If you use an empty one, be careful not to crush the can.

In the next step, you need to obtain a thin sheet of aluminum from the blank, the size of the reamer of the future box.

To do this, the can is cut.  Sharp and uneven edges are removed.

At the next stage, the edges and sides of the product are marked.

A thin metal sheet is placed on a solid base.

The diagram of the box can be drawn directly on a metal sheet.

Or you can trace a sketch made in advance on paper.

When the layout of the box is ready, we proceed directly to drawing the drawing. This is done using a ballpoint pen or a sharpened pencil. Please note that you will have to trace the patterns several times on both sides. This will make the design more decorative and convex.


You yourself were able to see that it is very easy to make products from thin sheet metal.
You may well be able to try your hand at this. You can make not only boxes in this way, but anything that comes to mind.
How to turn a hobby into a small business
Making such exclusive gifts can also be a profitable business. You can sell crafts through advertisements or recommendations from friends. If there is a salon in your city that accepts souvenirs, you can donate them there. It is quite profitable today to create metal products with your own hands. They can be put up for sale on many specialized websites. Such online sites are easy to find. The “Masters Fair” works well, but you can use other services.
How to sell your crafts online
If you decide to opt for online trading, then take into account that the operating principle of all stores is the same:
- You register as a craftsman who sells items.
- Fill out your profile.
- Exhibit your work.
- You come to an agreement with the customer.
- He pays for the goods.
- You deliver.
There you can display both finished items and take orders. It is very important to choose the right product category, come up with its description, and choose a high-quality image. Be sure to write a caption for the photo and indicate that you make metal products with your own hands. We accept exclusive items for sale that can easily be sent by courier or by mail to the customer. Items should not contain very thin or fragile items that could break during transportation. If such parts are available, you must provide high-quality packaging so that the product reaches the client in its original form. After all, every mistake can significantly affect your image. Try to complete all decorative metal products with high quality and on time. Good customer reviews play an important role in this line of work. This way you can turn your favorite activity into a source of income.

Finally
So, as you understand, it is quite easy to make metal products with your own hands. This type of activity would be an excellent hobby option. Also, your friends and family will be the happy owners of exclusive gifts. In addition, by offering samples for sale, you will create an image of a good craftsman and be able to make a profit.
Crafts from scrap metal
From what's lying under the welding table. Please do not judge too much for the clumsiness, but because... There is no grinder or milling machine, it was made using a grinder, electric welding, a file (when I was not too lazy))), and a cutter.
Moreover, it was done during lunch breaks, and when you are late...)))
I'll start with small things like cold stuff. From the bearing race. Hardening and tempering are done in a smart way, you can shave.))) I tempered it in an oven for calcining the electrodes. 


 Full size. Spring, bearing race. The pistol on the right is a working scarecrow gun with primers. At first I made it with construction cartridges, but it hurt my ears in the trash...))) The Kholodnyak (large) was forged and hardened in a forge.


 Full size MG.
Everything works until the drummer clicks. I did it for a week (if you count a couple of hours a day). Not working sights (in the sense of not moving). And the cupcake does not open (why, there are no cartridges anyway)))). 

 Source: The same thing - until the click. Magazine without spring. Not collapsible. I did not make a muffler or a cover for the barrel.


 I experimented with wood.)))

ya-superpuper.com
DIY crafts for the garden: step-by-step ideas and photos
For all lovers of tinkering, inventing and being creative, our today's selection of DIY crafts for the garden is intended. There is no single concept in them, some of them have practical significance, others are intended purely to lift the mood. On the other hand, isn’t this the most important thing we want to see in crafts for the garden?
DIY crafts for the garden: photos
Most of the DIY crafts for the garden, photos of which you will see below, are made from simple materials that are accessible to everyone. They will not require possession of complex tools, although construction skills may be useful to you, as well as artistic imagination. In addition to wood, plastic and metal, which we have traditionally used for many years, designers offer us new ideas for the garden. for which unusual materials are used. Who among us could have imagined that knitted items could become decorations for the site? And they did! We present to your attention a whole family of hedgehogs created using knitting needles and thick woolen threads.

Hedgehogs will look great both on the lawn, in the grass, and on the veranda or in the house. Such interior crafts will also be excellent souvenirs for friends. As you can see, they are all different sizes, all because they are based on cans and tins of different sizes. Even a child can make them if he has the most basic knitting skills in his arsenal. Pay attention to the choice of thread shade to imitate needles. If you cannot find melange yarn in shades of gray, black and white, then you can do it differently and simply knit in two threads, connecting black and white. In order to determine the size of the canvas, use a centimeter to measure the selected container: circumference and required height. Cast on the knitting needles the number of stitches that will correspond to the circumference. Use regular garter stitch, alternating knit and purl stitches. When the fabric is knitted, sew it like a sleeve and draw white threads through the narrow edge. They are knitted with four needles or special sock needles, on four sides. After knitting a little, put a jar inside the resulting stocking, which is intended for the base. After this, tighten the “rear” of the hedgehog with threads. Starting from the middle of the white knit, halve the number of stitches in each row to create an elongated muzzle.
At the very end of knitting, replace the white threads with black threads literally for a couple of rows to create a nose. All that remains is to sew on buttons as eyes, construct legs from threads, and the first hedgehog from a large family is ready.

A bird feeder is, of course, a noble craft, but cats may also want to occupy such a wonderful house. However, such crafts for a summer cottage made from logs are decorative in themselves, regardless of which residents occupy them. Moreover, at each site the fruit stock is renewed from time to time, so there remains a large number of logs that can be used for work. This design is very simple, but looks very impressive, especially if you place it on the territory of an alpine hill or in dense thickets.
Beer in cans and metal bottle caps do not have to be thrown into the trash. Start saving raw materials in the winter so that in the summer you can delight your children with funny metal crafts for your summer cottage in the form of owl faces.

To work, you will need a variety of metal parts and pieces (you can even see crafts made from a bicycle wheel below), but the principle of operation is the same - two more round parts are screwed onto the round base part with the help of screws - the eyes of an owl, and a tiny nose between them. The fastening is done using wire; it is inserted into the base material, three pieces on each side, to imitate claws and screwed to a branch, beam or other place where you want to place the craft.
DIY craft ideas for the garden
When looking for ideas for DIY garden crafts, you can go far and find products that are actually complex designs.
On the other hand, they are the ones that will cause the greatest delight among your guests, in contrast to the simplest crafts made from bottles for the garden. which are available at every site. You can try to make the following characters that will enliven your country landscape if you have minimal skills in creating sculpture. And, by the way, the basis of these garden sculptures are plastic bottles, but no one will guess about it except you.

To sculpt such a work, you will first need to create a frame from bottles. If you want to make figures as large as in the photo, then you will need to use not ordinary 1-2 liter bottles, but 5-6 liter eggplants. They are inserted into each other, each of them is first cut in half diagonally. Pieces of plastic pipes will serve as arms and legs; you can also bend them as you please. At the ends of the tubes we attach pieces of wire, between which we glue the fabric, we get excellent webbed feet. When the frame is completely ready, you can begin to cover the surface of the plastic with facade putty, dilute it to a dense consistency and coat the frame with an even layer. We cover the dried plaster with paint, and then glue the fabric on top of it with folds that will look like frog skin from a distance. And the final stage - we apply paint and PVA glue to the fabric, which will allow our figure to be in the open air, without fear of the sun, wind, or rain.

The following inhabitants of the decorative garden with their own hands are also dedicated to recycling materials harmful to nature. These chickens are made from colored plastic bags, which means they won’t be afraid of moisture either and will be able to please you for a long time. The only negative is that in the bright sun they can burn out and lose the brightness of their plumage. To create a polyethylene chicken coop, you will first need a frame made of thick wire. Take thick bags of bright colors, cut them into strips and string them on a needle, collecting them into a frill. This thread (or fishing line), on which the bags are located, is gradually tied around the frame. But while it doesn’t look too much like chicken, to do this, arm yourself with scissors and simply trim the layers of polyethylene, removing all excess. In order for the chicken to stand confidently on the ground, two wire legs are screwed to the frame and tied with black electrical tape. The final stages are purely decorative - make eyes, a beak with a beard and a comb for the chicken. For quiet purposes, you can use thick cardboard.
How to make DIY crafts for the garden
We continue to look for interesting ideas on how to make DIY crafts for the garden from materials that you have at hand. The following example can be recommended for those who have recently completed renovations, because we will recycle the remains of a corrugated pipe by making bright pumpkins out of it.

You can make such metal vegetables for your garden with your own hands in literally a matter of minutes. In the photo you see a hint on how this can be easily done: the pipe is simply pulled to the center and the edges are connected, for example, with an industrial stapler. After this, when the correct shape has already been acquired, you very quickly paint the metal using orange spray paint. We insert a piece of pipe and some building fibers inside. Now orange pumpkins will decorate your yard not only in the fall, but all year round, confusing your neighbors.

If you like to play bowling and you miss this hobby at your dacha, you can make a children's bowling alley from plastic bottles. But it’s boring to just knock down bottles filled with sand; it’s much more interesting when they are painted. These could be gnomes, as in the example, or the faces of characters from your favorite children's cartoons; in any case, knocking them down even with a simple soccer ball instead of a ball will be fun.
Beautiful DIY crafts for the garden
The following beautiful DIY garden crafts look different, but they are based on the same manufacturing principle. These are balls made of concrete and then covered with paint.

If in the first case this is an excellent decoration for a playground, then the second option, using metallic paint, makes such decor unearthly, cosmic.
Canisters of various detergents also have to be disposed of somewhere. We offer you two options for such artistic recycling. You can use a canister of even bright color to make a figurine of such a funny boar. You will need a minimum of additional materials - anchor bolts for the legs with hooves, an old brush to create real boar bristles and pieces of matching plastic for the ears. You can make one or a whole brood and place it for permanent residence in the sandbox.

And from a canister with inscriptions you can make a bird feeder. It must first be thoroughly rinsed and ventilated to remove any remaining chemicals. Cut out the middle so that there is space for pouring food, but there are still high enough sides. The surface of the plastic is smeared with PVA glue and hemp rope or twine is wound onto it in even rows.

Creative ideas for arrangement can be applied everywhere, even in the unusual design of a palisade. It immediately takes on an unusual look; it’s worth sharpening each peg and painting it with paint in different colors. This original set of colored pencils will not leave indifferent not only children, but also adults
Unusual DIY crafts for the garden
Unusual DIY crafts for the garden are limited only by your imagination, since if you have detailed information, any of us can create simple figurines. These could be crafts made from disks for the garden. painted stones, mosaics on the paths or elegant straw effigies.


The only thing you should always remember is that the decorative elements should still be beautiful so as not to look like just cut-off plastic bottles. If you are not confident in your artistic talents, then it is better to buy ready-made crafts in a store or order weaving, forging, and sculpting craftsmen who already have experience in creating garden beauties.
If you liked the article, express your “thank you” by clicking on the buttons below:
Imagine that you have become the owner of a suburban dacha in a beautiful place and with wonderful clean air!
But for now, your plot is just a gray, featureless piece of land, without buildings, country houses, fruit trees and flowers. How to register your summer cottage? How to make it alive, beautiful and attractive?

Some good tips in this article. For a person who has his own farm - a storehouse of wonderful ideas! I know firsthand: drinking water for chickens or other poultry has always been a problem. After all, it is not advisable for chickens to get wet, especially their legs. Often because of this they start to get sick. Therefore, a selection of ideas is a very useful hint.
My mother-in-law has a lot of laying hens, but I have never seen anything like this. I especially liked the ideas of drinking bowls for chickens; I would recommend such solutions to my mother-in-law. I think she will be only happy, and so will the chickens.
 For those who live in rural areas, such a thing is necessary. In the village, my grandmother used to water chickens using an inverted jar and a long saucer.
The system is very simple to operate, but the benefits are maximum, and it’s convenient for everyday use; you fill it with water and you don’t have to think about constantly adding it as the water flows. Convenient both outdoors and indoors. We still have pieces of pipes left after the repair; there will be a place to put them to good use.
Photos of forged products
If you love the strength of metal and the sophistication of its forms, then the selection of forged metal products will not leave you indifferent.
As you can see, the photo shows various household and interior items consisting entirely of forged metal, or including part of it.
Artistic forging fits perfectly into the interior, adding charm, notes of romanticism and antiquity to ordinary objects. As you can see, forged can be gratings, fences, furniture legs, headboards, bases and stands for lanterns and much more.
Forged products can be painted in any color, but black forged products are considered a classic option.
Forged products have not gone out of fashion for many years; they are a kind of classic style that emphasizes the exterior of any area. It is also noteworthy that forged products fit well into almost any room interior.


All photos on this page are taken from the site kuzniaoreh.ru and the products depicted on them were made by the “NUT” forge
DIY metal furniture - making metal furniture for home and garden
Several samples of metal furniture, which we want to bring to your attention, are easy to manufacture and practical. The absence of adhesive joints and the relatively low weight of metal furniture allow us to recommend these products as garden furniture and garden furniture.

Manufacturing of metal furniture
Special techniques are typical for making furniture with your own hands from metal., which you need to know. The starting material is usually duralumin or thin-walled steel tubes with a diameter of 16 to 22 mm. For metal furniture, the manufacturing process of which is described in this section, you can use disused duralumin folding beds, folding chairs, ski poles, etc.
The main operation in the manufacture of metal furniture is pipe bending. At home, this operation is easiest to perform in a special device consisting of two bars and a flat disk.
It is advisable to make the parts of the device from hardwood and securely fasten it on a solid base (workbench, table, etc.).
P.). The bars of the device are fastened so that there is a gap between them, allowing you to freely insert a pipe into it for bending. A prerequisite for the quality of this operation is to fill the pipes with sand or fill them with molten rosin. To do this, a wooden plug is hammered into the pipe blank at one end, then the tube is tightly filled with dry, fine-grained river sand. Now all that remains is to plug the tube on the other side and you can start bending.
When bending metal furniture parts of complex configuration, for example, a chair frame, it is necessary to use a plaz. The simplest bending plaza is a sheet of plywood or cardboard on which the contours of the future part are drawn. To reproduce the contour of a part on the plaza in full size, a coordinate grid is applied to it (similar to the grid shown in the figure on this page) and the configuration of the part from the drawing is transferred to the cells.
During the bending process, the part is periodically checked along the contour on the plaza. To connect pipe parts together, wooden adapter bushings are usually used, which allow the use of conventional fasteners - screws or studs. Plugs are placed in the supporting ends of the legs. Corks should be made from well-seasoned, dry hardwood. They can be turned on a wood lathe, and try to make the diameter of the plugs such that it ensures the tightest possible fit.
A few words about finishing metal furniture. Parts made of duralumin pipes are best finished by polishing to a mirror finish followed by coating with colorless varnish, but this is only possible with a power tool, an electric drill or motor, and a polishing wheel.
If you do not have such tools, then the metal parts of the furniture must be thoroughly sanded (especially steel) and painted with black or other colored varnish or paint for metal.
So, on the following pages of the site idea-master.ru we will tell you in more detail how to make metal furniture with your own hands: A round metal table, a metal chair, an armchair made of metal tubes, a kitchen table and a semi-soft metal bench.
All materials in the “DIY Furniture” section
How to make a bucket with your own hands from tin
How to make a bucket with your own hands from tin, galvanized iron or stainless steel with straight walls.
We cut out the product from the material

h– height (set the specified value)
d– diameter (set the specified value)
l– circumference (we find by calculation)
l = πd = 3.14 * 329 = 1033(mm)
h = 310(mm)
MANUFACTURING A CYLINDER
In the middle of the reamer we mark holes for attaching the ear

1.
On a rectangular sheet of thin-sheet galvanized steel GOST 14918-80, on a homemade manual sheet bender, or manually using a mallet and a beam, fold the edges of the sheet “heightwise” in opposite directions. Bend the sheet into a cylinder.
2.
We fasten the folded edges.
Press the resulting seam evenly with a mallet or mallet along the entire length of the cylinder.
3.
In order for the seam to remain inside the cylinder, it is necessary to carry out the following operation: turn the finished seam so that it is located near the edge of the beam; By hitting the seam with a mallet, we obtain the outer surface of the cylinder without a protruding seam.

FOLDING
The width of the fold depends on its purpose: obtaining a lock; rolling of wire.

4.
Set the cylinder relative to the block to its original position. Tap with a hammer and bend the fold.
5.
Tap with the pointed side of the hammer. We monitor the width of the fold - it should be the same.
6.
Align the fold by tapping with the blunt side of a hammer.
7.
We finally bend the bent fold at a right angle.
WIRE ROLLING
We insert a circle around the perimeter of the flange,

made of wire, the diameter of which must coincide with the outer diameter of the cylinder.

We round the circular edge and complete the seaming.
CONNECTION OF CYLINDER TO BOTTOM

8.
Fold the edges of the circle and insert it into the cylinder.
9.
With light blows of the pointed part of the hammer, we bend the fold inside the circle.
10.
Using strong blows from the blunt part of the hammer, we tap the seam on the beam, while turning the cylinder.
11.
We place the fold on the outer plane of the cylinder.
12.
If the work results in a convex bottom, it is necessary to level it.
13.
At the very edge of the bottom, we hit it with the blunt part of the hammer, along the entire perimeter of the circle. At the same time, the bottom will be leveled, the edges of the connection will receive a clearly defined contour.

ATTACHING THE INTERMEDIATE HOOP
The bottom of the bucket can be attached to the intermediate hoop, and the intermediate hoop can be attached to the cylinder.

14.
We attach the bottom of the bucket with a hoop.
15.
We connect the hoop with the cylinder (bucket body).
16.
We bend the fold at the hoop.
17.
We place the fold on the outer plane of the cylinder and thoroughly tap along the perimeter of the entire circumference.
MAKING THE EAR

We will cut out the ears from a similar material. Let's punch or drill through holes: two for rivets; one with a metal handle.
MANUFACTURING A HANDLE
We bend the handle from metal wire with a diameter of 5...6 (mm) GOST 18143-72.

How to make a bucket with your own hands from tin – as you can see, it’s not complicated. Having mastered a simple model. You can move on to a more complex model with sloping walls.
Every owner spends a lot of time thinking about how to decorate their home. Today there is a huge choice of materials - wood or plastic, but in the first place is metal - one of the durable, strong, resistant materials in the world, serving as an example and standard of metaphors.
History of origin
Metal products became most popular in Europe in the 11th century. Everywhere, facades of buildings, fences, and decorative statues began to be decorated with unusual forging, and the profession of a blacksmith became an honorable and famous figure in the early Middle Ages.

What kind of craft can be made from metal?
Having thought carefully, the owner decides to present a piece of the unusual to his home, but the question immediately arises: should he buy it or make it himself? Of course, do it yourself, because doing something with your own hands is much more pleasant and more profitable from a price point of view.

Today, forged ornaments for grilles, doors or fences are in fashion; forged animals, a mysterious owl, or a Russian bear also look great in the garden. Ladies prefer forged bouquets, and a rose created with their own hands will surprise anyone.

What do you need to make metal crafts?
There are not as many tools as it seems, all you need is the following list:
- Photo of a craft you like;
- Paper;
- Welding machine;
- Chisel and hammer;
- Grinder for cutting metal;
- Special rust solvent;
- Pencil and scissors, when using a stencil;
- Several washers or bolts for decorative elements;
- Steel rods, from a few centimeters to a meter.
- The basis of creation is sheet iron.


Step-by-step DIY crafts
An original idea for a metal craft would be an owl. First, for aesthetics you will need a template or stencil. It can be made from a sheet of paper with drawings printed on it.

After cutting out the owl drawing, the stencil should be applied to a sheet of steel and the drawing should be transferred; it should be done in the most realistic way.

The next step is to trim the metal with a grinder and drill holes for mounting and inserting the owl's eyes. After creating the body, you should move on to the details: the legs are made from a rod, and the irregularities are smoothed out with a grinder. At the end, our beauty is treated with a chemical rust remover and painted.

Master class on making roses
And materials. List of basic tools:
- Welder.
- Hammer and pliers.
- Sheet steel
- Bulgarian.
- Special paint for metal.
- Grindstone.
- Steel wire with a diameter of 6 mm.
- Metal scissors.


Attention. Do not forget about safety precautions when working with these tools! Be sure to wear gloves and a welding mask when working.


We take metal cutting scissors and cut out thirty rose petals (thirty petals will make the bud seem more magnificent). You need to move in cutting from small to large, that is, from 15 mm to 80 mm. Your rose should not be prickly. Therefore, a sharpening stone will help smooth out all the unevenness of the petals.


After forming a complete flower, we weld the spikes and clean off the excess with a grinder, clean the seams and cover with a layer of protective paint - the craft is ready.

Metal products with steel wire
The British National Academy of Sciences declared in 1856: “Everything that can be invented has long since been invented,” but time has shown a different outcome. So it is now. Every year new ways of decorating are invented.

For example, in recent years it has been fashionable to make a figure from wire or rod. Combinations and special weaves create an impression of indescribable beauty.

Master class - butterfly made of twig
In terms of its complexity, a steel butterfly is not difficult and will not take much time. Typically, the work technique consists of twisting the wire (the manufacturing process depends on the correct material: the material should not be too thick so that it can bend, but should not be too thin so as not to bend) into several layers.

A body is created using spiral turns, after which wings made from two ovals are attached.


Some interesting facts
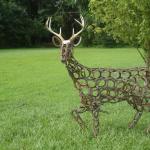
Metal is the most ancient mineral of interest to humans. He mined it, forged it, and then a new fence or another forged deer lit up the smile of passers-by.


During the rapid introduction of Hollywood films and the development of artificial intelligence, the topic of androids and the like became relevant. Although the world is far from the rise of the machines, it is always possible to forge a transformer, say, for an exhibition.

Vitaly Yashkovich from Krasnoyarsk became famous throughout the city for his miracle robots. His collection includes such titans of world cinema as: Megatron, Terminator T-200 and T-800, Star Wars androids, as well as droids from cartoons. The owner himself claims that he will not sell his robots to anyone, they say, he created for the soul

You too create, because the world is unidentified and multifaceted. Give him something new and unusual.

Photos of metal crafts


Metal is widely used due to the high strength and reliability of the material. Nails, wire, paper clips and other products come into use when the soul embarks on a creative flight for designer jewelry and crafts.
Make it funny composition of nails and nuts to decorate your interior or give it to someone - this is not a difficult task at all. Let's call it "Two people playing checkers."
First, let's find two nails (no more than 50mm) and four small nuts. You will also need several smaller nails. The nails are bent with pliers, repeating the shape of the sitting people. Two nuts are installed on the edge - these will be chairs. The remaining two will be the base for the table. Miniature checkers are installed on it. The chessboard behind which the games are played is made from a square piece of cardboard, and the checkers themselves are made from smaller nail heads bitten off using needle-nose pliers. To secure all structural elements to each other, you can use spot welding or special glue.

Many interesting crafts can be made from metal wire. Flexible and at the same time durable material allows you to create any shapes and designs.
To do it yourself butterfly made of wire and varnish You will need to put in very little effort. First you need to make a butterfly frame. It is most convenient to do the work in parts: assemble two wings separately, and then attach them to the body. You should not choose too thick wire for the craft - the thinner the wire, the neater the butterfly will look. Now that the frame is ready, you can start working with varnish. The brush must be passed along the inside of the wing to be filled. Then you should, generously dip the brush in the varnish, stretch the drop over the entire surface to be filled. You may not succeed the first time, but when the butterfly gains beautiful new wings, you will receive real satisfaction from the work done.

Insects often interfere with our daily lives. But made independently paper clip fly, traffic jams and salt shakers will probably not bring you any trouble, becoming your most favorite craft.
Let's assemble the fly's body - to do this, connect two corks with the letter "T" using glue.
Then we will straighten a dozen paper clips - they will serve as material for making various parts of the insect. By bending the paper clips in the way you need, we will make the blanks for two wings and legs of the fly. The eyes of our craft will look gorgeous if they are made from two lids taken from salt or pepper shakers. The last stage of the work is to connect all the parts together using the same straightened paper clips. The fly is ready to fly!

Now it’s worth showing that useful crafts can be made from metal. Take, for example, an unnecessary spoon - how many different interesting and original things can be made from it. One of these crafts is key hook.
A lonely spoon has been lying around in your table for a long time - great! You should also find a block that will serve as the basis for the entire simple structure. A spoon (or a fork to taste) is attached to a block with glue, which in turn is fixed to the wall. Fastening is done with self-tapping screws or self-tapping screws. You should not “tightly” screw the workpiece to the wall - after all, this hook is made specifically for keys and is not able to withstand a lot of weight.

Metal goes well with natural materials, and crafts made from these combinations are distinguished by their interesting appearance. To make pot made from a metal tin can and wooden clips You will need a minimum of materials and effort. The top of the tin can is cleared of sharp edges so that further work with the product is safe. Then wooden clothespins are attached to the walls of the metal base (clamp down), forming a circle around the tin can. The pot is ready, now all that’s left to do is fill it with soil and plant the seeds.

Also, metal products can be combined with each other to create more interesting and original crafts. Insect made by hand, made of wire and paper clips- a clear confirmation of this. Only in addition to the above material, another brush will be needed for the body of the future craft. All parts of the insect are assembled separately - four wings, two eyes, a nose and legs. The frame of the wings is made of wire, and the middle is made of paper clips. The nose and legs of the craft are made of a more durable material - wire. A cylindrical casing is placed on the handle of the brush (this can be any unnecessary part or spare part for something), which is flattened at the base. The connection of all parts is done by tying paper clips and wires together. A little imagination and patience and you already have a new species of insect in your hands.
Many crafts, decorations and household items can be made from metal clips, wire or other products. To do this, it is enough to have a minimum set of tools and basic skills in working with this material. Don’t be afraid to start - remember that “the eyes are afraid, but the hands do”
We also recommend
 Metal products - we decorate the house and yard with our own hands
 A tool bag is an indispensable thing for builders Patterns for belt bags for metalwork construction
 DIY oyster mushroom mycelium
 Airbrush for beginners: instructions from the master!
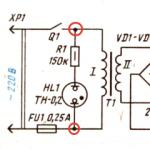 Designation of radioelements on diagrams
 Wood gasification Biomass resources for gasification