A pocket bag for tools made from improvised means. A tool bag is an indispensable thing for builders Patterns for belt bags for metalwork construction
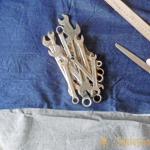
As they say, order should be everywhere. This also applies to your spouse’s tools. It is very easy to put things in order if you use an organizer for this. I suggest making your own organizer for wrenches. Now your accessories will be organized thanks to individual pockets. And the bag itself will take a very compact place among other tools.
We sew a organizer for wrenches with our own hands
01. To sew the organizer we will need a minimum of materials and time. I recommend using thick, wear-resistant fabrics such as raincoat or tarpaulin. I made it from thick denim. We will also need matching threads, scissors, a ruler and the wrenches themselves.
02. Decide on the size of the bag. To do this, you need to lay out all the keys in a row as they will lie in the finished product. That is, in descending order.

03. Now, using a ruler and chalk, mark the width for each pocket. The width of my largest pocket is about 7 cm. Further, in descending order, each pocket becomes narrower by 0.5 cm.
04. Keys can be removed. All that remains is to cut the pocket along the marked lines.

05. Cutting a pocket. I got the following. You may have different sizes depending on the number and height of the keys.

06. Cut out the resulting part and do not forget to add allowances for all cuts.

07. Fold the top edge of the pocket to the wrong side and hem it. For now we put it aside.

08. Let's work on the main part of the bag. We cut out the canvas according to the given diagram. The width of the organizer should be equal to the width of the pocket.

09. Cut out a rectangle and fold it in half.

10. Using pins, baste the pocket piece on top.

11. Sew using a sewing machine. We lay a line along each division on a turnkey basis. We fasten the ends of the lines.

12. Round and cut off the bottom corners.

13. Sew bias tape around the perimeter of the organizer. It can be cut from any suitable material. You can buy ready-made.
A tool bag is a must for any person doing repair work. And this is just a very convenient way to store everything that is usually kept separately. This bag is necessary for installers, mechanics, motorists and even needlewomen. You can make it yourself by drawing up a pattern depending on the number and nature of the tools. For example, for sharp ones you will need a hard cover to prevent the fabric from being cut through. But before that, you need to decide whether it will be a foldable fabric, for a belt or on a belt. The best option is a belt bag: it’s roomy, doesn’t take up your hands while working, and can easily be turned behind your back so it doesn’t get in the way.
What you need to make a tool belt bag
A homemade tool bag should be comfortable, as spacious as possible and suitable for the type of work being performed. The first thing you need to decide on is the materials. The fabric can be ordinary, but then you will need to sew thick paper in order for the product to keep its shape. In addition, you should take into account the durability of the fabric - it will be unpleasant if something made with your own hands quickly breaks.
There are three different types of materials for sewing bags: leather, leatherette and nylon. In rare cases, canvas fabric is used, but provided that the instruments are not sharp or are protected by covers.
The most affordable and versatile material is leatherette. However, the leather will be much stronger and easier to find. For a belt bag, you can alter an old briefcase or a woman's handbag - as a more suitable option than creating your own pattern.
Nylon is also accessible and versatile, has a lower cost and is therefore used much more often. Nylon bags are lightweight and do not require special care. They are easier to wash and clean than leather ones, which is especially important if you work with oils or other lubricants.
Another option is fabric-based oilcloth. It is also dense, inexpensive, and you can quickly sew a product from it without much expense. The cheapest option in terms of cost, you can also practice if you have no experience. But if you count on durability, then it is better to use leather.
Important! Leather is the best choice for making a durable tool bag.
The second thing you need: tools. You will need the following set:
- thick needle;
- strong threads;
- scissors for cutting out patterns;
- chalk or soap for marking lines on the pattern;
- sewing machine.
As well as the chosen fabric, zippers and metal rivets.
First, the pattern is cut out, after which all the parts are sewn together to form the finished product. If everything is done correctly, the bag will most likely last a long time.
How to make a tool bag for your belt with your own hands 
Pattern for the lightest model: just two or three rectangles sewn into one piece. Separate pockets for small parts are also taken into account.
Important! You should think in advance about the location of the departments, the number of pockets, the type of fastener, etc.
Sewing process:
- Cut out the pattern, leaving enough seam allowance.
- Hem the cut pieces to strengthen the edges. To do this, you can use fabric tape or overlap it with twine.
- Sew on a fabric belt that is wide and long enough to tie around your waist.
- Mark two pockets on the main apron, pinning the cutouts with pins.
- Inspect and try on the assembled parts, checking for ease of getting out the tools.
- Sew pockets.
The main thing you need to count on is the volume of the product. But you can’t stuff it all the way to the edges, otherwise the fabric will tear. The tools will pull it down, pulling the belt. The second is the functionality of all branches. It is important that they fasten so that small parts do not fall out, or remain open if necessary in order to get tools. You also need to choose the color of the material so that dirt is not visible.
Recommendations for making a tool bag 
The main recommendation is to choose a non-marking, soft material so that even sharp objects can be easily placed in it. Lack of contamination is especially important if the main purpose of use is repair or construction work.
In addition to the belt, it is recommended to equip belt loops. You can put a regular trouser belt through them to make it convenient to hang the bag on your belt if long waist tails are not too comfortable. This way it will take a compact shape when hanging, but remain roomy.
The tool bag is quite simple to make, considering the strength of the material and using all the tools.
A DIY tool bag will be useful to any installer, mechanic, car mechanic, or anyone who deals with.
Depending on the size, nature of these special products for work, as well as the number of pieces in such a set, the fabric, size and shape of the bag are selected.
In each specific case, a repairman or simply an owner who always has tools at hand in order to fix any household problems (broken furniture, leaking faucets), repair a car or boat.
For different types of work, a good set of tools should have everything that can be useful. It is important to first evaluate how large the bag should be: rollable, waist, shoulder strap, etc.
This type of convenient but compact bag is used when traveling, to store only narrowly focused tools, or to be convenient to take with you in the luggage compartment.
The simplest thing is to make a tool bag with your own hands using patterns.
The roll is made of thick fabric. It can be denim, tarpaulin, canvas material.
The average (most universal option) bag is made like this:
- First of all, you need to evaluate the thickness of the fabric and compare it with the expected weight of the tools that will be in it. If the material is of medium density, it is better to sew it in two layers (and each detail will have to be reproduced in duplicate and then sewn together).
- On the fabric, it is necessary to mark the rectangular parts of the pattern with chalk or bar soap of a contrasting color with the fabric (for example, the size of a bag for a repairman can be 50 cm by 45 cm with oblong pockets for secure placement of tools in them.
- After marking the fabric, it must be carefully cut along the outlined rectangular contours with sharp scissors.
- Now you need to check the edges of the patterns: if they do not crumble, the threads do not fall out (like denim), you can proceed to the next one; otherwise, it is necessary to process the edges with an overlocker or manually “house” to secure it.
After patterning (cutting) the semi-finished part, you can begin directly sewing the parts of the pattern together.
Sewing prepared pieces of fabric

What to do after finishing the previous four stages:
- Once a large, strong rectangular piece of fabric is ready, you can wrap those edges of the fabric, which in the example were 45 cm wide (this is the narrow side of the cut rectangle), towards each other so that a fold is formed. These are future pockets. The fold should be such that all the tools that need to be put there are held firmly in the pockets; they are usually made 11-13 cm deep, this depends on the length of the largest one.
- Now you need to sew with horizontal seams the places where the boundaries of the tool pockets will be. The main rule is to observe the checkerboard order of their arrangement. Having sewn up one side (you should get several vertical pockets), you need to lay twine or rope under the second, not yet formed fold of fabric - they will be useful as a holder for rolled up tools. Those places that will be near the end of the pockets on the sides of the product must be retreated by three centimeters, and it is better to sew them with several closely spaced seams to increase the strength of the product, especially the places.
- After sewing the second side in the same way, the bag will be ready.
After the work of sewing the parts is ready, you can sew all the connections again to be sure of the strength of the bag - that it will not tear at the most unfortunate moment.
Holder (lanyard)

If you sew several pieces of belt folded in the shape to the bag around the entire perimeter, you can thread a trouser belt through them.
This is very convenient for those who need to have their hands free during repair work.
With proper folding and sewing in exactly the right places, you can get a bag that takes a very small compact shape; you just need to roll up the bag with all the inserted tools and tie the lace inserted and sewn at the previous stage of production.
A do-it-yourself tool bag (drawings, patterns, diagrams) is quite simple to make, since the main thing is not the shape and number of pockets, but strength. To compile the optimal set (number) of tools, you need to use your master's instinct.
In the video you can see how to make a tool case with your own hands:
When renovating an apartment, it is important that all tools are at hand. When building a house or cottage, a similar item is also needed. The bag allows you to properly organize your workspace and save your time, because there will be no need to look for this or that tool. Even when climbing onto the roof to install a tool bag, you will simply need it. It allows you to free your hands and helps you not to be distracted from work all the time.
Such accessories are very popular both here in Russia and abroad. They are made from various materials, nylon or leather. The advantages of leather include its strength and the fact that it is able to maintain its shape. But at the same time, it has a number of disadvantages: it is heavy in weight, expensive, and offers a small selection of colors. In addition, if the tool bag gets dirty during work, it will be difficult to remove stains from it.
In addition to natural leather, bags are also produced from artificial leather, as well as from pressed leather that has undergone high-quality processing. It is popular due to its high strength, ability to withstand low temperatures, and wear resistance. Products from are inexpensive in price. Cases for storing tools are made from this material.

Nylon is a material of synthetic origin. It is durable and dense. Nylon bags are lighter than leather bags and are easy to remove any dirt from. The color variety of such items can satisfy any buyer.
They can be worn over the shoulder or on a belt. It depends on what tools it is intended for. The buyer can choose tool bags based on his taste. For example, an option with a wide belt that can be worn on the shoulder. This thing is very practical and affordable. These bags are very popular. However, they quickly lose their shape, and the tools stored in them end up in one pile.

More convenient is a tool bag made of nylon, inside of which there are special compartments, they have sealed walls. Bags with hard inserts are more expensive, but they are worth it. Their compartments and nests are designed for convenient storage of heavy items, which allows you to make a choice in their favor. Among the models of similar bags, one can highlight the manufacturer MATRIX. They are waterproof, wear-resistant, and suitable for use in field conditions.
The belt bag resembles a bandolier. It is attached to the belt. It can be called a tablet with a large set of slots and pockets designed to store tools. It is distinguished not only by its practicality of operation, but also by its ease.
When choosing which tool bag will be most convenient for you, you should proceed from the work that needs to be done. For installing drywall, a holster specifically designed for a drill is suitable, as well as two pouches for storing self-tapping screws. If you have roofing work to do, then choose It should have pockets for nails and holes for a hammer. For household repairs, a tool bag called This model is designed to be worn on the belt; it is sewn to the belt. The bag has several pockets that vary in size, as well as many slots for tools.
Good health to all masters! I sewed a roll-up bag for tools. Maybe it will be useful to you! You will need thick fabric, threads, and nylon braid for finishing. We cut 2 pieces measuring 60 cm * 30 cm. I have dermantine and tarpaulin. These will be the bases to which the pockets are sewn.
We make two pockets. The first -71cm*20cm (above) is attached to the inside, and the other, consisting of two parts -(bottom) is sewn onto the first. The size of the second pocket is the bottom side - 60cm*18cm, the top - 75cm*18(8 )cm. The pocket parts are longer than the base, as allowances are needed for the thickness of the tools.

First we mark the compartments and cut off the top pocket. The length of the upper parts of both pockets depends on the number of compartments and the length of each.

We attach two layers of pockets along the aligned lines of the compartments to the outside. We grind the edge with nylon braid and at the same time grind the “visor”.

The result is not 2, but 3 pockets. I didn’t have time to finish it. and my husband has already loaded the tools!
We also recommend
 Metal products - we decorate the house and yard with our own hands
 A tool bag is an indispensable thing for builders Patterns for belt bags for metalwork construction
 DIY oyster mushroom mycelium
 Airbrush for beginners: instructions from the master!
 Designation of radioelements on diagrams
 Wood gasification Biomass resources for gasification