DIY LED flashlights. DIY LED flashlight: selection of basic elements and order of assembly of the structure Powerful LED flashlights diagram
A flashlight is a necessary thing when traveling to nature or to the countryside. At night, on a personal plot or near a tent, only it will create a ray of light in the dark kingdom. But even in a city apartment, sometimes you just can’t do without it. As a rule, it is difficult to get something small that has rolled under a bed or sofa without a flashlight. And although nowadays there are devices that are multifunctional and can be a source of light, some of our readers will probably want to know how to make a flashlight with their own hands. How to make a small device from scrap items will be discussed below.
Classic shape
The most convenient design, which in principle has remained unchanged for flashlights for many years, is the design containing:
- cylindrical body with batteries of the same shape;
- reflector with a light bulb at one end of the housing;
- removable cover at the other end of the housing.
And this design can be obtained using unnecessary household items. If you make a lantern with your own hands, you will, of course, not have the beauty of shapes like an industrial design. But it will be functional and you will get a lot of positive emotions from a working homemade product.
So, the main problem, which at first glance is difficult to solve, is the reflector. But it just seems complicated. In fact, we are surrounded by many objects that can become preparations for a whole range of reflectors of different sizes. These are ordinary plastic bottles. Their inner surface near the neck is very close in shape to that of a reflector made at the factory. And the lid seems to be created for mounting an LED in it, which is the best light source today. It is brighter and more economical than a miniature light bulb.
Making a reflector
The fact that you may not be able to find a tube of suitable dimensions for making a body is not a problem. It can be glued together from individual parts. For example, from unnecessary disposable ballpoint pens. To spring the contacts, you can use a spiral, which is used for binding pages, and the contacts can be made from thin sheet metal, the raw material for which will be a tin can. Therefore, we start by choosing a plastic bottle of the desired size and selecting the remaining elements. The smaller the bottle, the stiffer and stronger the reflector will be. The easiest way to fasten parts during assembly is using construction sealant.

So, let's start making a flashlight with our own hands. Using a sharp knife, cut off the neck and parabolic part of the body from the bottle and trim the edges with scissors.


For effective reflection, we use foil in which chocolate bars are wrapped. If its size is not enough, you can cut a larger piece from a roll of foil intended for baking products. To keep the foil on the surface, apply a thin layer of sealant. Then we press and level the foil over it. If she wrinkles, it doesn't matter. The main thing is that there are no swellings and that it follows the shape of the base.
We press the foil with our fingers and, smoothing out the unevenness, form the most even surface possible. Using scissors, trim the edges of the foil flush with the plastic base. Along the contour of the neck we make a cutout with a knife for the LED, which will subsequently be installed in this place on the socket.


We make it from the bottom of a bottle cap, cutting off the threaded edges with a sharp knife and, if necessary, trimming them with scissors. Then, using an awl or the tip of a knife to make two holes in the socket, we thread the legs of the LED through them, pressing its base against it. To correctly install the LED lamp in the center of the cover, you must select the correct distance between the holes according to the location of the legs in the base of the LED.


We bend the LED leads to the sides until they touch the edges of the socket. We attach the conductors to them by twisting. If the twisting turns out to be unreliable due to the properties of the wire cores or for other reasons, soldering is used. After attaching the wires, the leads are folded along the socket. It is recommended to check the performance of the received part using the batteries used in the flashlight.


Then we cut out a contact pad for the battery from a sheet of tin, which rests on the socket with the LED. By twisting or soldering we connect the pad - terminal with a shorter wire. We attach the terminal to a spring, which in turn is attached to the socket. To fasten the elements we use sealant.


Then we glue the socket with the LED into the reflector.

Bottom and case with batteries
The part of the flashlight body opposite the reflector is also made from a part of a bottle with a neck. But only from the very neck with the lid. A terminal made of a sheet of tin is glued to its inner wall. A wire is also attached to it. This wire and the second wire from the LED will be used to control the flashlight. The terminal is in contact with the battery, being pressed by a cap that is screwed onto the neck.


Two main parts are ready. Now we need to make a case for the batteries. To do this, we use dry and therefore no longer needed felt-tip pens. We leave only the body, which we shorten in length and cut along the axis at the ends, making two protrusions for gluing. Before cutting, make marks with a marker, applying the body of the felt-tip pen to the parts to be glued.


Apply glue to the protrusions and glue them to the reflector and the back, respectively.


Then we cut out the switch parts from the tin sheet. We mount the wires to them and glue the parts to the body.


We insert batteries into the flashlight and use it. This, of course, is not a factory-made flashlight with a high-quality reflector and high beam. But it is made with your own hands, it is your own product, which gives good low-level lighting and gives great pleasure, and money cannot buy it. Now you have a clear idea of how easy it is to make a lantern yourself.


Ready flashlight and light from it
If 10 years ago many people could only find LEDs in expensive equipment, now this product is ubiquitous. The cost of LEDs has decreased significantly in recent years, so their use in many areas of technology is constantly growing. Just 3 years ago, few people could afford to buy, for example, a flashlight that glows not with an incandescent lamp, but with LEDs. Now this problem can be easily solved. However, not all options are good. There are often cheap fakes on the market, in which the LEDs quickly go out and burn out, so buying a ready-made unit is not always justified. Making an LED flashlight with your own hands is not so difficult now.
This design will likely be more durable than a store-bought flashlight. In addition, it can not only be powered by batteries, but be rechargeable. This is a fairly convenient and economical option that you will surely like.
Required materials and tools
So, now directly about how to make a rechargeable LED flashlight with your own hands.
The tools and materials necessary for construction can be found in every home; in extreme cases, go to the nearest specialized store. Of course, an LED flashlight will need LEDs.
They have a number of advantages compared to conventional lamps. They are brighter, more economical, and shock-resistant. You will also need a battery that produces a voltage of 12 V. You can buy it in a store or pull it out of some unnecessary thing, such as an old radio-controlled toy.

For work you will need the following materials:
- pipe 5 cm, it is advisable to use PVC material;
- PVC glue;
- PVC threaded fitting - 2 pieces;
- PVC threaded plug;
- toggle switch;
- 12 V battery;
- a piece of foam;
- LED lamp;
- insulating tape.
You will need the following tools:
- soldering iron;
- solder;
- hacksaw;
- sandpaper;
- needle file;
- side cutters.
Now you can start creating.
Return to contents
How to make such a device?

First, select a battery. It should be shaped to fit into the PVC pipe. You can use not only the one-piece model, but also connect several finger or little finger batteries in series to get a total voltage of 12 V.
Now it’s worth including a toggle switch in the circuit. It can also be soldered. It must be open so that when it is closed, current will flow through the circuit.
The DIY lantern is ready. All that remains is to create a housing for it, because a lamp with a separate toggle switch and battery does not have a very aesthetic appearance. By the way, at this stage it is better to test whether everything is in working order in order to exclude alterations.
If everything is fine, you can start making the case. It is also very easy to make with your own hands from the remaining material.
First, you need to cut a hole in the fitting and process its edges with a file so that the lamp can be easily inserted.
Now you need to measure the length of the lamp along with the battery in order to know exactly how long the pipe that acts as the housing will be needed.
- Before installing the LED lamp in its rightful place, the edges must be lubricated with glue to subsequently avoid moisture getting inside the lamp. Now you can glue the fittings on both ends of the PVC tube to finally protect the lantern from moisture.
- The toggle switch must be installed on the side opposite to the lamp under the plug. Now you can wait a little until the glue dries and the flashlight is completely ready for use. Although this, of course, is not quite a flashlight, but some semblance of it, which needs to be brought to mind.
The fittings and plug will protect the flashlight well from moisture getting into it. This is very important, because water is something that greatly affects electronic devices, in particular, a flashlight is no exception. That is why in this version of the battery manufacturing, much attention is paid to the issue of protection from moisture.
For this, various devices and materials are used to prevent it from getting on electronic parts. You can, of course, neglect these safety measures, but there will be no guarantee of flawless operation for many months and years.
If everything is done correctly, the owner of the device will certainly be satisfied with his work.
LEDs today are built into everything - into toys, lighters, household appliances and even office supplies. But the most useful invention with them is, of course, a flashlight. Most of them are autonomous and produce a powerful glow from small batteries. You won’t get lost in the dark with it, and when working in a dimly lit room, this tool is simply irreplaceable.
Small copies of a wide variety of LED flashlights can be bought in almost any store. They are inexpensive, but the build quality can sometimes be disappointing. Or maybe it’s homemade devices that can be made using the simplest parts. It is interesting, educational and has a developing effect on those who love to make things.
Today we will look at another homemade product - an LED flashlight, made literally from scrap parts. Their cost is no more than a few dollars, and the efficiency of the device is higher than that of many factory models. Interesting? Then do it with us.

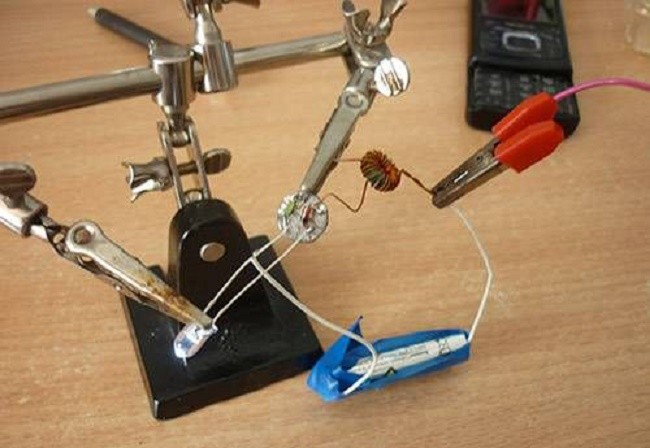
How the device works
This time the LED is connected to the battery only through a 3 ohm resistor. Since it contains a ready source of energy, it does not require a storage thyristor and transistor to distribute the voltage, as is the case with the Faraday Eternal Flashlight. An electronic charging module is used to charge the battery. A tiny micromodule provides protection against voltage surges and prevents the battery from overcharging. The device is charged from a USB connector, and on the module itself there is a micro USB connector.Required Parts
- Plastic syringe 20 ml;
- Lenses for LED flashlight with housing;
- Micro button switch;
- 3 Ohm/0.25 W resistor;
- A piece of aluminum plate for the radiator;
- Several copper wires;
- Superglue, epoxy resin or liquid nails.

Assembling a powerful LED flashlight
Preparing an LED with lenses
We take a plastic cap with lenses and mark the circumference of the radiator. It is needed to cool the LED. We mark the mounting grooves and holes on the aluminum plate and cut out the radiator according to the markings. This can be done, for example, using a drill.


We take out the magnifying lenses for a while, they won’t be needed now. Glue the radiator plate onto the back of the cap with superglue. The holes and grooves in the cap and radiator must match.


We tin the LED contacts and solder them with copper wiring. We protect the contacts with heat-shrinkable casings and warm them up with a lighter. We insert an LED with wiring from the front side of the cap.


Processing the flashlight body from a syringe
We unlock the piston with the handle of the syringe; we will no longer need them. We cut the needle cone with a painting knife.We completely clean the end of the syringe, making holes in it for the LED contacts of the flashlight.
We attach the lantern cap to the end surface of the syringe using any suitable glue, for example, epoxy resin or liquid nails. Don’t forget to place the LED contacts inside the syringe.


Connecting the charging micromodule and battery
We attach terminals with contacts to the lithium battery and insert it into the syringe body. We tighten the copper contacts to clamp them with the battery body.
The syringe has only a few centimeters of free space, which is not enough for the charging module. Therefore, it will have to be divided into two parts.
We run a paint knife in the middle of the module board and break it along the cut line. Using double tape we connect both halves of the board together.


We tin the open contacts of the module and solder them with copper wiring.


Final assembly of the flashlight
We solder a resistor to the module board and connect it to the micro-button, insulating the contacts with heat shrink.

We solder the remaining three contacts to the module according to its connection diagram. We connect the micro button last, checking the operation of the LED.
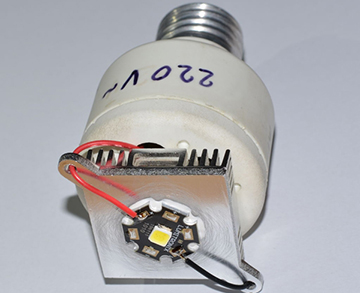
New generation light sources - LEDs - despite their still high cost, are becoming increasingly popular.
Due to their low energy consumption, they are successfully used not only in stationary lighting devices, but also in autonomous ones powered by batteries.
In this article we will talk about how you can make an LED flashlight with your own hands and what advantages it will have in comparison with a regular one.
 A light-emitting diode (foreign name - Light Emitting Diode or LED), like a regular diode, consists of two semiconductors with electron and hole conductivity.
But in this case, materials were used that are characterized by glow in the pn junction zone.
Generally speaking, LEDs have been used in electronics for quite a long time.
But previously they barely glowed, and therefore were used only as indicators, for example, indicating that the device was turned on.
With the development of technology, LEDs have become much brighter, so that they have become full-fledged light sources. At the same time, their cost is constantly decreasing, although, of course, they are still very far from an ordinary light bulb.
But many buyers are willing to overpay, because LEDs have a number of advantages:
- They consume 10–15 times less electricity than incandescent lamps of the same brightness.
- They simply have a huge resource, which is expressed in 50 thousand hours of work. Moreover, manufacturers back up their promises with a warranty period of 2 or even 3 years.
- They emit white light, very similar to natural light.
- Much less susceptible to shock and vibration than other light sources.
- They are also highly resistant to voltage surges.
Thanks to all these qualities, LEDs today confidently displace other light sources almost everywhere. They are used in everyday life, in car headlights, in advertising, and in portable flashlights, one of which we will now learn how to make.
Necessary elements for manufacturing
First of all, you need to get all the components that will make up the device.There are not many of them at all:
- Light-emitting diode.
- Ferrite ring with a diameter of 10 - 15 mm.
- Wire for winding with a diameter of 0.1 and 0.25 mm (pieces of 20 - 30 cm).
- 1 kOhm resistor.
- N-p-n type transistor.
- Battery.
It’s good if you can get the housing from a purchased flashlight. If it is not there, you can use any base to attach the components.
Assembly diagram
If everything is ready, we can start:
- We make a transformer: the magnetic core of a homemade transformer will be a ferrite ring. First, 45 turns of winding wire with a diameter of 0.25 mm are wound onto it, forming a secondary winding. In the future, an LED will be connected to it. Next, from a wire with a diameter of 0.1 mm, you need to make a primary winding with 30 turns, which will be connected to the base of the transistor.
- Selection of resistor: the resistance of the base resistor should be approximately 2 kOhm.
But the value of the second resistor needs to be selected. This is done like this:
- a tuning (variable) resistor is installed in its place.
- Having connected the flashlight to a new battery, set such a resistance on the variable resistor so that a current of 22 - 25 mA flows through the LED.
- Measure the resistance value on the variable resistor and install a constant resistor with the same value instead.
As you can see, the scheme is extremely simple and the probability of error can be considered minimal.

DIY LED flashlight - diagram
If the flashlight still turns out to be inoperative, the reason may be as follows:
- During the manufacture of the windings, the condition of multidirectional currents was not met. In this case, no current will be generated in the secondary winding. For the circuit to work, you need to either wind the windings in different directions, or swap the leads of one of the windings.
- The winding contains too few turns. It must be borne in mind that the required minimum is 15 turns.
If they are present in the winding in smaller quantities, current generation will again be impossible.
DIY 12 volt LED flashlight
Those who need not a flashlight, but a whole spotlight in miniature, can assemble a device with a more powerful power source. The latter will use a 12-volt battery. This product will be somewhat larger in size, but it will still be quite easy to carry.
To create a high-power light source, you need to prepare the following:
- polymer pipe with a diameter of about 50 mm;
- glue for gluing PVC parts;
- a pair of threaded fittings for PVC pipe;
- screw-on plug;
- toggle switch;
- 12V LED;
- 12-volt battery;
- auxiliary elements for installation of electrical wiring - heat-shrinkable tubes, electrical tape, plastic clamps.
As a power source, you can use several batteries from broken radio-controlled toys, which are combined into one 12 V battery. Depending on their type, you will need from 8 to 12 batteries.
A 12-volt LED flashlight is assembled like this:
- We solder pieces of wire to the LED contacts that are a couple of centimeters longer than the battery. In this case, it is necessary to ensure reliable insulation of connections.
- The wires connected to the battery and LED are equipped with special connectors that allow quick-release connections.
- When assembling the circuit, the toggle switch is installed so that it is on the opposite side in relation to the LED. The electronic filling is ready and if tests have shown that it works properly, you can begin manufacturing the case.
The body is made of polymer pipe. This is done like this:
- The pipe is cut to the required length, after which all the electronics are placed inside it.
- We place the battery on glue so that it remains motionless while carrying and manipulating the flashlight. Otherwise, the heavy battery may hit the LED element and damage it.
- We glue a threaded fitting to the pipe at both ends. There is no need to save glue - the connection should be tight. Otherwise, water may seep into the housing in this place.
- We fix the toggle switch inside the fitting installed on the side opposite to the LED. We place the switch on the glue, but it should not protrude outward so that the plug can be screwed onto the fitting.
To switch the toggle switch, the plug will need to be unscrewed, then put back in place. This is somewhat inconvenient, but this solution ensures complete sealing of the case.
Question of price and quality
Of all the flashlight components, the most expensive is the 12-volt LED. You will have to pay 4 – 5 USD for it.Everything else can be obtained for free: batteries, as already mentioned, are removed from radio-controlled toys, plastic pipes and parts very often remain as waste after installing plumbing or heating in a house.
If absolutely all the components have to be purchased in a store, then the cost of the lighting device will be approximately 10 USD.
 A homemade lamp from LED strip can be built easily and quickly. – see the manufacturing instructions and make your own unique product.
Read about how to properly install an LED strip with your own hands.
Conclusion
A convenient flashlight that provides bright light and at the same time can work for a long time without recharging the battery is always needed on the farm. As you can see, you can easily do it yourself, which will save you some money. The main thing is to be careful and strictly adhere to all the recommendations outlined in the article.
Video on the topic
LED light sources are by far the most popular among consumers. LED lights are especially popular. There are different ways to get an LED flashlight: you can buy it in a store or make it yourself.
LED handheld flashlight
Many people who understand at least a little electronics, for various reasons, increasingly prefer to make such lighting devices with their own hands. Therefore, this article will discuss several options for how you can make your own diode hand-held flashlight.
Advantages of LED lamps
Today, LED is considered one of the most profitable efficient light sources. It is capable of creating a bright luminous flux at low powers, and also has a lot of other positive technical characteristics.
It’s worth making your own flashlight from diodes for the following reasons:
- individual LEDs are not expensive;
- all aspects of assembly can be easily accomplished with your own hands;
- a homemade lighting device can run on batteries (two or one);
Note! Due to the low power consumption of LEDs during operation, there are many schemes where only one battery powers the device. If necessary, it can be replaced with a battery of appropriate dimensions.
- availability of simple diagrams for assembly.

LEDs and their glow
In addition, the resulting lamp will last much longer than its analogues. In this case, you can choose any color of the glow (white, yellow, green, etc.). Naturally, the most relevant colors here will be yellow and white. But, if you need to make special lighting for some celebration, then you can use LEDs with a more extravagant glow color.
Where can the lamp be used and features
Very often there is a situation when you need light, but there is no way to install a lighting system and stationary lighting fixtures. In such a situation, a portable lamp will come to the rescue. An LED hand-held flashlight, which can be made with one or more batteries, will find wide application in everyday life:
- it can be used for work in the garden;
- illuminate closets and other rooms where there is no lighting;
- use in a garage when inspecting a vehicle in an inspection pit.
Note! If desired, by analogy with a hand-held flashlight, you can make a lamp model that can be easily installed on any surface. In this case, the flashlight will no longer be portable, but a stationary source of light.
To make a hand-held LED flashlight with your own hands, you need to remember, first of all, the disadvantages of diodes. The truly widespread distribution of LED products is hampered by such shortcomings as the nonlinear current-voltage characteristic or current-voltage characteristic, as well as the presence of an “inconvenient” voltage for power supply. In this regard, all LED lamps contain special voltage converters that operate from inductive energy storage devices or transformers. In this regard, before you begin to independently assemble such a lamp with your own hands, you need to select the necessary diagram.
When planning to make a hand-held flashlight from LEDs, it is imperative to think about its power supply. You can make such a lamp using batteries (two or one).
Let's look at several options for how to make a diode hand-held flashlight.
Circuit with super-bright LED DFL-OSPW5111Р
This circuit will be powered by two, rather than one, batteries. The assembly diagram for this type of lighting device is as follows:

Flashlight assembly diagram
This circuit assumes that the lamp is powered by AA batteries. In this case, the ultra-bright DFL-OSPW5111P LED with a white glow type, having a brightness of 30 Cd and a current consumption of 80 mA, will be taken as a light source.
To make your own mini-flashlight from battery-powered LEDs, you need to stock up on the following materials:
- two batteries. An ordinary “tablet” will be enough, but other types of batteries can be used;
- “pocket” for the power supply;
Note! The best choice would be a battery “pocket” made on an old motherboard.
- super bright diode;

Super bright diode for flashlight
- a button that will turn on a homemade lamp;
- glue.
The tools you will need in this situation are:
- glue gun;
- solder and soldering iron.
When all the materials and tools are collected, you can start working:
- First, remove the battery pocket from the old motherboard. For this we need a soldering iron;
Note! Soldering the part should be done very carefully so as not to damage the pocket contacts in the process.
- the button to turn on the flashlight should be soldered to the positive pole of the pocket. Only after this will the LED leg be soldered to it;
- the second leg of the diode must be soldered to the negative pole;
- the result is a simple electrical circuit. It will close when the button is pressed, which will cause the light source to glow;
- After assembling the circuit, install the battery and check its functionality.

Ready lantern
If the circuit has been assembled correctly, then when you press the button the LED will light up. After checking, to increase the strength of the circuit, the electrical solders of the contacts can be filled with hot glue. After this, we place the chains in the case (you can use it from an old flashlight) and use it for your health.
The advantage of this assembly method is the small dimensions of the lamp, which can easily fit in your pocket.
Second assembly option
Another way to make a homemade LED flashlight is to use an old lamp in which the bulb has burned out. In this case, you can also power the device with one battery. Here the following diagram will be used for assembly:

Diagram for assembling a flashlight
Assembly according to this scheme proceeds as follows:
- We take a ferrite ring (it can be removed from a fluorescent lamp) and wind 10 turns of wire around it. The wire should have a cross-section of 0.5-0.3 mm;
- after we have wound 10 turns, we make a tap or loop and wind 10 turns again;

Wrapped Ferrite Ring
- Next, according to the diagram, we connect a transformer, an LED, a battery (one finger-type battery will be enough) and a KT315 transistor. You can also add a capacitor to brighten the glow.

Assembled circuit
If the diode does not light up, then it is necessary to change the polarity of the battery. If it doesn’t help, then the problem was not with the battery and you need to check the correct connection of the transistor and the light source. Now we supplement our diagram with the remaining details. The diagram should now look like this:

Scheme with additions
When capacitor C1 and diode VD1 are included in the circuit, the diode will begin to shine much brighter.

Visualization of the diagram with additions
Now all that remains is to choose a resistor. It is best to install a 1.5 kOhm variable resistor. After this, you need to find the place where the LED will shine brightest. Next, assembling a flashlight with one battery involves the following steps:
- Now we disassemble the old lamp;
- We cut out a circle from a narrow one-sided fiberglass that should correspond to the diameter of the lighting fixture tube;
Note! It is worth selecting all parts of the electrical circuit to match the appropriate diameter of the tube.

Parts of the right size
- Next we mark the board. After this, we cut the foil with a knife and tin the board. To do this, the soldering iron must have a special tip. You can do it yourself by winding a wire 1-1.5 mm wide onto the end of the tool. The end of the wire must be sharpened and tinned. It should look something like this;

Prepared soldering iron tip
- Solder the parts to the prepared board. It should look like this:

Finished board
- After that, we connect the soldered board to the original circuit and check its functionality.
Checking the functionality of the circuit
After checking, you need to solder all the parts well. It is especially important to solder the LED properly. It is also worth paying attention to the contacts going to one battery. The result should be the following:

Board with soldered LED
Now all that remains is to insert everything into the flashlight. After this, the edges of the board can be varnished.

Ready-made LED flashlight
This flashlight can be powered even from one dead battery.
Varieties of assembly schemes
In order to assemble an LED flashlight with your own hands, you can use a wide variety of circuits and assembly options. By choosing the right circuit, you can even make a flashing lighting fixture. In such a situation, a special flashing LED should be used. Such circuits usually include transistors and several diodes, which are connected to various power sources, including batteries.
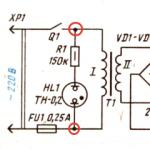
There are options for assembling a hand-held diode lamp, when you can do without batteries at all. For example, in such a situation you can use the following scheme:

We also recommend
 Metal products - we decorate the house and yard with our own hands
 A tool bag is an indispensable thing for builders Patterns for belt bags for metalwork construction
 DIY oyster mushroom mycelium
 Airbrush for beginners: instructions from the master!
 Designation of radioelements on diagrams
 Wood gasification Biomass resources for gasification