What beds to make. DIY beds in the country: examples of simple and beautiful beds
Do you want the beds in the country to not have to be loosened, weeded and watered? Learn how to make vertical beds and a pyramid for strawberries.
Garden planning and fencing material selection
The beds can be not only beautiful and neat, but also self-watering. It is convenient to work on such, and weeds do not grow on them. It seems that this is a pipe dream of a gardener, but the so-called beds for the lazy can be done by everyone.

Before you break them, measure the area that you are ready to give to the garden. Zoom out, draw this rectangle on paper. Now imagine yourself as a draftsman. Using a ruler and a pencil, draw beds 1 meter wide on the canvas, their length should be a multiple of two. The distance between the beds is 40 cm. It is quite enough for a comfortable passage.
Now you can go to the garden to transfer the markings from paper to the area. Fence the ridges with pegs and rope. Of course, they must be even and have 4 90 degree angles.
You will get not only beautiful beds, but also perfectly even if you drive four pegs in the corners, and then pull 2 ropes diagonally. They must be the same.
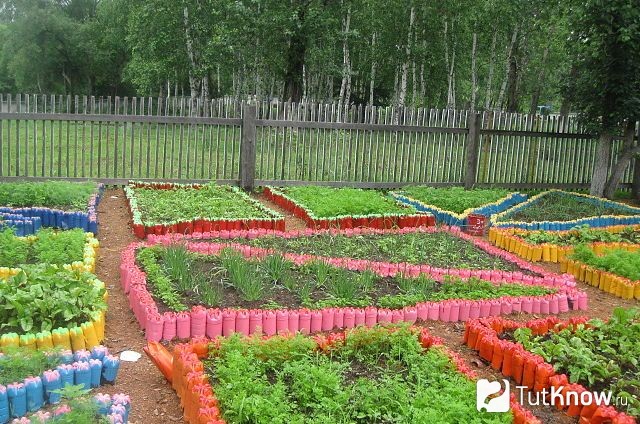
The edging for landings can be made of different materials. Some use brick for this. You can use empty plastic bottles. To do this, cut the necks to the widest place of the shoulders, pour earth or sand inside the container, turn it over, put it in a previously dug hole so that the bottle is half or a third in the soil. Prepare the second and the rest in the same way and install them next to each other using the same method. If desired, the bottles can be painted, in which case the correct beds will look very cheerful even when greenery has not yet grown on them.
If you have slate, you can protect them with this material. To do this, a ditch is dug around the perimeter. Its width should be slightly larger than the width of the slate sheet. Put it in a recess, fill it with a third or half of the soil, tamp the sheet in this place on both sides.
You can make beds not only from slate, but also from wood. Thick boards or timber are suitable for them. This material is pre-coated with an antiseptic in 2 layers, when it dries, a fence is made. If you have thin boards, then install holding pegs on the inside and outside of the ridge to secure the fence. If the boards are thick enough or you have a beam, fasten them at the corners with self-tapping screws to make a rectangle.
You can buy ready-made metal beds, sheets about 7 mm thick are coated with paint. Such fences are supplied already with fasteners.
Now you know that you can make a fence from:
- plastic bottles;
- slate;
- tree;
- gland.
Warm and self-watering beds
Plants do not like cold soils, and many, for example: cucumbers, watermelons, melons, zucchini, pumpkins, prefer warm beds rich in organic matter. For them, these will be just perfect.
For the device of warm beds, you can apply any of the presented methods. If you have a garden in a lowland, then use the "for the lazy" option. In this case, it is not necessary to dig a trench first, but it is enough to mark the garden bed, during the summer to put any organic garbage on it: mowed grass, foliage, thick stems of plants, tops, kitchen leftovers. Do not forget to periodically water the warm bed, it should be covered with a dark cellophane film so that the process of overheating goes better.
During the season, organic matter will half decompose, settle, many weeds will burn out. In the spring, you just have to pour fertile soil on it with a layer of 7 cm and plant pumpkins. They will grow well in such places.
Next year, you will plant other plants here that will be comfortable on such a ridge. If you want it to give warmth for several years, then arrange it a little differently, but this will have to be worked on.
Dig a pit 60 cm deep, lay stumps and dilapidated boards at the bottom, which must first be sawn. Chop branches of trees and stems of plants such as Jerusalem artichoke with an ax. Place a shredded cotton rag on top. Grass, leaves are thrown on such a basis, watered. A warm bed will warm the plants for a long time due to the effect of decay.
In no case do not put the remains of plants, branches and other organic matter affected by diseases on a warm bed. After all, the spores of some harmful microorganisms are very tenacious, and will cause damage to plantings.
In order to spend less energy on moistening the soil during the summer season, consider a drip irrigation system.
The photo shows how to assemble a purchased one, and what it consists of.

This is how the drip irrigation system looks already in the garden.

Instead of pipes, you can use a hose, even an old one. Holes are made in it so that water flows from each under one large plant. If you are making a watering system for carrots, beets, onions, greens, then the holes will be at a distance of 5–10 cm.
Recesses in rubber can be made with a regular nail of a suitable diameter. Put it with the point in the hose, hit with a hammer, and the hole is ready. A branch of the water supply is connected to such a device using pipes, solid rubber hoses and adapters.
In order for the water to evaporate less, it was not necessary to weed, loosen the ground, cover the drip irrigation system and the soil from above with a thick dark film or black non-woven material or roofing felt, roofing material.

Holes of the required diameter are cut in these materials with a knife or scissors, and plants are planted in them.

How to make a path in the garden?
Look how good it looks between two beds. It is convenient to walk on this, after the rain your feet will not get dirty in the ground. Therefore, it is not only beauty, but also convenience.

Such paths in the country are made of edged stone, the thickness of which is 4 mm. And here is the entire list of required materials:
- small gravel;
- coarse sand;
- carved stone;
- cement-sand mixture;
- reinforcing mesh;
- building level;
- rubber or wooden mallet.

To make the track smooth, first make a markup. To do this, pull a rope tied to the driven pegs around the perimeter. When laying stones, tap well with a mallet to remove voids under them.
Fill the gaps between the track elements with cement laitance. At this stage, you can not wash off the solution that has come out, and after a day you will remove it with a spatula.

For tall plants, consider how you will tie them up. You can use ready-made metal trellises, between which a rope is pulled, or you can make them yourself from wood. Then you will get such an amazing garden, on which there will be beautiful beds with picturesque paths.

There are other ideas on this topic that you might like, check them out.
Pyramid for strawberries in the garden

If you want to collect sweet berries in large quantities, then arrange just such a bed for strawberries. This building has many advantages.
- The berries will be less affected by gray rot, as they practically do not touch the ground and are well ventilated.
- Strawberries will be born sweet, as the garden warms up well, and each berry is illuminated by the sun.
- This design saves space, as it occupies a vertical rather than a horizontal space.
- Shrubs are easier to care for and you don't have to bend over to work those that grow in the middle and upper levels.
- The bed for strawberries looks well-groomed, looks beautiful and neat.
Choose a suitable place, it should be sunny, as strawberries like to grow in such areas. You need to position the pyramid so that one of its edges faces north.

Clear the prepared area of weeds by digging it up and removing the roots of wild plants. Put a chain-link mesh here, the size of which is 2 m 40 cm x 2 m 40 cm. Place a box of boards measuring 220x220x25 cm on it. Of course, they must be pre-treated with an antiseptic. To prevent strawberry stalks from being cut on the sharp edge of the boards, trim the tree with a planer.
Pour fertile sifted soil into the resulting box to a height of 15 cm. In its center, place an asbestos-cement or plastic pipe with a cross section of 10 cm. You must first drill two holes in it - the upper ones with a diameter of 1 cm and the lower one - 0.5 cm. They are necessary for irrigation. Close the lower end of the pipe.

Pour a mixture of compost and manure over the first tier, compact well. Then install a second box, the dimensions of which are 170x170x25 cm. Soil must also be poured into this second tier.
When pouring the soil, spill it well with water so that the soil sags. Don't forget to add a mixture of manure and compost to feed the plants. You can also pour a little mineral fertilizer for strawberries and plant it in the soil.
In the same way, 3 more floors are created. Here are their sizes:
- the third - 120x120x25 cm;
- fourth - 70x70x25 cm;
- fifth - 20x20x25 cm.
Start planting strawberries from the top tier. 4 bushes will fit here (one on each side), on the next place 12 plants. Going even lower one step, plant 5 bushes on each side on this middle floor. On the second tier from the bottom, you can fit 24–28 bushes in total, and 32–36 pieces on the lowest tier.
You can vary the size of the pyramid at your discretion, as well as its number of storeys. In addition to this, you can build other high beds for strawberries, for example, these.
Vertical bed for strawberries
See what materials are needed to arrange high beds.

For them you can use:
- pipes;
- polyethylene bags;
- old barrels;
- pots with nests;
- slate sheets;
- wooden and plastic boxes;
- tires;
- wheel disks.
- wide sewer pipe made of plastic;
- central tube for irrigation and liquid fertilizers with a section of 4-6 cm;
- sackcloth;
- plastic or metal funnel;
- drill.

We start with the design of a plastic pipe. Step back from the bottom up 10 cm, use a drill to make holes in it. Depending on the variety of garden strawberries, they should be at a distance of 15–20 cm from each other. Before reaching the top 15 cm, finish making holes.
Drill a lot of holes with a diameter of 4-5 mm in the central irrigation pipe, wrap it in burlap so that they do not clog the ground, install it in a large pipe. Close the lower part of this irrigation system with a plug or plug, and insert a funnel into the upper part.
A bed of tires is made even faster. For her, you need to put these rubber parts of the wheels one on top of the other, cut holes, fill the containers with soil and plant strawberries.

You will learn more about how to make beautiful beds from pipes by watching the video.
You will find many ideas on how to arrange a garden in the last video.
At first glance, the beds in the country do not require decorative elements, but in fact they play a big role not only in productivity, but also in the appearance of the entire garden plot. While working in the garden, almost each of us would like to see our site as well-groomed and pleasing to the eye as possible.
The form
The shape of the beds on the site primarily depends on your fantasies and how you want to see them in the end. There are a lot of decor options: beds are square, round, in the form of animals, various objects and other things. If you wish, you can not even follow the standard rules when building a garden bed, but come up with something new and unusual. It is recommended to arrange the beds on the garden plot, taking into account the features of the relief.
As a rule, there are no strict recommendations on sizes, but there is one nuance that should be taken into account when calculating. The size of the bed should be such that from any side you can reach its middle without any inconvenience. If you need to build a bed near a fence or wall of the house, then first think about whether you can easily reach the opposite side.

Attention ! The width of the wall beds should be within 70 - 80 centimeters. The width of the beds, located directly on the site and adjacent to the wall or fence, varies from 1 meter in width, from 2.5 meters in length, and the depth is from 20 to 50 centimeters. The distance between the beds themselves is recommended to be from 50 to 70 centimeters. The paths and paths between them should be approximately 20-50 centimeters below the surface layer of the beds.
Organization
If the summer cottage is located in the lowlands and places where dampness prevails, then the beds are best built in the autumn. It is recommended to choose a small size (1 by 1 meter), and the height should be no more than 30 centimeters. Thus, the soil will warm up much better, and the snow cover in the spring will come off much faster.
- to start, take four wooden boards;
- then collect from them a square 1 by 1 meter;
- after the base is ready, install the structure on a horizontal surface and fill it with soil mixed with fertilizer. If you need an early and plentiful harvest, then in this case it is best to equip raised beds.


The construction process is as follows:
- in a suitable area, it is necessary to dig a hole 40-50 centimeters deep. Choose the length of the hole according to your preference. As for its width, here the recommended width is from 1 to 1.2 meters;
- further along the perimeter of the dug hole, it is necessary to establish a semblance of a frame. The material for the frame can be chosen based on your own preferences, for example, stones, bricks, small logs and others. The frame, the height of which should be from 40 to 50 centimeters, must be closed from the inside with a plastic film;
- further, an iron mesh must be installed at the bottom of the pit, which will protect the crop from rodents;
- then carefully fill the hole. To begin with, a layer of sawdust, shavings, cardboard and other similar long-decomposing material (1/3 of the hole high) is poured onto its bottom. Sprinkle the layer a little with earth and pour water;
- at the end, we fill up the soil, which should be mixed with manure and mineral fertilizers.

Location
If the plot is small, there may be some problems with the location of the beds. To place the beds in a small area as rationally as possible, you should adhere to the following rules:
- it is necessary first of all to use any horizontal surfaces and suspended structures;
- the second option could be to combine a beautifully designed garden with a recreation area;
- you should also pay attention to various items on your site (unnecessary barrels, old carts, etc.), which can be used for planting vegetables.
Attention ! Remember that it is necessary to place the beds on a flat horizontal surface, thereby avoiding the possible accumulation of excess moisture.

tillage
As a rule, the beds are dug up twice a year, in spring and autumn, while adding all the necessary mineral and organic fertilizers. If digging takes place in the fall, it is best to leave the soil lumpy, which will help retain moisture. In addition, if the earth remains lumpy, then the pest larvae in it will freeze and die. Also, instead of autumn digging, mulching can be done. To do this, you will need to fill the soil with a sufficiently large layer, consisting of peat, sawdust and rotted compost. In the spring, the unripened layer must be removed with a rake, and then the soil should be dug up.

Borders
Many people often do not pay due attention to the design of the sides of the beds. As a rule, simple paths are made between them or upholstered with boards around the perimeter. But some want to create a beautiful view throughout the site, including the garden. You can decorate the bumpers in different ways, from improvised or purchased materials, for example, ready-made bumpers bought in a store, bumpers made of bricks or slate. It all depends on your imagination.

Kinds
vertical
A vertical garden bed will be a good solution for a small area. You can build it from improvised materials, for example, from boxes. But it is worth remembering that not all types of garden crops are suitable for growing in such a garden. The following types are suitable: strawberries, onions, lettuce, tomatoes, cucumbers.

From car tires
To do this, you need several rubber tires from the wheels of the car. First you need to prepare them: clean them of dirt and paint. Then soil with organic and mineral fertilizers is poured into the tire. The following types of crops are suitable for growing: parsley, dill, radish.

green wall
If your site has a fence or other building, then to give them an attractive appearance, you can try to build a so-called green wall. There is nothing complicated about this, you just need to attach the boxes to the fence or to the wall of the building, fill them with soil and plant the plants.
You can also go in a more original way and use simple plastic bottles instead of boxes. To do this, we fasten plastic bottles to the required surface, then cut a hole in the upper part of the bottle and fill it with earth. After that, you can plant the necessary crops.

weaving arch
At the summer cottage, you can build an arch from weaving types of crops, for example, cucumbers. To do this, we need several boxes where we fill the soil and plant seedlings of cucumbers. Then you need to build an arch from small pipes (if you make an arch yourself, then you can’t do without the ability to work with welding). After the arch is ready, seedling boxes must be placed to the bottom of the structure. As the cucumbers grow, they need to be tied up.
spicy
The spicy garden bed in the country occupies a special role, because the crops growing on it can be used as medicinal, seasonings for dishes, or simply playing the role of ornamental plants.
Attention ! A spicy bed is best placed in areas of the site where sunlight predominates.
Spicy herbs will be the perfect solution for creating an original landscape design. Spicy crops do not require close care from the summer resident, they will also help protect the garden from various kinds of pests:
- lavender will help prevent the spread of aphids on rose flowers;
- a thyme border around the perimeter of the garden bed will prevent the spread of pests on vegetable crops;
- yarrow will give carrots a sweeter and richer taste.
Suitable plants
- Melissa;
- thyme;
- yarrow;
- sage;
- fennel.
ornamental plants
- common basil;
- Melissa officinalis;
- mint;
- parsley;
- rosemary officinalis;
- thyme;
- caraway;
- medicinal sage;
- coriander;
- fragrant onion.
Worth paying attention
When arranging a spicy bed, it is worth considering that some types of crops (such as lemon balm or thyme) can grow to impressive sizes, thereby crowding out other crops. For this reason, plant growth must be monitored and controlled very carefully.
Growth control is carried out as follows: plants must be pruned in time, allocate an area for subsequent growth or limit it by constructing tile or brick sides. Thus, the area where it is planned to plant plants will be divided into squares, which are laid out in a checkerboard pattern using slabs or bricks. Crops are planted in free squares.
When planting greenery, you must consider:
- when planting spicy and medicinal plants, special attention should be paid to their environmental requirements;
- for spicy and medicinal beds, you need to choose species planting material.
If you follow these simple rules, as well as use creative ideas, you can give your site a pleasant appearance.
We will send the material to you by e-mail
A dacha is not just a plot for growing and harvesting. For many, this is a favorite place to relax and implement ideas for. Often the method of planting vegetable crops is relegated to the background, but this is not correct, because the appearance of the entire landscape largely depends on their interesting location and attractive appearance. This article tells you the easiest way to make beds for the lazy at the dacha. Photos and descriptions of the most successful ideas, as well as ways to implement them, should help make your site comfortable and well-groomed.
Tall structures made of boards for planting crops will be the highlight of any site
A garden bed is most often a fenced plot of land intended for growing a certain type of plant.
The main thing for a good harvest is fertile soil, the right planting time, and high-quality processing. However, in some cases, you should pay attention to other factors:
- Orientation to the cardinal points.
For most crops, this does not matter, but for example, rows of tomatoes and cucumbers for a good harvest should be located from north to south.
- Height.
If you want to harvest earlier than usual, you should mount tall structures. It is not difficult to make them (for example, you can assemble them from boards with your own hands without special devices in a short period of time), and the earth in them warms up faster.
When planning future beds, you need to know several aspects:
- The yield of the selected crop (that is, how many plants grow per 1m2 of area).
- Compatibility of plants that you plan to plant in the same area.

- Slate.
Usually this material is used only if it is available (for example, left after the repair of the roof).

- Plastic.
The main feature of plastic is that it can be given any shape, so it is great for round or other curved fit options. In addition, it is not affected by precipitation and low temperatures, so it will last a long time without losing its original attractiveness.

An expensive and durable option.

- A natural stone.
It produces the most spectacular bumpers that will serve for many years. Unlike bricks, stones have an irregular shape, which will allow you to make landscape design in an eco-style. Disadvantages of stone ledges: high cost and gradual sinking into the soil under the influence of its own weight, so such a ledge must be periodically checked and corrected.

Qualitatively made with your own hands from improvised materials will serve for many years, but for a good harvest, its correct location is also necessary.
Placing beds in the garden: how to arrange, photos, tips
The quality and quantity of the crop depends on the proper location of the beds in the summer cottage, so this issue should be given special attention. First of all, you need to know the following:
- Beds located on the cardinal points (from north to south) are a good solution only for low plants on a flat horizontal area.
- If the site has a slope that cannot be leveled, the beds should be across it regardless of orientation.
- It is desirable to make rows of one plant of the same size. This will make it easier to calculate the amount of fertilizer, the degree of irrigation and planting.
- If the site has multidirectional slopes, choose the south side (the crop will ripen faster on it).

In small areas, there is often a lack of free horizontal areas for planting. If this is your case, try one of the following ideas:
- Create vertical designs.

- Use unused items for planting plants (for example, a wheelbarrow, a barrel, and so on).
- Attach the bed to the recreation area.
How best to make beds in the garden - options
The beds are classified according to design features, while the following types are distinguished:
- Traditional (flush with the rest of the site, dimensions make it easy to reach the center from any side (right or left)).

- High (30-40 cm above ground level, contribute to the most rapid ripening of the crop).

- Deep (during the device, a trench is dug 20-30 cm deep, due to which the earth most often does not freeze through, and the landing can be carried out earlier).
- Narrow (for example, according to the Mittlider method, described in detail in the next chapter).
- Vertical (an excellent solution for small areas, but not all plants can be planted in this way).
Related article:
How to make beds from boards with your own hands
Now let's look at how to properly make beds in a garden made of wood. This material is the most common when arranging beds. Board structures have the following advantages:
- Reliability.
The tree perfectly retains moisture inside the row, and also does not deform for a long time.
- Low cost.
This material often remains after construction. If it was not there, you can buy boards at a fairly low price.
- Ease of installation.
The main thing is high-quality wood processing, if this is not done, insects and moisture will quickly destroy the structure.
- Attractive appearance.
Wood is a material ideal for eco-style beds.
The only drawback of board structures is their fragility (in comparison, for example, with plastic or brick). However, the ability to change them quickly and at the lowest cost more than covers it.

How to make a bed of boards with your own hands: photos, dimensions, installation sequence
If you decide to make a wooden structure, first of all you need to choose the type of wood:
- Oak or ash- hardwoods, the boards of which are perfect in this case, but their price is quite high.
- Pine- cheap, but short-lived. You can extend the life of such a fence with the help of periodic chemical treatment.
- Cedar or larch– the best price-quality ratio. Due to the presence of resin in these conifers, there is no need to process them.
- Acacia- also a great option for arranging beds.
What are the optimal sizes of the beds from the boards? First you need to decide on the height of the structure, which depends on the following factors:
- Features of the planted culture.
Some vegetables require a certain depth (for example, for potatoes, the planting depth must be at least 40 cm).
- Soil fertility.
If the soil is fertile, the sides can be made 10-15 cm high. If fertile soil is required to be backfilled, 30 cm or more.
- Bed type.
For example, for warm temperatures, a height of 50 cm or more is typical.
The most important parameter when arranging beds in the country is their width, since ease of use largely depends on it. If you make it too wide, it will be problematic to reach its center. Therefore, the maximum value of the width is considered to be 100 cm.
In most cases (if the planned design does not have a too complex shape), it will not be difficult to make a bed of boards with your own hands. The size of the boards depends on the size of the future bed, but if you only have material of insufficient length, it does not matter, several boards can always be spliced in length.
The procedure for the construction of a wooden structure:
- Territory preparation.
At this stage, it is necessary to level and dig the site for the structure.
For a rectangular structure, it is necessary to connect 4 boards and attach support bars to them, which should be 20-30 cm longer than future sides. They need to be slightly sharpened with an ax from the free side (to simplify entry into the ground).

- Construction installation.
We hammer the structure into the ground, while it is important to use the level to achieve maximum evenness of the structure.
- Surface treatment of boards.
First of all, the surface is primed (to protect against moisture and pests), then covered with oil paint (optional, you can leave the color of the tree).
- Backfill.
The composition depends on the type of construction and the selected culture. But in all cases, the first layer should be drainage.
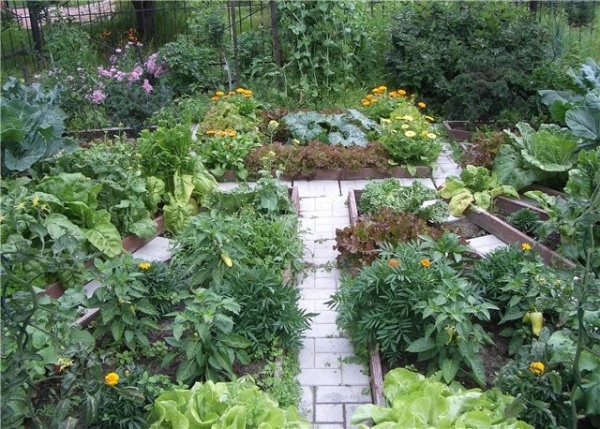
Most often, they try to plant only one crop in one area, but sometimes they practice joint planting of vegetables in the garden. However, it is worth remembering that not all plants get along with each other. Therefore, the following is a table of compatibility of vegetables in the beds.
Related article:
Interesting ideas come to mind for many summer residents and owners of private houses. In the article, we will consider original photo examples and several instructions for creating such beauty.
Mixed planting of vegetables in the garden: examples, photos
More and more summer residents are interested in obtaining not only a large harvest, but also an environmentally friendly one. Therefore, the question arises, how to achieve a quality crop without resorting to chemicals?
An excellent solution is a mixed planting of vegetables. After all, some cultures have a beneficial effect on each other. However, in this matter it is worth being extremely careful, since not all plants like any kind of neighborhood at all.

Thanks to the science of "allelopathy", a table of the neighborhood of vegetables in the garden has been compiled, using which you can significantly reduce the use of chemicals for pest control and fertilizer.
Neighborhood of vegetables in the beds - compatibility table
The table below reflects the compatibility of vegetables in the garden. Planting using this information will provide a quality crop with a minimum investment.

Mixed planting vegetables in the garden: examples with photos and tips
Each benevolent or unfriendly neighborhood of vegetables in the garden has its own rationale. For example, strawberries and onions are great neighbors. Onions protect the berry from rot and disease, and if parsley is also planted nearby, it eliminates the appearance of slugs.

Onions are also a great companion for most garden crops, as they keep pests away. The most interesting neighborhood of this plant is with carrots. Both cultures have their own pest - the onion and carrot fly, and the first one cannot stand the smell of carrots, and the second - onions.

Garlic is excellent for pest control, making it a good companion for most crops. However, it is not recommended to plant it next to plants of the legume family, since the latter are leaders in nutrient intake, and garlic needs quite a lot of them.
Joint cultivation of crops in the garden can be detrimental to other vegetables. For example, tomatoes should not be planted with cucumbers, as they require varying degrees of watering. Thus, the proximity of these two crops will create difficulties in processing (there will be a need for spot irrigation, which will take much more time and effort).
In addition to the properties of plants, it is necessary to pay attention to their size. For example, when alternating cabbage and radish, the second crop will receive insufficient sunlight, causing the quality of the crop to deteriorate significantly.
So, you have developed an ideal layout for all the vegetables in your summer cottage, but every year the harvest is getting worse. What to do? It is necessary to ensure crop rotation.
Table of crop rotation of vegetables in the beds
Crop rotation is the organization of crop rotation in the garden. Ideally, this process should be continuous and annual. However, in real conditions, this is very difficult to achieve for the following reasons:
- There is not enough information about the contamination of the soil and the presence of pests in it.
- There is no time for precise calculations of the ideal landing option.
Why is crop rotation essential for a good harvest? Each crop has unique characteristics in terms of obtaining nutrients. Someone is looking for them in the surface layers of the soil (for example, a cucumber), someone, in search of water, lowers the roots several meters deep (for example, a watermelon). In addition, the growth of each plant requires (to a greater extent) different elements (for example, for a tomato - phosphorus, for cabbage - nitrogen).
Now imagine that from year to year a certain layer of soil is depleted, and the content of precisely those substances that are necessary for this crop decreases. To make it easier for you to decide how to rotate vegetables, below is a table of vegetable crop rotation in the garden.

Important! The main thing is that the culture does not return to its original place within 3-4 years. During this time, the soil will have time to recover and accumulate the necessary amount of nutrients.
How to make a garden bed for cucumbers in the open field: photos, methods
Cucumbers are a rather capricious crop that requires special care. Many believe that it can only be planted in seedlings, however, thanks to many years of selection, there are currently several varieties that can be planted immediately in open ground.

First of all, it is necessary to prepare beds for cucumbers in the spring:
- Correctly choose the direction of the rows - from north to south.
- Fertilize the soil (the best solutions are cow dung or chicken manure, if they are not available, any mineral fertilizer will do).
- Put the sides (preferably at least 25 cm).
The main secrets of growing cucumbers in the open field are choosing the right planting time (from May to mid-June, depending on the region) and choosing the right variety.
How to make beds for cucumbers - common features
In the case when seedlings are not used, it will not work to grow a quality crop in the usual way (on standard beds). You must use one of the other ways to grow cucumbers in open ground:
- The device beds with a bookmark.
- Installation of a warm bed (including a raised structure).

These methods are non-standard, therefore, they are described in detail below to prevent errors during the arrangement.
How to make beds for cucumbers with a bookmark in the garden
To arrange a bed for growing cucumbers with a bookmark, it is necessary to dig a trench 30 cm deep and successively fill it with the following layers:
- Branches and sawdust.
- Straw, leaves and compost (at this stage it is necessary to fill everything with warm water).
- Sand.
- Organic waste (leaves, bark, etc.).
- Straw.
- Fertilizer (manure is best).
- Earth and humus.
- Lack of dirt from the beds due to the presence of bumpers.
- High yield.
- Aesthetic appearance (you can make beautiful identical beds).
- Even faster warming of the soil, which means that the harvest will appear earlier.
- Convenience (no need to bend over to care for cucumbers).
The main thing is to carefully compact each layer, otherwise the soil will turn out to be too loose, and you should not expect a good harvest.

Advantages of warm beds for cucumbers:
Raised beds for cucumbers in the open field
In an unfavorable climate, it is advisable to arrange raised (or high) beds 40-50 cm high (for convenience, you can make it higher). At the same time, the sequence of layers remains the same as in conventional warm structures on the surface of the earth. Such structures have the following advantages:

A dacha and a garden, instead of a place of rest, often become a place of exhausting work. Water, weed, loosen, water again, weed, loosen and so on in a circle. At the same time, the harvest is not always happy. The situation can be changed. There is a special technology - a smart garden. The cultivated area decreases several times, the amount of water required for irrigation decreases, and the yield increases. This is not a fairy tale. Many have already switched to smart beds and they are all satisfied with the result.
What is a smart garden or smart beds
A smart garden allows you to get maximum yields with minimal labor costs. How? There are several basic rules and techniques: proper planting planning, rotation of planted plants, special growing technologies (in high beds, trenches), drip irrigation, mulching or covering material. All this has been known for a long time and, for sure, is already used by many. But it is in the complex that all these measures give what is called a “smart garden”. Because on the site everything is done according to the mind.
A smart garden is formed, often raised or high beds, in which the necessary conditions for plant growth are created.
The main task of this technology is to do everything so that working in the country is not a heavy duty. This is possible if you approach the organization of the process wisely. And it’s completely in vain that this technology is called a “garden for the lazy”. At the stage of arrangement, you will have to work hard, but then everything will grow almost by itself, but the first stage requires shock efforts.
It's worth starting with site planning. It is necessary to choose the location of the beds, taking into account the illumination. Then develop a scheme for laying a section of water pipes and lay them. At the same time, you can engage in the device beds. Roughly in that order. All this takes time, considerable effort and money. Material costs may not be too large.
We are planning a garden
If you already have a dacha or a plot of land near the house, you have probably already encountered a situation of an overabundance of fruits, vegetables and berries. When the harvest has to be distributed to relatives, neighbors, colleagues. But in order to grow it, it took a lot of effort. To avoid such a situation, it is necessary to plan the harvest. Of course, you will not get great accuracy, but results close to the planned ones are possible.

A smart garden is also a decoration of the site
We consider the area of \u200b\u200bthe beds
The first thing to do is to sit down and think about what and how much you want to grow. The specific quantity is in kilograms. How much do you need to "eat" and "close". Write a list of plants (in a column) and the desired crop.
Having decided on the list of plants that you want to grow at home, we sit down and look at the average yield that can be achieved when growing on smart beds. It is given in the table. Since you are still an inexperienced "lazy gardener", reduce it by half. Next to each of the plants put down the numbers. It must be recorded in kilograms per square meter of area.

Now it is easy to calculate how much area you need to allocate for each type of plant: we divide the desired yield in kilograms by the average yield for each type of plant. We get the footage of the area for vegetables, berries, herbs, etc. If you add up all these areas, we will find out how many beds you need in total. These are the beds that should be placed on your site.
You're probably surprised at how little space you need for your garden beds. And really little. Much less than what we are used to! In processing, you will have very little land. The vacated place can be taken under, rockeries, and other decorations.
Where to locate
When planning smart beds, you need to take into account the degree of illumination. Almost all the plants you need prefer sunny places. In partial shade, you can grow rhubarb, sorrel, onions (including feathers). Perhaps everything. There are no garden plants that would grow well in shady places. Rather, they will grow, but the yield will decrease by 3-4 times. Shady areas should be taken under a recreation area or a flower bed with shade-loving plants should be placed there.

Another principle for placing beds: the more care (read watering) a culture requires, the closer to the entrance to the house it should be located:

Why arrange the plants this way? Because at the beginning of the watering / weeding work, gardeners are full of enthusiasm and the plants receive more water, weeds are more carefully removed. Gradually, the ardor subsides, less and less water gets to the square of the area, the processing becomes less thorough. And with the approach proposed above, the amount of water will be “just right” and everything will be in order with the cultivation of the soil.
Orientation to the cardinal points and precise positioning
If you want to get a crop from the entire area of \u200b\u200bthe lazy garden, the location is north-south. Strictly. Only in this way will the entire area bear fruit. Also arrange trellises for climbing vegetables. Although, they can be planted along the southern and eastern walls of buildings.
In order for a smart garden to be also beautiful, you need to think about where to put the beds. To do this, we take a plan of the site on a scale indicating the direction to the north / south. On it we draw all the buildings and capital paths, water supply (we pay special attention to the position of the taps), trees and shrubs. On the plan, we immediately outline the shadow zones - we will not place vegetables here, this is a place for flowers, fountains.

We cut out beds from paper (on the same scale as the site plan). Moreover, we make them of the shape that we plan: a rectangle, a square, a circle, a triangle, etc. The form is selected based on the area planned for the culture. And it doesn't have to be a boring rectangle. Since there will be enough free space (you remember that you need much less beds), then rationalism fades into the background, and we focus on aesthetics. After all, few people work in the country "so that there is something to eat", basically it is also a pleasure. And what could be more pleasant than the beauty of a cultivated area?
So, we sign each piece of paper denoting a smart bed - we put the name of the culture or crops (you can grow two or three or more on one bed). Now we are looking for a place for each, taking into account the rules described above. Along the way, you can change the shape of smart beds: for the sake of beauty or convenience. When you have found places, outline the contours, transfer the inscriptions. It remains only to implement the plan.
Irrigation system
A significant part of the work in the garden is watering the plants. If you use lazy beds, you will need to water much less frequently. But even in this case, it is better to do the piping in the area correctly. You already have a plan for the location of beds in your garden. Now add flower beds, bushes and trees there. Get a planting plan for the plants to be watered. Now you should think about how, so that there is no more than 2-3 meters to any "irrigation object". If you do this, then you will have to pull a small hose to each bed, which is much easier.

Homemade drip irrigation system made of polymer pipes, water source - barrel
Even better, if a hose for drip irrigation is laid in the smart garden. This will reduce water consumption and increase yields. Yes, at the same time. A drip irrigation hose is a polyethylene tube with small holes through which water oozes drop by drop. When planting, plants are planted next to the holes. As a result, water is supplied under the root, the plant receives a sufficient amount of moisture, and the gaps between plants remain only slightly moistened (due to the redistribution of moisture in the soil).
When using drip irrigation, you will have very little work. Open the faucet, wait a certain period of time, close the faucet. All. Hoses for drip irrigation are available for connection to the water supply (sold per meter), there are kits with a small pump that will pump water from the tank. The range of prices for hoses for drip irrigation is solid - prices differ significantly. No matter how limited your finances are, do not take the cheapest hoses - they will last no more than one season. It is better to pay a little more for a quality product and use it for several years. When choosing kits for drip irrigation, you also need to look at the irrigated area. But, most likely, it will suit you, since lazy beds are rarely large. Read more about drip irrigation kits and manufacturers.
How to make smart/lazy beds
The principle of building smart / lazy beds is that you need to create ideal conditions for the development of plants and ease of processing for yourself. What do plants need? Nutrients, enough light, air, moisture and the absence of a large number of weeds.

oxygen and nutrients
We provided them with a sufficient amount of sun by arranging the beds from north to south. The next task is nutrients and air to the roots. All this is laid when forming the beds. Depending on the type of soil, we select the components that are missing in the "source material". In Central Russia, the main soils are clay and loam, so humus of varying degrees of “maturity” is usually added (a year, two and three). This is for fertilizing, and for lightening the soil - for better oxygen access to the roots. Together with humus, bacteria and worms enter, which continue to process, enriching the soil and loosening it instead of you.

The yield per square meter will be hoo what ...
If necessary, you can make other fertilizers - in the wells when planting or when watering. Depends on crops or richness/poority of source soils. The most common natural fertilizers are chicken manure and cow manure, ashes. When making only cow dung, you will be annoyed by bears. If you add a little chicken manure, there will be no bear, and the composition of the soil will become richer.
Moisture retention and weed control
Moisture will be partially delivered by rain and dew, and partially will have to be added by irrigation. And so that less water is required, the entire space of the garden bed is not filled with plants, we fill it with mulch. Mulch, by the way, also reduces the number of weeds - there is not enough light for them under it.
Straw, cut grass, sawdust, fallen needles, special mulch made from wood chips can be used as mulch. All this can be used to mulch lazy beds. But all materials are imperfect. Here are their advantages and disadvantages:

There is another good way out: cover smart / lazy beds with a special black covering material. They completely cover the surface of the beds, sometimes in two layers. Small holes are made under the plants. Watering is carried out directly on the material - it does not retain water and air, does not allow weeds to grow, and protects the soil from overheating. In general, everything is good, except that you have to buy it.
How to make them
We figured out the general principles of creating a smart garden, now we will specifically understand how to make beds. You can’t walk on them, so they definitely need to be fenced - with stones, slate, iron, logs sawn in half, boards ... It doesn’t matter what, but the beds must be separated from the paths. And since you can’t step on the beds, their width should be such that you can freely cultivate the soil.
Now about the width of smart beds. It depends on the type: they will be of normal height or raised. If the beds are made at ground level, their width is 80-100 cm. Sitting on your haunches or bending over, you can process this width. If the beds are raised at least half a meter, it will be even more convenient to work. They do not only high beds. All possible growing technologies can be used:

Now about whether the usual height of the beds is better or raised. For a really lazy garden, raised ones are better: when cultivating the soil, you will have to strain less. But it's hard work and slow. So for starters, you can get high beds only for the most difficult crops to care for. And you can also use various containers / containers - for greens, salads, spicy plants. Suitable sawn along large barrels, boxes. On sale there are plastic containers that are produced specifically for the smart garden. They can generally be placed on the paths, near the entrance to the house.
The only crop under which you should not make raised beds is potatoes. It grows well in trenches, and making them is much easier and faster.
Between beds
The beds in the smart garden are separated, the distance between them is not less than 60 cm (90-100 cm or more is better). A solid distance that needs to be filled with something. Weeding between beds is not the best idea. Why then bother with separate beds in order to fight the weeds between them ... Therefore, you can either lay out / pave or sow with lawn grass. The best grass for our lawn is bluegrass and bluegrass. They grow quickly, form dense greenery that is not trampled down and even tolerates work with a cart.

The grass will need to be cut, so you will need a lawn mower or trimmer. And the cut grass can be used for mulch. Then, by the way, weeds will come out - they do not withstand frequent haircuts.
Some tricks
The technology is called the smart garden for a reason. You can test different approaches, novelties, experience of "colleagues". There are a few tricks that come along with the operation. We have already talked about one - about the covering material. It really simplifies care and mulch is not needed. There are other interesting ideas:

Surely there are more tricks in the processing of a smart garden. If we find out about them, we will definitely update the article.
Borders around garden and garden plantings are a practical solution that has a lot of advantages. However, not all summer residents are in a hurry to enclose vegetables and herbs, referring to the complexity of the work and the high cost of materials. Consider the most popular ways of erecting borders, try to dispel doubts and offer options on how to quickly and cost-effectively make a fence for beds from improvised materials. The variety of techniques allows you to create beautiful and practical fences for any type of plant.
Benefits of garden fences
Some summer residents adhere to the traditional way of cultivating the land and do not understand why the beds are fenced.
wooden fencing
Dividing the garden into mini-zones with the construction of fences has a number of advantages, both practical and decorative:
- Weed reduction. Framing the beds significantly reduces the area for the growth of weeds. In addition, when the sides are deepened into the ground, a kind of barrier is created that prevents the spread of pests and diseases to neighboring crops.
- Strengthening loose soil. The fence for beds prevents shedding of soil and reduces its weathering, erosion. The use of fences is especially important for sandy and sandy substrates.
- Getting an early harvest. Installing the sides for the beds allows you to create a "thermo-garden" by filling the erected box with various organic matter. In warm plantings, the temperature regime of the soil is higher than when organizing a traditional vegetable garden, so vegetables are planted and ripen faster.
- Ease of care. Weeding, loosening or harrowing the earth is much easier.
- Ease of lawn mowing. When mowing grass, bed borders protect plantings from damage by lawn mower blades.
- The attractiveness of a flower and vegetable lawn. The aisles remain clean, and the garden looks well-groomed.

Growing crops in separate boxes
Fencing can become an integral element of landscape design. The combination of multi-colored border tapes for beds or the original use of familiar materials will allow you to zone the site and create a bright garden composition in the country with your own hands.

Zoned vegetable garden on the plot
Garden fencing requirements
The requirements put forward to the framing of landings, first of all, depend on the purpose of the fence. Flower fences should be in harmony with the style of the entire garden, and borders for garden beds are selected taking into account the type of vegetable crops and the way they are grown.

Nice garden fence
General requirements:
- Strength. The sides must withstand the pressure of the earth and not spread on the sides when the soil gets wet - especially during the thaw and spring floods.
- Resistance to mechanical damage. In case of accidental impact with a rake or a shovel, the material should not deform or crack.
- Durability. It is optimal if the constructed frame will last at least 5-10 years.
- Easy assembly. Fences that are difficult to install should be erected for perennials - shrubs and flower beds. When arranging the ridges, it is desirable to provide for the possibility of dismantling and transferring the structure to another place.
- Environmental friendliness. The material must not emit toxic substances. This requirement is especially relevant when choosing polymer fences, since some plasticizers are poisonous when the temperature rises. Harmful elements can get into the soil, and then into the roots, stems, leaves and fruits of plants.
- Profitability. This criterion is best met by fences made from improvised materials: boards, old bricks, plastic containers.
Advice. For the construction, you should not choose a material that is very hot in the sun. In such structures, the soil dries out very quickly, and the plants experience a lack of moisture.

Planning a plot for growing vegetables
- the minimum height of the fence is 15 cm if there is fertile soil on the site, 30 cm if an embankment or partial soil replacement is expected;
- for planting potatoes, beets and other root crops, a raised ridge with a height of 40 cm or more is suitable;
- when constructing compost thermo-beds, the height of the box should be at least 60 cm;
- the width of one row is within 120 cm - this will allow you to effortlessly reach the middle of the plantings while cultivating the land or picking fruits.
We make fences with our own hands
There are many techniques for framing garden beds in the country. To choose the best option, you need to compare the positive and negative qualities of each method.

Practical use of the picket fence
Wooden fencing - a variety of options
Wood meets most requirements. This material for beds is economical, safe, easy to install and quite durable. The only drawback is the susceptibility to rotting in conditions of high humidity. However, this risk can be minimized by treating the curbs with an antiseptic composition.
To create wooden fences for beds with your own hands, a beam, lining, edged material, slab, hemp, long boards or a picket fence are suitable - any household blanks are used. The options below will help you decide on the formwork model for the beds:
- a multi-tiered ridge of profiled timber will decorate any cottage or backyard;
- picket fence for beds - the elements should be located back to back to prevent soil from spilling out;
- high warm plantings framed by croaker - an alternative to a traditional greenhouse;
- organization of natural farming on high ridges from boards.
When choosing a material, it is necessary to pay attention to the type and condition of the wood. Suitable wood species:
- ash and oak - high-strength, durable wood, minus raw materials - high cost;
- pine - inexpensive, soft material, easy to process, lack of wood - susceptibility to moisture;
- cedar and larch - have a long service life;
- acacia - has good performance characteristics, but is difficult to process.
How to make boards from boards with your own hands
We will analyze step by step how to fence the beds with boards with your own hands. The proposed option is suitable for breaking down a garden on open ground, the size of the box is 1 * 1.6 m.

Homemade fences from boards
Materials and tools:
- boards 150 * 25 mm, length 2.5 m - 4 pcs.;
- boards 150 * 25 mm, length 3 m - 2 pcs.;
- board 100 * 50 mm, length 2.5 m - 1 pc.;
- screws;
- tape measure, pencil and ruler;
- screwdriver and saw.
Work progress:


- "Grow" the height of the sides with another row of boards.
- Fix the upper shelves - first screw the longitudinal sides, and then the transverse ones.

Fixing the top shelves
Move the formwork to the right place and fill it with fertile soil.
Practical metal fencing
A French garden with metal borders for beds looks very neat. Due to the rigidity of the material, it is possible to achieve clear geometric lines. The galvanized framing of the beds is considered the strongest and most durable - galvanized steel coating is preferable to iron.

The use of metal structures
Features of metal fences for garden beds:
- ready-made modular fences are very mobile - they are easy to assemble, disassemble, transport and reinstall;
- high cost of a metal box;
- such a design will not “float” during the rainy season and after the snow melts;
- metal products are susceptible to corrosion; in the absence of galvanizing, the sides will have to be painted annually;
- the metal has good thermal conductivity - near the fence, the soil can heat up to a critical temperature, inhibiting the roots of plants.
Advice. It is better to install fences for beds with a polymer coating - the layer reduces the thermal conductivity of the metal and protects the soil from overheating.

Purchased galvanized fences
When creating fences with your own hands, galvanized corrugated board is often used. Consider step by step how to make a fence for ridges:
- Decide on the dimensions of the beds from the profiled sheet, mark the metal sheet and cut it. For cutting, you can use scissors for metal or an electric saw.
- When planning the product, it is important to provide that the direction of the waves of the metal profile should be transverse relative to the surface of the earth. The height of the formwork is calculated taking into account the depth of 10-15 cm.
- Mark the location of the beds on the site and dig a shallow narrow trench around the perimeter of the site.
- Set the prepared sides, level them, overlap them and fasten them with rivets.
- Fix a U-shaped profile on top of the corrugated board - it will hide sharp edges and protect the metal from moisture.
Durable stone fences
An unusual decorative fence can be built with your own hands from stone. The shape, layout order, dimensions of the elements used are all at the discretion of the performer. Do-it-yourself options for erecting stone borders for beds are presented below.
dry method. Large boulders are used as a fence. The first row of blocks is deepened into the soil by 5-8 cm, ensuring the stability of the structure. Subsequent cobblestones are laid out on a sand-and-earth sprinkling.

Dry stone laying
You can fence the beds with sandstone, limestone, basalt or pebbles. It is undesirable to frame the beds with granite - the mineral acidifies the soil, worsening its nutritional qualities.
Solution laying. The method is more laborious, but allows you to build a solid monolithic structure that does not require any maintenance. This approach involves the use of both large and small stones in construction.

Fixing stones on sand-concrete mortar
The use of curb stone. To cover the beds, some summer residents buy ready-made decorative plates. A wide range of suitable border stones for beds allows you to create original fences of different colors.

Curb stone in the arrangement of vegetable plantings
The disadvantage of this method is the limited height. The curb stone is not suitable for the construction of a raised thermo-bed.
How to make a decorative pergon around the garden
Gabions and pergons - bulk decorative fences. The mesh steel frame is filled with stones of different fractions. The design is simple in execution, does not need a foundation, is affordable and fits perfectly into any landscape design.

Gabions - an original way to decorate the beds
To create a pergona with your own hands you will need:
- durable galvanized wire mesh with a wire thickness of 2-3 mm;
- clamps for fixing the frame;
- geotextile for the substrate;
- filler - pebbles, stones;
- shovel, pliers, tape measure, level.

Fixing the sides of the frame
Work progress:
- Prepare the sides of the box from the mesh. When finished, the bed will be framed with rectangular blocks - the height and width are selected arbitrarily.
- Along the perimeter of the landing area, mark a strip with a width equal to the base of the fence. The soil should be leveled, compacted and covered with geotextile.
- Assemble the frame, fixing the position of the formwork with wire. Screw the fasteners inward to keep the structure neat. Leave the top of the prepared basket open.
- After installing the four boxes, fill the mesh frame with stones and screw on the top.

Filling the mesh box with stones
Available Plastic Fencing
The easiest and fastest way to fence vegetable plantings with your own hands is to edging the beds with plastic. A wide range of ready-made solutions for summer cottages is on sale.
Border tape. Flexible, lightweight fencing for framing lawns, flower beds, paths and raised beds. The tape is supplied in rolls of different lengths, the width of the strip is 20-50 cm. The kit includes plastic pegs for fixing the fence. Flat and corrugated "borders" are produced.

plastic border tape
The technology for installing the tape is very simple:
- Mark the border of the beds on the site.
- Align the pegs evenly along the contour of the "vegetable" platform.
- Attach tape to the wedges, partially deepening the curb into the ground.
Important! The tape must be well tensioned - this will ensure the rigidity of the fence, and prevent the appearance of sagging.

Assembly technology of garden polymer panels
An alternative to flexible tape is straight flat panels. They are more rigid, but are only suitable for creating straight mini-gardens. Thanks to the presence of teeth on the underside, the installation of plastic borders for beds is facilitated.
Volumetric panels "Garden board" and "Stone". Products emit natural building materials. With their help create various garden compositions. Polymer modules are decorative and practical, the only drawback is the relatively high cost.
Do-it-yourself assembly will not cause any difficulties - the set is equipped with panels, pegs and plugs. The task of the performer is to prepare the site and fix the curb.
Garden constructor - fencing with a flexible design. Sides for beds made of plastic panels are designed to create ridges and flower beds of an unusual shape. Border elements are combined into a closed single chain. By changing the direction of the "snake", in a few minutes it will be possible to create an unusual fence for growing country crops.
Budget fencing made of slate
For those who are looking for how to fence the beds in the country inexpensively, the option using slate is suitable. Asbestos-cement slabs are resistant to moisture, easy to process and install, durable and affordable.
A fence for garden beds in the country is often erected from flat or wave slate. On sale there are special asbestos-cement strips of standard dimensions: length - 3 m, thickness - 16-40 mm.

Strengthening the sides of the slate fence
Instructions for edging the beds with slate with your own hands:
- Determine the dimensions of the future ridge and, according to the dimensions, make blanks for the sides of the box. When calculating the height of the side, it should be noted that 20 cm of slate will go away when installed deep.
- Mark on the ground and dig a trench 20 cm deep around the perimeter.
- Install slate sheets in the dug holes in a strictly vertical position.
- Fix the sides - cover with earth and tamp.
- Prepare holes for fasteners in metal corners and asbestos-cement sheets.
- Attach the corners to the slate with bolts.
- To give rigidity and stability to the entire structure, it is desirable to install metal supports. Weld a metal plate to a reinforcing bar - a home-made support is fixed with bolts to the sides of the fence.

Fastening the sides of the box with a metal corner
By analogy, you can block the beds with wavy slate. To strengthen the high sides, it is necessary to build a frame of reinforcing bars and boards. Attach slate sheets to wooden elements with nails.

Wavy slate framing option
Before framing the beds with asbestos-cement sheets, you need to consider security measures. When sawing slate, a lot of dust is generated, so it is important to protect the eyes and respiratory tract. The cut site should be moistened with water.

Compliance with safety measures when cutting slate
Plastic bottle fence
Fencing beds with plastic bottles is not difficult. To implement a simple option, you will need PET bottles with a capacity of 1.5-2 liters, a shovel, sand and multi-colored paints.

Fencing with plastic bottles
Do-it-yourself step-by-step algorithm for fencing beds:
- Pick up a container of the same volume. It is optimal if the containers match in color, however, it is difficult to collect many identical bottles. Therefore, it is better to paint them in one color better from the inside.
- Fill the bottles with small pebbles or sand - this will give them the missing strength and ensure stability.
- Determine in the country a place for the formation of beds and markup.
- Dig a trench 8-10 cm deep along the perimeter, the width of the ditch should correspond to the dimensions of the bottles.
- Turn the filled containers upside down and install them in the trench as tightly as possible - the elements should not stagger.

Strengthening the plastic structure
Fenced beds can be reinforced at the corners with support posts. Make holes in the bottles in advance, stretch the wire and tighten it tightly on the side stakes. Such a hitch will prevent the elements from “falling out” when cultivating the land.
With a creative approach to the issue, even from used containers, it will be possible to build beautiful garden fences. They can have an unusual shape, consist of several tiers, or be complemented by decorative elements.

Creating ridges of an unusual shape
It is not difficult to build a fence for planting vegetables. When choosing the right material, you need to compare your own strengths, time and money costs for the implementation of the plan. Compliance with the chosen technology will help to easily "order" the garden and increase its efficiency.
We also recommend
 Dionysus - Greek god of winemaking
 The essence of the concept and classification of mortgage lending
 Prince Vsevolod Yaroslavich Mention of the princes in the "Word ..."
 Urinary tract infections Treatment of mixed urinary tract infections
 Description of an24 At what height does an24 fly
 What battle is considered the collapse of the "blitzkrieg"?