The sketch for the bas-relief is simple. Bas-relief images in the interior of the apartment: advantages, photos
Bas-reliefs have been used since ancient times to decorate various kinds of products and structures. Today, such decorative elements have found application in a wide variety of fields.
Bas-relief in the interior
The use of bas-reliefs gives a fairly wide scope for interior design. For example, you can create a separate panel in the form of a picture to decorate an empty wall.

Often bas-reliefs are used for. The bas-relief in combination with the original illumination creates a truly original picture - thanks to the illumination, all the bulges of the image will be seen even more clearly.
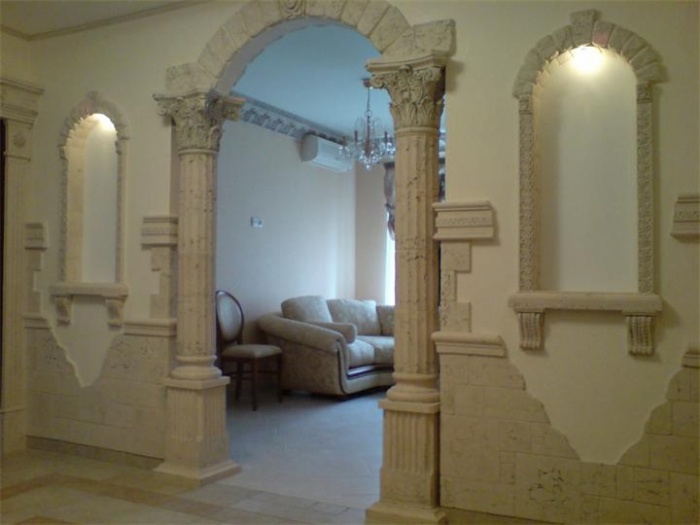
Bas-reliefs are great for decorating all kinds of openings.

Unlike another popular interior design option - decorative painting - bas-reliefs do not need additional color highlighting.
In the absence of color highlighting, a three-dimensional pattern will appear due to the play of light with well-equipped artificial lighting. Thus, the owner has the opportunity to create accents on the decor elements at the right time for him - just turn on the lighting.

In addition to purely decorative functions, bas-reliefs are also excellent for various functional tasks. For example, volumetric decoration allows you to level out uneven surfaces, decorate engineering communications, visually distort the space at the discretion of the owner, and create smooth transitions between different functional areas.

A competent combination of three-dimensional relief and decorative painting allows you to create truly original and incredible effects.
However, despite its many advantages, the bas-relief remains not such a popular option for decorating rooms. The essence of the problem lies in the high cost of arranging such volumetric elements.

Uninformed people often make the mistake of believing that the bas-relief is a prefabricated structure cast from plaster. In fact, such decoration is arranged by hand and is inherently exclusive. Therefore, it will take a lot of effort to arrange a beautiful bas-relief image, but with a great desire, you can handle all the activities yourself.

General guide to creating a bas-relief
To create a bas-relief with your own hands, you can use a wide variety of materials: gypsum, gypsum-based plaster, alabaster, clay, etc. It is easiest for beginners to work with gypsum and plaster based on it.

First step
Assemble a box with low walls from slats and plywood, more like a tray. In terms of its overall dimensions, the box must correspond to the dimensions of the future relief slab - this is where the bas-relief will be created.
Instead of a box, you can use other improvised means, for example, a candy box or a suitable frame glued to the glass with adhesive tape.


Second step
Cover the mold with polyethylene. Straighten the film so that there are no wrinkles or there are as few as possible.
Third step
According to the manufacturer's instructions and pour it into the mold.
If you plan to create an ornament with a high relief, insert wire into the slab for additional reinforcement of the future composition.


Fourth step
Leave the poured mixture for the initial setting. This indicator is individual for different materials, specify in a separate order.


Fifth step
Start creating a bas-relief. First you need to apply the contour of the created decorative ornament to the plate, and then begin to increase the volume inside the decorated contour from the newly prepared mixture.
Build up volume in layers, allowing each layer to harden slightly.


Convenient enough - while the material is wet, you can easily get rid of its excess with a knife, and adjust the ornament itself with a chisel and cutters for woodworking.
In addition, not completely dried material is simply sanded. It is much more difficult to perform the necessary processing of a hardened surface.


If you plan to create an in-depth image, you can solve the problem in two ways.
- The background layer is built up around the image, as a result of which the elements of the ornament appear in a certain recess. Finally, the background plane is polished.
- Images are deepened by sampling a certain amount of base material with the help of chisels and cutters already familiar to you.
Learn how to do it, as well as an overview of the basic techniques, from our new article.
Prices for popular types of plaster
Plaster
Bas-relief on specific examples

To make the process of creating a bas-relief more understandable, you should consider the procedure for arranging such a decor using specific examples. Your attention is invited to the two most popular options - "lilies" and "tulips". Having mastered the order of their arrangement, you will be able to cope with the creation of decorative bas-reliefs of almost any complexity.
"Lilies"
 Bas-relief "Lily"
 First step. Protect the base to be decorated by covering the required space with masking tape.
Second step. Cover the base with putty, let it dry and apply a primer. It is best to use primer paint. This composition is remarkable in that after drying, the grains of sand that make up the mixture remain on the base. Due to the roughness created, subsequent layers of finish are held as firmly as possible. On average, the paint-primer dries within 2-3 hours.
Third step. Apply a starting layer of Marseille wax to the surface with the help. This material hardens quite quickly, on average within 3-4 hours at room temperature.

Fourth step. Unfold the film and draw the details of the bas-relief. To do this, you need to fix a transparent plastic film on top of the working surface for its entire length and width. The bottom edge, at the same time, does not need to be fixed - you should be able to bend it freely.

Fifth step. With a marker, apply a sketch of future “lilies” on a plastic film - stems, leaves, buds.


Sixth step. After the sketch is complete, proceed with the application of Marseilles wax under the plastic wrap in accordance with the sketch. First use a trowel to work, and then a palette knife.


The Marseille wax used is white. To make the created decor more noticeable, cover the finish with a suitable compound. For example, you can use water that is lightly colored with maklovitsa. Such compositions can only be applied to a dried surface.
After tinting, you will once see in which places the finishing material needs to be given the outlines of stems, flowers, etc.
Your task is to make the planned bas-relief as realistic as possible and correspond to the sketch. This will take you a very long time, so there is no need to rush to finish everything as quickly as possible. Work carefully, thoughtfully and gradually.
 Bas-relief "Lilies" after the final decoration
 After giving the bas-relief the desired shape, let the composition harden and proceed to apply the second layer of decorative finishes - the desired color.
Prepare the paint according to the manufacturer's instructions. On average, such paints and varnishes dry for 5-8 hours. Specify the specific time in the description of the paint used.
In conclusion, you will have to apply the finishing layer of the finish - polished or another composition with similar properties. Using a wide brush, apply Otocento in a double layer over the entire area of the wall to be decorated. The second layer can be applied only after the first has dried. On average, it takes 1-3 hours. You must carefully paint over each element of the composition.
To give the composition additional visual volume and expressiveness, apply white ottocento to certain parts of the bas-relief.
"Tulips"

And directly the work on creating "tulips" is carried out according to the scheme already familiar to you, namely:

Read, a practical guide for, in our new article.
Creating a bas-relief with your own hands is a rather complex, painstaking, time-consuming and significant financial undertaking. However, with the right approach, you can give the interior of your home a unique look.
Successful work!
Video - Do-it-yourself bas-relief on the wall
The rejection of generally accepted clichés, the design of one's home in such a way that it is unique, the introduction of a special zest into it is not just a fashion trend, but a completely justified and natural expression of a person's own individuality. A bas-relief in the interior will become a truly exclusive decoration, and you can create it yourself.
The royal palace, the castle, the family estate of an influential family - this is where you could most often find bas-reliefs in the past. This was due to the complexity and high cost of creation. Gradually, the fashion for them came to naught, but now, with the advent of inexpensive and affordable materials, these decorative ornaments are experiencing a rebirth, perfectly combined with a wide variety of styles in the apartment.
Features of the bas-reliefs
Several features of the bas-reliefs that favorably distinguish them from other types of interior decorations:
- This decor element can be made from any material (papier-mâché, gypsum, decorative plaster, polystyrene, metal, etc.) that is plastic enough or suitable for pouring into a mold.
- Modern bas-reliefs are easy to perform and install, they are lightweight and affordable, but if they are made from natural materials (wood, stone), then at a considerable price they look really unique, extraordinary and exclusive.
- The plot of the image is chosen based on the tastes and needs of the customer, it can be antique, antique, neutral or emphatically modern.
- In addition to visual appeal, such decorative elements will help hide communications, defects, and surface irregularities.
Bas-relief as an interior element
Bas-reliefs will help to dilute the dullness and monotony of plain surfaces of walls and ceilings, especially when the addition of decorative elements or additional colors is undesirable.
Even the simplest bas-relief drawing will enliven the surrounding space if you manage to choose the right lighting.
A universal solution for all styles in the design of walls and ceilings are the branches and trunk of a tree or an abstract pattern that can fill the wall without overloading the space.
A bas-relief can be created in several ways:
- by molding directly on the wall surface;
- by manufacturing individual elements with subsequent mounting on the wall;
- in the form of a three-dimensional picture made on a solid basis (for example, on a gypsum-fiber sheet).
Novo-bas-reliefs
In 2014, Applico presented a novelty in the world of finishing materials. New bas-reliefs in the interior - flexible plates of different sizes with a color or monochrome pattern printed on them. Their distinguishing features:
- possibility of mounting on any surface;
- excellent noise and thermal insulation properties;
- plate flexibility;
- bio-, thermo- and moisture resistance;
- safety for humans and the environment.
The plates are mounted on the walls, according to the numbering indicated on them, they are fixed with a special adhesive.
A photograph of the new bas-relief is presented below:
Bas-relief painting
As we have already mentioned, the materials for creating bas-reliefs can be different. But beginners are advised to start with gypsum mixed with plaster. Do not worry, even the simplest plaster molding will ennoble the room, giving it elegance and solemnity.
The easiest kind of volumetric decor element to create on your own is a bas-relief-picture. The advantages of such a product:
- for this type of bas-relief, you do not need to prepare a wall;
- there is no fear of failure: if the picture does not work out, you can postpone work for a while or abandon the idea altogether, while the decoration in the room will not be spoiled;
- a bas-relief in the form of a picture at any time can be moved to another place, taken with you to a new place of residence.
Stages of self-creation of a picture in the technique of bas-relief
- At the same stage, we determine the size of the future bas-relief and its location.
It should be understood that the larger the size of the image, the more space is needed to “read” it; on small stucco, the decor will be correspondingly smaller, more detailed, and will require more skill.
- We prepare a sheet of GKL or GVL, draw on it a sketch of a future three-dimensional picture.
- We knead the gypsum plaster and apply it with a palette knife - a special spatula for painting - on the work surface. You can form parts with palette knives of various shapes, fingers, brushes. There can be several layers of material, the main thing is to wait for the previous one to dry.
- After drying, the surface of the bas-relief is polished with fine sandpaper and primed.
- If desired, the bas-relief can be painted, subjected to the procedure of artificial aging, to give it an antique look.
Before deciding to paint a bas-relief, think carefully: beginners in most cases are disappointed with the results of this stage, since it requires special skills and knowledge. In addition, a white or only slightly tinted bas-relief in most cases looks much better than a product painted in different colors.

I want to decorate my house, make it cozy and hospitable. In a typical building, it is more difficult to create an original design, but you can look for a way out. An interesting, and at the same time elegant solution would be to create a bas-relief on the wall. It can be made from various materials, in addition, you can do the creation of a three-dimensional image yourself. About the variety of bas-relief, its features, application can be read below. There is also a master class, thanks to which you can independently master this technique.
Bas-relief in the interior
To create a bas-relief image, you can use such materials like:
The walls are decorated with:
- landscapes;
- figures of people;
- plants;
- items.
These can be full-fledged artistic compositions. Thus, they can decorate the building inside and out.
The cast parts of the decor are made of polyurethane or gypsum, and hand, author's modeling is done using putty, polyurethane glue.
Bas-relief is often used in modern interiors. The technique of such compositions is different, this allows you to correctly place the bas-relief in a room of any style.
Bas-relief compositions will help to develop and complement the main theme of the interior, to place the necessary accents in the house. Stucco molding in the living room helps to achieve a special solemn atmosphere. In the bedroom, she creates an atmosphere of intimacy, in - the appearance of imaginary movement. All this helps to change the impression and create the necessary mood.
On an empty wall, you can create a panel in the form of a picture. If the bas-relief is highlighted, then all the convex details will look even more distinct. They are often used to decorate different openings.
Unlike decorative painting, bas-reliefs do not have to be highlighted with color. If desired, it can be left white, and it will look just as good. You can combine these two options, you get an original and unusual effect.
The bas-relief goes well with such finishing materials:
A simple stucco molding can give originality to a room in a minimalist style, it is suitable for a loft style, a classic.
Material use
Bas-relief compositions will be well combined on stone, in forging, together with wood and other natural materials. They are often used in the decoration of fireplaces. If there is a clock in the hallway, then modeling can be done around. In small rooms, you should not make large panels.
Advice
The attention of guests will be attracted by a bas-relief with illumination. If the room is in a classic style, then with the help of stucco molding you can fill the arch opening, the free space between the doorway and the ceiling.
If there is plasma in the living room in the middle of the wall, then such a relief decor can be made around it. It can also be used in the bedroom, especially if there are forged items, elements. You can place a large panel above the head of the bed.
With the help of a bas-relief, you can hide the bumps on the wall, and turn decorative elements from flaws. Also, engineering communications can be hidden behind the modeling. On a bare wall, you can create an integral picture, a landscape that will flow into beautiful decorative plaster.
Scene selection
Modern bas-relief allows you to recreate any idea. It could be:
- simple abstraction;
- landscape;
- flowers;
- panorama of the city;
- World map.
If the cast parts of the decor are chosen for the kitchen, then it is better to choose symbols that will characterize the abundance in the house, pictures with fruits and vegetables. In a children's room, it can be a light, airy decor featuring butterflies, birds, flowers, castles.
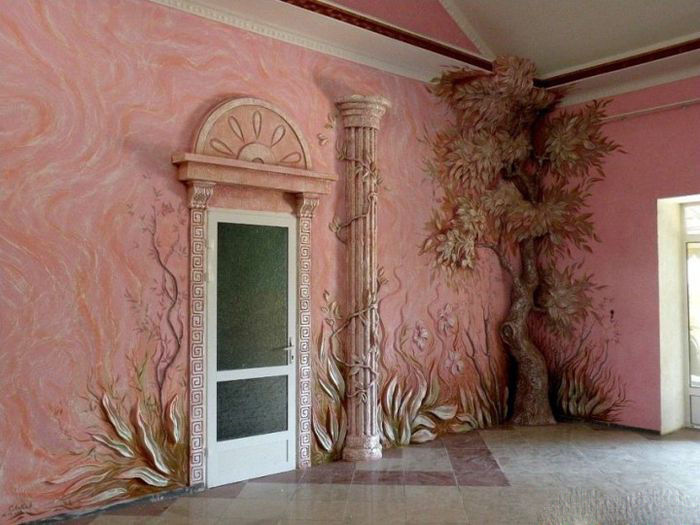
The bas-relief can be made the main composition, or it can be performed as an ornament that depicts separate scattered fragments or climbing flowers, a vine. It is used to decorate rooms, the facade of the house and other buildings.
plaster molding
Gypsum is a fairly popular material. All thanks to such qualities as fire resistance, environmental friendliness. This natural material is well suited for creating stucco moldings. Thanks to this, complex elements of relief decor can be created. And in order for the structures to last longer and be durable, they use a special varnish, primers, glue based on silicone or polyurethane. To protect the product from ultraviolet rays and precipitation, it is coated on top with acrylic paint.
The gypsum bas-relief composition can be given the appearance of wood, bronze, cast iron, or artificially aged. Using drying oil, you can imitate sculpting under ancient marble; shellac varnish is used to create terracotta. And to recreate antique bronze, a mixture of distilled water, copper sulfate or just oil paints is used.
If you want originality - add a little antiquity
Before painting, gypsum stucco should dry well. It is cleaned of dust, then primed. Mostly they use water-based paint for the ceiling, the painting itself is done with oil paint.
Polyurethane molding
The material is a plastic foamed by a special technology, it is environmentally friendly, does not absorb an unpleasant odor, excess moisture, and is resistant to temperature fluctuations. It looks good, and is suitable for its qualities for such premises: bathroom, kitchen.
Polyurethane stucco - ecological material
With the help of polyurethane moldings, you can visually correct the room. For example, you can visually make the ceiling higher and expand the room with the help of an overhead convex plank (molding), a vertical ledge in the wall, a pillar (pilaster).
They resort to molding to separate wallpapers of different tones. Stucco molding made of polyurethane can decorate interior doors. To facilitate the work with this material, a special adhesive for polyurethane is used.
With the help of such stucco molding, you can not only decorate or update the interior, but also furniture, you can create panels or frames, decorate ceilings, fireplaces, pedestals. Polyurethane stucco can be used in various areas, decorate products, parts, structures.
It will be of interest to you: REVIEW: Elegant Tapestry in the interior: combination with styles, design ideas (100+ Photos). How to create a cozy design with your own hands? (curtains, bedspreads, paintings)
Bas-relief master class
You can also make stucco molding on your own, for this it is taken
- gypsum;
- clay;
- alabaster;
- gypsum plaster.
Even a beginner can create a bas-relief design. In this case, it is better to use gypsum and plaster based on it. Maybe a chic picture will not work, but you can decorate the room with a relief image. The main thing is to follow the entire sequence of actions exactly:
- A box with low walls is assembled from slats and plywood, which looks like a tray. In dimensions, it must correspond to the dimensions of the future relief slab, there it will be necessary to create a bas-relief. In addition to the box, you can take other means, for example, an ordinary candy box, or a frame of suitable sizes, only pre-glue it to the glass with adhesive tape.
- It is necessary to cover the form with polyethylene. The foam must be straightened so that there are no wrinkles on top. If alignment fails, at least leave a minimum of irregularities.
- The solution is prepared exactly according to the instructions of its manufacturer, and poured into the mold. When planning to create an ornament with a high relief, wire is installed in the slab to further reinforce the composition.
- In order for the mixture to initially set, it must be left for a while. It is impossible to say exactly how long it will take, because. The indicator is different for each material. Just before using this or that raw material, it is necessary to clarify all the nuances of working with it.
- You can start creating the bas-relief itself. First, the contour of the necessary decorative ornament is applied to the tile. Then you can begin to increase the volume inside the circuit from the newly prepared mixture. The volume is built up in layers so that each layer hardens a little.
It is not difficult to work with plaster, it is even convenient, but while the raw material is wet. At this time, you can get rid of the excess, use a knife, and adjust the ornament with a chisel, a chisel for woodworking
If the material is not completely dry, simply plaster it. Dealing with an already hardened surface is much more difficult.
If you need to make an in-depth image, then you can do this in the following ways:
- The layer of the background itself needs to be built up around the figure, it will turn out that all the elements will be in a small depression. Everything is completed by grinding the background plane.
- Images can be deepened if you select a small amount of base material using cutters, chisels.
Self-creation of a bas-relief image is painstaking work, it requires time and considerable costs. But, with a reasonable approach, the design of your home can be given an original, even unique look.
Types and themes for creating a bas-relief
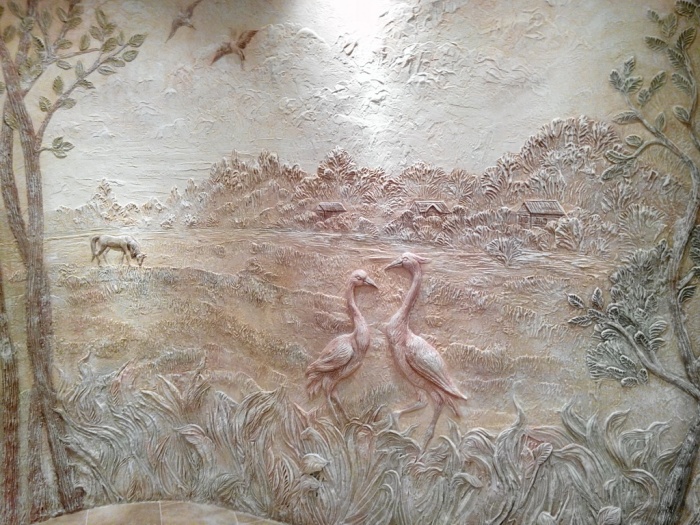
Ideas for creating such a relief design are different. Their size, complexity and plot depend on the style and volume of the room. You can depict animal or plant motifs, antique scenes or abstract elements.
The image of a tree is one of the most neutral and versatile solutions.
A three-dimensional picture can be made on the wall itself, or a pre-prepared plate with a ready-made relief image can be installed.
Flowers
Swans
Wood

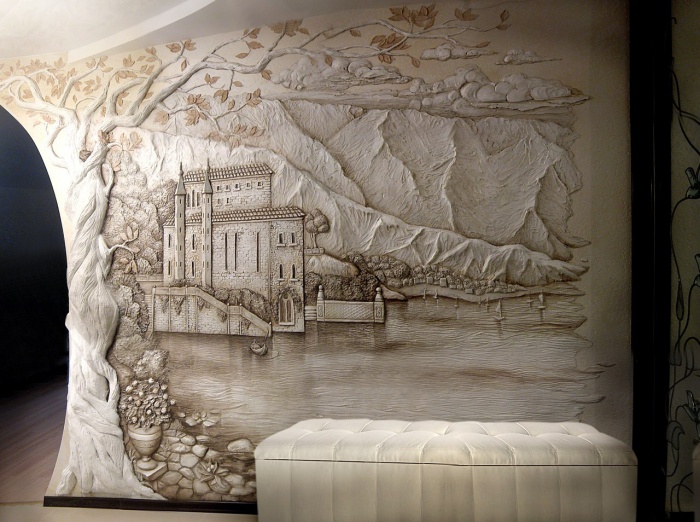
Bas-relief - a type of sculptural decoration of premises and structures in the form of a convex up to half of the volume above the plane of the convex image. It is made from materials suitable for carving, modeling or casting in molds (decorative plaster, alabaster, polystyrene, clay, wood). It is used as an element of interior design, for architectural decoration (decoration of friezes, pylons, vaults, fountains, capitals, facades).
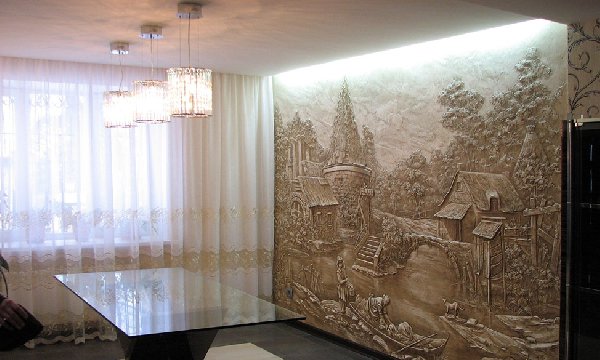
A bas-relief on a wall made of plaster, putty, or other material can be plot or abstract, made in a classic, antique, modern or other style. A branched tree, a baguette, a gypsum flower on the wall will be a win-win solution, adding harmony, liveliness, color even to the most unassuming, “modest” interior. Inaccessible to a wide range in the past due to the high cost, today colorful or monochromatic protruding images have become achievable for anyone. Among the variety of possible options for decorating rooms, gypsum paintings have become super popular in recent years and have taken a leading position.
This picture will perfectly decorate the wall.Step-by-step production of a three-dimensional study
Asking how to make bas-reliefs on the wall with their own hands, non-specialists mistakenly believe that the master sticks industrially produced parts of a plaster miniature onto the plane. The creation of a bas-relief is a process of artistic modeling from plaster (other materials) directly on the wall with your own hands (by a master) or with the technique of producing blanks, free plastering, or another method of parts of a future picture, followed by gluing “tiles” or parts of a miniature.
The order of implementation of the bas-relief on the wall

Each bas-relief is unique and individual. Even an experienced craftsman cannot create two identical studies even from one drawing.
 Each drawing is unique in itself, it is impossible to repeat it.
 What you need to make a miniature from alabaster
The bas-relief on the plaster wall can be done by hand. To implement the project, the following minimum skills are required:
drawing;
preparation of solutions;
stencil production;
creation of wire structures.
 To create such a drawing, experience and knowledge in the field of construction will be required.
 The formation of a bas-relief requires knowledge of the properties of the mixtures (setting time, the possibility of adding dyes, determining the optimal density of the solution for different works) from which the image will be made. It should be borne in mind that when working with a layer of 10 or more millimeters, it is necessary to make a wire frame that prevents the gypsum from cracking.
 In order not to contact the master, you can use casting molds
 To perform you will need:
drawing (in full size);
a pair of round + the same number of flat paint brushes, a thin nylon brush (for children) for drawing;
graphite pencil, felt-tip pen or marker;
masking tape;
stencils of the required thickness;
capacity for diluting the batch;
special tools for creating reliefs (palette knives);
materials from which the matrix will be made (for example, silicone) and a mixture for bas-relief;
paints, color (colored bas-reliefs);
confectionery (for thick lines) or medical syringe (for the design of the thinnest veins);
sustainable reliable forests (goats).
With the help of loops, stacks, cutters, excess mortar is removed, the edges are trimmed, individual elements are created, and the details are given the desired shape layer by layer. When creating a bas-relief on the wall with your own hands, the tools are dipped in water to remove residue to avoid drips and other unwanted contaminants. At the end of the work, all tools are washed. The syringe is disassembled, cleaned and dried.
 All work must be carried out carefully and according to the recommendations.
 Step by Step Guide to Performing the Grapevine Study
Consider how to form a bas-relief on the wall with your own hands using the example of the production of an image of a vine with a bunch, curly leaves. The work is carried out by the method of making various parts from an alabaster mixture with their subsequent fixing on the wall. Berries and leaves are cast into molds, ornate stem and tendrils are drawn by hand. In the production of large heavy parts, a wire frame is used to reinforce and facilitate fastening to the wall.
The first step in creating a do-it-yourself volumetric bas-relief on the wall is to complete the composition in full size and transfer the outlines to the place of the future picture. The sketch is transferred by drawing on the film (performed with a marker). A thin layer of base is applied to the prepared wall. The polyethylene sheet is placed in the required space and fixed, the contours of the sketch are outlined. The sample is removed, and the outline remains on the surface. The contours are also transferred to a dry plane. In this case, after fixing the film from above, its edge rises, and the lines are drawn with an ordinary slate pencil.
 First of all, you need to draw a sketch of the picture
The second point in the execution of the bas-relief is the manufacture of a mold for leaves and grape berries. Consider the execution of the matrix of sealant with filler (talc/starch). Filler is poured onto the board and kneaded with sealant like regular dough. An object of the corresponding shape (oval or ball) and size is pressed into the resulting material. After the silicone has solidified, the sample is removed. It turns out a matrix for the formation of berries. For sheets, you can use a factory-made silicone / polyurethane matrix, or make a template yourself using the above method. A sample of the leaf shape for a bas-relief is molded from plasticine or salt dough.
 Forms can be made for leaves and berries
The third point is the mixing of the composition and the casting of individual gypsum elements. For pouring into molds, a solution is made from one part of water and two parts of gypsum. Water is taken at room temperature. Other ingredients (sand, plaster, etc.) are not used when mixing the composition of alabaster for bas-relief. Dry gypsum powder is gradually added to the water with constant moderate stirring (to avoid the formation of lumps). Intensive mixing of the solution is not recommended. The mixture will be enriched with oxygen, and the part will turn out with air bubbles. Products are removed after the final hardening of the gypsum.
 With the help of casting molds, you can make a very beautiful drawing.
The fourth stage is the preparation of the plane and the gluing of individual elements onto the bas-relief. The plane is covered with satengypsum or acrylic putty, then reinforced with the chosen method. Berries and leaves are attached by gluing (pressing in) finished parts at the points indicated on the sketch. For fastening heavy elements, a wire (steel) with a diameter of 2-3 mm is used.
The fifth step is the execution of the stem and antennae. It is performed on a bas-relief with a syringe for decorating cakes. Particularly thin lines are executed with a medical syringe without a needle.
 Leaves and berries can be made with a cake syringe or regular
The last point is the finishing of the bas-relief. Coloring is carried out with specialized paints for stucco molding (thin halftones are obtained by shading). Bright accents in the bas-relief are made with acrylic paints. Then the painting is covered by the previously indicated method.
A bird, a butterfly on the wall near a bunch or a leaf will diversify and decorate the sketch, give it individuality and special charm. If the miniature is made from separate parts, all connection points are carefully closed, smoothed and sanded to obtain the effect of a single canvas.
 At the end, the drawing must be treated with protective equipment.
 Modeling on the walls with a stencil
If you need to create a bas-relief with a repeating fragment (for example, a flower, a curl, a leaf), the easiest method is to work with stencils. Anyone can handle this artistic decoration of the room. Even someone who has never been able to draw will design a unique artistic sculpture without much effort and special skills. The pattern is printed on a conventional printer. The template is made on a suitable material by cutting out those elements that need to be applied to the wall. You can buy factory-made stencils for bas-relief on the wall. They are available in a large assortment in hardware stores.
 You can apply a drawing on a stencil
 The template is fixed in any convenient way (for example, masking tape). Empty spaces are filled with a thick alabaster or other mortar (the thicker the stencil, the thicker the batch is made) with a cliche-thick layer and left to dry completely. If uneven edges are obtained during separation, they are sanded with fine sandpaper. Subsequent processing is carried out in a manner common to all methods.
 The template for the picture can be fixed in any way
 From all of the above, we can conclude that everyone can make a beautiful, bright and attention-grabbing outstanding drawing on the wall with their own hands. Self-creation of a bas-relief in your own home is an incomparable pleasure in the process and a unique decorative element as a result. It is worth setting a goal and the interior of an apartment, house or public institution (cafe, restaurant, clinic, etc.) will acquire its own unique atmosphere.
Video: How to make a bas-relief with your own hands
Video: Master class. Bas-relief of a flower
Let's talk about how you can make a bas-relief with your own hands. This issue worries many property owners, and therefore deserves a detailed study. Many people in our time are trying to bring some zest to the created interior.
For example, the bas-relief in the interior is gradually gaining new fans. It makes it possible to implement interesting ideas for decorating the interior of a living space into reality.

How to make a bas-relief on the wall with your own hands? Stylists often use this design technique when decorating mansions that have a real fireplace.
Original gypsum ornaments can encircle the fireplace, as well as decorate window and door openings.
Attention! Aerobatics in the interior world is considered a decorative pattern, which includes additional lighting. With its help, you can give images the volume of 3D graphics.
How to make a bas-relief on the wall with your own hands? We offer step-by-step instructions, the observance of which will allow you to create an original relief on the wall with your own hands.
How to create a three-dimensional drawing with your own hands
Those owners of country houses whose profession is not related to repairs believe that such a decorative element as a bas-relief is a prefabricated structure cast from plaster. In reality, this decorative element is made by hand, so it can be considered an original work of modern art.
Any elements of gypsum and putty are unique decorative elements; when they are created, a sketch is first drawn up.
Advice! In order to create a three-dimensional drawing on the wall, you need some skills and abilities, compliance with technological features.
Before creating bas-reliefs on the wall, it is important to first select materials. Currently, alabaster, gypsum, plaster, and clay are used to make bas-reliefs.

Having chosen the material for making the decor, you can proceed to the manufacture of the base, which will be the basis for the future bas-relief. For work, you will need a wooden box with low sides.
Attention! The bottom in the created box will be plywood.

The dimensions of such a box will correspond to the dimensions of the created bas-relief. Instead of a box, you can use a box that has a rigid base and walls. The base of the box is carefully covered with a polymer film, making sure that wrinkles do not form. Then you can proceed to the process of preparing the solution, fully observing all the recommendations of the manufacturer.
After the solution is ready, it is carefully poured into the mold.
Attention! In the manufacture of bas-reliefs with high patterns, wire will be required for the reinforcement process.
The poured mixture remains in the box until completely dry, the drying time depends on the composition of the solution.
Then you can proceed to the direct manufacture of the future bas-relief. The main condition is the creation of a certain contour of the intended ornament, followed by filling it with a mixture. The decor builds up gradually, and the previous layer must dry completely, only then it will be possible to create a new layer.

Advice! To draw contours on the finished surface, you can use the film. After all the contours are drawn, the film can be removed.
Interior stylists consider plaster to be a good material for making an original bas-relief. Among the many advantages of this material, we highlight the convenience of working with it when wet. This material is quite malleable, so you can remove excess plaster, adjust the shape of the pattern being created.
Plaster that is not completely dry can be sanded, giving the finished bas-relief a sophisticated look.
As a prerequisite for creating a high-quality and beautiful bas-relief, professionals note the complete hardening of each fragment.
In order to create recesses in the wall panel, you can use several methods:
- cut through the material and remove some parts of the created bas-relief with a chisel;
- build up the background around some point, which, after finishing, will be lower.

Basically, a flower is used as the basis for the images on the created bas-relief: a tulip or a lily. Not everyone will be able to make such a complex drawing on their own, so many owners of country houses try to order a bas-relief from professional craftsmen.
In order to simplify the process of creating a lily from gypsum or plaster, you can immediately apply it to the wall surface.
In such situations, all other interior elements must be covered with a special masking tape to prevent damage. Then the base of the pattern being created is covered with putty, and after complete drying, a primer is performed.
Advice! Professionals recommend choosing paint for priming - a primer, the properties of which make it possible to create an excellent coupling with the decorative elements of the bas-relief being created. It takes three to four hours for the finished mixture to dry completely.
With the help of a trowel, Marseille wax, which is a quick-drying material, is applied to the bas-relief. By fixing the film on the surface of the created bas-relief, it will be possible to draw small details.
Attention! The film must be fixed so that, if necessary, one of its edges can be bent.

The outlines of the planned pattern on the film can be drawn using a colored marker. Further, having unfolded the polymer film, on the traces made, you can draw a lily using Marseille wax. The painting is carried out on the wall, so there is no need to use a special substrate.
Many interior designers choose white wax for work related to the manufacture of bas-reliefs. The main task of the master is to give the created bas-relief optimal realism.
Advice! Acrylic paints are suitable for making the final layer of the created composition.

Conclusion
For a person who does not encounter such a decorative element, it is difficult to decide on an independent creation of an unusual bas-relief in his country house or city apartment.

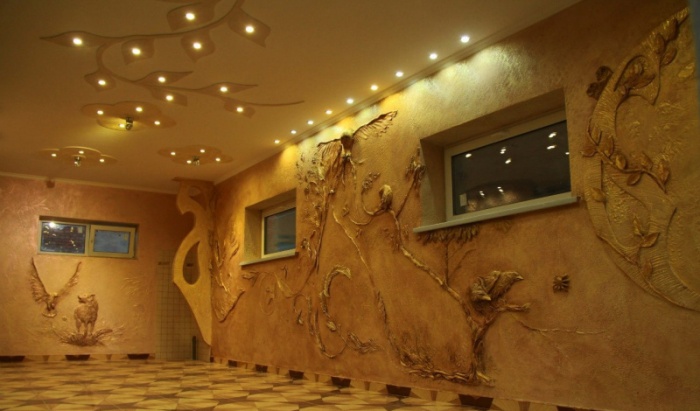
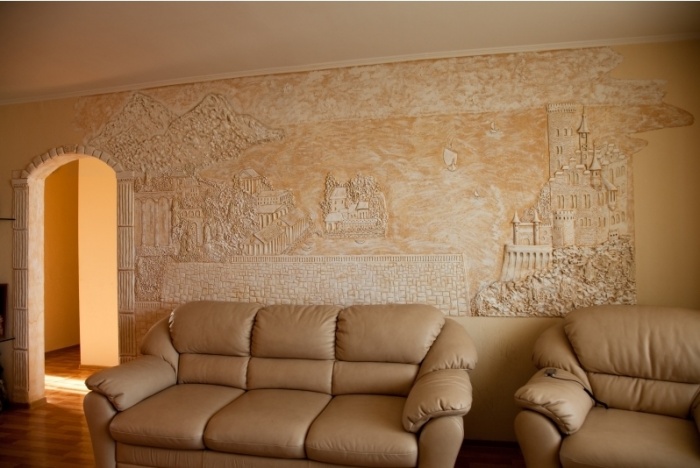
Basically, the bas-reliefs depict trees, flowers, animals, birds, and also create original plot compositions.
The fashion trend of the last season is the creation of three-dimensional images, which are initially created in a box, then fixed on the wall.
Even when creating the simplest version of gypsum stucco, you can count on getting a solemn and elegant interior.
To obtain complex compositions, professionals recommend creating bas-reliefs directly on the surface of the wall.
The bas-reliefs fit perfectly into the interior of the bedroom, the living room space. With it, you can make the kitchen individual and unique, focus on its decoration.
Ready-made bas-reliefs are suitable for interiors of different styles, from modern to fusion. To create large paintings, you will need perseverance, accuracy, desire.
To make an individual genre painting, which will depict wild animals, you will need a professional master.
We also recommend
 Dionysus - Greek god of winemaking
 The essence of the concept and classification of mortgage lending
 Prince Vsevolod Yaroslavich Mention of the princes in the "Word ..."
 Urinary tract infections Treatment of mixed urinary tract infections
 Description of an24 At what height does an24 fly
 What battle is considered the collapse of the "blitzkrieg"?