Topiary figurines made of artificial grass with their own hands. Features of creating topiary sculptures
Topiary (topiary) is the art of creating green sculpture, namely geometric shapes and animal figures. The art itself is ancient, especially the monks loved it. And in general, European gardeners used it very widely. Now the art of topiary has spread so widely that it has already migrated to the garden plots of ordinary people. Indeed, the topiary figure is not difficult to make with your own hands.
In fact, there are several ways to create a green sculpture. Figures can be formed from shrubs suitable for this purpose, such as boxwood, barberry, arborvitae, juniper. But this requires special skills and knowledge. Due to its simplicity and accessibility, the creation of frame topiary has gained wide popularity. That is, climbing (and not only) plants are planted on the formed wire or mesh frame, which, overgrowing, cover it and form a green figure.
In this master class, we are talking about creating a frame flower bed in the form of a turtle. The process is not complicated and does not require special devices. You will need square-hole wire mesh (available at hardware stores), metal wire, a round plastic stand, pliers, sphagnum moss, and the plants themselves. In this case, grass and succulents were used.

From a piece of wire mesh we form the body of a turtle. In the lower part, to give the figure stability, we install a round plastic stand, on which we will later put a round plastic pallet.

From the grid we form 4 cylinders - legs:

We fasten the legs to the body with a wire:
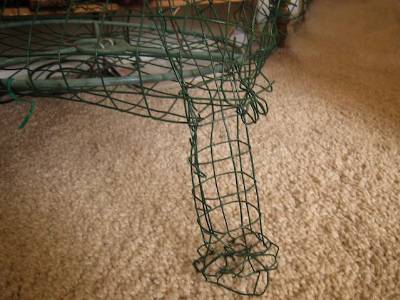
From the grid, according to the same principle, we form and attach the head and tail of the turtle to the body:

To strengthen the frame, you can insert sticks into the center of the legs, which are placed on corks from plastic milk bottles:

A drip tray is installed for the extra water that the moss will absorb.
When the frame of the figure is ready, we proceed to fill it with moss and sphagnum (which can be bought at the store if it is not possible to get it in natural conditions). We fill the frame with all this substrate quite tightly so that there are no air gaps.
When everything is filled, we proceed to planting plants. In this case, grass and succulents were used for these purposes, which were planted in the cells of the grid.
(18
ratings, average: 4,22
out of 5)
 Recently, topiaries, or European trees, have become increasingly popular. This is a great way not only to decorate your home, to give it incomparable comfort and personality, but also a great leisure activity for all family members.
What does the word topiary mean?
Once upon a time, and to this day, the art of topiary is widely used in park decoration and denoted a garden with short-cut trees framed by garden sculptures. Today, this name also means a small artificial tree, and such a unique miracle is easy to do with your own hands.
Another name for "topiary" is the tree of happiness. The explanation of this metaphor has its roots in the Ancient East. For a long time, the ball in many religions was considered to be the personification of the sun, creation, infinity and perfection. Eastern religions associate sunrise with hope, the beginning of life, spring, childhood and happiness. Bringing a topiary as a gift, you seem to give a person dear to you a piece of life and happiness. According to the rules of Feng Shui, a tree brings joy to the house.
Topiary is not the personification of any particular plant that exists in nature. This is fabulous tree embodies the wildest fantasies of the author. Its crown can have not only the typical shape of a ball, but topiary forms can be made in the form of a heart, a cone, etc.
 Making a European tree is not only a hobby, but also a whole art. However, everyone can make a topiary with their own hands. Its height is from 15 to 50 cm. The materials used in the manufacture of the tree are very diverse, it can be made from any improvised natural and artificial means: from berries and fruits, dried flowers or spices, to paper, plastic, coins and other materials . You can even make artificial grass topiary.
The minimum basis for the manufacture of wood is four required components:
- flowerpot or stand;
- the basis;
- trunk;
- crown.
A stand or flowerpot serves as the basis for placing a tree. As a stand, you can use not only a flower pot, but also an unusually decorated jar, cup, glass or other container corresponding to the general idea.
The ball is the basis for the composition., representing perfection, or a foam figure of any other shape. For the base figure, you can use other improvised materials. Usually they buy a ready-made base blank in a needlework store, which saves a lot of time.
To make the barrel, you need wire (preferably thick). As a rule, the wire is wrapped with twine; braid and decorative tape are also widely used.
Making a crown is perhaps the most interesting and creative moment in the entire process of work. There are almost limitless opportunities for the realization of the most daring and original ideas and fantasies.
Crown materials are:

bonsai trees serve as a wonderful decoration of the house not only in the living room, but also in the kitchen, bedroom and other rooms. A tree glowing in the dark will not only be an element of decor, but will also perform the practical function of a night lamp. A European tree made of fresh flowers is a wonderful gift for any celebration.
Gallery: do-it-yourself topiary (25 photos)


How to make a do-it-yourself topiary: step by step instructions
So, we make a topiary with our own hands. Consider the process of making a coffee tree as an example. Coffee bean topiaries are very popular not only because of their appearance, but also because of the wonderful aroma of coffee spread around.
Characteristic features of the coffee tree:

Necessary materials:
- any newspaper to create a form or a ready-made base;
- corrugated paper (preferably brown or a similar shade to the color of coffee);
- threads;
- stick (for accurate and uniform application of glue);
- coffee beans;
- cup;
- multi-colored pebbles;
- dry twig (for a tree trunk);
- coins (or fake money);
- plasticine.

Topiary from coffee beans- a wonderful and stylish gift for a man (husband, colleague, etc.).
Topiary Ideas
Ideas for European trees can be taken from the Internet, needlework magazines and catalogs, or use your own imagination. Implementation options are numerous. You can create a whole garden of topiaries at home. Anything can become a tree decoration, you can safely combine various materials, creating unusual forms of the base, inventing fantastic figures or sculptures for decoration.

Make an original topiary you can do it yourself for any occasion, from the New Year holiday to an anniversary or other celebration. And you can engage in the manufacture of works in this technique without any reason, but as a leisure activity for the whole family and a wonderful pastime for adults and children.
Topiary technique in landscape design
 Topiary art finds its wide application in landscape design, decoration of the territory of a country house, summer house, garden. Initially, topiary art was a technique for curly cutting trees and shrubs. As a result of such a haircut, plants are given any shape (balls, cones, etc.) or ornaments, from which you can create a variety of figures and whole green sculptures (animals, people, fabulous objects or structures, etc.).
Topiary technique and its types
- Ornaments and figures from flowers and plants. It is not difficult to form a certain ornament or figure with the help of a special ready-made topiary frame, in which plants are planted according to the plan.
- green sculptures. Frame or topiary sculptures are a fashion trend in modern garden or lawn decoration. To create them, you need a frame made of durable wire. Its inner part is laid out with a grid with small cells and filled with soil (if the sculpture is large, then sawdust or other filler can be placed inside, and filled with soil mixture on top). Seeds, seedlings or the plants themselves are planted in the soil and then cared for in the usual way.
- Nivaki - also a trendy idea in modern garden and landscape design - is growing a tree in the open field with a change in the shape of its trunk or interlacing several trunks. This element of decor has proven itself with a compact design of a small area. Nivaki from willow, pine and other trees look great in the garden.
Creating do-it-yourself topiary at home or on the site is not particularly difficult. Should always start from simpler forms and, improving their technique and art, move on to creating complex figures and compositions for the garden. The main thing, as noted by most garden sculptors, is patience, love for plants, careful and proper care of them.
with your own hands - a very real idea.
Let's discard the desire to purchase a finished plant of a bizarre shape, arm ourselves with a sharp eye, the same tool and try to create a topiary with our own hands.
Let's try to implement the most difficult - the traditional method of formation.
We will cut a living plant. Whether it will be a tree or a shrub, everyone will decide for himself.
By the way, cutting and trimming are somewhat different concepts:
- when cutting, the branches are cut to the same length, the best time for it is the period of shoot growth
- pruning is used when a complex shape is created and each branch is formed individually, the best time for pruning is February or March.
Choosing a plant for cutting
Before starting work, you should carry out the preparatory stage - figure out what shape you want to give your topiary, which plant is best for it. By the way, it is the coincidence of the plant and the conceived form that will subsequently give an ideal result, and it will be easier and more pleasant to work.Let's get back to plant selection. The main characteristics that a plant must meet are:
- slow growth;
- the ability to form replacement shoots throughout life;
- the presence of many dormant buds on the trunk;
- shade tolerance.
- Deciduous trees: common pear, forest apple (wild), various types of willows, small-leaved linden, ginnal maple, Tatar maple, small-leaved elm.
- Coniferous trees and shrubs: Norway spruce, prickly spruce, Siberian larch, common juniper, western thuja, Cossack juniper.
- Shrubs: alpine and golden currants, shrub cinquefoil, brilliant cotoneaster, common barberry and Thunberg barberry, hawthorn, viburnum vesicle.
Cut plants begin at the age of five years, when a strong root system is already developed. It is unlikely that there will be many ideological gardeners who grow their trees and shrubs from seeds, as a rule, all seedlings are purchased in nurseries. It is recommended to purchase seedlings at the age of two or three years, they are inexpensive, take root well and are still quite flexible, and this is important in order to set them the direction of growth.
Usually, the plant undergoes one, maximum two haircuts per season, depending on the intensity of growth. For one haircut, it is not recommended to remove more than 1/3 of the volume of the plant, the formation should occur gradually.
Please note that the plant should be evenly lit; in difficult cases, holes are made on top of the bush for light to penetrate inside. All this is necessary to prevent exposure. For example, it is already impossible to restore a bare coniferous fence.
It should also be remembered that a haircut is a stress for the plant, so you should not abuse it. Your "experimental" must be regularly watered and fed, as the plant after cutting is susceptible to disease and pest attacks.
geometric shapes
 Topiary classics are, of course, geometric shapes - a cube, a ball, a cylinder (or column), a pyramid. The technique for creating them is approximately the same, only the auxiliary rails are lined up in accordance with the geometry of the selected figure.
 Consider the process on the example of a cube (the simplest figure).
To form a cube, you can use one plant, or you can combine, for example, 4, 5 or more units (depending on density) for density and plant them in a square.
If young plants were planted, then it is better to start cutting them from the next season, if a long-growing tree or shrub is turned into a cube, it must first be subjected to rejuvenating pruning and only then formed. 
Enough time has passed, the plant has taken root and grown stronger, you can begin to form the topiary.
We mark a square on the ground, for accuracy we put four wooden slats - these will be the side faces, determine the upper border of the cube and fasten four more slats perpendicularly - so you get a working pattern, which will be easy to cut.
When there are no extra branches and leaves around the pattern, the result of the work will become visible - the first topiary came out from under your hand!
Topiary is a transformation of trees and shrubs into large figures of various shapes. To independently create a masterpiece on the first attempt is an impossible task. Looking at the photo of the topiary, you can immediately understand the complexity of mastering the skill. It will take a lot of time to master this skill, but the result will more than pay for the effort expended.
Application
Topiary brings order and a sense of peace to the gardens, used in the design of the classical approach. It is recommended to apply symmetrically, so they form ideal lines in the frame of the garden.

If you want the instruction to please you in the winter, then choose evergreens for landscaping. Green topiary figures, framed by a snow cap, transform your yard into a fabulous landscape.


Planting plants is allowed not only in open ground, but also in large containers and pots. But only certain plants are suitable for this, for example:
- thuja bushes;
- boxwood.

They allow you to form the perfect contour of a figure, for example, a ball or a cone.

Plant selection
When forming a list of necessary plants, it is worth considering your preferences.

The most popular are plants from the coniferous family, since it is easier for them to give a certain shape, which lasts for a long time and special care conditions.

Main types:
- western thuja;
- ordinary juniper;
- spruce prickly;
- Cossack juniper.

Deciduous plants:
- holly magnolia;
- red barberry;
- hawthorn bushes;
- honeysuckle ordinary.

For a grandiose figure, a rough elm or linden is planted. They attract not only with their aesthetic appearance, but also emit wonderful aromas that are beneficial to health.


Technique without frame
This technique takes as a basis the manual cutting of shrubs with ordinary garden shears or secateurs. Here, one of the main roles is played by the art of the specialist's topiary, and his ability to cut plants correctly and measuredly.

The next important step is to choose a suitable plant with a well-growing crown to be able to change shape to the desired result. The shape of the leaves, their length, the density of vegetation - everything matters.

Tip for beginner gardeners - conifers and deciduous trees, such as thuja, boxwood bushes, privet, are a convenient option.

The progress of the frame topiary
It is not difficult to do the job, but it will take a lot of time to complete it. Let's describe the progress in detail:

Decide on the shape of the topiary, it should fit into the overall design of the garden and be practical.

Basic forms:
- geometric shapes (ball, pyramid, square, cube and others);
- fairy-tale heroes;
- figures of various animals and birds.


Create a metal frame for topiary from wire, preferably steel, fasten by welding or with special ties.

Pour out the base, in this case, black soil with nutrients, adding a resinous substance for viscosity. Add water.


Secure with a steel mesh so that the structure is stable and the earth does not spill out. Spray water on the structure.

Add earth, pour water. The mixture should be viscous and not go beyond the frame. Remove excess layers of earth with a trowel. Make sure that there are no gaps, otherwise everything will fall apart.

Sow the soil with seeds. Combine flower seeds and herbs for the best effect.

There is a long process of caring for plants. Water only with a watering can, so as not to spoil the design.


Instruments
It is not necessary to have the most sophisticated tools in the arsenal, the most classic and simple ones are enough. The most common set includes:
- Gardening scissors;
- Tapestry scissors;
- Regular pruner;
- Lopper;
- Reiki made of wood.

It is worth applying patience and imagination, and you will get a masterpiece. Do not immediately take on a complex figure, first get your hand on simple forms.

Even simple, but voluminous figures in the process of mastery formation can be converted into more complex ones. The cube is converted into the shape of a ball through certain manipulations and actions.


Filler landscaping process
The last, final step in creating do-it-yourself topiary in the garden. It is worth sowing the structure in the order in which the plants will grow. First flowers, then lawn grass.

Consider an example of planting a topiary in the shape of a lion:
- The first in planting is the “lion skin”, which is planted with flowers;
- "Mane" - add lawn grass, which is decorated with long stems;
- Small details of the figure. Tail part, ears, paws, muzzle;
- Deepenings are made in the soil with a sharp object, sending seeds or already rooted plants into them;
- Seal holes and cover with moss;
- It is advisable to install supports for each figure so that the structure does not collapse;
- Watering can be done both manually using a watering can, and a special irrigation irrigation system can be carried out.


The process of choosing plants, various planting schemes - gives a wide flight for your imagination when making a topiary. But do not forget that summer is not all year round, and in winter everything can die if you do not take care of warming. It will take a lot of effort and time to master such a skill, but the result is worth it.

DIY topiary photo in the garden


The ideal way to show the world your own creative abilities and assert yourself is to create garden figures and sculptures. For this, it is not necessary to graduate from an art school or be an advanced designer. A little imagination, proper care and cutting of plants in the near future will provide your garden with a park of exotic animals and green sculptures, vaguely reminiscent of the shape and form of your beloved woman.
From Gurzuf to Kamchatka, we will trim the bushes smoothly
The curly haircut of shrubs and trees, as an art, has its roots in the literal and figurative sense in the days of the Roman Empire. The first element cut by the deft hands of a gardener in the form of a cube or a ball was the godfather of the garden topiary.
It is now impossible to imagine the most beautiful garden plots without original and expressive figures in the form of geometric volumes, architectural structures or funny animals. Today, the fashion for topiary from flowers or plants is at its peak. But in order to master the techniques and techniques of a curly haircut, you will need patience and imagination, as well as love and time.
The first timid attempts to create something similar in the Gurzuf park were clumsy and inexpressive. Something was missing when creating the figures: either the gardener was afraid to cut off the excess, or there was a lack of violent imagination and the embodiment of his ideas. If you fully possess all these qualities, or strive to acquire them, then this type of landscape gardening art is for you!

But the fantasy of newly minted topiary gardeners knows no boundaries in summer cottages and landscaped areas. Today, magnificent figures can be seen not only in boring Jurassic parks. How to become a real toriary?

Topiary techniques or how to make a green beast
There are several techniques for creating topiary. These are frameless and frame technologies.

frameless technology
The frameless technology is based on the manual shearing of shrubs with garden shears. With frameless technology, the accuracy of the haircut and the creation of the required volume depend on the skill and skill of the gardener. With frameless technology, you should choose a suitable plant so that the possibility of an overgrown crown influences the choice of the shape of the desired figure. This largely depends on the type of plant and the density of the foliage, its length and the shape of the leaves. We will suggest that to create a beautiful topiary or hedge, it is preferable to use thuja, boxwood, privet (Ligustrim) and conifers.

every gardener wants to know
Not all plants and shrubs are suitable for creating topiary. These should be plants with hard and fast-growing leaves, such as thuja and boxwood. Thuja is a genus of evergreen coniferous trees and shrubs of small height of the cypress family. There are several types of thuja that are suitable for creating topiary.
boxwood is also a representative of evergreen shrubs and has about 40 species. Boxwood is a shrub up to 12 m high with leafy shoots. Sessile leaves come in different sizes. Boxwood is planted in the spring and, when rooting, the first cutting of the leaves is carried out. With timely watering and spraying the shrub, it does not stop the growth of shoots, which provides a dense green crown.

Privet is a genus of shrubby plants of the olive family and has 40 species.
For sculptures and figures, climbing plants are used, namely: five-leaf akebia, common ivy, round-leaved tree pliers, tri-striped and five-leaved girlish grapes. The duration of the green cover is determined by the climate of the area and the plant variety for the topiary with the possibility of wintering.

Useful tips: choosing plants for topiary
For the hand-made creation of forms and sculptures, it is better to give preference to plants with small leaves, which are able to form replacement shoots throughout the growing season. Not bad if there are many living dormant buds on the branch, ready for the subsequent growth of foliage. Now it's up to you to choose the right tool for cutting plants.

haircut tool
The workshop of a real topiary should have a powerful tool in its arsenal - a tool for cutting foliage. What criteria should be used to select a haircut tool?
For daily care of figures and shrub sculptures, you will need a minimum set of tools, which is represented by sharply sharpened trellis (garden) scissors, pruners (straight and side), a lopper and a saw.

Care using a tool involves regular crown alignment with cutting off growing shoots according to the semantic load of the plant. In addition, care involves watering and feeding the plant.
frame technique
The frame technique is fundamentally different from the curly haircut.
Having mastered the technique, you can confidently answer the question: "How to make a topiary with your own hands." The frame technology of topiary is based on the technique of filling the frame of the figure with soil mixture and subsequent planting of vegetation in the frame.
The process of creating a figure or sculpture consists of the following steps:
Selection of the location of the figure and plant
Creating a layout and wire frame
Filling the frame with soil mixture
Planting vegetation in a filled frame.

The basis of the topiary (topiary frame) is a home-made or purchased ready-made wire frame. Using the framework, complex sculptural forms and tiny desktop compositions are created.
Any step-by-step wireframe topiary begins with a wire frame sketch and embodies the idea in a cardboard layout. Modeling will allow you to make adjustments to the image of the sculpture and eliminate modeling errors.

framework anatomy
The anatomy of the frame should correspond to the idea of the figure. We will suggest that if a hare is planned, then the emphasis must be increased on long ears, and if it is an elephant, then on the trunk and tail. The long hind legs of a hare are anatomically completely unsuitable for an elephant and vice versa. There was also a novelty in topiary - animals with lamps.

Imagine a lynx or a tiger standing on two hind legs and holding a lamp in the front. Therefore, it is necessary to transfer all the dynamics of the green beast in the frame.
Then, the frame of the mold is assembled from the wire, taking into account the possibility of layering until the formation of volume. At the intersections, the wire is fixed by welding, ensuring the stability of the sculpture. The finished frame is braided with a mesh with cells no more than 10 mm.

Useful tips: collecting soil for filling
The soil mixture for the contents of the frame is carefully selected. In one container, a nutrient mixture and soil are mixed, consisting of leafy soil, turf and the top layer of peat. Then finely chopped straw is added to the resulting mass. Due to the presence of straws and moistening of the soil mixture, the latter will not spill out of the frame. Then balls are made from the mixture and placed in a frame container.
How to fill the frame with soil is shown here.
landscaping filling
The final step in creating a frame topiary is the landscaping of the filler. The filler is populated with plants in the order in which they subsequently grow. This means that the “culture” is planted first, and then the lawn. For example, to create an imitation of the skin of a lion, germinated seeds were first introduced into the soil mixture, and then for the mane - a lawn mixture with long stems.

Let's tell you that they start filling the frame with landscaping with small details - tail, ears, beak and limbs. The planting technology is as follows: in a lump of the mixture, a deepening is made with a sharp object to a depth in which seeds or plants with a root will fit.
After such an injection, the recess is closed up and rammed with moss.
Each frame figure is equipped with support posts and platforms, thanks to which the frame, filled with earth mixture, stands steadily in a conditional place.

For the convenience of caring for the structure, they think over and carry out a drip irrigation system. The tubes are placed along the frame for uniform watering, which facilitates the care of the original and picturesque object of the suburban area - the topiary.
We also recommend
 Hero pioneers in the Great Patriotic War Heroes of the Patriotic War pioneers presentation
 Presentation "Formation of posture in preschool children Hygiene of correct posture presentation for children
 Sciences of the human body
 Presentation "history and prospects for the development of robotics"
 The value of the struggle of Russia with the Polovtsy
 Asia and Africa after World War II