Crafts from rims with your own hands. Making a knife from an old brake disc
Read in the article
Fire Safety Rules
It is very important to observe fire safety rules in the manufacture of the furnace. This will prevent unpleasant situations and injuries.
It is important to understand that a disk oven heats with infrared radiation. That is why shielding is recommended to convert the infrared stream into warm air. Shielding involves surrounding the furnace with steel sheathing, which is installed so that there is a gap of 7-10 cm from the floor to the structure itself, as well as between the sheathing and the furnace.
So, it is important to observe the following safety rules when operating the structure:
- A steel sheet should be laid on the floor, and preferably a reinforced concrete slab. This must be done so that such a coating extends beyond the contours of the structure by 60 or more centimeters in each direction. This will prevent a fire in the room if coal accidentally hits the floor.
- It is important to exclude any contact between the chimney and the metal stove with flammable materials. Additionally, you can use insulating gaskets.
- Before kindling the furnace, it is imperative to make sure that there is draft in the channels. In the absence, you should first warm up the chimney with a small amount of burnt firewood or by cleaning the ash pan and the passages themselves.
- It is strongly not recommended to use liquid firelighters, as this can lead to the ejection of fire from the firebox opening.
- When mounting the stove in a bath, it is recommended to do this so that the furnace part of the structure goes directly to the dressing room. Such an arrangement has a huge number of advantages, including it is more convenient to heat, smoke will not get into the steam room even in windy weather, the dressing room will also be heated.
Advice! If you want to make an oven in accordance with all the rules, you will additionally need wood hangers (large bolts and nuts will do), iron sheet, pipe cuts, cement-sand mortar, clay, steel channels and refractory bricks. And the body for the structure can be made directly from the rims themselves.
Features of the wheel stove
Metal stoves are widely used, but they cost a lot, and sometimes there is a desire to make it yourself. The easiest option is a metal barrel, but it has a small thickness of metal and can burn through with strong fire. A furnace welded from a steel sheet of the required thickness will also be expensive. The most optimal way is to make a stove from rims.
This design has a number of advantages: the availability of free material; discs are made of steel of sufficient thickness, which provides the necessary strength and reliability, and the metal itself perfectly withstands prolonged heating without cracking and deformation; the metal heats up easily and quickly when using any fuel; round shape with a central hole allows you to ensure the optimal shape of the furnace; different disc sizes (from different cars) allow you to find the right size for the whole structure; the wheeled stove gives off heat well into the room, which is important when using it for heating. .
Advantages and disadvantages
The disc oven has the following advantages:
- Materials for manufacturing are available everywhere, and even buying old discs will not result in serious financial costs;
- Simplicity in the manufacture of the device;
- The finished furnace has a sufficient margin of safety for use for a long time;
- The finished design does not take up too much free space;
- Automotive steel demonstrates resistance to high loads, mechanical damage and deformation;
- Can be used in high humidity conditions;
- The product is suitable for use with various types of fuel: wood, pellet fuel, charcoal and coal.
Let us focus on the fact that almost any stove made from wheel disks will be portable, which is very convenient in a private house or cottage
Despite all the advantages, this type of stove has its drawbacks:
- When installing the device directly on the ground, sufficient thrust is not created to maintain the combustion of fuel, as a result, the burner often goes out;
- The brazier turns out to be too low, and without additional legs it is inconvenient to cook food on it;
- Steel discs heat up too quickly, and if handled carelessly, serious burns can occur;
- The steel cools too quickly, as a result, a large amount of fuel is required to maintain the desired temperature.
Due to the shortcomings, such stoves are practically not used as the main device for heating a house or a summer residence, but at the same time they are perfect for heating baths, technical rooms, and also for cooking.
Bake a friend on a hike and in the country
Don't be lazy - spend 3-4 hours free time and become the owner of an amazing and very functional stove made of rims. Its advantages are obvious:

- light;
- portable;
- heats up quickly and gives off heat;
- budgetary;
- any fuel is suitable for it;
- does not burn out.
A mobile stove made from old rims will become indispensable for use in a bath. And if you build oven with a place under the cauldron, the device will be a great addition to outdoor gatherings or meetings with friends in the country. By installing a cauldron on it, you can safely cook delicious soup or porridge, and by removing the cauldron and putting a grate on top, you will get excellent kebabs.
Rate this article:
Average rating: 5 out of 5 .
Rated: 1 reader .
What you need to know about stoves
When making a stove from car disks, you need to be aware of one more circumstance. According to the rules for the construction of solid fuel burning furnaces from the bottom of the furnace or grate, i.e. from where the fuel is placed, to the first vertical obstacle to the flow of flue gases (eg the roof of the furnace) must be at least 40-50 cm, if conditioned fuel is loaded into the furnace. If damp or waste, the specified distance must be increased to 60-80 cm; the oven warm-up time will then increase. The latter is unimportant for disc furnaces, since they warm up quickly.
The reason is that hot pyrolysis gases are released from solid fuels, which contribute a significant, or even decisive, share to the heat release. If the pyrolysis gases come into contact with a less heated surface, they will not be able to burn out and soot will fall out. With further use of such a furnace, its coking will occur - a dense soot is formed on the roof of the furnace and in the chimney. It not only reduces the thermal efficiency of the furnace (an analogue of the efficiency in the furnace business), but is also a fire hazard.
Note: a high furnace for raw fuel is made so that the pyrolysis gases and water vapor have time to separate, and the first ones also burn out before they reach the roof. In this case, the fuel is loaded no more than half the height of the furnace.
Disc stoves are very often operated on waste fuel (rotten dry wood, damp cuttings, etc.), but at the same time, there may simply not be enough worthless discs for a high stove, or the stove layout is optimal in this case (see below ) will not allow you to make a high firebox. Then you can make a stove out of disks by using a non-standard grate made of steel sheet from 6 mm and reinforcing bars from 10 mm. There is no need to fear that there is not enough air for combustion: through a hole with a diameter of 10 cm, with a chimney 1.5 m high, it will pass enough for a power of 18 kW on wood and 30 kW on coal. An oven from disks will never develop such a thing.
Non-standard grate for autodisc oven
The non-standard grate is simply inserted into the oven with a gap of approx. 6-10 mm, due to the difference in TKR materials, see above. This design has another advantage - the problem of the ash pan is solved, which is quite serious for disc stoves. In this case, a tin can with a diameter of 15 cm or more is simply substituted under the ash.
Note: horizontal disk ovens (see below) are made without grate for the same purpose, i.e. the fuel burns on the hearth of the furnace, and the air flow is regulated by a throttle in the blower. The resistance of steel for discs makes it possible to apply such a solution.
Stages of work
First of all, the disks must be completely cut out the core with a grinder. On the last, topmost disk, you can leave it.

Welding elements of the furnace
After the core has been cut out, we proceed to welding. Welding requires 5 mm electrodes.
First of all, it is necessary to weld the first disk to the iron sheet, which should be larger than the disk. This is necessary so that the coals that fall out during the fire do not harm the room, but if the potbelly stove made of rims is operated on the street, then this action is no longer necessary.
If the stove is made for indoors, then there is already a hole on the upper disk that can be used for a pipe, and the rest of the space can be sealed with an iron sheet.
You also need to weld all the existing holes on the disks. How many discs to weld, everyone decides for himself, depending on what size the oven will be and for what purposes it is provided.
Firebox and blower
Further in the design, it is necessary to cut a hole for the firebox, but this must be done at such a distance that there is room for a blower. The photo shows how to make a hole for the firebox, but this stove is designed for outdoor use, so there is little space left for the blower.

If you plan to make a stove for a bath from disks, then, accordingly, the stove will be higher and the firebox will be located higher. Basically, a hole for the firebox is made in the second disk from the bottom, and for the ash pan in the first one. We do not throw away the sawn off part from the hole for the firebox, since it will come in handy for us as a door.
Then we saw through the same hole, from below for the blower. For draft, it will be enough to make a hole measuring 30 by 15 cm. If the oven is made for the room, then we also leave the sawn off part, since it will serve as a door.
grate
For the grate, it is necessary to find a grate that is suitable in size. If there is no lattice, you can take a piece of durable iron, in which holes should be drilled.
doors
Next, we move on to installing the door. To do this, you first need to weld the hinges to the hole prepared for the door, and then weld the door itself to the hinges. To make it convenient to open the door, you need to attach a handle to it. To do this, we need either a drill for metal and a bolt, or welding and any curly handle that can be welded to the door. If you decide to make a handle according to the first option, then for this we drill a hole in the door with a drill, the thickness of which should correspond to the thickness of the bolt or be four times larger. We insert a bolt into it and twist it on the edges of the nut on both sides. With the help of a handle, and the door will be easier to open, and not get burned.
Brazier from rims
Such a device using old wheels has a lot of advantages, starting with ease of transportation and ending with the ability to maintain the required temperature inside the device due to free air access.
It is convenient to use such a brazier due to its optimal height. It is characterized by ease of movement, easy and simple maintenance, and at the same time has a high level of reliability and durability. We considered the options for making a portable brazier from steel sheets, as well as a folding appliance.
There are many ways to make home-made units from rims. Consider the simplest of them, the manufacture of which will require a minimum of materials and effort. For its device, it is enough to seal the lower opening of the disc with a steel sheet or other material, for example, ceramic tiles.
But, despite all the advantages, this type of barbecue has some disadvantages. Among them are the following:
- low location of the plane for cooking;
- if you install such a device directly on the ground, there will not be enough thrust to maintain the flame, which may cause it to go out;
- small volume of the combustion chamber.
In terms of ease of use, such a design is equated to a conventional hiking stand for a brick skewer. For infrequent use, such a model will fit perfectly, but to make a more reliable and convenient unit, you need to work a little more.
For such a brazier, you will need two rims, as well as a set of tools and materials, including:
- welding machine with electrodes;
- grinder;
- meter profile pipe;
- fasteners in the form of bolts and nuts;
- wire;
- mask and gloves for personal protection.
There is nothing complicated in the manufacture of a brazier from two rims. Step by step it looks like this:
- In one metal part, we cut out the mounting pad using a grinder or autogen. Along the entire circumference, we weld two disks to each other in such a way that at the bottom of the structure there is the remaining partition from the first, that is, processed, part.
- Door manufacturing. The presence of this element simplifies the control of the intensity of the flame: firewood can be thrown without removing the dish from the grill. For accurate execution at the beginning of work, it is necessary to outline the correct location of the door on the side surface of the wheeled oven. It should be located a few centimeters above the bottom. A weld will pass through the middle of the rectangle, which is a sash. Having finished marking, we proceed to make a hole for the door, after which we process the edges of the cutout. Using bolts on one of the sides of the rectangle, you need to make loops for easy opening and closing of the door. We weld nuts to the sash itself, which will pounce on the bolts installed in the body. The final touch is to create a handle for the door from another bolt. To do this, it is welded a few centimeters from the edge on the side opposite from the hinges.
- An important stage in the work is the manufacture of barbecue supports. The optimal height of the legs is 60-80 cm. To create them, a profile pipe is suitable, from which three identical segments of a certain length are cut. Further, they are welded to the furnace body at an equal distance from each other. To maintain the same angle of inclination of all legs, it is recommended to install them with an emphasis on the side and partition. Compliance with these conditions ensures high stability of the structure on any surface.
- At the final stage, handles are made for the convenience of transporting the barbecue. It is recommended to place these elements in the middle of the structure on the sides of the door. Having outlined their edges, it is necessary to weld nuts to the body, into which handles bent from 8 mm wire are threaded.

An important nuance in creating a wheeled barbecue is as follows: the bottom of the furnace should not be welded with metal, as this will interfere with the creation of good traction. To optimize the work, you can cover the bottom with a metal mesh or make a grate of thick wire, constructing a kind of grate.
That's all, brazier from a rim ready. If desired, you can improve its appearance. To do this, the metal must be well calcined so that all the remnants of paint, gasoline and oil burn out. After that, you can start grinding the case, and at the end cover it with black heat-resistant paint.
Similar articles:
A potbelly stove made from car rims is a cheap and compact option
When deciding to make a metal furnace with your own hands, you may encounter a number of problems. The first is the choice of a suitable foundation, the very "body" of the future potbelly stove. An improperly selected barrel or cylinder, having too thin walls, can become a waste of time and effort, because with constant exposure to elevated temperatures, the thin walls will burn out or deform. When making a potbelly stove from sheet iron, the problem of a high price will arise, since high-quality metal is not cheap. There is a great alternative that is both reliable and cheap. This is the manufacture of a potbelly stove from old rims.

Used rims from trucks will be an excellent material for the manufacture of potbelly stoves
Tip: Old rims can be found in the garages of friends or try to contact the nearest tire shop, where they will be sold at the lowest price, if they are not given away for free.
The advantages of wheeled construction are quite obvious. Firstly, it is the availability of the source material, which is a waste and often used disks are simply thrown into the trash. Secondly, the metal used in car rims has a sufficient thickness, which will provide the future design not only with reliability, but also endow it with excellent immunity to constant exposure to elevated temperatures. At the same time, the thickness of the metal of the rims has an optimal thickness, not being too thin and too thick, since a thick layer of metal is also not the best choice for a furnace, since most of the energy from burning the fuel will be spent on heating thick walls. The third advantage of the discs is again the metal itself, since the used alloy heats up quickly, which ensures more economical fuel consumption. Another clear advantage of potbelly stoves from rims is their round shape and the presence of a central hole, which seems to be specially adapted to accommodate a chimney pipe. And the last advantage can be a variety of rims in diameter, allowing you to create ovens of the required size for the needs of each particular room. The average oven usually has a diameter of about half a meter, and wheel rims from trucks are ideal for creating a potbelly stove of this size with your own hands.
Raw Materials
To create a stove from discs for a cauldron, you only need a couple of car discs. Moreover, it is highly desirable that these be stamped models, since alloy wheels are definitely short-lived. This is due to the fact that aluminum alloys are present in alloy wheels.

Disks can be both from passenger cars and from trucks, but small-tonnage
Additionally, from the materials you will need: plates or a profile pipe for the legs, wire, a bolt, hinges for the door and a metal sheet to close the bottom of the future furnace.
A cauldron oven requires a record minimum of materials:
- Tools for creating a furnace
- The list of necessary tools is also extremely short in content. This is:
- Apparatus for welding.
- Accordingly, the electrodes.
- A small "Bulgarian".
- Disks for stripping and cutting.
- Measuring and marking means.
- Heavy hammer.
Advantages and disadvantages
 The advantages of using an oven from car rims include:
- Low cost. The construction of a heater does not require large investments of funds, since its most material-intensive part is made from ownerless rims.
- Durability and sufficiently long service life. In the production of car rims, thick steel is used, which has high strength, so such a home-made unit will faithfully serve more than one heating season.
- High thermal stability. Given the peculiarity of the steel alloy from which it is used for the manufacture of car rims, the device is able to withstand the effects of frequent and prolonged heating to high temperatures.
- Heating speed. A device of this design can quickly heat up to the desired temperature, regardless of what type of fuel is loaded into it.
- No size restrictions. For the construction of the furnace, you can choose disks of a more suitable size and raise the structure up not only from two, but also from three, four or more disks.
- High heat dissipation. The efficiency of a home-made stove made from car rims reaches 80 - 85%.
However, potbelly stoves from car rims, in fact, like other metal stoves:
- unable to accumulate and retain heat for a long time. The metal case quickly gives off heat and cools down, so such a potbelly stove will heat the building only while firewood or another type of fuel is burning in it;
- require the installation of a high chimney. To ensure a sufficient level of draft, it is necessary to build a chimney with a height of at least 2 m;
- must be regularly cleaned of all departments, and especially carefully the chimney. A large diameter chimney must be cleaned at least once every 1.5-2 months. If its diameter is small, then this procedure should be carried out at intervals of 1 time per week.
What is a good stove made of rims
A stove made of wheels is capable of heating a room measuring 15-17 m2. It is used, despite the specifics of the selected materials, not only in the garage, but also to provide heat in other utility rooms and baths. The main advantage of the heater is the availability and high quality of the material.
The discs are made of strong and thick steel, which ensures a long service life. In terms of quality, the wheels are in no way inferior to boiler steel in sheets and profiles.
In addition, the garage oven practically does not dry the air, and the metal does not emit harmful fumes at high temperatures. The environmental friendliness of the material is due to the fact that the discs are made of specialized steel that is resistant to corrosion.
Process of creation
Do-it-yourself construction of a furnace device from disks begins with the conversion of disks into the necessary structural details.

Such metamorphoses begin with a disk, which will be the upper compartment of the furnace being manufactured.
It is positioned so that the mounting part is at the top. Further, a circular hole is cut out along the mounting holes with a “grinder” and the cut out contents are removed. The dimensions of the circle are determined in relation to the existing cauldron, which will achieve the stability of this specific dish. The hole must certainly be perfectly round, and therefore all flaws are corrected immediately.
The disk for the lower compartment of the furnace device is installed with the mounting platform down. Then the top is placed on it, and their mating edges are carefully boiled in a circle.

The result should be a welded structural blank.
Let's move on to the combustion chamber system. To create it, a rectangular fragment is cut out at the base. Its approximate dimensions in centimeters are ~ 20x12 (for rims from cars). When marking the location of the combustion chamber, it is necessary to make an indent ~ 2 cm from the lower edge of the disk. Such a trick is guaranteed not only to provide high rigidity of the structure, but also facilitates the operation of the furnace.
The disk fragment cut out for the combustion chamber is preserved. In the future, it will serve as an excellent firebox door.
After completing the operation of forming the combustion chamber, you can choose two options for a stove for a cauldron of disks. One of them is extremely simple, but the second will require some additional actions.
Option 1
This is the simplest version of a disc stove, made by hand.
It is quite obvious that this option does not require any additional manipulations with the structure. The stove for a cauldron is quite ready for operation even with an open oven chamber. However, the draft will have to be regulated by covering the furnace hole with improvised materials, for example, with a sheet of iron. A stand for such a variant of the furnace device is absolutely not needed and the structure can be located directly on the ground. But it should be remembered that such a simple variation consumes a larger amount of firewood.
Although for country trips, such a lightweight option is the best solution
Option 2
If desired and due diligence, it is quite possible to make a more perfect model, and the oven for a cauldron from rims will look more presentable. An example would be the following sample:
In this version, there are additional structural elements that facilitate the operation of the furnace device and give it a more aesthetic appearance. This is:
- Furnace door. They are made from a fragment of the lower disk cut earlier. It is processed, polished, a fastening loop is welded. The handle of such a door can be an ordinary bolt.
- Paws of stability. For structural reliability, several stability tabs can be welded to the lower edge of the base disk. Pieces of profile pipes or strip steel are quite suitable. If the cooking process is carried out indoors, then such an oven must be installed with paws on a metal sheet. Such a stand will provide fire safety.
- Legs. If the option with stability legs is not particularly attractive, then legs can be welded to the structure. This will allow you to raise the oven from the disks for the cauldron to such a given height, which will clearly provide more comfortable cooking. Legs are made, as a rule, from profile pipes.
- Pens. It is desirable to weld handles to the created furnace structure. They make it easy to carry. They can be made small, or they can be made large curly. For handles, pieces of steel strips or steel rod are used.
It is noteworthy that neither the first option nor the second absolutely needs a chimney.
Finished furnaces of both options must be melted and calcined in the "idle" mode. This will reveal the flaws in the assembly and completely remove the old paint.
It is quite obvious that a stove for a cauldron made of car rims absolutely does not require tangible financial costs, materials and time, and is also elementary in its implementation.
Potbelly stove for a bath from accessories for wheels
A potbelly stove for a bath from accessories for wheels has some differences from other stoves. In particular, it is necessary to organize a container for water in it. To create the upper chamber, you will need two rims. They need to cut out the central mounting plates with a grinder. Only rims remain
It is important to understand that water will be heated in this tank, so it is important to achieve tightness. Both rims are stacked on top of each other and welded together
From above, the finished tank must be closed with a movable damper or a metal lid. You can worry about safety and tightly weld the product, leaving a small sliding hole for pouring water. It remains to make only the bottom of the chamber, for which you need a metal plate.
Next, you need to cut holes in the upper and lower parts of the tank according to the diameter of the chimney pipe. Then the pipe should be mounted and welded. A thin tube should be installed so that it is at the very bottom of the tank at an angle to the floor. It should be closed with a faucet. It will be used to drain water.
It is important! At this stage, the design should be checked for tightness. To do this, the tank is filled with water and inspected for leakage.
Particular attention should be paid to pipe cuts and seams. If there is a leak, be sure to drain the water, dry the tank, and then eliminate the gaps by welding
Now you can start developing the heater. To do this, you need to take the two remaining rims and cut the core out of one of them. Both products are mounted on top of each other and welded so that the hub of the entire disk is in the middle. It will perform the function of a kind of crate. Stones should be poured on top of the resulting container. The lower part of the structure will become the upper part of the firebox.
It is desirable to give preference to rounded stones, such as diabase, peridotite, basalt, jaldeite, dunite or gabbro-diabase. However, such material is quite expensive. An alternative option is to look for stones near water bodies. It is worth giving preference to rocks of a dark color, which have a non-layered structure and good hardening by the sun and moisture.

Worth knowing! From time to time the stones in the stove need to be replaced. This is due to the fact that the material tends to collapse under the influence of high temperatures. This leads to the fact that the smoke comes out of the homemade stove with difficulty, which adversely affects the operation.
Next, you need to organize a quality foundation. It must be not only durable, but also fireproof. A reinforced concrete screed is excellent, which is additionally lined with fire-resistant bricks on top. It is necessary to start creating the lower part of the future bath stove only after the base has dried. At this time, you need to prepare red heat-resistant bricks (approximately 60 pieces for a 62x62 cm masonry structure). Bricks should be laid in a square, fastened with clay diluted with water. Be sure to leave a cavity for the blower, as well as a hole for the door. And on top of the masonry, you need to mount the grate.
It remains only to collect all the parts of the structure together. The metal part must be connected to the brick one, and the firebox and blower must be closed with manufactured doors. Next, weld the second piece of pipe to the central hole of the hub and sew it to the top of the chimney (we ran it through the water tank). Then you need to lay large or medium pebbles on the bottom, and small pebbles on top of the heater.
In some cases, it becomes necessary to strengthen the structure. Metal channels will help with this, which need to be welded at a slight angle to the water tank and heater. It remains to bring the pipe itself into the chimney, which must be lined with refractory bricks, and close it with a damper. A huge advantage of such a home-made stove can be called the fact that it is able to heat a medium-sized steam room in just one hour.
That's all, the sauna stove is ready for operation. This is a potbelly stove with a pipe, which will significantly save money, because now there will be no need to buy a finished structure. You can also pay attention to the drawings, which will allow you to make a larger-scale home-made furnace from used stamped disks.
Advice! The design always turns out to be standard, but you can add originality to it by decorating it beautifully. This will help photos of those people who have already managed to make a stove from disks for a cauldron or for a bath. You can choose the most suitable option and implement it, or dream up and create your own masterpiece.

Barbecue stove
If you intend to make a barbecue oven from discs, then the core does not need to be cut out. In this case, a grill is placed on the burner - a flame divider, which will act as a culinary grill-radiator. The main advantage of the design is that different temperature zones appear on the grill, opening up wide opportunities for the simultaneous preparation of different dishes.
 This is very convenient when going on a picnic, where everyone can get food to their liking. It is customary to make a stove of this type from disks with a small amount technological holes. Bicycle spokes are used as parts for the working grid. It is not necessary to cook them, because they are perfectly fixed with each other and with the help of heat-resistant glue for metal (cold welding method).
If you need to create a potbelly stove, then you can use the entire disks. Due to the thick metal, the heat capacity and heat transfer time are significantly improved, but they are much worse than in the case of cast iron furnaces. Among the design flaws is the high labor intensity of arranging an improved furnace with increased work productivity due to a complex structural configuration.
If you have a large amount of waste fuel, then when creating a potbelly stove for non-residential premises, you can also refuse to use divider partitions. A similar option is easy to make from the disks of a truck. This will allow to achieve higher efficiency and more productive heat transfer.
As a result, given the large size of horizontal potbelly stoves, most often people prefer vertical solutions. If the task is to make a stove from discs, then the first step is to find a suitable grate and ash pan
It is important to prevent coals and hot ash from falling onto the fire pavement.
If we talk about thermal properties, then they are significantly improved with the help of both tricks:
- The first is to surround the upper flame part with a special annular casing made of thin steel, but not galvanized, since zinc is able to melt under the influence of a temperature of 440 degrees. The solution is indispensable in cases where rapid heating of the room is required.
- The second option involves lining the furnace with any available material, which is characterized by high heat capacity and thermal conductivity.
Step by step instructions for making
How to make a do-it-yourself oven for a cauldron from rims, knowledge of the main stages of manufacturing this design will help to solve this problem:
- Lay the bottom piece face down on a flat surface. We place the middle part on it with the inside of the disk down. After checking its position, we make 4 tacks after 900.
- Once again, after checking the assembly and arrangement of individual parts in a vertical plane, you can proceed to welding the structure. It is important to note here - do not weld one seam completely. To protect parts from deformation, it is better to cook in a step-by-step way. Having welded a small section at the 1st joint, turn the structure by 900 and weld the seam section from this side. Then proceed to welding the 2nd seam. So alternating sides and seams, boil all the joints.
- We beat off the slag and check the quality of the seam. If you find lack of penetration, undercuts or holes, be sure to add molten metal to these places.
- We put a cleaning circle on the grinder and clean the seams and places of cuts of the front parts.
- Now it is important to make a good door for laying firewood. Stepping back from the bottom of the furnace 200 mm, mark the window for the furnace; height -180 mm; width - 200 mm.
- On the opposite side of the door, at the top of the middle part, we mark the installation location of the chimney. Using electric welding, carefully cut a hole to fit the pipe, insert the outlet so that the free end looks up. The pipe must be flush with the metal of the rim. We make 3 tacks, making sure that the part is in the correct position, we scald the joint in a circle.
- All parts are cleaned with a grinder, it is better to knock off the burrs from cuts with a file.
- From the bar we make handles for carrying the furnace. To do this, mark a distance of 50 mm on the workpieces on both sides and bend it at an angle of 900, holding the workpiece in a vice with a short segment protruding upwards. We bend with a hammer. Then, at the top of the structure, on opposite sides, we mark the places for attaching the handles, expose and weld them.
First you need to prepare the discs for welding. To do this, the front side is completely cut out on the upper part. This is done for free passage and even distribution of heat in the cooking zone. We perform similar work with the middle part of the future furnace. The lower disk is left unchanged. To eliminate confusion, we write the installation location of the parts on the parts with chalk.
Cut out the front
We place the 3rd part on the assembly unit face down, check the correct installation of the part and grab it in 4 places.
We cut out the window with a grinder with a cutting wheel along the marking lines. We will use the cut piece to make the door. To do this, on 3 sides we grab a wire with a cross section of 6-8 mm along the outer side of the workpiece. From the hinged side in the middle of the window, we weld a part from a profile tube. We insert a rod for the loop into the second tube and grab it on one side.
Cut out the door
We install the door in place, put the counterpart of the eyelet and weld the tube to the disk. We grab the finished bent U-shaped handle to the door and put a homemade latch from a bar and a profile.
Example of a door (they can be made in different ways)
The resulting design
If required, mark and weld 3-4 legs at a slight angle. For better penetration, the ends of the blanks must be cut at an angle so that the legs are flat against the furnace.
"Legs" for the stove
We wind several turns of an asbestos cord on the chimney and insert it into the outlet. The pipe should fit tightly, and the cord will prevent smoke from escaping at the junction.
Almost finished design, it remains only to attach the handles and clean the details.
Our car wheel oven is ready.
Additionally, you can watch the video:
Other examples of various home-made stove designs to order from the disks in the photo:


Garden mini oven from car rims
Owners of land plots of private houses and summer residents often build various barbecue grills, braziers, and so on for cooking outdoors. An excellent solution to this problem is the manufacture of a garden stove from car rims.
The product can be made in a universal configuration. On the stove, you can fry shish kebab, cook pilaf in a cauldron, cook various products on the grill.
Installing a garden stove is quite simple. You will need two car rims. In one disk, the central part of the front side is cut out. The disc is installed with the hole down. Along the perimeter of the disk, legs made of steel reinforcement of large diameter or a corner are welded. A homemade grate is installed on the cut hole.
In the second disk, the front side is cut out almost completely, it is welded to the first disk. In the second disk (in the upper part), supports are welded to install the grate. A cauldron (without a grid) can be installed on the supports. The grate is made of fittings or pipes of small diameter.
A window for the door is cut out in the side surface. The metal door is fixed using factory or home-made hinges, you can do it easier - hang it on steel hooks.
Garden stoves are manufactured in two versions - with or without a chimney. The flue pipe from a piece of a meter pipe leads most of the flue gases into the channel, facilitating the process of cooking - a small part of the flue gases passes through the grate. When using raw firewood, wood chips, a large amount of smoke is generated during the combustion process. In this case, the construction of a chimney is mandatory. Otherwise, the dishes will be unnecessarily smoked, the food will acquire a sharp smell of smoke.
To install the chimney, a hole of the appropriate diameter is cut in the side surface of the second (upper) disk. A branch pipe 200 - 300 mm long is welded to it. A steel outlet is welded to the branch pipe, to which a vertical chimney pipe is mounted. Docking of a branch pipe and a vertical pipe is sometimes carried out without a branch, through an oblique joint.
Oven for cauldron and barbecue

The stove under the cauldron can also be used as a barbecue. This device can be made from only two disks from the wheels of a passenger car. If you need a larger design, then there are no restrictions here, you can use wheels from GAZ-53 and UAZ. The bottom is cut in one of them, and after the rims are welded together. The unit must be installed securely on any surface; for this, legs are fixed to the lower section using a welding machine. The holes for the hub must be plugged, while the side holes are left, through which air will enter the firebox. In order to make it convenient to carry the case, handles should be welded to it from the outside, and an opening should be made in the side part for installing the door. The latter should be made from a piece that sits on the loops. We can assume that the oven from the discs is ready for this. As practice shows, a cauldron can fit on it, and if necessary, five skewers with meat.
What you need to know about stoves
If you intend to make a stove from wheel disks for a cauldron or heating a non-residential premises, be prepared to pay attention to one more feature. Based on the rules of the structure of fiery solid fuel furnaces, from the floor of the furnace or grate, t
e. the place where the fuel product is located, to the first vertical obstacle to the flow of flue gases should be about 40-50 centimeters. This option is necessary when using conditioned fuel. If it is damp or junk, the distance is increased to 60-80 centimeters. In this case, the heating time of the furnace increases rapidly. Therefore, it is impractical to use such fuel for disc furnaces.
 It is no secret that hot pyrolysis gases can be released from solid fuel products, which significantly affect heat release. If they are in contact with a less heated surface, they will most likely fail to burn out, resulting in soot falling out. Further use of such a furnace leads to its coking, dense soot appears on the vault of the furnace and in the chimney. It significantly reduces thermal efficiency, but differs in fire hazard.
A stove made of disks is often filled with waste fuel, including:
- rotten dry land;
- damp trimmings;
- and other products.
 True, unusable discs for a furnace with a decent height may simply not be enough, or the optimal scheme design will prevent the possibility of creating a high firebox. In this case, to prepare the furnace, you will have to use a non-standard grate made of durable steel sheet with a diameter of 6 millimeters and reinforcing bars from 10 millimeters. There is no need to worry that there will not be enough air for combustion: through a hole with a diameter of 10 centimeters, with a chimney 1.5 meters high, there will be enough air for 18 kW of power on wood and 30 kW on coal.
Sauna stove
For the manufacture of a sauna stove, wheels from passenger cars are not suitable - they are too small. The author of the idea, whose diagram is shown below, used 4 old rims from the ZIL-130 truck. Located one above the other, each of them performs its function:
- the first disk serves as a cap for the combustion chamber. As planned, the sauna stove has a small brick firebox with doors opening into the dressing room;
- the second rim is a heater;
- the third is an additional heat exchanger that takes the energy of flue gases and transfers it inside the steam room;
- the fourth disk is a tank for heating water.
Note. You can do without a brick firebox by organizing one inside the first rim. But then you will have to heat the bath from the steam room, and it is more difficult to make tight-fitting doors in the disk case.

All additional metal parts required to assemble the furnace are shown in the following diagram. A do-it-yourself sauna stove works according to this principle: firewood burning in a firebox gives off heat through its walls and rim No. 1 with a carved bottom. It is welded to a second disk, where the bottom is left in place, so that it can be filled with stones. Inside, a pipe passes through them with outgoing combustion products and heating the heater.

Further, the pipe gets inside the third rim, where instead of the bottom, a gas divider made of sheet metal is installed. The products of combustion wash the divider, and the stove for the bath from the disks gives off more heat, since this section plays the role of an economizer. Well, the last stage of flue gas cooling takes place inside the 4th rim, turned into a tank with a lid and a water tap. As a result, the oven works no worse than factory copies, and in terms of durability it will surpass any of them.

How to make a potbelly stove from rims
A potbelly stove made of rims will be portable, which is very convenient, since you can use this design as needed in not only the garage, but also in other rooms. It can be installed both horizontally and vertically. Both models have high heat transfer, and differ from each other only in the presence of grates and the location of the chimney.
materials
For the construction of a potbelly stove, it is desirable to use parts from the wheels of cars or light trucks. The disks from a heavy-tonnage truck are too massive, a potbelly stove from them will turn out to be bulky and heavy. In such a design, it will be difficult to ensure the tightness of the joints when joining individual elements. 
In addition to the disks themselves, for assembling the oven with your own hands, you will also need several additional materials:
- reinforcement rods with a diameter of 20 - 24 mm;
- steel corner;
- sheet metal 4-5 mm thick;
- heat resistant paint;
- several bolts and nuts;
- pipe with a diameter of 100 - 150 mm and a wall thickness of at least 5 mm.
Instruments
The set of tools necessary for the construction of a potbelly stove from car rims should consist of:
- welding unit and electrodes;
- grinders (angle grinders) with a set of cleaning and cutting discs;
- drills;
- gas cutter;
- sandpaper;
- brushes;
- sledgehammers;
- hammer;
- measuring and marking devices: chalk or marker, tape measure and ruler
To protect the surface of the body and eyes from harmful radiation from the welding arc, sparks and splashes, it is necessary to work in special uniforms, complete with a canvas suit and gloves, closed boots, a headgear under a shield, a welder's shield and goggles.
Step-by-step instruction
Diagrams of the device of different models of stoves-bourgeois from car wheel disks
Drawing of a vertical model of a potbelly stove made of 4 wheels
When making an oven from discs on your own, you must follow the following sequence of actions:
- make two round plates from sheet steel, the diameter of which must correspond to the size of the disks;
- connect all parts of the body into a single structure;
- if desired, you can organize a chimney on the side so that you can use the top of the potbelly stove as a hob, it will look like this:
cut out the central part of all four discs with a grinder along with the hubs;
cut a small square opening for the blower on the side surface, and make a door from the separated part of the metal. It is put on bolts welded to the body and secured with nuts. For ease of use, the door is equipped with a metal handle and a latch;
weld the walls of the two disks together. Close the bottom of the lower disk with a metal plate and weld legs from a metal corner or reinforcement to it;
weld the two remaining disks together and close the upper part with a circle of sheet steel;
cut an opening for the firebox on the lower disk of this part of the furnace and install a door, similar to a blower door;
install grate. For these purposes, inside the combustion chamber, weld the guides from the corner and put on it a pre-welded structure made of sheet steel along the edges and reinforcement in the middle. The reinforcement bars must be positioned so that the distance between them does not exceed 2 cm, otherwise small firewood will fall through;
cut a round hole for the chimney on the upper surface of the device;

- clean all irregularities and defects on the surface of the device;
- paint the finished device with heat-resistant paint.
- potbelly stove from rims - ready!
lower the chimney into the upper hole and weld;
In the manufacture of such a potbelly stove, it must be taken into account that the special alloy composition of the steel of the rims is not standardized for welding. Therefore, when connecting disks, you must follow the following rules:
- only two mating parts can be welded at a time; it is forbidden to assemble the entire device at once;
- after a seam has been formed, parts with welded edges must be left alone for about 3 to 5 minutes, so that the residual internal stress is absorbed;
- the surface of the weld must be free of any visible defects: cracks, splashes, shells or bubbles.
Instrument preparation

If you decide to make a hearth for a cauldron or an ordinary stove using car wheels, then you need to take care of the availability of tools, among them should be highlighted:
- welding machine;
- electric drill;
- chisel;
- sledgehammer;
- disks;
- paint brush;
- ruler;
- grinder;
- hacksaw for metal;
- a hammer;
- file;
- pliers;
- roulette.
It is noteworthy that almost any of the made models based on disks will be portable, which is very convenient, because this design can be used in a bathhouse or on the street. It is best to use steel whose diameter varies from 40 to 50 cm. Their height can be 25 cm. The hearth for a cauldron, like a sauna stove, cannot be made of aluminum disks, as well as those made on the basis of aluminum alloys.
The most difficult option for a do-it-yourself potbelly stove made of disks is considered to be a heating structure in a bathhouse. It is used to create a medium-sized sauna with warm, moist air. At the heart of the stove for a bath is a brick firebox.
The structure of the heating system is somewhat more complicated than that of a simple horizontal potbelly stove made of disks, but it is quite possible to do it yourself.
First lay a brick firebox. In calculating the dimensions of the masonry and foundation, they proceed from the diameter of the wheels. As a rule, ordinary car wheels are used, therefore the dimensions of the firebox are on average 625x625 mm. Under it should be a cast foundation.
Functionally, the firebox is divided into 2 parts, so you need to think over the masonry in advance. Cold air from the locker room should come from below, solid fuel materials should be thrown from above.
 Drawing of a stove from disks for a bath.
After the firebox has been built, they begin to weld the structure. It consists of 4 disks. Struts and a reflector are installed in the lower one for a uniform and smooth flow of air, as well as high-quality heating of the tank.
The third disk is welded so that stones can be placed inside, and a metal pipe is installed in the center to remove smoke. The third and second discs are connected by legs to fix the structure. The smoke transfer pipe is attached to the bottom of the third wheel.
In the second disk, an air divider is installed on top, which is necessary for heating water. The divider is mounted on 2 metal legs. The top disk is a reservoir for supplying warm water. A pipe of convenient length is attached to it, and a faucet is also mounted.
In the center is a pipe for removing smoke. The chimney is fixed to the support platform with struts. Under the support platform is a sheet of galvanized iron.
This is a general scheme for welding a disc furnace. Let us consider in more detail the nuances of creating individual parts of the structure.
Water tank
The water tank is made from one wheel. To do this, it is necessary to weld the bottom and the upper part so that there is a hole in the center corresponding to the diameter of the pipe, the standard is 16 cm
It is also important to make a smooth and accurately made seam, otherwise the water will flow out of the tank, and the reliability of the design is called into question.
After welding the container, you need to weld the pipe and check the quality of welding by collecting water there.
 For complete and high-quality heating of water and stones, each intermediary disc must have a divider or reflector. The heater is a container with a pipe in the center to remove smoke. It is necessary to completely weld the bottom, install the pipe and attach the container to the top of the furnace.
A pipe is attached to the third disk - the upper part of the furnace - with the help of casings, and an air divider is installed inside to heat the tank.
Foundation and brickwork
The foundation of the furnace must be monolithic and slightly extend beyond the boundaries of the furnace. The average dimensions of the foundation are 700x700 mm. The furnace is divided into 2 equal parts: at the floor level of the locker room, from where fresh air is supplied and at the steam room level, where solid fuel materials are thrown.
In both cases, metal doors are attached, and a combustion structure is installed between the levels.
Stove assembly
Scheme of the furnace in development.
The assembly of the stove should begin with laying the firebox and welding the elements. First, the internal parts of the structure are installed - a divider and an air reflector, then the bottoms are welded to the structures for water and stones.
Then the smoke exhaust pipes are installed, after which the remaining elements are attached to each other. After complete assembly of the structure, it is necessary to carry out a mandatory test run of the furnace.
A properly welded stove will not allow smoke to pass through, and will ensure uniform heating of the containers. High-quality masonry will ensure constant air circulation, which contributes to rapid heating and long burning.
Features of the stove from discs for baths and saunas
For baths and saunas, stoves are made higher and completed with pipes. This is what the oven will look like.

When making a stove for a bath, you need to consider a few points:
- The disks are metal, and this material is very hot, so brickwork must be made around the stove itself to protect the walls from fire.
- Welding seams should be approached very carefully. If the seams and existing holes are poorly welded, then the sauna stove will smoke and let sparks through.
- In order for the stove made of discs for a bath or sauna to last longer, it must be coated with special materials that protect against corrosion and rust.
- In the manufacture of the stove, it is necessary to provide an additional tank where the stones will be located. In the photo, such a tank is located on the second disk.
- To keep the stove hot longer, you need a valve. For it, you need to make a small incision at the very top. The valve must completely shut off the hot air outlet.
Here is such an oven made of car rims can only be used on the street.

How to make a stove from disks for a bath with your own hands
First of all, the discs need to be prepared: cleaned of debris, rust or paint residue with sandpaper. After that, you can proceed to the manufacture of the structure, observing the stages of work in the specified order.
Water tank
To equip the upper chamber of the future stove, two rims are needed. Water will be heated in this tank, so it must be airtight. To do this, for 2 disks, the central plates for fasteners are cut out with a grinder, leaving only the rims. They are stacked on top of each other and welded together.

Cutting the core of the disc
The upper part of the tank is closed with a metal lid or a movable damper. For safety reasons, you can combine these two options and tightly weld a larger segment of the cover, making only a small hole sliding or folding, through which water will be poured into the tank. A metal plate cut from a sheet is welded to the bottom of the chamber.

The device of the upper part of the stove
After welding, holes are cut in the upper part and at the bottom of the tank according to the diameter of the chimney pipe. It will pass through the entire tank, should be tightly blocked by the walls and go out through the bottom. A thin tube is installed in the side of the tank at the very bottom at an angle to the floor and closed with a tap to drain hot water.
Note! The tank must be checked for leaks. Fill it with water and carefully inspect the cracks for leaks, paying special attention to the joints between the tank walls and the pipe slots.
If defects are found, they must be eliminated by welding, but only after removing the water and drying the tank.
Arrangement of the heater and the upper part of the firebox
From the two remaining rims, you need to make a heater and a firebox cover. From one core is cut out, the second remains intact. The blanks are placed one on top of the other, and sewn together by welding so that the hub of the whole disk is in the middle (it will act as a lattice). From above, the container remains open - stones are poured here. The lower part of the cylinder will serve as the upper part of the firebox.
For the arrangement of the heater, natural rounded stones, which are used in saunas and baths, are best suited - diabase, basalt, peridotite. But they are quite expensive. Therefore, you can look for material for the heater near the nearest reservoir - these stones have been well hardened by moisture and the sun. The best option is dark-colored rocks with a non-layered structure.

The best stones for a heater
Note! The stones in the stove, although slowly, are destroyed under the influence of high temperatures. And this makes it difficult for smoke to pass. Therefore, periodically the contents of the heater should be sorted out and replaced.
Foundation and brickwork
It is recommended to install the stove for a bath from rims on a solid and fire-resistant foundation. It can be built from a reinforced concrete screed, and the upper surface can be lined with fire-resistant bricks.
When the base dries, you can proceed to the bottom of the furnace. For a stove with masonry 62 * 62 cm, you will need 60 pieces of red heat-resistant bricks. They are fastened with clay diluted with water and laid in a square. Do not forget to provide a cavity for the blower and a hole for the door. Attach the grate to the top of the masonry.
Stove assembly
All parts of the structure are assembled in series. The metal part is connected to the brick one, the firebox and the blower are closed with doors cut from a metal sheet.
Scheme of the stove-heater for a bath from rims
On a note! For comfortable use, it is desirable to equip the door with a handle from one large bolt. And so that firewood or coals do not accidentally fall out - also with a latch from a narrow plate of metal and a small loop.
Further, the second section of the pipe is welded to the central hole of the hub located between the firebox and the heater and sewn to the upper part of the chimney through the water tank. Stones are placed in the heater: below - large and medium, above - small.
To strengthen the structure, metal channels are welded to the rim of the heater and the water tank, which are installed at a slight angle to the upper part of the body. The pipe is discharged into a chimney lined with refractory bricks and equipped with a damper.
Such a stove will heat the steam room and the water in the tank in just an hour.
- It is important to lay in the place of welding quality seam- no defects should be visible on it.
- When working with a welding machine, you can not immediately try to weld everything - work is being done in stages. Having welded the parts together, you need to wait for the seam to cool to the touch temperature.
- When assembling the structure, do not forget that for the correct operation of the furnace it is important to provide size of the combustion chamber according to the type of fuel that you plan to use.
- After completion of work, be sure test the design and eliminate the identified shortcomings.
Attention! All welding work must be carried out in compliance with safety regulations, in protective clothing and a mask. Do not touch parts until they are cool.
Conclusion
It can be concluded that the device of the furnace from metal disks can be completely done with your own hands. In practice, such a furnace shows itself from the best side. It is not very whimsical to maintenance, does not impose special requirements on the quality of fuel. The bath heats up faster than from a factory design of a similar power.
The average warm-up time for a volume of 16 m3 to 1200 C, with proper insulation, takes only one hour, although the consumption of firewood increases. Suitable for those who are wealthy enough not to save on this item of expenditure.
The durability and reliability of the design has been tested in practice. On the forums on the network, you rarely see negative reviews and comments. Problems most often arise from manufacturing errors. To avoid them, strictly follow the recommendations presented.
However, with all the advantages, the design also has some disadvantages:
- high risk of burns due to careless handling;
- the design quickly heats up the room, but it also cools down quickly;
As you can see, these disadvantages do not outweigh the advantages. They can be dealt with quite effectively. A brick protective screen device can solve both problems at once: reduce injury risk and increase the heat capacity of the furnace
Another tip - when assembling, pay special attention to the tightness of the container of the last disk. To heat the water faster, cover the boiler with a lid.
We will send the material to you by e-mail
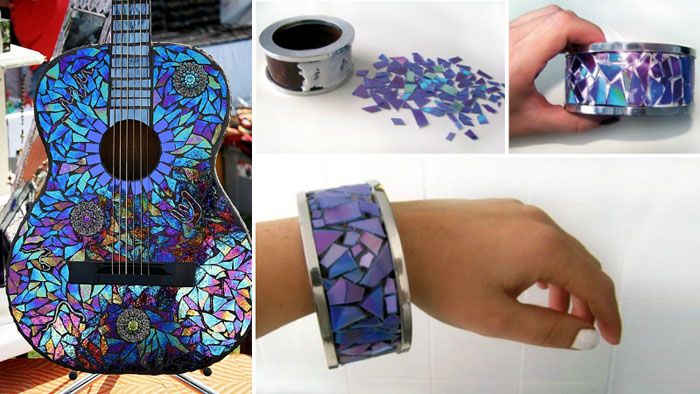
Some part with pity once beloved CDs. Men are reluctant to give away rims from automobile wheels. In order not to have to part with your favorite things, the editors of the site found a lot of ideas on how to make simple and beautiful crafts from disks.
Many no longer use CDs or DVDs. But why throw away something that might be useful?
Beauty is near and created with your own hands. It is enough to take a disk, scissors and ... imagination. From this material you can build an excellent designer lamp, panels, wall clocks. Car rims serve as a kind or harsh men's garages.
DIY crafts from computer disks
For many, an interesting technique for working with CD-blanks has become a discovery. They are easily divided into two halves, each of which is perfectly cut with scissors into small pieces. But with these brilliant mosaics, you can already make interesting crafts: decorate any, decorate, veneer.

| Illustration | Action Description |
|---|---|
 | We will prepare three pieces of plywood, a threaded rod, a light bulb with a cartridge, a cord with a switch and a plug, washers and nuts. |
 | We circle the disks on a piece of plywood and cut them out with a jigsaw. |
 | In one circle, drill a hole for the cartridge and insert it inside. |
 | Let's make a hole for the wire. |
 | We connect three circles, the one with the wire will be in the middle. We drill three holes at equal distances from each other. |
 | It remains to make identical holes in the stack of discs. We string them on three pins inserted into the base. |
Frames for photos and mirrors from discs
What else can be done from old CDs for the home? We offer to build a beautiful frame for or photos. The work process is simple: glue is applied to the base (ready-made flat mirror frame or cardboard) and pieces from the blank are laid. You can cut them into squares or choose an arbitrary shape.


Do-it-yourself clock from discs
The clock in the house can also be made by hand. To do this, you will need an unnecessary DVD-blank, a decoupage napkin or rice paper, a wide synthetic brush, hands and a clockwork, craquelure varnish.
| Illustration | Action Description |
|---|---|
 | Lubricate the surface with craquelure varnish, after wetting the brush in water and wringing it out. |
 | As soon as the varnish has dried a little, we apply acrylic paint. Both layers will be ready for further work in 2 hours. |
 | The drawing is torn out by hand. |
 | We apply PVA to the surface with a brush, lay out the drawing and coat it with glue on top. |
 | After we glued the sequins as numbers, we are assembling the clockwork. |

What can be done for the kitchen from old CDs
The kitchen is a special place. Housewives spend a lot of time there. In order to make the time more fun, you can make a few crafts for the kitchen with your own hands. It can be flowers from disks, panels, a lamp, a mosaic on, furniture decoration.


Decor of kitchen furniture: original and easy


Related article:
What crafts for children can be made from disks with your own hands
Plunging into the world of childhood is useful for many: to see how a child's eyes sparkle with pleasure and the knowledge that he did everything himself! It is precisely such positive emotions that are easy to get when working with DVD discs: a child can handle the decor with minimal help from adults.


Related article:
This decor is especially popular when creating objects in vintage style. In the article, we will consider detailed photo instructions for decoupage: furniture, on glass from napkins, on a box.
Crafts from disks by May 9
Crafts for the holiday of May 9 are reduced to the design of the disk space with thematic elements and symbols.

As a basis, take a clean blank. Using PVA glue, an application of colored paper, cardboard or satin ribbons will be glued to it. In order for the panel to hang, an awl heated over a gas burner pierces a hole from the edge of the blank. A rope or ribbon is inserted before the creation of the application.

If you use satin ribbons instead of paper, then you should also study the MK for creating flowers from satin ribbons. It is undesirable to touch the finished work until the glue has completely dried.
How can you use old discs to make three-dimensional figures
From blanks you can build amazing three-dimensional figures. This work is more difficult than the previous ones, since many pieces are required, cut into elongated triangles and stripes. They are all attached to the base with Titanium Ceiling Tile Adhesive. Anything is taken as a basis, up to plastic bottles or unnecessary plastic toys.


DIY crafts from old car rims with instructions for making and photo examples
Here you may need the help of a man - we attract dads, husbands, grandfathers. It is not only decorative, but also practical. Let's try to make an original place for a fire and a table.
Crafts from rims for the garden
Instructions for creating a campfire site are shown in the photo below. It will take less than a day to build such a structure.

To create a fire, stamping is ideal: both holes for an air duct, and enough space for both firewood and coals. If desired, two such disks can be welded together by welding 4 legs to them - the design will serve as an excellent brazier for a cauldron.
Article
Despite the fact that metal is considered one of the strongest and most durable materials, it loses its position over time. However, what can no longer serve its intended purpose is often quite capable of working out another term in a different role. For example, obsolete rims can be adapted to various needs, which is successfully done by lovers of useful homemade products.
Barbecues, stoves
One of the most common designs made from used discs is barbecues in various designs. In the simplest version, coals are simply placed in the disc, and on top - a grill for meat or skewers. The disk itself can either stand on the ground / stones, or on legs. It is not difficult to build a brazier with legs in the presence of a grinder and a welding machine, but, in addition to the tool and the base, you will need a metal profile pipe for the bed.
The disk is cleaned of rust, a partition is cut out on one side, a plug is welded into the bottom. Three legs are welded either in the bottom or on the sides, the optimal length of the legs is 40-45 cm - a brazier of this height is convenient to use. You can also immediately fix the grill grate and transport handles.

Two discs placed one on top of the other can be used without legs, and if you cut through the door, you get not only a barbecue, but also a potbelly stove.

If you need a larger potbelly stove, for a garage, greenhouse or other needs, you can weld a double one - from four discs, with separate loading.

By equipping the bed with a jack, you can adjust the intensity of heat treatment and change components depending on the desired dish.

Hose clamp
In order for the hose to last as long as possible, and it was convenient to use, a holder is needed. The round shape is optimal, as it prevents the occurrence of creases. A disused disk with minimal modification will be an excellent holder.

original shelf
In the country, in a garage or outbuilding, a pair of discs cut by a third can become the basis for a shelf.

If you do not bother with cutting and arrange the disks horizontally, in several rows, and between them there are boards or shields, you will get a reliable and stable rack.
Coffee table
Polished to a shine disk plus a transparent glass top - an exclusive coffee table for interiors in a modern style.

Plafonds
Lightweight car rims, as well as motorcycle rims, can be turned into stylish chandeliers by equipping them with cartridges or LED strip.

Bar chairs
Of course, not so much the second life of old discs as outrageous furniture, but as an option - why not?
© When using site materials (quotes, images), the source must be indicated.
A stove made of disks from automobile wheels is capable of heating a room up to 15-16 square meters. m, a bath furnace or become an inexpensive efficient cooking appliance, which, in fact, is what this article is about. Its main advantage is the availability of high-quality material - thick, resistant and durable steel. Boiler steel in sheets and profiles is expensive, and ordinary structural steel in a furnace building quickly burns out.
The additional advantage of a disc oven can be seen from experience. Take two pieces of metal of approximately the same size and weight: one of plain steel and the other cut out of a rim, and heat it up harder, at least in a kitchen on gas. From the first, the smell of hot iron will immediately go, and the second can be heated to orange (about 900 degrees), without feeling anything unpleasant in the air. The wheel rim furnace practically does not dry the air and does not emit harmful fumes into the atmosphere, because the rims for the wheels are made of special steels that are resistant to corrosion. They are, of course, not standardized for heat resistance, but the margin of stability that is laid in them is quite enough for a wood-coal stove.
What you need to know about discs
Working oven. made using car rims. Don't do these!
To make a furnace from disks with your own hands, you need to know not only the advantages, but also the disadvantages of the source material and some, which are significant in this case, the design features of furnaces. The disadvantage of special steel is that it is not standardized for welding properties. There are several technologies for the production of disks for wheels, but welding for this, if used, is very limited, followed by thermal tempering (annealing) and flaw detection of the seam. And, of course, no designer of vehicles is pledged to the fact that something will be welded to the wheels during operation.
From this follows a very important conclusion from the point of view of safety: from disks (see Fig.), as well as pyrolysis ones, no way to do it! Unless you really want to see boiling, most likely burning, oil flow through a crack in the seam or chemically aggressive highly toxic gases begin to be released through a crack in the seam. And it is impossible to extinguish these furnaces, they must burn out completely. From disks, only a solid fuel flaming furnace can be made.
Note: welding seams for special operating conditions, not properly controlled for quality, are considered unreliable. Welded vessels operating under pressure, flame vessels and for chemically aggressive contents, which have not passed flaw detection and after it have been tested in the operating mode of use, are a priori recognized as unsuitable. Any furnace satisfies at least two of these conditions.
Nevertheless, it is quite possible to make a completely safe solid fuel furnace from car rims for welding for non-residential premises (a country house also belongs to them) if you follow the following. regulations:

- The weld must be visually of high quality, without visible defects - cracks, splashes, shells, bubbles, see fig. on right;
- Only two mating parts can be welded at a time; it is by no means possible to weld the entire structure at once!
- After each seam, the welded parts must be allowed to rest to absorb residual internal stresses, approx. from 3 minutes for each kilogram of the mass of the connected parts. Practically - cook further no earlier than when 3-4 cm from the end of the seam to the metal can be touched with a bare hand;
- The finished furnace, after a daily exposure to the absorption of the same stresses, is subjected to a test run, from 3 hours stationary and from an hour portable street, at full power, i.e. with a fully open air throttle (if any) or a furnace / blower door, and a maximum fuel load.
During the test run, annealing of the furnace takes place simultaneously. Detected minor welding defects, no more than 2 per seam, are eliminated after a day, after which the furnace run with annealing is repeated.
Note: the modulus of thermal expansion coefficient TKR of steel for auto disks is significantly less than that of structural steels. Why is understandable, but this circumstance also needs to be borne in mind when making an oven, see below.
What you need to know about stoves
When making a stove from car disks, you need to be aware of one more circumstance. According to the rules for the construction of solid fuel burning furnaces from the bottom of the furnace or grate, i.e. from where the fuel is placed, to the first vertical obstacle to the flow of flue gases (eg the roof of the furnace) must be at least 40-50 cm, if conditioned fuel is loaded into the furnace. If damp or waste, the specified distance must be increased to 60-80 cm; the oven warm-up time will then increase. The latter is unimportant for disc furnaces, since they warm up quickly.
The reason is that hot pyrolysis gases are released from solid fuels, which contribute a significant, or even decisive, share to the heat release. If the pyrolysis gases come into contact with a less heated surface, they will not be able to burn out and soot will fall out. With further use of such a furnace, its coking will occur - a dense soot is formed on the roof of the furnace and in the chimney. It not only reduces the thermal efficiency of the furnace (an analogue of the efficiency in the furnace business), but is also a fire hazard.
Note: a high furnace for raw fuel is made so that the pyrolysis gases and water vapor have time to separate, and the first ones also burn out before they reach the roof. In this case, the fuel is loaded no more than half the height of the furnace.
Disc stoves are very often operated on waste fuel (rotten dry wood, damp cuttings, etc.), but at the same time, there may simply not be enough worthless discs for a high stove, or the stove layout is optimal in this case (see below ) will not allow you to make a high firebox. Then you can make a stove out of disks by using a non-standard grate made of steel sheet from 6 mm and reinforcing bars from 10 mm. There is no need to fear that there is not enough air for combustion: through a hole with a diameter of 10 cm, with a chimney 1.5 m high, it will pass enough for a power of 18 kW on wood and 30 kW on coal. An oven from disks will never develop such a thing.

The non-standard grate is simply inserted into the oven with a gap of approx. 6-10 mm, due to the difference in TKR materials, see above. This design has another advantage - the problem of the ash pan is solved, which is quite serious for disc stoves. In this case, a tin can with a diameter of 15 cm or more is simply substituted under the ash.
Note: horizontal disk ovens (see below) are made without grate for the same purpose, i.e. the fuel burns on the hearth of the furnace, and the air flow is regulated by a throttle in the blower. The resistance of steel for discs makes it possible to apply such a solution.
What oven to make?
Based on the foregoing, the possibilities of self-manufacturing a furnace from auto disks can be sorted into shelves as follows:
- When it is desirable and necessary, because the use of auto disks makes it possible to improve the quality of the furnace and/or simplify its manufacture.
- When possible for the main (heat) parts of the furnace structure instead of expensive heat-resistant steel.
- When possible, partially as a sufficiently resistant improvised material.
- When it is impossible in any - discussed above.
When needed
The best use of oven rims is in mobile (portable) outdoor and garden cooking stoves and as a fire pit. In the simplest hearth stove made of disks for summer cottages, a large mass and height of the side (rim of the disk) are used, which allows stabilizing heat transfer and provides some protection from the wind. How to make a simple country-garden stove from a car disk, see video:
Video: garden mini-oven from car rims
For a cauldron
However, the best use of auto disks in garden stoves is under the cauldron. The stove made of discs for a cauldron is completely round, namely, in the corners of a brick stove under a cauldron, the cooking utensils heat up weaker, and soot settles there. The disc oven provides absolutely uniform heating of the cauldron and saves firewood, which is very important when using waste fuel. The branches and chips collected on the site and in the vicinity may not be enough for pilaf or beshbarmak to ripen as expected. And dampish and rotten fuel in a massive brick firebox simply will not heat the cooking vessel to the required degree. In the oven under the cauldron of auto disks, both are excluded, but - we emphasize - if it's done right.
Flue gases follow the path of least resistance. If you simply weld 2 disks and cut a furnace hole on the side, then hot gases will go through technological (to facilitate construction) holes in the disk hub, pos. 1 in Fig., because their total area is larger than the mounting and axial, and they are lower. If the stove is fired up to the maximum, then, perhaps, a tongue of flame will appear from the axial hole, pos. 2, but with a cauldron on the burner of such an oven, all the heat will again go sideways to no avail, pos. 3, or if you try to drown out some of the technical holes, or add fuel, the flame will break out of the loading door, pos. 4. On such a stove, food cooked by languishing over coals is good, pos. 5, but not everyone cooks like that.
The correct stove for a cauldron of disks must, firstly, be equipped with a tightly closing door on the loading opening. Secondly, the cauldron should sit in the cutout of the burner, partially blocking the technological holes in the hub, pos. 6. This is easy to achieve: you need to cut the middle of the hub with a grinder, as shown in pos. 7. The rest will not be wasted - it will make an excellent grate. How to make a garden oven for a cauldron from car wheels, see also the video
Video: oven for a cauldron of disks
Barbecue option

It is not necessary to cut the core of the disc hub, except for languishing on coals, in the case when a garden barbecue oven is made from discs. Then a grate is placed on the burner - a flame divider, which will at the same time be a culinary grate-grinder. The advantage of this design is that several different temperature zones are formed on the grid, pos. 1 in fig. on the right, which allows, for example, to cook simultaneously rare roast beef (half-raw with blood), medium (juicy, moderately baked like a barbecue), and well done (fried until crispy). If there is a company at a picnic, everyone will receive at the same time each according to their taste. It is desirable to make such a furnace from disks with a small number of wide technological holes in the hub, for example. from Gazelle. The grille is made from bicycle spokes. There is no need to cook them: they are perfectly connected with heat-resistant glue for metal (cold welding).
Note: stoves without a furnace door are sometimes made from disks of the same type (pos. 2 in the figure on the right), by placing not thick wood chips during the furnace through the technical holes in the hub. But the stove turns out to be gluttonous and poorly cooked. Why - see above.
When you can fully
Completely from the disks, a heating stove-potbelly stove is well obtained. The advantage in this case will be its large heat capacity and heat transfer time - the body metal is thick - although, of course, not the same as cast iron, and a slight increase in efficiency. The downside is the higher labor intensity of manufacturing improved furnaces with increased efficiency due to the complex configuration of the body.

If there is enough waste fuel, then a potbelly stove made of disks for heating a small room can be made without internal divider partitions (see below) horizontal, pos. 1 in fig. It is highly desirable to make such a furnace from truck disks: firstly, a larger volume of the furnace will increase its efficiency and heat transfer time. Secondly, due to the complex surface of the disc rim, the area of the heat-generating outer surface can be one and a half to two times larger than that of a simple round one of the same volume from a barrel or. The same circumstance, together with the high corrosion resistance of car wheel disks, makes it possible to equip the furnace with a jacket for water heating, see for example. track. plot:
Video: stove-stove from disks with a shirt
Horizontal potbelly stoves are bulky, so vertical ones are more often made. If we are talking about a disc stove, then, firstly, you need to take care of a suitable grate and ash pan for it, see above. It’s impossible for coals and hot ash to fall directly onto the fireproof blind area!
As for the thermal properties, they can be improved in two ways. The first is when a quick heating of the room is required, and the heat transfer time is not significant, for example, if the stove is placed in a garage. Then its upper, flame, part is surrounded by an annular casing made of thin steel (not galvanized! Zinc melts at 440 degrees, and its vapors are poisonous!), with a gap of 40-60 mm, pos. 2 in fig. The potbelly stove thus turns into a stove-heater. But, by the way, a horizontal disc heater will be much more efficient, see below.
The second method is used when, on the contrary, it is necessary to increase the heat transfer time after the firebox, for example, in a country house inhabited from spring to autumn. To do this, it is necessary to clad the furnace in any available way with materials that combine high heat capacity and thermal conductivity. Oven stone steatite (talcochlorite) is expensive, but fireclay brick (pos. 3) will completely replace it. In extreme cases, you can put a wild stone heavier and denser on the hob, pos. 4. If the stove is made of 4 cargo disks, the fuel burns out completely and the view closes by midnight, then in a tracksuit under an army blanket, you sleep peacefully until 6-7 in the morning. You can sleep.
Let's improve the potbelly stove from disks
It is possible to increase the thermal efficiency of any potbelly stove by installing cut-off partitions inside. Thus, an afterburner chamber is formed. In this case, the air casing, which converts the potbelly stove into a heater, also increases the efficiency of the furnace.

Schemes of the device of bourgeois from disks are given in fig. The vertical simple one (pos. 1) is more compact, somewhat more efficient than the horizontal one (pos. 3) and gives a hob, but it is more difficult to put an afterburner chamber cutter (pos. 2) into it, because. in this case, it must be welded to it along the entire contour adjacent to the furnace body. However, a vertical potbelly stove with a single-turn afterburner achieves an efficiency of slightly more than 60%. A simple horizontal potbelly stove (pos. 3) is the worst in all respects, but stoves are made quite effective on its basis. The leading value for the development of modifications is the smallest internal diameter of the fuel chamber d.
Note: for welding the potbelly stove body from auto disks, their hubs are cut out completely, see fig. on right.
Dimensional ratios for potbelly stoves made of disks with a single- and 2-turn afterburner are given in pos. 4 and 5. The efficiency of both approx. 60%, but a 2-turn saves it on waste fuel, and a single-turn requires a quality one to ensure the highest possible thermal efficiency. It is not necessary to cut the cutter (steel from 4 mm) exactly along the inner contour of the furnace body: in its blank, you only need to select the holes so that there is a gap between the cutter and the wall of the body of approx. 1.5 cm. pos. 4a. Then the afterburner will become self-adjusting for the operation (burning mode) of the furnace and it will keep the efficiency close to the maximum, both at low and at full speed. A similar solution is used in Buleryan ovens, but holes are punched in the cutter for this. In mass production, it is more profitable: the cutter is still cut down in one stroke of the press punch, and metal waste is willingly bought by metallurgists as high-quality raw materials for open-hearth furnaces. Well, at home it’s easier to leave a gap along the edges of the cutter.
A horizontal potbelly stove made of disks with an afterburner is generally equal in efficiency to a buleryan if it is equipped with an air casing with a slotted nozzle at the top and an air intake skirt at the bottom, pos. 5a. The casing should fit outside to the body, and the channels formed will act in exactly the same way as in the buleryan or furnaces Engineer Butakov, Fire-Battery, etc.
Note: in the chimneys of highly efficient potbelly stoves made of disks (pos. 2 and 5), there must be a condensate collector with a drain cock, because flue gases come out slightly warm.
On the basis of a horizontal potbelly stove, a full-fledged heating boiler can be made from disks, pos. 6. If you weld its flame body from KAMAZ disks, you can accelerate to a thermal power of approx. 40 kW, and this is enough to heat an ordinary residential building.

However, to make the heat exchanger housing from disks of the same size, pos. 1 in Fig., is irrational: then it will be necessary to install a structurally complex and requiring periodic repair fire tube heat sink, pos. 2. It is better to weld the heat exchanger body from smaller discs, eg. from a car. The temperature in it will then rise to values that allow the use of a water-tube heat sink. Of the preventive measures, it requires only an annual pressure test in order to pressurize the system before starting and inspect after it.
The water-tube heat receiver is a frequent one-piece coil through which the coolant flows. The distance between the branches is equal to the outer diameter of the pipe; the branches are staggered. It is possible to make a water-tube heat sink for a home boiler heat exchanger from discs from a copper tube with a clearance of 20 mm and a wall thickness of 2 mm. The input-output of the heat receiver to the heat exchanger in this case is sealed by cold welding.
Oven partially made of discs

Auto disks are widely used as components in sauna stoves. A sauna stove made of disks can be built as a whole, but only for a sauna of a barely average level. In a Russian bath, steam from any all-metal stove is harsh.
How the stove in the bath, built using car wheel disks, looks like, is shown in fig. rights, and a complete diagram of its structure is given in Fig. below. The main thing that in this furnace provides the proper quality of steam is a brick firebox. Auto disks are used as a container for the contents of a closed heater and for the manufacture of a hot water tank.

Note: it is only possible to build a home-made sauna stove with an open stove only with a special design made entirely of bricks, which provides complete, up to carbon dioxide and water vapor, afterburning of gases from the furnace before they reach the stove. Branded metal sauna stoves with an open heater are made for this from special materials using complex technology. If you try to repeat this on your own from ordinary materials, a cloud of soot will fly out of the heater with each addition of water.
This stove for a bath has already been repeated by many lovers of a steam bath in their bathhouse. In general, everyone is happy; only one persistent defect was noticed: the lower cutoff (details Brace and Reflector on the right in the figure) after a year or two is warped and detached from the struts, or the struts from the body. The reason is obvious: different TKRs have become the specified parts and the body from the autodisk. To eliminate the defect, apparently, it is necessary to make the cutter also from a smaller disk, for example, a passenger one. Most of the rim must be cut out, leaving 4 legs. Then heat the transition points of the rim to the hub and bend the legs to size.
There is no need to weld holes in the hub. Due to the heat transfer to the body, the cut-off will be slightly colder than the flue gases. Since the hub is convex, a gas plug is formed under it like a gas view in a bell-type stove, as in a bad garden stove made of disks, see above, and the flue gases will still flow around the bottom of the heater, as shown by the arrows in the diagram.
Combi option
Dozens of unusable wheels from amateurs do not lie around in garages, but wear out, as a rule, in pairs, either front or rear. In this case, in order to make a fairly efficient stove with a high firebox from the disks, a pair of disks will need to be supplemented with a piece of steel pipe of a suitable diameter with walls of 6 mm or more.
The device of the furnace from 2 disks from automobile wheels is shown in fig; nothing special from those described above, it does not differ. The same furnace can be made horizontal. For the design of the burner, see above.
 (No ratings yet)
Made brazier, oven, barbecue. a smokehouse made from car disks is an example of how waste materials can be reused for a useful and necessary design. These wheels are made quite simply, they can be made by hand in the garage or in the home workshop. Although the design is simple, such a product can be used for many tasks.
How to make a brazier from rims
For self-assembly of this design from auto disks, we think over in advance what the scheme of our product will be. We prepare consumables in the right quantity, as well as a list of tools. To do the job efficiently, you need to be able to use a grinder to cut metal, and a welding machine.

A simple option - barbecue for skewers


More complex brazier models with a grill grate

How the barbecue oven works:
Downstairs we put firewood or cooked coals. A grill is placed on top or skewers are stacked. We can also place dishes on the grid or directly on the wheel, if the size is suitable. Thanks to the heat that rises, you can cook food in the same way as a regular barbecue. If we want to smoke products, then we close the exit at the top, we look for the wood chips to smolder - smoke should form. In each case, an individual design is thought out, depending on the needs of the owners. However, when assembling a fixture, the basic design principle is the same, regardless of the model.


Smoking chamber from car rims
Brazier from disks will be more profitable if it is adapted for various tasks. For those who prefer homemade balyk and sausages, a smokehouse is recommended, which will serve as a device made of disks. Such a useful thing is done using at least two units of material.
The work is built on the principle in which two disks are connected to form an integral hollow structure. The upper part is modified to make it convenient to fry kebabs - as in the previous model. However, in order to keep the smoke, a cover and a chimney system should be equipped. The partition with holes can be left, which will be easier. In this case, the device can act as a cooking surface.

To fix the door, we weld a nut onto it so that they are symmetrical with respect to the weld. One bolt is also fixed to the brazier by welding in such a way that the door nuts are put on them. After that, the grill is ready! Now you can enjoy the cooking process and the dishes themselves.
Ideas on how to create a brazier, barbecue, oven from car wheels with your own hands

The ability to adjust the height of the cauldron on the rack above the disk.

With elements of forging barbecue grill

brazier from a disk on legs.

Barbecue from a rim and a skewer.

Hanging original brazier.

The wheel disk for a brazier-barbecue is taken from a truck.
We also recommend
 Hero pioneers in the Great Patriotic War Heroes of the Patriotic War pioneers presentation
 Presentation "Formation of posture in preschool children Hygiene of correct posture presentation for children
 Sciences of the human body
 Presentation "history and prospects for the development of robotics"
 The value of the struggle of Russia with the Polovtsy
 Asia and Africa after World War II