Do-it-yourself wall cladding with MDF panels: the benefits of finishing. How to properly sheathe walls with mdf panels Wall sheathing technology with mdf panels
MDF panels are widely used not only due to their low cost and environmental friendliness. Do-it-yourself installation of MDF panels is simple; it requires only elementary accuracy and precision. It is possible to create an MDF coating with good decorative qualities without being a carpenter or finisher; the skills of a home craftsman are enough.
What is MDF?
MDF (MDF - Medium Density Fibreboard - English, HDF - German) is made from wood waste. But they should not be confused with fiberboard or chipboard. MDF is made by dry hot pressing of wood, without a binder. The essence of this method is that the microscopic tubes and fibers of lignin, which make up wood, become plastic under high pressure and temperature, as when steaming, interlock and stick together. The structure of MDF is similar to felt, but not from wool, but from wood fibers.
MDF does not differ in special mechanical properties, but, due to the absence of a chemical binder, it is absolutely environmentally friendly. For interior decoration, MDF is ideal. Techniques for working with MDF are the same as for wood. MDF is glued with any wood glue. Especially for MDF, the Liquid Nails adhesive was developed - a construction adhesive with sawdust filler, which allows both gluing and puttying gaps and sealing holes with self-tapping screws.
Note: MDF panels are produced with a decorative outer coating. When buying liquid nails, make sure that the tone of the hardened composition matches the tone of the MDF panels used. Sample - a frozen drop on the lid of the jar, or from the seller.
Tool for the job
In addition to the usual home tools, you will need a plumb line (it is easy to make it yourself from a nut, not a fishing line or thread), a tape measure, a building level and a drill attachment for screwing screws. You can do without a special screwdriver. You also need a locksmith square (metal, with legs of different thicknesses). It will be convenient to cut pieces for slopes along it: a thick leg is used as an emphasis, and relying on a thin one, they cut.
To cut MDF, you need a jigsaw or a hand saw. The saw is good for its compactness, convenience - it is similar in size and shape to a hair clipper - and versatility. By changing the complete circles, you can cut wood, metal, stone. But a saw with a cutting depth of more than 12 mm or more costs more than a jigsaw; the thickness of MDF is 16 mm.

Mounting technologies
Important: if the room for MDF finishing has ever dampened at least once, if traces of midges, swelling or peeling of the plaster are noticeable, if the plaster is bumpy, uneven or its layer is more than 12 mm, then before finishing the MDF, the plaster must be removed to the main wall. In any case, it is desirable to remove the plaster - this will reduce the cost of fasteners and will reveal hidden wall defects. Of course, you need to remove the baseboards.
Two technologies for mounting MDF wall panels are used:
- On a wooden crate;
- On a frame made of special galvanized profiles.
It is easier to make a wooden crate, it requires fewer hardware for fasteners, but wooden slats, or even slabs, are more expensive than a metal frame. In addition, the wooden crate requires pre-impregnation against fungus, rot and mold. In damp rooms and in brick houses, it is definitely not recommended to use a wooden crate: moisture and fungal spores can penetrate from the outside simply through the pores of the brick, and the cavities between the cladding and the wall are an ideal environment for the development of pests.
For a metal frame, you will need UD profiles (guides) and CD. Both of them are U-shaped and differ only in the configuration in the section. Sellers often offer mounting ends ("ears") and connectors to the CD profile. Their use makes sense when performing a large amount of work in a limited time. With self-finishing one or two rooms, it is quite possible to do without them. How will be described below.
More about crate and its methods.
About thermal insulation
In the process of finishing the room with MDF panels, it makes sense to additionally insulate it by filling the cells of the crate with foam plastic on construction foam or silicone. The protrusions of the foam are cut off with a mounting knife.
In addition to the actual insulation, this will provide additional protection against the accumulation of condensate in the voids and the development of wood pests. MDF is the same wood, and is also affected by them, although to a lesser extent.
In the summer, when the building warms up, the heat inflow into the room will significantly decrease. Just MDF on a frame - a single heat shield with a reflectivity of about 0.25. With a layer of foam - a double screen. The reflection coefficient of the foam is more than 0.7; accordingly, no more than (1 - 0.7) x (1 - 0.25) = 0.225 heat will enter the room through the walls against the previous one. The outflow of heat through the walls in winter will decrease by the same amount.
Considering that the heat exchange through the walls is at least 0.15 of the total heat flux, one can count on a reduction in heating / air conditioning costs by at least 10%, and this is a tangible value in the budget at existing tariffs.
If more serious internal thermal insulation is planned -.

crate
Fasteners for crates
The wooden crate is attached to the wall either with self-tapping screws or mounting nails (dowel-nails). The dowel-nail looks like a self-tapping screw with a smooth asymmetrical thread profile. It is driven into a plastic clip-nest with a hammer. The head of the dowel-nail has a slot for a screwdriver, so that if necessary, it can be unscrewed. The metal crate is fixed only with self-tapping screws.
For fixing the crate, fasteners with a diameter of 4-6 mm are used. The stronger the base wall, the smaller the required diameter. Each self-tapping screw or dowel-nail is completed with a plastic socket. Holes in the wall for fasteners must be drilled according to the diameter of the nest body; elastic protrusions are not taken into account. The nest in the hole is clogged with light hammer blows.
The body of the fastener (nail, self-tapping screw) must sit in the main wall by at least 30-40 mm. For example, if the thickness of the plaster layer is 12 mm and a rail or profile 40 mm thick is used for the lathing, the MDF thickness is 16 mm, then the length of the hardware must be at least 12 + 40 + 16 = 68 mm. Those. fasteners need a length of 70-80 mm. The depth of the holes for the nests is equal to the length of the nest + 15-20 mm for dust and crumbs. In this case, 100 mm. If the drill is longer, a stop tube should be put on it. But don't drill too deep: the walls between rooms can be half a brick, less than 200mm with two layers of plaster.
Wooden crate
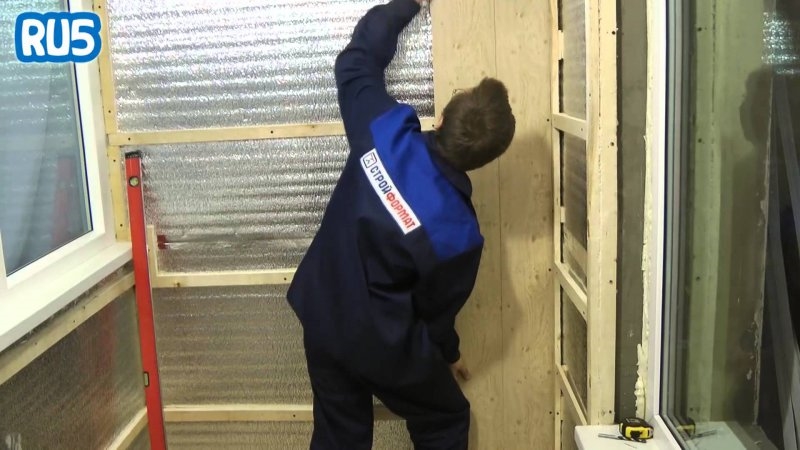
We start the wooden crate with the installation of vertical racks. We put racks in all corners, in pairs, so that they form an angle, and along the edges of window and door openings from floor to ceiling. We check the verticality of the racks with a plumb line.
Having attached the rack, we outline it on one side with a pencil along the wall and drill holes for fasteners with a drill in concrete or stone in increments of 500-700 mm. We drive nests for fasteners into them, mark their position on the stand with a pencil. Then we drill holes in the rack with a diameter of 2/3 of the diameter of the fastener and attach it in place. For more experienced craftsmen, the holes in the racks are drilled in advance, and the marking of the holes in the wall is done right through them.
Next, in a similar way, we mount horizontal logs with the same step. Each piece of the lag is fixed with the same pitch as the rack. On the top of the openings and under the window sills, we must install logs, regardless of whether they fall “on a step” or not. The slopes of the openings are also decorated with slats, along the inner and outer edges, without crossbars. The final stage - we remove the ledges at the joints of the rails with a planer.
Note: when lathing the ceiling, keep in mind that the MDF panels are located along the racks and across the lags. That is, if the sheathing panels on the ceiling will be located along its short side, then the ceiling crate must be done parallel to its long side, and vice versa.
Metal crate
The metal crate is made in a similar way: racks at the corners and openings, then crossbars. The step of the crate is the same as the wooden one. Racks are made from the UD profile, CD profiles are inserted into them and pushed to the place. Then CD, after alignment with a level and a tape measure in horizontal and pitch, are attached to the UD, and then to the wall, into the holes drilled in advance in it.
Between themselves, the details of the metal crate are connected by short self-tapping screws. The CD is also attached to the wall with self-tapping screws. Dowel-nails cannot be used: fasteners will either not be finished off, or the profile will be crumpled. Pieces of the CD profile are pre-connected to each other to the desired length.
Note: work on a metal crate is best done using a small grinder or a hand-held circular saw. With an electric jigsaw, even with a metal saw, the work is delayed and a lot of marriage is obtained.

Ears and Connectors
The “ears” of the CD are made as follows: at the ends of the mounting pieces of the “P” stick, we cut it to a width of UD up to the crossbar plus 2-3 mm. The cut must be made a little obliquely, so that from the ends of the "sticks" to the edge of the profile there is also 2-3 mm more than from the crossbar. If cut straight or reverse beveled, the CD may jam during installation. "Ears" will be needed if the crate is made only from CD. If the racks are made of UD, then the CDs simply slide into them.
For CD connectors, we measure in advance its own piece of the desired length. One connector requires 100-120 mm profile. If, for example, 10 connectors are needed, they will take 1 - 1.2 m CD. The “P” sticks of the CD are not straight, but with an inward bend. It is this bend that needs to be cut off by the same 2-3 mm. Then we cut the workpiece into the desired number of pieces.
The CD is connected as follows: the connector piece is pushed halfway into one of the profile pieces to be connected, and another piece is pushed onto the remainder. The connector, of course, will go into thrust; there may be a small gap between the pieces to be joined. This is not scary, the work on sheathing from this will not stall and will not become more complicated.
Sometimes it is advised to additionally fix the connection with self-tapping screws; it's redundant. During installation, it is already held quite firmly due to friction. In the future, the connector will not fall out - the wall will not give - and will not slide to the side, because. inserted with spacer.
Note: under communications - pipes, wiring in wooden slats or metal profiles of the crate cut grooves in place. Before the crate, it is necessary to measure the height to which the communications protrude above the wall, and choose the thickness of the crate elements by 5-10 mm more.

Sheathing with MDF panels
Striker and Claymers
MDF panels are interconnected by a symmetrical tongue-and-groove lock in the form of a comb and a corresponding groove. MDF panels can be fastened to the wooden crate with small nails, hammering them obliquely into the corner of the groove. Until the end, the carnations are finished off with a metal striker and a hammer. It looks like a punch for metal, only at its narrow end, instead of a point, there is a small depression along the nail head. A nail head can be made from a center punch by removing the point on an emery wheel and carefully drilling a recess on a drilling machine.
Claymers are used for fastening to a metal crate (and to a wooden one when working according to the standard scheme). Claymer - a small metal bracket to the hole for fasteners and cloves that press the flange of the tongue groove. The gluer is inserted into the groove of the MDF panel until it stops, and fixed with a self-tapping screw. Fastening with adhesives is more expensive and requires more labor, but it is more reliable, and if necessary, the lining can be disassembled without damaging the MDF.
Panel installation
Installing MDF panels on the crate is much easier than preparatory work:
- We start from the corner. We cut to size the required number of MDF panels for sheathing the mounting plane to the nearest rack. At the corners of the cuts, we go through once (“widen”) with sandpaper.
- On the first panel, we cut off the ridge of the tongue, and fix it in the corner with nails (on a wooden crate) or small self-tapping screws (on a metal one). From the side of the groove of the lock, we fix it with carnations or glues.
- Lay on the next panel, slide the comb into the groove, fasten it along the groove, etc. until the last two panels remain.
- We cut the last panel in length to size, with a tack of 2-5 mm, depending on which corner or plinth the final finish will go.
- The comb of the last panel is cut in half and rounded.
- We insert the last two panels into place with a “house”, press until they “snap into place”.
- We push the last panel all the way to the penultimate one; at the free edge we fix with self-tapping screws.
Note 5:"The last two" is a responsible operation and requires some skills. It is advisable to pre-train on MDF samples. If the training "house" is jammed, it can be pry at the joint with a screwdriver.
MDF panels are a fairly popular material that many people know about, and those who don’t know will definitely get acquainted with it in the process of selecting coatings and compositions for wall decoration. MDF is a fairly thin and light type of coating that can be used for a number of jobs, which include finishing vertical surfaces. Panels are made from small particles of wood, interconnected into a single array using high pressure accompanied by heating. The main component is lignin - a natural substance released by wood under the influence of high temperatures. And the main advantage of MDF panels is that they do not contain substances hazardous to human health (for example, phenol, which can be part of a number of adhesives used to create other derived materials from wood residues). Although a number of third-party substances, in addition to lignin, each panel still contains. It can be epoxy resin, which, when cured, does not pose a danger to the body.
On a note! The abbreviation MDF stands for "fine fraction".

The panels created in production are then decorated. That is, they need to be painted, pasted over with a special film, laminated. Only after that the panel can perform a decorative function. She is often able imitate various natural materials like wood or stone, but it can also have a completely different, brighter and more creative color.

MDF is used in various fields of human activity, but above all - for the production of furniture, doors, materials used to decorate surfaces inside rooms. In the latter case, we can say that the panels are suitable for finishing vertical and horizontal surfaces, including for the ceiling, sometimes they are also used for decorating floors, but very rarely (much will depend on the type of MDF, which will be discussed below). Most often, however, the panels can be seen precisely on the walls and ceilings.

Important! MDF panels that do not have a specific treatment do not like high humidity, so they can only be used indoors, provided that they are dry and warm enough. Otherwise, the material will become unusable very quickly. But laminated panels can be used for finishing kitchens and bathrooms.

The coating fully complies with sanitary standards and requirements, which means that the panels can be used for decoration even in bedrooms and children's rooms if desired. Panels are a great option to make walls smooth and pleasing to the eye in any room. The main thing is to choose them correctly.

Find out how to do it, and also check out interesting ideas (photos) and instructions in a special article on our portal.
Panel types
Not all MDF is the same and can be purchased for all types of work. It is important to understand here that there are certain types of panels, and each is used only in certain cases.

Table. The main types of MDF.
| View | Characteristic |
|---|---|
| Whole-pressed | This is a standard panel, which is produced just in the process of conventional pressing and is a canvas of wood fibers. The material will have moderate strength, smooth surface, good heat and sound insulation. Such MDF is inexpensive, but environmentally friendly and safe. Relative to analogues, this is the cheapest option. But the material does not differ in increased moisture resistance, does not have any additional processing, and the color of different plates may differ even in one batch. Usually such plates are used for decoration of premises for various purposes. |
| moisture resistant | This panel has increased resistance to moisture, it is denser than the previous version, stronger and more resistant to mechanical stress. Such panels can be used for finishing bathrooms. |
| Laminated | This is a fairly expensive, but resistant to a number of influences panel. She is not afraid of water, as her surface is laminated and will not let moisture in. The panels are not terrible and abrasion, as well as exposure to a number of substances. Sometimes such panels, due to their stability, can even be used for outdoor work (the main thing is that they are not constantly exposed to water, so such panels should be mounted outdoors only under awnings). |
| Other special | In theory, a moisture-resistant panel also belongs to this category, but it is used quite often and therefore has been described separately. And so they still emit heat-resistant, flexible panels and a material having an increased density. Flexible ones can be used to finish arches and other curved structures, high-density panels will perfectly cope with strong mechanical stress, but heat-resistant or fire-resistant ones are not afraid of fire and practically do not burn due to the content of a number of special substances in them. And they can be fixed in the area of fireplaces and stoves, as well as very close to heating boilers. |

Depending on how the MDF panel is finished, it is also divided into several types.

- Veneered, which resembles in appearance an ordinary natural tree. Sometimes such a panel can hardly be distinguished from an ordinary wooden board. That is, the panel is covered with veneer on the outside - thanks to it, it is possible to achieve the desired appearance. Veneer is the thinnest layer of natural wood. This is the most expensive option for MDF.
- Painted panel can have any color, which can be achieved by applying coloring compounds to the material. Moreover, MDF can turn out both matte and glossy. There is no imitation of wood texture.
- Laminated panel- cheap and affordable, this is the reason for its popularity. Outside, it is usually covered with a melamine film. Such panels look beautiful, and they are not afraid of water. They are also fairly easy to wash.

As for the format, for wall decoration can be used:
- rack MDF, 2.5-3.8 mm long and 13-28 cm wide;
- tiled square shape with a side width of 30-98 cm;
- sheet, with a length of one panel 1.25-2.5 m.
In the apartment, you can use both rack and tile variations of MDF. But for finishing spacious rooms it is better to buy a sheet version.

Prices for MDF panels
MDF panels
Advantages and disadvantages
We can say that MDF is one of the simplest, easiest and most convenient ways to finish walls and align them. But these panels have a number of other advantages.

Characteristics of MDF
- Panels can protect walls from external influences.
- The price of the material is relatively low, despite the fact that it is quite environmentally friendly and safe for humans.
- Working with MDF is easy and convenient - they are light and easy to process, do not generate dust, and a minimum of construction waste is formed. And for cutting panels, you can use both a hacksaw and a jigsaw. To install the panels, you do not need to have any special skills, just read the instructions on the Web. Yes, and it is not necessary to align the walls first if the material is fixed on the bars.
- If necessary, MDF is easy to dismantle.
- Cleaning the panels is easy - dirt can be easily removed from them using a damp cloth.
- The material has a beautiful appearance, is able to imitate various surfaces, and also has heat and sound insulation properties. This judgment is especially relevant if the panels were attached to a wooden frame base.

But it should be understood that there is not a single material that would not have flaws. And MDF has them too. So, the material (especially - simple, not laminated) is afraid of an increased level of humidity. Also, the panels are not durable, and if desired and as a result of negligence, they are easy to damage. Because, in fact, they rarely trim the floors. MDF, in addition to the refractory option, burns well, and this is also its minus. It is important to remember that when mounted on a wooden frame, the panels will take up some space and may narrow the room somewhat. So in cramped rooms it is not always worth mounting them.

Find out what to use for, and also check out the installation options and process in a special article on our portal.
Where to start work? Tools and materials
Working with MDF is easy and simple, but the master will still need a certain set of tools and materials. So, it is without fail a jigsaw or a hacksaw for sawing, a screwdriver, a pencil, a puncher, a tape measure. Of the materials in the right amount, you need to purchase fasteners, the panels themselves, as well as wooden bars or metal profiles. If wires are laid behind the panels, then it is advisable to purchase a corrugation for them.

Advice! Determining the required amount of coating is simple - for this you need to take measurements from the walls and perform simple arithmetic operations. By the way, it is better to purchase panels with a small margin - in the process of work, some of them may be damaged, and there should be no gaps between individual planks. So some panels may need to be replaced.
The finished look of the wall, finished with MDF, will give the finishing corners. It is worth purchasing them in advance and installing them after the installation of the coating is completed.

How can panels be fixed?
There are two ways to fix the material on the walls - using glue or a frame. The choice of method is usually made depending on the condition of the walls and the wishes of the master. So, adhesive version involves the installation of panels on an adhesive composition such as "liquid nails", but this method is only suitable if the surface of the walls themselves is not curved. This is the easiest way, but limited in its applicability. In other cases, only the wireframe method becomes relevant.

Frame method of fastening MDF- this is the creation on the wall surface of a crate-like structure made of bars or metal profiles. A similar frame is created when installing drywall on the walls, only the crossbars will be located horizontally. The step between the horizontal supports is 50 cm, and between the vertical bars that serve as a support for the horizontal ones - about 3 m.
The panels themselves are fastened to the crate using clamps. They are installed from the end of the panel so that they will not interfere with fixing the next panel on the crate, but they will perfectly hold on it the one that was fixed with their help.

Wall panels are a quick and inexpensive repair, and at the same time a neat and stylish appearance of the room.
The process of mounting panels on the frame
Step 1. The first step is to inspect the walls and identify the most protruding place on them. It is on him that you will have to focus when creating the frame. On the wall surface, using a pencil, you can make notes for the crate (the distance between the horizontal parts of the crate is 40-50 cm). You need to take a bar 20x40 mm and file it into segments of the desired length (this is usually the width of the wall).

Important! The frame rails are always attached strictly perpendicular to the panels, so if they have a different orientation, then the frame lines will be drawn in accordance with their orientation (for example, not horizontally, but vertically).
Step 2 Next, the bars must be attached with self-tapping screws on the wall strictly horizontally. It is important to understand that if the wall is concrete, then you first need to mark the holes for the dowels, drill them, install the dowels, and then attach the rails to them.

Step 3 It is necessary to fix all the elements of the crate, observing a step of 40-50 cm. Above and below, near the floor and ceiling, you need to maintain a small distance - about 3-5 cm to the base.
Step 4 Before further work, it is important to make sure that the rails are fixed evenly. You can do this using a level.

Prices for building levels
Building levels
Step 5 If the wall is not even, then you can align the slats by placing pieces of bars of the desired thickness under the right places for support. These pieces of bars must be fixed with self-tapping screws.


Step 6 It is important to fasten the details of the crate both along the edges of the walls and in the area of doorways.

Step 7 Now you can start installing the first panel. It starts from the corner of the room - you need to attach the first panel to the corner of the wall and check with a level that it is level. If necessary, the panels can be cut to the desired length.


Step 8 Next, the panel must be attached to the laths of the crate using self-tapping screws. They are screwed only along the edge of the panel. Moreover, only the first panel or the last one is additionally fixed to the screws (in places that will be covered with skirting boards, corners, etc.).


Step 9 To fasten the remaining panels, you need to use special fasteners - kleimers. Kleimers must be installed as follows - slide into the groove of the previously installed panel and fix it on the crate with a construction stapler or small nails.


Step 11 Then you need to fix the panel with a clamp on the crate.

Step 12 All panels are fixed in the same way.

Step 13 If the panels need to be cut, then this is done like this. First you need to apply markup to the panel - how much it needs to be shortened or made narrower. And then just saw off the excess with a jigsaw or hacksaw.

Step 14 After all the panels have been installed, you can install the fittings to give the wall a finished look. Glue must be applied to the folding corner on the wrong side, then folded and glued into the joint between the walls, pressing firmly. Excess glue should be removed immediately with a cloth. Panel installation completed.


screwdriver prices
screwdriver
Video - Wall decoration with MDF panels
The nuances of the work
Mounting adhesive prices
Mounting adhesive
Working with MDF panels is not difficult, but there are certain nuances that should be taken into account when installing this material. So, the panels immediately need to be joined very tightly - any gaps between them are quite difficult to close, and they will be striking. Where it is possible to hide the heads of the self-tapping screws, it is better to additionally fix the panel itself with them - this will avoid distortions of the material in the future.
From the first panel, it is best to cut off the comb before installation. She doesn’t need it, but his absence will allow her to move the panel as close as possible to the corner. It is easy to cut the material, but sometimes it can crumble, and the laminated coating can crumple. So you need to work with a hacksaw or a jigsaw blade with very fine teeth, then this can be avoided.

Important! Always cut the material from the front side!
Some communications can also be laid behind the panels. But this aspect is important to take into account even before the installation of the frame, since the thickness of the bars will directly depend on how wide the free space between the panels and the wall is needed.

Find out which popular options can be used in a special article on our portal.
In general, there are no difficulties in working on wall cladding with MDF panels. The main thing is to strictly follow the instructions. Even a beginner can handle the job, so this is a great chance to save money on renovating the room if you do the MDF installation yourself.
We decorate the walls with MDF panels
We decorate the walls with MDF panels
This information is intended for those who want to finish MDF walls quickly and cheaply on their own, or for those who just want to expand their horizons. By studying this article, you will understand that do-it-yourself decoration is not very difficult. After all, the installation is alternately painted and shown in the form of photographs.
MDF material is wood waste (chips) mixed with a special adhesive solution and pressed.
A similar structure of the material makes it similar to chipboard boards. but at the same time it is very different. So, for example, the high temperature of processing wood waste in the production of particle board makes it possible to avoid adding various resins and other negative chemical compounds to the mixture for gluing.
Despite this, they have excellent technical performance, as a result of which they are widely in demand today.
Let's take a closer look
Interestingly, this material is used for finishing work on all surfaces, from ceiling to floor installation of ceiling panels. On the other hand, this type of material is much more common in various administrative buildings and public places. Perhaps, people do not use it for their home due to the lack of domestic warmth and comfort of this material.
Installation of MDF panels
Three years ago we bought our first apartment. It was almost completely finished, only the walls in the room and in the kitchen were simply putty. We decided to wallpaper them, and in the kitchen, in the working part and near the dining table, to decorate the walls with panels.
In the store, we liked MDF sheet panels made to look like ceramic tiles. The choice of colors was great. The seller said that MDF panels can be fastened directly to liquid nails glueif the walls are smooth wallpaper for leroy walls. We were pretty even.
MDF panels are made from pressed wood chips, which are impregnated with special compounds, and covered with a paper-based film on top. MDF panels seemed to us more environmentally friendly than PVC. Still, they are made from natural material, and modern technologies make it possible to avoid the use of harmful resins and phenols in the production. The size of the panels was about 1.5 m by 1.8 m. I don’t remember exactly now.
The disadvantages of MDF panels is that they are not fire resistant and not very moisture resistant (we personally saw the latter) installation of pfc panels. I recently read that MDF sheet panels need to be fixed to the crate. But then we followed the advice of the seller and glued the panels on liquid nails.
Our MDF panels did not go all the way to the ceiling, but to the level of kitchen cabinets. Therefore, we simply placed a sheet of MDF panel vertically and glued it entirely. We first drew the top line along the level, along which the panel was supposed to go. Just got the right height. Near the dining table, the panel was glued horizontally - this can be seen in the photo.
But cutting the panel has become a problem for us. In general, an electric jigsaw is used for this. We didn't have it. My husband tried to cut the panel with a regular saw, cut with a knife. In the end, he got angry and just broke off a piece. Our MDF panels were under tile made toilet renovation with plastic panels video. And just at the seam, the panel broke. Only a crack went sideways, which was to be expected. But this crack turned out to be behind our locker. So we covered it with paint and forgot about it. To mask the panel joints and edges, we used white PVC corners and PVC profiles. They were also glued on.
As a result, we were satisfied with the appearance of the kitchen. It took only a few hours to install the panels, most of the time we struggled with sawing the panels. The MDF panels held up well. In any case, in two years they did not fall off, although in that apartment there was very high humidity. Externally, the panels looked like tiles. We knew that it was not a tile. But acquaintances came to visit us, whose attention we did not focus on repairs. Later in the conversation it turned out: they were sure that our kitchen was tiled. The photo shows a general view of the kitchen, pasted over with MDF sheet panels.
I didn’t like the following in sheet panels: the pattern on them was erased when washing; installation of wall panels on glue. Wipe a little harder with a sponge - and the paint is already peeling off. They also get wet from contact with water and quite strongly. That is, they definitely cannot be used to finish the bath. However, the price of the panels was about 600 rubles per sheet, it took us three sheets. Agree, for such a price it is difficult to find the perfect material.
If the issue of environmental friendliness is not an empty phrase for you, then you have probably paid attention to mdf panels for walls for a long time. With their help, you can seriously decorate your interior, make it more expressive and modern, while not completely emptying the family budget, which is precious in the current economic conditions. In addition, the installation process does not differ in any transcendental level of complexity and is quite accessible for mastering by a "mere mortal". Therefore, feel free to arm yourself with a tool and hurry to buy material - today we will talk about how to fix MDF panels to the wall in such a way that you will experience well-deserved satisfaction at the sight of the result.

Pros and cons of using in the interior

It is quite logical before the direct installation of this or that finishing material to inquire about what positive and negative sides it has. Moreover, from the point of view of the appropriateness of using MDF panels, they are far from such an unambiguous solution as plastic or drywall. Similar instructions, but already on fixing drywall, you can read in the article: "How to fix drywall to the wall: 2 installation methods".
+
- environmental friendliness already mentioned above;
- the simplest installation;
- good soundproofing performance;
- a wide selection of textures and colors;
- elementary care;
- low cost.


-
- combustibility of the material;
- irregularities are possible at the joints of the fragments;
- not suitable for outdoor decoration;
- poor moisture resistance;
- possible deformation under mechanical action;
- inconvenient installation of hanging furniture.

As you can see, it is possible to fasten MDF panels to the wall surface only in relatively dry rooms with favorable thermal conditions. Be sure to get rid of mold on the walls, if any. At the same time, it is necessary to take into account the fact that this material is very afraid of any force impact and will inevitably crack in case of any active contact with it. Otherwise, all the negative aspects of using it are safely leveled by its pluses. One of them is a wide selection of a variety of textures and colors, allowing you to decorate the interior in full accordance with your aesthetic needs. 

Tools and Consumables

In order to fix the panels, you do not need any specific tools. You need to keep on hand all the same standard set that is used to mount any other finishing material.
- plumb;
- level or corner;
- a hammer;
- screwdriver;
- electric jigsaw or wood saw;
- construction stapler;
- roulette;
- pencil.
Prepare and consumables:
- nails;
- dowel;
- self-tapping screws;
- wooden slats or metal profiles for the frame (subject to this method of installation);
- liquid nails or other adhesive composition.


It remains only to add the MDF panels themselves - and then there will already be a complete set of everything necessary for high-quality and successful installation. In order to calculate their exact number, you need to make the correct markup. 

Foundation preparation and marking

Probably the most tedious and tedious stage, which many masters (both beginners and already professionals) do not take quite seriously. It's a pity, because a lot depends on the quality of the preparation of the base surface. Especially if you mount the mdf panels directly to the base without creating a leveling frame. Therefore, it is better to think soberly and perform the necessary manipulations with the utmost quality and care:
- if possible, carefully, but without too much fanaticism, remove the old finish (read how to remove liquid wallpaper from the wall);
- if the paint stubbornly does not want to get off its "familiar" place, then leave it - it will not interfere with you during further installation;
- eliminate all possible cracks with a primer and repair compound;
- if the cracks are minor, then first make them wider with a hammer and chisel, and then treat them with a deep penetration primer - this will help protect your base surface from mold and mildew;
- after all the processing, decide where and how you will attach the panels to the wall - in order to make accurate markings;
- lean the level against the wall and determine the upper and lower mounting points;
- draw a horizontal line along the perimeter of the room in which the repair will take place, and then directly under the ceiling;
- we determine the location of the guides based on the optimal step of 50 cm.


All your further actions depend on how you decide to fix the panels on the wall - directly on the glue or through the auxiliary frame device. Consider both types of installation, noting the features of their use, the pros and cons, as well as the specifics of the various stages. 


Method one. Installation using the crate

- recommended in cases where the base surface is characterized by severe irregularities that cannot be corrected manually;
- for rooms with high humidity, it is best to use not wooden slats as a base for the frame, but metal profiles;
- the method using the crate is indispensable in cases where additional wall insulation is planned.

The main disadvantage of this option is the need to mount the frame, which slightly lengthens the duration of the work. In addition, the frame takes up a certain number of centimeters of free space. Are you ready to put up with such "arbitrariness"? Very often, you simply don’t have options, because achieving the perfect surface is far from possible every time you need it. 
Lathing device
A very important point is to know how to fix the MDF panels to the wall: vertical or horizontal. The nature of the device of the auxiliary frame directly depends on this.
- horizontal arrangement of MDF panels - vertical lathing scheme;
- vertical arrangement of MDF panels - horizontal lathing scheme.


As you can see, everything is quite simple - it is unlikely to be confused! 


Some points to pay attention to:
- before installation, the rails should be treated with an antiseptic - this way you protect the wood from the appearance of microorganisms;
- the length of the rail must be at least a few millimeters less than the actual distance from the top to the bottom of the structure.


Subsequence
- no matter what type of frame you are going to design - metal or wooden, in any case, first of all, you need to fix the corner posts, and then the transverse ones and those that will be located in the openings;
- a step of 50 centimeters is optimal for all types of crates;
- for fixing narrow and wide metal profiles, it is best to use self-tapping screws, since the so-called dowel-nails are less reliable for this kind of fastening.


The whole process of mounting the frame is in the next video.
Fixing panels
- we cut off the comb at the first panel and with the same side we clamp it to the crate of the adjoining wall;
- we fix it to the horizontal bars with the help of self-tapping screws, do not forget to retreat 1 centimeter from the very bottom;
- each subsequent panel is inserted in the same way into the groove of the previous one and secured with nails or clamps;
- the most difficult element is the last one: it is cut to the desired size, inserted and fixed on the vertical rack of the frame with self-tapping screws.
A video detailing the key points of the operation is below.
Method two. Mounting with glue

- used only in cases where the base surface of the wall is close to ideal;
- not recommended in rooms with high humidity;
- saves usable space.

Surface preparation and marking with this method are practically no different from the previous method we have considered. The only difference is that you need to work hard primer in order to exclude the appearance of fungus or other destructive processes.
For the rest myself action algorithm
looks like that:
- prepare the MDF panels, cut the necessary fragments with a hacksaw or jigsaw;
- apply the adhesive around the perimeter of the sheet, and draw a line exactly in the middle of it;
- apply glue not with a continuous line, but with dots - this way you will save the composition;
- press the panel against the wall and fix;
- First of all, fix whole sheets, all corner elements and fragments - last.

As an excellent adhesive for MDF panels, we recommend using liquid nails- fast, reliable and very inexpensive. 


How to fix MDF panels to the wall surface with glue, the following video will tell.
Conclusion
Information on how to properly attach MDF panels to walls of any type will definitely not be superfluous. In some cases, this material appears to be almost the ideal solution for decorating a wall surface. In addition, it is quite light and easy to install, so it is quite possible to cope with it even alone. The main thing is to clearly follow the time-tested algorithm for fixing MDF panels and not be lazy to work hard on the base base, so as not to reproach yourself for the fungus and other troubles that have appeared. 
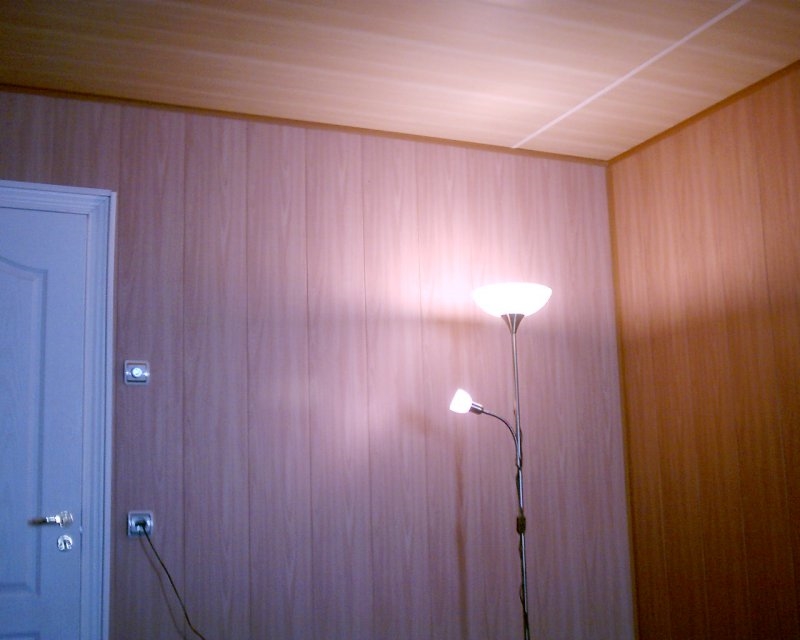


Photo: vk.com
Among the variety of finishing materials, MDF panels are gaining more and more popularity. The products are characterized by excellent decorative qualities, a variety of colors and textures. Let's designate the strengths and weaknesses of the panels, figure out what types are used in the house, how MDF sheets are attached to the wall.
Composition of MDF wall panels
MDF panels (fine fraction) are formed from small wood particles under the influence of pressure and high temperature. As a result of heating, wood releases lignin, which acts as an adhesive composition, gives the material desired density and strength. Paraffin can be used as an additional binder. Sawdust makes up at least 90% of the total mass. The remaining 10% are binders and additives, preventing decay.
Due to the absence of synthetic resins, MDF is considered safe for human health - its use is permissible in residential premises, as well as in institutions with increased sanitary and hygienic requirements. The basis for the manufacture of MDF is woodworking waste: off-grade breeds, curved sections, trimmings. Despite the complexity of the technological process, wood panels managed to preserve a number of positive qualities of natural raw materials.

Pros and cons of finishing material
MDF wall panels have a number of advantages:
- Security. wood derivatives do not emit toxic components there is no health hazard.
- Decorative. The range of products allows you to choose the finish according to the requirements of the interior of the room. The panels differ in shape, color and texture - the choice of decor is unlimited. Finishing with imitation wood, as well as MDF panels under the stone, is in wide demand.
- Practicality. The cover is strong and durable. Such a finish increases the thermal efficiency of the room improves sound insulation.
- Ease of installation. Installation does not require careful preparation of the walls, the whole process can be done independently. With the help of decorative panels it will turn out hide minor imperfections, uneven walls.
- Unpretentious care. Unlike solid wood, MDF does not require periodic treatment with protective compounds. It is enough to periodically wipe the coating from dust.

Among the shortcomings of the panels are the following:
- mounting on the frame reduces the useful area of \u200b\u200bthe room - it is better to use a different material for finishing cramped rooms;
- material sensitive to high humidity- in some cases, it is necessary to use moisture-resistant MDF for the bathroom, pool, kitchen;
- mounting on the panel of hinged shelves, cabinets is performed using special fasteners;
- MDF canvas can't withstand a strong blow- a dent or hole is formed.
Variety of MDF panels
The whole variety of panels for wall decoration can be classified according to production technology, the method of designing the front part and standard sizes.

Classification by manufacturing method
MDF panels are divided into two categories: all-pressed and laminated. The first type includes ordinary sheets obtained from wood fiber by dry hot pressing. All-pressed panels are not coated or processed in any way, but their surface is smooth due to the tight pressing of the smallest particles. Such material has a non-uniform color. For wall decoration, it is repainted or used in its original form in the arrangement of non-residential premises. Laminated panels are made using a similar technology, but are additionally covered with a polymer film. Coating provides good wear resistance, strength, moisture protection and a variety of colors.
There are MDF panels for special purposes. They are made from durable woods at elevated temperatures and under increased pressure. These include:
- moisture resistant - not afraid of water, according to the characteristics comparable to plastic;
- heat-resistant - the composition contains flame retardant additives, product marking - KM1 and KM2;
- flexible - due to improved plasticity, they are suitable for creating arched and curved structures.
If it is planned to mount heavy objects on the wall, then it is better to use high-density MDF.

Decorative coating options
Depending on the top layer, the following types of MDF boards are distinguished:
- veneered;
- glossy;
- painted.
Veneered panels top coated thin layer of natural wood(3 mm). This finish fully conveys the texture and pattern of natural material. Veneered plates are universal - they are used in classic, modern and ethnic interior styles.
Glossy panels are covered with a polymeric film. The plate can be given almost any color. There are options with holographic effect or 3D pattern.
Painted MDF panels are very popular due to their affordability and unlimited choice of shades. You can choose a decorative finish for any design of the room. A layer of paint smooths out all the bumps and roughness of the wood composite. This option is often chosen for finishing the hallway, kitchen, living room.
Minus material - susceptibility to mechanical stress. Careless handling may cause scratches, chips.

Shapes and dimensions of wall panels
Based on the location and design ideas, the shape of the plates is selected. There are three options for MDF panels on sale:
- Tiled. These are compact panels of square or rectangular shape. Running dimensions - 30 * 30 cm, 90 * 90 cm. They involve mounting without rails on glue. Tiled canvases can act as an independent element of decor or be combined with other elements of decoration. Their installation requires careful preparation of the walls.
- Rack. Dimensions of MDF slats: length - from 2.5 m, thickness - 8-12 mm, width is variable. Rack panels are usually mounted vertically, mounted on a frame. This shape is relevant for narrow spaces, as it visually expands the space.
- Sheet. The large size of wood canvases allows you to quickly complete the decoration of spacious rooms. Plate dimensions - from 1.2 * 2.4 m. Possible frame and adhesive fastening technology.
The thickness of the MDF is selected taking into account the purpose of the plate. An indicator of 1.2 cm or more will provide additional heat and sound insulation of the walls.

How to fix MDF panels to the wall
Before fixing decorative plates, it is worth deciding on the installation method. The use of the crate will hide the curvature of the walls and allow you to place an additional layer of insulation. The glue method is best used in a limited space, where every centimeter counts.
Frame technology: step by step installation
The first step is to choose the material for the crate. Possible options:
- Galvanized steel. Metal rails are best used in wet areas. The material does not give in to corrosion, endures temperature and humidity fluctuations.
- Wooden bars. Planks with a section of 3 * 3 cm are suitable. If necessary, laying insulation, you can take bars of greater thickness. Elements of the crate are pre-needed treat with flame retardants and antiseptic.
Stages of work:
- Measure walls.
- Cut the bars - their length should be somewhat less than the parameters of the walls. With a vertical arrangement of the plates, the frame rails are installed horizontally, and vice versa.
- Fix the rails to the wall with dowels or screws.
- Install slab insulation in the cells of the frame.
- Mount MDF panels. Fixation is carried out with self-tapping screws or special nails. Fasteners are screwed into the grooves of the lamellas.
- Install connecting strips and outer corners.
How to fix the plates on a metal crate? First, wall guides are mounted around the perimeter, after which - intermediate rails at a distance of 40-50 cm from each other. The frame is fastened with hangers and self-tapping screws, and then proceed to sheathing MDF boards.

Features of the adhesive method
On the one hand, this technology is easy to implement, and on the other hand, it requires additional preparation of the base. The wall must be smooth, without drops, dents and other defects.
Action algorithm:
- Prepare the surface. Remove the old coating, clean the base, treat the wall with a deep penetration primer. This composition will increase the adhesion of materials, reduce the consumption of glue.
- Mark the panels according to their layout on the wall, cut them out. For cutting, a hacksaw or jigsaw is suitable.
- Knead the adhesive and apply the solution to the back of the panel.
- Press the MDF against the wall, support for a couple of seconds.
- After attaching all the canvases, it is necessary to install connecting strips, corners.

It is important to decide how to glue the MDF panels to the wall. Types of suitable compositions:
- Compounds. Universal adhesives capable of withstanding significant loads. Suitable for fixing glass, stone, wood, rubber and other products. Compound Representatives: Titan Wild, Multi Purpose, Moment, Tytan Euro-Line #601.
- Special series. Adhesives widely used in frameless construction. To apply them, you need a gun. Options: Moment Liquid Nails, Solvent Free and Heavy Duty by Titebond, MF220 by Macroflex and LN-910/LN-901 by Liquid Nails.
- Mounting foam. Despite the fact that the main purpose of the material is sealing, the foam composition is also used for mounting small MDF boards. Bonding is performed universal foam or mortar for interior work.
For inexperienced installers, the best option is liquid nails. Glue easy to use, the fastening is reliable and tear-resistant.
MDF panels are used in residential, non-residential and business premises. Thanks to various mounting technologies, they can be installed on almost any base - brick, wood or concrete wall. In conditions of high humidity it is necessary to use special hydrophobic MDF boards.
We also recommend
 Hero pioneers in the Great Patriotic War Heroes of the Patriotic War pioneers presentation
 Presentation "Formation of posture in preschool children Hygiene of correct posture presentation for children
 Sciences of the human body
 Presentation "history and prospects for the development of robotics"
 The value of the struggle of Russia with the Polovtsy
 Asia and Africa after World War II